SOP-MES0073 CMMS Admin
42Q Home > Shop Floor Control > Configuration > CMMS Admin
Contents
Administration
The administration module of CMMS (CMMS Admin) is designed for administrators (manufacturing engineers) to perform pre-configuration tasks so that plant machinery and equipment is properly maintained. Within the CMMS Admin portal, plant administrators define groups responsible for repair and maintenance, set notification alerts, and add plants, departments, and projects to the CMMS system. 42Q’s arsenal of CMMS tools consists of two configuration portals (CMMS Admin and CMMS Assets); five production portals (CMMS Calibration, CMMS Preventive Maintenance, CMMS Spare Parts, CMMS Work Order, and CMMS Work Request); and two reporting portals (CMMS Report and CMMS Dashboard). The CMMS Touch and Mobile tool is available for mobile/tablet applications. Refer to the table below for sub-module names and corresponding functions.
| Sub-module Name | Function |
| Company |
|
| Group |
|
| Plant |
|
| Department |
|
| Escalation |
|
| Project |
|
| Work Request Category |
|
| Log |
|
| UoM |
|
- The CMMS Administration Module is accessed by selecting Shop Floor Control > Configuration > CMMS-Admin
Figure 1: CMMS Administration Portal Navigation
- Once accessed, the user is able to access all available CMMS Administration sub-modules.
Company
In the company sub-module page, users can search, add, edit, activate/deactivate, and export vendor and manufacturer company information.
Figure 2: Company Main Page
Search/Filter Company
- To search the company list:
- Enter a partial or complete company name into the search field at the top of the company sub-module page and select the search icon (e.g. magnifying glass).
- The result of the search parameters entered will display.
Add Company
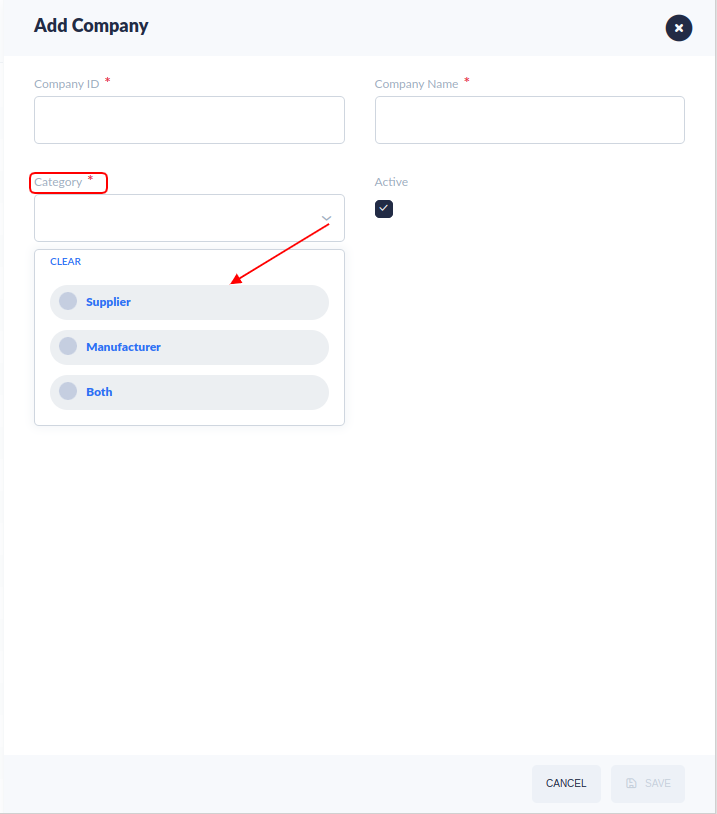
From the Company List page select Add. The Add Company pop-up window appears.
- Enter the following company information:
- Company ID
- Company Name
- Category
- Active
Figure 2a: Add Company: Company
Edit a Company
- From the Company List page selects a company from the list. The Edit function now displays.
- Select Edit. The Edit Company pop-up window appears.
Note: The Edit Company includes the same information fields available in the Add Company
- Under the Edit Company window, edit any of the provided fields as needed:
- Company Name
- Category
- Active
Company Address
- From the Compnay List page select a company from the list. The Address function now displays.
- Select Address, theCompany Address pop-up window appears.
- Under the Company Address List , users may add, edit, or delete company address listings.
Figure 4: Company Address
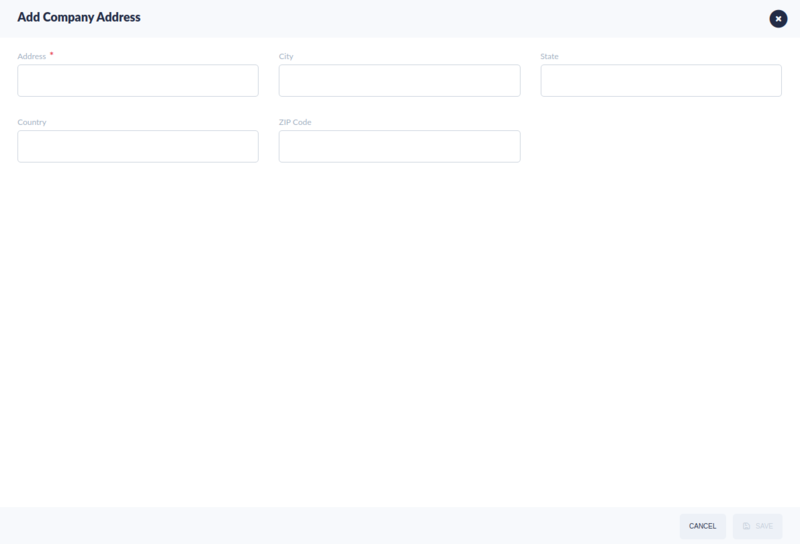
- Select ADD. The Add Company Address pop-up window appears.
- Complete the fields provided:
- Address
- Zip/Code
- State
- City
- County
- Select Save to finish or Cancel to abort.
Edit/Delete Company Address List
- Select an address from the Company Address List to activate the edit/delete function.
- Select Edit to update the company address information. Or select Delete. The selected address was removed from the Company Address List.
Figure 6: Edit/Delete Company Address List

Company Contact Person
Under the Company Contact , the user may add, edit, or activate/deactivate contacts.
- From the Company List page select a company. The Contact Persion function now displays.
- Select Contace Person. The Company Contact pop-up window appears.
Add Company Contacts
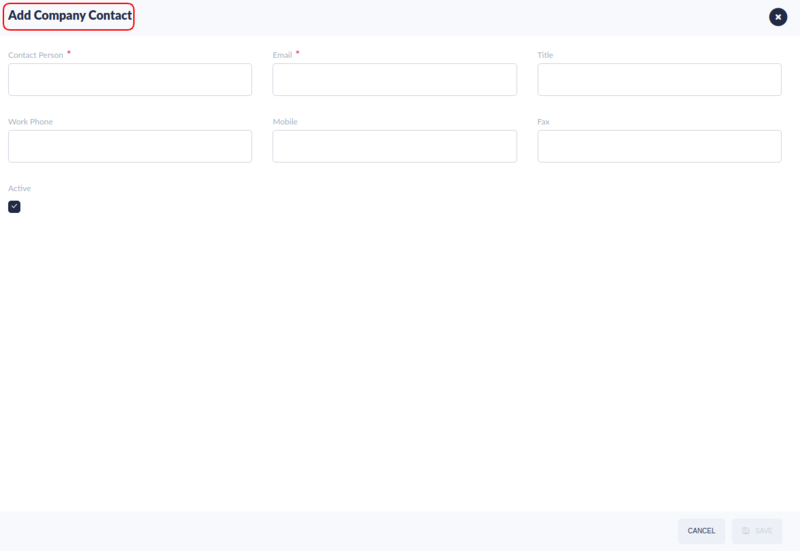
1. Select Add from the Company Contact List . The Add Company Contact pop-up window appears.
2. Complete the fields provided:
- Contact Person
- Title
- Work Phone
- Fax
- Mobile
- Active
3. Select Save to complete or Cancel to abort.
Figure 7: Add Company Contacts
Edit Company Contact List
- Select a company contact from the Company Contact List.
- Select the Edit.
- Select Deactivate/Activate to disabel or enable the company contact.
Figure 8: Edit Company Contact List

Activate/Deactivate a Company
To activate or deactivate a company from the Company sub-module page:
- Select a company from the Company List. The Activate/Deactivate function now displays.
- Select Activate/Deactivate. This enables the selected company if it was previously disabled, and disables the company if it was previously enabled.
- The Status of the company shows in the list
Figure 9: Activate/Deactivate Company
Group 
Within the Group submodule of CMMS Admin, administrators assign users and groups to machine maintenance tasks (termed categories). Prior to creating a group, it is helpful to have a clear concept of what categories the group will handle and what tasks they will perform.
1. To access the Group sub-module, navigate to CMMS Admin > Group.
2. The Group List displays all existing groups.
Figure 11: Group List
3. Users may search by employing the following filters, available in the menu bar at the top of the page:
- Group Name :Search according to the Group that is responsible for asset maintenance.
- Category: Search according to the role assigned to the maintenance task (e.g. WO Requestor, WO Assignee, PM Notification)
- Department: Search according to the Department to which the Group asset belongs.
- Group User: Search by the assigned individual user.
- Active: Search by the status of the department.
4. Users may add, edit, or Activate/Deactivate groups, and Export Groups List in .csv format to save, print, or share as desired.
Add Group
- To add a group, select the green ADD icon located above the group list.
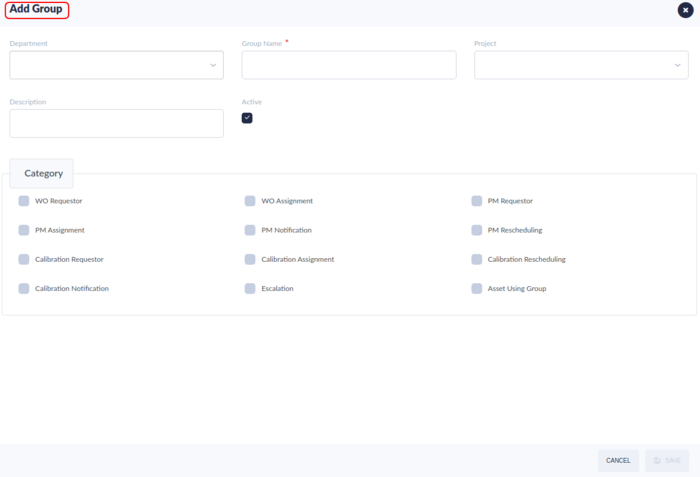
- The Add Group form displays.
Figure 12: Add Group: General
Enter the following information into the General tab:
- Department (Optional): Select a Department from the drop-down list provided. Note: List appears in a tree format, with parent departments and child departments grouped accordingly. See Department for more information.
- Group Name (Mandatory): Enter the name of the Group assigned to the task. Note: Groups with the same name are not allowed in the system.
- Active (Optional): This checkbox allows administrators to enable or disable the target group. The default value is “Active.” To disable the group, please un-check the checkbox.
- Project Name(Optional): Select the Project the group is assigned. A drop-down menu is provided. See Project for more information.
- Category: Select the task the group is assigned by marking the checkbox next to the Category. The following work categories are available:
- WO Requestor (Work Order Requestor): This Group has rights to request, create and open the work order.
- WO Assignment (Work Order Assignment): This Group is able to assign the work order.
- PM Requestor (Preventive Maintenance Requestor): This Group has rights to initiate the preventive maintenance.
- PM Assignment (Preventive Maintenance Assignment): This Group is able to assign the preventive maintenance.
- PM Notification: (Preventive Maintenance Notification): This Group receives email notifications for scheduled preventive maintenance tasks.
- PM Rescheduling: (Preventive Maintenance Rescheduling): This Group can reschedule preventive maintenance requests.
- Escalation: This group will be notified via email if the work order or preventive maintenance is not completed at the scheduled due date.
- Calibration Requestor: This Group has the right to initiate a calibration request.
- Calibration Assignment: This Group is responsible for assigning calibration jobs.
- Calibration Rescheduling: This group may reschedule calibration jobs.
- Calibration Notification: This group receives email notifications for scheduled calibration tasks.
- Asset Using Group: This user group is to define who is going to use and manage the assets.Users selected as Asset Using can view activity for the asset(s) assigned to their Group at the CMMS My Asset Module (Shop Floor Control > Configuration > CMMS - Asset > My Asset).
- ''''Description: Add any additional details about the group in this free text box.
Select Save to confirm or Cancel to exit.
Edit Group
To edit a group:
- Select the group from the list.
- Select the Edit icon.
- The Edit Group pop-up window displays.
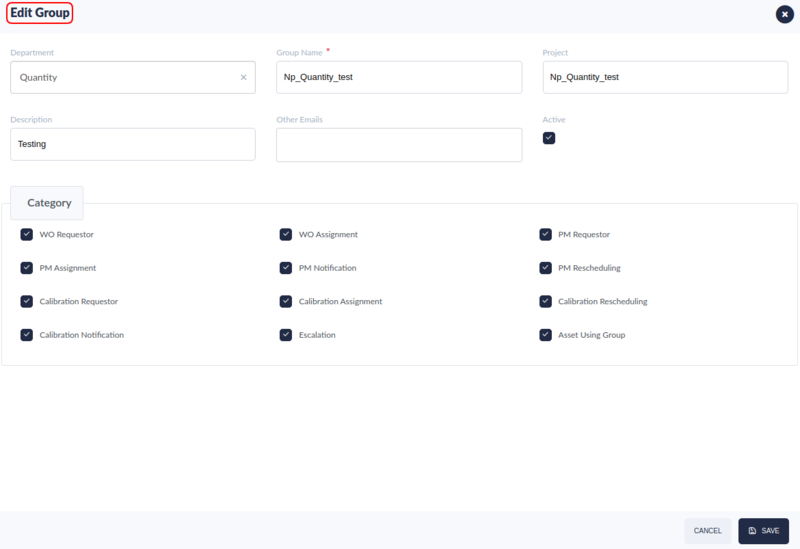
Figure 13: Edit Group
4. Edit any of the following fields:
- Department
- Group Name
- Active
- Project
- Category
- Description
- Other Emails
Group Users
To assign users to a group:
- From the Group List page select a group. The Users function displays.
- Select Users. The Users pop-up window appears.
- Under the User page, users may add users to this group, delete users from this group,set the approver or default assignee for this group.
Figure 14: Group User
- User Status: Denotes whether the selected user is currently available.
- Approver: If Yes, this user can approve a work order according to the Work Order Flow defined in CMMS Setting. Approval rights are toggled on or off with the Enable/Disable feature on the top of the menu bar.
- Default Assignees: The Default Assignee is the primary technician assigned to maintain and repair a given asset or tooling equipment. If the default assignee is not available (e.g. vacation, out of the office), the next user in the group will automatically be assigned to the PM work order.
Add Users to the Group.
To assign users to a group:
- Select the ADD icon.
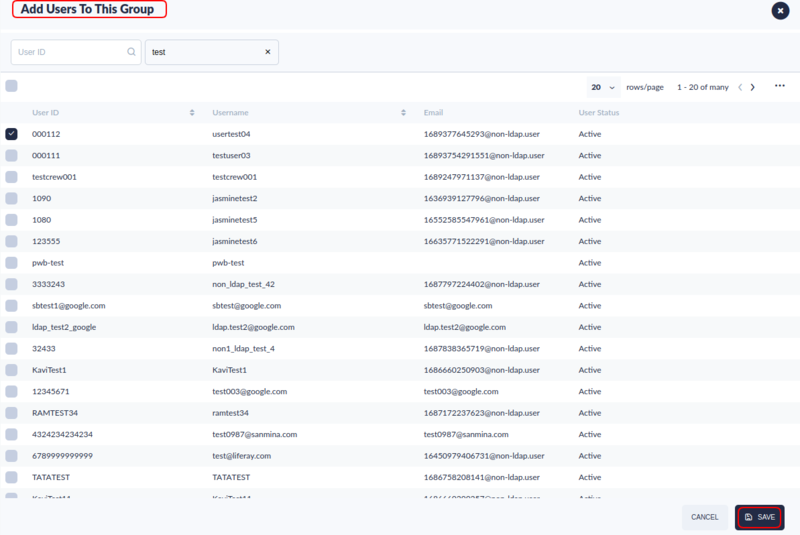
- A new window now displays: Add New Users to This Group.
Figure 15: Add New Users to This Group
- Scroll the available list or type the user’s name in the search box.
- Select the users by checking the box to the left of the User’s name.
Note: Any number of users may be selected.
- Select Save to save the selected Users to the group, or select Cancel to abort.
Delete a User from a Group
To delete a User from the Group:
- Check the checkbox in front of the User’s name.
- Select the Delete icon from the top menu bar.
- The User will be removed from the Group List.
Enable/Disable Group Users Approval Permission
Administrators can edit a user's approval permissions from the menu at the top bar.
Approver
The Approver feature establishes permissions for the PM Work Order Requester Group. All users that belong to the group may close the Work Orders they have requested. However, users with Approval permissions may close any work order associated with the specific Group, even if they did not request it. Approved users are denoted with a Can Approve checkmark next to their name.
To Change Approval permissions:
- Check the checkbox in front of the User’s name.
- Select Approver from the top menu bar.
- The “Approver” column will reflect the user’s new permissions: No signifies the user cannot approve work requests, while Yes denotes active approval status.
Assign User Permissions: Default Assignee
- Default Assignees: The Default Assignee is the primary technician assigned to maintenance and repair for a given asset or tooling equipment. If the default assignee is not available (e.g. vacation, out of the office), the next user in the group will automatically be assigned to the PM work order.
Note: When the default assignee is selected, administrators can skip the Assign User steps. Default Assignees are automatically assigned to the Work Order. Default Assignees are defined in CMMS Admin > Group.
The default assignee is just for PM work order, the work order generated by PM according to maintenance frequency.
- Select the Users by checking the box to the left of the User’s name.
- Select the "Default Assignee" from the top menu bar.
- Select Default Assignee column will reflect the user's permissions.
Activate/Deactivate Group
To change the status of a group:
- Select the checkbox in front of the group name.
- Select the Activate/Deactivate icon from the top menu bar.
- The Active' 'column signify groups staus.
Plant 
In this module, users can add or edit plants as well as enable or disable plants.
The purpose of this plant name is to support multiple plants in a big plant. For example, Some plants have sub-plant A991, A992, Some plants have sub-plant B801, B802. The plant could select the plant name configured in this function(Plant) for the asset, this could be a filter for the plant to find out their sub-plant asset.
1. To access plant maintenance, navigate to Administration > Plant.
2. The Plant List displays all existing plant types. Multiple Administrative modules may be open at the same time and are easily navigated with the tabs located at the top of the page.
Figure 16: Plant List
Add Plant
1. To add a plant, select ADD located above the Plant Name list.
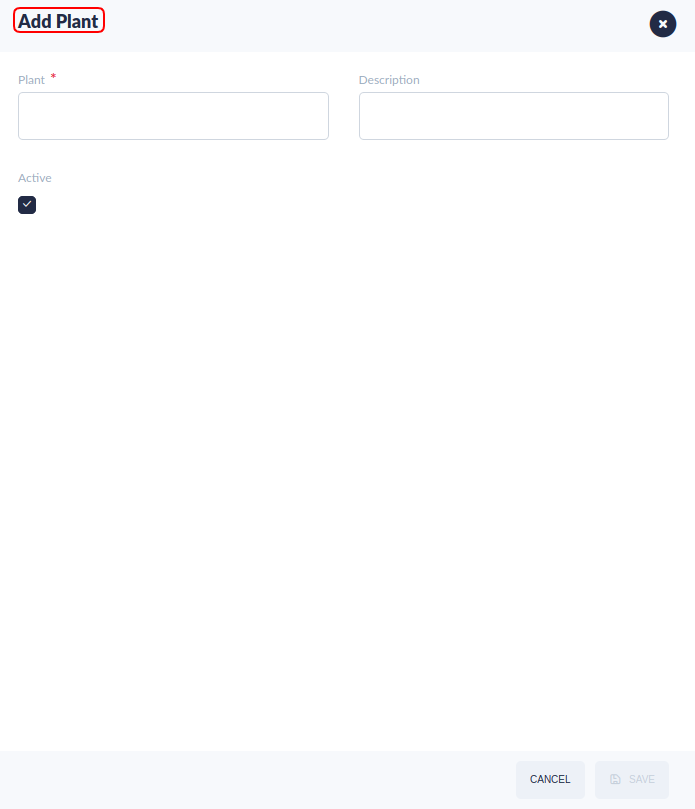
2. The Add Plant Form displays:
Figure 17: Add Plant Form
3. To add a plant, enter the following information:
- Plant Name- the name of the plant to be added to the plant list.
- Description- Additional plant information.
- Active- By default, the screen will choose "Yes."Select the checkbox to enable the plant, or deselect the checkbox to disable the plant.
4. Select Save to add the plant to the plant list. Select Cancel to exit.
Edit Plant
1. To edit a plant, select the plant from the plant name list by clicking on the field.
2. Once highlighted, select Edit.
3. The Edit Plant Form displays:
4. The user can update the following:
- Plant Name;
- Description;
- Active; (Active status is denoted by a checkmark in the Enable field.);
5. After updating, select Save to confirm. Select Cancel to exit without updating.
Activate/Deactivate the Plant
1. To activate or deactivate a plant, select the plant from the Plant List.
2. Select the Activate or Deactivate button located above the plant list.
Department 
This section covers how to perform department maintenance in the Asset Management system. In Department Maintenance, administrators can add or edit departments, and view department hierarchies.
1. To access Department Maintenance, navigate to Shop Floor Control>Configuration>CMMS Admin>Department.
2. Navigate to the appropriate Department icon.
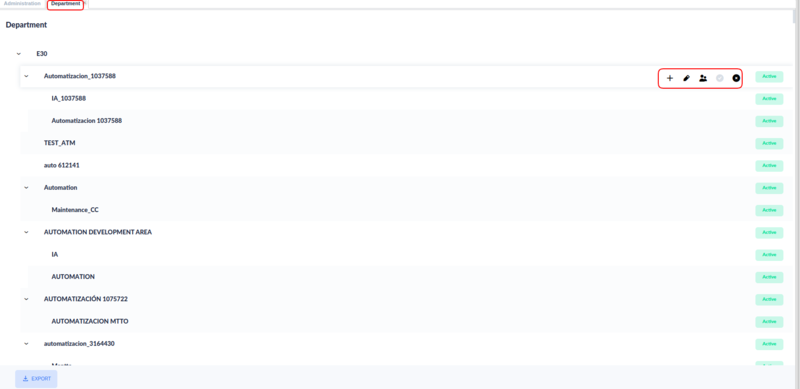
3. A Department Name List displays all added departments located under parent nodes in a tree-level format.
Figure 18: Department Name List
4. The user can Add, Edit, Add users and Activate/Deactivate departments from the list.
Add Department
1. To add a department, click on the node, a menu displays with theAdd/Edit/Users/Deactivate/Activate functions.
2. Select the Add function from the pop-up menu.
3. Once chosen, Add Department Form displays:
Figure 19: Add Department Form
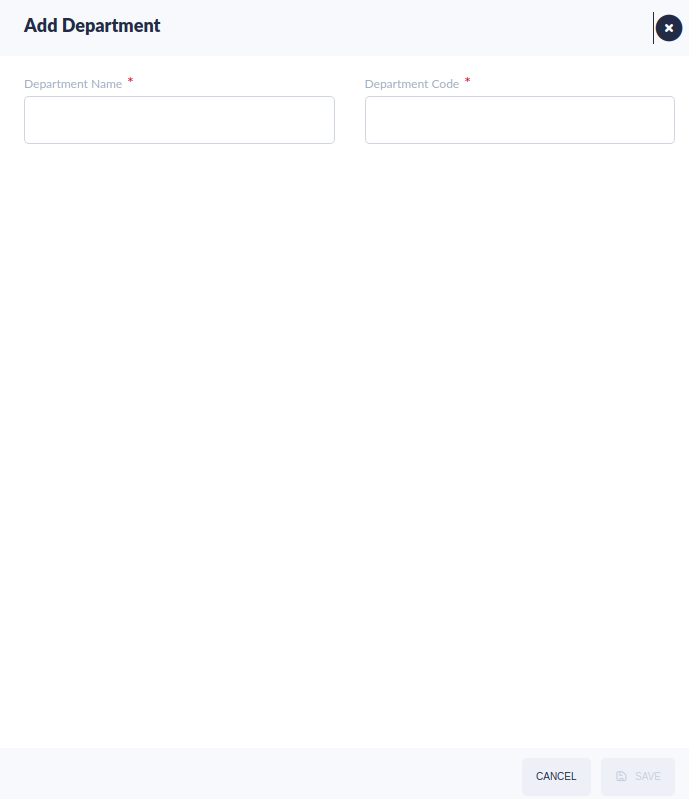
4. Enter the Depent artmName and the Department Code and then select Save. The department will be added as a child node of the item selected as the parent node. The department will appear underneath its parent;
Edit Department
1. To edit a department, choose the department and select Edit.
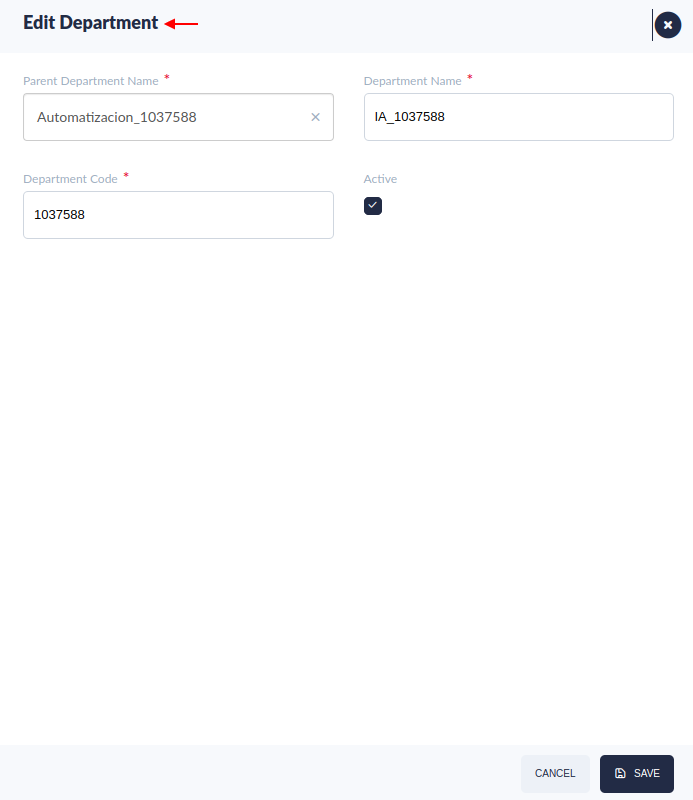
2. The Edit Department form displays:
Figure 20: Edit Department Form
3. The following items are available to update:
- Parent Department Name (Mandatory): Displays all available departments in the local system. Select the parent department name that will be the new parent department of the item to be updated.
- Department Name (Mandatory): Enter the department name to update.
- Department Code (Mandatory): Enter the department code to update.
- Active (Mandatory): Toggle the checkbox to change the active status.
Note: If the user disables one department, all of the children departments associated with it will automatically be disabled.
Add or delete users to the department,
- To add/delete users to the department, choose the department and select Users.
- The Users for Department form displays:
Figure 21: Add or Delete Users for the Department
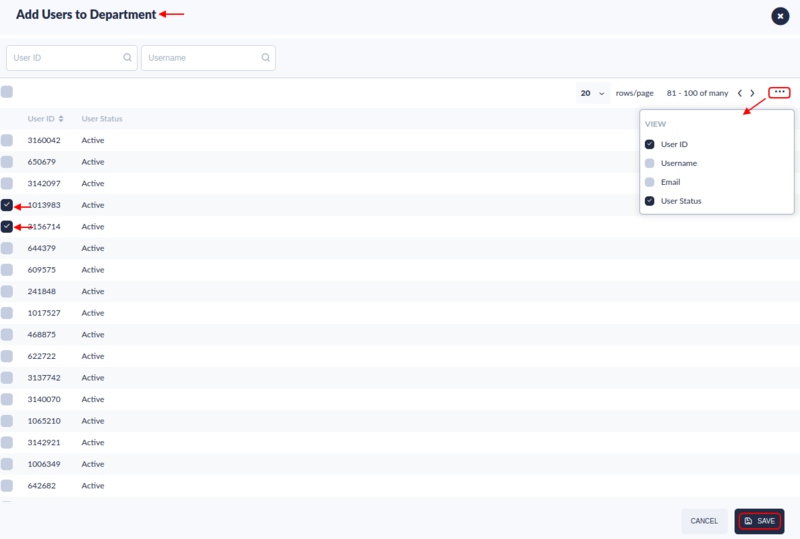
- To add a user to the department, select Add to open the Add Users to Department window.
- Select checkboxes in front of the users’ ID,
- Select Save to add users to the department.
Figure 22: Add Users for the Department
- To delete a user from the department, select the checkbox in front of the user's ID,then select Delete.
- Select Yes to confirm changes for the department.
- Or select No to exit.
Escalation Setting 
This section covers how to perform escalation setting maintenance. Whenever an asset fails or a work order has been in a certain status for too long, higher levels of authority need to be notified to expedite maintenance. If maintenance fails to respond, additional levels must receive notification of the problem.
Escalation settings allow users to define the time(hours or minutes) how soon to receive the notification when the assets fail or work order is due, also allow users to define the groups or additional persons who will receive notifications.
Escalation settings define who will receive notifications and when they will receive those notifications.
1. To access Escalation Setting navigate to: Shop Floor Control > Configuration > CMMS Admin > Escalation Setting.
2. The Escalation List displays Projects according to Location, Escalation Type (Repair, Preventive Maintenance, or Calibration), and Setting Type (Asset Down, Assigned, WIP, Waiting for Parts, Waiting for Buy-off, Due Date). Also displays the time allotted before escalation (in minutes), the groups who will receive the escalation notice, and the project name.
Figure 27: Escalation Setting
3. Users can view the Minutes column in descending or ascending order.
4. Users can Add, Edit or Delete escalations from the list.
Add Escalation
1. To add an escalation, select Add from the top menu bar.
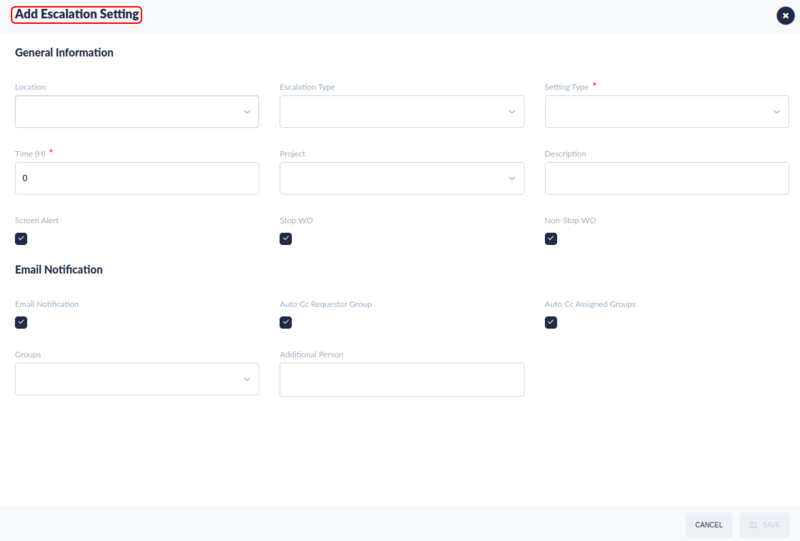
Figure 28: Add Escalation
2. The Add Escalation Setting Form displays:
3. Enter Project - Select the Project Code associated with the escalation setting from the drop-down list provided. This field is optional. However, if null, the escalation setting will be a default escalation setting. This means every work order, with or without a project code, has to send emails and/or alerts according to this setting. If given a code, this escalation setting is operated only by work orders with the same project code.
4. Enter Location- drop-down tree with all locations available in the system. The location field is a configuration that will be used in other modules like Asset, Calibration, and Work Order. For further information see the Location User Guides – for Admin Module Location field is optional. When configuring the Production Line in the Asset Module, locations are only available up to the 3rd Level. See figure (below) for a visual example.
5. Locations should be named based on the following conventions:
- Building - Should be the 1st level from location;
- Floor - Should be the 2nd level from location;
- Shop Floor - Should be the 3rd level from the location.
6. *Enter Escalation Type from the following options, provided in a drop-down box: (See Figure below).
- Repair
- PM
- Calibration
7. Enter Setting Type from the following options, provided in a drop-down box. Setting types are dependant upon the Escalation Type selected.
Setting Types for Escalation Type: Repair
- Asset Down: if the corresponding asset has broken down for more than the specified time (defined in the Time H/M field below), send an email or screen alert to the specific group (defined in the "Group" tab below).
- Assigned: if the specific work order has been in "Assigned" status for more than the specified time, send an email or screen alert to the specific group.
- Work in Progress (WIP): if the specific work order has been in the status "Work in Progress" for more than the specified time, send an email or screen alert to the specific group.
- Waiting for Parts: if the specific work order has been in the status "Waiting For Parts" for more than the specified time, send an email or screen alert to the specific group.
- Waiting for Buy-off: if the specific work order has been in the status "Waiting For Buy-off" for more than the specified time, send an email or screen alert to the specific group.
Setting Type for Escalation Type: PM and Calibration
- Due Date: Due Date defines when email notifications are sent to escalation groups for Calibration and PM work orders. If theCalibration or PM work order is not completed by the Due Date defined, the escalation group will receive an email notification.
7. Enter Additional Information in provided fields:
- *Time (H/M)- Enter the grace period (in Hours or in Minutes) allotted before the escalation process is activated.
- Email Notification- The default is selected. If the user does not want an email notification, remove the checkmark from the box provided.
- Screen Alert- The default is selected. If the user does not want a screen alert, remove the checkmark from the box provided. The alert information appears on the dashboard. If selected, this escalation setting will send alerts onto the CMMS dashboard (shop floor monitor) once the setting condition is satisfied. If not, no alert will be sent.
- Description: Enter a Description of the escalation.
- Auto CC Requester Group-The default is selected. If Requesters do not need to receive a copy of the alert, remove the checkmark.
- Auto CC Assign Groups-The default is selected. If Assigned Groups will not receive a copy of the alert, remove the checkmark.
- Stop WO- Default is selected. When checked, it alerts the operator of the problem and also stops the work order in progress. NOTE: Stop WO field is only available when a Repair Escalation Type is selected.
- Non Stop WO- The default is selected. When checked, it alerts the operator of the problem but does NOT stop the work order in progress. NOTE: Non-Stop WO field is only available when a Repair Escalation Type is selected.
- *Group Tab- Select the group associated with the escalation setting. It is possible to choose more than one group. This will be the receiver of the e-mails or alerts.
- Additional Person- Send e-mails to other personnel or administrators. This is a good choice if alerting administrators and vendors outside of the department and/or company. NOTE: Users can add as many additional person emails as needed. Enter the email address. Hit Enter. The numbered list displays below.
- None Stop WO- The default is selected. When checked, it alerts the operator of the problem but does NOT stop the work order in progress.
- Additional Person- Send e-mails to other personnel or administrators. This is a good choice for alerting administrators and vendors outside of the department and/or company.
Note: Users can add as many additional person emails as needed. Enter the email address. Hit Add. The numbered list displays below (see Figure 34c).
8. Select Save to add the escalation setting. Select Cancel to exit without saving.
Edit Escalation
1. To edit an escalation, select the''''escalation record' from the list then select Edit.
2. The Edit Escalation Setting Form displays.
3. All fields are available to update. After updating, select Save to confirm or Cancel to exit without saving.
Delete Escalation
1. To delete an escalation setting, select the setting type from the list by marking the checkbox to the left of the line and then select Delete.
2. A confirmation pop-up window will display:
3. Select Yes to confirm or No to cancel.
Project
This section covers Project Maintenance. This section provides add, edit and delete functions for project codes used in the Escalation section.
1. To access Project Maintenance, navigate to Shop Floor Control>Configuration>CMMS-Admin>Project.
2. The list displays all existing Projects.
Figure 38: Project List
Add Project
1. To add a project, select Add.
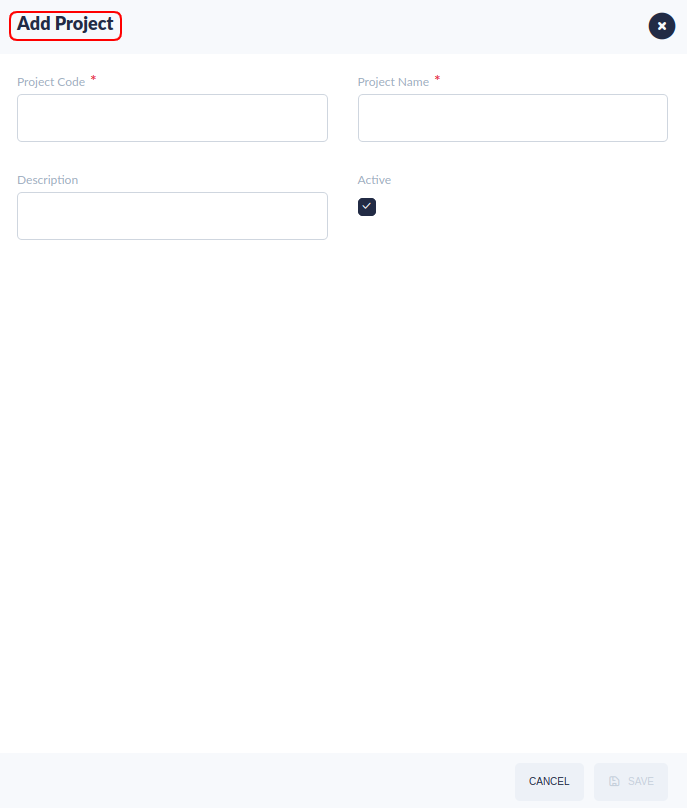
2. The Add Project Form displays:
Figure 39: Add Project Code
3. To add a Project, enter the following information:
- Project Code- an acronym that facilitates the identification of the plant.
- Project Name- the name of the project.
- Active- The default is selected. If the user wants to deactivate the project, please unselect the Active checkbox.
- Description- any additional information needed for the project.
4. Select Save to save, or Cancel to exit without saving.
Edit Project
To edit a project:
1. Select the project from the list and then select Edit.
2. The Edit pop up displays:
3. All fields are available to update. After updating, select Save to confirm or Cancel to exit without saving.
Enable/Disable A Project
- To enable or disable a project, select the project informaiton from the list and then select Activate'/Deactivate'.
- If the project is enabled, selecting the Deactivate button will disable it. If a project is disabled, select the Activate button will enable it.
WR Category
This section covers how to perform category maintenance in the CMMS system. In Category Maintenance, administrators can add, edit, or delete categories.
Note: Work Requests are completed in the Work Request portlet (Production > CMMS > Work Request) - only the categories, approvers, and assigned groups are defined with CMMS Admin > Work Request Category.
Access
To access the Work Request Category navigate to: Shop Floor Control>Configuration>CMMS-Admin>WR Category.
Figure 40: Work Request Category
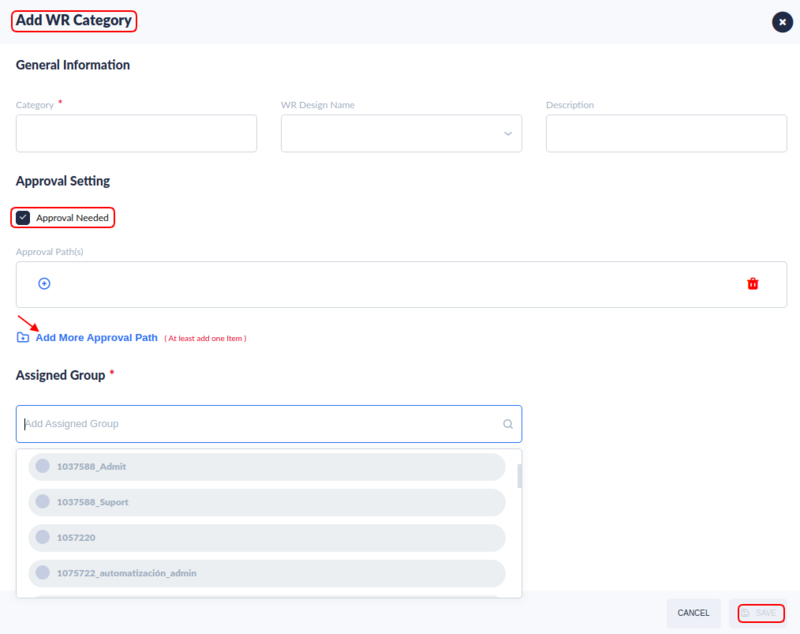
Add a Work Request Category
1. To Add a new WR Category, selct the ADD WR CATEGORY button on the top menu bar.
Figure 43: Add Work Request Category
2. A pop-up menu bar will display:
3. Here, users may choose among the following options:
- Category: Name the new Category
- Approve Needed: Approval is required by default. Uncheck the box to if does not need required approval.
- WR Design Name: This field is optional. When the WR design name is empty, it means this work request is just for a workflow(such as an approval process), and will not affect the assets or spare parts. When the WR design name is not empty, there will be some fields to add and some functions to achieve after the work requests approval and completion. The CMMS system supports four types for the WR Design Name: Issue New Parts,Multi Asset Transfer,Return Old Parts, Update Asset Status.Please see How to Manage a Work Request with WR Design name(Customized Work Request) for further information.
- Add Approval User: Choose a User from the drop-down bar.
- Approval Path(s): Specify the Approval Path.
- Description: Add additional information regarding the Work Request Category.
- Groups: Select preconfigured groups from the group list to the Assigned Group List.
Note: The Approval Path(s) can be set with more than one( multiple) path option , users can press the "Enter" key to separate the approval paths. Please see the add work request function at CMMS - Work request >My Requested.
Figure 45: WR Category Approval Path multi options
4. Choose Save to add the new WR Category or Cancel to exit without saving.
Edit Work Request Category
1. To Edit Work Request Categories, select the checkbox on the left of the category.
2. Select Edit.
3. A pop-up menu will display.
4. Users can reassign Groups or WR Design Name or change approvals and descriptions using the Edit WR Category Form.
5. Choose Save to confirm changes or Cancel to exit without saving.
Delete Work Request Category
- To Delete Work Request Categories, select the checkbox on the left of the category.
- Choose Delete.
- Select Yes to delete the WR category, or No to exit.
Log 
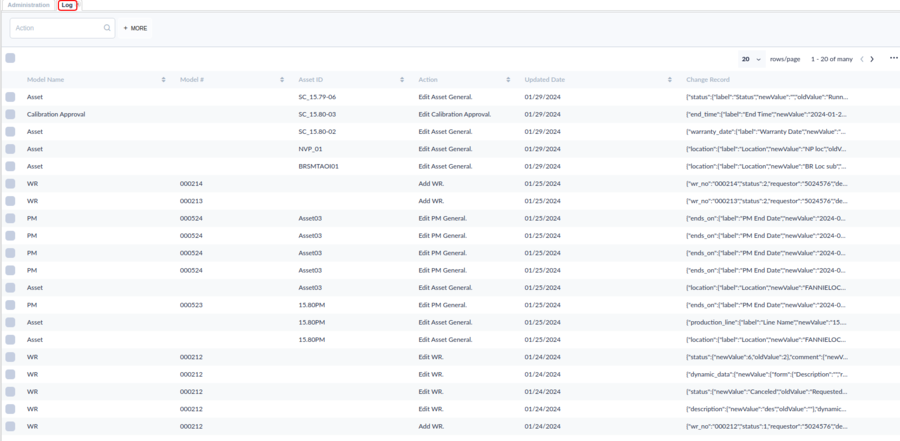
The log module provides a detailed log of system activities connected with Asset, Work Order, PM,Calibration, Work Request. The Log submodule offers a quick reference option for users.
- To navigate to the Log Submodule: Shop Floor Control > Configuration > CMMS Admin > Log
Figure 46: Log List
2. Information available in the Log submodule includes:
- Model Name: This field identifies the portal where the transaction occurred.
- Model #: (Optional) Model number. when model is selected as PM, this is PM id, when it's asset, it's the Asset ID.
- Asset ID: Asset ID number or asset key.
- Action: Provides a brief description of the type of activity completed and the location of that activity. To access more information, hover over the field to view all information.
- Updated By: Identifies the user who did the activity.
- Updated Date: Notes the date of the activity
- Change Record: Details of the transaction are provided in this field. Activity is listed in sentence format with brackets around each activity. To access more information, hover over the field to view all information (see figure', below).
Note: The audit trail included in the Log submodule of CMMS Admin is VIEW only.
CMMS Settings
CMMS Settings is an administrative feature used to configure workflow according to the plant's process to handle work orders. . Plants define permissions and work order flows to reflect the activity and product on the selected production line. CMMS Settings is dependant upon Group, Asset, and Location. All three must be configured before a workflow can be assigned.
- Go to: CMMS Admin > CMMS Settings.
Figure 50: CMMS Settings Main Page
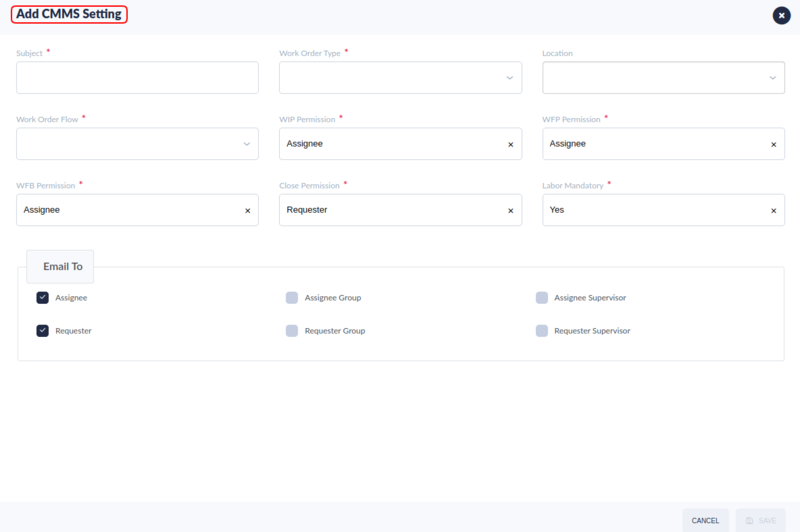
- Select Add.
- The Add CMMS Settings window displays:
Figure 51: CMMS Settings
- The following fields are available.
CMMS Settings Fields
- Subject: Title of the Work order flow. The title should be easily identifiable to the end-user and should reference the asset, its location within the plant, or the repair itself.
Subject Title Examples:
- Work Order Flow for ICT Asset-Bldg1-Floor 2
- Preventive Maintenance work order flow for Koh Young inspection machinery
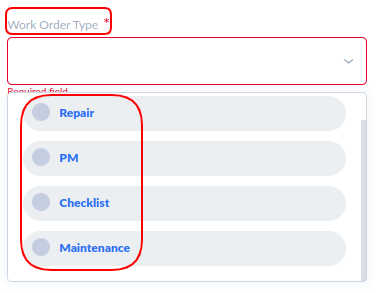
- Work Order Type: Select Repair, PM, Maintenance or Checklist. Repair/Checklist WOs are scheduled as needed. Preventive Maintenance (PM) WOs are ongoing and require a step-by-step checklist.
Figure 52: CMMS Settings Work Order Type
- Location: The location of the asset being serviced. A drop-down feature includes all CMMS locations displayed with familiar parent/child folders in a tree-type format . Note: If the Location field is left blank, the system will apply the work order flow to all plant assets.
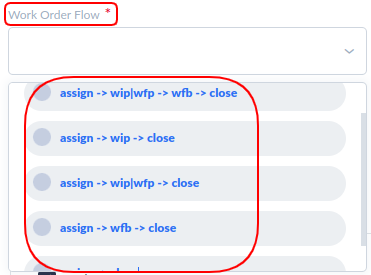
- Work Order Flow: The pathway for the work order.
Figure 53: Work Order Flow Options
Work Order Abbreviations
Assign: Assign
WIP: Work In Progress
WFP: Waiting for Parts
WFB: Waiting for Buy Off
Close: Close
- 'WIP Permissions: Select the users with permission to change the WO status to Work In Process: Requester, Assignee, or Both'.
- assign → WIP/wfp → wfb → close: This work order flow places the most standard upon a work order. It is useful for asset maintenance in plants where products require strict compliance and/or build precise products.
- assign → WIP → close: This workflow does not require confirmation. The technician is allowed to directly close the work order when s/he completes the tasks. There is no option to mark missing spare parts in this workflow. Reserve this workflow for procedures that do not require specialized parts.
- assign → WIP/wfp → close: This workflow does not require confirmation. The technician is allowed to directly close the work order when s/he completes the tasks. Missing parts may be noted while the work order remains in WIP.
- assign → wfb → close: This workflow requires confirmation but does not allow the technician to leave the work order incomplete, or mark the work order on hold due to missing parts.
- assign → close: This work order flow is the least restrictive, and the quickest. There is no option to move the work order to a temporary WIP status, and no option to mark the work order WIP while waiting for parts. It is useful for checklists (sets of pre-production tasks such as cleaning the line, activating fans, ensuring surfaces are clear), or ordinary rote maintenance that can be quickly completed without special parts.
- WFP Permissions: Select the users with permission to change the WO status to Waiting For Parts: Requester, Assignee, or Both
- Close Permissions: Select the users with permission to change the WO status to Close (complete): Requester, Assignee, or Both
- Labor Mandatory: Yes/No: Select Yes if the technician must record Labor hours before marking the work order Closed or WFB. Select No if the technician (assignee) is not required to report her/his labor hours.
Note: If Yes is selected, the system will not allow the technician to complete the work order until labor is recorded and the system will display an error message telling the user to record labor.
- Email to: Select the employees who will receive notifications about this Work Order:
- Assignee: Technician assigned as the user of the Group
- Requestor: Employee who requested the Work Order
- Assignee Group: The Group assigned to conduct the Work Order.
- Assignee Supervisor: The supervisor who has enabled the approve function for the assignee group.
- Requester Supervisor: The supervisor who has enabled the approve function for the Requester group.
Here is an example of how to set someone not to receive the PM Work Order notification emails.
User scenario: The user doesn't want to receive the PM work order notification emails anymore.
As seen in Figure 62a, the Requester group and Requester can receive the PM work order notification emails.
Solution: Delete the user from the requester group. Please see the add/delete users to the group for details.
If the user is the PM requester, please make sure to untick the Requester for the Email to set.
Permission Rules
The following section further describes the rules that apply to each work order permission.
Note: Work Orders are completed in the Work Order module of CMMS (Production > CMMS > Work Order). PM type work orders are defined in the CMMS Preventive Maintenance (Production > CMMS > Preventive Maintenance) and completed in CMMS Work Order.
- Users cannot reject or close a work order once it is assigned.
- The following section describes each work order status.
![]() TIP: Read more about Work Orders in CMMS Work Order.
TIP: Read more about Work Orders in CMMS Work Order.
- Waiting for Buy Off is the final checkpoint before the work order is moved to completed when the work order flow of assigned → WIP/wfb → close is selected. The following rules apply:
- Only users given WFB Permission can move a WO status from Waiting for Buy Off to Closed.
- A work order cannot be canceled when it is in Waiting for Buy Off'status.
- WOs cannot be moved from Waiting for Buy Off to Closed until the technician marks the WO Checklist “Completed.”
- WIP: Only users given WIP Permission can move a WO status from WIP to Closed.
- WFP: Only users given WFB Permission can move a WO status from WFP to Closed.
- Closed: Only users given Closed Permission can move a WO status to Closed.
- Labor: If Labor Mandatory is defined as Yes, the WO status cannot be changed to Completed until the assigned users enters his/her labor hours, using the Labor Tab in CMMS Work Order (See Edit Work Order > Labor Tab).
- Select Save to add a new setting.
- Select the checkbox left of the Subject, select Edit or Delete to edit or delete a CMMS setting,
UoM
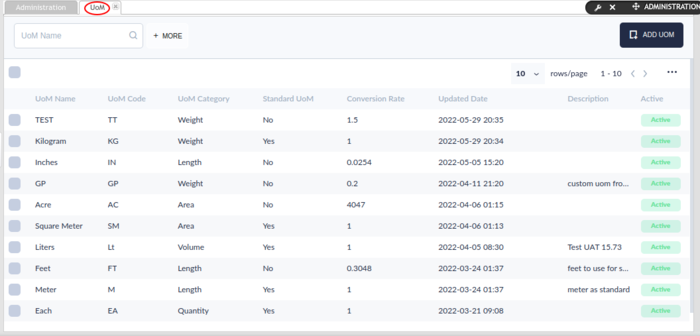
At the Units of Measurement module, users can configure the units of measurement.
Figure 56: UoM Main Page
Add UOM
- Select ADD UOM on the top right.
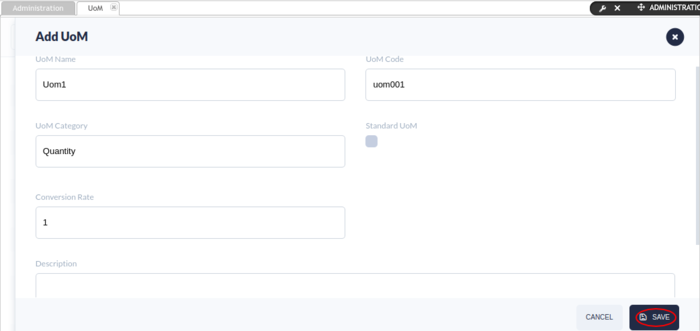
- The Add UOM will show.
Figure 57: Add UoM
- UoM Name: The name of the unit of measurement.
- UoM Code: The code of the unit of measurement.
- UoM Category: The category of the unit of measurement. The options are as follows:Weight, Area, Length,Quantity,Temperature, Volume, Time.
- Standard UoM: This unit of measurement is a standard unit or not.
- Conversion Rate: The Units consumed at one time.
- Description: The detailed description for the unit of measurement.
Note: The Standard UoM and Conversion Rate two labels have the inner connection. When talking about standard UoM, we're mention for one category, there's one selected as standard, and other unit can will be converted to the standard UoM in the database, for example, if meter is standard for length, then when you add a centimeter, the conversion rate should be 0.01 and only one standard uom is allowed for one category.
- Select the SAVE to add a new unit of measurement or CANCEL to exit without save.
Edit UoM
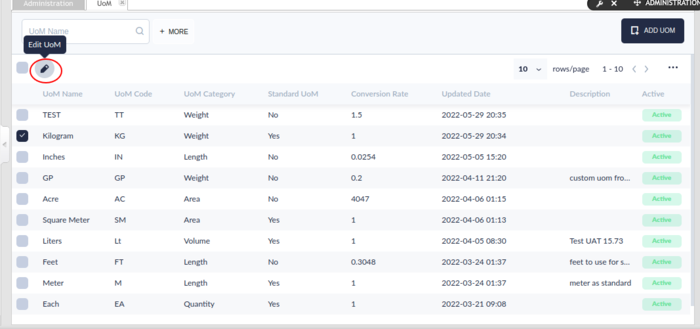
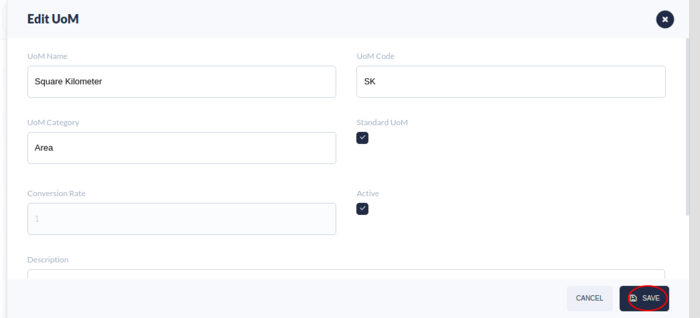
- Select one UoM, then select the Edit UoM icon.
- Edit the items at the Edit UoM page.
Figure 58: Edit UoM menu
- Check the checkbox Active to make it active status or uncheck to make it inactive.
Figure 59: Edit UoM
- Select the SAVE to update the changes or CANCEL to exit without saving.

