SOP-5-I-MDS0076-C CMMS Work Order & Preventive Maintenance
42Q Home > Production > CMMS > Work Order & Preventive Maintenance
Contents
- 1 CMMS Summary
- 2 Work Order
- 2.1 Search/Filter
- 2.2 Add A Work Order
- 2.3 Edit Work Order
- 2.4 My Work Order/My Group Work Order/My Requested Work Order/My Group Requested Work Order
- 3 Preventive Maintenance
CMMS Summary
42Q’s CMMS (Computerized Maintenance Management System) tools are designed to manage a plant’s assets, specifically, the machines and equipment companies use daily to build life-enhancing products.
It is important to note that 42Q’s Asset Management tools (CMMS) relate to the assets (machines/equipment) that manufacture the factory product, not the products themselves. Data about the product process (locations, part numbers, containers, pass/fail rates) is configured in the SFDC (Shop Floor Data Collector) module of 42Q MES and stored in 42Q’s MES cloud.
Work Order
Within 42Q’s Work Order portlet, line operators and administrators can report machine failure or maintenance issues in real-time and track the progress of work requests. Administrators assign and schedule all aspects of a work order to include email alerts, checklists, and labor hours. The work order submodule provides repair checklists for machine technicians, thus eliminating bulky clipboards and paperwork.
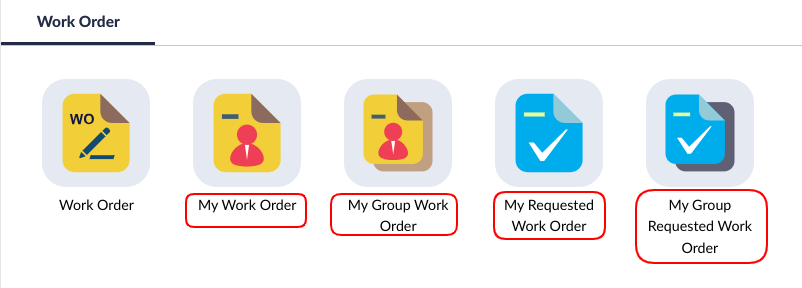
The work order includes these submodules:
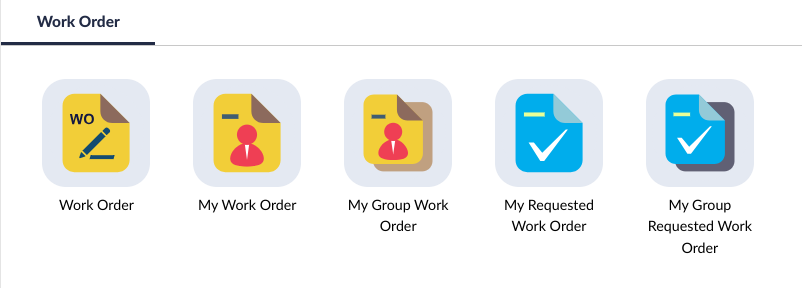
- Work Order: This page will list all the work orders. Users can manage all the work orders on this page.
- My Work Order: This page will list all the work orders that were assigned to you/current user. This is a quick entrance to manage the associated work orders.
- My Group Work Order: This page will list all the work orders that were assigned to your/current user’s group. This is a quick entrance to manage the associated work orders.
- My Requested Work Order: This page will list all the work orders that were requested by you/current user. This is a quick entrance to manage the associated work orders.
- My Group Requested Work Order: This page will list all the work orders that were requested by your/current user’s group. This is a quick entrance to manage the associated work orders.
1. To access Work Order Maintenance, navigate to Production > CMMS > Work Order and then select the Work Order icon.
Figure 1: Navigation Path
2. The Work Order List main page displays:
Figure 2: Work Order List Main Page
- The users can search special work orders, the default search field is WO, the users can add the search fields by clicking the +More. Or select CLEAR to remove the search field.
- The users can define the rows of one page.
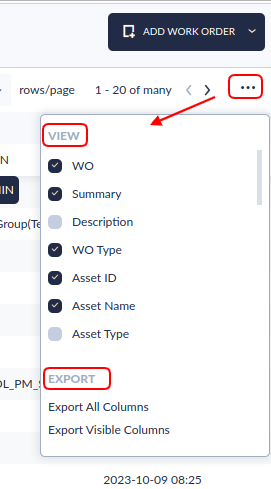
- The users can select the ... to define whether to show the columns. Also can export the work order information.
Figure 3: View and Export the WO Columns
- The Work Order Page displays all the work orders according to the search conditions. If there is no work order this page will be empty.
- The following work order information is available to view. Descriptions of each of these fields are discussed in the Add a Work Order section of this document. Problem, Root Reason, Corrective Action, Completed Date fields are added when the Work Order is moved to completion. Descriptions of these fields are discussed in the Edit Work Order section of this document.
- WO
- Summary
- Description
- WO Type
- Location
- Line name
- Department
- Asset ID
- Asset Name
- Asset Type
- Requestor
- Assignee
- Requestor Group
- Assigned Group
- Priority
- Shop Order
- Part Number
- Project
- Checklist
- Problem
- Root Reason
- Corrective Action
- Status
- Creation Date
- Plan Date
- Completed Date
- To view more detail, expand the field using the + icon.
- Double click the WO information to access the work order and begin work.
- Features on this page include:
- Filter: Filter and search the list on the page.
- Add: Add a Work Order.
- Edit: Edit a Work Order from the list.
- Export: Export the Work Order as a .csv to share, print, or save on desktop.
Search/Filter
The search/filter feature can be used to narrow the list that is displayed on the main Work Order List page. Filters are available for selection at the top of the Work Order List page.
1. To filter the Work Order List, select one or more of the filters and apply them by clicking the Search icon identified by a magnifying glass on the far right of the menu bar.
2. The following filters are available:
- Work Order: WO number.
- Summary: Brief description of the WO.
- Description: The description of the WO.
- Overdue: All Overdue Work Order will display. These Overdue Work Orders have not handled by assigned users.Department: The department where the problem asset is located.
- WO Type: Filtering options include: All, Repair, or PM (Preventive Maintenance). See section Edit this Work Order General Tab: Work Order Type for an explanation of Work Order types.
- Asset ID: Code identification for the Asset.
- Line Name: Name of the production line that is affected by the problem.
- Project: Configured project identified in the WO.
- Problem: Configured problem identified in the WO.
- Priority: Configured priority identified in the WO.
- Creation Date From: Date range when the WO was created.
- Creation Date To: Date range when the WO was created.
- Plan Date: Date when the WO was planned.
- Status: Corresponds to the Work Order’s process in the system. Choose from the following Status filtering options:
- Assigned: Work Orders in Assigned Status will display. These Work Orders have not been opened by the Assigned user.
- Work In Progress (WIP): Work Orders in Progress will display. The Assigned user has opened this Work Order, moved the status to WIP, and completed some fields (e.g. Labor hours may/may not be recorded in WIP Work Orders; Checklists may be completed/partially completed; Work Logs may be filled/partially filled.) WIP Work Orders have not yet been moved to Waiting for Buyoff Status.
- Waiting for Parts (WFP): The Work Order has been placed on hold by the Assigned technician due to unavailable parts. The Requestor must move the status back to assigned when part availability is confirmed. The up/down status of this asset is dependant upon whether Non-Stop was selected in the original Work Order. (See Status Permissions for more details about asset roles and permissions.)
- Waiting for Buy Off (WFB): Work Orders in Waiting for Buyoff will display. Work Orders in this status are awaiting approval by Requestor. Work Orders are only moved to Waiting for Buy Off after labor hours have been recorded and the checklist (if assigned) has been marked complete. Waiting for Buy Off status also requires completion of Problem, Corrective Action, and Root Reason Description fields. (Note: Waiting for Buy Off is the final step before a work order is moved to Closed status. Waiting for Buy Off Work Orders can only be moved to closed by the Requestor, upon final approval.)
- Rejected: Work Orders in Rejected Status will display. Only the Requestor may reject a Work Order that has been moved to Waiting for Buyoff. Work Orders in Rejected Status must be reassigned.
- Canceled: Canceled Work Orders will display. Requestors are allowed to cancel a Work Order.
- Closed: Work Orders in Closed status will display. Closed is the final step in the Work Order process and denotes a completed Work Order.
Add A Work Order
A work order is a job order that is created to perform any equipment related tasks, which includes but is not limited to maintenance, repair, calibration, and scrap. Any CMMS user can create a work order. Once created, the Work Order moves through the predefined approval steps defined in CMMS Settings.
1. To create a new work order, select theADD WORK ORDER button on the Work Order List main page. This generates an s''''ub-menu pop-up:
Figure 4: Add a New Work Order
2. There are two sub-menu available in this window: REPAIR and CHECKLIST.
- Repair Work Order: Select the Repair option to initiate a Work Order for an asset that is malfunctioning or broken. Note: Repair work orders must be approved in CMMS Work Request based upon group permissions.
- Checklist Work Order: A checklist work order includes quick setup or cleaning steps that are required on the asset prior to production. (e.g. 1. Clean all screens. 2. Sweep debris from the production floor. 3. Ensure cameras on AOI machines are properly aligned.)
Add a Repair Work Order
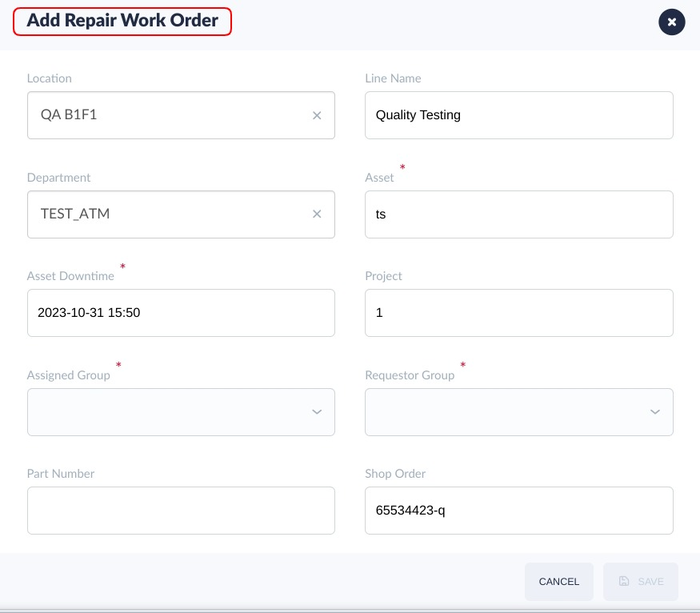
Select REPAIR to create a repair work order, then Add Repair Work Order page available.
Figure 5: Add Repair Work Order
The General information (Figure 5, above) requests the following data:
- Location: (Optional) Select the asset’s location from the drop-down list. Locations are displayed graphically, in a parent/child hierarchy, typically according to buildings and floors. Once a location is selected, information in the Line, Asset, and Group fields is automatically populated and available for selection. Note: To configure locations to assets, navigate to the CMMS Asset portal: (Shop Floor Control > Configuration > CMMS Asset > Location).
- Line Name: (Optional) Select the production line to which the asset of the work order belongs from the drop-down menu.
- Department(Optional: Select the department from the drop-down menu.
- Asset ID(Mandatory): Displays an asset in the production area. Select the asset in need of attention, that is connected to the new work order.
- Asset DownTime: (Mandatory) Enter the date and time the asset went down. The Asset Down Date and the Asset Down Time cannot be a date in the future. Only current and previous dates and times are allowed.
- Project (Optional): Select the project designation from the drop-down list. If a selection is made, the email escalation process for the work order will operate according to the parameters of the project selected. If no selection is made, escalation will be performed according to default settings.
- Assigned Group: (Mandatory): Select a group from the drop-down list to handle the new work order. The list displays groups that can be assigned to the work order. Groups are configured in the CMMS Administration portal(Shop Floor Control > Configuration > CMMS Admin > Group).
- Requester Group(Mandatory): Select from the drop-down list provided. Available groups are populated according to the line/asset selected.
- Part Number: (Optional). Plants may add additional numbers that may help to identify the parts or equipment associated with the given work repair/maintenance.
- Shop Order: (Optional): The Shop Order number in the MES 101. The Production SO # can be used to generate reports in MESWeb.
- Non-Stop: (Optional): By default, this field is not chosen. Checking this function allows the machine to continue production despite the problem being reported.
Note: For Checklist and repair Work order, if the work order was created as non-stop, then the initial status remains (e.g. running), when the work order goes into WIP, the asset status will still be in initial status (e.g. running). If the work order is canceled/closed, the next asset status still be the initial status (e.g.running) as when the user creates a work order non-stop, their purpose is not to affect the production. If the work order was created as a stop, then the initial status should be unscheduled down from the start time/asset downtime. If the work order is canceled/closed, then the asset status will change to the next asset status(defined at the CMMS Setting).
- Priority(Optional): Select a priority level from the drop-down list provided. Priority is organized in descending levels of importance: P1, P2 , or P3. (P1 is the default value) To select another priority, choose a different one from the drop-down list.
- Standard Output: (Optional) Default for this value is 0. Standard Output refers to the quantity of product produced per hour. When standard output is entered, administrators may compare the standard output with actual output data, available in reports generated in the MESWEb.
- SO Quantity: (Optional): Select the Shop Order Quantity. The default number is 0.
- Summary: (Mandatory): Enter a brief description for the work order.
Note: This item cannot be edited anymore once saved in the system.
- Description: (Optional): Provide further information about the work order here if necessary.
Note: Once the description is added and saved, it cannot be edited.
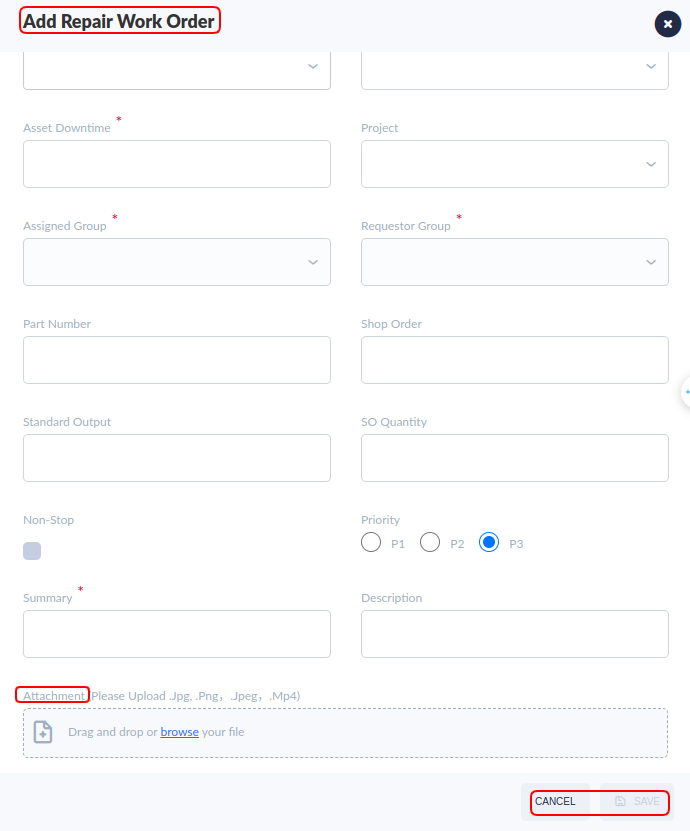
- Attachment: The Attachment provides a convenient storage system for additional paperwork that pertains to a given work order, such as additional user manuals, special instructions, warranty information, or materials lists. To add an attachment to the new work order, select the Attachment within the Add Repair Work Order window.
Figure 6: Add a New Work Order: Attachment
To add an attachment to the repair work order, select the browser button.
- Locate a file on the local drive to attach.
- Select Open to upload the file into the MES system; the file will display in the File text field.
- Fill in general information of the work order and add attachments to the work order if necessary.
- Select Save. The new work order will be displayed on the Work Order List page.
- Note: Once the WO is successfully created, the system saves the WO status as ASSIGNED, where it will await administrative approval. And will send alert emails to the users( Email to be defined in the CMMS Settings).
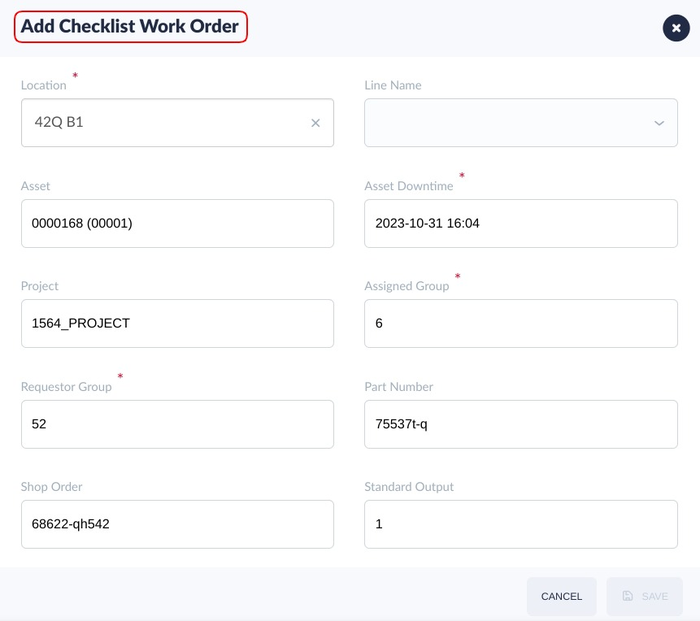
Add a Checklist Work Order
- Select CHECKLIST to create a checklist work order, then Add Checklist Work order page available.
Figure 7: Add Checklist Work Order
The General information (Figure 7,above) requests the following data:
- Location: (Mandatory) Select the asset’s location from the drop-down list. Locations are displayed graphically, in a parent/child hierarchy, typically according to buildings and floors. Once a location is selected, information in the Line, Asset, and Group fields is automatically populated and available for selection. Note: To configure locations to assets, navigate to the CMMS Asset portal: (Shop Floor Control > Configuration > CMMS Asset > Location).
- Line Name: (Optional) Select the production line to which the asset of the work order belongs from the drop-down menu.
- Asset (Optional): Displays an asset in the production area. Select the asset in need of attention, that is connected to the new work order.
- Asset DownTime: (Mandatory) Enter the date and time the asset went down. The Asset Down Date and the Asset Down Time cannot be a date in the future. Only current and previous dates and times are allowed.
- Project (Optional): Select the project designation from the drop-down list. If a selection is made, the email escalation process for the work order will operate according to the parameters of the project selected. If no selection is made, escalation will be performed according to default settings.
- Assigned Group: '''(Mandatory): Select a group from the drop-down list to handle the new work order. The list displays groups that can be assigned to the work order. Groups are configured in the CMMS Administration portal ('Shop Floor Control > Configuration > CMMS Admin > Group).
- Requester Group(Mandatory): Select from the drop-down list provided. Available groups are populated according to the line/asset selected.
- Part Number: (Optional). Plants may add additional numbers that may help to identify the parts or equipment associated with the given work repair/maintenance.
- Shop Order: (Optional): The Shop Order number in the MES 101. The Production SO # can be used to generate reports in MESWeb.
- Non-Stop: (Optional): By default, this field is not chosen. Checking this function allows the machine to continue production despite the problem being reported.
Note: For Checklist and repair Work order, if the work order was created as non-stop, then the initial status remains (e.g. running), when the work order goes into WIP, the asset status will still be in initial status (e.g. running). If the work order is canceled/closed, the next asset status still be the initial status (e.g.running) as when the user creates a work order non-stop, their purpose is not to affect the production. If the work order was created as a stop, then the initial status should be unscheduled down from the start time/asset downtime. If the work order is canceled/closed, then the asset status will change to the next asset status(defined at the CMMS Setting).
- Standard Output: (Optional) Default for this value is 0. Standard Output refers to the quantity of product produced per hour. When standard output is entered, administrators may compare the standard output with actual output data, available in reports generated in the MESWEb.
- SO Quantity: (Optional): Select the Shop Order Quantity. The default number is 0.
- Summary: (Mandatory): Enter a brief description of the work order.
Note: This item cannot be edited anymore once saved in the system.
- Description: (Optional): Provide further information about the work order here if necessary. Note: Once the description is added and saved, it cannot be edited.
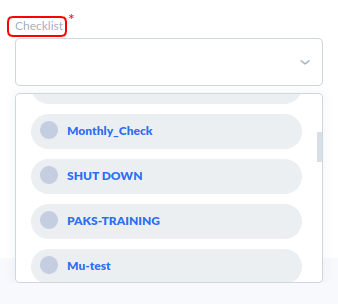
- Checklist (Mandatory): To add a checklist, selecting this field displays a list of uploaded checklists (see figure, below). Note: To configure checklists to assets, navigate to the CMMS Asset portal: (Shop Floor Control > Configuration > CMMS Asset > Checklist).
Figure 8: Checklist
- Fill in the information of the checklist work orders.
- Select Save. The new work order will be displayed on the Work Order List page.
- Note: Once the WO is successfully created, the system saves the WO status as ASSIGNED, where it will await administrative approval. And will send alert emails to the users( Email to be defined in the CMMS Settings).
Edit Work Order
This is an ongoing process that follows the creation of a new work order in CMMS and must be completed by an administrative employee. During this process, Administrators will assign resources and groups to handle the created work order.
To assign resources to a work order:
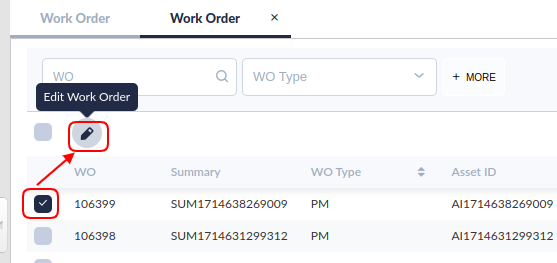
- Select the work order you wish to assign from the Work Order List page by double-clicking the Work Order. Or to select the edit icon on the right. (See Figure, below).
Figure 9: Edit Work Order Menu
- An Edit Work Order page will display (see below). There are several tabs available for use within the Edit Work Order page. There are six tabs: General, Checklist,Labor,Attachment,Worklog,WO BOC andSpare Parts for the PM work order, Maintenance work order and Checklist work order. For the Repair work order there is no Checklist tab.
Note: There are four work order types available:
- Repair Work Order: Generated when a critical event occurs, such as shut down of an asset. Note: Repair work orders are approved in CMMS Work Request based upon group permissions (CMMs Admin > CMMS Setting).
- Checklist Work Order: Generated for prerequisite activities prior to starting the Work Order itself. A checklist work order includes quick setup or cleaning steps that are required on the asset prior to the repair. (e.g. 1. Clean all screens. 2. Sweep debris from belt area. 3. Ensure cameras on AOI machine are properly aligned.)
- PM Work Order: PM Work Orders are scheduled in the Preventive Maintenance portal and are automatically generated by 42Q according to the defined calendar due date. Once created, PM Work Orders display in CMMS Work Order as a Work Order - they are not differentiated as PM type. PM type Work Orders may also be accessed and completed directly from the Preventive Maintenance module.
- Maintenance Work Order: Maintenance work orders are automatically generated by the system based on the tooling control defined in CMMS Asset > Maintenance Tab. Maintenance type work orders fall into three categories:
- Expired Date Control Maintenance
- Usage Control Maintenance
- Periodic Control Maintenance
- See the Tooling Control for full details on maintenance type work orders.
Figure 10: Edit Work Order Page
Edit this Work Order General Tab
The General tab remains displayed by default; the General tab allows the requester to assign resources and add additional details to the work order if necessary.
The following fields are read-only and will populate automatically:
- Work Order ID: The unique work order number auto-generated by the system when created.
- Asset Name: Plant and line No. where the asset is located, as in P-2L3
- Asset ID: Displays the equipment/machine the work order is related to. This is a read-only item.
- Location: Which Location the asset of the work order belongs
- Line Name: Which production line the asset of the work order belongs
- Create Date: The date when the work order was created.
- Requester: The requester of the work order.
- Requester Group: The group to which the requester of the work order belongs.
- Asset DownTime: The time when the asset went down.
- Non-Stop: When checked, this setting allows the machine to continue producing despite the problem being reported.
The following fields are available to edit as needed:
- Asset UpTime: The time the asset came back up. This item can be edited by the requestor and supervisor of the request group. However, once the work order has entered Assigned status, the requestor cannot edit it.
- Project: Defined by the requester. This can only be edited by the request group if the Requester field is empty.
- SO Quantity: Defined by the requester.
- Standard Output: Defined by the requester. This can be edited by the request group if the Requester field is empty.
- Shop Order: This field is for providing the shop order ID that was given when the requester was presented with the original problem. This can be edited by the request group if the Requestor field is empty.
- Part Number: This can be edited by the request group if the Requestor field is empty.
- Summary: A brief description of the work order. This can be edited by the Request Group if the Requester field is empty.
- Description: Additional details for the work order. This can be edited by the request group if the Requester field is empty.
- Repair Code: Repair type work orders in assigned status may be assigned a Repair Code if a repair code was defined in 42Q’s OEE module. Note: If a Repair Code was not assigned in OEE, this field will display as empty.
- PM: Preventive Maintenance. This is a read-only item.
- Work Request: Displays the work request number that is related to this work order. This is a read-only item.
- Problem: Displays all available problem types of the selected category above. Select a proper problem type from the drop-down list. This item is editable to anyone who is involved in the work order. (See Figure: Problem Drop-Down Screen, below)
- Status: These fields are automatically populated from status information entered previously. Users can change the status of the work order here. Note: A user’s capability to change the status of the work order is limited based on their assigned groups.
Figure 11: Problem Drop-Down Screen
Status Permissions
- Status permissions are defined in CMMS Admin > CMMS Settings and are contingent upon the selected work order flow for the individual asset. Only those permissions defined for the selected work order will display when editing the work order.
- Users cannot reject or close a work order once it is assigned, and work order in "Waiting for Buy Off" cannot be canceled.
- The following section describes each work order status.
- Waiting for Buy Off is the final checkpoint before the work order is moved to complete when the work order flow of assigned → WIP/wfb → close is selected. The following rules apply:
- Only employees given WFB Permission can move a WO status from Waiting for Buy Off to Closed. (Employee permissions are defined in CMMS Admin > CMMS Settings).
- A work order cannot be canceled when it is inWaiting for Buy Off status.
- WOs cannot be moved from Waiting for Buy Off to Closed until the technician marks the WO Checklist “Completed” (See Edit Work Order: Checklist Tab for Checklist Instructions.)
- Note: This step is dependent upon CMMS Settings.
- WIP
- Only employees given WIP Permission can move a WO status from WIP to Closed.
- WFP
- Only employees given WFB Permission can move a WO status from WFP to Closed.
- Closed
- Only employees given Closed Permission can move a WO status to Closed.
- Labor
- IfLabor Mandatory is defined as Yes, the WO status cannot be changed to Completed until the assigned employee enters his/her labor hours, using the Labor Tab in CMMS Work Order (Edit Work Order > Labor Tab).
- Priority: Displays the priority level of the work order. This item can be edited by anyone involved with the work order.
- Assign Group: If a Default Assignee has not been designated (CMMS Admin > Groups > Edit User > Default Assignee), supervisors must manually assign groups to the work order. To assign the Group:
Move the group from the Groups text box to the Selected Groups text box .
Select the group by double-clicking. The line will highlight.
Use the green arrow button to move the group from Selected Groups to Groups.
- Assigned To: This section displays all available users in the selected groups. Once the Group is selected, will then need to assign the user from that group to complete the work order.
Check the box in the Assigned column for the respective user.
Click SAVE to save the assignment into the local system. The requester of this work order and the supervisor of the selected group have full editing rights to this item.
Figure 12: Assign to User
Default Assignee Exception
IMPORTANT NOTE: If a default assignee was defined, there is no need to assign a user. The work order will display the default assignee .
- Corrective Actions: (Mandatory) Enter the actions performed to complete the Work Order.
- Root Reason: (Mandatory) Enter a description of the root reason, or the reason the problem occurred.
- Rejection Remarks: Enter the justification for the rejection of the work order.
Note: This must be completed prior to changing the work status to Rejected. Once the work order is given Assigned status, only the request group and assigned group may edit this field.
- Completion Text: Enter additional notes here once the work order has been completed. Once created, this item may only be modified by the assignee and the selected group supervisor.
Edit Work Order: Checklist Tab
The checklist includes all the steps necessary to repair a given machine. The technician will need to complete and check every step on the checklist.
- Choose the asset in need of repair by double-clicking on its icon.
- The checklist displays according to its location.
- Users may unfold the instructions for a detailed list.
Figure 13: Asset Checklist Tab
Figure 14: Asset Special Checklist Tab
- As repairs are completed, the technician will check each line item as Completed by selecting Completed from the Status checkboxes. Users may choose: Pending, Completed or Skipped (see figure, below).
Note: The Comment field is available for technicians to add any outstanding comments.
- The status of the checklist may also be edited. To edit the checklist:
- Select the new status from the drop-down menu choices (Completed, Skipped, or Checked).
- Select Update to save choices orCancel to abort.
- Edit the Comment text field as needed.
Note: Checked items with a Completed status can be given a Waiting for Buy Off status under the General tab.
Simplified Checklist Option
Technicians may need to quickly complete a PM checklist or WO checklist. In such cases, users may bypass the Status, Update, and Remark fields. To complete the checklist in this manner:
- Fill the tick mark at the end of the line.
- Users must still complete each item in the checklist.
Export the checklist
Users can select the EXPORT to export the checklist into the .xls file save it to the local driver.
Edit Work Order: Labor Tab
The Labor tab allows the user to assign labor hours to a work order. The following functions can be performed from the Labor tab: Add labor, Edit labor, and Delete labor; however, only the assignee and the assigned group supervisor may perform these operations.
Figure 15: Labor Tab Menu Bar
- Items that appear in the Labor List are organized by: User Name, Description,Hours Used, Start Date, and End Date.
- The input interface window allows the following fill fields:
- Start Date: format yyyy-mm-dd hh:mm
- End Date: format yyyy-mm-dd hh:mm
- Used Hours: qty of hour – must be greater than 1
- Description: any applicable description in the box
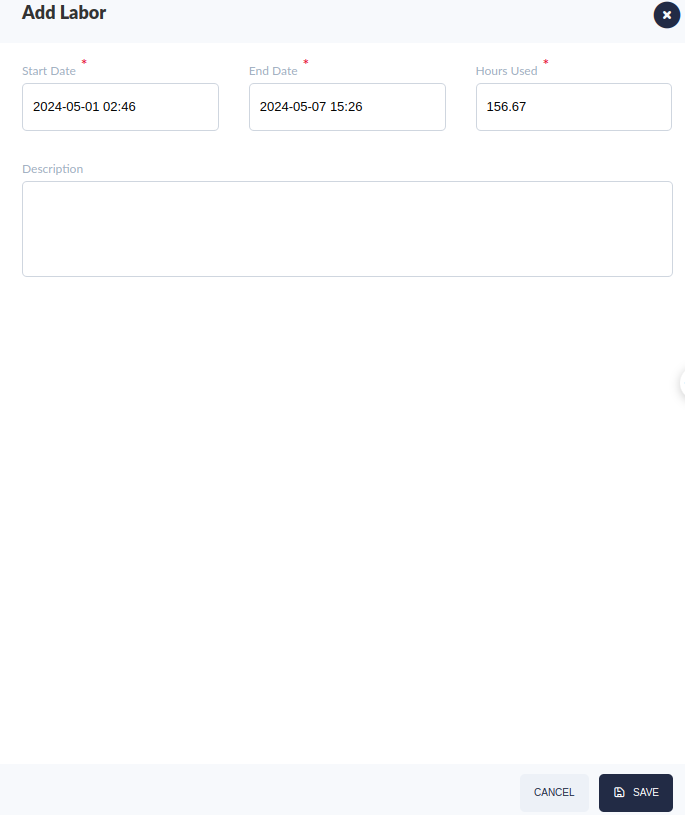
Add Labor
To add labor time to the work order:
- Select ADD LABOR from the Labor menu.
- An Add Labor window displays
- Add all necessary information according to the conventions listed above.
Figure 16: Add Labor
Note: The system does not allow the user to insert a future date/time.
The system will auto-populate the End Time with Labor’s End Time if the users change the Work order’s status to closed.
The system will auto-populate the Start Time same as the Work Order’s Start Time.
Edit Labor
To edit a labor entry:
1. From the Labor Tab select a labor entry from the list.
2. Select Edit. The Edit Labor pop-up window displays, which looks identical to the Add New Labor pop-up window.
3. Edit any of the fields provided.
- Start Date
- End Date
- Used Hours
- Description
4. Select Save to finish or Cancel to abort.
Note: It is not possible to edit the Labor for a WO in the following statuses:
- Assigned
- Canceled
- Closed
- Rejected
Delete Labor
To delete a labor entry:
- From the Labor, Tab select an entry from the list.
- Select Delete. The entry is deleted from the Labor list.
Edit Work Order: WO Attachment Tab
The WO Attachment tab can be used to provide attachments for the respective work order. WO Attachment functions include Add attachment and Delete attachment. Entries in the WO Attachment list are organized by: File Name; Description; Create User; and Download.
The Attachment tab also can view(Read-only) the attachments for the Asset.
Figure 17: WO Attachment Tab
Add an Attachment
To add an attachment:
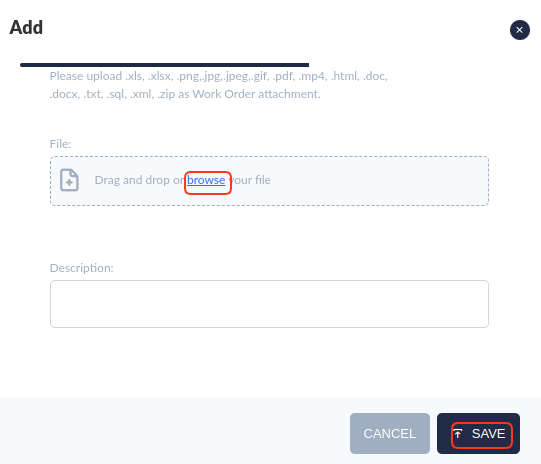
- Select ADD ATTACHMENT from the WO Attachment menu. An Add an attachment pop-up window appears.
- Click Browser to select an attachment from the local drive.
- Enter a brief description of the attachment in the Description box.
- Select Save to complete the process or Cancel to abort.
Figure 18: Add a New Work Order Attachment
View/Download/Delete an Attachment
To view/download/delete an attachment from the WO Attachment tab:
- Select an attachment from the list, the button View, Download, and Delete will show at the right.
- Click View/Download/Delete.
Edit Work Order: Work Log Tab
The Work Log provides a means for users to enter comments concerning work done for a given order. Once a labor entry is added, it cannot be removed. The work log can be accessed by navigating to the Work Log tab, as in Figure 18, below.
Figure 19: Work Log Tab
As illustrated in the Figure above, the Work Log tab is simple in design. To use:
- Enter the Description of the Work log information.
- Select users or users group from the Notify list. Secondary recipients can be added in the Notify Others field. Once saved, the associated users will receive an email about the work order’s work log.
- The users can check theAdd to Completion Text to add the Description to the Completion Text of the Work order in the general tab.
- Select Save to send the message to the designated recipients.
- The message history can be viewed in the lower box. Prior messages are organized by Date.
Edit Work Order: WO BOC (Bill of Components) Tab
1. The WO Boc tab lists component information (Part Number) that will be needed to repair the Asset ID of the selected Work Order. Access the bill of components (BOC) by selecting the WO Boc tab.
Figure 20: Edit Work Order Boc Tab
2.The Boc tab provides a list of Part numbers displayed hierarchically, as a tree.
Note: The information in the Boc tab corresponds directly to Boc details configured for that WO in the Configuration module and available through the following path: Shop Floor Control > Configuration > CMMS Asset > Asset > Edit Asset > Boc.
Edit Work Order: Spare Parts Tab
- The Spare Parts tab lists spare parts information that will be needed to the Asset ID of the selected Work Order.
- Choose the Spare Parts tab on the top.
Figure 21: Edit WO Spare Parts tab
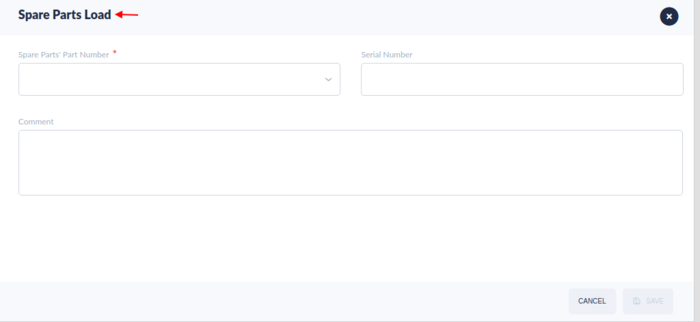
- Select LOAD to load the spare parts for this Work order.
Figure 22: Edit WO - Load Spare Parts
- Spare Parts’ Part Number: The Part number of the spare part.
- Serial Number: The serial number of the spare part.
- Comment: The comment on the spare part.
- Enter the Spare Parts’ part number, serial number, and comment, then select Save to load the spare part.
- Users can select the Current/History to view the currently used spare parts or the history of spare parts for this work order.
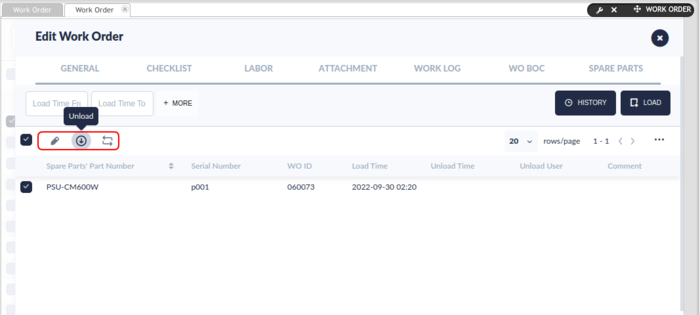
- Users can unload and replace the spare parts for the work order.
Figure 23: Edit WO - Unload/ Replace Spare Part
- Select the loaded spare part, then select the Unload
 to unload the spare parts.
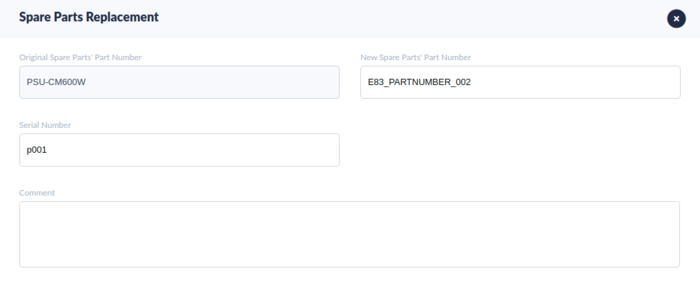
 - Users can select Replace
 to replace another spare part for the work order.
Figure 24: Replace spare part
My Work Order/My Group Work Order/My Requested Work Order/My Group Requested Work Order
- My Work Order: This page will list all the work orders that were assigned to you/current user. This is a quick entrance to manage the associated work orders.
- My Group Work Order: This page will list all the work orders that were assigned to your/current user’s group. This is a quick entrance to manage the associated work orders.
- My Requested Work Order: This page will list all the work orders that were requested by you/current user. This is a quick entrance to manage the associated work orders.
- My Group Requested Work Order: This page will list all the work orders that were requested by your/current user’s group. This is a quick entrance to manage the associated work orders.
Figure 25: Work Order
On the page, there will filter the work orders that are associated with the current user or the current user’s group.
The operations are the same as the work order.
Preventive Maintenance
Unlike the Work Order submodule, the Preventive Maintenance submodule is used to create and complete non urgent work orders. Regularly scheduled maintenance prevents negative events and ensures the equipment used on the shop floor is always in satisfactory operating condition. Alerts are automatically triggered to appropriate teams. The Preventive Maintenance submodule is equipped with an intuitive, color-coded calendar applicaiton. Note: Within the remainder of these instructions, Preventive Maintenance will be referred to as PM.
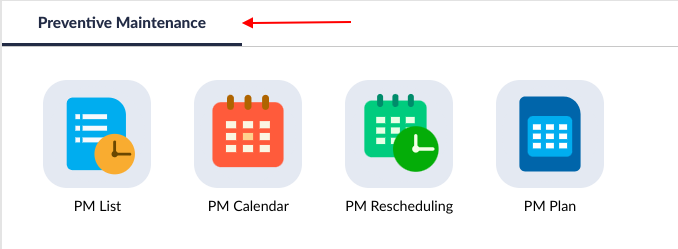
1. To access Preventive Maintenance, navigate: Production > CMMS > Preventive Maintenance. The Preventive Maintenance icons display.
Figure 26: Preventive Maintenance Main Page
PM List 
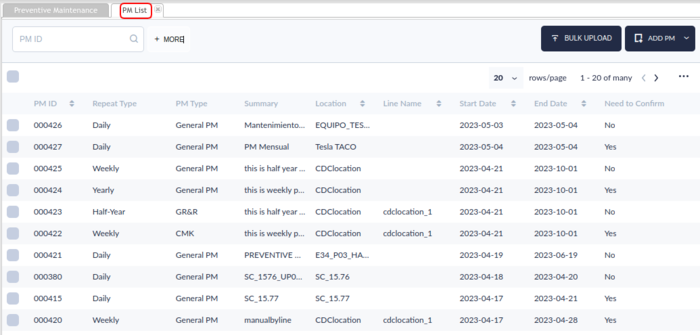
1. The Preventive Maintenance List displays:
Figure 27: Preventive Maintenance List
2. The list is arranged by most recent start date and descends to the oldest start date.
3. The following information is displayed in the list:
- PM ID: PM Number.
- Repeats Type: How often the maintenance will occur: Daily, Weekly, Monthly, Yearly, Quarterly, Half Year, or Special. Special allows the user to schedule a PM with 2 or more combined periods.
- Repeat Every: Number of repetition times.
- PM Type: General PM (Preventive Maintenance); CMK (Machine Capability Index); or GR& R (Gauge Repeatability and Reproducibility).
- Summary: Brief description of the PM.
- Description: Text description of the PM.
- Location: Location Name.
- Line Name: Name of the production line.
- Start Date: Date when PM starts. Format: YYYY-MM-DD.
- End Date: Date when PM ends. Format: YYYY-MM-DD.
- Updated By: Name of the last employee who edited the WO.
- Need to Confirm: PMs that require confirmation (Need to Confirm) are noted in the PM list with a blue checkmark. PMs that do not require confirmation are noted in the PM list with a grey checkmark.
Search/Filter PM Lis
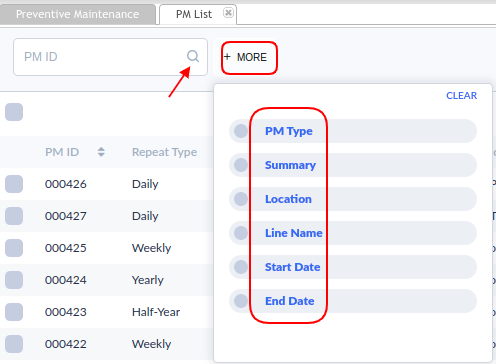
4. The user can filter the list by:
Figure 28: Search PM
- PM Type: Type includes: General PM (Preventive Maintenance); CMK (Machine Capability Index); or GR& R (Gauge Repeatability and Reproducibility).
- Summary: The summary of the PM.
- Location: The familiar tree hierarchy is available as a drop down menu.
- Line Name: Users can specify the exact line s/he would like to view or edit by choosing from the list provided.
- Start Date: Users can specify the start date for the preventive maintenance.
- End Date: Users can specify the end date for the preventive maintenance.
Bulk Upload PM
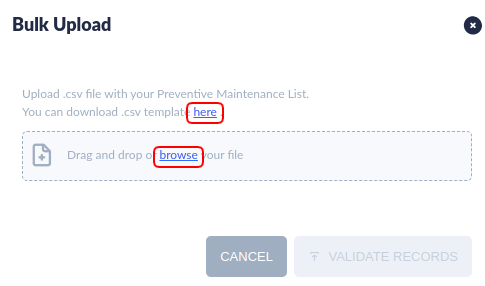
With the Bulk Upload PM function, users can import(create/add) many PMs at one time. This function involves downloading the template file, uploading the file and validating whether the data is valid. Users can download invalid records to check and correct them.
Note: The system does not support bulk uploading the special type PM.
- Select the BULK UPLOAD , the Bulk Upload window pop-up.
Figure 29: Bulk Upload PM
- Select the here(blue link) to download the .csv template file and fill in your PMs records if you do not have the template file.
- Drag and drop or select browse(blue link) to open your file.
- Select VALIDATE RECORDS, the UPLOAD button will show if the validation process passed.
- Select Upload to save the PMs records to the system.
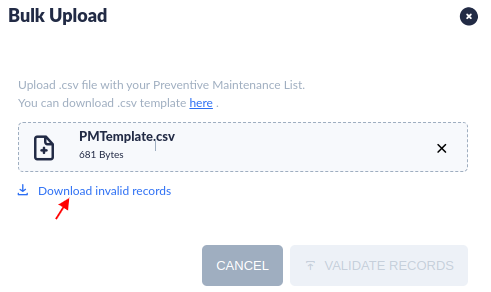
- Select Download invalid records to download and check the invalid records if some records are invalid.
Figure 30: Download invalid Records
Add Preventive Maintenance
1. To add Preventive Maintenance, select Add PM from the Preventive Maintenance List screen. Note: PM work orders must have a checklist associated with them. Checklists are assigned to Assets and are configured in the CMMS Asset submodule (Shop Floor Control > Configuration > CMMS Asset > Checklist).
Figure 31: Add Preventive Maintenance
- The sub-menu with two options: BY ASSET, BY LINE.
- Select BY ASSET or BY LINE,
- The Add PM(By Asset) or Add PM(By Line) page displays.
- Fill the fields then select SAVE to add a new PM work order.
Figure 32: Add PM by Asset
Figure 33: Add PM by Line
The difference between these two PM types is that there are several fields that are different, which can be called special fields, and the rest of the fields are the same which can be called General fields.
Add Preventive Maintenance: General fields
1. Within the General fields, the user schedules the parameters for preventive maintenance . The following fields are available for entry:
- PM Type:(Mandatory) Select the following types of PM from the available drop-down menu:
- General PM: Any type of general PM to include cleaning, lubricating, switching belts, etc.
- CMK: Machine Capability Index
- GR & R: Gauge Repeatability & Reproducibility
- Summary (Mandatory): Brief description of the PM. Free text/static format.
Note: Summary information displays in the PM Calendar as the main heading; Add a brief sentence that clearly identifies the task (e.g. Monthly PM for Line#3, Check belts in Line#1).
- Description (Optional): Additional information (if necessary). Free text/static format.
- Create WO Before (Days) (Mandatory): This field specifies how many days prior to maintenance the WO should be created. To create an immediate Work Order, users may select “0” in the Create Before field. PM Work orders are available in the Work Order Portal (Work Order > Filter by PM > WO # > Edit). Note: When a WO is created, the system triggers an email alert. Therefore, the user should be mindful to add a number larger than the number added to the Alert Email Before field.
- Start Time (O'clock)(Mandatory): The time that maintenance is set to begin (hours). Default=9:00 o’clock. Choices include hourly increments from 1 - 22.
- Duration Time (Hours) (Mandatory): The number of hours of maintenance programming. Default = 1 hour. Choices include hourly increments from 1 - 23. It is helpful to think of this as programming the length of the maintenance.
- Duration Time Example: The Duration Time field is particularly useful for plants operating around the clock, with scheduled maintenance that spans the 12 a.m. hour. By selecting maintenance duration by hours, plants’ daily time zones will not be affected. In the following example, maintenance is scheduled to begin at the second shift, 4:00 p.m. Duration Time is set for 14 hours - the next scheduled maintenance begins at the first shift, 6 a.m.
- PM Start Date* (Mandatory): The day when maintenance should begin. When selected, a calendar popup menu is activated. The time zone is automatically applied.
- PM End Date(Mandatory): The day when maintenance should end.
- Location (Mandatory): Users may schedule a PM for an entire production line or for one individual asset. If configuring for an entire line, select a child location (indicated by a blue folder). If configuring for an individual asset, select a parent location (indicated by a yellow folder) OR a child location.
- Repeat Type (Mandatory): Defines the maintenance frequency: number + Daily/Weekly/Monthly/Yearly/Quarterly/ Half Year,/Special.
- Grace Period (Days)(Mandatory): The amount of time the assigned group has to perform maintenance.
- Grace Orientation: Forward/Backward (Mandatory): Grace orientation determines whether the grace period falls after or before the scheduled PM. Choose Forward/Backward to set the period after and before the scheduled PM. Choose Backward to set the grace period before the scheduled PM.
Note: When creating PM, CMMS provides Grace Period and Grace Orientation for users to do PM reschedule.Forward means conducting time can be the future. Backward is the last date for the PM plan date.For example, schedule a PM with plan date as Aug-20 with weekly type, grace date = 3 days:
if Grace Orientation = Forward/Backward, it means CMMS admin can reschedule PM to Aug 17 - Aug 23.
If Grace Orientation = Backward, CMMS admin can reschedule PM date to Aug 17- Aug 20.
- Need To Confirm: Checkbox that indicates if confirmation is needed. The default value is No (unchecked). If checked, users with proper permissions will need to confirm.
- Confirmation Escalation Email Before (Days):Select the number of days prior to the scheduled maintenance that an email will be sent to system users responsible for the confirmation of the PM task. Default = 1.
- Confirmation Escalation Email Group:(Mandatory/Conditional): The group that has permission to confirmate the PM. As with the Escalation Group must be preconfigured.
- Alert Email Before (Days) (Mandatory): Select the number of days prior to the scheduled maintenance that an email will be sent to system users responsible for the PM task. Default = 7.
- Alert Email Group: (Optional) Email Alert Groups depend on the location or line selected. Choose the groups that will receive an email alert by marking the checkbox next to the group name. Email Alert Groups must be assigned to the PM Notification Category.
- Rescheduling Group (Mandatory): The group that has permission to reschedule the PM. As with the Assigned Group, the Reschedule Group must be preconfigured.
Add Preventive Maintenance: Special fields
Add PM (By Asset) special Fields
- Asset*(Mandatory): Drop-down list of the assets.
- Assigned Group*(Mandatory): Drop-down list that contains the group name(s) associated with the asset(s). The Group selected must already be assigned to the category PM Assignment.
- Requestor Group*(Mandatory): Drop-down list that contains the group names associated with the asset(s). Only groups associated with the selected asset and assigned to the PM Requestor category will display. Note: Groups may be added by location. Requestor Group and Assigned Group are disabled unless there is one Asset selected.
- Checklists*(Mandatory):PMs must have a checklist associated with them; additionally, checklists are assigned repeat time intervals. If a time interval is selected that is different from its corresponding checklist, an error message will alert the user of the discrepancy when the user attempts to save the PM. If an error message appears: Return to Shop Floor Configuration > CMMS Asset > Asset Type> Checklist Tab to locate the correct repeat type for the selected asset or location.Special checklists are predefined by repeat type (e.g. monthly, quarterly, half-year, yearly) in the CMMS Asset module (Shop Floor Control > Configuration > CMMS Asset > Checklist) prior to selection within the PM module.
Add PM (By Line) special Fields
- Location*(Mandatory):Drop-down list that contains the locations.
- Line Name*(Mandatory): Drop-down list that contains the production lines.
- Assigned Group*(Mandatory): Drop-down list that contains the group name(s) associated with the line(s). The Group selected must already be assigned to the category PM Assignment.
- Requestor Group*(Mandatory):Drop-down list that contains the group names associated with the line(s). Only groups associated with the selected line and assigned to the PM Requestor category will display. Note: Groups may be added by location. Requestor Group and Assigned Group are disabled unless there is one production line selected.
PM Work Flow
PM created > System adds PM to PM Calendar > System creates WO > System sends email to the Assigned Groups x days before scheduled PM > Technician assigned PM locates assigned WO (Work Order) in Work Order portal > Technician completes PM and checklist according to the defined Workflow (CMMS Admin > CMMS Setting).
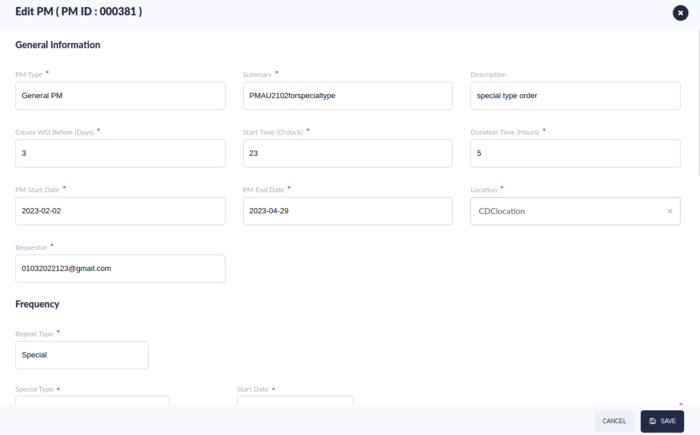
Edit PM Work Order
PM Work Orders can be modified.
Select the PM and select the Edit ![]() icon from the top menu bar.
icon from the top menu bar.
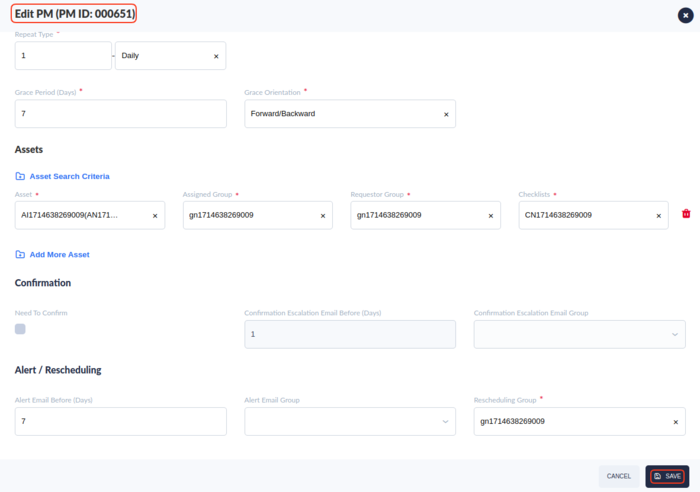
The Edit PM page shows.
Figure 34: Edit PM
Parameters selected for the original PM work order are available for edit.
- Modify the items.
- Select the SAVE to save the changes.
Edit PM: Affected Assets
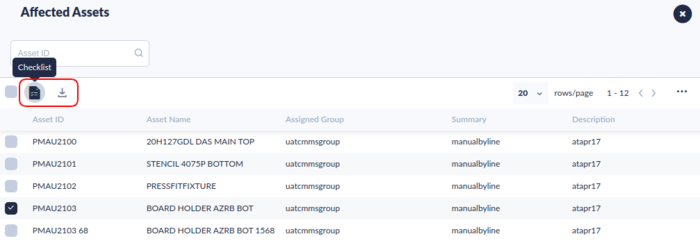
- The Affected Assets allows users to quickly view affected assets of the selected PM Work Order.
- Select the desired PM from the list and select the Affected Assets
 icon.
icon. - A new window displays, allowing users to view affected assets of the selected PM.
- The following category fields are available:
- Asset ID
- Asset Name
- Assigned Group
- Requester Group
- Summary
- Description
- Users may also View and Download the Checklist.
- Select the Checklist Icon to open theAsset Checklist sub-page to view the checklists.
- SelectDownload icon.
- A .csv file automatically downloads onto the user’s local drive.
- Users may share, print, save, or rename as desired.
Figure 35: Affected Assets
Edit PM Work Order: Calendar
The Calendar of Edit PM offers five features: Edit Calendar, Copy Calendar, Create WO , Export Checklist and Work Order List.
The Edit, Copy and Create WO features allow users to view scheduling details associated with the selected PM. Users with Rescheduling permissions may Copy and Create WOs in the Calendar Tab. This feature prevents users without editing permissions from accidentally cancelling or altering scheduled maintenance activity.
- Select the desired PM from the list and select the Calendar
 icon.
icon. - A new window displays, allowing users to manage the calendar of the selected PM.
Figure 36: Edit PM: Calendar
Edit Calendar
- Select the calendar from the list and select the Edit Calendar icon.
- A new window displays, allowing users to edit the calendar of the selected PM.
Figure 37: Edit Calendar
Copy Calendar
The Copy feature allows users to copy an existing work order to another date, as long as that date falls within the specified grace period. Users must have Rescheduling permissions to complete this transaction.
To Copy Calendar:
- Select the Calendar to be copied. Note: Only PMs with WOs associated with them (designated by an underline and Status of WO Generated) are available for Copy.
- Select the Copy Calendar icon. This activates a pop-up window, Add PM Calendar. The following details display:
- Plan Date
- Rescheduled Date (if applicable)
- Status: Select Planned to copy the WO and create a new PM
Figure 37: Copy PM Calendar
Calendar: Create WO
The Create WO(Work Order) feature is used to escalate scheduled maintenance activity. Users may bypass the calendar activity and manually select a scheduled PM work order (PM Work Order in Planned Status) for immediate release.
Figure 38: Create WO for Planned PM
To move PMs from Planned Status to Work Order Generated Status:
- Select the Planned PM Calendar.
- Select the Create WO icon.
- The status on the far right will change from Planned to WO Generated.
- The Work Order List icon will be available.
Figure 39: WO Generated Status
- Select the Work order list icon to view details of all WO#s associated with the selected PM. (See Figure, below).
- Users can select the Work Order Details to go to the Work Order window.
Figure 40: Work Order List
Calendar: Export Checklist
The Export Checklist allows users to export the PM’s checklists to their local drive:
- Select the PM Calendar from the list .
- Select Export Checklist .
- A .xls file/files automatically downloads onto the user’s local drive.
- Users may share, print, save, or rename as desired.
CMMS PM/Google Calendar Integration
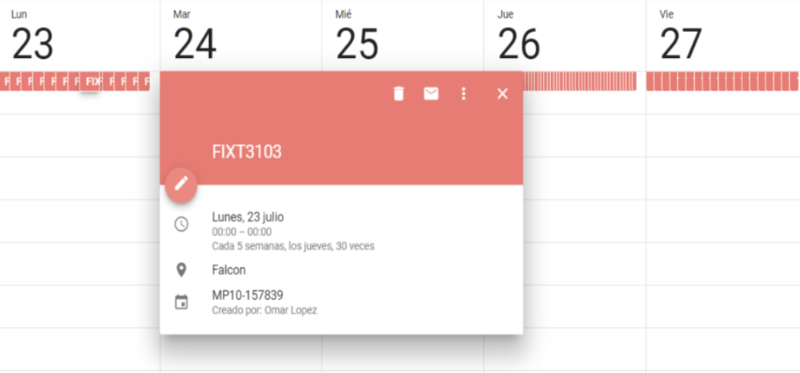
CMMS seamlessly integrates with Google Calendar.
- The connection is achieved by establishing communication between 42Q/Google APIs.
- Once connected, PM work order details and due dates are automatically posted to the Assignee’s Google Calendar.
Figure 41: Google Calendar Integration
![]() TIP: Follow this API guide to integrate CMMS PM with Google Calendar,
TIP: Follow this API guide to integrate CMMS PM with Google Calendar,
PM Calendar 
Information displayed underneath the Calendar tab automatically populates according to the details provided in the PM Work Order.
- The calendar provides an overview of scheduled PMs. Users may also export PM work order details from this submodule.
- To navigate to the Preventive Maintenance Calendar: Production > CMMS Preventive Maintenance > PM Calendar.
- Choose the second icon.
5. The PM Calendar submodule allows users to view PM Work Orders according to the following categories and color codes:
Planned (no need Confirmation) (Blue Text)
Planned (need Confirmation) (Orange Text)
Rescheduled (Confirmed) (Green Text)
WO Generated (Turquoise Text)
Canceled (Pink Text)
Figure 42: Calendar Categories/Color Codes
6. To view filtering options, choose the double downward arrow icon on the far top right screen. The following filtering options are available:
- Assigned Group
- Asset Type
- PM Type
- Asset Department
- Location
- Line Name
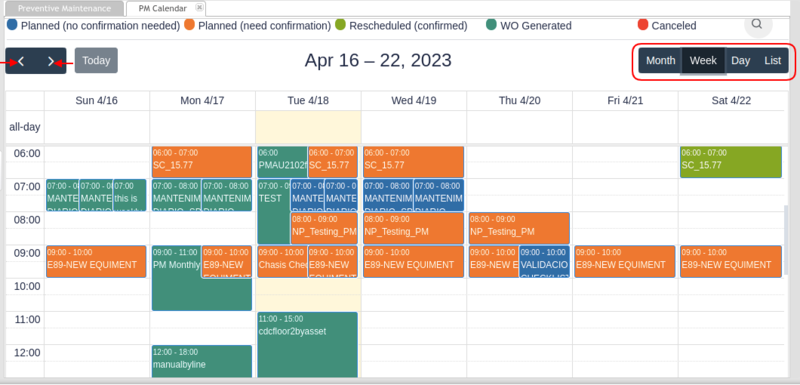
7. Users can view according to Day, Week, or Month and move between fields with the arrow icon located in the center of the screen (see Figure below) located in the top center of the screen
Figure 43: Navigate PM Calendar Top Menu Bar
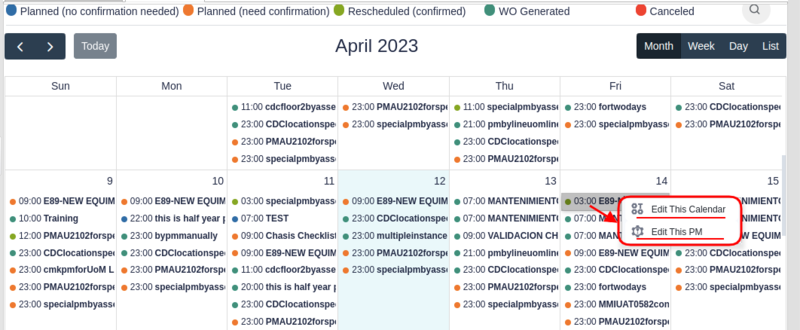
8. Users can also Edit this Calendar or Edit the PM maintenance by right-clicking on the PM WO’s colored bar.
9. The menu will appear with Edit this Calendar or/and Edit This PM (See Figure, Below)
Figure 44: Navigate Edit Calendar Menu
10. Select theEdit This Calendar.
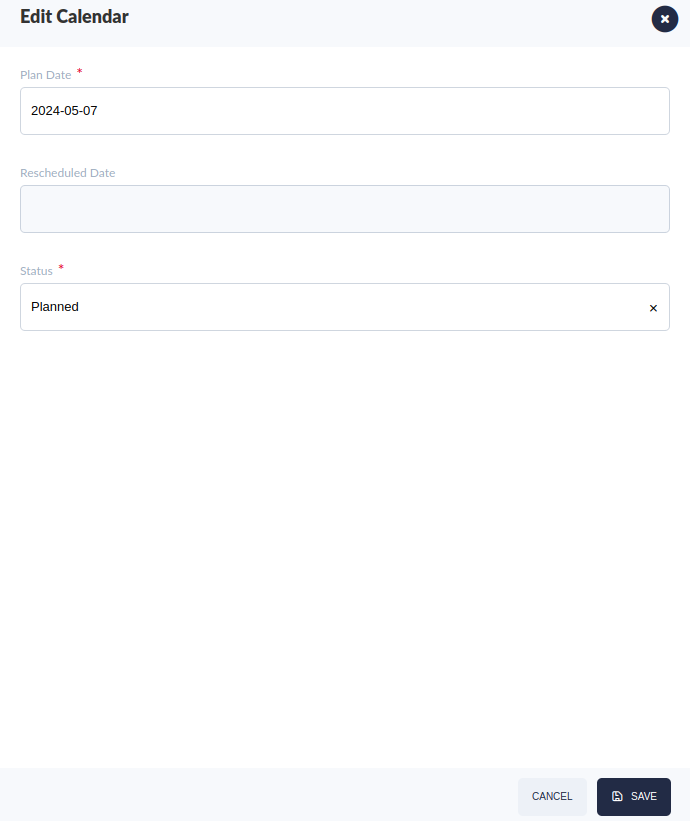
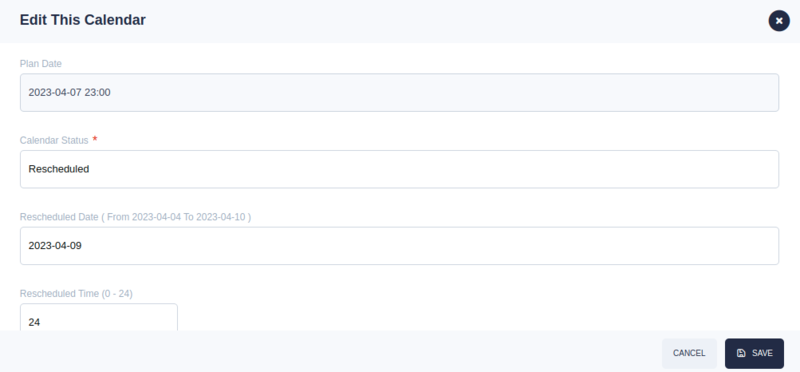
11. The Edit This Calendar page will populate.
12. Within the page, users may edit the following:
- Calendar Status
- Rescheduled Date
- Rescheduled Time
- Grace Period
Note: Only users who belong to the Reschedule Group have edit permissions.
Figure 45: Edit Calendar in PM Calendar
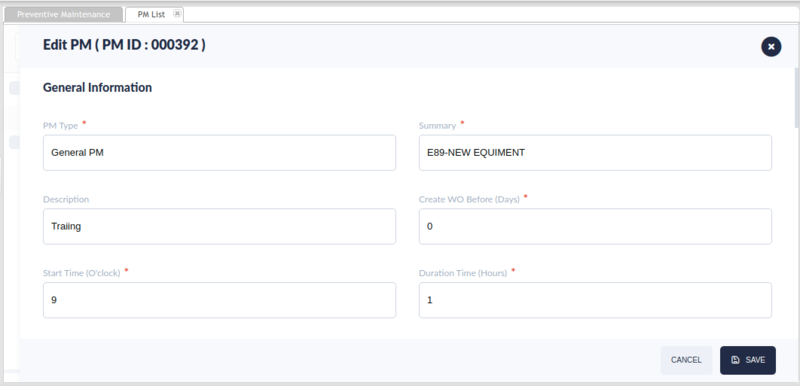
13. Users can eidt the PM by selecting the Edit Thim PM menu.
14. Once selected, the system will open another new tab with the user's browser and tgo to theEdit PM page
Figure 46: Edit PM in PM Calendar
PM Reschedule 
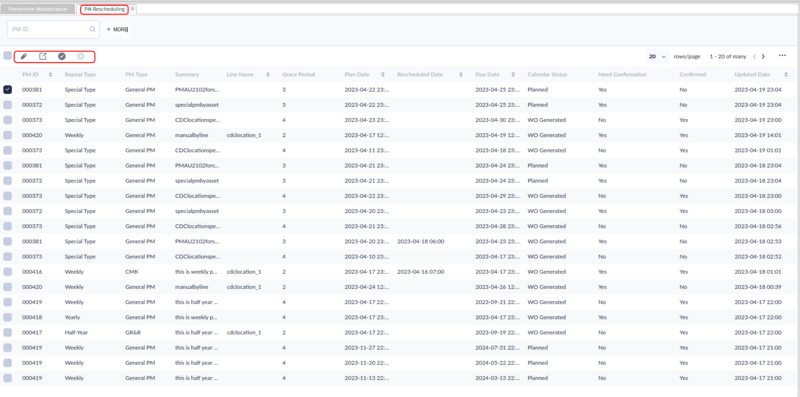
Users can reschedule and confirm Preventive Maintenance work orders under the PM Reschedule Tab of Preventive Maintenance.
- Navigate: Production > CMMS Preventive Maintenance > Reschedule Calendar.
Figure 47: PM Reschedule
- Select the PM calendar line for reschedule by activating the checkmark next to its name.
- A tool bar displays, with buttons: Edit Calendar, Edit PM tab, Confirmed andUnconfirmed.
Note: The buttons correspond to the action tabs available in the PM Calendar submodule.
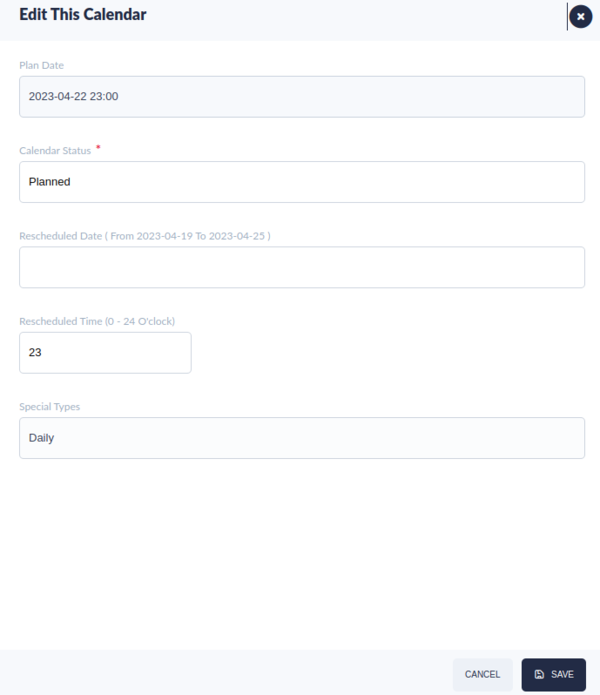
Edit this Calendar
The following options are available for edit:
- Rescheduled Date
- Rescheduled Time
- Calendar Status: Planned, Rescheduled, Cancelled.
Note : For Rescheduled Date,user only can select the valid Date, then invalid are grey can not selected.
Figure 47a: Edit Calendar
3. Select Save to save the changes or Cancel to abort the action.
Edit PM
Users may edit the fields in the PM page, then select Save to save the changes or Cancel to abort the action.
Figure 48: Reschedule the PM Calendar Functions
PM Plan 
The PM Plan provides an overview of Plans for PMs. Users may also export the checklist and view the work order details for the PM Plan that WO(work order) Generated.
To navigate to the Preventive Maintenance Calendar: Production > CMMS > Preventive Maintenance > PM Plan.
Figure 49: PM Plan Main Page
To view the Work Order Details,
- Select the PM Plan which the calendar status is WO Generated and plan date is not later than current date.
- Select theWork Order Details button from the toolbar, then the system will open another browser window and go to the Work Order module with the Edit Work Order page available.
To Export Checklist
Select the PM Plan which the calendar status is WO Generated and plan date is not later than current date,
Select the Export Checklist button from the toolbar, then the system will download the checklist as .xlsx file.
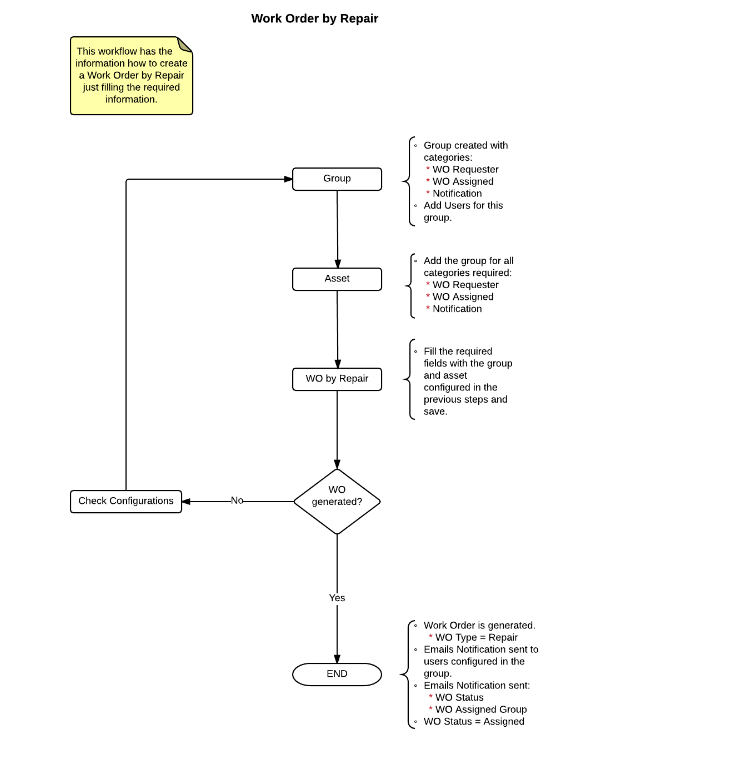
Appendix A: Work Order Workflow
Figure 63: Workflow WO by Repair
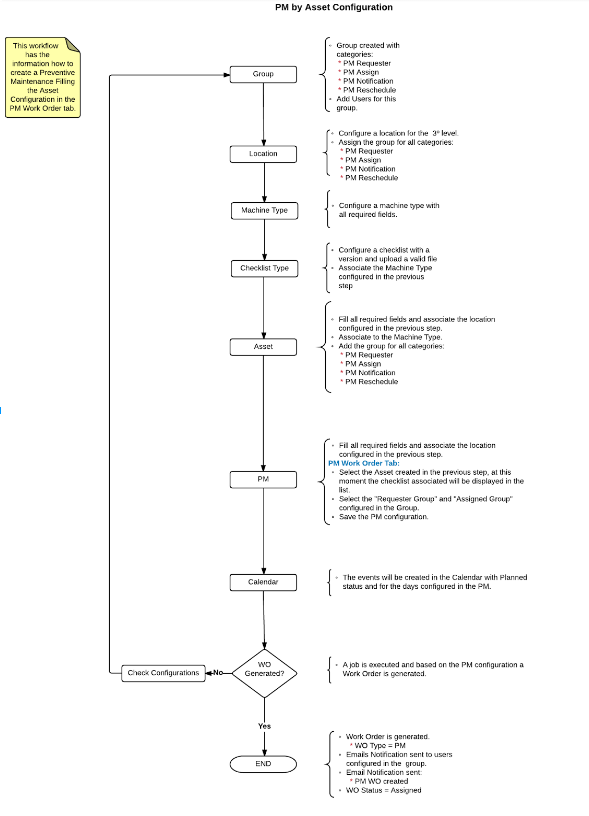
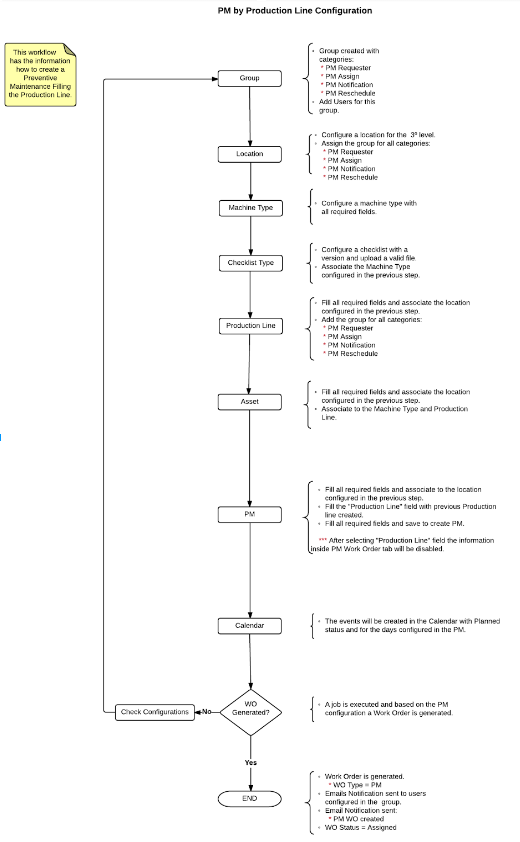
Appendix B - Preventive Maintenance Workflow
Figure 64: PM by Asset Configuration Workflow
Figure 65: PM by Production Line Configuration Workflow
