SOP-MES0073 CMMS Admin
Cirrus > Shop Floor Control > Configuration > CMMS Config
This edition applies to Cirrus and all subsequent releases and modifications until otherwise indicated in new revisions.
Contents
Administration
This edition applies to CMMS for Cirrus and all subsequent releases and modifications until otherwise indicated in new revisions.
The administration module is designed for administrators (Manufacturing Engineer profile) to perform all administration-related actions. There are seven sub-modules available to local system administrators. Refer to the table below for sub-module names and corresponding functions:
| Sub-module Name | Function |
| User |
|
| Group |
|
| Plant |
|
| Department |
|
| Escalation |
|
| Project |
|
| Work Request Category |
|
NOTE: See below the available profiles and their respective modules access.
Equipment Operator |
Engineer (Quality, Process, Facility) |
Manufacturing Engineer |
Spare Part/Asset Management |
CMMS Work Order
|
CMMS Work Order
|
CMMS Admin
|
CMMS Asset
|
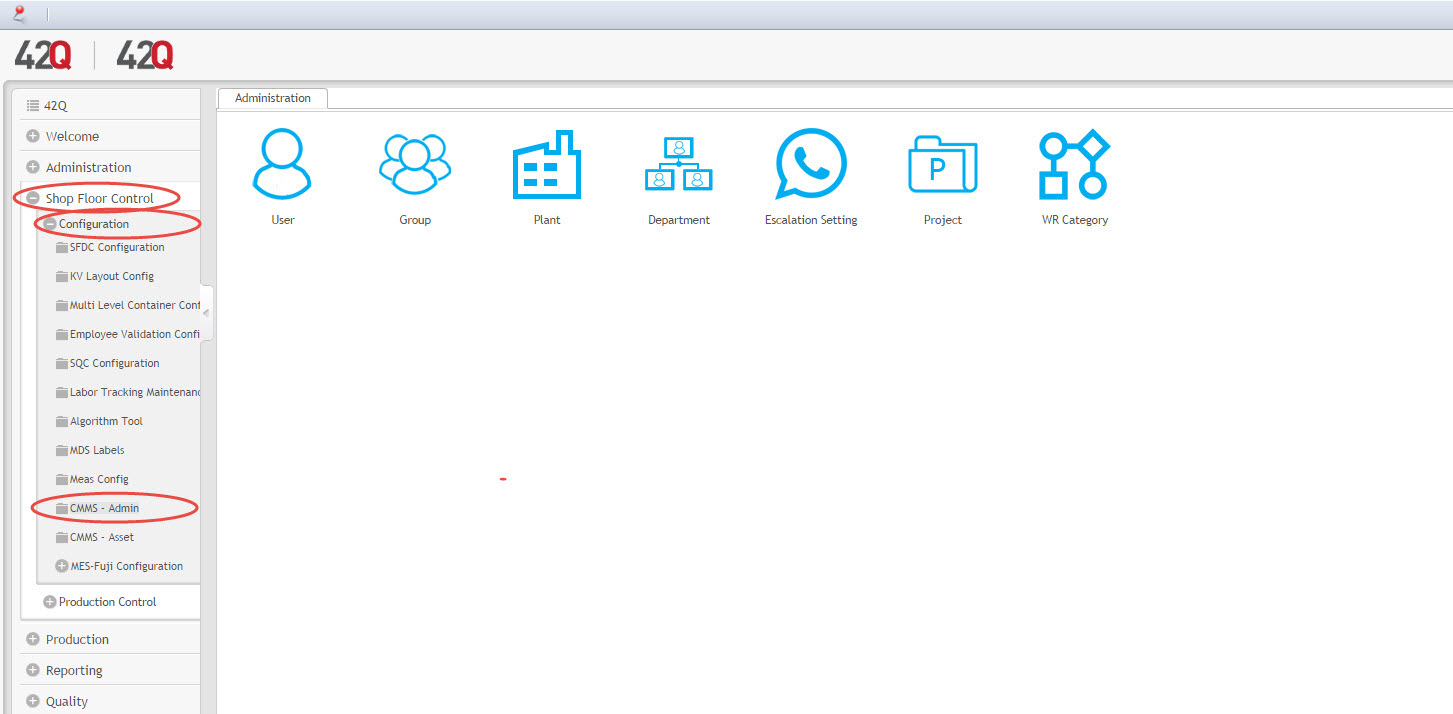
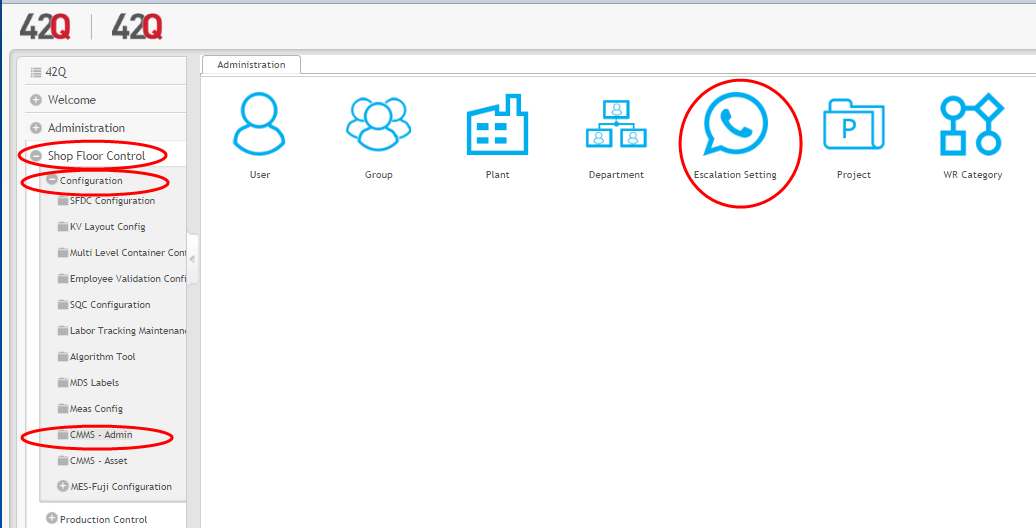
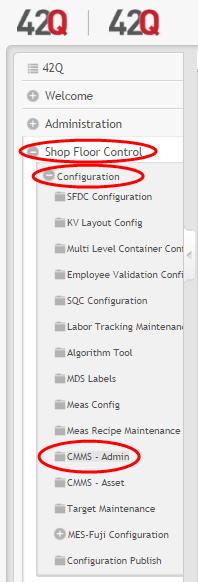
The CMMS Administration Module is accessed by select Shop Floor Control > Configuration > CMMS-Admin
Figure 1: CMMS Administration Module]
Now the user is able to access all available CMMS Administration sub-modules.
User
The main purpose of this sub-module is to import information from Liferay and allows users to view that information in order to assign for groups, escalation and WO. Only administrator users can access this feature.
1. To access User sub-module, navigate to CMMS-Admin > User.
Figure 2: User Administration
2. The User List displays all existing users.
Figure 3: User List
The user can search by: Active/Inactive, Email Address and User Name fields. Administrators canAdd Users or Edit existing User information.
Add a User
1. To add a user, select the green add icon located above the user list.
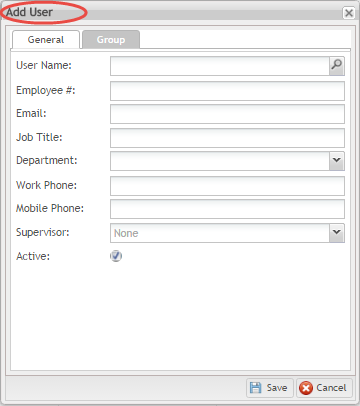
2. The Add User form displays:
Figure 4: Add User Form
There are two tabs available in the Add User.
General Tab
The General tab allows administrators to enter general information about the target user to be added to the local system.
1. To add a user, enter the following information into the General tab:
- User Name (Mandatory): Enter the universal account name of the target user. (Input format: First Name _Last Name)
- Email (Mandatory): Enter the SANM Gmail address of the target user. (Input format: First Name.Last Name@sanmina.com).
- Job Title (Optional): Enter corresponding job title of the target user.
- Department (Optional): Enter the department name to which target user belongs.
- Work Phone (Optional): Enter the office phone number of the target user. Include the extension number if the user cannot be reached by a direct line.
- Mobile Phone (Optional): Enter the mobile number of the target user.
- Supervisor (Optional): Select the correct supervisor for the target user from the drop-down list provided.
- Active (Optional): This checkbox allows administrators to enable or disable the target user. The default value is enabled. To disable the user, remove the check from the checkbox.
2. After entering all necessary information, select Save to confirm or Cancel to exit.
Group
The Group Tab allows Administrators to group users to handle category-based tasks.
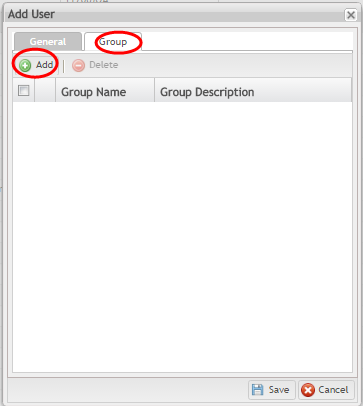
1. To assign a user to a group or groups, select the green Add icon from the groups tab.
Figure 5: Add User Group
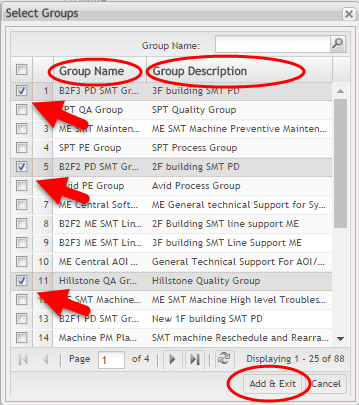
2. Place a check mark in one or more of the boxes to the left of the group names, then select Save.
Figure 6: Assign User to Group
Edit User
1. To edit an existing user, select the user from the User List page, and then select Edit.
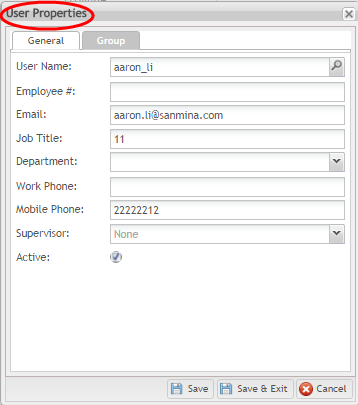
2. The User Properties form displays.
Figure 7: User Properties
3. The following options are available:
- Update general information of the selected user - General tab.
- Enable or disable the selected user - Check or uncheck the Active checkbox under General tab
- Update group information of the selected user- Group tab.
- Select Save & Exit after updating. Or, select Cancel to exit without saving
Enable/Disable User
The administrator can enable or disable a User from the user list.
1. To enable/disable a user from the user list, select the target user by placing a checkmark to the left of the email address.
2. Select the Enable/Disable icon located above the user list.
3. The blue checkmark that denotes active or inactive to the far right of the line of user's information will reflect the new inactive or active status.
Figure 8: Enable/Disable User
Export User List
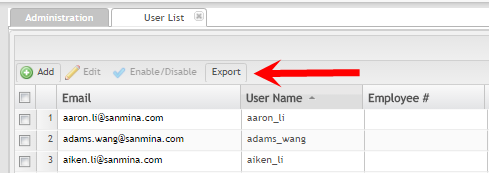
The user is able to Export the User List as it is displayed in the page in a .CSV format.
Figure 9: Export User List
1. Click on Export to save the file.
2. Open the .csv file.
3. A copy of the User List will open in a separate spreadsheet. It can be shared, printed, or saved to a desktop.
User data is listed according to some or all of the following fields:
- Email address: email address from the user register in the System (MES PORTAL);
- User name: First and last name from the user register in the System (MES PORTAL);
- Employee #: employee I.D. number (MES PORTAL);
- Job Title: title from the user register in the System (MES PORTAL);
- Department: user work department from the user register in the System (MES PORTAL);
- Work Phone: phone from the user register in the System (MES PORTAL);
- Mobile Phone: Mobile from the user register in the System (MES PORTAL);
- Supervisor: name and title of work supervisor from the user register in the System (MES PORTAL);
- Created by: name of administrator who originally entered user data into the System (MES PORTAL);
- Updated by: name of administrator who updated user information in the System (MES PORTAL);
- Update Date: date the administrator updated the User's information (MES PORTAL);
- Active: if user is disabled in the System, this information should be presented as unchecked. Otherwise, information will be presented as checked.
Group Maintenance
This section covers how to perform group maintenance in the Asset Management system. In this module, "group" refers to a group of users who handle the same category or categories of problems, requests or tasks. Therefore when creating a group, the user must have a clear concept of what categories the group will handle. In Group Maintenance, administrators can add, edit or delete groups as well as assign categories and users to a specific group.
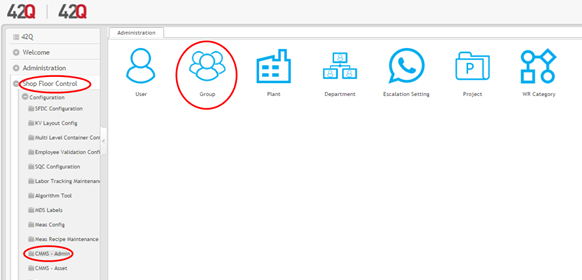
1. To access Group Maintenance, navigate to Shop Floor Control>Configuration>Admin>Group
Figure 10: Access Group Maintenance
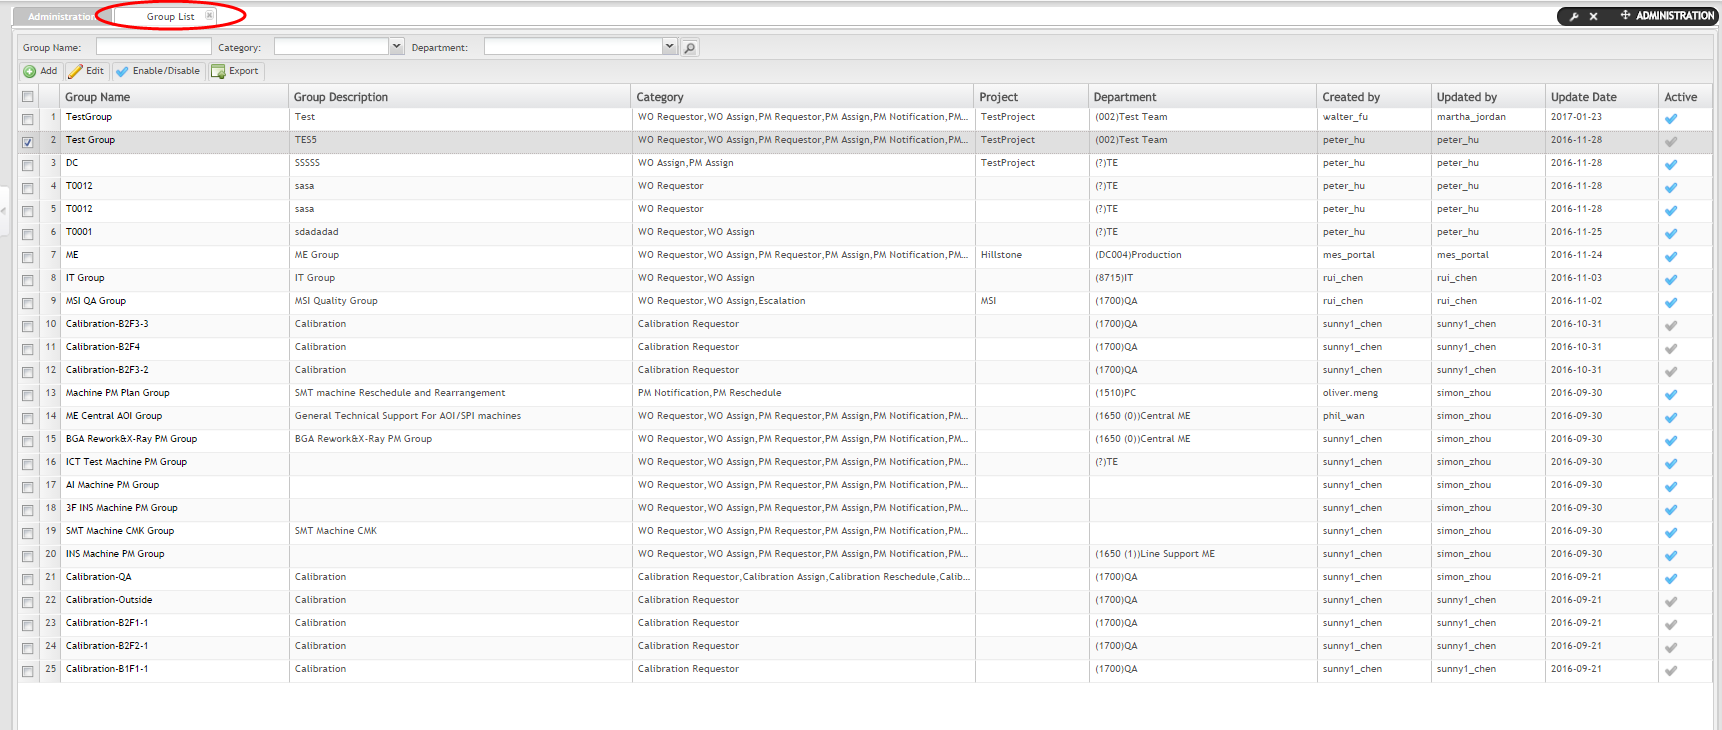
2. The Group List displays all existing groups. Multiple Administrative Modules may be open at the same time; the user can easily navigate between submodules with the tabs located across the top of the page.
Figure 11: Group List
Available Information includes:
- Group Name
- Group Description
- Category
- Project
- Department
- Active/Inactive Status
- Author
- Date of Creatioin
- Update Date
Users can Add, Edit, or Delete groups from the list and also Export the Group List in .CSV format for the purpose of sharing and/or printing. The .CSV spreadsheet can also be conveniantly saved on a desktop.
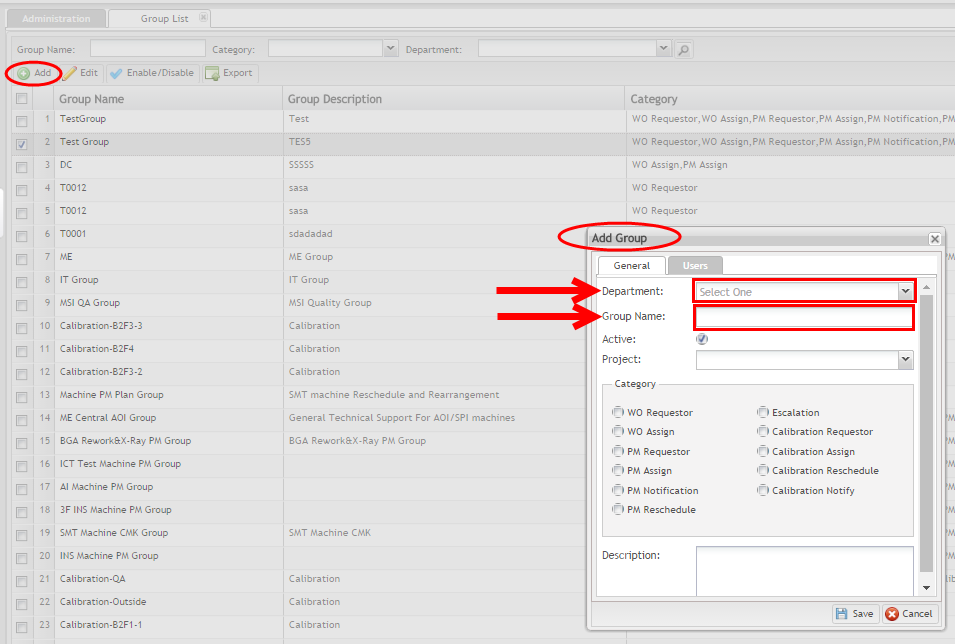
Add Group
1. To add a Group, select Add located above the Group List.
Figure 12: Add Group
2. The Add Group form will display:
3. Enter the following information:
- Department (Mandatory): Select a department from the drop down box provided.
- Group Name (Mandatory): The group name to be added to system.
- Active: Allows the user to enable or disable a group. Default value is enabled (active). To disable a group, uncheck the checkbox.
- Project: The name of the Project or Company affiliated with the Asset/Work Order
- Description (Optional): Additional details of the group.
NOTE: Groups with the same name are not allowed in the system.
4. If the user doesn’t want to assign a category to group or users, select Save to confirm or Close to exit, otherwise, fill out the information in the available tabs (Projec't'’s Category and Users).
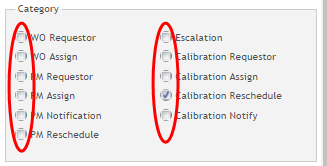
Assign Category to a Group
All existing categories will appear in the list under the Group’s Category tab. The administrator can assign a category to a group from this tab.
1. To assign a category to a group, place a check in the box to the left of the category name.
2. Select Save to confirm or Close to exit.
Figure 13: Assign Category to Group
NOTE: If there is not a proper category in the list, the user will need to create a category prior to completing this step. Categories are added in theWork Request Category Tab (See Add Work Request)
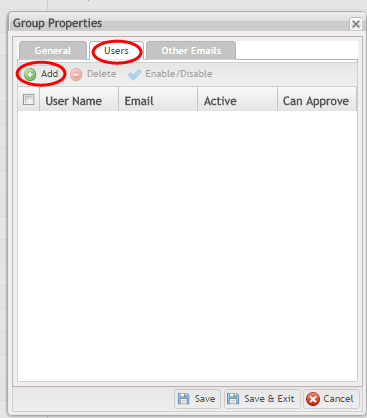
Assign Users to a Group
The administrator can assign users to a group from the Users tab.
1. To assign a user to a group, first select the Group by checking the box to the left of its name.
2. Choose the green Add icon.
Figure 14: Assign Users to Group
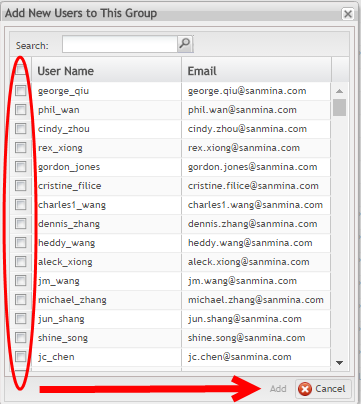
3. The Add User pop-up displays:
Figure 15: Assign Users to Group
3. Place a check in the box to the left of the User Name to be assigned to the group.
4. Select Add to confirm or Cancel to exit.
Figure 16: Add New Users to a Group
Delete Users from a Group
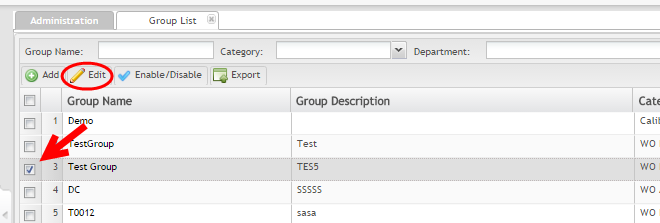
1. To delete a user from a group, first select the Group by checking the box to the left of its name.
2. Choose the Edit button on the top menu bar above the list.
Figure 17: Choose the Group
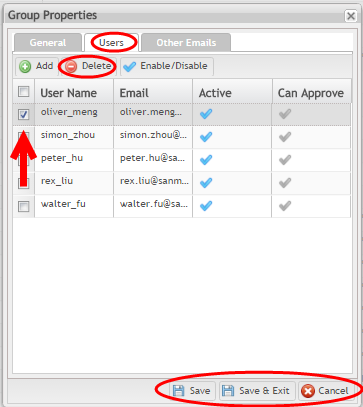
4. Choose Users tab.
5. Select the User you wish to delete by checking the box next to his/her name.
6. Choose Delete on the top menu bar.
7. SelectSave/Save&Exit to confirm.
Figure 18: Delete User from Group
Enable/Disable Users from a Group
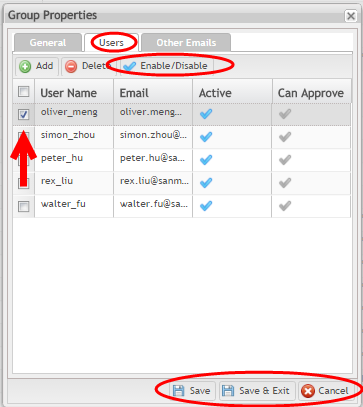
1. To enable or disable a user in a group, select the user from the User Name list and then select Enable/Disable.
If the checkbox is marked Active, it indicates that the user has permission to add and delete groups and users as well as schedule maintenance and repairs.
2. Select Save or Save and Exit to confirm or Cancel to exit without making changes.
Figure 19: Enable/Disable a User
Edit Group
1. To edit an existing Group, select the group from the Group Name List and then select Edit.
Figure 20: Edit A Group
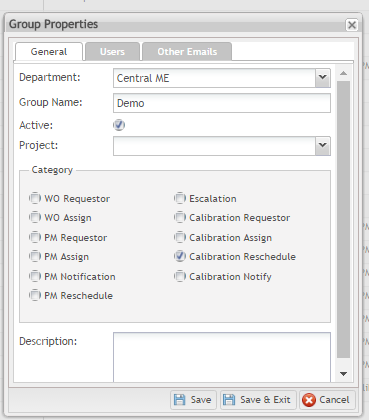
2. The Group Properties form displays:
Figure 21: Group Properties Form
3. The following items are available to update:
- The general information for the group in the General tab. (Group Name, Group Description)
- The active status. Check or uncheck the Active checkbox in theGeneral tab to enable or disable the group.
- Add or Delete users in the Users tab.
- The active status of the users in the group in the Users tab.
- Add or Delete Emails in the Other Emails tab.
4. After updating, select Save and Exit to confirm. Select Cancel to exit without updating.
Attention: It is not allowed inactive group if it is being used by Preventive Maintenance, Asset (so unless the group is defined as default), Work Order with status (ASSIGNED, WIP, WAITING_FOR_PARTS, WAITING_FOR_BUY_OFF), Location (unless the group is defined as default) or Production line (unless the group is defined as default)
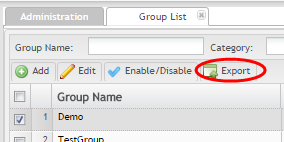
Export A Group List
To export the details of a Group in .CSV format, check the box next to the desired group.
Choose the Export button on the top menu bar.
A .CSV will download to your computer to easily share, store, or print.
Open the .CSV file to view details in spreadsheet format.
Figure 22: Export A Group List to a .CSV file
Plant Maintenance
This section covers how to perform plant maintenance in the CMMS system. In Plant Maintenance, administrators can add or edit plants as well as enable or disable plants.
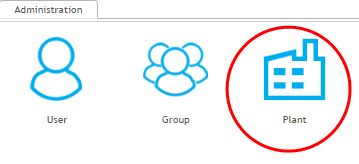
1. To access plant maintenance, navigate toAdministration > Plant.
Figure 23: Access Plant Maintenance
2. The Plant List displays all existing plant types. Multiple Administrative modules may be open at the same time and are easily navigated with the tabs located at the top of the page.
Figure 24: Access the Plant List
Figure 25: Plant List
Add Plant
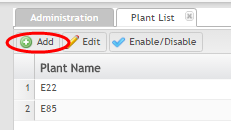
1. To add a plant, select Add located above the Plant Name list.
Figure 26: Add Plant
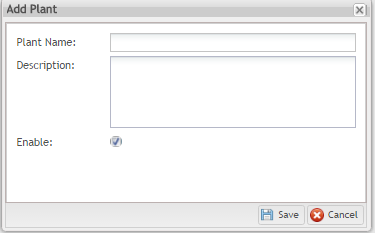
2. The Add Plant Form displays:
Figure 27: Add Plant Form
3. To add a plant, enter the following information:
- Plant Name- the name of the plant to be added to the plant list.
- Description- Additional plant information.
- Enable- By default, the screen will choose "Enable." Leave checkbox filled to enable plant, or remove the checkmark to disable the plant.
4. Select Save to add the plant to the plant list. Select Cancel to exit.
Edit Plant
1. To edit a plant, select the plant from the plant name list by clicking on the field. Doing so will darken the line.
2. Once highlighted, select Edit.
Figure 28: Edit Plant
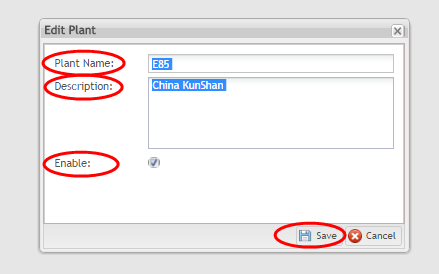
3. The Edit Plant Form displays:
Figure 29: Edit Plant Form
3. The user can update the following:
- Plant Name;*Description;
- Plant Status (Active status is denoted by a checkmark in the Enable field field.);
4. After updating, select Save and Exit to confirm. Select Cancel to exit without updating.
Enable/Disable the Plant
1. To enable or disable a plant, select the plant from the Plant List.
2. Select the Enable/Disable button located above the plant list.
Figure 30:Enable Disable Plant
3. If the plant is disabled, selecting theEnable/Disable button will disable it. Similarly, if the plant is disabled, selecting the Enable/Disable button will enable it. A blue checkmark denotes an enabled plant; a grey checkmark denotes a disabled plant.
Department Maintenance
This section covers how to perform department maintenance in the Asset Management system. In Department Maintenance, administrators can add or edit departments, and view department hierarchies.
1. To access Department Maintenance, navigate toShop Floor Control>Configuration>CMMS Admin>Department.
Figure 31: Access Department Maintenance:
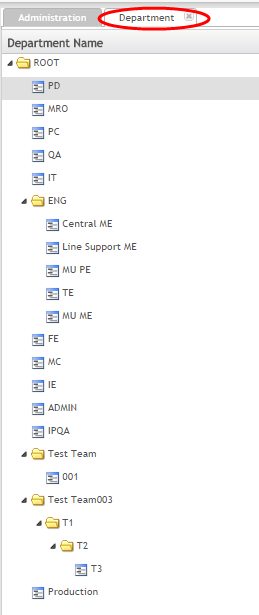
2. Navigate to the appropriate Department icon. Multiple Administrative modules may be open at the same time and are easily navigated with the tabs located at the top of the page.
Figure 32: Department Maintenance Submodule
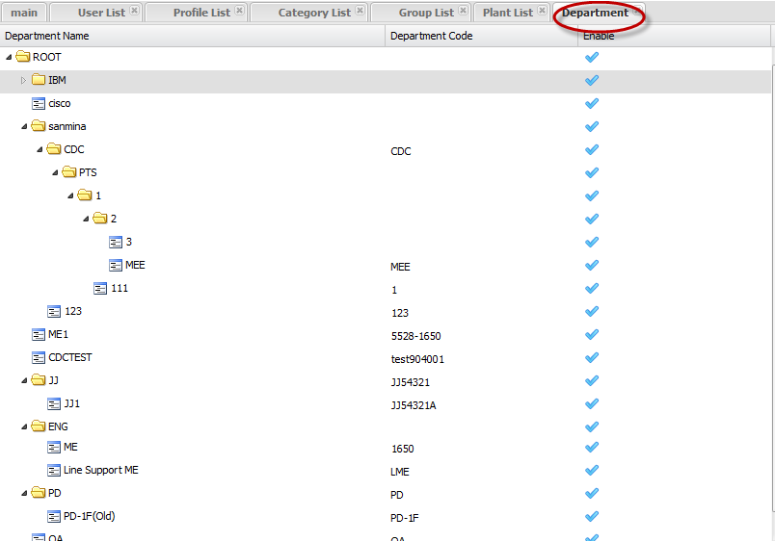
3. A Department Name List displays with all added departments located under parent nodes in a tree level format.
Figure 33: Department Name List
1. The user can search by:
- Active/Inactive;
- Name;*Code;*Parent Department
2. Users can Add, Edit, View or Delete departments from the list and also Export the department list as it is displayed in the page in .csv format.
Add Department
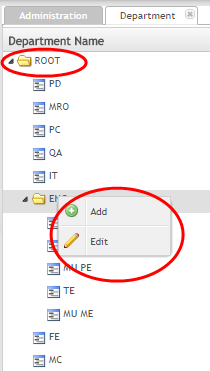
1. To add a department, click on the parent node. Parent Nodes are indicated with a distinctive yellow file folder icon.
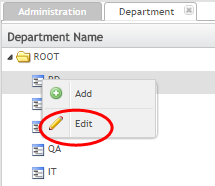
2. A pop-up menu displays with the Add and Edit functions.
3. Select the Add function from the pop-up menu.
Figure 34: Add Department
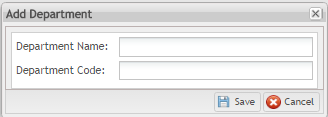
4. Once chosen, Add Department Form displays:
Figure 35: Add Department Form
5. Enter the Department Name and the Department Code and then select Save. The department will be added as a child node of the item selected as the parent node. The department will appear underneath its parent (indicated by a yellow file folder); Departments are represented with a blue notebook icon.
6. Select Save to confirm. Select Cancel to exit.
NOTE:The maximum level of the tree is six. As a warning, the Add button will be disabled for the sixth level.
Figure 36: Six Levels
Edit Department
1. To edit a department, choose the department and select Edit.
Figure 37: Edit Department
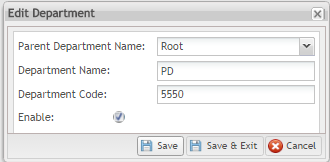
2. The Edit Department form displays:
Figure 38: Edit Department Form
NOTE: The ROOT node cannot be changed.
3. The following items are available to update:
- Parent Department Name (Mandatory): Displays all available departments in the local system. Select the parent department name that will be the new parent department of the item to be updated.
- Department Name (Mandatory): Enter the department name to update.
- Department Code (Mandatory): Enter the department code to update.
- Enable (Mandatory): Toggle the check box to change the active status. NOTE: If the user disables one department, all of the children departments associated with it will automatically disable.
4. After updating, select Save and Exit to confirm.
5. Select Cancel to exit.
Delete Department
1. To delete an existing Department, select the department from the Department list and then select Delete.
2. The confirmation message displays.
3. Select Yes from the confirmation prompt to confirm, or No to exit.
Escalation Maintenance
This section covers how to perform escalation setting maintenance. Whenever an asset fails or a work order has been in a certain status for too long, higher levels of authority need to be notified to expedite maintenance. If maintenance fails to respond, additional levels must receive notification of the problem. Escalation setting allows the administrator to create, edit or delete escalation settings.
1. To access Escalation Setting,Shop Floor Control>Configuration>CMMS Admin>Escalation Setting. Multiple Administrative modules may be open at the same time and are easily navigated with the tabs located at the top of the page.
Figure 39: Escalation SettingList
2. The Escalation List displays all existing setting types.
Figure 40: Escalation List
The user can search by: Setting Type, Project and Location fields. The user can ADD, EDIT or DELETE escalations from the list.
Add Escalation
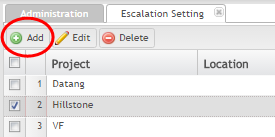
1. To add an escalation, select Add located above the Setting Type list.
Figure 41: Add Escalation
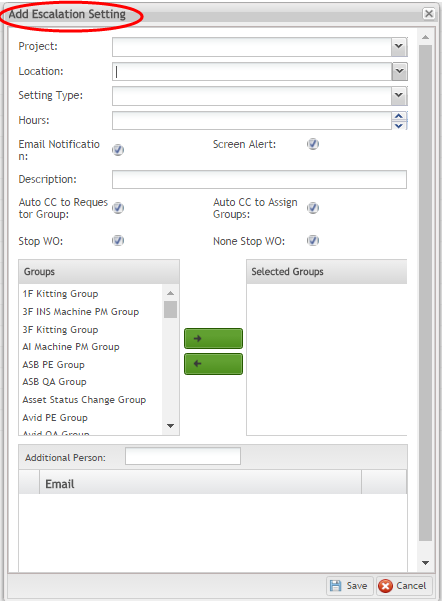
2. The Add pop up displays:
Figure 42: Add Escalation Pop-Up
3. Enter Project - Select the Project Code associated with the escalation setting from the drop down list provided. This field is optional. However, if null, the escalation setting will be a default escalation setting. This means every work order, with or without a project code, has to send emails and/or alerts according to this setting. If given a code, this escalation setting is operated only by work orders with the same project code.
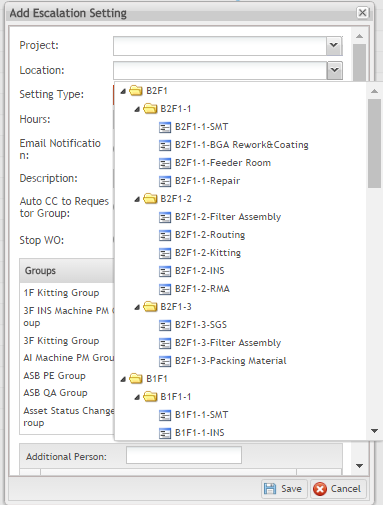
4. Enter Location - drop down tree with all locations available in the system. The location field is a configuration that will be used in other modules like Asset, Escalation, Work Order. For further information see the specific User Guides – for Admin Module this field is optional. When configuring the Production Line in the Asset Module, the rule is: only available to locations in the 3rd level and in the list all Locations 3rd levels, as defined:
- Building - Should be the 1st level from location;
- Floor - Should be the second level from location;
- Shop Floor - Should be the 3rd level from location
Figure 43: Add Escalation Setting: Location
5. Enter Setting Type from the following options, provided in a drop-down box:
- Machine Down: if the corresponding asset has broken down for more than the specified time (defined in the "Hours" field below), send an email or alert the specific group (defined in "Group" tab below).
- Assigned: if the specific work order has been in "Assigned" status for more than the specified time, send an email or alert the specific group.
- Work in Progress: if the specific work order has been in status "Work in Progress" for more than the specified time, send an email or alert the specific group.
- Waiting for Parts: if the specific work order has been in status "Waiting For Parts" for more than the specified time, send an email or alert the specific group.
- Waiting for Buy-off: if the specific work order has been in status "Waiting For Buy-off" for more than the specified time, send an email or alert the specific group.
Figure 44: Setting Type Drop-down Box
5. Enter Additional Information in provided fields:
- Hours- Enter the amount of time maintenance has to change the status of the work order (time in hours).
- Email Notification- The default is selected. If the user does not want an email notification, remove the checkmark from the box provided.
- Screen Alert- The default is selected. If the user does not want a screen alert, remove the checkmark from the box provided. The alert information appears on the dashboard. If selected, this escalation setting will send alerts on the dashboard once the setting condition is satisfied. If not, no alert will be sent.
- Auto CC to Requester Group-The default is selected. If Requesters do not need to receive a copy of the alert, remove the checkmark.
- Auto CC to Assign Groups-The default is selected. If Assigned Groups will not receive a copy of the alert, remove the checkmark.
- Group Tab- Select the group associated with the escalation setting. It is possible choose more than one group. This will be the receiver of the e-mails or alerts.
- Stop WO-
- None Stop WO-
Additional emails- Send e-mails to other personnel or administrators. This is a good choice for alerting administrators outside of the department.
5. Select Save to add the escalation setting. Select Close to exit without saving.
NOTE: The system will not allow two escalations with the same Setting Type and Project. Choose naming conventions accordingly.
Edit Escalation
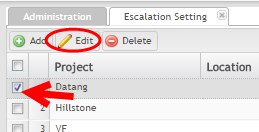
1. To edit an escalation, select the Project from the list and then select Edit.
Figure 45: Edit Escalation
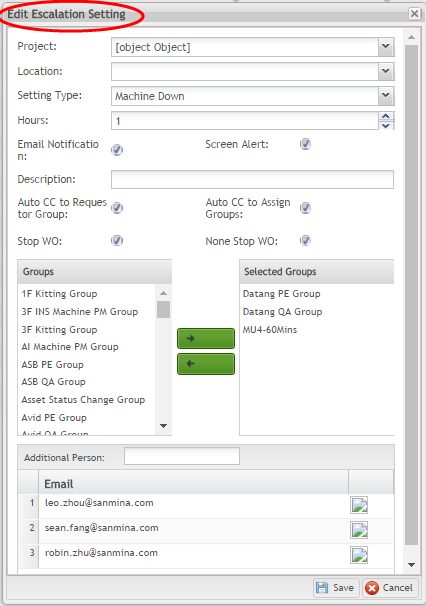
2. The Edit pop up displays:
Figure 46: Edit Escalation Pop-Up Menu
3. All fields are available to update. After updating, select Save to confirm or Close to exit without saving.
Delete Escalation
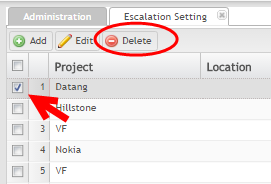
1. To delete an escalation setting, select the setting type from the list and then select Delete.
Figure 47: Delete Escalation
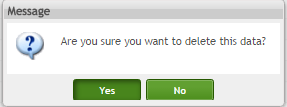
2. A confirmation pop-up will display:
Figure 48: Delete Escalation Confirmation
3. Select Yes to confirm or No to cancel.
Project
This section covers Project Maintenance. This section provides add, edit and delete functions for project codes used in the Escalation section.
1. To access Project Maintenance, navigate to Shop Floor Control>Configuration>CMMS-Admin>Project. Multiple Administrative modules may be open at the same time and are easily navigated with the tabs located at the top of the page.
Figure 49: Project Maintenance
2. Navigate to Project Maintenance with the helpful Icons located within the Portal. Multiple Administrative modules may be open at the same time and are easily navigated with the tabs located at the top of the page.
Figure 50: Project Icon
3. The Code list displays all existing code types.
Figure 51: Code List
Add Project
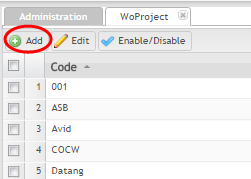
1. To add a project, select Add located above the Code list.
Figure 52: Add Project Code
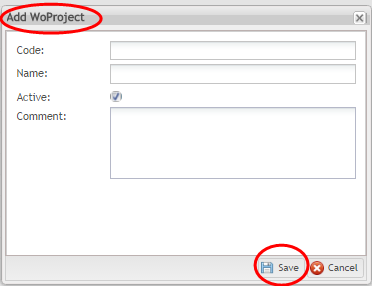
2. The Add WO Project Form displays:
Figure 53: Add WO Project Form
3. To add a Project, enter the following information:
- Code- an acronym that facilitates the identification of the plant.
- Name- the name of the project.
- Active- The default is selected. If the user wants to deactivate the project, remove the checkmark from the box provided.
- Comment- any additional information needed for the project.
4. After entering all necessary information, select Save to confirm addition. The new project will appear in the Code list on the main Project screen.
5. Select Cancel to exit without saving.
Edit Project
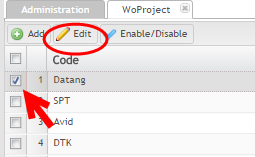
1. To edit a project, select the project from the list and then select Edit.
Figure 54: Edit Project
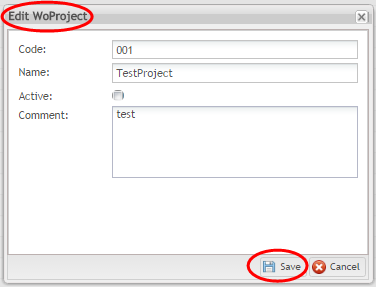
2. The Edit pop up displays:
Figure 55: Edit Project Pop-up Menu
3. All fields are available to update. After updating, select Save to confirm or Cancel to exit without saving.
Enable/Disable A Project
1. To enable or disable a project, select the project code from the list and then select Enable/Disable.
Figure 56: Enable/Disable Project
2. If the project is enabled, selcting the Enable/Disable button will disable it. If a proj3ect is disabled, slecting the Enable/Disable button will enable it.
3. Once disabled, the Active field to the far right of the screen will display a grey checkmark. Active (or Enabled) projects display with a blue checkmark in the Active field.
NOTE: The system verifies if project is being used in another table. If so, it is not possible to delete and a warning message is displayed.
Work Request Category
This section covers how to perform category maintenance in the CMMS system. In CMMS, work orders, work requests and purchase requests will be assigned to user groups based on categories. This ensures the appropriate users have the appropriate information. In Category Maintenance administrators can add, edit, or delete categories.
Access
1. To access Work Request Category navigate to: Shop Floor Control>Configuration>CMMS-Admin>Work Request Category.
Figure 57: Work Request Category
2. Choose the WR Category icon to enter the submodule.
Figure 58: Work Request Category Icon
Add a Work Request Category
1. To Add a new WR Category choose the green Add button on the top menu bar.
Figure 59: Add Work Request Category
 2. A pop-up menu bar will display:
Figure 59: Add WR Category Form
3. Here, administrators may choose among the following options:
Category: Name the new Category
Approve Required: Approval is required by default. Uncheck the box to remove required approval.
Add Approval User: Choose a User from the drop down bar.
Approval Path: Specify the Approval Path.
Description: Add additional information regarding the Work Request Category.
Groups: Move preconfigured groups from the group list to the Assigned Group List.
4. Choose Save to add the new WR Category or Cancel to exit without saving.
Edit Work Request Category
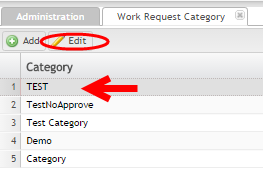
1. To Edit Work Request Categories, highlight the line you wish to Edit by double clicking. The line will turn grey.
2. Choose Edit.
3. A pop-up menu will display.
Figure 61: Edit WR Category Form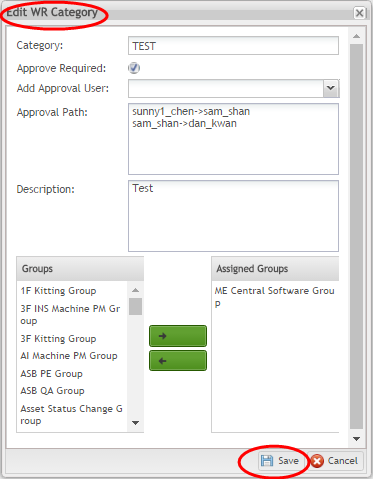
3. Users can reassign Groups or change approvals and descriptions using the Edit WR Category Form.
4. Choose Save to confirm changes or Cancel to exit without saving.
Document Revision History
| Date | Author | Title | Version | Change Reference |
| 09/01/15 | Elaine Fonaro | Technical Writer | v 1.0 | This is the first revision of CMMS Administration for Cirrus |
| 03/16/16 | Elaine Fonaro | Technical Writer | v 1.0 | Added information about Location Field. |
| 03/23/16 | Elaine Fonaro | Technical Writer | v1.0 | Added Attention notes regarding Deactivate Department/Group (editing functionality) and Delete Group. |
| 04/18/2016 | Elaine Fonaro | Technical Writer | v1.0 | Added the Export Functionality for User, Group, Department, Escalation and Project sub-modules; Update images: 03, 05,8, 9, 10, 4,18, 19, 20, 21 and 24. Added the business rules for Activate/deactivate functionalities. |
| 02/01/2017 | Martha Jordan | Technical Writer | v1.0 | Recreated document to match new functions in Portal. |

