SOP-MES0035 Admin Shop Floor Control Administrator
42Q Home > Administration > Shop Floor Control Administrator
Contents
Introduction
Administrative privileges in 42Q are located in the Administration menu heading.With the portal, Administrators are able to access privileges from one convenient location.
Administrators can access privileges from one convenient location.
Privileges include:
- User Maintenance
- Plant Maintenance
- Site Maintenance
- Profile Maintenance
- Generic Attribute Maintenance
This SOP is intended to guide administrators in managing and maintaining 42Q, as well as to provide an overview of 42Q’s operation.
To access any of the Administration functionalities, the user must sign in to 42Q with their Username and Universal password, then select the Administration expandable heading located in the menu on the left of the screen.
Shop Floor Control Administrator
Within Shop Floor Control Administrator, users configure necessary devices, servers, applications, and workstations for use on the production shop floor. Administrators also define how shop floor data will be downloaded into the Shop Floor Control system and define user permissions for each server.
The following portlets are available for configuration within Shop Floor Control Administrator. Each portlet is described in greater detail in this SOP.
- Android Device Maintenance
- Device Maintenance
- Download & Services
- Input Device Status
- NetDC Status
- System Logs
- Task Scheduler
- SSH Logins Maintenance
To access Shop Floor Control Administrator, navigate to Administration > Shop Floor Control Administrator
Android Device Maintenance
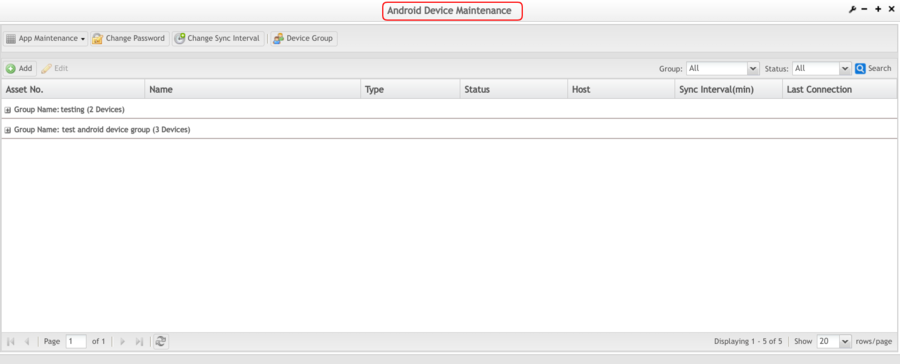
Android Device Maintenance is the primary module for managing the tablets to which the Package Maintenance applications are pushed. The Android Device Maintenance main page lists the Android devices according to the following properties:
- Asset No.: The Asset Number for the device listed.
- Name: The Name given to the device listed.
- Type: The type of device listed.
- Status: The Active or Inactive status of the device listed.
- Host: The device IP for the device listed.
- Sync Interval: The time interval (in minutes) of the device listed.
- Last Connection: The date and time of the last communication of the device listed.
The primary functions of the Device Maintenance module are displayed in the menu bar and include; Add Device Detail, Edit Device Detail, App Maintenance, Change Password, Change Sync Interval, Device Group.
Figure 1: Android Maintenance
Add a Group
Before a device can be added, the user must configure the Group(s) to which the device is assigned. To create a group:
Select Device Group from the menu bar. The user is directed to the group page that lists the Name and Descriptions of any existing groups.
Figure 2: Device Group
Add Device Group
This feature will allow the user to go Back, Add and Delete.
- Select Add from the new menu bar. A new row appears at the top of the list.
Figure 3: Device Group Page
- Enter the Name and the Description of the new group.
- Select Save to add the new group. Otherwise, select Cancel to abort the process.
Note: Editing of entries can be performed by double-clicking a group from the list. The row becomes editable, and the user can change the group name and description.
Note: It is recommended to use an intuitive, consistent naming convention for groups (e.g., format plant_building_area).
Delete a Group
Groups may be deleted from the group list:
- Select a group from the list by checking its corresponding box.
- Select Delete from the menu bar. This removes the group.
Note: Select Back to return to the Android Device Maintenance main page.
Add Device Detail
To add a device,
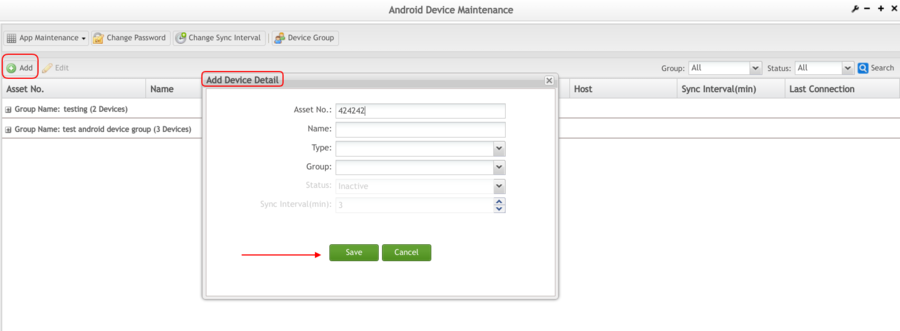
1. Select Add from the Android Device Maintenance menu bar. This opens the Add Device Detail window.
Figure 4: Add Device
2. Enter the Asset Number of the device to be added.
3. Provide a Name for the device.
4. Select a Group to which the device will belong.
Edit a Device
To edit a device, from the Android Device Maintenance main page:
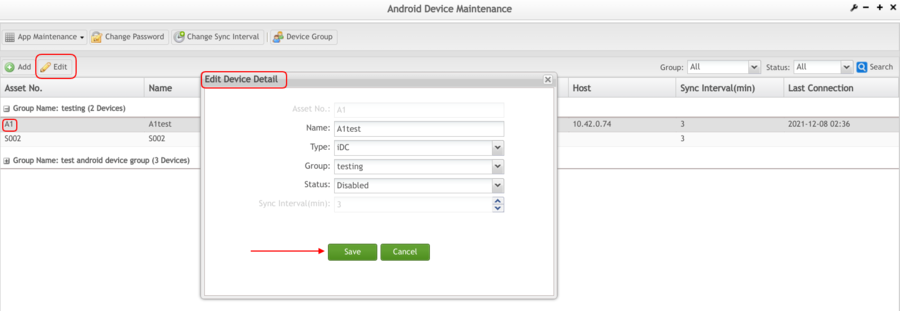
1. Check the box of a device from the list. The Edit function becomes available. Select Edit.
2. The Edit Device Detail window pops up. The Asset No. is displayed and the Sync Interval, but neither is editable.
Figure 5: Edit Device Window
3. The user may edit the following fields: Name, Type, Group, andStatus.
4. When the changes are complete, select Save to keep the changes or Cancel to abort.
App Maintenance
App Maintenance is used to manage applications in tablets within a group. Within this submodule, users schedule installation time for the configured tablets; applications will automatically be installed on the selected tablet according to the schedule chosen. To use this function:
- Select App Maintenance from the menu bar.
- Select the Group from the drop-down menu bar.
Figure 6: App Maintenance Selection
- The system directs the user to the applications assigned to the selected Group.
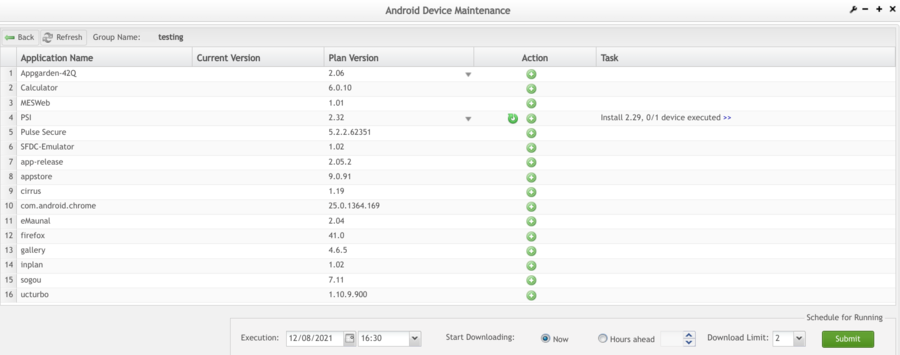
- The user may now take actions to install, remove, schedule, or cancel updates for scheduled applications, by using the icons on the Action column Remove App
 Install App
  Cancel Task
Figure 7: App Maintenance Screen
Schedule Installation
- Enter a Date and Time in the Execution field on the bottom menu bar
- Select the green plus action button.
- Once selected, the task is noted in red text to the right of the icons.
- Select the green Submit icon on the far right, lower menu bar to confirm the installation of the application.
Schedule Uninstall
- Enter a Date and Time in the Execution field on the bottom menu bar
- Select the red minus action button.
- Once selected, the task is noted in red text to the right of the icons.
- Select the green Submit icon on the far right, lower menu bar to confirm the update/removal of the application.
Note: Once Field IT has scheduled a push for an APK installation, users can select a time and date to download the APKs before the installation time and date. It is recommended that users schedule APK downloads outside production scanning peak times to avoid impacting network bandwidth.
Note: Be sure to note any time zone differences when scheduling applications.
Change Password
The Change Password function allows for changing the password for the Appgarden login. This function applies to all devices. To use this function,
1. Select Change Password from the menu bar. The Info window pops up prompting the user to enter a new password for all devices.
2. Enter the password in the field provided and select OK to save the new password or select Cancel to keep the old password.
Figure 8: Change Password
Change Sync Interval
The Change Sync Interval function allows the sync interval to be changed on all devices. To use this function,
1. Select Change Sync Interval from the menu bar. The Info window pops up.
2. Enter the new sync interval number (in minutes) into the field.
3. Select OK to save the new interval or select Cancel to revert to the previous interval.
Figure 9: Change Sync Interval
Device Maintenance
To access the Device Maintenance page, navigate to Administration > Shop Floor Control Administrator > Device Maintenance.
- Users may search according to Shop Floor ID, Device ID Category, or Device Title. Filters are located across the top menu bar. Select the Green Search Icon.
- Export a full report by selecting the Device ID (Double click on the line of text), then choose Export Report. A full report downloads onto the user’s local drive.
Figure 10: Device Maintenance Main Page
Device Maintenance Report
Export a Device Maintenance
To obtain a full report from a specific Shop Floor ID, follow these steps:
- Select a Shop Floor ID Name from the dropdown list in the dialogue box. \
- Select Export to obtain a full report from the selected Shop Floor ID. A full report downloads onto the user’s local drive.
Import Device Maintenance Reports
To add a report from a specific Shop Floor ID, follow these steps:
- Select a Shop Floor ID (Name) from the dropdown list from the Device Maintenance Form.
Note: The Import button will be disabled until Shop Floor ID (Name) is selected and browsed in the Device Maintenance Form.
- Select the Import button. A pop-up window will appear with a file browser.
- Select Browse to upload the CSV file with the Device Information. Once the file has been selected, the CSV file address will appear in the box.
Note: The imported Name (Shop Floor ID) in the CSV file must be the same as what is browse in the Device Maintenance.
- Select Import to begin with the uploading.
Note: The import files are based on the export template, it is required that the import file header matches exactly the export template header.
Figure 11: Upload a CSV file
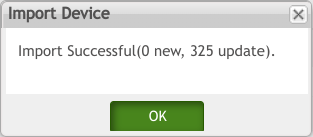
Once the uploading process has been completed, a dialogue box will appear with the updated status about the CSV Imported file.
- Select OK when the upload is complete.
Figure 12: Import Device Complete
Update Device Information
A list of available devices will be displayed according to the device number. The following categories will be available by double-clicking on the device row.
- Device ID: Displays the Customer input by the user
- Device Code: Displays all device IDs connected to the Shop Floor Control host. *based on SDE configuration
- Device Type: Desktop, Android and NetDC
- Port: Input target Ship Flor Control port number. Usually, the default value is "18000".
- Description: Fill in further details about the location.
- Station ID: Name was given to a group of device numbers available to a user at a specific station.
- Ip/Mac Filter: This function is mainly for Shop Floor Control IP and MAC address filters.
- Active: Check the box to activate the selected client in the DC emulator. Yes indicates the client is activated and No means inactive.
* Device, Type, Port, Description, Station ID, and Active are the only categories that can be edited.
Figure 13: Device ID/Description/Station ID
Filters
By selecting on theIP/MAC Filter icon, a form displays allowing the administrator to add or delete filters.
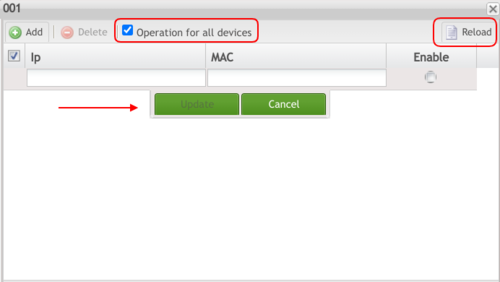
1. A 001 form displays allowing the administrator to add or delete filters.
2. To add a filter, select the Add icon.
3. Enter either the IP and/or the MAC address and click the Activate checkbox, and then select Update.
Figure 15: Enter IP and/or MAC Address
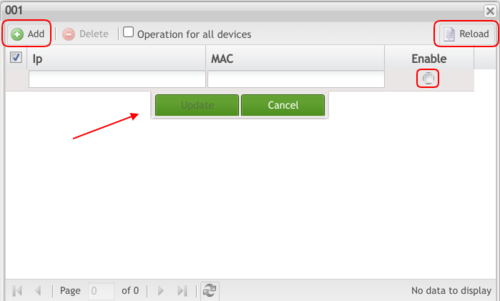
4. Enter the IP or MAC address and mark the tick box beneath “Enable”, then select Update.
5. Select the Reload button to restart the tomcat service, and enable the change.
6. Check the Operation for all devices checkbox to implement the filter for EVERY device.
Figure 16: Reload and Operations Options
7. To delete a filter, select the filter from the list and then select Delete.
8. When adding or deleting is complete, exit the form to return to the device list.
9. If changes are made, select the Update button to save the changes. Otherwise, select Cancel to return to the list.
Download and Services
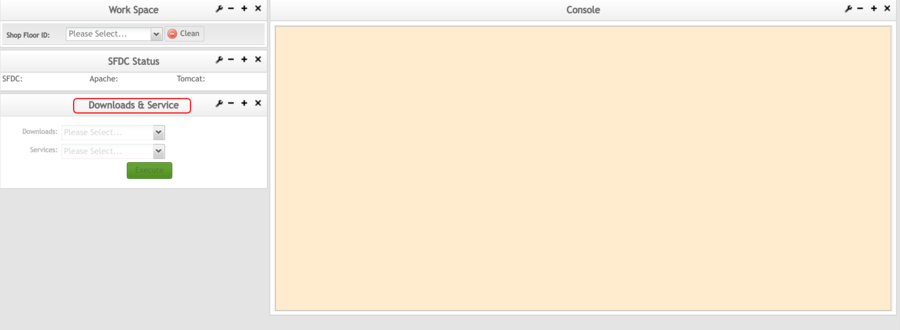
- To access the Download and Services page, navigate to Administration > Shop Floor Control Administrator > Download and Services.
Figure 17: Download and Services
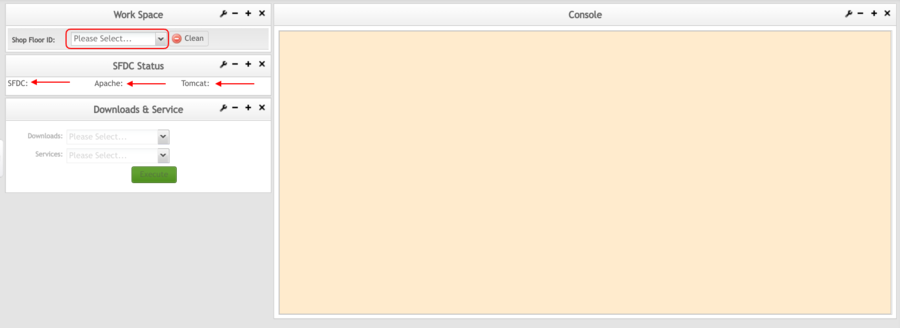
Select a Shop Floor ID from the drop box at the top of the main screen.
Before proceeding, Shop Floor Control, Apache, and Tomcat will all validate the ID.
Figure 18: Downloads and Services Validation
Once the Shop Floor ID has been validated, the following Actions and Downloads drop-down boxes will be available:
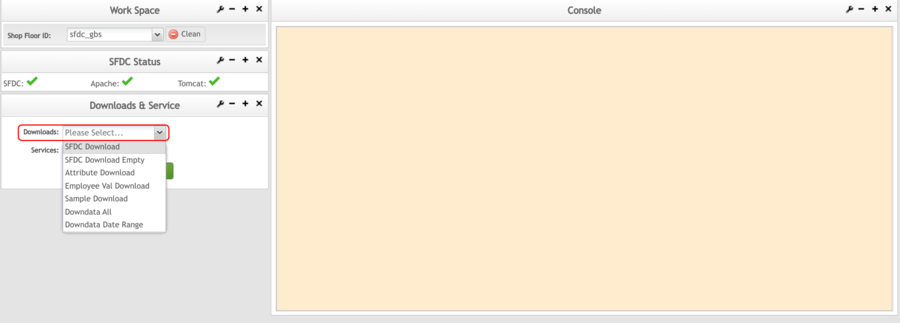
Downloads
Figure 19: Downloads Drop Down
- Shop Floor Control Download: Is used to download configuration changes made in MES to the local database on the Shop Floor Control PC. This is done through a proxy. SFDCDNLD can be run without stopping the Shop Floor Control service. This allows production to continue to run while the download is performed. Once the SFDCDNLD command has been completed, a Restart command is used to put the downloaded changes into effect, minimizing the amount of downtime required for changes to be made to the system.
- Shop Floor Control Download Empty: Performs an empty download, clearing out the current configuration from the Shop Floor Control PC. Useful if changing the Shop Floor Control PC configuration from one line to another.
- Attribute Download : Used to download the Attribute Definition configuration from the MES server to the local database on the Shop Floor Control PC. This is done through a proxy. ATTRIBUTEDNLD can be run without stopping the Shop Floor Control service. This allows production to continue to run while the download is performed. Once the ATTRIBUTEDNLD command has been completed, a Restart command is used to put the downloaded changes into effect, minimizing the amount of downtime required for changes to be made to the system. ATTRIBUTEDNLD does not download any Shop Floor Control configuration changes, only those made to the Attribute Definition module in MES.
- Employee Val Download: Is used to download Employee Validation configuration changes made in MES to the local database on the Shop Floor Control PC. This is done through a proxy. EMVDNLD can be run without stopping the Shop Floor Control service. This allows production to continue to run while the download is performed. Once the EMVDNLD command has been completed, any changes will take effect immediately, alleviating any Shop Floor Control downtime. Unlike SFDCDNLD, the Shop Floor Control service does not need to be stopped and restarted for the changes to take effect. EMVDNLD does not download any Shop Floor Control configuration changes, only those made with the Employee Validation module in MES.
- Sample Download : Used to download Sampling Configuration changes made in MES to the local database on the Shop Floor Control PC. This is done through a proxy. Unlike SFDCDNLD, the Shop Floor Control service does not need to be stopped and restarted for the changes to take effect.
- Downdata: All Is used to retrieve all the WIP serial numbers and information from the MES server. This is typically required if an upgrade was performed to Shop Floor Control, as the local database is typically updated with a new database. Downdata does not run by proxy, therefore it requires that the Shop Floor Control service be stopped in order to download the WIP data. Depending upon the amount of WIP, this operation can take a significant amount of time, thereby requiring Shop Floor Control to be down for the duration.
- Downdata Date Range: Is used to retrieve the WIP serial numbers and information from the MES server for a specified date range. This is typically necessary if an upgrade was performed to Shop Floor Control, and only a portion of the MES data is to be downloaded to the local database. Downdata does not run by proxy, therefore it requires that the Shop Floor Control service be stopped in order to download the WIP data. Depending upon the amount of WIP, this operation can take a significant amount of time, thereby requiring Shop Floor Control to be down for the duration.
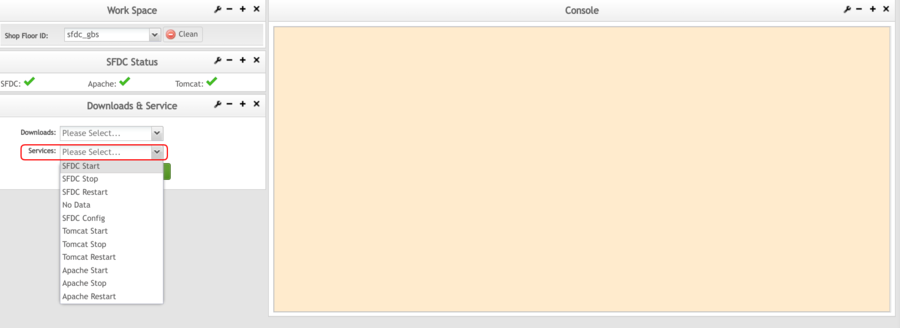
Services
Figure 20: Services Drop Down
Note: Once the action has been executed, other actions can be performed. However, if the user needs to also perform a download, the process will have to be restarted. (Download and Services>Select the Shop Floor ID> ID validated> select the Downloads drop-down box. The same process applies after performing downloads).
- Start: Used to start the Shop Floor Control service if it is not running.
- Stop: Used to stop the Shop Floor Control service. This is typically done to perform subsequent operations such as an upgrade to resolve a problem that might have occurred.
- Restart: Used to stop and start the Shop Floor Control service. This is typically required when an SFDCDNLD command is run, which can occur without stopping Shop Floor Control. In order for the downloaded changes to take effect, the Shop Floor Control service must be stopped and restarted. Restart can also be used in place of the Start command to start the Shop Floor Control service, once it has been stopped.
- Nodata: Used to remove all the local WIP information from the local database on the Shop Floor Control PC. Nodata is not recommended unless a specific reason requires it. All Yield and Defect information is also deleted from the Shop Floor Control PC. After a Nodata command has been run, each serial number scanned into Shop Floor Control requires that the unit information be pulled from the MES server. This can drastically slow down production, as each serial number must be retrieved from the MES server when it is scanned the first time.
- Shop Floor Control Config: Used to configure the Shop Floor Control PC. When launched, the user will be prompted for the following items: MESUSER
MESUSER
MESHOST
MESIP
MEASIP
MEASDB
SAVE_DATA_DAYS
AUTO_DEL_TIME
DB_VACUUM_TIME
IP FILTER Y/N
MULTI_THREAD Y/N
MESUSER = Shop Floor Control PC name (pXXdcX)
MESHOST = MES Server name (pXXlsX or pXXasX)
MESIP = MES Server IP address (xxx.xxx.xxx.xxx)
MEASIP = Shop Floor Control Measurement Server IP address (xxx.xxx.xxx.xxx) The prompt is displayed as part of shop floor control config in version 6.1 and higher.
MEASDB = Shop Floor Control Measurement Server database name (CPR) The prompt is displayed as part of shop floor control config in version 6.1 and higher.
SAVE_DATA_DAYS = 7 by default. This defines the number of days worth of data to store in the local db for status 20 and 25 units. It also defines the number of days to retain Finished units history in the local db.
Note: In Shop Floor Control version 6.1 and higher, a second number defines the number of days worth of data to store in the local db for all other statuses. Add a comma after the first number to define the second value (For example 21,7).
SAVE_DATA_DAYS=x,y
Delete any wip units (Status 20, 25) older than "x" days
Delete any non-wip units (Status 26,27,28,29,30,63) older than "y" days.
If only one value is defined, the system will use the same number of days for all unit statuses.
AUTO_DEL_TIME = Time of day to move units from local db to MES db. This time should be during a break or downtime when production is not running to minimize impacting performance. Time of day to remove Finished units from the local db (based on SAVE_DATA_DAYS parameter).
DB_VACUUM_TIME = Time of day to rebuild the indexes in the local database and optimize the machine. This is similar to a defragmentation operation in a Windows computer. This time should be during a break or downtime when production is not running to minimize impacting performance. It should also be different from the AUTO_DEL_TIME, so as not to interfere with that operation.
IP FILTER Y/N = Enables/Disables (default) access control to the Shop Floor Control through AutoSFDC XML. Please refer to the AutoSFDC Client section for further information about controlling access to Shop Floor Control through AutoSFDC XML. The prompt is displayed as part of the Shop Floor Control config in version 5.21 and higher.
MULTI_THREAD Y/N = Available in Shop Floor Control 6.0 and higher. The default setting is No. Enabling will allow Shop Floor Control to create multiple socket connections to MES when needed. Please see the section on multi-threading for more information.
- Tomcat: The Tomcat menu has three commands, Start, Stop, and Restart. These commands function in the same manner as the comparable Shop Floor Control Application commands. These commands are used for controlling the Tomcat application, which handles all the web-based applications such as AutoSFDC XML, the Data Collector GUI, the Command GUI, and SPC Web. In order for these applications to function, Tomcat must be up and running.
- Apache: The Apache menu has three commands, Start, Stop, and Restart. These commands function in the same manner as the comparable Tomcat commands. The Apache application is the code that handles all the web server functionality. This software allows for Web access and in conjunction with Tomcat, allows for all the different Shop Floor Control applications to run.
Input Device Status
1. To access the Input Device Status page, navigate to Administration > Shop Floor Contol Administrator > Input Device Status.
Figure 21: Input Device
Note: The input device page is for CS9400 data collectors which must physically be connected to the Shop Floor Control PC, requiring an "on the ground" Shop Floor Control PC. Most Shop Floor Control PCs are currently cloud-based.
Figure 22: Current Status
NetDC Status
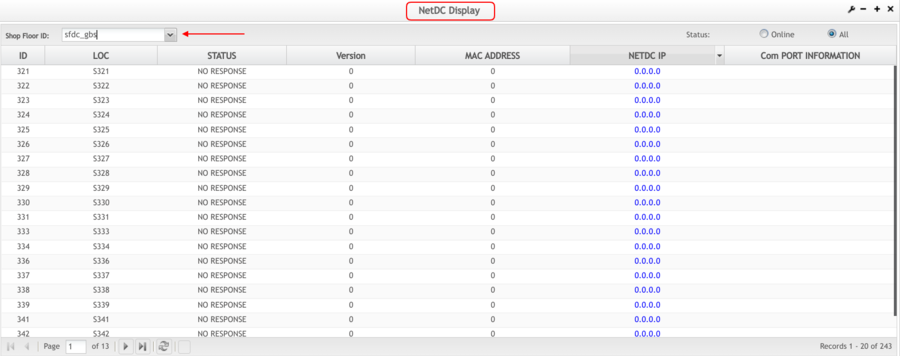
1. To access the NetDC Status page, navigate to Administration Shop Floor Control Administrator NetDC Status.
2. Select a Shop Floor ID from the down box provided.
3. A list of all NetDC ID’s will display:
Figure 23: NetDC Status
System Logs
To access the System Logs page, navigate to Administration > Shop Floor Control Administrator > System Logs.
1. Select the Shop Floor ID from the drop-down box.
Figure 24: System Logs Main Screen
2. Select the Log File from the next drop-down box. The System log will appear without having to select any other function.
Figure 25: System Logs
Once the System Log appears, the Refresh and Export functions will be available.
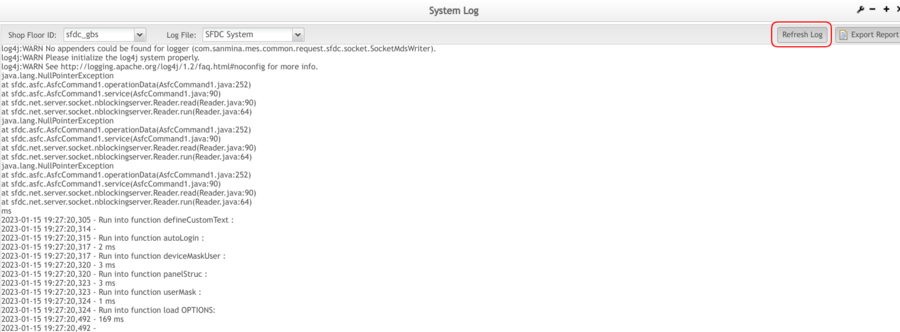
Refresh Log
1. To refresh the System log, select the Shop Floor ID and Log File, then select Refresh Log.
Figure 26: Refresh Log
Export Report
1. To export the System log, select the Shop Floor ID and Log File, then select Export Report.
Figure 27: Export Report
- Select either All Pages, Current Pages, or Pages (Select a page range) and then select the Export Excel button.
- A popup menu displays, allowing users to export information in an Excel file onto their local drive.
Task Scheduler
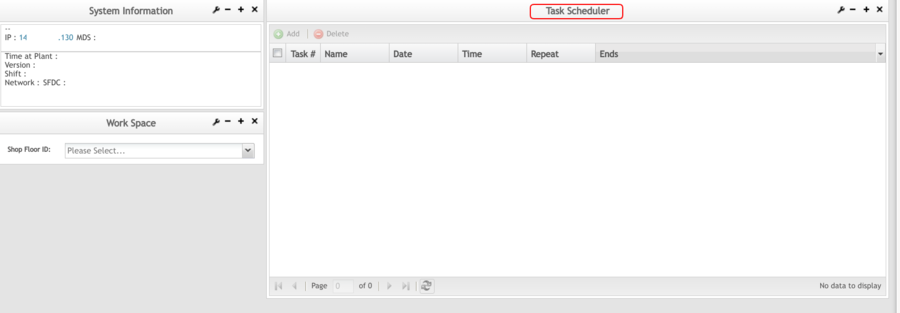
The Task Scheduler is designed to allow Shop Floor Control tasks such as downloads, restarts, etc. to be scheduled in advance and run, without user intervention. This allows tasks to be run when production is down, and the SFDC admin is not present. With the Task Scheduler, an administrator can add or delete tasks.
1. To access the Task Scheduler page, navigate to Administration > Shop Floor Control Administrator > Task Scheduler.
Figure 27: Task Scheduler
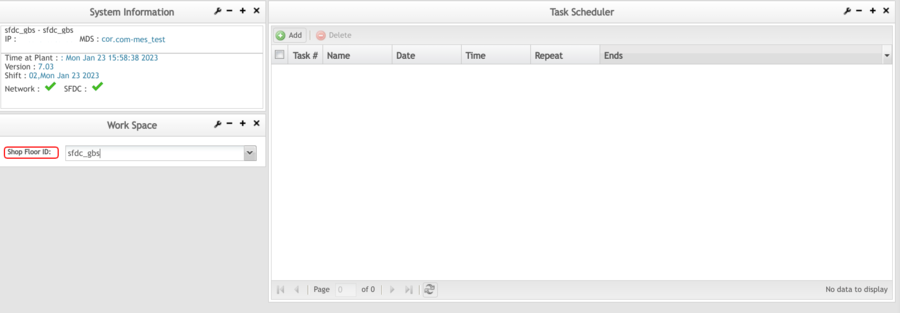
2. To activate the action options, the user must first select a Shop Floor ID from the drop-down box provided.
Figure 28: Select Shop Floor ID
3. The system information portlet will refresh with the Shop Floor ID status. Once this happens, the Add and Delete functions will be available.
Add Task
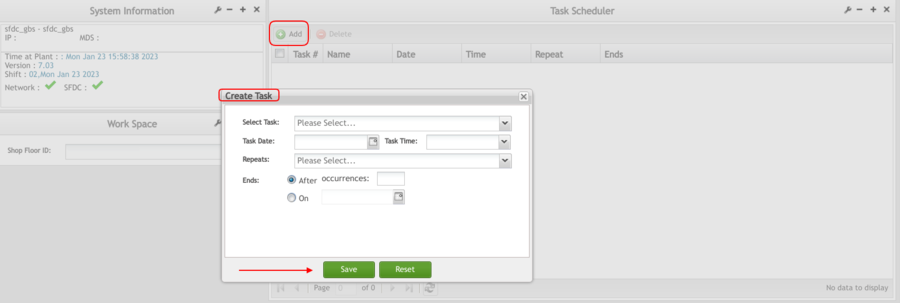
1. After selecting a Shop Floor ID, select Add located above the Task # list.
2. A Create Task form will display:
Figure 29: Add Task
3. Select a task from the Select Task drop-down menu.
4. Select a task date from the calendar to the right of the Task Date field or manually enter a date in the mm/dd/yy format.
5. Select a time for the task to begin. (Times are in Military Time and displayed in 15-minute increments from 12:00 am displaying as 00:00 to 11:45 pm displaying as 23:45)
6. Select an option for the repetition cycle for the task. (Daily, Weekly, or Monthly)
7. Select an End option. If Never is selected, the task will repeat until specified otherwise. If After Occurrences is selected, the task will repeat a specific amount of times, depending on the number entered into the option box. If On is selected, the user must select or enter a date on which the task will end.
8. Select Save to schedule the task, or Reset to clear all fields
Delete Tasks
1. To delete a task, select the task from the Task # list and then select Delete.
SSH Logins Maintenance
Secure Shell (SSH) is a Unix-based command interface and protocol for securely getting access to a remote computer.
SSH Login Maintenance defines which users can SSH to the Shop Floor Control PC.
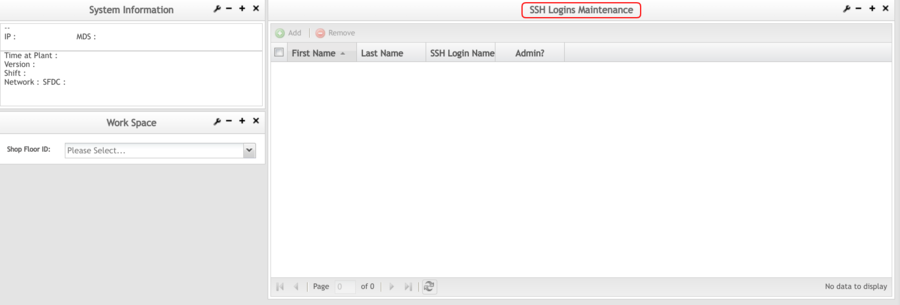
To access the SSH Logins Maintenance page, navigate to Administration > 'Shop Floor Control Administrator> SSH Logins Maintenance'.
Select the Shop Floor ID from the drop-down box under Work Space. After a moment, the list will display to the right.
Figure 31: SSH Logins Maintenance
Add SSH Logins
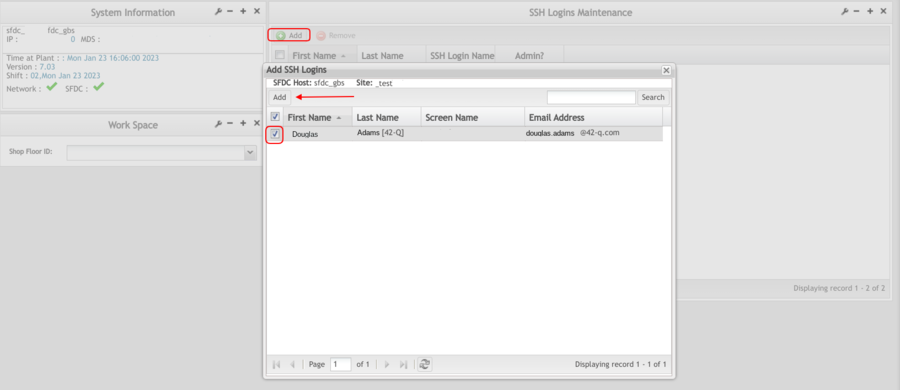
1. To add an SSH Login user, select the Shop Floor ID located under WorkSpace, then select the Add button located above the list of available users.
Figure 32: Add SSH Login
2. On the following screen, there will be another list of users. Check the box to the left of the user to add and select the Add button.
Remove SSH Logins
To remove a SSH Login user, select the box to the left of the user name to remove and select the Remove button located above the list.
