SOP-5-I-MES0090-C CMMS Calibration
42Q Home > Production > CMMS > Calibration
Contents
Calibration Introduction
Purpose
Calibration portal:
- Allows manufacturing plants to schedule calibration for measuring and testing equipment;
- Verifies and ensures all assets are accurately set according to required specifications;
- Assists plants in meeting process requirements in accordance with regulatory standards per 42Q company policy.
Features
The following features are available within Calibration:
- Manufacturing teams can define the calibration frequency for the individual assets on their production floor.
- Administrators may set calibration schedules per individual equipment units.
- Production Teams receive an email notification before scheduled calibration begins on their equipment.
- Plants can track and report all corresponding results of the calibration process such as cost and service provider information for periodic audit requirements.
Calibration Configuration
- Calibration operates within several modules of the 42Q MES system.
- Calibration settings must be predefined within the CMMS Asset module of 42Q. To configure calibration settings, navigate to Shop Floor Control > Configuration > CMMS Asset > Asset.
Figure 1: Asset Main Page

3. Select the existing Asset ID to open the Asset page. Users may type the Asset ID directly into the textbox on the top menu bar, or choose from the list by selecting the checkbox next to the Asset ID line.
4. Choose the Calibration icon.
Figure 2: Select Asset ID
5. The Calibration Asset displays.
6. Input all applicable data, then select Save to submit or Cancel to abort.
Calibration Fields
The following fields are available for input:
- Calibration Needed: Define whether or not this asset needs calibration. Select the checkbox if the asset needs calibration. NOTE: Once configured, the necessary calibration will appear in the Calibration Requested list under Production > CMMS > Calibration > My Requests.
Note: When creating a new Asset, system will set the Calibration Needed as “false.” The default value for Calibration Needed is unchecked. If the asset requires calibration administrators must manually select Calibration Needed (see screenshot below).
- Accuracy: Tolerance level for the asset. This string of requirements (e.g. ±0.3℃) will be used by the technician to complete the calibration adjustment.
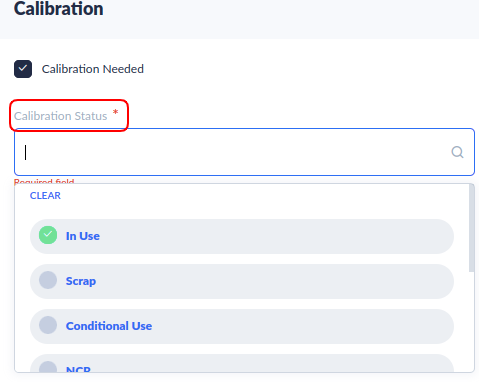
Figure 3: Status Menu
- Status: The following status options refer to the Asset being calibrated:
- In use: Calibration successful - the machine is now Usable. Paste the calibration label on the machine.
- Scrap: Cannot repair; must be scrapped
- Conditional Use: In use on the special condition
- NCR (No Calibration Request): No scale with the machine; paste the “NCR” label
- NIS: (Not In Service): The machine is presently not in service and calibration is not needed at this time; paste the “NIS” label. Note: Assigning an unused asset to “NIS” reduces costs.
- Lost: Lost by user department and cannot be located; paste “lost” label to mini-machine and change status to the “Lost.”. Note: By marking the asset status lost, the record remains in the MES system.
- RTC:(Return to Customer). Note: Once returned, the asset will be removed from the system. It belongs to the customer and is no longer available to the plant.
- On hold: Calibration failure; repair and recalibration needed
- Method:
- Internal calibration: Calibration is performed by the company’s in-house lab (see Type: QA Calibration, below).
- External calibration: Calibration is performed by calibration service providers that are accredited to ISO/IEC 17025 or accredited by CNAS, and qualified by 42Q.(see Type: Engineering Calibration, below)
- Type: QA Calibration/Engineering Calibration (see also above: Method)
- Repeat Every: The calibration frequency.
- Repeat Type: The period (in Day/Month/Year) between calibrations.
Note: The Engineering Calibration team or QA Calibration team (located under Type) specify current calibration dates for each piece of equipment, then according to calibration frequency ('Repeat Type')(Day/Month/Year), the system then calculates the next calibration (due) date for each piece of equipment.
- Money Spent: (This field is Optional) Amount billed to the external customer for this calibration.
- Internal Costs: Amount billed to the Internal Customer for this calibration.
Note: The user may bypass the drop-down bar and type directly in any of the fields; this approach is helpful when inputting larger number values.
- Currency: The type of currency used in the plant, according to country. Choices include CNY/USD/JDY
- CSP: Calibration Service Provider for the asset being serviced.
- Alert Email: Send an automatic email alert to the rescheduling group.
Note: An automatic email will be sent to the rescheduling/approver and requestor for rescheduling/approval action.
Note: If the user wants to receive the calibration auto-reminder email, she or he must make sure the Checkbox Alter Email be selected and the user is in the groups associated with Calibration or the group category is Calibration Assign/Calibration Reschedule/Calibration Request/Calibration Notify. Please refer to this how to manage Calibration to set the user groups.
- Alert Email Before (Days): The number of days before the plan date to send an email alert.
Note: The number is the days that before the Next Calibration Date to send the calibration auto reminder email to the user if the Alter Email is selected.
For example: As in Figure 4a: The Last Calibration Date is 2019-09-06, Repeat Type is Month, Repeat Every is 1, so the Next Calibration Date will be set to 2019-10-06 automatically by the system. The Alter Email Before (Days) is 1 and Alter Email be selected, so the CMMS system will send an auto to alter email at 2019-10-06 local timezone 00:15, that is 1 day before 2019-10-06 (Next Calibration Date).
Important reminders: If you set Grace Period (Days) = 5, and Grace Orientation = Forward/Backward, that means you can handle the calibration between 2019 -10- 01 and 2019-10-11. It’s better to set the Alter Email Before (Days) > 5, so you receive the calibration auto alter before 2019-10-01.
- Need Approval: Choose whether or not the calibration needs to be approved.
- Approval User: If the calibration needs approval, the user must select the approval user by choosing a user from the drop-down list provided.
- Last Calibration Date: Input the date the machine was last calibrated
- Next Calibration Date: This field automatically populates based on the date chosen above and the number of days chosen in the interval field.
- Grace Period(Days): The time period (in days) available to reschedule the next calibration date. Days can be set after and before (Forward/backward) the next calibration date or before (Backward) the next calibration date. The default for this setting is one day; plants typically set this date for the 15th day of the month.
- Grace Orientation: Grace orientation determines whether the grace period for rescheduling calibration is before or after the plan date. Choose Forward/Backward to set the period after and before the next calibration date. Choose Backward to set the time period before the next calibration date.
EXAMPLE: If the next calibration date was the 15th of the month, a 7-day Forward/Backward grace period would allow the user to reschedule the calibration date anytime between the 8th day of the month and the 23rd of the month. A 7-day Backward grace period in this example allows the user to change the calibration date anytime between the 8th - 15th of the month.
Note: If Forward is chosen, the Next Last Calibrated Date cannot be later than Last Calibrated Date+Calibration Internal+Grace Period. If Backward is chosen, Next Last Calibrated Date cannot be later than Last Calibrated Date+Calibration Internal - Grace Period.
- Comment: Add any additional comments in this text box.
Input Status
1. Calibration Work orders move through a defined path. Only approved users can change the status of a calibration request. The following list details calibration status options.
- Completed: Completed calibrations.
- Not Started: The initial status.
- Rescheduled: The Work Request calibration has been Rescheduled.
- Rejected: The Work Request calibration has been rejected. Only Approvers can reject Calibration WRs
- Work In Progress: Status is WIP.
- Completed-approval: Calibration work order that has received final approval. WRs are approved in the “My Approvals” submodule.Note: If the “Need Approval” checkbox has not been checked during configuration, the calibration work order will be automatically transferred to Approved status.
2. Calibration status can be configured independently of the calibration work request and from various CMMS portals.
3. Requesters can select one approver path and assigned group, then create a calibration work request at a different time.
4. Requesters can also schedule a calibration from the Approver Path or Assigned Group (Navigate to Production> CMMS > Calibration> My Approves).
5. Note: When a calibration status is changed, the system sends automatic email notifications to the user who initiated the status change as well as assigned groups, approval groups, requestor groups, rescheduling groups.
Calibration Process and Responsibilities
Step 1: Calibration Requester: Calibration Requesters are usually part of the Engineering Team. Calibration Requesters define the calibration needed for each asset and create regularly scheduled calibration requests.
Step 2: Assigned Group: The assigned group consists of Technicians who perform the calibration. After completion, Assigned Groups close the calibration directly unless the calibration request requires administrative approval. (noted by a checkmark next to the “Needs Approval” option)
Step 3: Calibrations awaiting approval are located in the administrative user’s file within the “My Approvals” submodule.
Calibration Submodules
Once configured, calibration work requests are managed within the Calibration module, located in the Production area of 42Q’s MES system. Users can: view/edit their requested calibrations, view/edit calibrations assigned for their approval, view/edit calibrations awaiting rescheduling, approve calibrations, import calibration information, and view the status of calibrations in progress. Easy-to-understand icons aid the user in navigation between submodules.
Calibration Process and Responsibilities per Submodule
- My Requests: Calibrations requested by the current user.
- My Assigned: Calibrations assigned to the current user.
- My Rescheduling: Calibrations to be rescheduled by the current user.
- My Approvals: Calibrations awaiting approval by the current user.
- Calibration List: Import and view calibration data.
My Requests
1. Calibrations requested by the current user are displayed in the My Requests submodule.
2. Navigate to Production > CMMS > Calibration > My Requests to show the calibrations requested by the current user.
Figure 4: My Requests
3. Users can search for equipment (assets) by selecting any of the filters displayed across the top of the screen.
4. Choose the search icon (e.g. magnifying glass) to search by desired field(s).
5. Select ... then select Export All Columns orExport Visible Columns to export Requested Calibrations to a .csv file
6. The Send Email function sends an email notification to the assigned groups, approval groups, Requestor groups, and rescheduling groups.
My Assigned 
1. Calibration assignments are managed from the My Assigned submodule.
2. Calibrations assigned to the current user will be displayed in the My Assigned submodule.
3. Navigate to Production > CMMS > Calibration > My Assigned to see a list of calibrations assigned to the current user.
Figure 5: My Assigned Calibration
Edit Asset Calibration
To edit an Asset Calibration:
- Select the Asset ID
- Select Edit Calibration icon (noted with a yellow pencil) to display detailed calibration information.
- Assigned employees may utilize the Status drop-down feature to record completed calibrations.
- Managers may edit any detail of a calibration record.
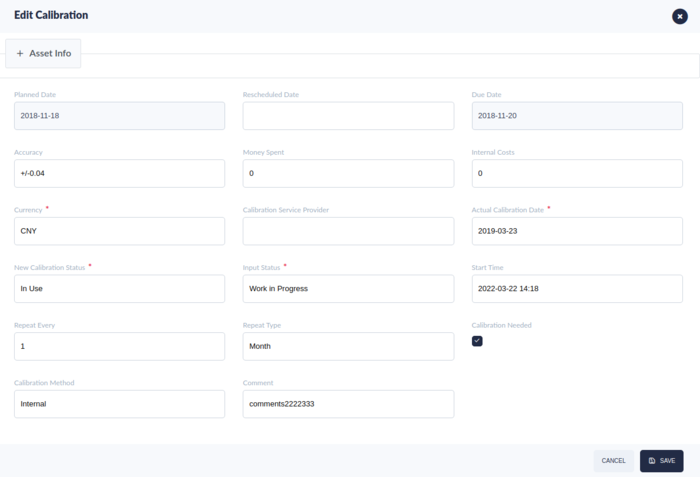
Figure 6: Edit Calibration
- The Edit Calibration screen displays.
My Assigned: Edit Calibration
To Edit an Asset Calibration:
- Select the Asset ID.
- Select Edit Calibration icon to display detailed calibration information.
- Under the Edit Calibration page, users may view details of the scheduled calibration or edit the fields therein.
- Edit the fields and select the Save icon to submit the update.
- Select the Cancel icon to close the page without saving.
- Note: With one exception, all fields are the same as those configured in Shop Floor Control > Configuration > CMMS Asset and discussed in detail in this document under Calibration Configuration.
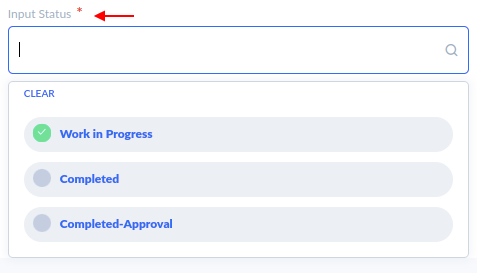
- Input Status Field: This field is an important field available in the My Assigned portlet. The following choices are available in the drop-down menu of Input 'Status:
- Not Started: Signifies no action has been taken on the assigned calibration.
- Work in Progress: Calibration has begun but is not yet complete. Technicians may wish to select this field if the calibration is taking longer than expected.
- Rescheduled: If calibrations are rescheduled, administrators select this field to signify the change. The Reschedule feature corresponds to My Rescheduling Portlet.
- Completed-Approval: Once calibration is completed, technicians select this field. An email will be sent to the Calibration Approval group, who will sign the work approved in My Approvals submodule.
Note: If the checkbox Need Approval is selected, the Input status will show as Completed-Approval . If Need Approval is not selected, the input status will show as Completed .
- Rejected: Rejected calibration requests are noted with this field.
Figure 7: Input Status Fields: My Assigned
Note: Aabout the input status that will show at what the situation and which status the users can select.
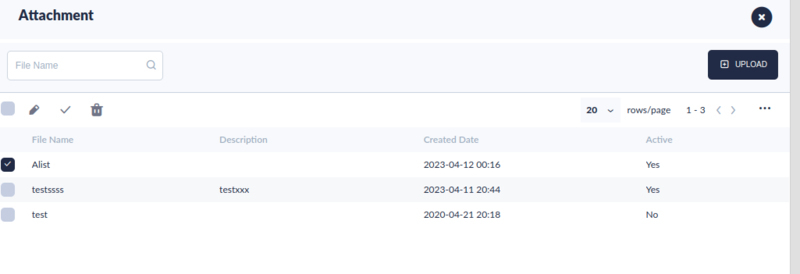
My Assigned: Attachment
To Edit the attachment of Asset calibration.
- Select the Asset ID.
- Select Attachment icon to display detailed attachments of the calibration information.
- In the Attachment page, users may update attachments to complete the calibartion. Function include: Add; Edit; Enable/Disable; or Delete.
Figure 9: Attachment Functions
3. Selecting the Upload icon prompts the Upload Attachment pop-up window to display. Users may add details about additional attachment associated with the asset's calibration requirements.
Figure 10: Upload an Attachment
4. Select Save to add your attachment file or Cancel to abort the action.
My Rescheduling
Users can view the list of calibrations awaiting rescheduling in the My Rescheduling submodule of Calibration.
1. Navigate to Production > CMMS > Calibration > My Rescheduling.
Edit an Asset ID in My Rescheduling
Figure 11: My Rescheduling Calibration
1. Select an Asset ID by marking its accompanying checkbox, then select Edit to open the detailed information for rescheduling.
2. The Edit Calibration pop-up window displays.
3. The User can collapse or expand the available fields by activating the triangular button next to Asset Info .
Figure 12: My Rescheduling - Edit Calibration Pop-up Window
4. Change the Rescheduled Date, then select Save to submit the update or Cancel to exit the page without saving.
Note: System sends email notifications to assigned users when Calibration is due.
Send Email in My Rescheduling
When the Send Email icon is selected, the system will send an email to the Requester, Assigned Group, and the Rescheduler (current user). The Send Email function resides in the top menu bar next to the Export icon.
My Approvals
1. Calibrations awaiting approval by the current user can be accessed within the My Approvals submodule.
2. Navigate to Production > CMMS > Calibration > My Approvals to view approvals for the current user.
3. Within the My Approvals submodule, users may approve,edit, or view calibrations.
Edit Asset ID in My Approvals
1. Select the desired Asset ID.
2. Filtering options in this submodule include: Edit; Waiting for Approval; and History.
3. Select Edit to edit or view calibration information. This will open a pop-up window: Edit Calibration Approvals, with a General Tab.
Figure 13: Edit My Approvals
Edit My Approvals
Figure 14: Edit My Approvals
1. Edit the available fields as desired:
- Plan Date
- Rescheduled Date
- Due Date
- Accuracy
- Money Spent
- Internal Costs
- Currency: Select the currency by country: CNY; USD; JPY
- Calibration Service Provider: Calibration Service Provider
- New Calibration Status: Change the asset status by selecting from the status choices available in the drop-down menu bar:
- In use
- Scrap
- Conditional Use
- NCR
- NIS
- Lost
- RTC
- On Hold
- Input Status: Change the status by selecting from the status choices available in the drop-down menu bar:
- Completed - Approval
- Approved
- Rejected
Note: Input Status field is critical. Users approve the calibration request using the Input Status field.
- Actual Calibration Date
- Start Time
- Repeat Every
- Repeat Type
- Calibration Needed: Activate the checkbox to approve the calibration.
Note: In order for the calibration to be approved, Calibration Needed field must be activated with a checkmark.
- Calibration Method: (Internal; External)
- Comment
Note: Please refer to section 2.1 Calibration Fields in this work order for more detailed explanations of each field.
2. Select Save to confirm the update or Cancel to exit the page without saving.
3. Changes will be automatically updated in the SOP-5-I-MES0074-C CMMS Asset portal under the Calibration History and Calibration Sections.
Email Notifications
- Calibration status changes trigger an automatic email to the Approver and Requester assigned to that calibration.
- Once the current user approves a calibration (by moving it from Waiting for Approval to Approved status) the Assigned Group receives an email notification.
- Similarly, when the Assigned Group closes a calibration, the system sends an email notification to the Requester and the Assigned Group
Calibration List 
- In this module, users can bulk upload and view calibrations according to status, shop floor location, initiator, and more.
- A complete list of every calibration completed on the plant's assets is available for view.
- Navigate to Production > CMMS > Calibration > Calibration List.
Figure 15: Calibration List
Note: The Calibration List submodule is a view only feature.
3. Because the Calibration list is exhaustive, the search option is a useful feature included in the Calibration portal. Filtering options across the top of the Calibration List page include:
- Asset ID
- Using Dept
- Input Status A drop-down menu provides the following choices:
- Not Started
- Work in Progress
- Completed
- Rescheduled
- Completed Approval
- Approved
- Rejected
- Type: A drop-down menu provides the following choices:
- QA Calibration
- Engineering Calibration
- Owner
- PoC
- CSP
- Location
- Owning Dept
- Line
- Assigned Group
- Rescheduled Group
- Requester Group
- Calibration Due Date: A calendar is available in the drop-down menu.
Definitions
Internal calibration: Calibration performed by QA Cal. Lab
External calibration: Calibration performed by Calibration Service Providers that are accredited to ISO/IEC 17025 or accredited by CNAS, and qualified by 42Q
CSP: Calibration Service Provider
NCR: No Calibration Required
CAR: Corrective Action Request
Bulk Upload Calibration
With the Bulk Upload calibration function, users can import(create/add) many calibrations at one time. This function involves downloading the template file, uploading the file and validating whether the data is valid. Users can download invalid records to check and correct them.
- Select the BULK UPLOAD , the Bulk Upload window pop-up.
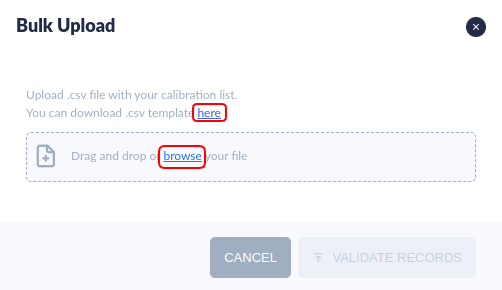
Figure 16: Bulk Upload Calibration
- Select the here(blue link) to download the .csv template file and fill in your calibrations records if you do not have the template file.
- Drag and drop or select browse(blue link) to open your file.
- Select VALIDATE RECORDS, the UPLOAD button will show if the validation process passed.
- Select Upload to save the calibrations records to the system.
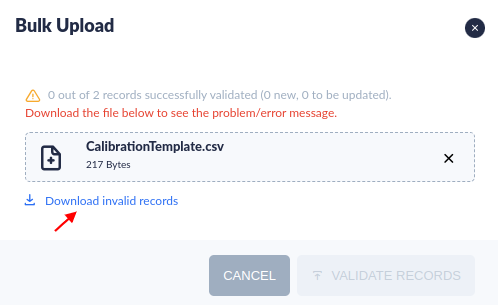
- Select Download invalid records to download and check the invalid records if some records are invalid.
Figure 16a: Download invalid Records
View Calibration Details
To view the calibration record details, select the checkbox in the left then select View button in the top bar.
Figure 17: View Button
The Calibration View page shows the details of the calibration.
Calibration Master and Recall List
The system provides a report that allows users to check the asset list and related information according to the calibration date at the MESWeb module.
Navigator to Reporting > MESWeb > CMMS Reports > Calibration Master and Recall List.
Figure 17: MESWeb Calibration List

Step1: Select Data source.
Step2: Select the Calibration date is due, Asset Status, or other optional options
Select Go to view the list.

