SOP-5-I-42Q-MES0134-C NetSuite 42Q Integration
42Q Home > Tools > NetSuite 42Q Integration
Contents
Process Description
42Q Role
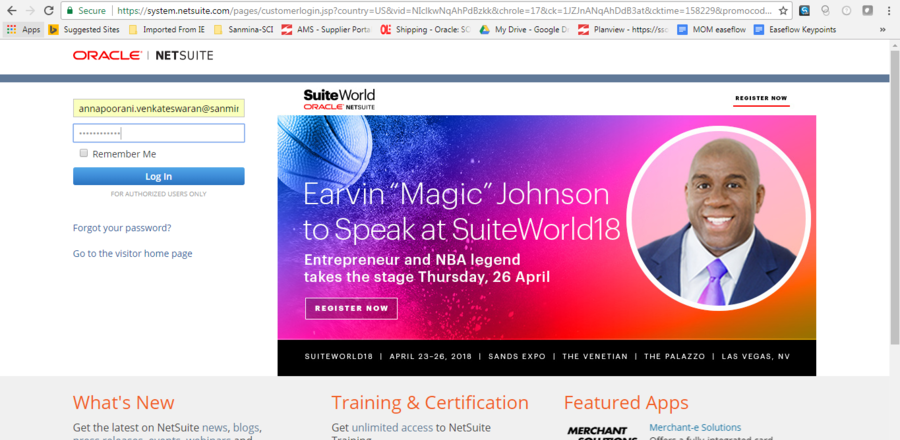
Login to Netsuite using the link Oracle Netsuite
Figure 1: Login Screen
User Role
User should have the below role for Netsuite-42Q interface transactions. “easeFlow Sandbox LTD (Trailing) - 42Q Role”
Figure 2: Easy Flow
WO Creation
WO Creation In Netsuite
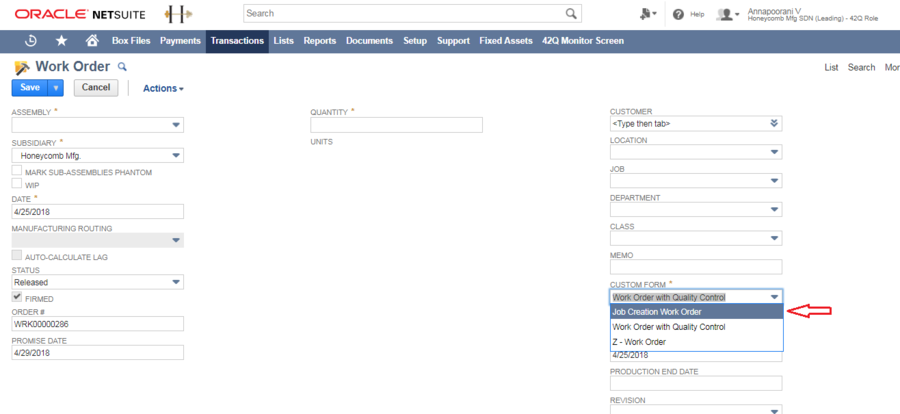
To create a WO, choose respective form from the dropdown CUSTOM FORM.Select “Job Creation Work Order”. This will open the customized WO form.
Figure 3: Work Order
Mandatory Fields
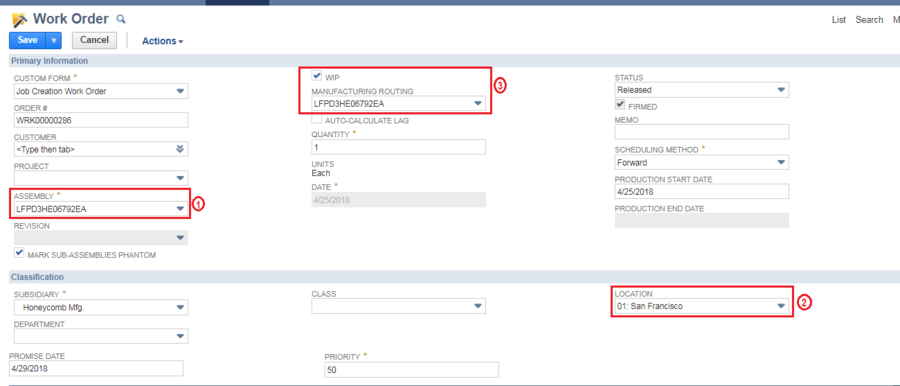
Enter all the mandatory fields (indicated with a * symbol). It is recommended to fill the fields in proper order:
- ASSEMBLY
- LOCATION
- WIP check box
The WIP check box automatically populates the manufacturing routing when checked.
Figure 4: Shop Order Browser
WO in 42Q
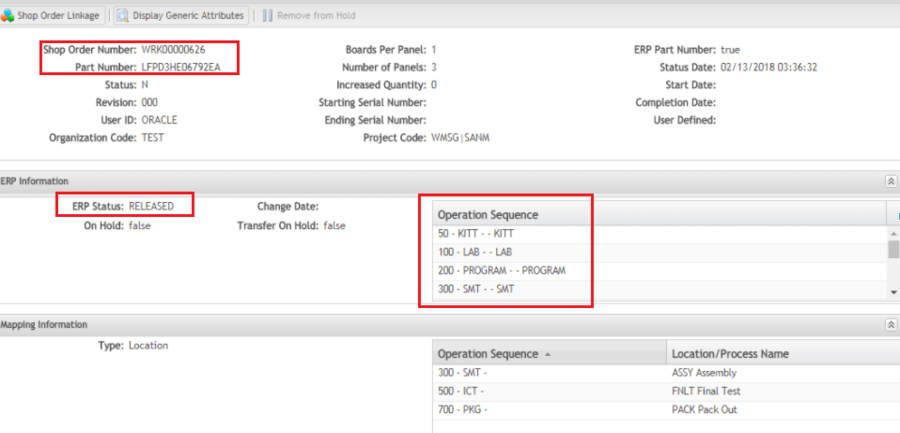
Work Order once released in Netsuite, can be viewed in 42Q. To view the WO details in 42Q, go to Production Control → Shop Order Browser. Browse the WO number and select it.
Following information can be viewed for every work order:
- “Shop order information” - WO Release notes, Serial numbers, Routing & Mapping.
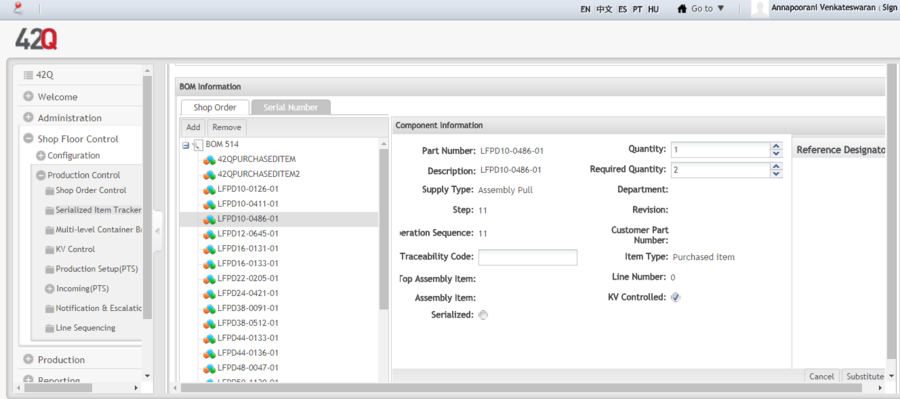
- “BOM Information” - Work Order BOM components.
Figure 5: Shop Order Information
Shop Order Information
Figure 6: Shop Order Information
BOM Information
Figure 7: BOM Information
WO Acknowledgement
To know if the transaction is successfully received by MES, click on the “Netsuite-42Q interface” tab. This tab displays the current Job creation status. The initial status is “7-Received by MES” which will be eventually changed to “10-ACK successful” if the process is success. It takes approximately 2 minutes to get the success ACK from 42Q.
Figure 8: Status: 7-Received by MES
Figure 9: Status: 10 -ACK successful
WO Release
In Netsuite
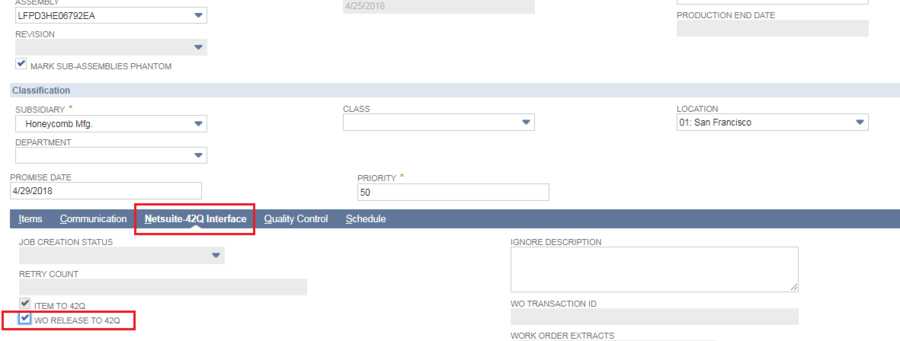
To release a Work Order to 42Q, it is necessary to check the “WO release to 42Q” checkbox.To do this, Go to “Netsuite-42Q Interface” tab → Check the required check box. After filling all the necessary details, save the Work order.
Figure10: Netsuite-42Q Interface
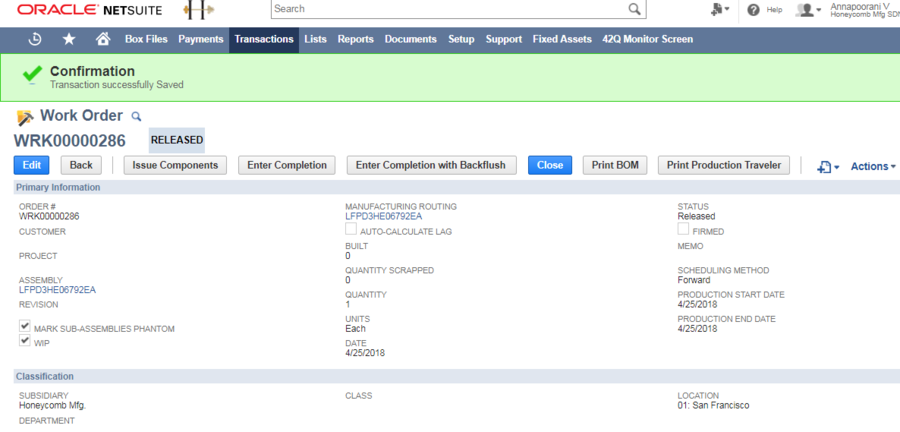
On saving, a unique WO number will be generated. This can be viewed and released in 42Q.
Note that “Item to 42Q” checkbox should be checked if the assembly item is to be transferred to 42Q along with WO details . However, even if it is unchecked, WO will be interfaced to 42Q but without the assembly details.
Figure11: Work Order
In 42Q
The work order created in Netsuite has to be released in 42Q separately. This can be done under “Production Control” Option.
- Go to Production Control →Shop Order Control.
- Select “Shop Order Release”. Search the Work Order created in Netsuite and select it.
- On selecting the WO, release option gets highlighted.
- Release the WO in 42Q.
Figure12: Release
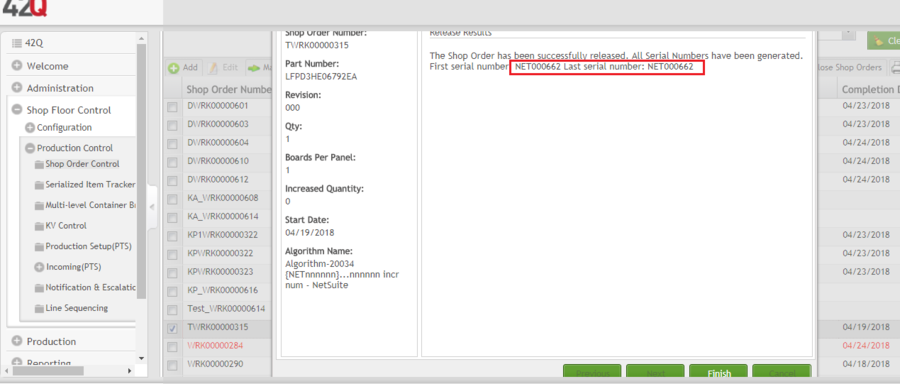
Releasing a WO will take you through few windows. Completing the steps will release the work order. Serial numbers will be generated based on WO quantity.
Figure13: WO Released
Note: If a WO is already released, It will no longer be available in Shop Order Control. Anyway, the WO can be anytime viewed in SHOP ORDER BROWSER.
WO Update
It is possible to update few fields after saving/releasing a WO in Netsuite.
In Netsuite
Below listed are the fields that can be modified even after WO creation
- Item description - Click on the assembly item. Edit the description and save it.
- WO Quantity - Click on Edit and change the WO quantity.
- Production start date - Modify the date and save the WOW.
- WO components supply type - Change the supply type to PUSH and save WO.
- WO components quantity - Click on WO Edit. Modify any WO component quantity and save the WO.
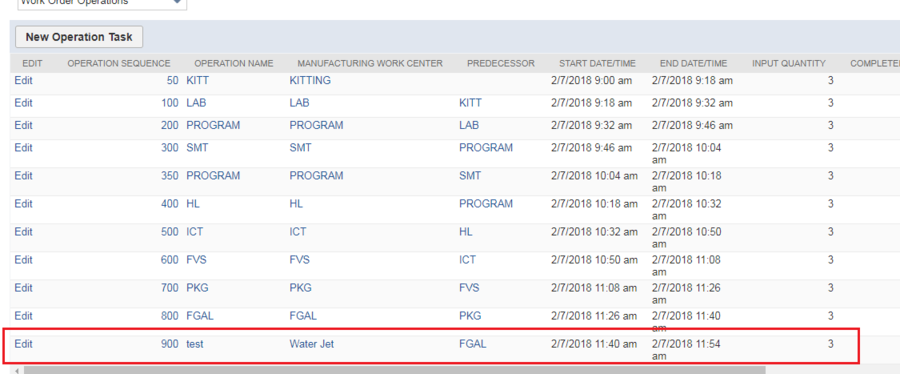
- Routing Change - Addition of routing operation.
Figure14: New Operation Task
In 42Q
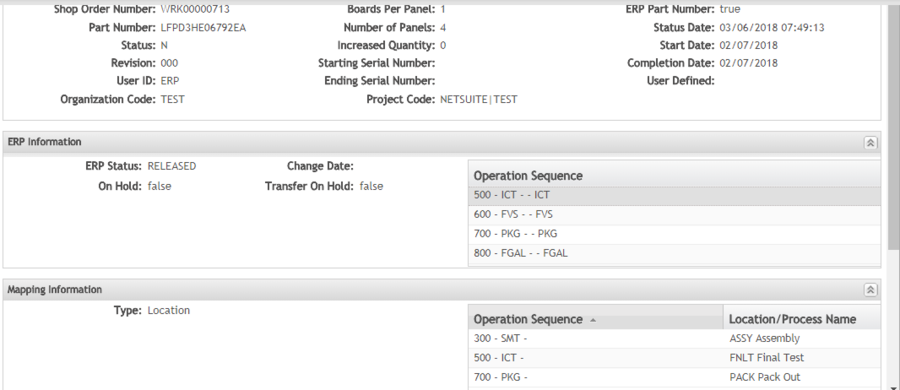
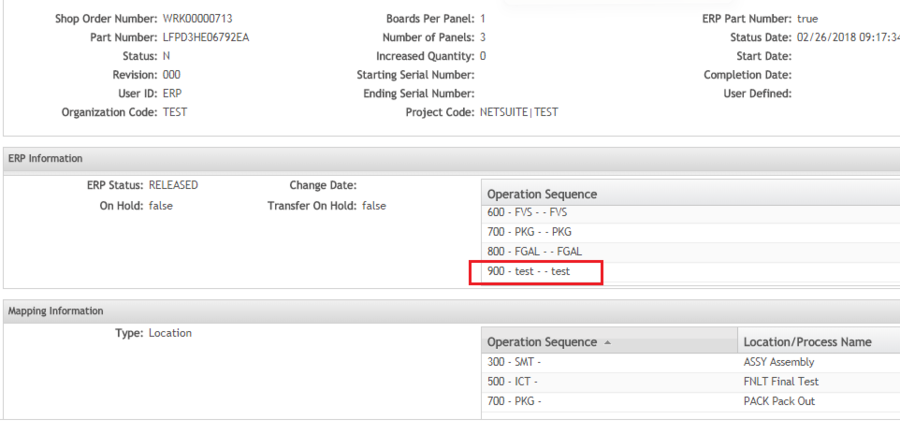
To view the updates in 42Q, search the WO and click on “Shop order information”. Check the operation sequence to view the updated routing step.
Figure15: Operation sequence before the routing addition
Figure16: Operation sequence after the routing addition
WO Update - Online Calls
Online call includes decreasing the quantity and closing the WO.
WO Quantity Decrease
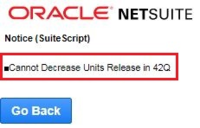
WO qty can be decreased before it is released in 42Q system.If the WO is partially released then the qty can be decreased for the unreleased qty.Note: Qty decrease cannot be done after WO is released in 42Q and the assembly item is in process. Netsuite will throw the below error.
In Netsuite
Figure17: Oracle Netsuite
In 42Q
It is recommended to delete the unprocessed items after WO release in 42Q in order to decrease the WO quantity
Figure18: Deleted Unstarted Units

Work Order WIP Moves
In 42Q
To move the units from one station to other, open the 42Q Production scanning workspace.Enter the station as STRT and give the serial number. Give the command END and execute it. On execution, unit will be moved from STRT to ASSY. Move the units sequentially as per belowSTRT → ASSY(Assembly) → ASS2(Assembly 2) → FNLT(Final Test) → FNLI(Final Inspection) → PACK(Pack Out).
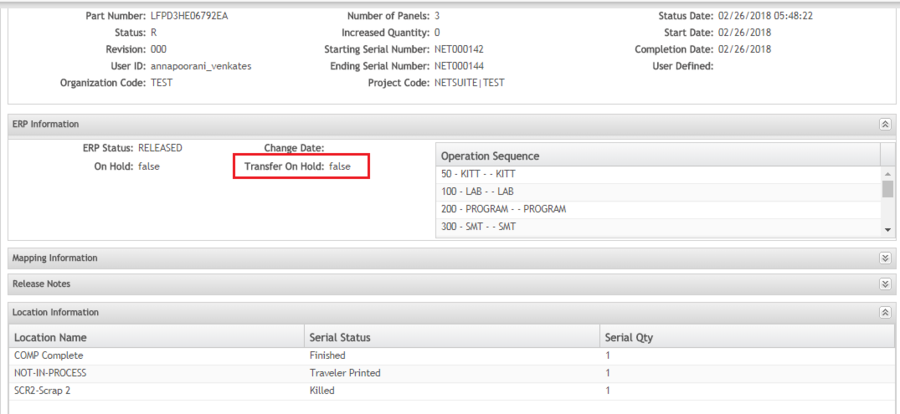
Whenever a WIP move done, Shop order information “Transfer on hold” value changes.The status isTRUE when the transaction is sent to Netsuite Status changes to FALSE when the transaction is received by Netsuite
Figure19: Transaction Received by Netsuite
Note: You can also skip a station and move unit if situation demands. To do this, use “MOVE” command and enter the workstation where you wish to move the unit.
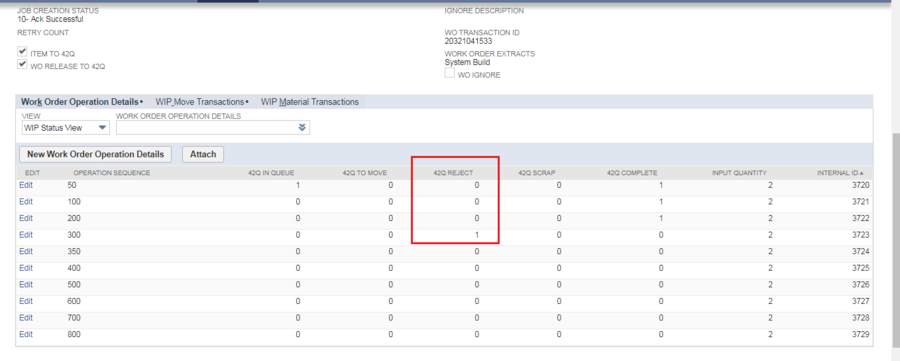
REJECT
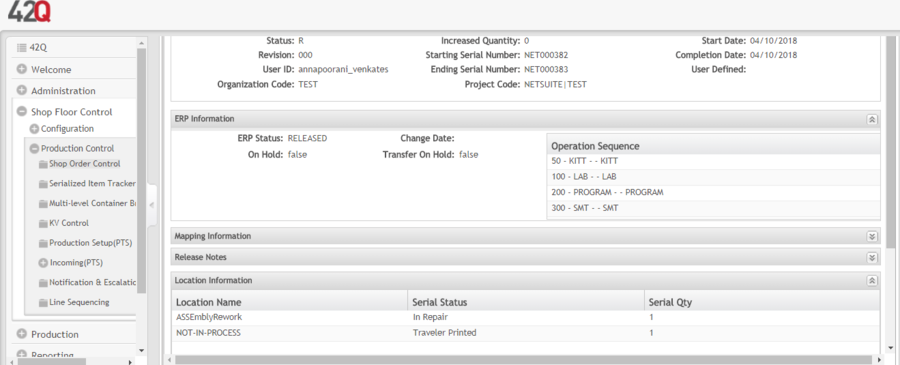
It is possible to reject a unit in 42Q. To do this, use the command “Record Defect” and give the defect code ####.Now the unit will be in “ASYR Assy rework” station. Execute the command and check the unit status in 42Q. The status of the unit will be “In Repair”.
REPAIR
To repair a unit, use the command “repair” and give the code ####. This will repair the unit and move it back to the workstation from where it was sent to repair. Units can then be moved further as per sequence.
Figure20: Repair
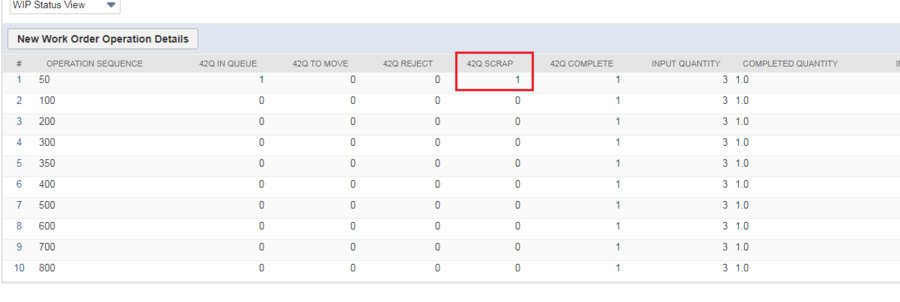
SCRAP
It is possible to move units to scrap if situation demands. To do this,
- Select the command “Move”;
- Enter SCR2 and execute.
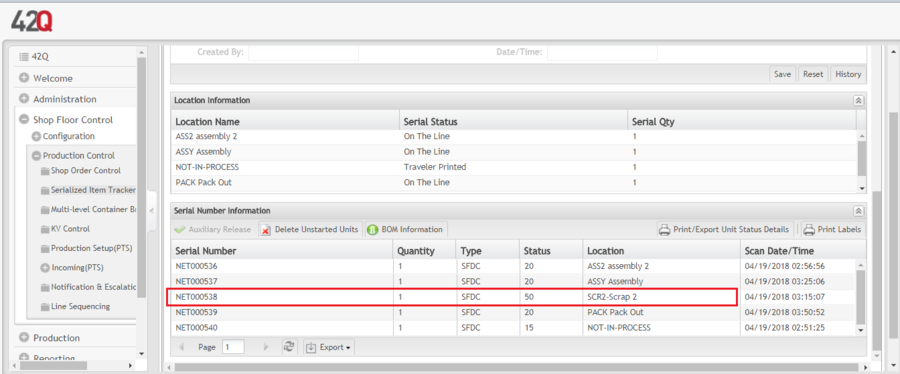
This will move the unit to SCRAP. You can check the serial number status in Shop order information as below :
Figure21: Scrap
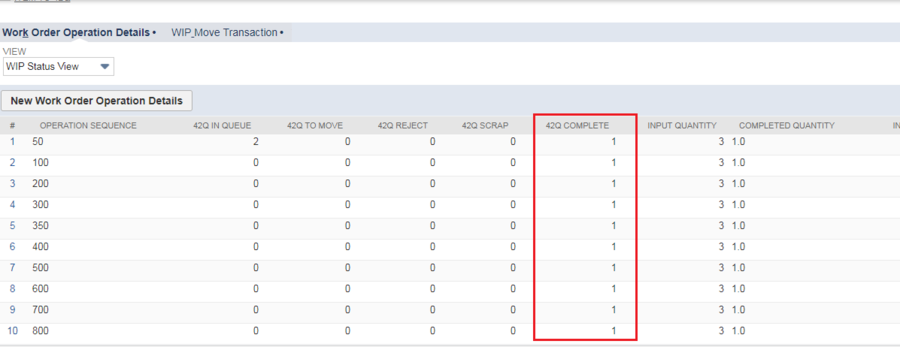
COMPLETE
To complete the WIP move, enter the command COMP and execute. This will complete the WIP moves and the unit will be built.
In Netsuite
- Initially before the unit is built, the WO status will be IN PROCESS.
- After the Unit is built, the WO status is BUILT
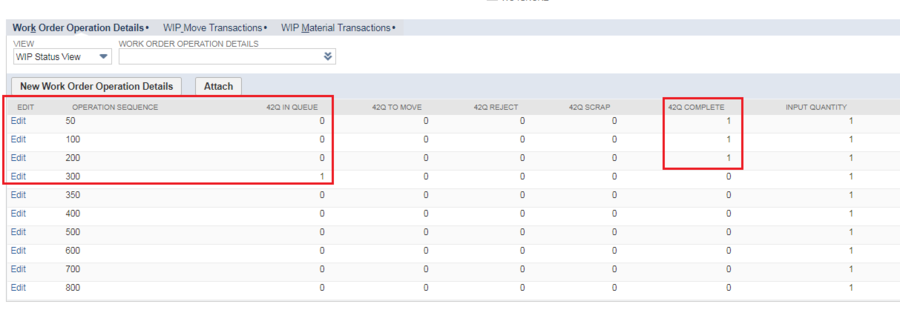
WIP Moves Update in Netsuite
Figure22: Work Order Operation Details
You can also check REJECT and SCRAP updates in the same tab as above.
REJECT Update in Netsuite
Figure23: Work Order Operation Details
SCRAP Quantity in Netsuite
Figure24: Work Order Operation Details
Units Completed in Netsuite
Figure25: Work Order Operation Details
Work Order Completion
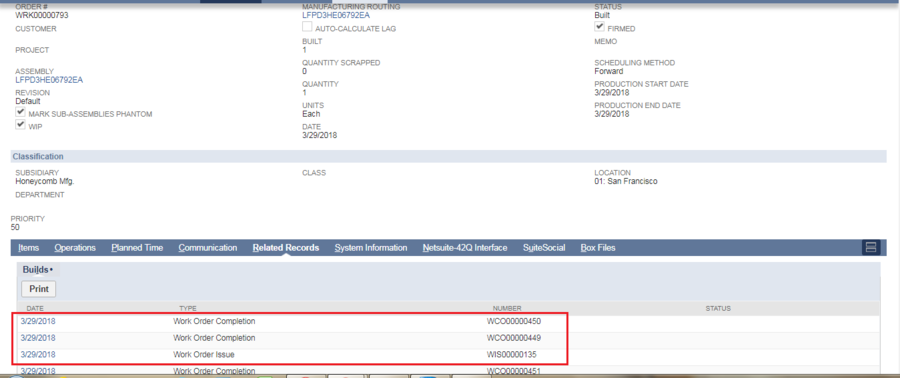
If the unit is built, WO gets completed. To check if WO is complete, open the WO and go to “Related Records ”.
This gives the Work Order completion record. Work order completion includes Work Order Issue which is further discussed in the below section:
Figure26: Work Order Completion
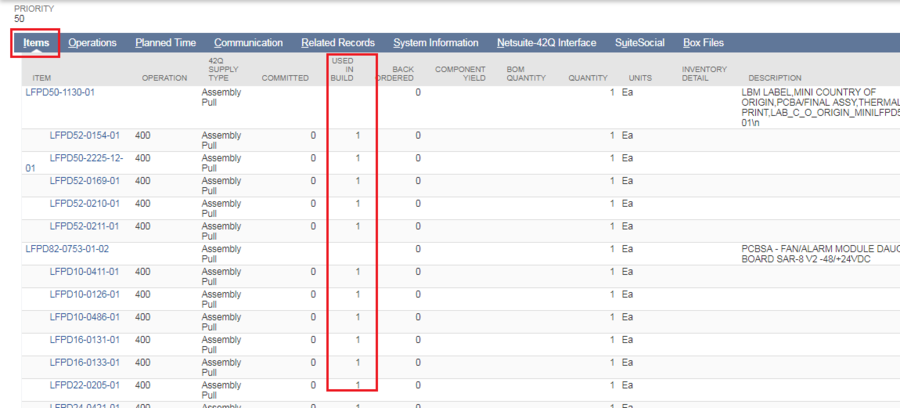
Also it is recommended to check the quantity updated in “Used in build” column to make sure the unit is built and updated.
Quantities Used in Build
Figure27: Items Used in Build
Material Transaction
In this section we deal with Material ISSUE and Material RETURN. Please note that it is possible to ISSUE only push components.
ISSUE in 42Q
During WIP move, the push item demands for a serial number input. This serial number in a given format should be entered which is called a material Issue. To do a material issue in 42Q,
- Move unit from STRT to ASSY.
- Now enter the station as ASSY and issue the material.
- Enter a valid serial number and execute.
Material Return in 42Q
Issued material can be removed in 42Q. This indicates a deletion of material Issue. To do this follow below steps
- Go to the station where the unit is currently available.
- Enter the commandRMCMP and execute.
(OR) - Select “components” tab and delete the component issued.
ISSUE in Netsuite
Once material issue is done in 42Q, it takes approximately 5 minutes for the status update in Netsuite. You can check the material status update in “Custom default view”.
Go to “Netsuite-42Q interface” tab and select the “WIP material transaction” tab. You can see the Material status as 4-PROCESSED and transaction type as ISSUE.
Figure28: WIP Material Transactions
Note: If you try to issue a serial number which is non-existent in Netsuite, the material status would give a MOVE ERROR/ERROR with a failure message in Monitor screen. You can anytime add the serial number and retry to process the ISSUE. In Netsuite, you can check the ISSUE component. To do this open Work Order and select the PUSH component for which you wish to check the ISSUE. Open the “Inventory Detail”. This will give you the ISSUE details as below:
Figure29: Inventory Detail
Material Return in Netsuite
Once material return is done in 42Q, it takes approximately 5 minutes for the status update in Netsuite.
- Go to “Netsuite-42Q interface” tab and select the “WIP material transaction” tab
You can see the Material status as 4-PROCESSED and transaction type as RETURN.
Figure30: WIP MAterial Transaction
Note: If Issued component quantity is 1, then the issue record will be deleted as such.If Issued component quantity is greater than 1, then only the return component will be deleted.
Online Calls
Online calls includes the below 2 sections: WO quantity decrease & WO close.WO Close
Closing a WO means the units are completely built and WO is complete. 42Q status is updated to “C” when Units are built in 42Q and WO closed in Netsuite.You can close a WO in different possible conditions.
Close the WO in Netsuite which is unreleased in 42Q.
You can view the status updates in 42Q and Netsuite as below:
- 42Q status = X
- Netsuite status = CLOSED
Figure31: Shop Order Browser
Close a WO manually in Netsuite which is released in 42Q.
You can see that WO cannot be closed unless the WO qty is built in 42Q.If done so, it will throw a warning prompt “Job has WIP or Completed serials in 42Q System” as below:
Figure32: Oracle Netsuite
Note: Ensure that the WO qty is built in the 42Q system. For partially released WOs the released qty should be built and the unprocessed units should be deleted for the WO closing in Netsuite.
Figure33: Delete Unstarted Unit
Monitor Screen
Netsuite has a customized MONITOR SCREEN where you can view all Work order transactions. To view this, go to “42Q monitor screen” tab.Monitor screen is made available for the below sections:
- Work Order create and Ack
- WIP Move transactions
- WIP Material transactions
Monitor screen has the following functionalities available:
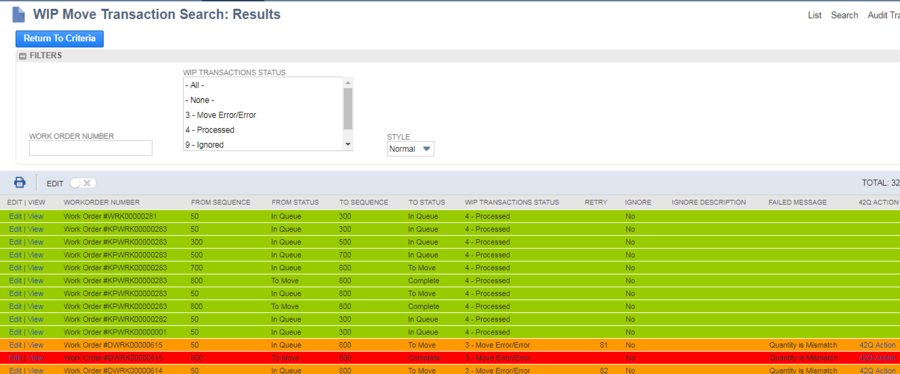
- Color codes – GREEN indicates the successful transactions. RED indicates the failed transactions. Amber indicates the transactions that have been retried.
- Failure message display – For any failed transaction, you can view the failure message and take necessary action against it.
- Filters – it is possible to apply filters and view the data in monitor screen. Filters are customized depending upon the screen.
- 42Q Action – You can do a RETRY from monitor screen for any failed transaction. This is further discussed in the below section.
Figure34: Results
User Retry
In case of any unexpected error, it is possible to do a RETRY to re-process the order. You can perform a RETRY, from monitor screen or at the Work order level.
- WIP move error
- Material Issue/Return error
- Communication failure
Figure35: Custom Default View
Retry in Monitor Screen
Figure36: Retry
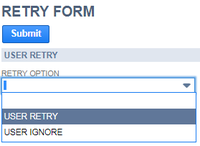
Clicking “42Q Action” from any form, takes you to the RETRY form where you have two options: RETRY & IGNORE.
RETRY – The transaction will be processed if successful or the Retry count will be increased based on the number of retries.
IGNORE – The Retry will be ignored and it will be highlighted in WO level.
Figure37: Retry Form
WO IGNORE
Figure38: WO Ignore
