SOP-42Q-MES0048 Production Part Traceability
42Q Home > Production > 100% Traceability > Production Part Traceability
Contents
- 1 Introduction
- 2 Production Part Traceability
- 3 Confirm High-Value QTY
- 4 Break Panel
- 5 Rework Record
- 6 Touch (combines load/unload materials)
- 7 Touch App (Solder Paste)
- 8 Replace Board Barcode
- 9 Board Scanning Status
- 10 Appendix A: Load Material Error and Resolution List
- 11 Appendix B: Scan Board of Error Message and Suggested Solutions
Introduction
The Part Traceability System (PTS) is an essential component of the MES suite of tools, designed specifically to meet the growing demands of customers. Its primary objective includes offering comprehensive traceability at the component level and ensuring strict quality controls. By automating production lines and enforcing rigorous product quality control, this system plays a pivotal role in enhancing overall productivity. its successful implementation has been witnessed across numerous plants worldwide. As technology continues to evolve and SMT process equipment tools become increasingly intricate and feature-rich, the PTS application and its accompanying features consistently advance. However, our commitment remains to provide support for all technology tools. 42Q prioritizes offering the necessary flexibility to accommodate various line types and deliver diverse levels of traceability that are crucial to the success of your business.
Production Part Traceability
This user manual is a basic general training guide and is not meant to teach the process flow for an individual plant or department functionality. Individual 42Q sites may have minor or specific process changes that will be documented at the site level.
Note: This work instruction is applicable to all Traceability MES15 only.
To access Production Part Traceability navigate to Production > 100% Traceability>Production Part Traceability
Prerequisites
- Complete the Traceability Getting Started 42Q-MES0024 PTS Production Setup
- Traceability Production Line environment setup is completed and under the online state.
- Material Reels are labeled in the Traceability format correctly. See 42Q-MES0028 Incoming Material Labeling
- All the feeders are labeled and have been set up correctly in Traceability. See 42Q-MES0049 SMT Part Traceability
This overview explains the material verification logic flow in Traceability before the materials are loaded into the workstation.
| Tasks | Purposes | References |
|
1. Defined picklist (listing of materials placement) to convert placement programs (as depends on the machine type). 2.|Assigned each defined picklist to the associated workstation under the required production line in TraceabilityWEB > Production Setup |
To provide what materials will be used and what placement environment will be set up for verification and future traceability purposes. | |
| 2. Assigned the correct Work Order and ECN (Engineering Change Notification) when setting the required production line in Traceability WEB> Production Setup | To identify a BOM to be used for SSCI and AML materials verification in Traceability material loading. |
Note: An error message will display during material loading on either Traceability WEB > Load Material or NetDC data collector for any failure such as AML material verification failed, feeder type and corresponding records that cannot be identified, and material quantity low-level status alert. Please see Appendix A for the complete errors listing and suggested solutions.
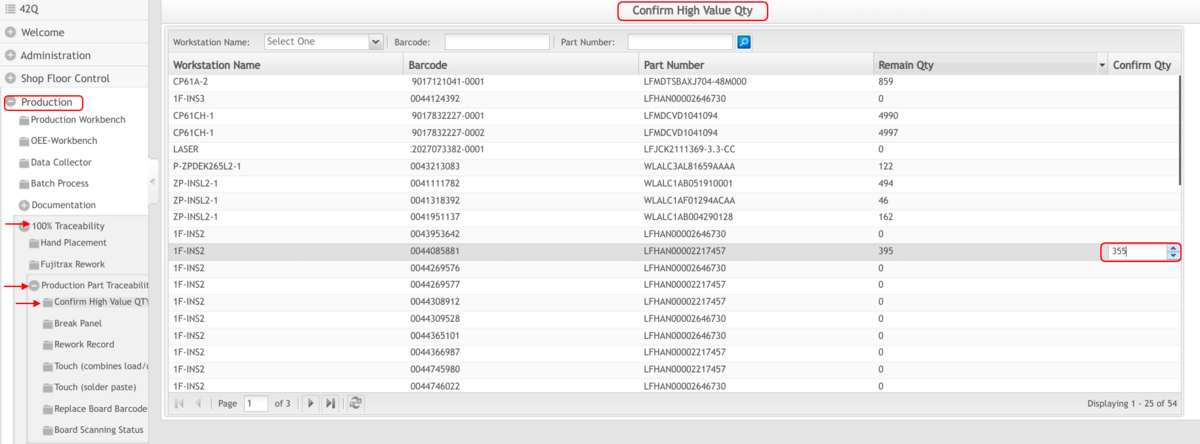
Confirm High-Value QTY
When the production line is set offline, the system would unload high-value material automatically. This location is used to input the remaining quantity for high-value material.
Note: If the production line includes high-value material the system will prompt the user with the message, "Please confirm remain qty of high-value material!"
After the high-value material unloads, the user should request to confirm the reel remaining qty in this function. The material reel will change to on-hold status until quantity confirmation is set.
Prerequisites
To prevent the operator from entering the wrong quantity, please go to the Traceability "System Settings" page and set High-Value Tolerance >(%) and High-Value Tolerance <(%) parameters first in order to keep the remaining qty correct. It will prompt the correct range when the qty operator entered is out of the tolerance range.
To access the Confirm High-Value QTY page, navigate to Production > 100% Traceability > Production Part Traceability > Confirm High-Value QTY
Figure 1: Confirm High-Value QTY
All unconfirmed high-value materials will show in the list, to search the specified high-value material by searching Workstation Name, Barcode, or Part Number.
- Click the line, and then enter the high-value material quantity into the Confirm Qty column.
Once successfully updated, the high-value material information will disappear from the list, users also can click the refresh to research the materials.
Notes:
- The unconfirmed high-value material cannot be used in load material.
- If unconfirmed high-value material is used, the message "Please confirm the high-value Qty" will display.
Break Panel
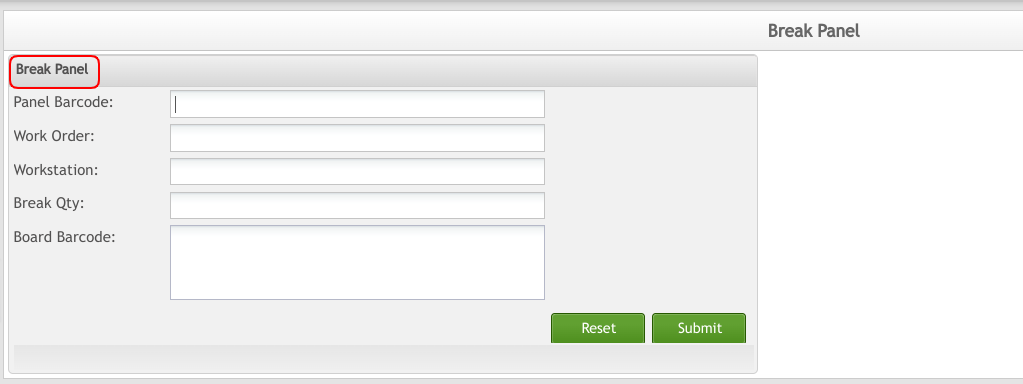
Once the production line is set to scan the panel at the end of the appointed line, the operator needs to use this function to break the panel. Panel number refers to the Picklist board number. The break panel operator needs to scan the panel barcode and the all boards' barcodes. The board barcode needs to match with the regulation in the workstation setup and the board qty refers to Picklist.
To access the Break Panel page, navigate to Production > 100% Traceability > Production Part Traceability > Break Panel.
- Scan the panel barcode which had been scanned in Scan Board Barcode module
- Once the panel barcode is correct, the Data for Work Order, Workstation, and Break Qty will display.
Figure 2: Break Panel Data
- Scan each individual board barcode associated with the panel.
- Select Submit.
- Select Reset to re-scan the Panel barcode.
Rework Record
To access the Rework Record (Traceability) page, navigate to Production > 100% Traceability > Production Part Traceability >Rework Record.
- Scan or input the product board barcode to be reworked.
- Enter the PCB reference designator to be repaired. The old component and old code are displayed.
- Scan or enter the new material barcode for updating the material placement record.
- Enter the Remark information.
Figure 3: Rework Record- Submit
- Select submit.
- The system will display the result on the board rework screen.
Note: Traceability will update the material with its newly assigned material barcode.
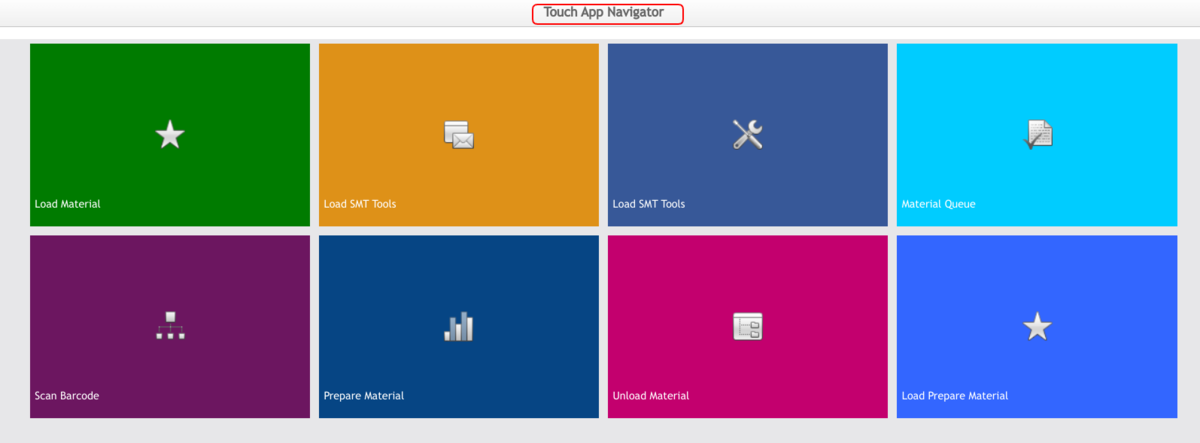
Touch (combines load/unload materials)
This module is the entrance for:
- Load material
- Load SMT Tools
- Material Queue
- Scan Barcode
- Prepare Material
- Unload Material
- Load Prepare Material.
To access the Touch page, navigate to Production > 100% Traceability > Production Part Traceability > Touch (combines load/unload materials)
Figure 4: Touch App Navigator
Load Material
To access the Load Material portlet, select the Load Material function from the Production > 100% Traceability > Production Part Traceability > Touch (combines load/unload materials) menu.
Figure 5: Load Material
Workstation: Input or scan the Workstation, and the detailed items for load material will display.
Notes:
- For the SMT workstation, the fields will contain the Material barcode, feeder barcode, and station;
- For the AI workstation, the fields will contain the Material barcode and station;
- For the HL workstation, the fields will contain a Material barcode.
Figure 6: Load Material to an SMT Workstation-Web
- Material Barcode: Scan (or Input manually) the material reel Traceability barcode.
- New Feeder Barcode: Scan New Feeder Barcode. (Apply to the feeder which will be loaded to the defined SMT machine slot).
- Old Feeder Barcode: Scan Old Feeder Barcode. (Compulsory in replenishment based on the following cases:
- To update what other feeder has been used before replenishment.
- To advise the same feeder will be used after replenishment.
- Station Location: Scan the station barcode. (I.e. SMT machine slot, as formatted in SMT placement program.)
- Request Material: This field will show if set Yes at the Work Station Setup.
- Select Send.
- "Material has been loaded" will display after the material loads successfully.
- The detailed information can be seen on the "Load Material Report" page.
- The users can see the loaded detailed information by selecting the Report.
Figure 6a: The Detailed Loaded Report
- All: Show all the stations.
- Not Loaded: Show the stations which are not loaded materials.
- Load: Show the stations which are loaded with materials.
- Zero QTY: Show the stations whose Remain Board(Rem.Brd) equals zero.
- Load All: Load the materials to all the stations. This load all function can only load the materials uploaded by the unload all function.
Note 1: The feeders can be unloaded individually and check the Unload All blue button to unload all feeders' barcodes (feeder name) at the function Unload material.
Note 2: The MSD Floor Life is applicable if the material has been classified MSD level and MSD controlled option is activated in Traceability. MSD Floor Life is indicated in green (the remaining time on production before the material is sensitive to moisture.
Note 3: The workstation floor life (the Green bar indicator as shown in Figure 4) results when all loaded materials are not sensitive and/or this MSD controlled option is not activated. It is measured using the least material MSD Shop Floor Life of the loaded material as guidance.
Note 4: If the user-defined thickness and orientation do not match with SMT defined, the information will be displayed in the red font at the top side of the screen.
Note 5: If the SMT program file has defined material thickness and orientation but without defining in Manufacturer Information, the system is not to appear prompt information at the top side when loading material.
Load SMT Tools
This function is used to load the jig for the next scanning board.
Prerequisites
- Set Jig Control=Yes under System Setting ('Traceability') page.
- Jig barcode has been created.
- Mapping has already been created for this barcode.
From the main menu in the Touch App Navigator, select the option: Load SMT Tools
Figure 7: Load SMT Tools
- Input or scan the Workstation Available.
- Input the corresponding jig barcode in the Jig Barcode textbox.
- Select Enter.
- The system will auto verify whether the jig barcode can be loaded to the selected workstation based on the defined mapping. If the jig barcode is correct, it will then be loaded successfully. An error message will show up at the top side if the system fails to load jig.
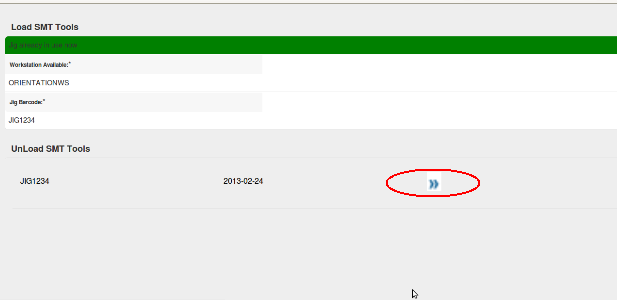
- If the JIG has been loaded to the workstation, then the user can enter the workstation and JIG barcode again to unload the Jig from this workstation.
Figure 8: Unload SMT Tools Web
The JIG barcode will be unloaded after selecting the Unload Icon (blue arrow).
Material Queue
This function is used to batch joint materials.
Prerequisites
- Set Allow material queue =Yes under the "System Settings (Traceability)" page
To access the Material Queue portlet, select the Material Queue function from the Production > 100% Traceability > Production Part Traceability > Touch (combines load/unload materials) menu.
Figure 9: Material Queue- Add to Queue
2. Workstation: Scan or input the Workstation.
3. Station: Input to the Station. The loaded material will show automatically.
4. Confirm Qty: Input the confirm Qty.
5. New material Barcode: Input or scan the New material Barcode.
6. Select Save.
7. If the save is successful, the material queue will be like the following. See Figure 16.
8. Select Cancel to exit.
9. Select Return to return to the previous page.
Figure 10: Material Queue- Queue List
9. Select Unload to delete the material list if needed.
Note 1: The first material must be loaded and cannot be unloaded from the Material Queue list.
Note 2: Material queue max reels and Material queue max Boards cannot be larger than the values set at the system settings page if Allow Material Queue is YES.
Scan Barcode
After the production line has been activated the materials loaded in Traceability, go to the Scan Barcode module.
General Board/Panel/Serial barcode scanning
- Input the Workstation name, and then select Enter. The BOM, Picklist, and Work Order information will display. The field Board Barcode will show and can be edited.
- Scan the PCB board/panel/serial barcode as per Workstation Setup defined in the Production Setup module; Please refer to SOP-5-I-PTS0009 Workstation Setup.
Figure 11: Scan Board Barcode
4. After the input barcode is verified (including the barcode format and if any previous scanning has been processed), a successful prompt will display at the top of the screen.
Extra Board Barcode Scanning
Figure 12: Scan Board Barcode- Scan Extra S/N
1. Scan Extra (Extra serial number (i.e. Package label)) is required to scan if Scan Extra S/N has been defined on the current workstation setup.
2. Select Send.
Replenish Material
It is compulsory to update all replenished materials and feeders in all Traceability online production environments. As described in Load Material, new replenish material will be replaced after entering either/both the new material barcode and feeder barcode. See the following sample scenarios for illustration.
| Scenario 1: (Process) SMT (Material) New material package with unique Traceability material barcode. (Feeder) The same feeder will be used for refilling purposes. |
|
| Material Barcode | Scan the new 'Traceability'material barcode from a new material package. |
| New Feeder Barcode | Scan the existing loaded feeder barcode. |
| Old Feeder Barcode | Scan the existing feeder barcode. |
| Old Remain Qty | Click AUTO to retrieve from traceability 'material record. |
| Station Location | Scan SMT slot position barcode. |
| Scenario 2: (Process) SMT (Material) New material package with unique Traceability material barcode. (Feeder) The different feeder will be used for refilling purposes. |
|
| Material Barcode | Scan the new 'Traceability'material barcode from the new material package. |
| New Feeder Barcode | Scan the new feeder barcode. (i.e. Feeder will use after replenishment).. |
| Old Feeder Barcode | Scan last used feeder barcode (i.e. Feeder which used before replenishment). |
| Old Remain Qty | Click AUTO to retrieve from 'Traceability 'material record. |
| Station Location | Scan SMT slot position barcode. |
| Scenario 3: (Process) Auto insertion (Material) New material package with unique Traceability material barcode. (Feeder) New feeder barcode. |
|
| Material Barcode | Scan new 'Traceability'material barcode from a new material package. |
| Station Location | Scan station barcode. |
| Scenario 4: (Process) Hand Load (Material) New material package with unique Traceability material barcode. |
|
| Material Barcode | Scan a new 'Traceability'material barcode from a new material package. |
Prepare Material
To prepare material in advance while the production line is either in offline mode or online mode.
- To access the Prepare Material portlet, select the Prepare Material function from the Production > 100% Traceability > Production Part Traceability > Touch (combines load/unload materials) menu.
Figure 13: Prepare Material Web
2. Workstation: Scan (or Input manually) the Workstation.
3. Work Order: Scan (or Input manually) the Work Order.
4. BOM P/N, ECN Number: If the workstation and work order are correct, BOM P/N and ECN numbers will show automatically.
5. Barcode: Scan or input manually the material barcode.
6. Feeder: Scan or input manually the new feeder barcode.
7. Station Location: Scan or input the station barcode. (i.e. SMT machine slot, as formatted in SMT placement program.)
8. Select Enter.
9. If prepared successfully, the user can search for the information on the "Prepare Material Report" page.
Unload Material
Unload Feeder/Material from Workstation.
1. To access the Unload Material portlet, select the Unload Material function from the Production > 100% Traceability > Production Part Traceability > Touch (combines load/unload materials) menu.
Figure 14: Unload Feeder with Material
2. Make sure the Unload All is not checked.
3. Scan or enter the Workstation.
4. Scan or enter the Barcode.
5. Check the High-Value box to input the Confirm QTY if needed.
6. Select Enter to unload material.
Figure 15: Unload All Material from the Workstation
1. With the Unload All checked.
2. Scan or input the Workstation.
3. Select Enter to unload all materials.
Note: Check the Unload All button to unload all materials. USE WITH CAUTION
Load Prepare Material
Load prepared material singly.
- To access the Load Prepare Material portlet, select the Load Prepare Material function from the Production > 100% Traceability > Production Part Traceability > Touch (combines load/unload materials) menu.
Figure 16: Load Prepare Material Web
2. Workstation: Scan (or Input manually) Workstation.
3. New Feeder: Scan New Feeder Barcode. (Apply to the feeder which will be loaded to the defined SMT machine slot). NOTE: Prepare material before Load Prepare Material, or the user can load material directly.
4. Input Station Location number.
5. If request material is needed, select the checkbox.
6. Select Enter.
7. The successful prompt information will display at the top of the page. The user could also go to the “Load Material Report” web page to check if the load material was successful by entering the same information as the preparation material. If the load prepare material was successful, the information (before prepared material) will disappear from the “Prepare Material Report.”
Note: Prepare material before load prepared material or the user can load the material directly.
Touch App (Solder Paste)
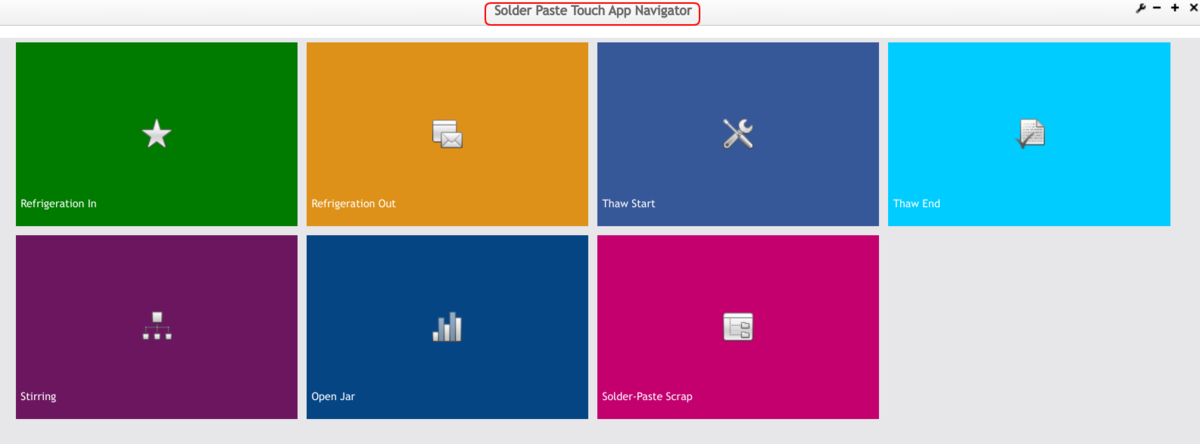
Users can do the Solder Paste process through the Solder Paste Touch menu after the configurations are done, it contains the following submodules: Refrigeration In, Refrigeration Out, Thaw Start, Thaw End, Stirring, Open Jar and Solder-Paste Scrap.
Figure 17: Solder Paste Touch Ap Navigator
Refrigeration In 
Once the Refrigeration In icon is selected, users can complete the mandatory fields: Refrigerator ID, Refrigerator Temperature, Solder-Paste Material SN,older-Paste Material SN List, Comment, and Submit.
Figure 18: Refrigeration In
- Employee Number: The ID/number of employees, this employee number is to call the login user information automatically. On the pad/Touch side, it can be used to scan the user code. Employee Number can not be empty and must be valid.
- Refrigeration ID: The number of refrigeration. The refrigeration ID can not be empty and must be valid. This refrigeration ID is an Asset ID managed by the CMMS system.
Note: In order to get/verify the refrigeration ID/Asset ID, users need to set the CMMS web server information in the system setting (Others > CMMS Web Service URL).
- Refrigeration Temperature: The temperature of refrigeration.
- Solder-Paste Material SN: The barcode of solder paste material.
- Solder Paste Material SN List: This application supports putting more than one solder paste material in refrigeration at one time. Once users scan/input the solder paste material barcode at the Solder-Paste Material SN text field and press Enter key, the material barcode will show on this list line by line.
- Comment: Comment on the refrigeration in action.
Notes:
- If the value of ‘Refrigerator Temperature’ for the corresponding MPN is not between the value of ‘Optimal Storage Temp - Storage Temp Dev’ and ‘Optimal Storage Temp + Storage Temp Dev’ (Optimal Storage Temp and Storage Temp Dev can be configured in function (‘Solder Paste material Control’) then the system will prompt error message such as ‘Incorrect Storage Temperature’.
- If the shelf time of the current solder paste material is more than ‘Shelf-Life’ configured in the function ‘Solder Paste material Control’ then the system will prompt error messages such as ‘Shelf Time Expired’.
- If the count of ‘Thaw Cycle’ is more than ‘Max Allowed Thaw Cycle’ configured in function ‘Solder Paste MPN Control’ then the system will prompt error messages such as ‘Count of Max Allowed Thaw Cycle is reached’.
Refrigeration Out 
Once the Refrigeration Out icon is selected, users can complete the mandatory fields: Refrigerator ID, Solder-Paste Material PN, Solder-Paste Material SN, Solder-Paste Material SN List, Reference Work Order Comment, and Submit.
- Input Reference Work Order, Comment, then click Submit button
Figure 19: Refrigeration Out
- Employee Number: The ID/number of employees, this employee number is called the login user information automatically. On the pad/Touch side, it can be used to scan the user code.Employee Number can not be empty and must be valid.
- Refrigeration ID: The number of refrigeration can not be empty and must be valid.
- This refrigeration ID is an Asset ID managed by the CMMS system.
Notes: In order to get/verify the refrigeration ID/Asset ID, users need to set the CMMS web server information in the system setting(Others > CMMS Web Service URL).
- Refrigeration Temperature: The temperature of refrigeration.
- S''''older-Paste Material PN: The part number of the solder paste material.
- Solder-Paste Material SN: The barcode of solder paste material.
- Solder Paste Material SN List: This application supports putting more than one solder paste material out of refrigeration at one time. Once users scan/input the solder paste material barcode at the Solder-Paste Material SN text field and press Enter key, the material barcode will show on this list line by line.
- Reference Work Order: The work order of the solder paste.
- Comment: Comment on the refrigeration in.
Notes:
- ‘Employee Number’, ‘Refrigerator ID’, ‘Solder Paste Material PN’, and ‘Solder Paste Material SN’ can not be empty, and if the value is invalid, the system will pop up an error message.
- Reference Work Order can be null, if it is null, it will map to the N/A level solder paste control. If it is not Null, it must exist in the system. If the solder-paste material PN has been changed, it must input the refrigerator ID first.
- Once users input the Refrigerator ID, all the Solder Paste in this refrigeration will list. The Part Number put in the refrigerator first will be in front. We recommend taking the first one (material PN) in order.
The system supports taking out more than 1 solder paste material of the refrigeration at one time. Once users change the value of ‘Solder Paste Material PN’ (must input ‘Refrigerator ID’ first) then the further refrigeration in value of ‘Solder Paste Material SN’ can be displayed first automatically according to the FIFO rule.
- The ‘Reference Work Order’ item can be empty. If this is empty, it will map to the N/A level for the one Solder Paste MPN control.
- The ‘Reference Work Order’ item is related to the part configured in the‘Solder Paste MPN Control’ function.
- If the shelf time of the current solder paste material is more than ‘Shelf-Life’ configured in the function ‘Solder Paste MPN Control’ then the system will prompt an error message such as ‘Shelf Time Expired’.
- If the storage time of the current solder paste material in the refrigerator is less than ‘Min Storage Time’ configured in the function ‘Solder Paste MPN Control’ then the system will prompt an error message such as‘Not Reach Min Storage Time’.
- If the Solder Paste Refrigeration FIFO is‘YES’, the solder paste was put into the same refrigerator earlier than that solder pastes with the same MPN will be allowed to take out from the same refrigerator. Otherwise, the system will prompt a warning message to remind the user to take out the earlier solder paste.
Thaw Start 
Once the Thaw Start icon is selected, users can complete the fields: Solder-Paste Material SN, Reference Work Order, Thaw Humidity(%), Thaw Temperature (°c), and Comment.
Figure 20: Thaw Start
Notes:
- ‘Employee Number’, and ‘Solder Paste Material SN’ items can not be empty.
- The ‘Reference Work Order’ item can be empty.
- If the previous step (Refrigerator Out) has already mapped ‘Solder-Paste Material SN’ and ‘Reference Work Order’ then the value of ‘Reference Work Order’ will display automatically after the user completes inputting the ‘Solder Paste Material SN’ item.
- If the shelf time of the current solder paste material is more than ‘Shelf-Life’ configured in the function ‘Solder Paste MPN Control’ then the system will prompt an error message such as ‘Shelf Time Expired’.
- If the value of ‘Thaw Humidity’ is not between the value of ‘Ambient Humidity Low Limit’ and the value of ‘Ambient Humidity High Limit’ (Ambient Humidity Low Limit and Ambient Humidity High Limit can be configured in function ‘Solder Paste MPN Control’) then the system will prompt an error message such as ‘Incorrect Thaw Humidity’.
- If the Solder Paste Thawing FIFO is ‘YES’, the solder paste that is taken out from (or put into) the same refrigerator earlier than the solder pastes with the sam MPN will be allowed to do the ‘Thaw Start’ action, otherwise, the system will prompt a warning message such as ‘It is not the correct FIFO solder paste’ to remind the user.
Thaw End 
Input Employee Number, Solder-Paste Material SN, then press Enter key Input/select Reference Work Order, Comment, then click the Submit button.
Figure 21: Thaw End
Notes:
- ‘Employee Number’, and‘Solder Paste Material SN’ can not be empty.
- The‘Reference Work Order’ item can be empty.
- If the previous step has already mapped‘Solder-Paste Material SN’ and ‘Reference Work Order’ then the value of ‘Reference Work Order’ will display automatically after users complete inputting the ‘Solder Paste Material SN’ item.
- If the shelf time of the current solder paste material is more than ‘Shelf-Life’ configured in the function‘Solder Paste MPN Control’ then the system will prompt an error message such as ‘Shelf Time Expired’.
- If the Thaw time of the current Solder Paste material is less than in Thaw Time’ configured in the function ‘Solder Paste MPN Control’ then the system will prompt an error message such as ‘Not Reach Min Thaw Time’.
- If the Solder Paste Thawing FIFO is‘YES’, the solder paste that is taken out from (or put into) the same refrigerator earlier than the solder pastes with the sam MPN will be allowed to do the ‘Thaw End’ action, otherwise, the system will prompt a warning message such as ‘It is not the correct FIFO solder paste’ to remind the user.
Stirring 
Input Employee Number, Solder-Paste Material SN, then press Enter key.
Input/select Reference Work Order, Comment, then click Submit button.
Figure 22: Stirring
Notes:
- ‘Solder Paste Material SN’ item can not be empty.
- The‘Reference Work Order’ item can be empty.
- If the previous step has already mapped the ‘Solder-Paste Material SN’ and ‘Reference Work Order’ then the value of‘Reference Work Order’ will display automatically after the user completes inputting the‘Solder Paste Material SN’ item.
- If the shelf time of the current solder paste material is more than ‘Shelf-Life’ configured in the function‘Solder Paste MPN Control’ then the system will prompt an error message such as ‘Shelf Time Expired’.
Open Jar 
InputEmployee Number, Solder-Paste Material SN, then press Enter key.
Input/select Reference Work Order, Comment, then click Submit button.
Figure 23: Open Jar
Notes:
- ‘Solder Paste Material SN’ item can not be empty.
- The‘Reference Work Order’ item can be empty.
- If the previous step has already mapped the‘Solder-Paste Material SN’ and‘Reference Work Order’ then the value of‘Reference Work Order’ will display automatically after the user completes inputting the ‘Solder Paste Material SN’ item.
- If the shelf time of the current solder paste material is more than ‘Shelf-Life’ configured in the function‘Solder Paste MPN Control’ then the system will prompt an error message such as‘Shelf Time Expired’.
Solder Paste Scrap 
Input Employee Number, Solder-Paste Material SN, then press Enter key.
Input Scrap Reason, then click the Submit button.
Figure 24: Solder Paste Scrap
Notes:
- ‘Solder Paste Material SN’ can not be empty.
- If any of the above solder paste control steps prompt a ‘Warning Message’ or‘Error Message’ then the system prompts an alert message such as ‘Do you want to scrap current solder-paste material?’ at the same time.
Replace Board Barcode
The purpose of this module is to replace the scanned board barcode under various circumstances such as barcode label replacement for warranty board and damaged barcode label.
Figure 25: Replace Barcode- Submit
1. Scan or enter the original barcode.
2. Scan or enter the new barcode.
3. Select Send.
4. The result will display in the list on the Replace Barcode main screen.
Board Scanning Status
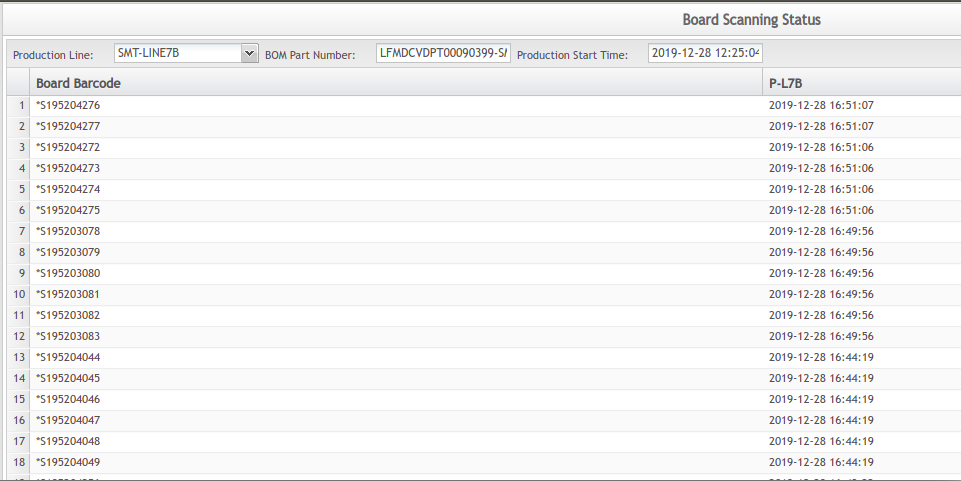
Board scanning status will show the latest scanned board on the production line.
To access the Board Scanning Data page, navigate to Production >Production Part Traceability > Board Scanning Status.
Figure 26: Board Scanning Status
1. Enter the first 4 characters of the line name.
2. The production line name will display.
3. Select the production line.
4. The scanned barcode information will display in the Board Scanning Status list.
Appendix A: Load Material Error and Resolution List
| Error prompt | Comments (R: Reason S: Solution) |
| Feeder does not match! | R: Feeder type mismatches what defined in the feeder picklist. S: To check the feeder type this defined in Feeder Maintenance. or S: To check the feeder type associated with this material in the SMT placement program. |
| Feeder is now in use! Material is now in use! |
R: Feeder or Material is still in use or loaded at the affected online or offline workstation. S: Unload the affected feeder by first finding out which production line and what workstation has such feeder loaded then unload the feeder through the proper unloading process as described in section 6. |
| Station does not exist! | R: Invalid or Mismatch material loading location relative to what is defined in the feeder picklist. S: To check the station (or slot) location this defined in the feeder picklist. |
| Feeder does not exist! Old feeder does not exist! |
R: Feeder barcode record is not found in Traceability. S: To insert the feeder barcode and assigned the feeder type in Feeder Maintenance. |
| Station or Designator does not match! | R: Defined picklist (material p/n and reference designator based on station setup) is different than BOM (material p/n and reference designator). S: To check and compare the consistency of feeder picklist and production BOM. |
| Old feeder does not match! | R: Feeder barcode record is not defined or found in Traceability. S: To check if such an old feeder barcode is been used at the same station. Or S: To check if such an old feeder barcode record is been defined in Traceability WEB-- > Feeder Maintenance. |
| Material barcode not found! | R: As prompted. S: To check if the affected material barcode exists in TraceabilityWEB > Material Report. Consult with the material labeling team for re-label if necessary. |
| No old feeder in workstation! | R: As prompted. S: Not required to scan any feeder in "Old Feeder Barcode". |
| Material is not in AML | R: Such material is not in BOM'
s Approved Material List. |
| Old feeder must be released! | R: As prompted. S: Re-input the old feeder in "Old Feeder Barcode". |
| No BOM item | R: Incorrect BOM loaded when set Traceability production online. S: To check if the work order has been assigned to the correct BOM p/n. |
| No material in picklist! | R: As prompted. S: Re-define the picklist by first set the affected production offline. |
| Material has been run out | R: Attempted new input material is been recorded zero quantity in Traceability. S: Cycle-count the material and update the material in Traceability Web > Reprint Material Label. |
| Material has been expired | R: Attempted new input material is been expired. S: Baking process and history required in Traceability WEB -- >Unfinished MSD Handling. |
| Material not found in BOM | R: Attempted new input material (its SSCI P/N) is not found in BOM. S: S: To check if the work order has been assigned to the correct BOM p/n. |
Appendix B: Scan Board of Error Message and Suggested Solutions
| Error prompt | Comments (R: Reason S: Solution) |
| Incorrect BOM! | R: Loaded materials listed in the SMT picklist and/or its reference designator are not defined in the selected ECN BOM. S: Verify the materials are all correctly defined in both SMT picklist program with associated designator and ECN BOM under Traceability WEB > Show BOM. |
| Check component loaded. | R: Component which has attempted to load is already expired. S: Load the alternative material package which comes with a valid production shelf life and condition. |
| Only#of loaded materials / Total # of materials should load Material Loaded! | R: Incomplete the number of material(s) loaded to the scanning workstation. S: Load the reported missing materials to the affected scanning workstation. |
| This board floor life has expired. | R: The PCB is been expired and not applicable to shop floor production. S: Oven baking required to set the temperature and humidity conditions back to specifications. |
| Check is panel? | R: Incorrect scanning behavior set up on the workstation. S: To check the Panel option is selected under the Workstation Setup > Scan Board/Panel. |
| Incorrect Panel Barcode Format | R: Incorrect barcode regulation set up on the workstation. S: To check the Barcode Regulation is been correctly setup under Workstation Setup > Scan Board/Panel. |
| Incorrect Barcode Format | R: Incorrect barcode regulation set up on the workstation. S: To check the Barcode Regulation is been correctly setup under Workstation Setup > Scan Board/Panel. |
| Incorrect Panel Extra S/N Format | R: Incorrect barcode regulation set up on the workstation. S: To check the S/N Regulation is been correctly setup under Workstation Setup > Scan Board/Panel. |
| Incorrect Extra S/N Format | R: Incorrect barcode regulation set up on the workstation. S: Check if the S/N Regulation has been correctly set up under Workstation Setup > Scan Board/Panel. |
| Panel Not Yet Released | R: Affected panel has not been scanned through all workstations before the Break Panel process. S: Check if the panel has passed through all workstations scanning prior to breaking the panel. |
| Duplicated Serial Barcode | R: As prompted. S: Investigate, re-issue, and reprint a unique serial barcode for scanning. |
| Duplicated Barcode | R: As prompted. S: Investigate, re-issue, and reprint a unique board barcode for scanning. |
| Barcode Length can't exceed 48! | R: As prompted. S: Re-define the barcode length to less than 48 alphanumeric sizes in Workstation Setup > Barcode Regulation. |
| Previous workstation not scanned! | R: Affected unit is not scanned at a previous workstation. S: Scan the affected unit at the missing scanning workstation. |
| This MSD material has expired! | R: Loaded material(s) is expired and is no longer authorized for use in production. S: Unload the affected materials for further material investigation and load valid material such as baked or sealed material. |
| Can't Generate continuous serial barcode. | R: Continuous serial(s) has been generated and been scanned. S: Verify the scanning always starts with the smallest serial on the panel. |
