SOP-42Q-MES0021 Algorithm Maintenance
42Q Home > Shop Floor Control > Configuration > Algorithm Maintenance
Contents
- 1 Introduction
- 1.1 Creating Algorithms
- 1.2 Create Element
- 1.2.1 Constant Element
- 1.2.2 Variable Element
- 1.2.3 Part Element
- 1.2.4 Shop Order 2 Element
- 1.2.5 Order Number Element
- 1.2.6 Date Element
- 1.2.7 Custom Period Element:
- 1.2.8 Year Code Element
- 1.2.9 Year Custom Element
- 1.2.10 Year Month Period Element
- 1.2.11 Year Week Period Element
- 1.2.12 Year Day Period Element
- 1.2.13 Month Code Element
- 1.2.14 Month Custom Element
- 1.2.15 Month 24 Element
- 1.2.16 Month Day Code Element
- 1.2.17 Month Day Custom Element
- 1.2.18 Month Day Period Element
- 1.2.19 Week Custom Element
- 1.2.20 Week Day Code Element
- 1.2.21 Week Day Custom Element
- 1.2.22 Week Day Period Element
- 1.2.23 Sequence Element
- 1.3 Edit Algorithm
- 1.4 Copy Algorithm
- 1.5 Deleting an Algorithm
- 1.6 Exporting an Algorithm
- 1.7 View Customcode Record
- 1.8 Special Functionalities
- 1.9 Test Algorithm
- 1.10 Activate Algorithm
- 1.11 Select Enabled
- 1.12 Import Algorithm
Introduction
Algorithm Maintenance provides the ability to create and modify serial number algorithms. The Algorithm Maintenance adheres to the format used by 42Q customers and engineers when writing specifications for serial number algorithms. It is integrated with SFDC and generates serial numbers (shop order and containerization modules) and MAC addresses.
The main Algorithm Maintenance portlet is to trigger actions according to MES parameters.
To access the Algorithm Maintenance, navigate to Shop Floor Control>Configuration>Algorithm Maintenance.
Note: A user only has access to the modules assigned to his or her profile.
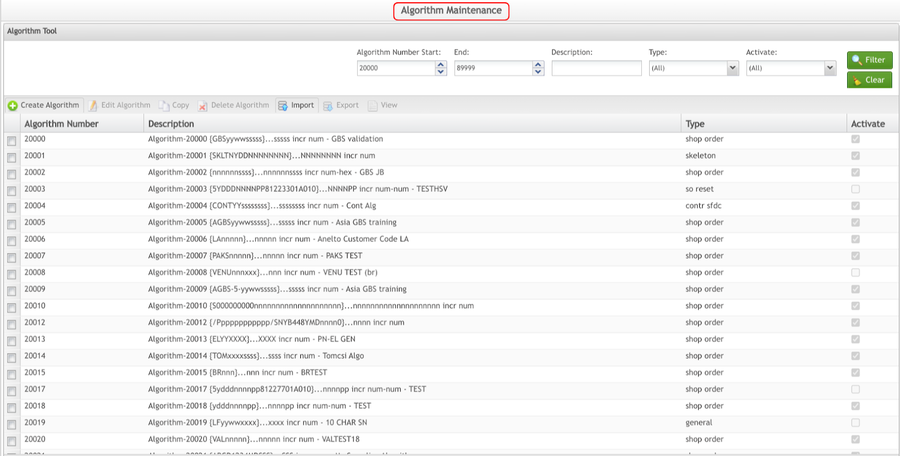
Figure 1: Algorithm Maintenance Main Page
This Algorithm main page displays all defined algorithms. The user is able to Create Algorithm, Edit Algorithm, Copy, Delete Algorithm, Import, Export, and View. See the next topics for further information.
The filter feature allows filtering results by algorithm number range, description, type, and active status. When Type displays All it means that algorithms not created by the tool are displayed in the list. Enter the desired filter criteria and select Filter. Select Clear to clear the fields.
Creating Algorithms
Note: As a general rule, consult customer serialization documentation when creating customer-defined serial number algorithms to ensure correct algorithm format and functionality. This avoids the risk of generation and use of incorrect serialization formats.
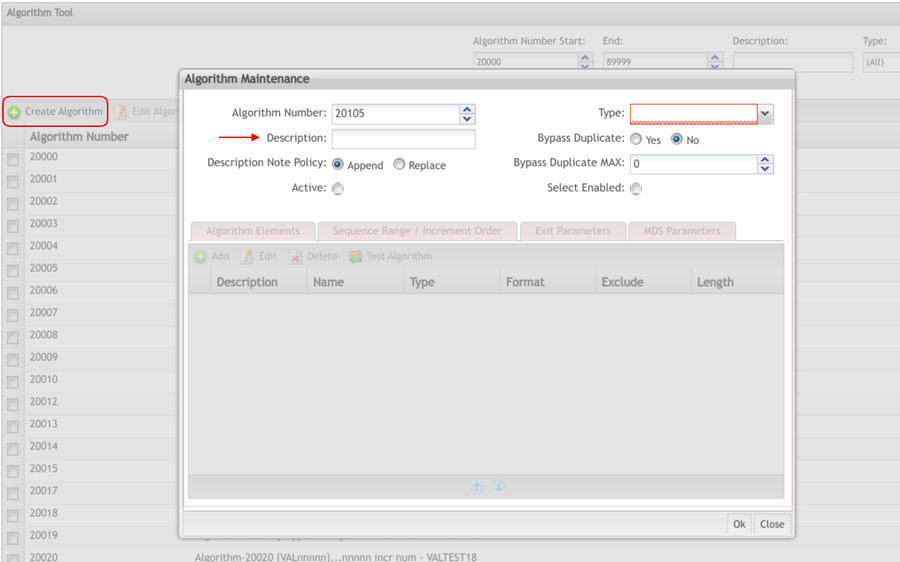
1. To create algorithms, select Create Algorithm on the main menu. The Algorithm maintenance window displays.
Figure 2: Create Algorithm
2. The Algorithm Number available in the database is displayed. If necessary, it is possible to enter a special algorithm number.
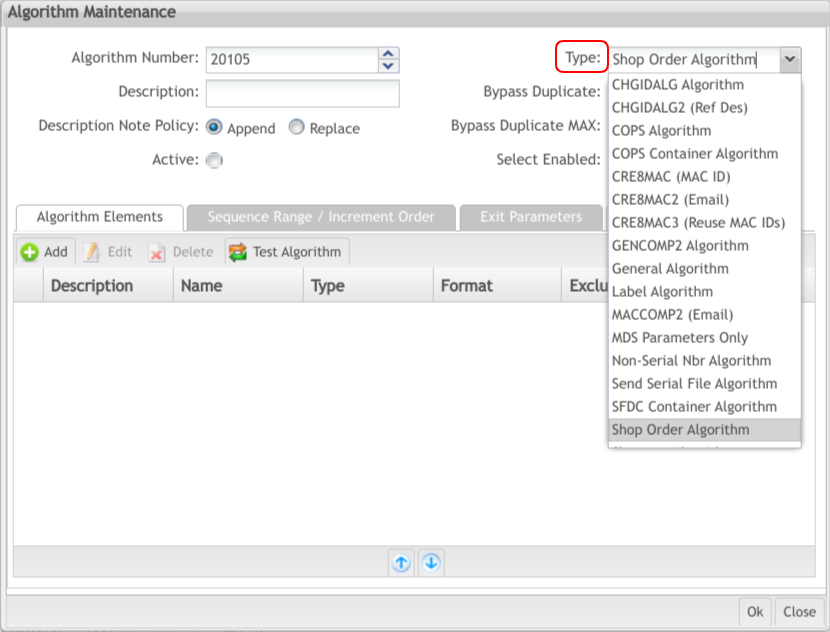
3. Choose the algorithm type that determines how the algorithm will be used in production by selecting the algorithm type in the Type drop-down list.
Figure 3: Algorithm Types
The Algorithm Maintenance currently supports the following algorithm types:
- SFDC Container Algorithm: This algorithm type is used to generate serial numbers from the SFDC Container menus in MES.
- GENCOMP2 Algorithm: This algorithm type is used to generate serial numbers using the GENCOMP2 command from SFDC.
- CRE8MAC (MAC ID): This algorithm type is used to generate serial numbers using the CRE8MAC command from SFDC.
- Label Algorithm: This algorithm type is used to generate serial numbers for labels. The Label algorithm type requires that a particular label be programmed by IT to call the specific serial number algorithm using this algorithm type.
- Non-Serial Nbr Algorithm: This algorithm type is used when no serial is generated.
- CRE8MAC2: Sends e-mails alerting the user when the MAC address quantity is low.
- General: Created for general purposes.
- Skeleton Algorithm: To be used in the release process in the Shop Order module.
- CHGIDALG Algorithm: This algorithm type is used to generate serial numbers using the CHGIDALG command from SFDC.
- CHGIDALG2 (Ref Des): This algorithm type is used to generate serial numbers using the CHGIDALG2 command from SFDC. The reference designator parameter is passed to the CHGIDALG2 command from the MES parameters in the Algorithm Maintenance.
- CRE8MAC3 (Reuse Mac IDs): This algorithm type is used to generate serial numbers using the CRE8MAC3 command from SFDC. The CRE8MAC3 command sends e-mails alerting the user when the MAC address quantity is low. The CRE8MAC3 command also seeks out ranges of serial numbers that have not yet been generated and assigned.
- MACCOMP2 (Email) - This algorithm type is used to generate serial numbers using the MACCOMP2 command from SFDC. The MACCOMP2 command sends e-mails alerting the user when the MAC ADDRESS quantity is low.
- Send Serial File Algorithm: This algorithm type is used to generate serial numbers using the SENDSERIALFILE command from SFDC. The SENDSERIALFILE command sends a file that lists the generated serial numbers to users. The SENDSERIALFILE command also sends e-mails alerting the user when the serial number quantity is low.
An existing algorithm may not be changed to a different algorithm type under the following conditions:
- If the algorithm has already been used in production. This condition can be overridden by setting the latest serial number to blank in the Latest SN Menu of the Testing Facility.
- If the latest serial number has already been set to a non-blank value in the Latest SN Menu of the Testing Facility. This condition can be overridden by setting the latest serial number to blank in the Latest SN Menu of the Testing Facility.
A Shop Order algorithm type may not be changed to a different algorithm type under the following conditions:
- If the algorithm definition contains an element where the Variable Length attribute is set to Yes.
- If the algorithm definition contains an element where the Previous Must Match Current attribute is set to Yes.
- If the algorithm definition contains an element where the Return Previous Value attribute is set to Yes.
- If the algorithm definition contains a "sequence" element where the Suppress Zeros attribute is set to Yes.
- If the algorithm definition contains an "order nbr" element.
4. Enter a description in the Description Note field.
Description Note Policy: When this attribute is set to Append, and Description Note is not blank, the Description Note is appended to the algorithm description. Append is the default for this attribute. Sometimes it may be desirable to exclude the algorithm sequence information from the algorithm description. To exclude the sequence information from the algorithm description, set the Description Note Policy to Replace.
Note: As a general rule, set the Description Note Policy to Replace when utilizing customer serialization documentation, and enter the customer name and document number as the Description Note (as space permits). This aids in Algorithm selection and serves as an easy reference to customer documentation.
Verify the algorithm description displays before deploying the algorithm.
5. Select the bypass yes or no option to Bypass Duplicate.
Bypass Duplicate: When Bypass Duplicate is set to Yes, generated serial numbers that match existing serial numbers will be bypassed and the next unique serial number will be returned instead. When Bypass Duplicate is set to No, a generated serial number that matches an existing serial number will cause an error to be returned and halts the release process.
Note: As a general rule, it is preferred to set Bypass Duplicate to No. Only set Bypass Duplicate to Yes when using the exported serial file to import or print serial numbers, or if there are alternative means of identifying the bypassed serial number(s). This avoids the risk of printing bypassed (duplicate) serial numbers during the label print process when utilizing an external application or software.
6. Enter a value greater than 1 onBypass Duplicate MAX field and click on the Ok button.
Bypass Duplicate MAX: When Bypass Duplicate is set to Yes, then Bypass Duplicate Max must be set to a non-zero value, indicating the maximum number of existing serial numbers that may be bypassed. The maximum value is 9999 to avoid a runaway transaction. When Bypass Duplicate is set to No, Bypass Duplicate Max must be set to zero.
Create Element
There are 23 element types available, as displayed in the Element Type list:
Figure 4: Element Type
Note that date-type elements include the specific element type date, as well as the other date-oriented elements, such as custom period and year code (all element types, except constant, variable, part, order number, and sequence, are date oriented). Note the distinction between the date element and date-oriented elements (which includes the date element). These two terms will be used as appropriate and are not interchangeable.
In general, any combination of these element types may appear in a single serial number algorithm definition in any order. A single element type may appear more than once. However, there are a few restrictions:
- The order nbr element type will not be available in the list of available element types if the algorithm type is not Shop Order.
- There may be only one month 24 element type in a serial number algorithm definition.
- Standard calendar element types will not be available in the list of available element types if there is already a fiscal-calendar element in the algorithm definition.
- Fiscal calendar element types will not be available in the list of available element types if there is already a standard calendar element in the algorithm definition.
- A variable-length or zero-suppressed sequence element must be the last element in a serial number algorithm definition (see the "sequence" element for more details).
Common Element Attributes:
Many element attributes are shared by the various element types:
- Element Name: Every element (except the Constant element) has an Element Name (the Constant element has a Constant Value instead). The name of an element is made up of one or more instances of a single letter; this letter may not be used in the element name for any other element. All values entered in the upper case in the element name field will be converted to lower case. The length of an element in the serial number definition is determined by the length of the value entered in the element name field.
- Element Type: Every element has an Element Type, as selected from the Element Types list.
- Element Description: Every element has an Element Description. This is an optional, 20-character text field where information may be recorded about a given algorithm element. This value does not affect the function of the serial number algorithm.
- Element Format: Most element types require an Element Format, with the exception of the date elements. Valid element formats are Numeric, Alphabetic, Alpha-Numeric, Numeric-Alpha, Hexadecimal, and Character. The "Character" format allows all printable characters (except space) to be included in the element. Valid formats for the Date element are Year, Day of Year, Month, Day of Month, Week, Day of Week.
- Format Exclude: Element types that have the Format attribute (except for "Date" element) also provide for the exclusion of characters from the element format. Letters, numbers, and other characters entered into the format exclude field, for a given element, will not be permitted to appear in serial numbers. For example, a 42Q customer may specify that the sequence number of the serial number may not contain the letters "I" or "O". Enter excluded characters one after the other, as it is not required to separate them with commas or spaces. If characters are separated with spaces, the spaces will be removed automatically. If characters are separated with commas, the commas will also be removed unless the Element Format is Character. In this case, the comma character will be retained as it may be desired to exclude the comma character from the element format.
- Format Pattern: This field is present in many detail screens. It is a read-only field that shows the Element Format, including the Format Exclude characters, in a concise pattern display.
- Reset Sequence Using This Element: Setting this attribute to Yes, a part, or any of the date-type elements may be used to reset the value of the algorithm sequence to its minimum value. The algorithm sequence value will reset to its minimum value if the new value of the "reset" element is different from the value used in the latest serial number.
- For the date-type element, the date value in the latest serial number, for that element, is compared to the current date. If the current date is different the algorithm sequence will be reset to the minimum value. This is the default for date-type elements.
- For part element, the value in the latest serial number, for that element, is compared to the current value in the part maintenance field selected for this element. If the current value is different the algorithm sequence will be reset to the minimum value. By default, the Reset Sequence using this Element attribute is set to No for part elements.
- Previous Must Match Current: Set this attribute to Yes when the value in the starting serial number of a part or a date-type element is required to match the current value. In the case of a date-type element, the value of the element in a serial number must match the current date, else an error is returned upon release. For a part element, the value of the element in a serial number must match the current value in the part maintenance field selected for this element, else errors es returned upon release. This option is available for the type "Shop Order Algorithm" only. It may not be used if either the Reset Sequence using this Element or the Return Previous Value attribute is set to "Yes". The default for this attribute is "No".
- Return Previous Value: Set this attribute to Yes if it is required to return the same date-type element value as the previous serial number. The value in the date element in the new serial number will be the same as the previous serial number regardless of the current date. This option is available for the type Shop Order Algorithm only. It may not be used if either the Reset Sequence using this Element or the Previous Must Match Current, the attribute is also set to Yes. The default for this attribute is No.
Note: The Reset Sequence Using This Element, the Previous Must Match Current, and the Return Previous Value attributes are mutually exclusive. These attributes appear together on a detailed screen, yet only one may be set to Yes.
- Minimum Value: The value of an element in a serial number must be greater than or equal to the value in the minimum value field.
- Maximum Value: The value of an element in a serial number must be less than or equal to the value in the maximum value field.
'Note: 'Minimum Value and the Maximum Value fields are optional, except for Sequence Elements, where they are mandatory. In cases where the minimum and/or the maximum value fields are left blank, the respective default values will be the smallest and the largest values possible with the format specified for that element.
Date-Type Element Attributes:
Date-type elements include the element specifically called date as well as the other date-oriented elements; such as custom period, year code, etc.
- Calendar Type: The calendar type can be Standard, Fiscal, or Eaton (Fiscal).
- The Standard calendar is the most commonly used; it begins on January 1 and ends on December 31.
- The Fiscal calendar is used where the year is made up of 52 or 53 weeks and generally begins on or around January 1. The ISO-8601 calendar is a fiscal calendar defined such that the first week of the year is the week containing the first Thursday of the standard calendar year.
- First Day of Week: The first day of the Fiscal week may be either Sunday (as in the 42Q calendar) or Monday. The first day of the week applies only to fiscal calendars and has no significance in the standard calendar.
- Eaton Calendar: If the calendar type is Fiscal, then the Eaton Calendar may be used (otherwise, the fiscal calendar will be one defined by ISO-8601). The Eaton Calendar is defined such that the first week of the fiscal year is the week containing January 1. The First Day of the Week in the Eaton calendar is always Sunday. However, in an apparent anomaly, the days of the week are numbered beginning with Monday, such that Monday = 1, Tuesday = 2, and Sunday = 7. The name Eaton Calendar refers to the name of the company that uses this fiscal calendar. This calendar is available for use in any algorithm.
Note: Certain element types, such as the month-type element, for instance, require a standard calendar. Other element types, such as a week-type element, require a fiscal calendar. A few element types, such as year-type elements, allow for either a standard or fiscal calendar. The type of calendar required for an element is displayed in the Element Types list.
If the algorithm definition already contains an element that requires a standard calendar, then those element types requiring a fiscal calendar will not be available for selection in the Element Types list; likewise, if the algorithm definition already contains an element that requires a fiscal calendar, then those element types requiring a standard calendar will not be available for selection in the Element Types list. To view all available element types, observe the Element Types list when adding an element to an algorithm that currently had no elements.
A date element may be defined with an Element Format which requires a standard calendar (day of the year, month, or day of the month), with one that requires a fiscal calendar (week or day of the week), or with one that can be either (year). If the algorithm definition already contains a date element with an element format of week or day of the week, then the element formats month, day of the year, and day of the month will not be available for other date elements and Calendar Type will be set to Fiscal. If the algorithm definition already contains a date element with an element format of month, day of the year, or day of the month, then the element formats week and day of the week will not be available for other date elements and the Calendar Type will be set to Standard.
Constant Element
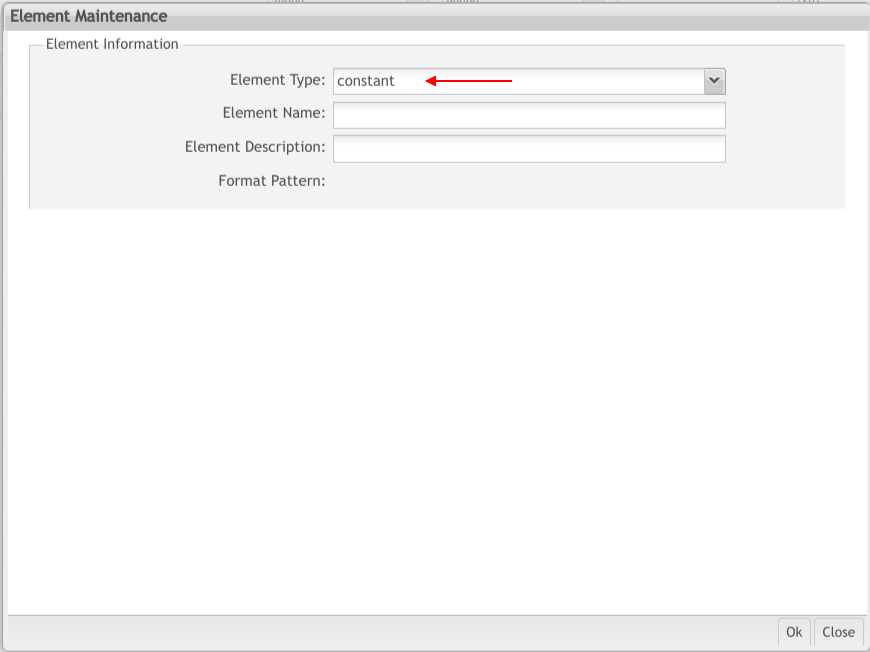
Figure 5: Element Maintenance: Constant Element
The Constant Value of a constant element may contain any characters found on the keyboard. When serial numbers are generated, the constant value will appear exactly as it is entered (except that lower-case letters will be converted to upper case). The value of a constant element will always be the same, as defined in the Element Name field on the constant detail screen.
If a constant element is to have one or more trailing blanks, then the number of blank characters following the element name must be entered into the Trailing Blanks field; otherwise, trailing blanks typed into the Constant Value field will be discarded. Leading blanks may simply be entered in the element name and will be retained automatically.
The length of a constant element in the serial number definition is equal to the length of the value entered in the Element Name field (including any leading blanks) plus the number of Trailing Blanks.
Validation messages are displayed when element data has exceeded the maximum character limit, as follows:
- Lower case is converted to upper case
- Element Name cannot be > 20 characters
- Element Description > 20 characters
- Trailing Blanks > 99.
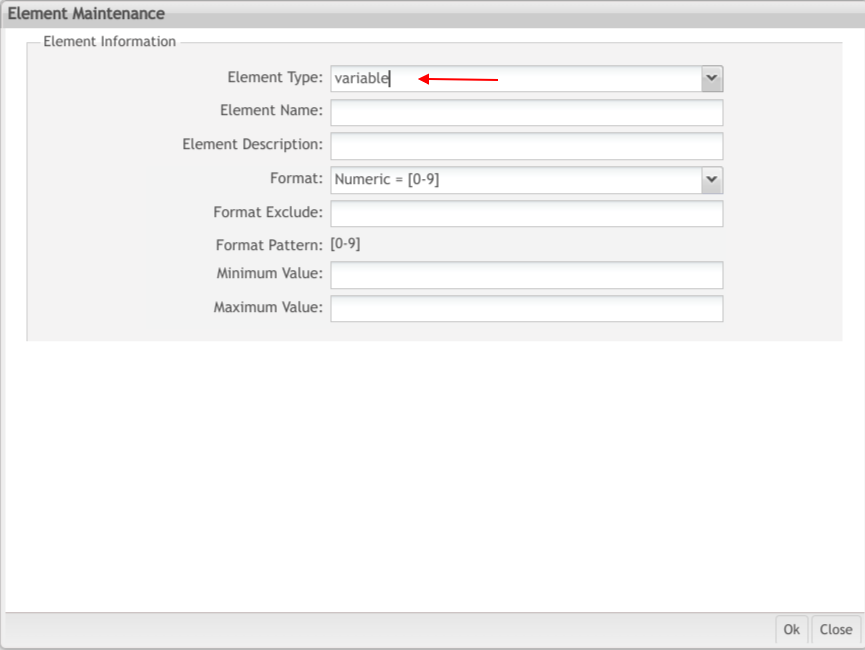
Variable Element
Figure 6: Element Maintenance: Variable
The value of a variable element may be different from one serial number release to another, as long as the value meets the specification on the variable detail screen.
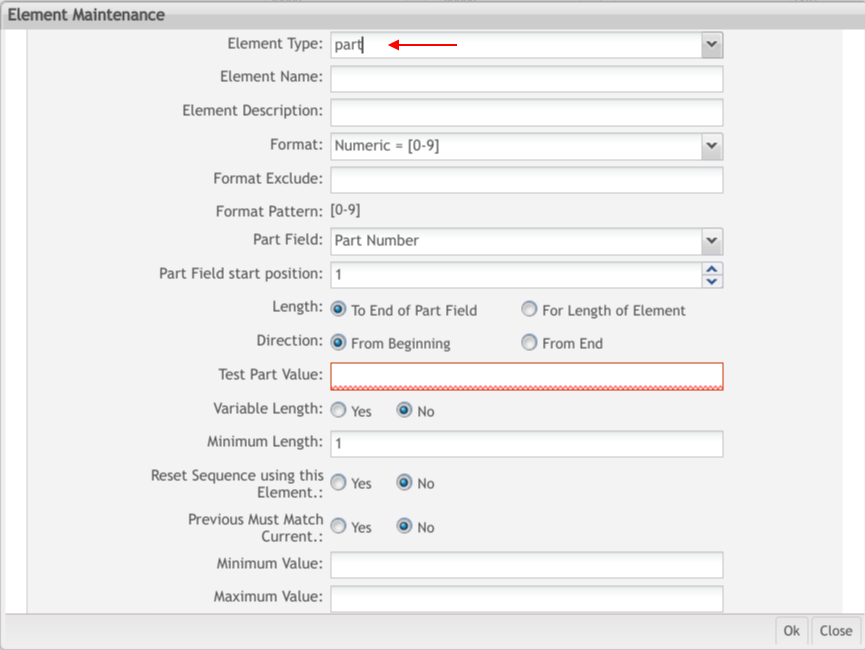
Part Element
Figure 7: Element Maintenance: Part
The value of a part element is taken from a field in the part maintenance record at the time the serial number is generated.
The following attributes apply to Part elements:
- Part Field: Select one of the fields from the drop-own box. This attribute indicates where the serial number data for the part element will come from.
- Part Field Start Position: This attribute indicates the starting position, in the part field, for the selection of data for the part element.
- Length: This attribute indicates how many characters will be selected from the part field. The selection of data, from the starting position, can be made in either of two ways: (1) to the end of the part field; (2) for a number of characters equal to the length of the part element.
- Direction: This attribute will determine from which end of the "part" or "shop order" Value the substring will be selected. The options will be "From the beginning" and "From end". The "Direction" field will affect how "Field start position" and "Length" are applied to the "Value" field.
- Test Part Value: This attribute is the data that will be used to test the part element in the Test Algorithm step.
- Variable Length: Set the Variable-Length attribute to Yes to allow a part element to be of variable length. The length must not be less than that specified in the Minimum Length attribute, nor greater than the length of Element Name. Also, the length of the part element in the starting serial number must be the same as the length of the selected value in the part maintenance field. For a variable-length part element, the Length field must be set to End of Part Field, since those characters selected to determine the length of the part element for a given serial number.
- A Part element may be set to variable-length only for a Shop Order algorithm. There may be only one variable-length Part element in a serial number algorithm definition. A variable-length Part element may not be in the same algorithm definition as a variable-length or zero-suppressed Sequence element.
- Minimum Length: For a variable-length element, the Minimum Length must be less than the length of the Element Name but not less than 1. For a non-variable-length element, the minimum length will automatically be set to equal the length of the Element Name.
- Minimum Value: if this attribute is not blank, the value of the part element in the latest serial number and the value of the part maintenance field must be greater than, or equal to, the Minimum Value.
- Maximum Value: If this attribute is not blank, the value of the part element in the latest serial number and the value of the part maintenance field must be less than, or equal to, the Maximum Value.
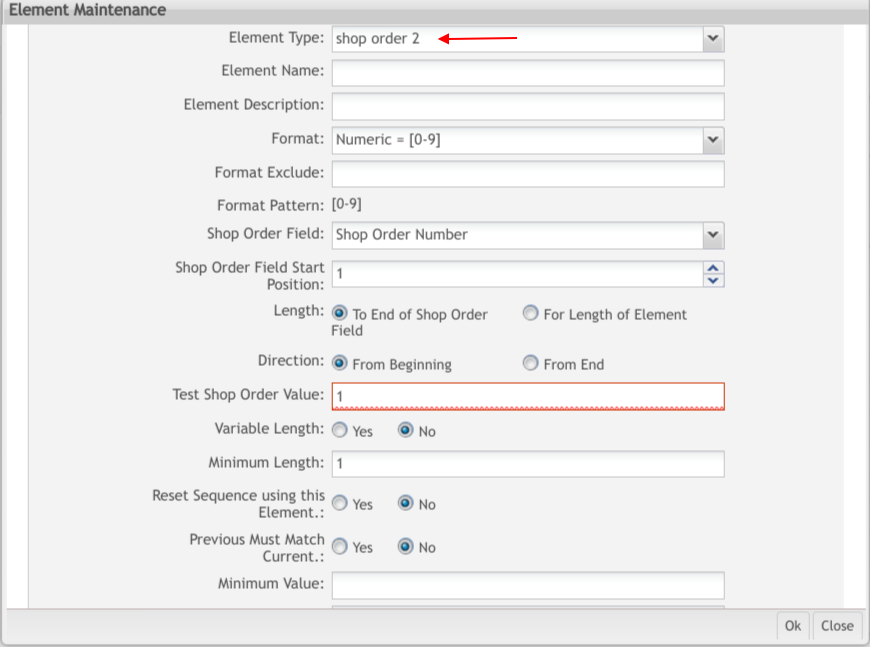
Shop Order 2 Element
Figure 8: Element Maintenance Shop Order 2
This element will function as the part element. The only differences will be in the name of the element type, shop order 2, and the list of Fields in the drop-down list. Otherwise, the part and shop order 2 element types will function identically.
The Fields in the drop-down list for shop order 2 will be shop_order_number, revision, and user_defined and date.
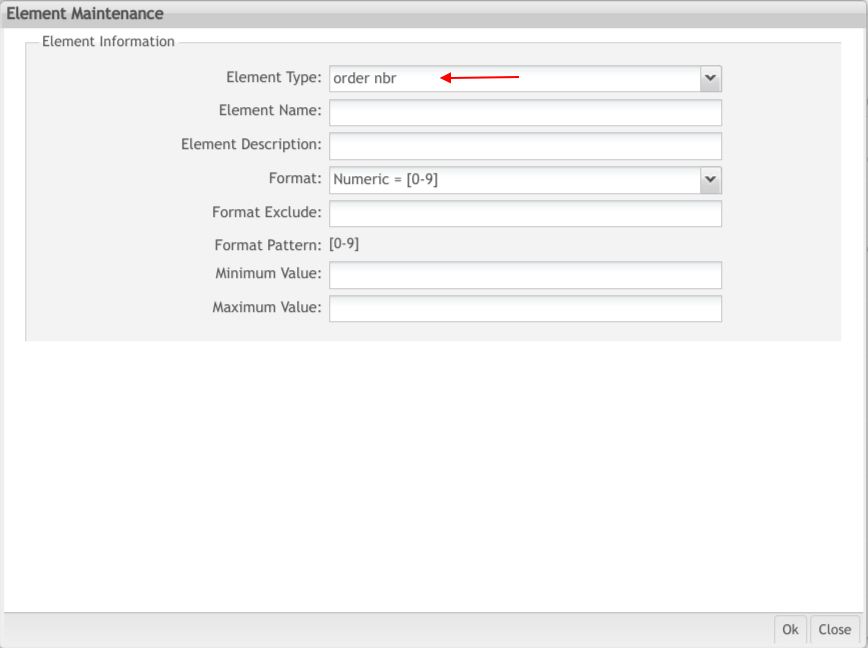
Order Number Element
The Order Number element may only be used with the Shop Order Algorithm type.
Figure 9: Element Maintenance: Order Number
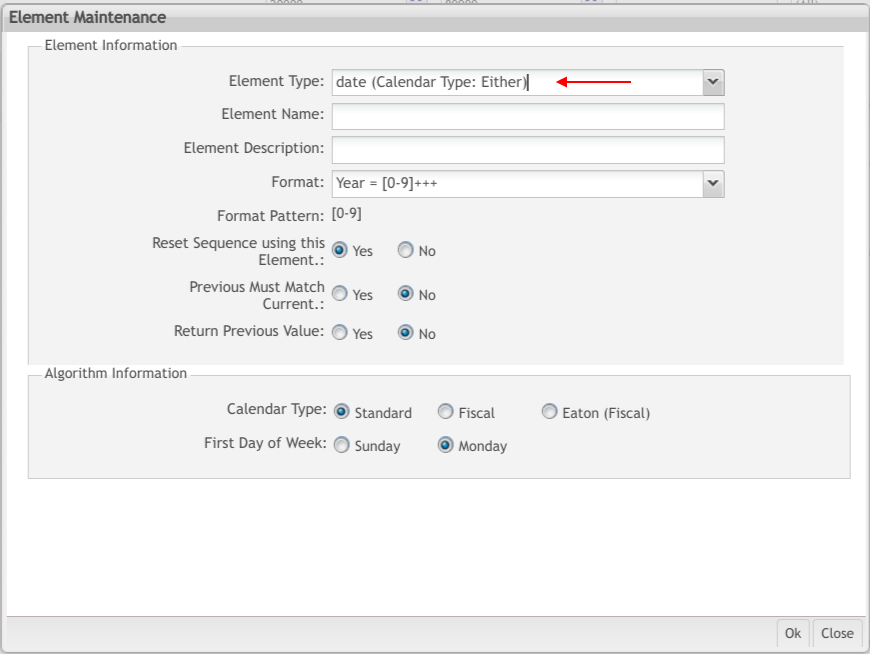
Date Element
Figure 10: Element Maintenance: Date
Date elements contain numeric values which represent various date formats:
- Year: 4-digit year, the last two digits of the year, or the last digit of the year.
- Day of Year: values between 001 to 366
- Month: values between 01 to 12
- Day of Month: values between 01 to 31
- Week: values between 01 to 53
- Day of Week: values between 1 to 7
Element Formats Month, Day of Month, and Day of Year require a standard calendar.
Element Formats Week and Day of Week require a fiscal calendar.
If the algorithm definition already contains a Date element with a format of Week or Day of Week, then the element formats Month, Day of Year, and Day of Month will not be available and Calendar Type will be set to Fiscal.
If the algorithm definition already contains a Date element with a format of Month, Day of Year, Day of Month, Month, or Month 24 element, then the element formats Week and Day of Week will not be available and Calendar Type will be set to "Standard".
A Date element may be used to reset the value of the algorithm sequence to the minimum value by setting the Reset Sequence using this Element attribute to Yes. The algorithm sequence value will then reset to its minimum value if the value of the Date element in the latest serial number is not the same as the current date. This is the default for Date elements.
The value of a Date element in the starting serial number may be required to match the current date. If the Previous Must Match Current attribute is set to Yes, and if the value of that Date element in a serial number does not match the current date, the serial number will return an error. This option is available for Shop Order Algorithm only and may not be used if Reset Sequence using this Element is set to Yes.
A Date element may be required to return the same value as in the previous serial number. If the Return Previous Value attribute is set to Yes", the value in the date element in the new serial number will be the same as the value in the previous serial number. This option is available for "Shop Order Algorithm" only and may not be used if "Previous Must Match Current" or "Reset Sequence using this Element" is also set to "Yes".
Not all date values in a serial number may be represented by numeric values. In these cases, look to other date Element Types that have more flexibility in defining the date values.
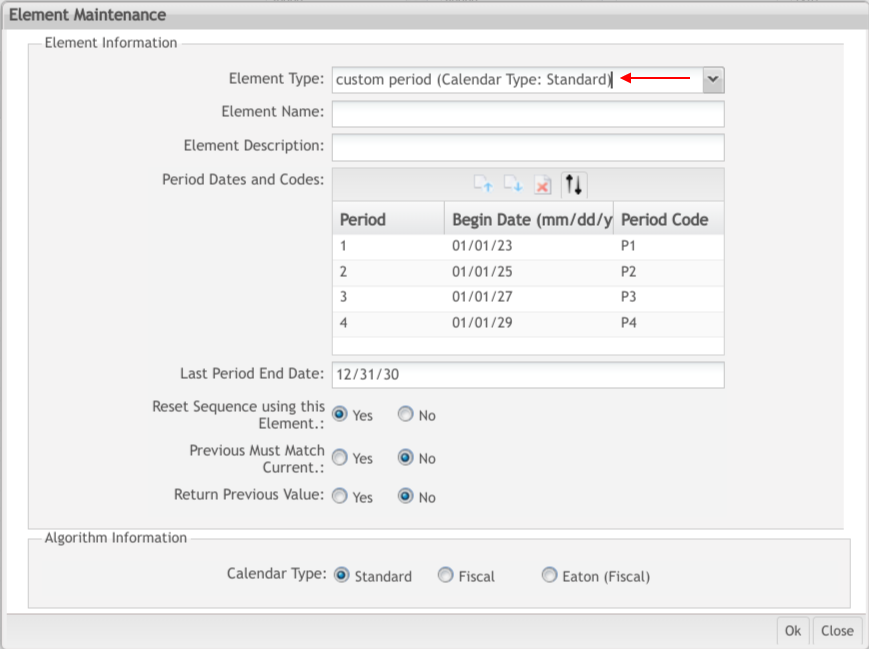
Custom Period Element:
Figure 11: Element Maintenance: Custom Period
A Custom Period element is a variable-length code that represents a user-defined period of time. In the example above, the period code element value P1 will represent the years 2009 and 2010, P2 will represent 2011 and 2012, and so on. A period ends on the day before the next period begins. P4 will represent the years 2015 and 2016, ending on 12/31/16.
The Period Dates and Codes table is maintained using the buttons Add Before, Add After, Delete Period, and Sort by Date buttons.
Begin Dates may be entered in any order but they must be sorted into ascending date sequence before clicking Ok; otherwise, an error is displayed.
Period Codes must be unique within the custom period table, and must all be the same length as the element name.
The Last Period End Date must be greater than or equal to the last period Begin Date.
An algorithm using the Custom Period element is valid only during the time covered by the custom period table.
The Calendar Type for a custom period element is always "Standard".
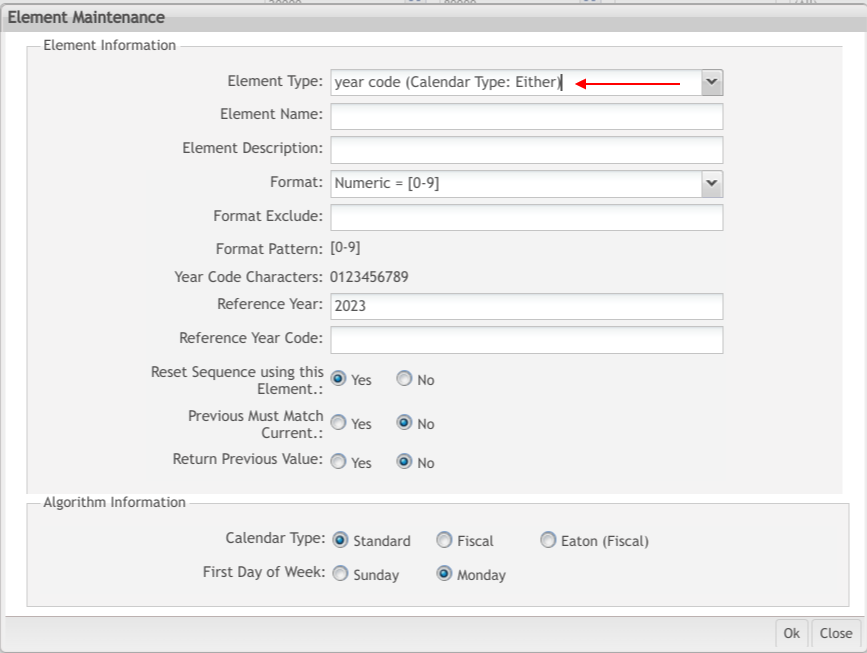
Year Code Element
Figure 12: Element Maintenance: Year Code
A Year Code element is a 1-position code that represents a given year. In the example above, the year code element value 0 will represent the year 2000, 1 will represent 2001, and 9 will represent 2009.
Any Reference Year may be referenced by any Reference Year Code; the only restriction is that there must be a valid code to represent the current year. In this example, the serial number algorithm will not work after the year 2009. Any characters that are excluded from the format pattern will not be valid as Reference Year Codes.
An algorithm using a Year Code element is valid only during the time covered by the year code characters.
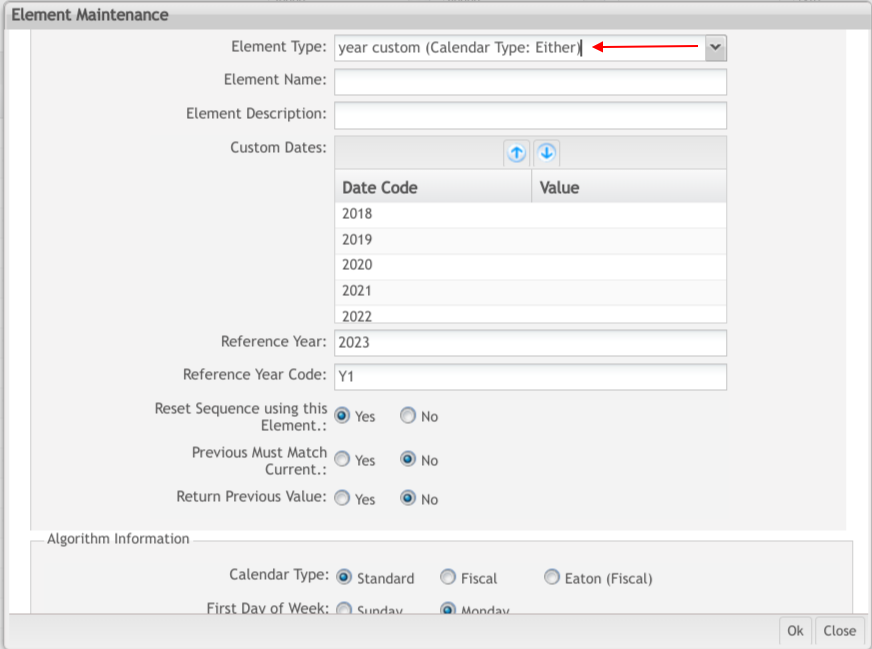
Year Custom Element
Figure 13: Element Maintenance: Year Custom
A Year Custom element is a variable-position code that represents a given year. In the example above, the year custom element value Y1 will represent the year 2009, Y5 will represent 2013, and Y9 will represent 2017.
Any Reference Year may be referenced by any Reference Year Code; the only restriction is that there must be a valid code to represent the current year. In this example, the algorithm will not work after the year 2017. An algorithm using the Year Custom element is valid only during the time covered by the Year Custom table.
Year Month Period Element
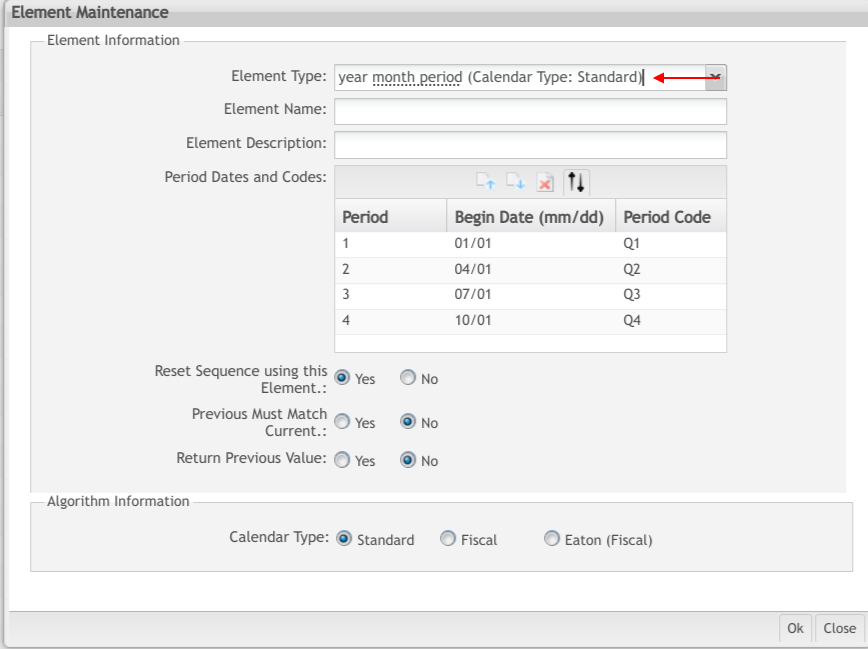
Figure 14: Element Maintenance: Year Month Period
A Year Month Period element is a variable-length code that represents a user-defined period of the standard calendar year. The beginning date of a period is the month and day, and the first Begin Date must be 01/01. In the example above, the period code element value Q1 will represent the first quarter of the standard calendar year, Q2 will represent the second quarter, and so on. A period ends on the day before the next period begins.
The Year Month Period Date and Codes table are maintained using the buttons Add Before, Add After, Delete Period, and Sort by Date buttons.
Begin Dates may be entered in any order but they must be sorted into ascending date sequences before clicking Ok; otherwise, an error is displayed.
Period Codes must be unique within the year-month period table and must be the same length as the element name.
The Calendar Type for a year-month period element is always Standard.
Year Week Period Element
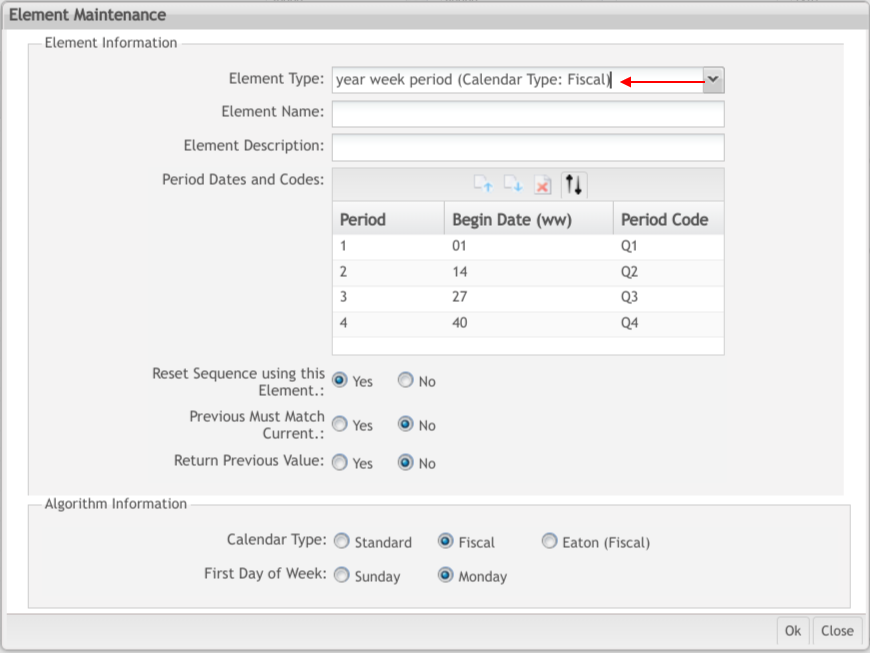
Figure 15: Element Maintenance: Year Week Period
A Year Week Period element is a variable-length code which represents a user-defined period of the fiscal calendar year. The beginning date of a period is the fiscal week of the year, and the first Begin Date must be 01. In the example above, the period code element value Q1 will represent the first quarter of the fiscal calendar year, Q2 will represent the second quarter, and so on. A period ends on the day before the next period begins.
The Year Week Period Dates and Codes table is maintained using the buttons Add Before, Add After, Delete Period, and Sort by Date buttons.
Begin Dates may be entered in any order but they must be sorted into ascending date sequences before clicking Ok; otherwise, an error is displayed.
Period Codes must be unique within the year week period table and must be the same length as the element name.
The Calendar Type for a year week period element is always Fiscal.
Year Day Period Element
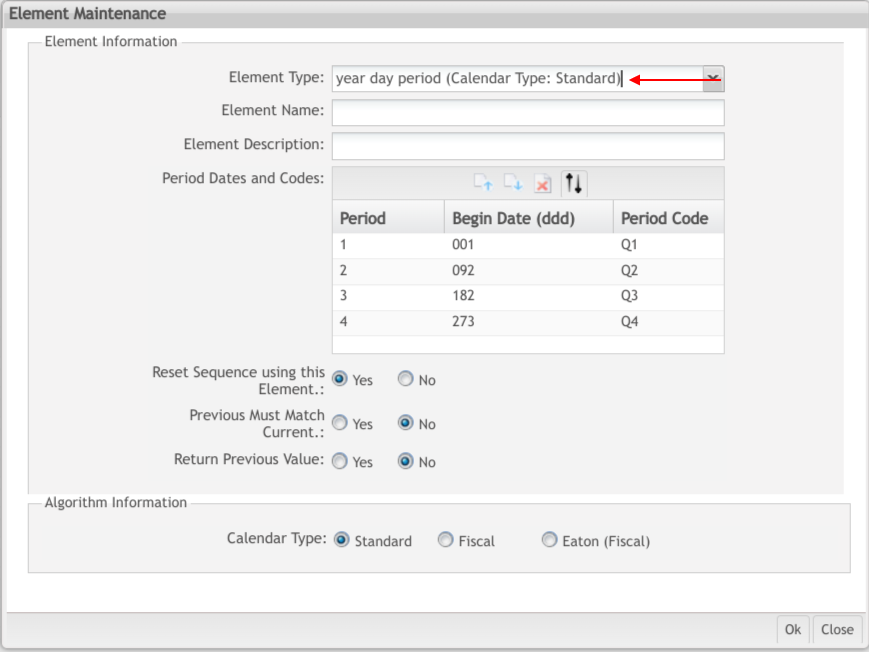
Figure 16: Element Maintenance: Year Day Period
A Year Day Period element is a variable-length code that represents a user-defined period of the standard calendar year. The beginning date of a period is the day of the standard year, and the first Begin Date must be 001. In the example above, the period code element value Q1 will represent roughly the first quarter of the standard calendar year, Q2 will represent roughly the second quarter, and so on. A period ends on the day before the next period begins.
Note: Due to leap year, a given day of the year may fall on a different day of the month, or even on a different month.
The Year Day Period Dates and Codes table is maintained using the buttons Add Before, Add After, Delete Period, and Sort by Date buttons.
Begin Dates may be entered in any order but they must be sorted into ascending date sequences before clicking Ok; otherwise, an error is displayed.
Period Codes must be unique within the year day period table and must be the same length as the element name.
The Calendar Type for a year day period element is always Standard.
Month Code Element
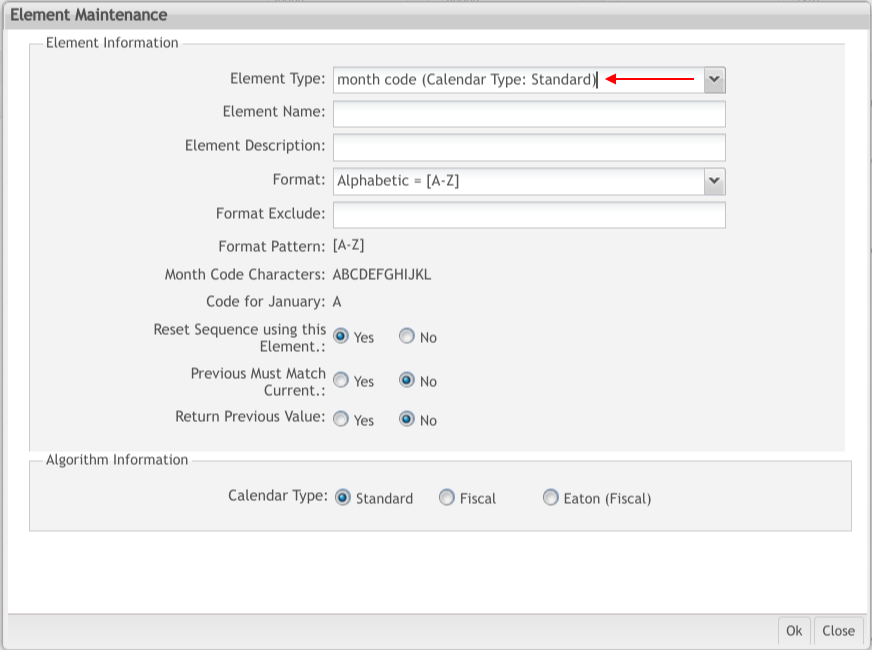
Figure 17: Element Maintenance: Month Code
A Month Code element is a 1-position code that represents a given month. In the example above, the value A will represent January, the value B will represent February, and L will represent December.
The Calendar Type for a Month Code element is always Standard.
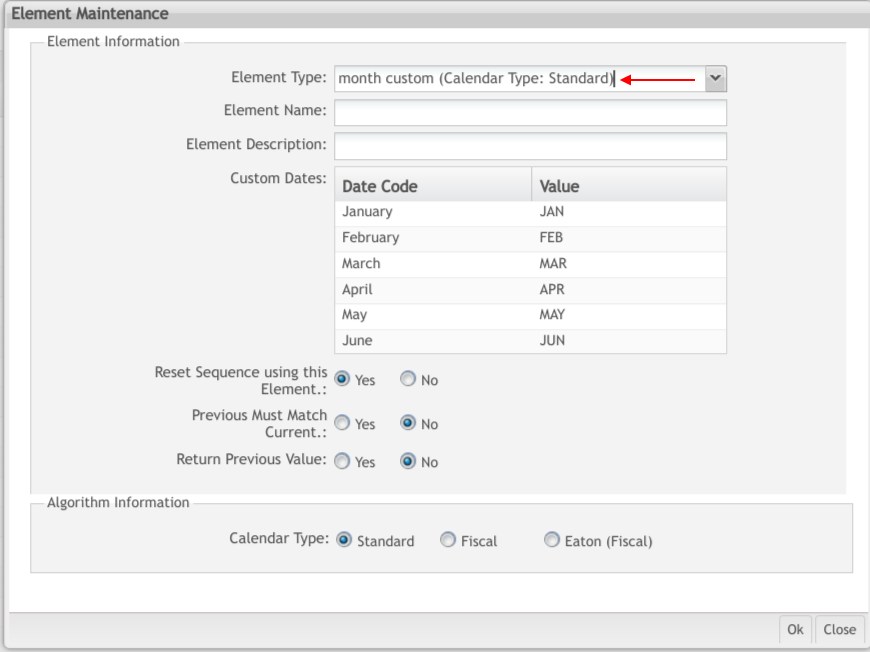
Month Custom Element
Figure 18: Element Maintenance: Month Custom
A Month Custom element is a variable-position code that represents a given month, according to the rules specified on the detail screen. In the example above, the value JAN will represent January, the value FEB will represent February, and so on.
Month Custom Codes must be unique within the Custom dates table and must be the same length as the element name.
The Calendar Type for a Month Custom element is always Standard.
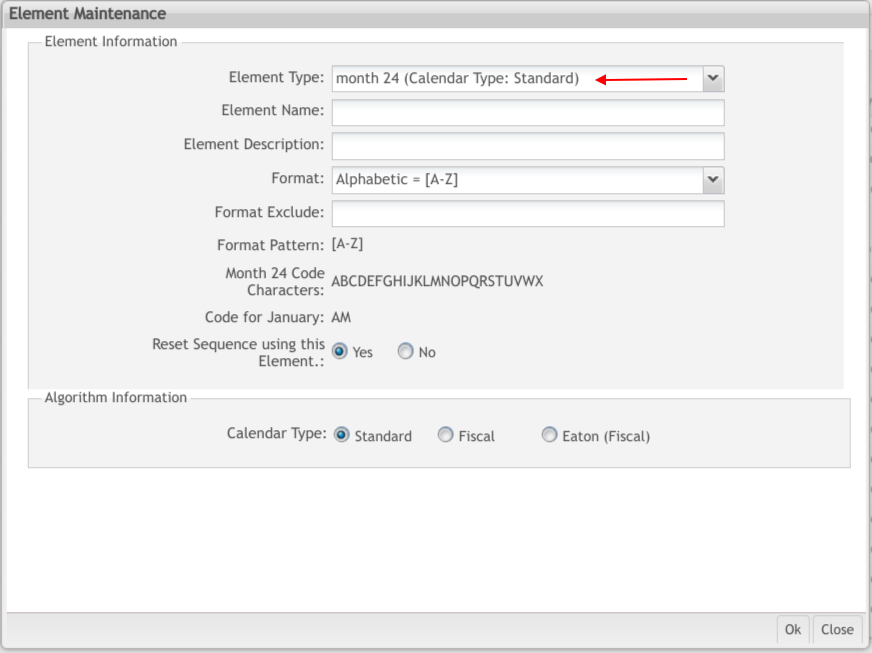
Month 24 Element
Figure 19: Element Maintenance: Month 24
A Month 24 element is a 1-position code that represents a given month with two codes representing each month. In the example above, the month codes A and M will represent January, B and N will represent February, and so on.
The Month 24 element is unique in that it functions as a prefix to the sequence elements. For example, if the month code in the latest serial number is the first code representing the current month, and if the sequence has reached its maximum, then the following will happen in the next serial number: (1) The sequence will reset to the minimum and (2) the second-month code will now represent the current month.
Note: It does not matter where the Month 24 element falls in relation to the Sequence element in the algorithm definition. The Month 24 element will always function as the high-order element of the sequence.
There can be only one Month 24 element in an algorithm definition.
The Calendar Type for a Month 24 element is always "Standard".
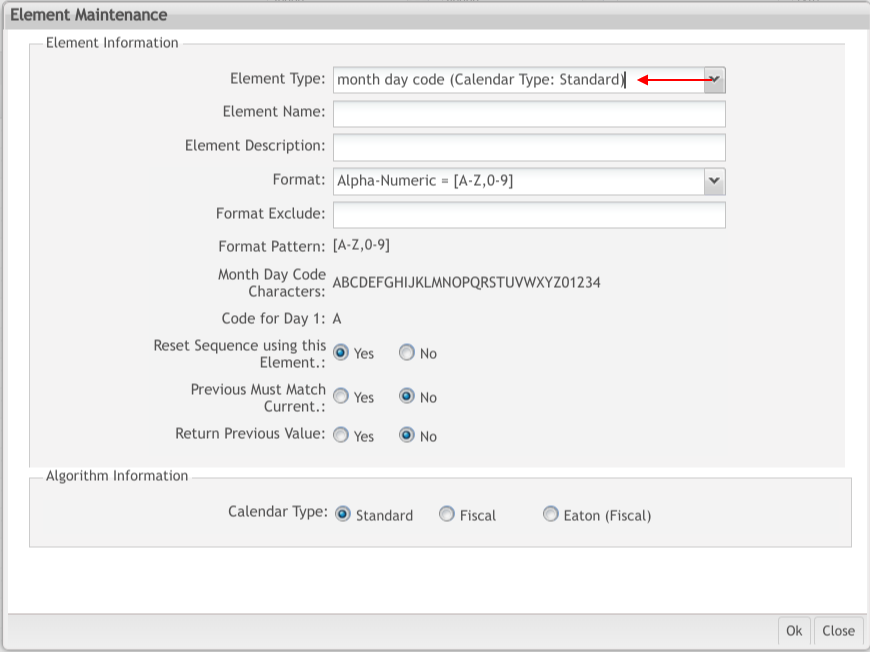
Month Day Code Element
Figure 20: Element Maintenance: Month Day Code
A Month Day Code element is a 1-position code that represents a given day of a standard calendar month. In the example above, the value A will represent day one, the value B will represent day two, and 4 will represent day 31.
Note: Codes at the beginning of the format (those before the code that will represent day 1) must be explicitly excluded. Codes that follow the one that represents day 31 are excluded automatically.
The Calendar Type for a Month Day Code element is always Standard.
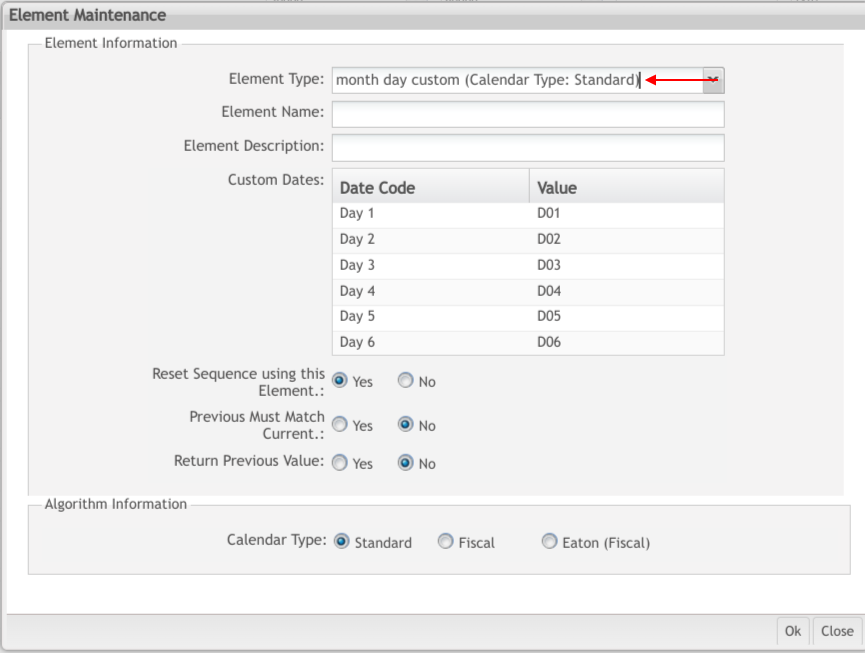
Month Day Custom Element
Figure 21: Element Maintenance: Month Day Custom
A Month Day Custom element is a variable-position code that represents a given day of a standard calendar month. In the example above, the value D01 will represent day one, the value D02 will represent day two, and so on.
The Calendar Type for a Month Day Code element is always Standard.
Month Day Period Element
Figure 22: Element Maintenance: Month Day Period
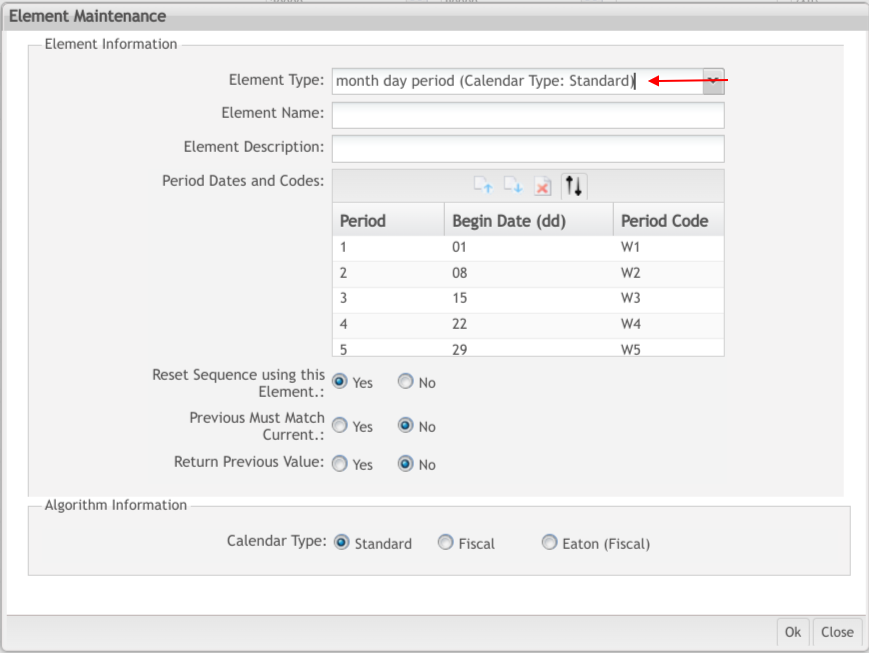
A Month Day Period element is a variable-length code that represents a user-defined period for the standard calendar month. The beginning date of a period is a day of the standard month, and the first Begin Date must be 01. In the example above, the period code element value W1 will represent the first seven days of the month, W2 will represent the second seven days, and so on. A period ends on the day before the next period begins.
The Month Day Period Begin Date and Codes table is maintained using the buttons Add Before, Add After, Delete Period, and Sort by Date buttons.
Begin Dates may be entered in any order but they must be sorted into ascending date sequences before clicking Ok; otherwise, an error is displayed.
Period Codes must be unique within the month-day period table and must be the same length as the element name.
The Calendar Type for a month day period element is always Standard.
Week Custom Element
Figure 23: Element Maintenance: Week Custom
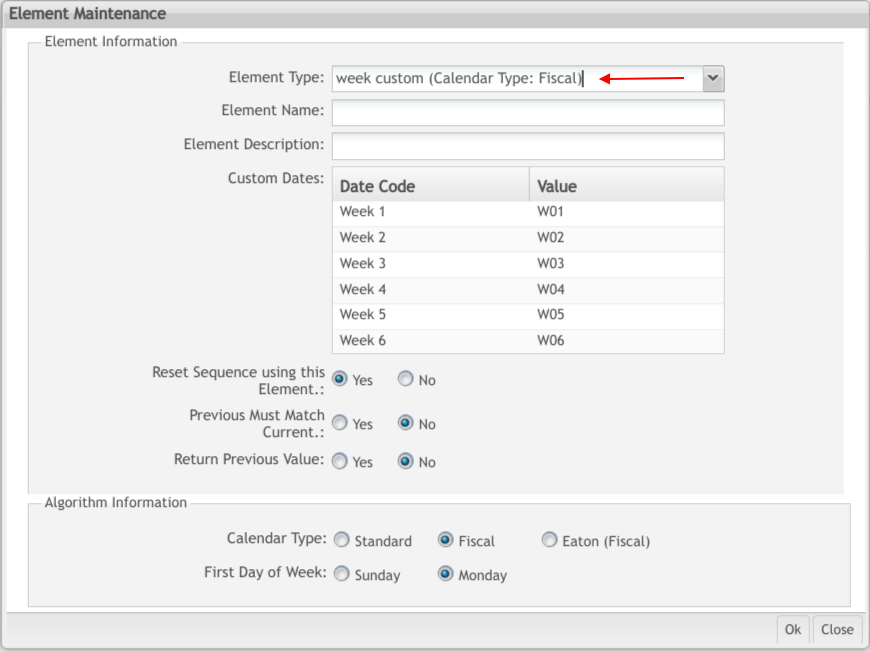
A Week Custom element is a variable-position code that represents a given week in a fiscal calendar year. The element name can not be greater then 10. In the example above, the value W01 will represent week one, the value W02 will represent week two, and so on.
The Calendar Type for a Week Custom element is always Fiscal.
Week Day Code Element
Figure 24: Element Maintenance: Week Day Code
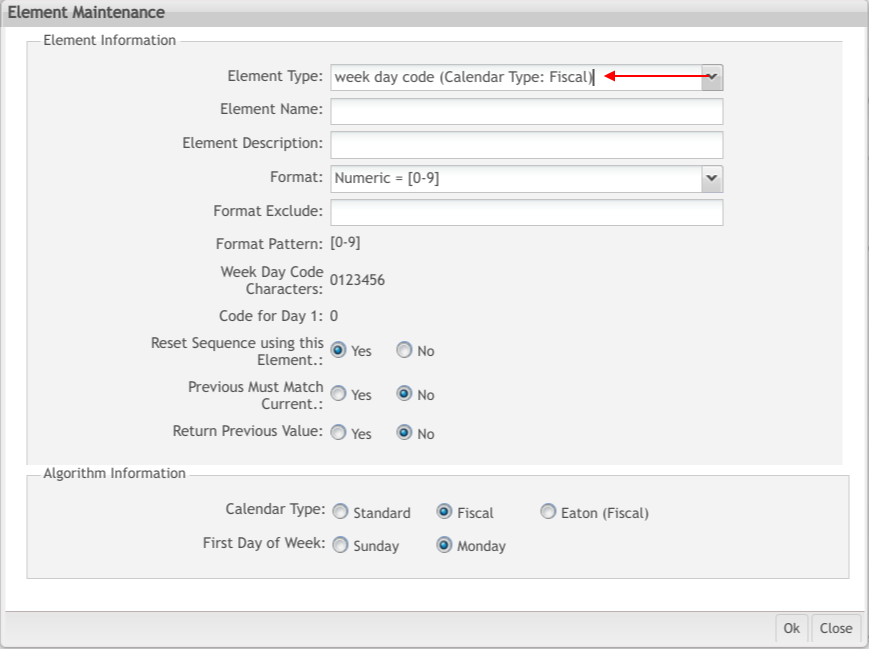
A Week Day Code element is a 1-position code that represents a given day of a fiscal calendar week. In the example above, the value 0 will represent day 1, the value 1 will represent day 2, and so on.
Note: Codes at the beginning of the format (those before the code that will represent day 1) must be explicitly excluded. Codes that follow day 7 are excluded automatically.
The Calendar Type for a Week Day Code element is always Fiscal.
Week Day Custom Element
Figure 25: Element Maintenance: Week Day Custom
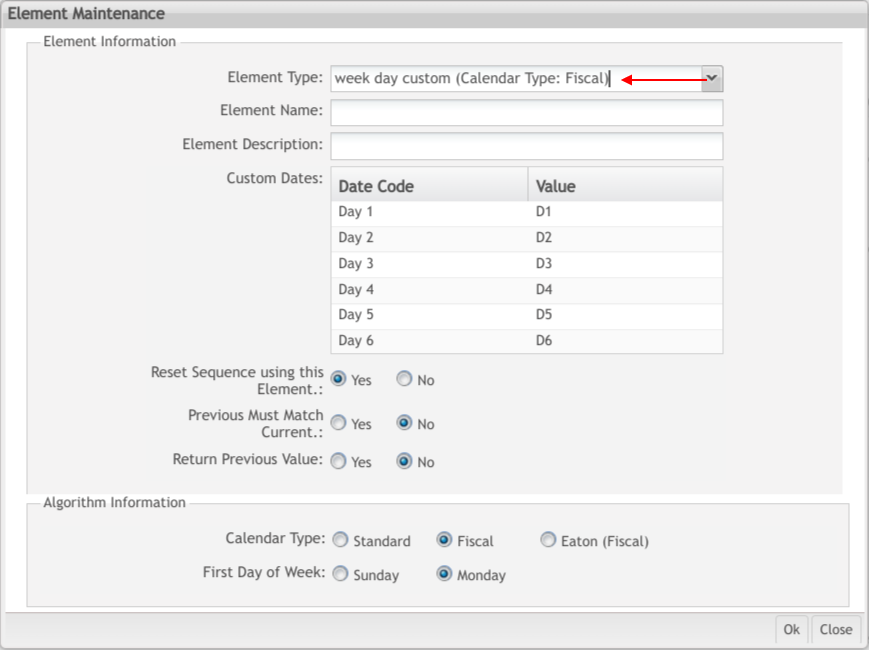
A Week Day Custom element is a variable-position code that represents a given day of a fiscal calendar week. The element name cannot be greater than 10 characters. In the example above, the value D1 will represent day 1, the value D2 will represent day 2, and so on.
The Calendar Type for a Week Day Custom element is always Fiscal.
Week Day Period Element
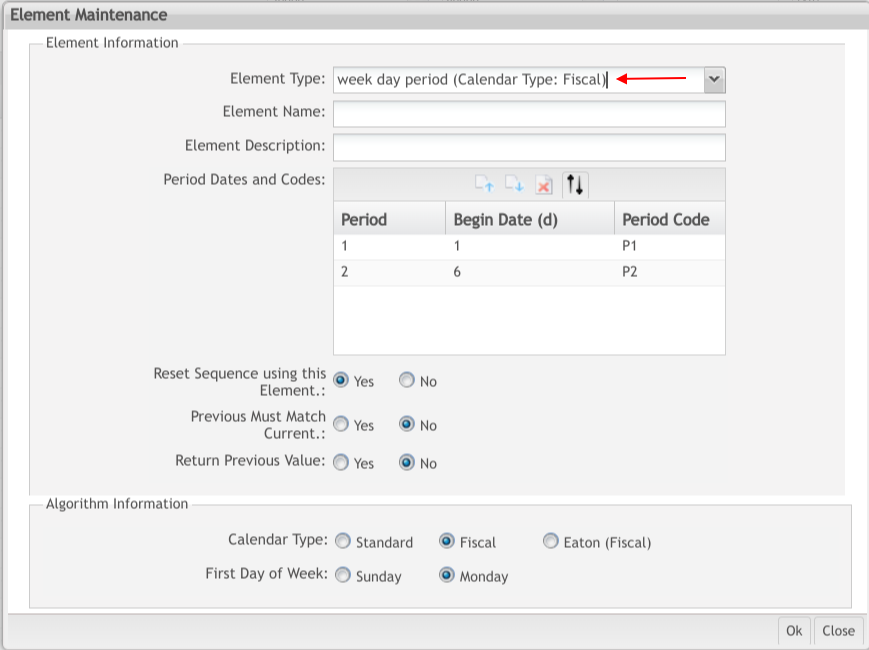
Figure 26: Element Maintenance: Week Day Period
A Week Day Period element is a variable-length code that represents a user-defined period of the fiscal calendar week. The element name cannot be greater than 10 characters. The beginning date of a period is the day of the fiscal week, and the first Begin Date must be 1. In the example above, the period code element value P1 represents the first period of the fiscal week and P2 represents the second and last period. A period ends on the day before the next period begins.
The Week Day Period Begin Date and Codes table is maintained using the buttons Add Before, Add After, Delete Period, and Sort by Date buttons.
Begin Dates may be entered in any order but they must be sorted into ascending date sequences before clicking Ok; otherwise, an error is displayed.
Period Codes must be unique within the Period Dates and Codes table and must be the same length as the element name.
The Calendar Type for a week day period element is always Fiscal.
Sequence Element
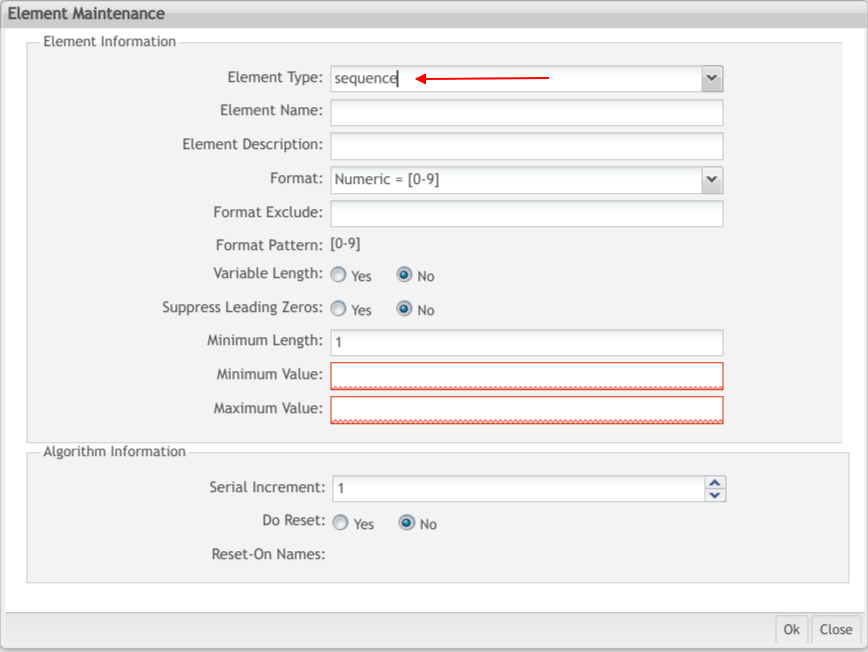
Figure 27: Element Maintenance: Sequence
The sequence element is unique among the element types, in that it increments with each new serial number. Also, it is the only element that can exist as the sole element of a serial number definition.
Every serial number definition must have at least one sequence element. All other element types are optional.
The sequence element is also unique in that multiple instances of the sequence elements are treated as a single sequence. This permits a multi-format sequence, where one part of the sequence is alphabetic, for example, and another part is numeric. For instance, a 42Q customer may specify that a serial number sequence is composed of a letter, followed by three numeric digits.
Note: With multiple sequence elements, the sequence element that appears first in the serial number definition is the high-order element in the sequence and increments first. The last sequence element is the low-order element. View Section 1.1.9 Special Functionalities Sequence Range / Increment Order for additional details.
Variable Length: This is a mandatory field. A sequence element in a serial number may be of variable length, with no more positions than the length of the element name (it cannot be greater than 20 characters) and no fewer than the Minimum Length (which may not be less than 1). A variable-length sequence element must be the last element of the serial number algorithm definition. If there are multiple sequence elements in the serial number definition, the variable-length attribute applies only to the last sequence element (it cannot be set for any other sequence element). Only a Shop Order Algorithm may have a variable-length sequence element.
The length of a variable-length sequence element is based on the previous/latest serial number. Thus, the length of that sequence element can be changed only by changing the length of the sequence in the Starting Serial Number field on the Shop Order Release screen.
Be aware that a variable-length sequence uses the minimum and maximum values, reading from the right. For example, if a sequence element has three positions but is variable-length, with a minimum length of 1 and a minimum value of 001, and if the sequence in the actual serial number generated has two positions, then the minimum value for that particular sequence number is 01, not 00.
Suppress Leading Zeros: A sequence element may have suppressed leading zeros. A suppressed-zero sequence element must be the last element of the algorithm definition. If there are multiple sequence elements in the serial number definition, the suppressed-zero attribute applies only to the last sequence element (it cannot be set for other sequence elements). Only a Shop Order Algorithm may have a suppressed-zero sequence element.
Note: The Variable Length attribute and the Suppress Zeros attribute are mutually exclusive and only one may be set to Yes in a serial number algorithm.
Do Reset: When this sequence element attribute is set to Yes and serial numbers are generated, the sequence will be reset to the minimum value when either of two conditions exist: (1) The Reset-On Names attribute is blank and the sequence has reached the Maximum Value; or (2) the Reset-On Names attribute is not blank and the value for one of the reset-on names has changed from the latest serial number.
Note: Setting the Do Reset attribute applies to all sequence elements at once (if there is more than one in the serial number definition). Please see the Reset-On Names attribute (below) for additional information.
Reset-On Names: When this sequence element attribute is not blank, it will contain a list of the names of other elements in the serial number definition for which the attribute Reset Sequence using this Element has been set to Yes. The following element types contain the Reset Sequence using this Element attribute: Part, Date, Year Code, Month Code, and Month 24.
Note: The single exception to this requirement is for the high-order sequence element (this is the sequence element that increments the fastest. In the case of an algorithm that has only one sequence element, that element is the high-order sequence element).
As a general rule, it is recommended to set the Do Reset attribute to Yes to ensure appropriate resetting of the sequence element.
Edit Algorithm
1. To edit an algorithm, select an existing algorithm and click the Edit Algorithm.
Figure 28: Algorithm Maintenance (Edit Algorithm)
2. Go through the tabs and make the necessary updates.
3. Follow the same steps and rules used to create algorithms. See the Creating Algorithms topic for more information
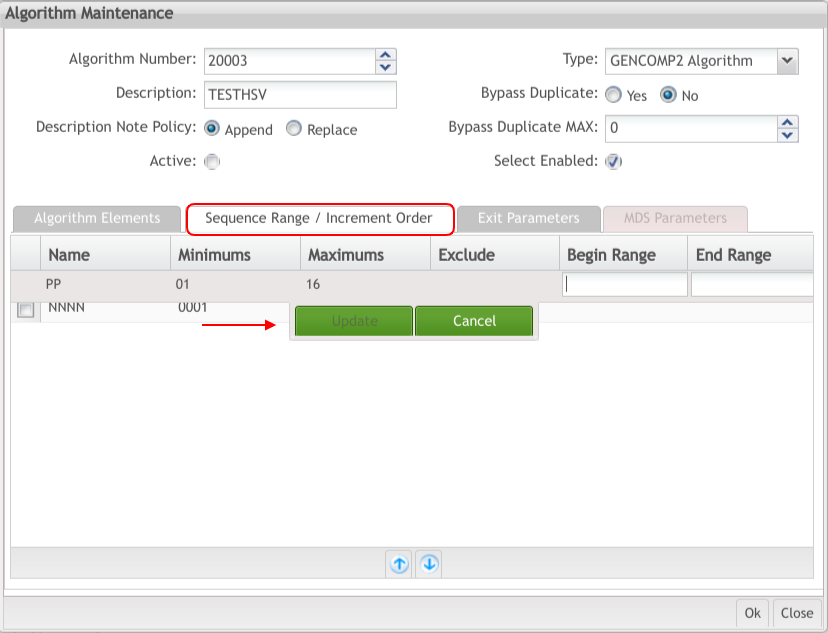
For the Sequence Range/Increment Orders Tab a tooltip is available to help the user to see any update done. The tooltip displays the range Val Min and Val Max and it is the same for all lines. If the sequence is updated.
Figure 29: Sequence Range /Increment Order Tab
Updating the Begin Range and End Range, the tool-tip value is automatically updated.
Note: it is not allowed to put different values for Minimum and Maximum in the last line. This rule is valid only if there is more than one Sequence element.
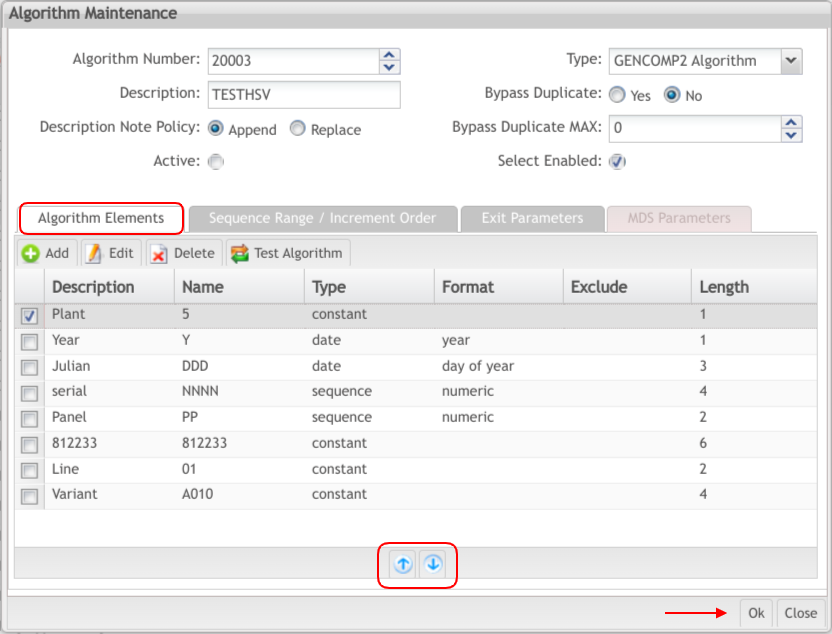
If the sequence is updated in the Algorithm Elements Tab, the tool-tip is also updated.
Figure 30: Sequence Update
Copy Algorithm
1. To copy algorithm information, on the Algorithm List, select an existing Algorithm and click Copy.
- The Algorithm Maintenance form is displayed. All fields are populated with the information from the copied Algorithm except the Algorithm Number. The Algorithm Elements list is also displayed with the same elements from the copied Algorithm.
- Remember that each window changes according to the algorithm type. The below sample is displaying a Shop Order Algorithm type.
Figure 31: Algorithm Maintenance (Copy Algorithm)
2. Enter either a valid Algorithm Number; otherwise, the system automatically populates this field with the next available number. Then click the Ok button to complete the process (or click Close to cancel). The Algorithm Maintenance window closes and the algorithm created is displayed at the Algorithm Browser list.
Deleting an Algorithm
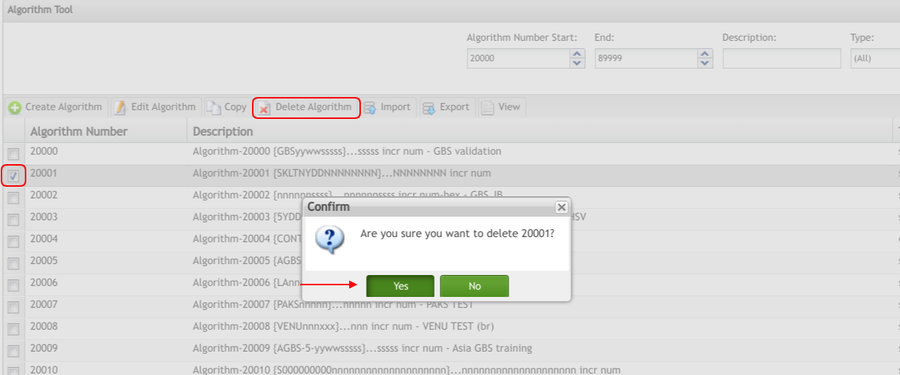
Select a non-active Algorithm in the algorithm list and select the Delete Algorithm icon. A confirmation message is displayed.
Figure 32: Algorithm Maintenance (Delete Algorithm)
Select Yes to confirm the deletion, or No to cancel. The algorithm is removed from the database and the algorithm is no longer displayed in the Algorithm Browser list.
Exporting an Algorithm
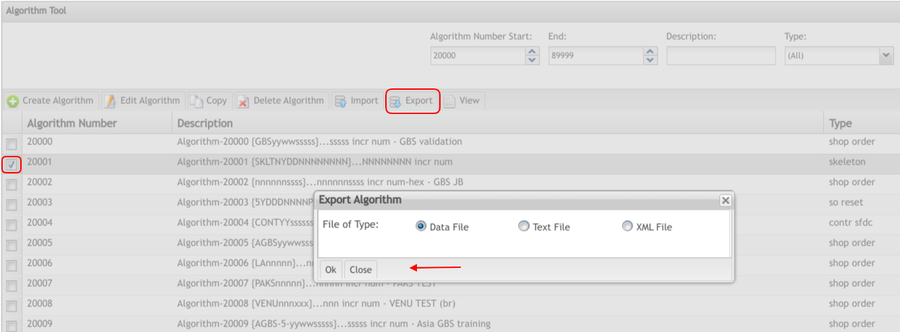
Select an algorithm from the list and click the Export icon to export the algorithm. Choose the file type and click on Ok.
Figure 33: Save Dialog
Choose a destination folder and the file type and click Ok to save the file, or Close to cancel.
Note: The last characters of the file name are the algorithm number.
View Customcode Record
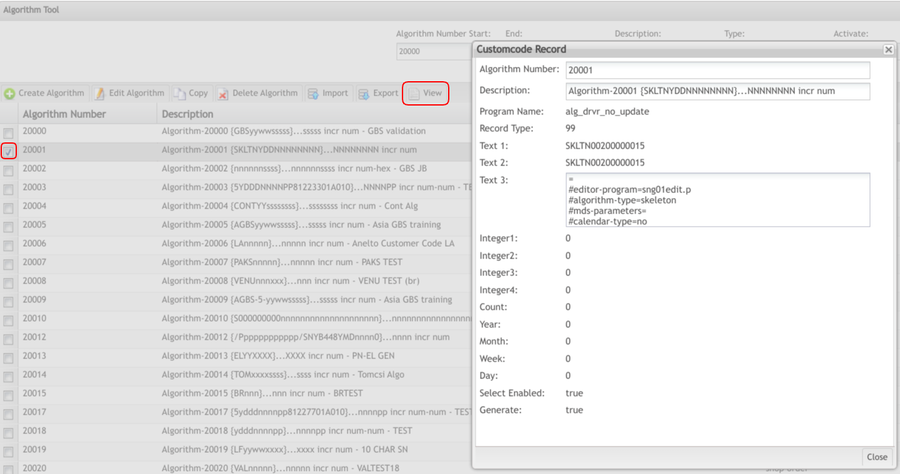
In the Algorithm Browser list, check the box of a Shop Order Algorithm and select View. To view the customcode, it is necessary to have an active algorithm with element steps. The Customcode Record window is displayed.
Figure 34: Customcode Record
All the information is displayed as read-only. The fields displayed depend on the algorithm type. The Record Type, Text1, Text2, and Text3 contain the algorithm information. The Text3 content is enabled for the copy.
Select Close to exit this window and return to the Algorithm Maintenance page.
Special Functionalities
MES Parameters
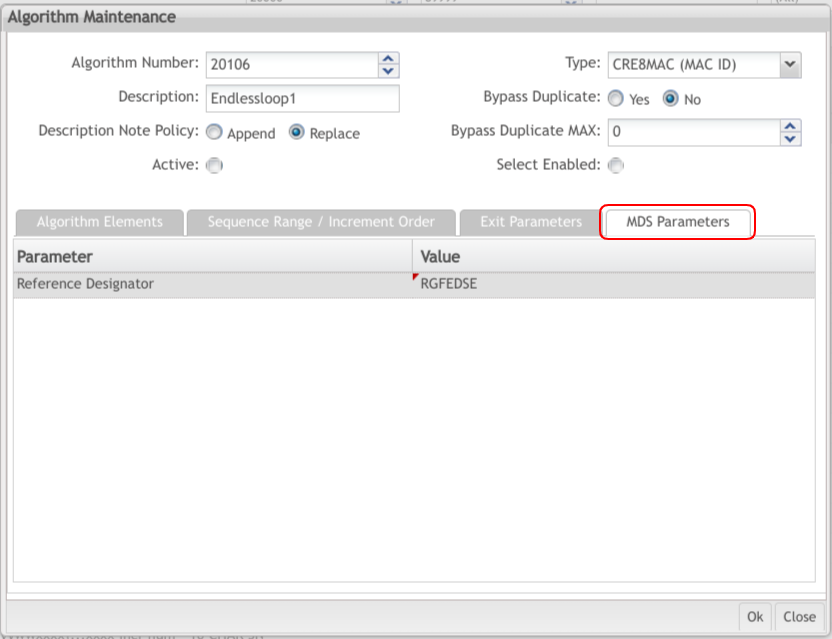
Figure 35: MES Parameters
If available, this tab allows assigning specific MES parameters to the algorithm and depends on the algorithm type. If the algorithm type does not include MES parameters, then the MES Parameters tab will be disabled.
If an algorithm type includes such parameters (CRE8MAC), the MES Parameters tab will be enabled. If an algorithm has MES parameters that are required, the algorithm may not be deployed until those parameters have been assigned.
In the example above, the algorithm type has a mandatory Reference Designator parameter. Note that the Reference Designator parameter is specific to the CRE8MAC Algorithm type.
Hover mouse pointer above Reference Designator parameter name to view parameter rules:
- Data Type = character
- Mandatory = Yes
- Upper/Lower Case = Upper Case
- Minimum length = 0
- Reset button: clicking this button will set the MES parameters for an algorithm to blank, or to the designated default values.
Sequence Range / Increment Order
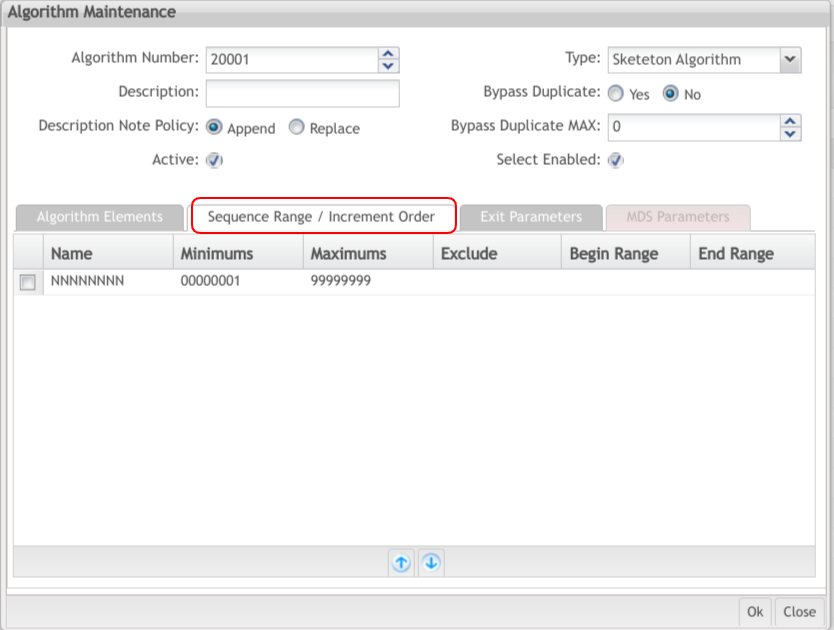
Figure 36: Sequence Range / Increment Order
If available, this tab allows managing:
- The order in which the sequence elements are incremented (Increment order).
- Minimum and Maximum range of the sequence elements.
Elements are incremented in the order they appear in the table (from top to bottom).
The Increment Order allows multiple sequence elements to increment in other than the standard high-to-low order. The natural incrementing order of sequence elements is from top down, where the top-most element increments first before any elements that follow it. This order is satisfactory for most serial number formats. The sequence element appearing first in the serial number format is the high-order element. The Algorithm Maintenance follows this standard. Occasionally, it is necessary to alter this order, such that a sequence element appearing earlier in the serial number may be required to increment prior to another sequence element appearing later in the format. The Update Sequence Incrementing Order screen provides this functionality for algorithms with multiple sequence elements.
Sequence Elements: This selection list of sequence elements represents the order that the elements that appear in the algorithm format.
Move-Up and Move-Down: Clicking these will cause the highlighted sequence element to move higher or lower in the incrementing order.
To change the order in which the sequence elements will increment, select an element in the selection list and then click the Move Up or Move Down button. Once the sequence incrementing order is satisfactory, click Ok. Click the Cancel button to undo any changes.
The Sequence Order functionality is best understood by testing it in the Test Algorithm to see how the serial number will increment when the standard incrementing order is modified.
Sequence Range
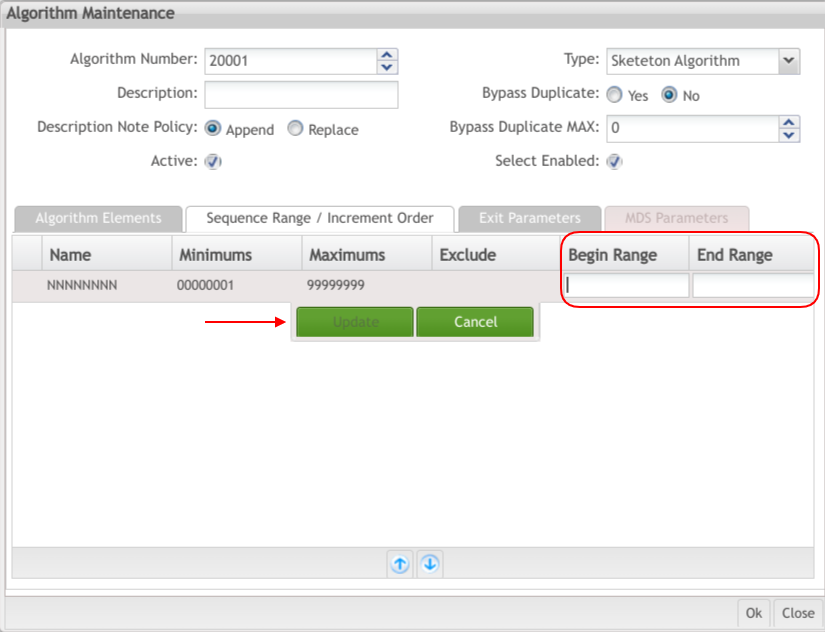
The Update Sequence Range screen provides the ability to define the Begin Range and End Range for an algorithm.
Figure 37: Updating Sequence Range
When an algorithm contains just a single sequence element, then the Minimum and Maximum Values (defined on the edit screen for that element) are the same as the Begin and End Range values. However, when an algorithm contains multiple sequence elements, then the Minimum and Maximum Values for those elements may not be sufficient to describe the Begin and End Range for the entire algorithm.
Sequence Range (from High to Low Incrementing Order): This list of sequence elements represents the order in which the elements will increment, from top to bottom.
Beginning Range: The beginning range values assigned to each of the sequence elements in the Elements list. Beginning range values are assigned by selecting an element from the Sequence Elements selection list and then clicking Update (see the sample screen immediately below for more details).
End Range: The ending range values assigned to each of the sequence elements in the Elements list. Ending range values are assigned by selecting an element from the Sequence Elements selection list and then clicking Update (see the sample screen immediately below for more details).
If the begin and end sequence range values are satisfactory, click Ok. Click the Cancel button to undo any changes.
NOTE: All Begin Range values for an algorithm must either be valid values or they must be blank. Likewise, all End Range values for an algorithm must either be valid values or they must be blank. However, Begin Range values for an algorithm may be blank while End Range values may contain valid values or the other way around.
Test Algorithm
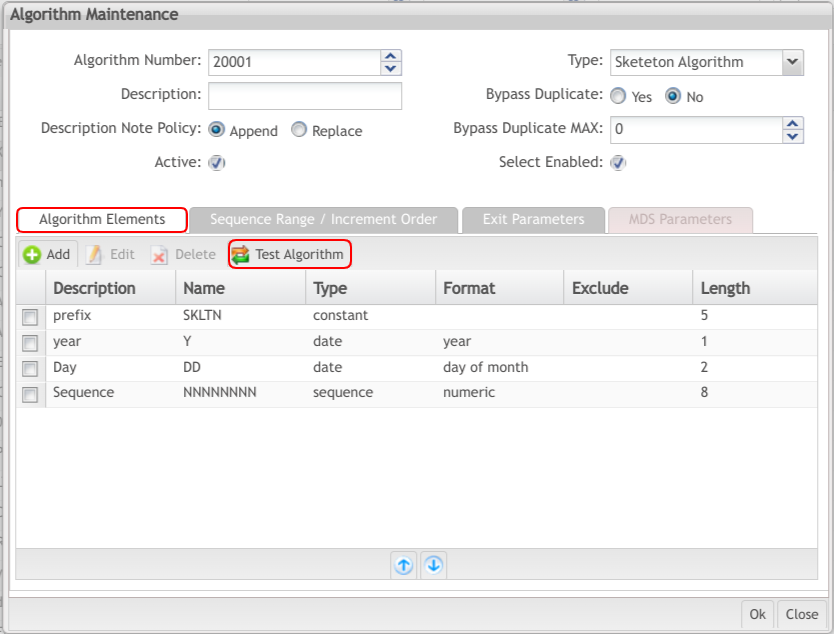
The Testing Facility is accessed by clicking the Test Algorithm button on the Tasks window.
As a general rule, it is highly recommended that each and every algorithm be tested in the Testing Facility. Each element should be tested to function as expected by modifying part data, dates, constant values, sequencing, etc.
Figure 38: Test Algorithm
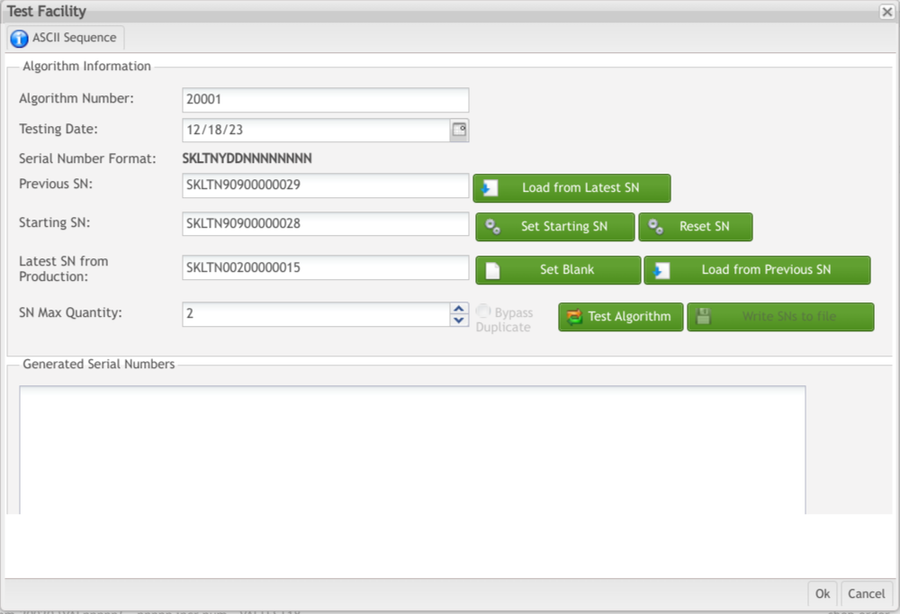
The Testing Facility allows for the testing of serial number definitions, the setting of test part maintenance data, the writing of test serial numbers to a file, and the setting of the latest serial number in production.
Figure 39: Test Facility Window
Follow the steps below to test the serial number generation:
1. Fill in the fields in the Testing Information form
- Testing Date: this is the date that will be used for testing serial number algorithms which contain date elements. The default testing date is the current date; however, it can be changed to any desired date.
- Serial Number Format: The Serial Number Format is displayed.
- Previous SN: This is the last generated serial number. Clicking on Load from Latest SN will set the previous serial number to be the latest SN from production.
- Starting SN: This is equivalent to the Starting SN in production.
- Clicking on Set Starting SN will set the starting SN to be the next serial in sequence after previous SN.
- Clicking on Reset SN will generate first serial for starting SN and previous SN.
- Latest SN from Production is the latest serial in production.
- WARNING: Setting the latest serial number to blank will affect future serial numbers generated in production. Please use with care.
- Clicking on Load from Previous SN sets the latest SN from production to be the previous SN.
- SN Max Quantity is how many test serial numbers will be displayed, at one time, in the Generated Serial Numbers screen.
2. Click on the Test Algorithm button to generate test serial numbers to verify algorithm functionality.
- The Test Algorithm portlet is much like the Release portlet on the SFDC Shop Order Release module, except that the Test button will generate a series of test serial numbers, not actual serials. The Test button used the Starting SN, just as is the case in production. If the Algorithm Maintenance encounters an error in creating the test serial numbers, the error is displayed.
3. Select Write SNs to file to export the generated serials to the file.
4. Select Ok to save the testing information and return to the previous screen, or click Cancel to discard the changes.
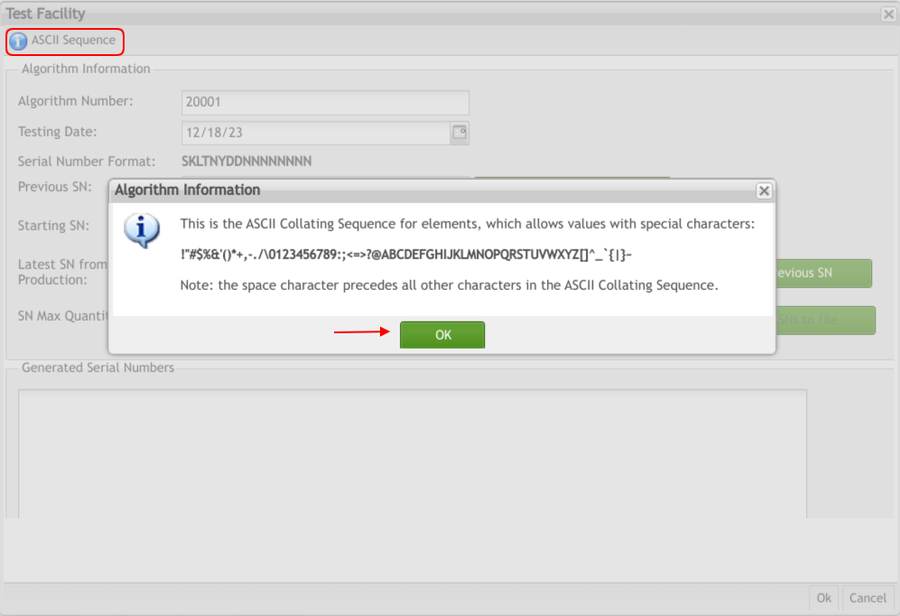
Note: View the ASCII information by clicking on ASCII Sequence in the Tasks window. The ASCII Sequence option in the Tasks window displays the following information dialog:
Figure 40: ASCII Sequence
This allows quick reference to the sequence order of numbers, letters, and other characters.
Activate Algorithm
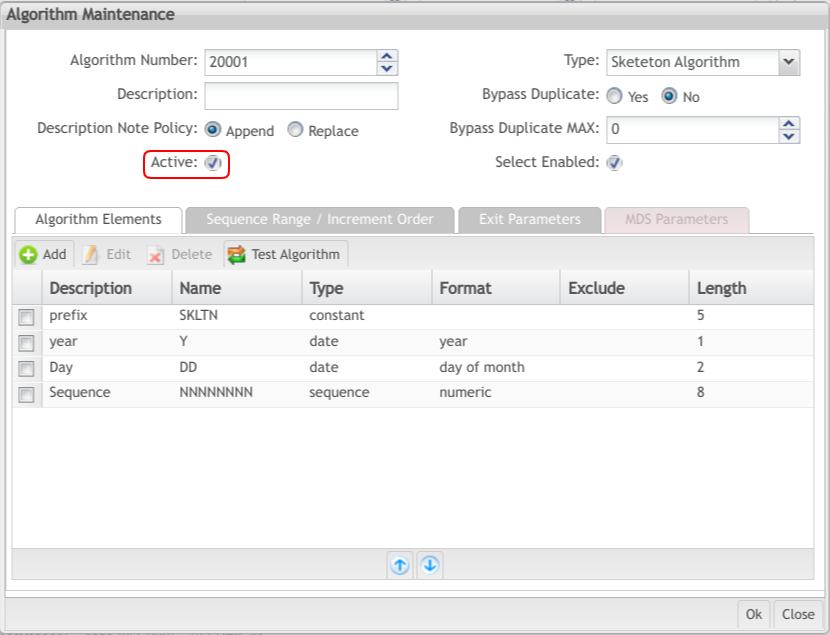
After a serial number algorithm has been defined and tested (before the algorithm may be used in production) it must be activated. This is accomplished by checking the Activate Algorithm box in the Algorithm Maintenance window.
Figure 41: Algorithm Maintenance: Activate Algorithm
An algorithm that is not yet active will not have the Active box checked. A deactivated algorithm will not appear in the list of algorithms on the SFDC Shop Order Release screen.
For SFDC Container or GENCOMP2 algorithm types, Activate Algorithm requires the Latest Serial Number be set in the Latest SN Menu of the Testing Facility. For Shop Order algorithm types, the Latest Serial Number does not have to be set, although it is recommended. The Shop Order Algorithm is the only type that allows the Latest Serial Number to be Set Blank.
Select Enabled
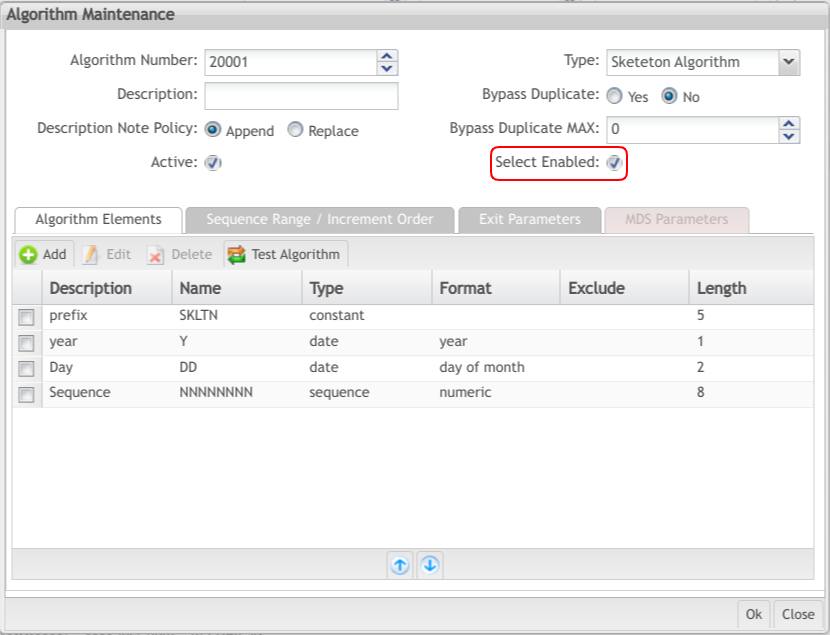
The Select Enabled flag was provided specifically to allow the user to specify whether a given algorithm should be displayed in the S/N Algorithm drop-down box in the Part Number Form window of the Part Number screen. The Select Enabled flag is entirely under the control of the user. When an algorithm is created, the flag defaults to Checked for Shop Order algorithms and to Unchecked for all other algorithm types. However, from then on, the Select Enabled flag retains the value assigned by the user.
Currently, the only place the Select Enabled flag is referenced (other than in the Algorithm Maintenance) is on the Part Number Form window, as described above.
Figure 42: Algorithm Browser
Import Algorithm
To use the Import portlet, from the AlgorithmMaintenance main menu, click Import Algorithm. The Import Algorithm dialog displays.
Figure 43: Import Algorithm Dialog
Select Search and browse for an algorithm data file. Then select Ok. The algorithm file will be imported into the Algorithm Maintenance.
