How To Record Defects against the Panel Serials
Contents
Introduction
This How-to document will help users correctly record defects against a panel serial number in which Boards per panel quantity is greater than 1, to fail the defects in the production workbench module. This method allows the users to populate the accurate yield and defects while running the MESWeb reports.
Production Workbench
Production Workbench is an interface designed to streamline data capture on the shop floor. It offers a wide range of customizable options to meet individual needs, including enhanced work instructions and the ability to handle deviations effectively. Users can easily capture data in multiple ways while maintaining tracked and non-tracked assembly components. Additionally, it provides the flexibility to view, add, remove, and map attributes to multiple documents, and even single chapters, all from a single user interface at the same station. The tool also offers convenient features for recording and repairing defects.
Production Workbench leverages a variety of Conduit commands, empowering users to view a unit's history and effectively manage Attribute Value Pairing (AVP) to define and configure steps.
To access, navigate to Production > Production Workbench. Enter the valid Employee number and Station ID for user login and configuration. (For detailed information see Production Workbench.)
How to Record Defects against the Panel Serials
To record defects for the panel serials:
- Scan or Enter the serial number.
- Click on the Select Command dropdown menu and enter the value Record Defect.
- A list of commands will be displayed, select the Record Defect command.
Figure 1: Record Defect command
- In the Defect Code field, enter the defect code to display the available options.
- Select the Defect Code.
- If the Board per panel quantity is greater than 1, Enter the Reference Designator along with the Board number in the panel. (I.e., Format: Location-Board number in the panel) For example:
- The Panel Quantity = 5
- Defect code = xxxx
- Reference designator = "J1-2, J1-3, J2-3"
Note: Here J1, J2 refers to Location and 2,3 refers to Board number in the panel. If the board number is not given with the reference designator, there will be a quantity mismatch while running the MESWeb report to populate defects.
- Enter the Defect Quantity. (Since 2 boards are defective, enter 2 in the Defect Quantity column.)
- Select the Checkmark and the defect code is added successfully to the unit.
Figure 2: Reference Designator with Board number
Yield and Defect Report Output
To populate the defect recorded against the serial number in the Yield and Defect report, navigate to Reporting> MESWeb > Reports > Default Reports > Yield & Defect Reports.
- Select a Data Source, customers, products, process, lines, and other required parameters in the given field.
Note: Check-in Report by Panel option to get the accurate report for the Panel Serial number.
- Enter Go and the result report is displayed.
Figure 3: Yield and Defect Report
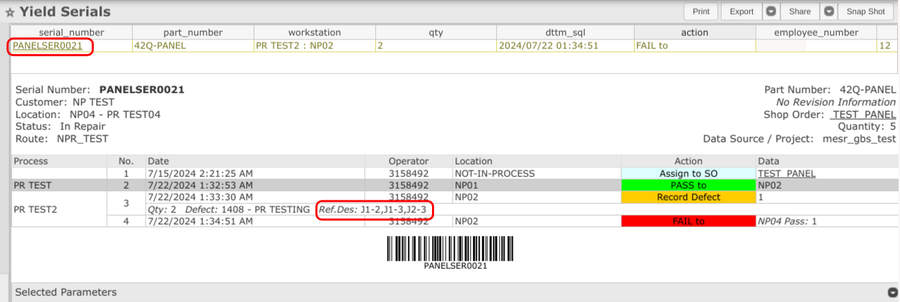
- Select the Failed units and it directs to the Yield serials Report. The report shows all the defective serials.
- The report accurately recorded the defect with the reference designator and board number.
Figure 4: Yield Serials
In Yield & defect:
|
|
|
|
|
|
|
|
|
|
In Top Defects:
|
|
|
|
|
|
|
|
|
|
In Top Defective:
|
|
|
|
|
|
|
|
|
|
|
|
|
|
|
|
|
|
|
|
|
|
Selected parameters:
|
|
|
|
|
|
|
|
|
|
|
|
|
|
|
|
|
|
|
|
|
|
|
|
|
|
|
|
|
|
|
|
|
|
|
|
|
|
|
|
|
|
|
|
|
|
|
|
|
|
|
|
|
|


