42Q-MES0177-A NetSuite Adapter Installation Guide
42Q Home > Tools > 42Q NetSuite Adapter > NetSuite Adapter Installation Guide
Contents
Install Bundle
In order to install the bundle, users must follow the steps listed below:
Note: To install a bundle there are prerequisites. The user may need to:
- Share the account number to 42Q team for providing access to the bundle
- Account number can be found in the netsuite URL https://tstdrv1757159.app.netsuite.com/
- The user should log in using a user with an "Administrator" role to execute the installation procedures
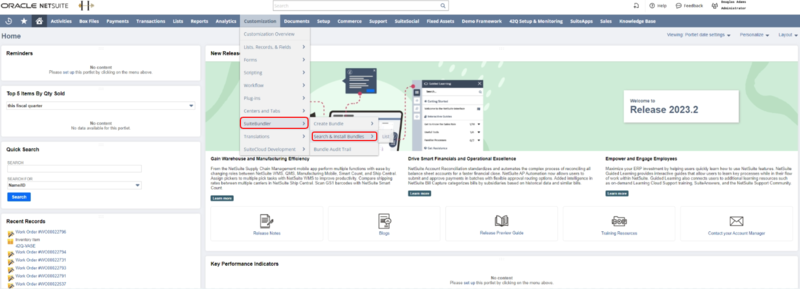
- To access Bundle Installation, navigate to Customization > Suite Bundler > Search & Install Bundle
Figure 1: Accessing To The ‘Search & Install Bundles’ Portlet
- Search for “XX42Q_Netsuite_adapter”
Note: Make sure the bundle is available for Suiteapp.com
The bundle number should be 449725 (please confirm with support if this is the latest bundle ID)
Figure 2: Search & Install Bundles Portlet
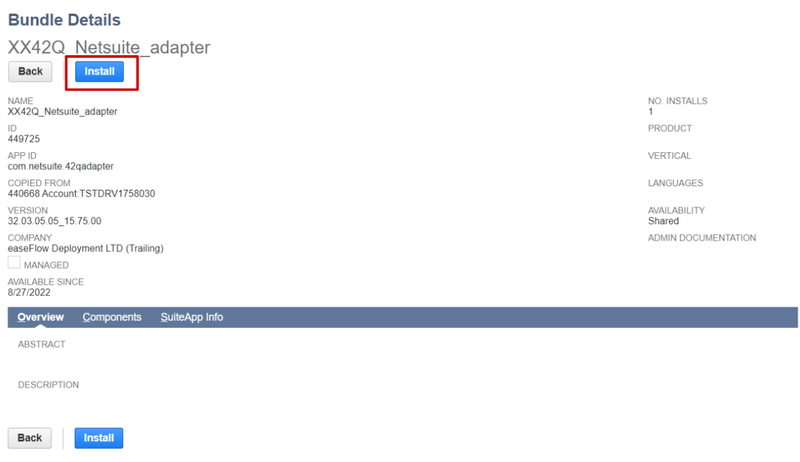
4. Open the bundle and select the Install button to initiate the installation of the bundle.
Figure 3: Starting Bundle Installation
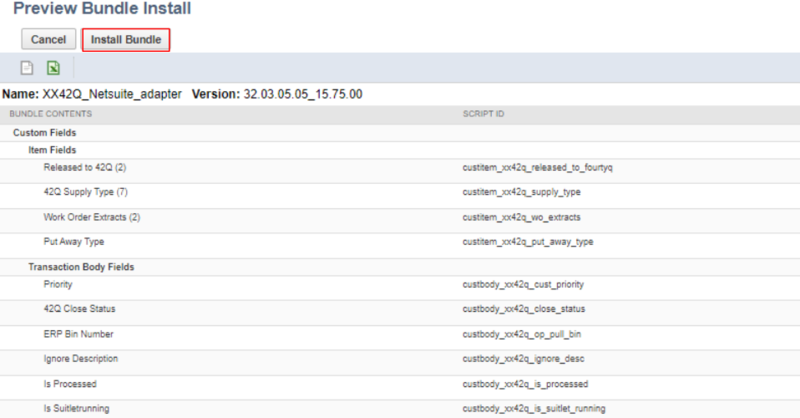
- The next page will show all the components included in the bundle. Select the Install button to proceed.
Figure 4: Accessing to the "Manage Users" Portlet
- Once the installation is complete the bundle will be listed in the installed bundle page with the green tick icon.
Figure 5: Bundle Installation page
Add Custom 42Q Roles To The Users
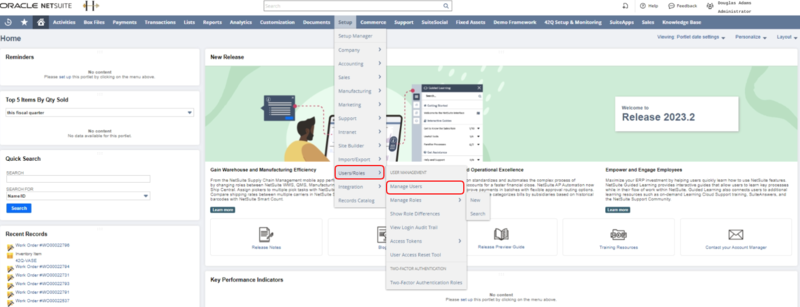
To access to the roles of the users, navigate Setup > Users/Roles > Manage Users
Figure 6: Accessing To The ‘Manage Users’ Portlet
- Select on the user'and'Edit'
- Select Access to determine the role for the user
Figure 7: Assigning a Role to a User
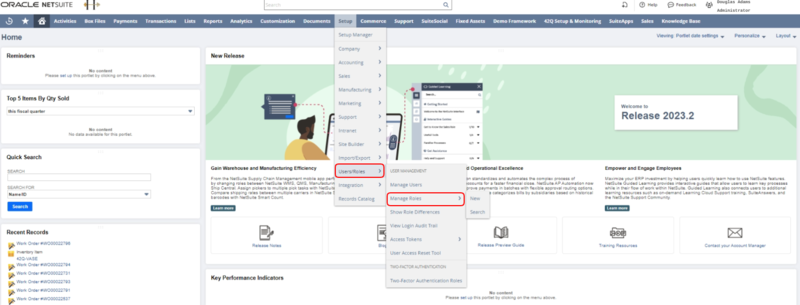
Manage Roles
To access managment role, navigate to: Setup > Users/Roles > Manage Users.
Figure 8: Manage Roles
To add Custom Roles, follow the steps bellow:
- Add custom roles to the users. The following roles are available to assign based on user’s requirement:
- 42Q Connect
- 42Q User
- 42Q Admin
- 42Q ShipmentUser
- 42Q Monitor
Figure 9: Edit User's Role
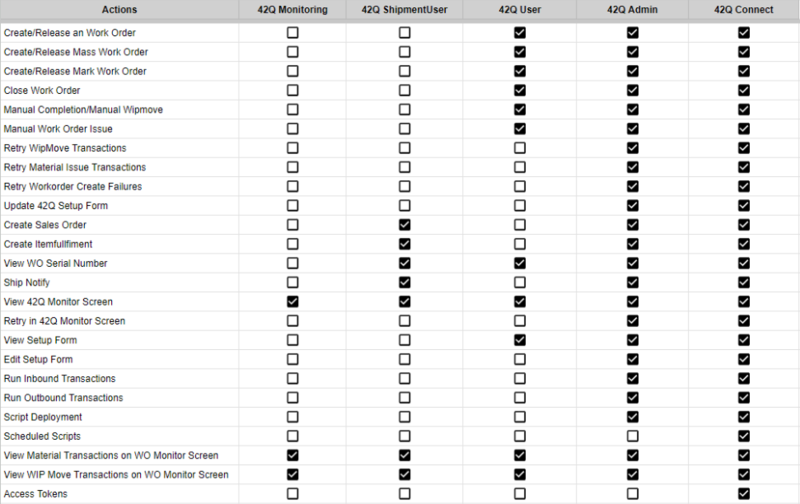
Note: The access levels provided for each custom role are mentioned below.
Figure 10: 42Q Roles
Determine URL from installed RESTlet
To obtain the RESTlet URL, navigate to Customization > 'Scripting > Script Deployment'
Figure 11: RESTlet Menu
- Select View on the Script Deployment record with internal ID “customdeploy_xx42q_wo_inbnd_txn_restlet”
Figure 12: View Script Deployment
- Copy in a note the EXTERNAL URL, and provide it to the 42Q team.
Figure 13: External URL
Note: The URL may change after each deployment. The user must make sure that the right URL is provided for interfacing with 42Q
Create Access Token
Access Token may be created for a user having "42Q Connect" role. To create Access Token:
- Select the application name as Netsuite_42Q_Integration.
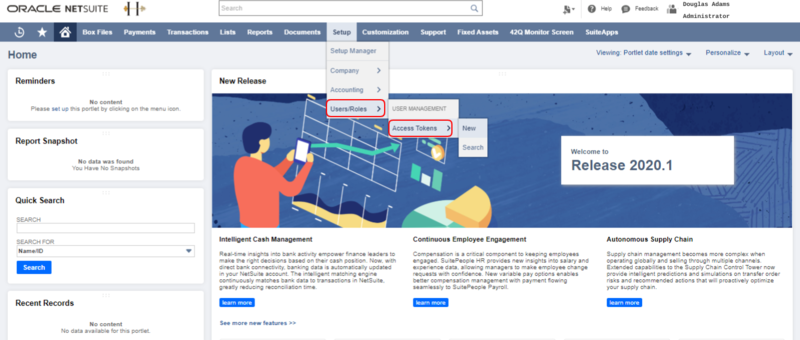
- Navigate to Setup -> Users/Roles -> Access Token -> New
Figure 14: Access Token Menu
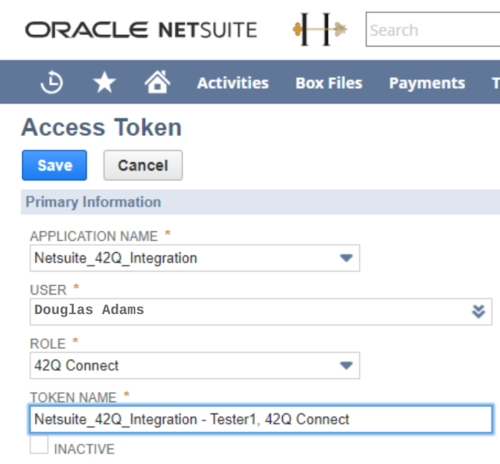
- Complete the fields below and then click Save
- Application Name - “Netsuite_42Q_Integration”
- User - Business User with which the integration scripts are executed
- Role - “42Q Connect Role”
- Token Name - Default will be a combination of Application Name and Role. Users can also change it as per their requirement.
Figure 15: Access Token Fields
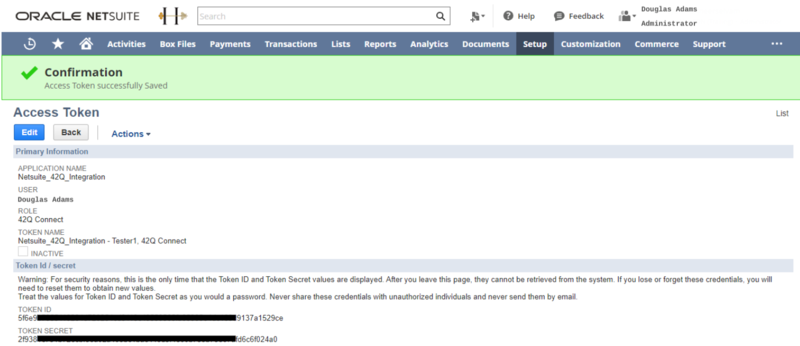
- Copy in a note the TOKEN ID and TOKEN SECRET andprovide it to 42Q team
Figure 16:Confirmation Message of the Created Token
Note: Tokens are generated only once during creation. If the token information is lost inactive the old token, generate new credentials and provideass it on to the 42Q team.
Note: If there is an issue with the Inbound transactions please reach out to the 42Q Support team. They will be able to validate the URL and Token details to make sure the right connection details are set up.
Create 42Q Adapter First Time Configuration
To create a 42Q Adapter Configuration, follow the steps listed below:
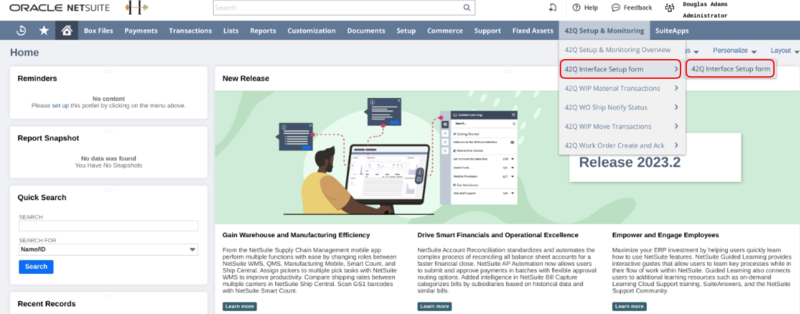
- To access the configure, navigate to: Select 42Q Setup & Monitoring > 42Q Interface Setup form > 42Q Interface Setup form.
Figure 17: Accessing To The 42Q Interface Setup form
Note: The users who will have access to edit the setup page are below roles will have edit access for the setup page:
- Administrator
- 42Q Connect
- 42Q Admin
All other users will be able to view the setup data and cannot edit them
Note: To mass load the setup data please reach out to the 42Q Services team
Creating new records
Note: If the user wants to create new records using the 42Q Interface Setup Form, the user should first enter the values for the Global setup section and save the form. Once the form is reloaded then they can proceed with entering the details in the subtab.
Global Setup
Note: Only when the Global setup record is created the user will be able to choose the Customer code value under Plant Setup.
- Multiplier and Custom attribute setups are based on locations. If the plant needs the setup they need to add the required fields for the particular location.
Fields |
Data Type | Description | Values |
|
42Q URL |
Free-From text |
42Q endpoint URL for Outbound transactions |
URL from 42Q |
|
42Q Customer Code
|
Free-Form text | Unique identifier for each user location | Determine with the 42Q team |
| Version |
Free-Form text
|
Static value- for future enhancements | Default value: "1.0" |
| 42Q Username |
Free-Form text
|
Username to access the endpoint- URL | Provided by the 42Q team |
| 42Q Password |
Pasword field
|
Password for authentification | Provided by the 42Q team |
| Routing URL |
Free-Form text
|
Static value - for future enhancements | Default value: “https://www.42-q.com/” |
Figure 18: Defininf Global Setups
Plant Setup
Figure 19: Defining Global Setups
To customize the plant setup tab select the location and enter all fields. All fields are mandatory to save the record.
- Select the fields, choose the right value from the dropdown list
The information below corresponds to the 42Q Plant Setup Tab fields name and its description :
Fields |
Data Type | Description | Values |
|
Location |
Free-Form text |
Netsuite location from which the Workorders are created. This will be used by the adapter for both outbound and inbound transaction to used the mapped Org code, check inventory etc |
Location should be mapped by the customer |
|
ORG Code
|
Free-Form text | Organization code set to link with 42Q. | Determine with 42Q |
| Customer Code |
List / Record
|
Organization code set to link with 42Q. | Determine with 42Q |
|
Notification to Email ID |
Free-Form text
|
Not used currently, added for future enhancements. |
Determine by the Users |
|
Notification from the Email ID |
Free-Form text
|
Not used currently, added for future enhancements. |
Determine by Users |
| Job Type |
Free- Form text
|
Static value added for 42Q XML data. | "Default" |
| Job Class |
Free-Form text
|
Static value added for 42Q XML data. | "Default" |
| Assy Revision |
Free-Form text
|
Static value added for 42Q XML data. |
"Blank" |
|
Assy Revision Desc
|
Free-Form text | Static value added for 42Q XML data. | "Blank" |
|
Routing Revision
|
Free-Form text | Static value added for 42Q XML data. | "1" |
| Schedule Flag | List / Record |
Static value added for 42Q XML data.
|
"YES" |
| Available 24 hrs Flag | List / Record |
Static value added for 42Q XML data.
|
"YES" |
| Schedule Priority | Free-Form text | Values will define the work order priority from the WO create form. Based on the setup the adapter will pick the value from different priority fields |
Determined by Customers Custom : User maintained field Customer: Customer priority field Location: Location Priority field |
| Assigned Units | Free-Form text |
Static value added for 42Q XML data. |
"1" |
| Advance BOM | List / Record |
User should update this field based on their company feature
|
Yes - if the Advanced BOM feature is enabled No - if disabled |
| Over Completion Percentage |
Free-Form text
|
Over completion percentage for the plant | Blank if over completion is not used |
| Default Bin |
Free-Form text
|
Default global bin for the plant for material issue consumption and receipt | Determine by Users |
| Show Phantom |
List / Record
|
This will allow the adapter to include the phantom item in the WO create/Change XML | Suggested value is "No" |
| Online Routing Components |
List / Record
|
Trigger online call for routing and component changes before sending WO update XML to 42Q. | Suggested value is "Yes" |
| Online Call Status Complete |
List / Record
|
Trigger online call for complete status change before sending WO update XML to 42Q . | Suggested value is "Yes" |
| Large Order Item Limit | Free-Form text | Define the large BOM order limit. This will determine the component count which will categorize the order as a large work order or standard order. | Suggested value is "30" |
| Built Status Validation | List / Record | This will make the adapter to validate the failed material transaction both Pull and Push before updating the Order status to built once all the units are completed |
Yes- to validate failed material No- to skip the validation |
| 42Q PULLBIN | List / Record |
dapters can be configured either to use “Only 42Q pull bin value” and error the pull components issue if the material is not available. If set to No the adapter will look in other places apart from the XML pull bin. Below is the priority of pull bin determination
|
Yes - to use only 42Q pull bin values No - to use bin number based on the available priority |
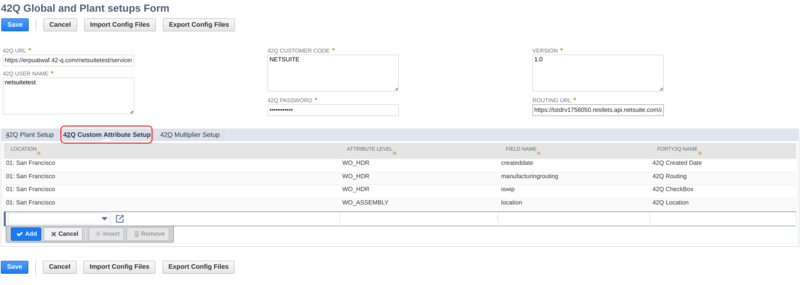
Custom Attribute Setup
Users can also send additional information in the WO create XML to 42Q using the custom attributes. Following custom attribute types are available based on the field locations
- WO_HDR: WO header
- WO_ASSEMBLY: WO Assembly item header page
- WO_BOM_ATTRIBUTE: BOM revision page for WO line Components
- WO_COMPONENT: WO components item header page
Figure 20: 42Q Custom Attribute Setup
Fields |
Data Type | Description | Values |
|
Location
|
List / Record | Netsuite location from which the 42Q orders are created | User to determine |
| Attribute Level |
List / Record
|
Attribute Type as listed above | User to determine |
| Field Name |
Free-Form text
|
Netsuite Internal ID | User to determine |
| FORTY2QNAME |
Free-Form text
|
Attribute name in the WO created XML for 42Q to identify the values |
Determine with the 42Q team |
Multiplier Setup
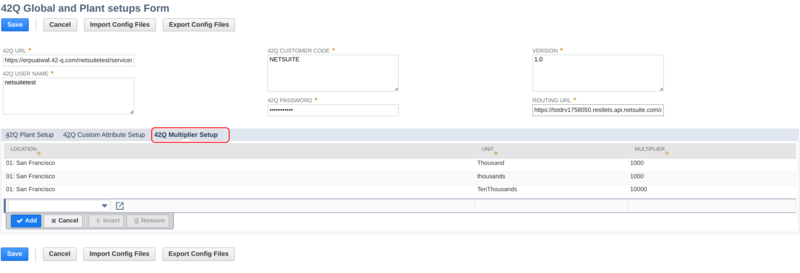
Users should mention the different UOMs used for WO units. Based on this, the adapter will convert the units into “Eaches” and send it to 42Q in the WO create/update XML. Similarly it will also convert back to original units whenever there is a WIP move from 42Q.
Figure 21: Multiplier Setup
| Description | Values | ||
|
Location
|
List / Record | Netsuite location from which the 42Q orders are created | User Values |
| Unit |
Free-Form text
|
Units used for WO Assembly item | User Values |
| Multiplier |
Free-Form text
|
Multiplier value to convert the Units to Eaches |
User values |
Note:If there is an issue with the Inbound transactions please reach out to the 42Q Support team. They will be able to validate the URL and Token details to make sure the right connection details are set up.
Post Intallation Validation
Verify Scheduled Scripts Start Time
Scheduled scripts should be set to 12:00 AM based on the customer server timezone. I
Note: If the Start Time is set to any other time than 12:00 AM (for example it is set to 2:00 PM), the script will start at 2:00 PM, but then finish its hourly execution at 12:00 AM. It will not resume until the next day at 2:00 PM. Scheduled scripts should be configured in Script Deployments.
There are six 42Q related scheduled scripts that utilize native NetSuite Scheduled Scripts.
- WO Retry Schedule job
- Scheduled script which processes the Mass order creation XMLs, failed WO create and Update XMLs
- Retry LargeOrder Process
- Schedule script to pick Large order Create and Update XMLs
- WIP Move Retry Scheduled Job
- Failed WIP transactions will be picked and reprocessed
- Material Transactions Schedule Job
- Failed MAT transactions will be picked and reprocessed by Material Transactions Schedule Job every 15 mins for a 24hr time period from the MAT record creation date.
- Retry InboundXML scheduled Job
- Schedule script to Inbound WIP/MAT XML from 42Q and continue with WIP/MAT custom record creation.
- Update Work Order Status scheduled Job
- Scheduled script which will scan for orders completed in past 24hrs and send WO completion XML to 42Q if the Built Qty matches the Workorder qty and there are no Mat move transaction failures.
To verify the schedule scripts starts time, navigate to Customization > Scripting > Script Deployments
If the user wants to deploy scheduled scripts that are scheduled to run every 15 min on a 24 hour basis, the following sample values should be set on the Script Deployment page:
- Deployed = checked
- Daily Event = [radio button enabled]
- Repeat every 1 day
- Start Date = [today's date]
- Start Time = 12:00 am
- Repeat = Every 15 minutes
- End By = [blank]
- No End Date = checked
- Status = Scheduled
- Log Level = Error
- Execute as Role = Set to Administrator
NetSuite documentation on scheduled scripts best practices: https://docs.oracle.com/en/cloud/saas/netsuite/ns-online-help/chapter_N3361671.html
Check for the MES folder
Once the bundle is installed, the 42Q MES folder will be created automatically.
The user can check the folder structure using the following navigation: Documents > Files > File Cabinet
Figure 22: File Cabinet Menu
The 42Q MES folder should be available at root structure
Figure 23: Root Structure Folder
Inside the 42Q MES folder the following folders should be present
- WO ACK XML
- Storage location for WO create and change acknowledgements from 42Q
- Export files
- Destination folder for Setup form data export
- Import files
- Source folder for import data files for Setup form import functionality
- WO Create and Update XML
- Storage location for WO create and update XML sent to 42Q
- WIP Move and Material Move Xml
- Storage location for WIP and Material movement XML files from 42Q
- WO SNO XML
- Storage location for Shipment Serial number XML files sent to 42Q
Figure 24: Folder Structure
