42Q-MES0176-A Oracle Adapter Installation Guide
42Q Home > Tools > Oracle Adapter Installation Guide
Tools
Oracle-MES
Oracle Adapter Installation Guide
Version MES15.80
Revision B1
Contents
Introduction
This guide is designed to help Oracle DBA/SysAdmin users set up an Oracle Apadapter allowing them to create a database and establish the top directory structure following the standard Oracle application process.
Pre-requisites
XX42Q Custom Top and Custom Application Creation
This action is intended for Oracle DBA/SysAdmn only, once this option is selected, follow the next steps:
- Create a custom database user XX42Q and provide the grants (connect, resource).
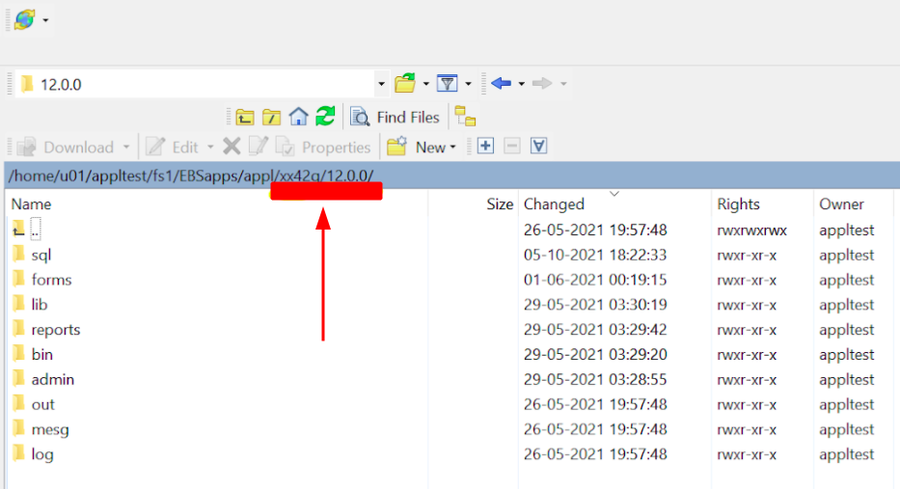
- Create XX42Q_TOP custom top directory and all its subfolders per the Standard Oracle application process.
Figure 1: Top Directory and Its Subfolders
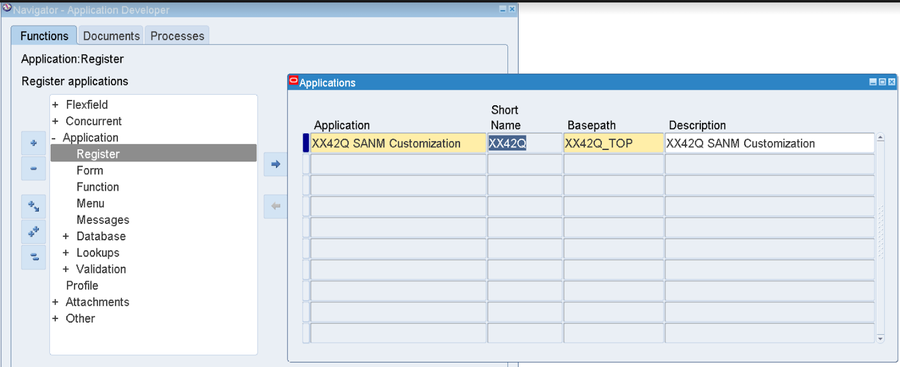
3. To register the Custom Application, navigate to Application Developer > Application > Register.
|
|
|
|
|
|
|
|
|
|
|
|
Figure 2: Register Applications
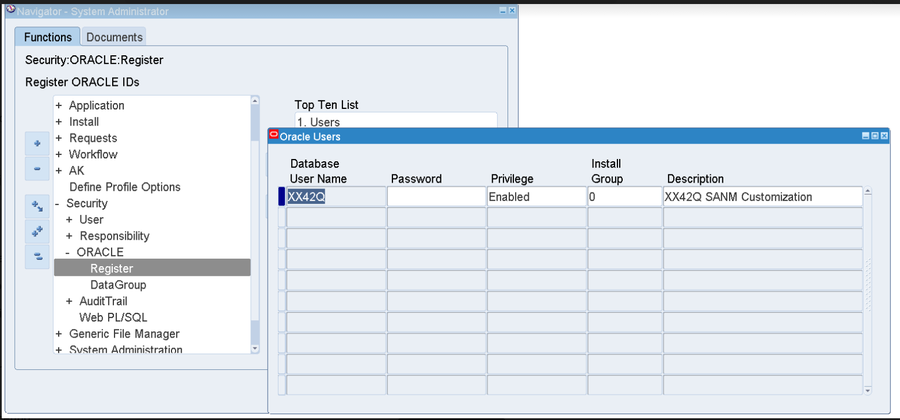
4. Navigate to System Administrator > ORACLE > Register. Register the XX42Q database user and password.
|
|
|
|
|
|
|
|
|
|
Figure 3: Oracle Users Form
5. Navigate to System Administrator > ORACLE > DataGroup. Add the Custom Application to the Data Group.
|
|
|
|
|
|
Figure 4: Adding an Application To a Data Group
Grant on AQ Package and ACL Setup
This action is intended for Oracle DBA/SysAdmn, once this option is selected, follow the next steps:
- Connect to APPS Database, GRANT ALL on the DBMS_AQADM to Custom Schema.
- Grant Execute on DBMS_AQADM, DBMS_AQIN, and DBMS_AQJMS for database users APPS, XX42Q andXX42QWEB.
- Set up ACL with the host and port details for inbound connectivity of web services.
Copy Files Into the Server
This action is intended for Oracle DBA/SysAdmn, once this option is selected, follow the next steps:
- Unzip the work order objects.zip file and move the scripts into UNIX Server in ASCII format.
Note 1: Remember the Path where files are copied.
Note 2: If the zip file is copied, then extract the files from the ZIP file.
2. log in to the Unix Server and navigate to where the above files are copied.
3. Run the Oracle Apps Environment script (.env).
4. Check the permission in the file and if the file doesn’t have the right permission please provide the necessary permission using chmod command for all files that start with XX. Suggested permissions are 666.
Example: $ chmod 666 XX*
Installation Execution
This action is intended for Oracle DBA/SysAdmn, once this option is selected, run the script (SANM_INSTALL_SCRIPT.sh ) by providing the below parameters and follow the next steps:
- Apps database user name and password (APPS/XXXX).
- Custom Schema database user name and password (XX42Q/yyyy)
- Custom TOP: $XX42Q_TOP
Example: SANM_INSTALL_SCRIPT.sh apps/XXXX XX42Q/yyyy $XX42Q_TOP
Check the Log file for more details. The log file will be created with the script execution date and time.
Custom Responsibility, Menus, Forms, and Functions
LDT Files
- The following custom 42Q Responsibilities, Menus, Forms, and Functions will be provided during the installation process.
- All the Responsibilities, Menus, Forms, and Functions are present in the LDT files delivered along with the installation package.
Here is the list of objects available in the LDT files:
Admin OUR
- XX42Q_ADMIN_RESP.ldt - Admin Responsibility.
- XX42Q_ADMIN_MENU.ldt - Admin Menu.
| ||
| ||
|
|
|
|
|
|
|
|
|
|
|
|
|
|
|
|
|
|
|
|
|
|
|
|
|
|
|
|
|
|
Support OUR
- XX42Q_SUPPORT_RESP.ldt - Support Responsibility.
- XX42Q_SUPPORT_MENU.ldt - Support Menu.
| ||
| ||
|
|
|
|
|
|
|
|
|
|
|
|
|
|
|
|
|
|
|
|
|
|
|
|
|
|
|
|
|
|
User OUR
- XX42Q_USER_RESP.ldt - User Responsibility
- XX42Q_USER_MENU.ldt - User Menu
| ||
| ||
|
|
|
|
|
|
|
|
|
|
|
|
|
|
|
|
|
|
|
|
|
|
|
|
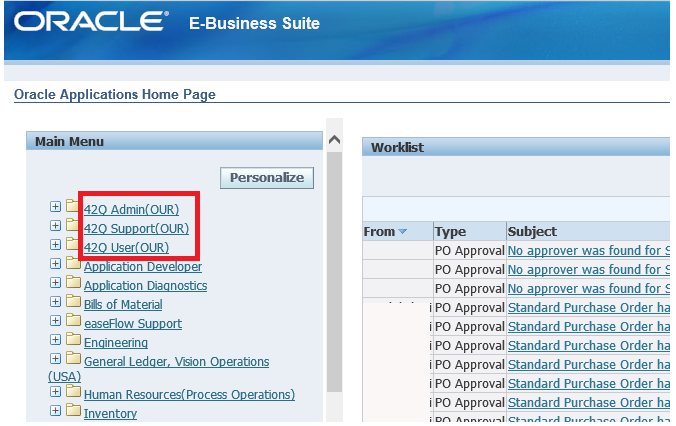
All the 42Q OURs specified in the LDT files should be displayed on the Home Page of Oracle. Each OUR contains a list of forms.
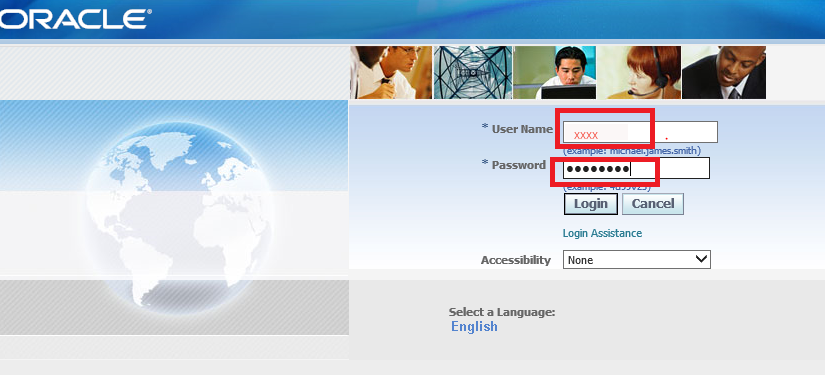
- Navigate to the URL: Login (sanmina.com)
- Login with the Username and Password.
Figure 5: Login Page
Figure 6: Home Page
Menus and Forms
- Each responsibility has a menu assigned to it. All the menus that are associated with the 42Q OUR should exist. Forms are used to view, edit the data, and perform the operations.
- To access, navigate to System Administration > Application > Menu.
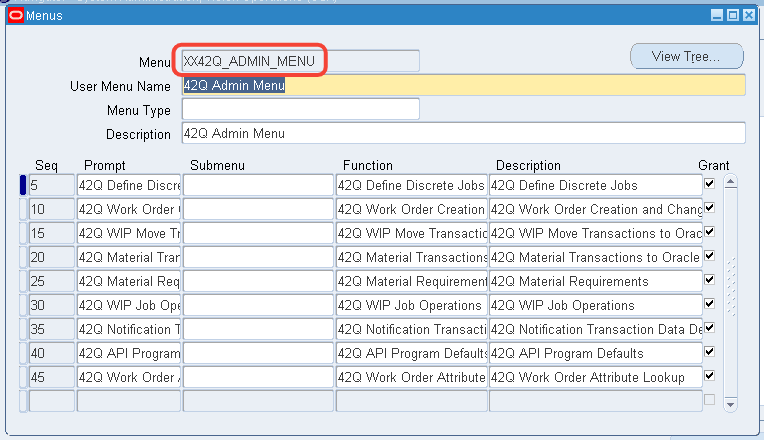
- Query the Menu using one of the menu names XX42Q_ADMIN_MENU.
- It shows the list of forms that are connected to the menu.
Figure 7: XX42Q_ADMIN_MENU
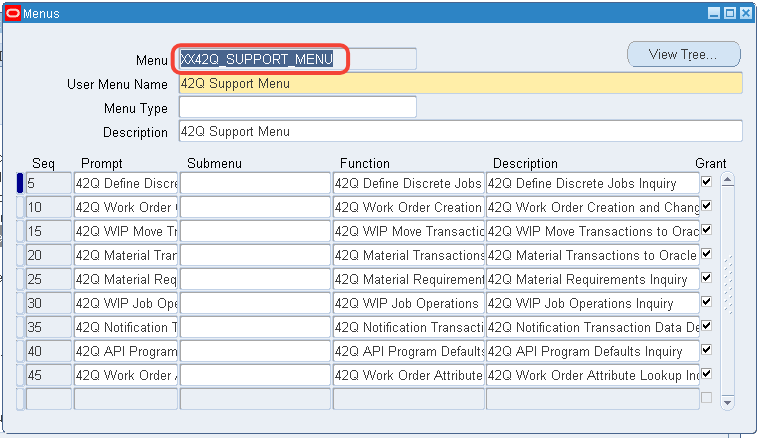
5. Query the Menu using the menu name XX42Q_SUPPORT_MENU.
Figure 8: XX42Q_SUPPORT_MENU
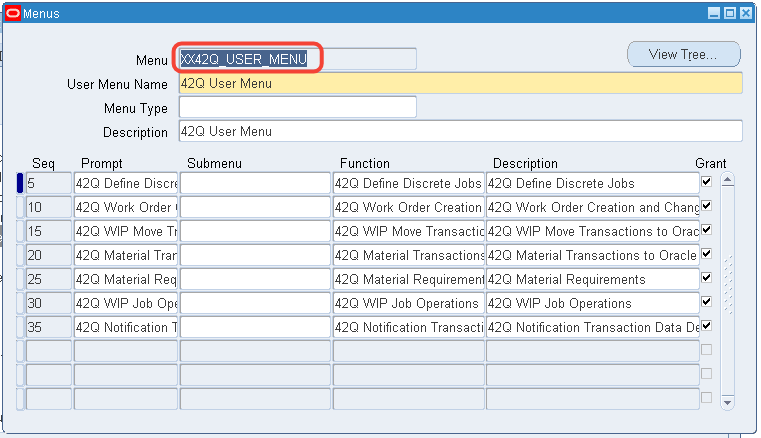
6. Query the Menu using the menu name XX42Q_USER_MENU.
Figure 9: XX42Q_USER_MENU
Form Functions
- Functions are used to define the role of each form.
- To access navigate to System Administration > Vision operations(USA) > Application > Function.
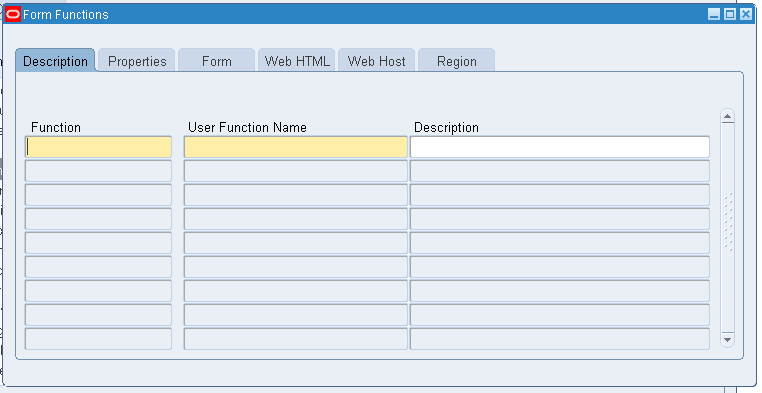
Figure 10: Form Functions Homepage
3. Query the Function using the 42Q function name %XX42Q%.
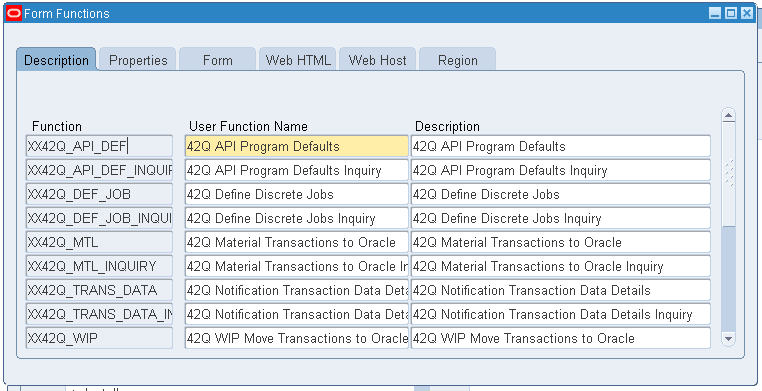
4. The list of form functions with their function and user function name is displayed.
Figure 11: Function and User Function Name
Add XX42Q_MES_INTERFACE as an Inventory, Item category, Flexfield
This action is intended for Oracle DBA/SysAdmn, once this option is selected, follow the next steps:
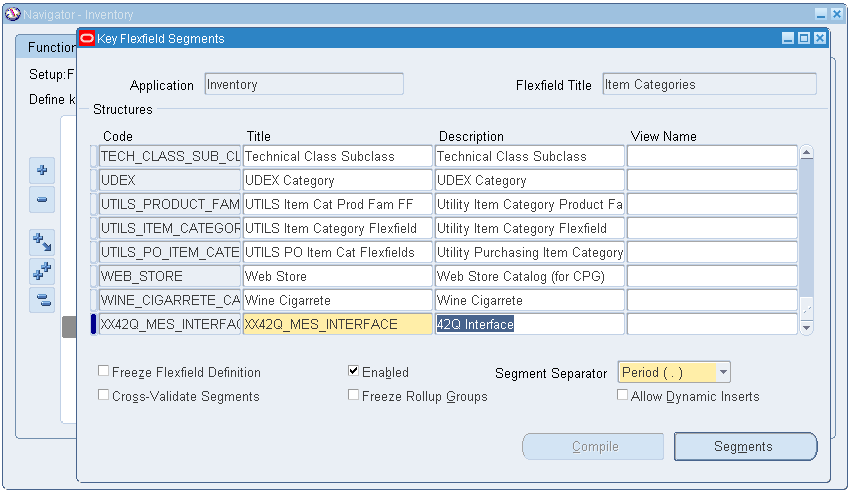
- Navigate to Inventory Responsibility > Setup > Flexfields > Key > Segments.
- Query for Application as Inventory and Flexfield Title as Item Categories and Enter below details:
|
|
|
|
|
|
|
|
|
|
|
|
Figure 12: Key Flexfield Segments
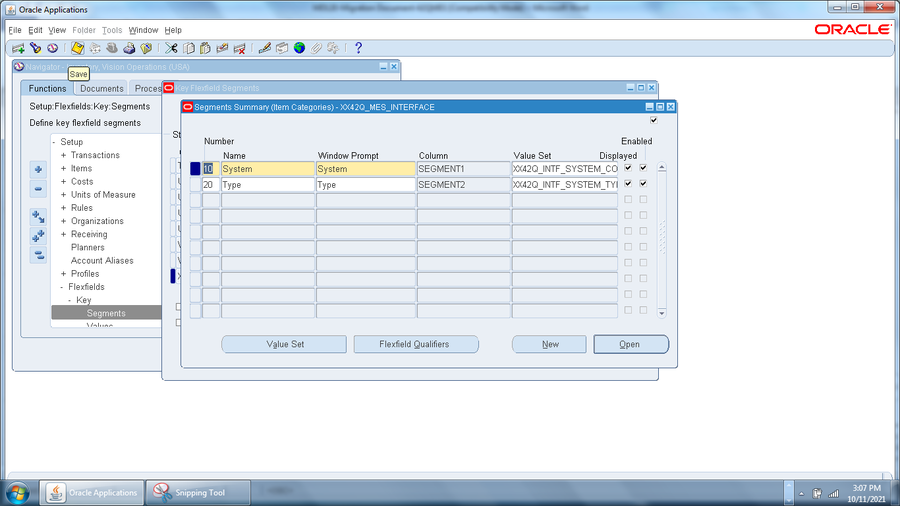
3. Click on the Segments button, and enter the below details:
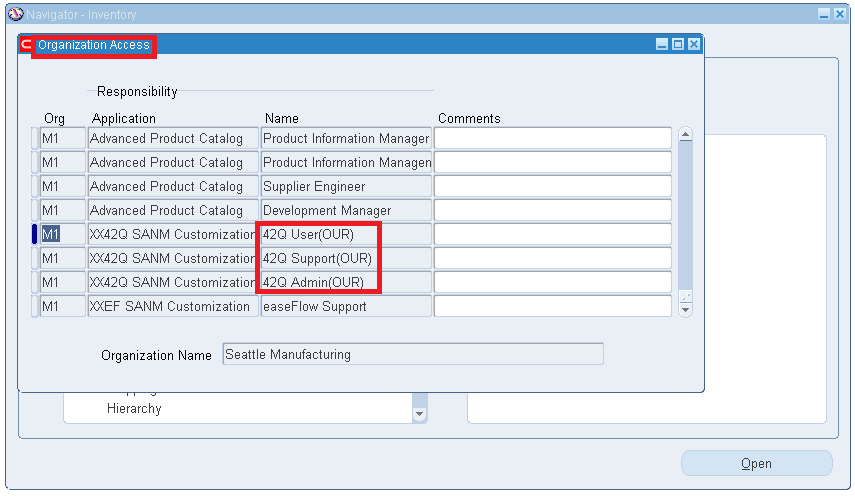
Organization Access
- Each OUR should be assigned to a specific ORG.
- Navigate to Inventory Responsibility > Setup > Organization > Organization Access.
- Enter the required details and save it.
|
|
|
|
|
|
|
|
Figure 14: Organization Access
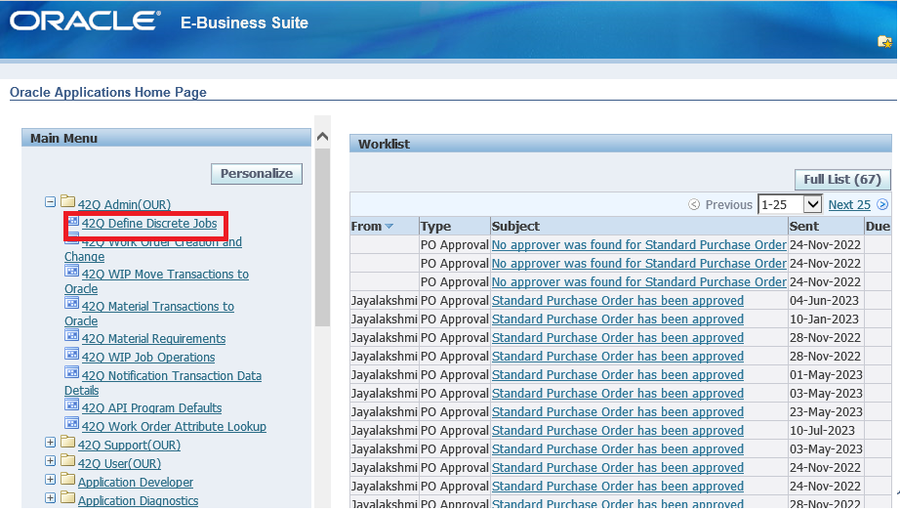
4. Each OUR has a list of forms.
5. Click the expand button in the 42Q Admin(OUR) to list and open the form.
Figure 15: Oracle Home Page
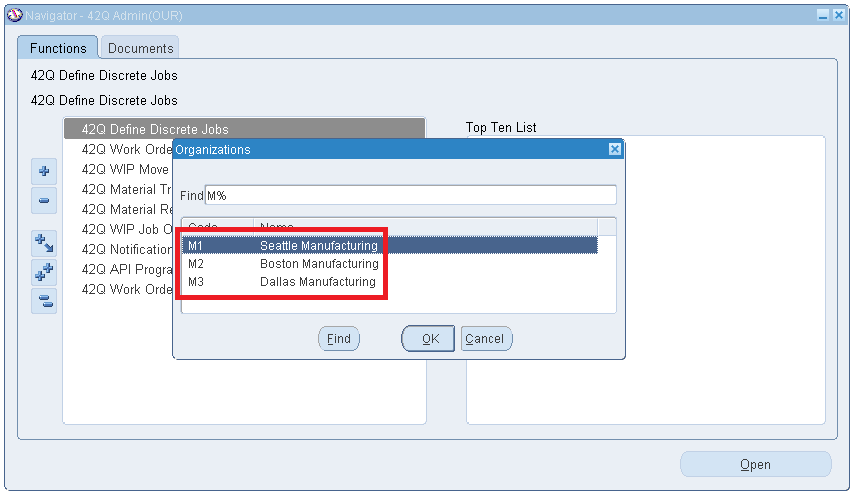
6. A list of the ORG will be displayed based on the organization access provided for the OUR.
7. Initially, users should select one of the ORGs to open any form.
Figure 16: Organization List
XX42Q WebServices Installation
42Q Oracle Adapter Typical System Requirements
- 2 x vCPU
- 4GB Mem
- 100GB SSD/HDD
42Q Oracle Adapter Software Requirements
- Any OS capable of running java/tomcat (The following guide assumes Unix/Linux type environments)
- Java 1.8
- Apache Tomcat 8.5.XX (Exposed to the internet either behind a Reverse Proxy or directly with SSL/TLS enabled although not recommended)
42Q Oracle Adapter Qualified in
- OpenJDK 64-Bit 1.8.0_41
- Apache Tomcat 8.5.66
- RHEL 6.6 (Sanmina R12 Oracle Infrastructure)
- Oracle Database 11g Enterprise Edition Release 11.2.0.3.0 - 64bit Production
Install Java 1.8 and Tomcat 8.5
- Tomcat can be installed as a service or manually started and stopped.
- The following helper scripts can be used to start and stop the Web Services.
- To override the default Log4j2 configuration within the 42Q Oracle Adapter WAR file add the location of the new custom log4j2.xml file to the JAVA_OPTS.
- Other additional JAVA_OPTS can be added to the start_tomcat.sh such as -Xms or -Xmx, minimum and maximum memory allocation, respectively.
https://docs.oracle.com/javase/8/docs/technotes/tools/unix/java.htmlstart_tomcat.sh
#!/bin/bash
JAVA_HOME=<JAVA_HOME>
export JAVA_HOME
TOMCAT_HOME=<TOMCAT_HOME>
export TOMCAT_HOME
PATH=$JAVA_HOME/bin:$TOMCAT_HOME/bin:$PATH
export PATH
# export JAVA_OPTS="$JAVA_OPTS -Dlog4j.configurationFile=/<Path>/log4j2.xml" #Uncomment to specify custom log4j2.xml properties file
$TOMCAT_HOME/bin/startup.sh
stop_tomcat.sh
#!/bin/bash
JAVA_HOME=<JAVA_HOME>
export JAVA_HOME
TOMCAT_HOME=<TOMCAT_HOME>
export TOMCAT_HOME
PATH=$JAVA_HOME/bin:$TOMCAT_HOME/bin:$PATH
export PATH
$TOMCAT_HOME/bin/shutdown.sh
42Q Oracle Adapter Web Services Installation
- Copy the provided files into the Tomcat locations:
<TOMCAT_HOME>/lib
ucp.jar
ojdbc6.jar
<TOMCAT_HOME>/webapps
Xx42q.war
42Q Oracle Adapter Web Services Configuration
1. Add the following environment and resource variables to the end of the Tomcat context file:
<TOMCAT_HOME>/conf/context.xml
<Environment
description="URL for 42Q ERP Interface"
name="xx42q.URL"
value="https://erpuatwaf.42-q.com/xxxxxxxxxxxx/services/hcommsfService"
type="java.lang.String" override="false" />
<Environment
description="Username for 42Q ERP Interface"
name="xx42q.username"
value="xxxxxxxxxxxx"
type="java.lang.String" override="false" />
<Environment
description="Password for 42Q ERP Interface"
name="xx42q.password"
value="xxxxxxxxxxxx"
type="java.lang.String" override="false" />
<Environment
description="Flag to disable the checking of a valid SSL/TLS Cert to be used for testing purposes only"
name="xx42q.ignoreSSL"
value="false"
type="java.lang.Boolean" override="false" />
<Environment
description="Datapool to be used by xx42q webservices"
name="xx42q.dbpool"
value="jdbc/xx42q"
type="java.lang.String" override="false" />
<Environment
description="HTTP Timeout in milliseconds to be used xx42q by webservices"
name="xx42q.httpTimeout"
value="20000"
type="java.lang.Integer" override="false" />
<Environment
description="HTTP Response Timeout in milliseconds to be used by xx42q webservices"
name="xx42q.responseTimeout"
value="20000"
type="java.lang.Integer" override="false" />
<Environment
description="Retry delay on HTTP Error in milliseconds to be used by xx42q webservices"
name="xx42q.retryDelay"
value="1000"
type="java.lang.Integer" override="false" />
<Resource
description="R12 Test Data Source for 42Q"
name="jdbc/xx42q"
connectionPoolName="xx42q"
user="XX42Q"
password="xxxxxxxxxxxx"
url="jdbc:oracle:thin:@(DESCRIPTION=(ADDRESS=(PROTOCOL=TCP)(HOST=xxxxxxxxxxxx)(PORT=xxxxxxxxxxxx))(CONNECT_DATA=(SERVICE_NAME=xxxxxxxxxxxx)))"
minPoolSize="25"
maxPoolSize="50"
inactiveConnectionTimeout="20"
auth="Container"
factory="oracle.ucp.jdbc.PoolDataSourceImpl"
type="oracle.ucp.jdbc.PoolDataSource"
connectionFactoryClassName="oracle.jdbc.pool.OracleDataSource"
validateConnectionOnBorrow="true"
sqlForValidateConnection="select 1 from DUAL"/>
2. To override the warnings in the log files add the following lines at the end of the Catalina properties file:
<TOMCAT_HOME>/conf/catalina.properties
javax.xml.parsers.DocumentBuilderFactory=com.sun.org.apache.xerces.internal.jaxp.DocumentBuilderFactoryImpl
javax.xml.transform.TransformerFactory=com.sun.org.apache.xalan.internal.xsltc.trax.TransformerFactoryImpl
javax.xml.parsers.SAXParserFactory=com.sun.org.apache.xerces.internal.jaxp.SAXParserFactoryImpl
javax.xml.datatype.DatatypeFactory=com.sun.org.apache.xerces.internal.jaxp.datatype.DatatypeFactoryImpl
