SOP-42Q-MDS0034 CMMS Work Request
42Q Home > Production > Work Request
Contents
Work Request
42Q’s CMMS (Computerized Maintenance Management System) tools are designed to manage a plant’s assets, specifically, the machines and equipment companies use daily to build life-enhancing products.
The Work Requestsubmodule is used by administrative personnel to assign, track, edit, and approve all equipment-related tasks. Employees assigned the task will then access one of the CMMS modules to complete the assignment. Examples of the types of tasks that may be managed from the Work Request submodule include ordering machine parts (Spare Parts), troubleshooting machine failure (Work Order), relocating an asset to another plant or production line (Asset), or defining a sub inventory to a locator (Spare Parts), to name a few. Please note that the work request submodule is only a management portal; real tasks are completed within the corresponding CMMS modules, as described above.
1. To access Work Request Maintenance, navigate to Production > CMMS > Work Request.
Figure 1: Work Request Main Page
2. There are four (4) sub-modules located in the Work Request portal: Work Request, My Requested, My Approvals, My Assigned:
- Work Request page lists all Work Requests, independent of their status, approver, or requestor. This page is view only.
- My Requested page lists all Work Requests submitted by the current user; the user can add or edit work requests.
- My Approvals page lists the WRs that need approval by the current user.
- My Assigned page lists the WRs assigned to the current user.
Work Request 
A complete list of work requests is available. This submodule is a view-only feature.
Figure 2: Work Request List
- Users can search the work request list by Category, Status, and Created Date.
- Click view to view Work Request on a VIEW ONLY submodule
Figure 3: Example of Work Request Details in Work Request Submodule
- Users can click the Print Icon to print the work request( see Figure 3).
My Requested 
All work requests that have been created by the current user in the local CMMS will be listed in the Work Request page. From the Work Request page, users can add a work request, edit a work request, and search/filter the work request list.
Figure 4: My Requests Main Page
Adding/Creating a Work Request
- Select the My Requested icon on the main page.
- Click the green Add button to create a new work request. (See Figure 2).
Figure 5: Add Work Request Page
- Complete the following fields.
- Category: Select a category from the drop-down list.
Note: Categories are predefined in the module: Shop Floor Control > CMMS Admin > WR Category. If the desired category is not available in the drop down list, the user should return to CMMS Admin to configure the information. Once the WR Category is selected, the following fields will populate automatically: Assigned Group, Approval Path, and Category Des. This is because those requirements were configured together with the Work Category at the beginning of the process, in the CMMS Admin portal.
- Category Des: The category description will automatically populate when the WR Category is chosen.
- Assigned Group: This field will automatically populate when the WR Category is chosen.
- Approval Path: Select the Approval Path designated for this Work Request.
Note: Approval Paths is configured in CMMS Admin > WR Category. See WR Category section for more information. If there are multiple approval paths, users can select one of them, see Figure 3.
- Due Date: Select the date the work request will expire.
- Status: Drop-down choices include: Requested (Default) or Cancel. This field cannot be changed.
- Description: Provide a more thorough description of the issue that concerns the work request.
4. Click Save to save the work request.
Figure 6: WR Category Configuration Example:
Figure 6: In the above example, the following have been assigned to WR Category WRApproval: Assigned Group: TestWR; Approval Path: alice_zhong->helena_wang. The same information populates when the Work Request is created.
5. Add attachments to the Work Request if necessary (See Figure, below). Users may upload any pertinent information to the Work Request (e.g. user manuals, diagrams, warranties, shop floor diagrams, BOCs, etc.)
6. To add an attachment to the new work request, click the Add button and a small window will appear. See Figure 5 (below):
Figure 7: Add New Attachments to Work Request

7. Click Select File... to locate the file to attach.
8. Enter more information about the file in the Description textbox if necessary.
9. Save the attachment to the local system and the uploaded file will be displayed .
NOTE: In the event an incorrect attachment is uploaded, users can Delete the document from the Attachment list and upload the correct one(s).
10. To delete an attachment:
- From the Attachment list, select an attachment from the list.
- Select Delete. The selected attachment is removed from the list.
11. Once the Work Request is saved, the item moves to request status and the system automatically sends an email to the following persons: (See Figure 6)
- Requester
- Approver
- Approver’s Supervisor
NOTE: If the Approval Path has more than one Approver, just the first Approver and his/her Supervisor receive the requested e-mail at this step.
Example Approval Path
The following steps outline how an approval path flows when the path is defined with the following users:
alice_zhong->helena_wang:
- The new Work Request is created.
- Once the new Work Request is successfully saved, the requester and the first approval alice_zhong receive an email.
- alice_zhong must approve the Work Request.
- The Approval Path then moves to helena_wang
- helena_wang will then receive the e-mail.
- helena_wang must approve the Work Request.
- When all the employees listed in the Approval Path have approved the work request (in this example both alice_zhong and helena_wang), then the Assigned Group members receive one email alerting them of the work request.
- At this point, the work request will move to Approved status.
Figure 8: Email for the Work Request
Edit Work Request
Once a work request has been created and is in requested status, it can be edited using the Edit function. To edit a work request:
- Select a file, by hovering your mouse on the WR#
- Click the Edit function.
- The Edit Work Request Screen appears.
- The user may now edit fields as needed.
- Users may also add or remove attachments as needed.
- Users can change the status from Requested to Canceled within the Edit submodule (see Figure 7: Edit Work Request).
Figure 7: Edit Work Request
Note: Only Work Requests in the requested status can be edited. Work Requests in Approved or Closed status cannot be edited.
Status: Search My Requested
Users may search the Status of a request by choosing the drop down list in the menu bar in the My Requested submodule. Search the Work request by: Status, Category, Requested Date.
Figure 8: Search Work Request
Customized Work Requests with Trigger Function
If a Customized Work Request has been predefined as a backend application, users will follow a different set of steps to Add a new Work Request.See: How to Create, Manage, and Run Reports for a Customized Work Request.
My Approvals 
1. Navigate to Production > Work Request> My Approvals to open My Approvals page.
2. All work requests assigned to the current user for approval will be listed on the My Approvals page.
3. From the My Approvals page, users can approve or reject a work request, and view the history of a work request. (See Figure 9).
Figure 9: My Approvals
4. Select the Waiting for Approval menu at the top to see the work requests list that need approval by current user.
5. To open a work request, hover the mouse over the WR#, then click to open the detailed information page.
6. The Edit Work Request task window appears.
Approval Status
Work Orders may be assigned one of three status types:
- Waiting for Approval
- Approved
- Rejected
- Choose the desired Approval Status
- Enter the Comment
- Then click the Save button
- Choose Cancel to keep the work request in Waiting for Approval status.
- Once the approval Status changes, the Work Request information will disappear from the list, and the system will automatically send an email to the associated user.
Figure 10: Email when status changed
NOTE: Only employees assigned to the Assigned Group may approve a work request. Once work requests are approved, an equivalent work order is created within the appropriate CMMS submodule.
History
1. To view the status History of your WR list, select the WR from the list and choose the History button on the top menu bar. (See Figure 11).
Figure 11: My Approvals-History
2. Once chosen, the Edit Work Request Task tab appears and the Approval History is available by scrolling to the bottom (Figure 12).
Figure 12: A Work Request Approval History
My Assigned 
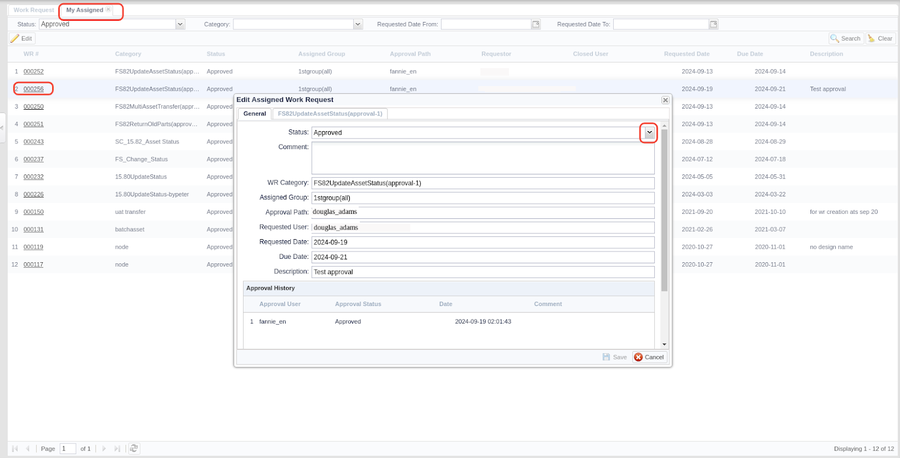
1. Navigate to: Production > Work Request> My Assigned. Choose the My Assigned icon.
2. All work requests that have been approved and assigned to the current user are listed in the My Assigned submodule. From this submodule, users can close a work request or search a work request by Status, Category, Requested Date (see Figure 14).
Note: Only the user who is in the Work Request assigned Group and has approval permissions can close the Work Request. Administrators can edit a user’s active status and approval permissions from the CMMS - Admin > Group > Edit Group user Tab.
Figure 13: My Assigned
3. Users can search the Work Request list by Status (Approved/Closed) located on the top menu bar.
4. To close a work request, select one work request, then click the Edit button
5. The Edit WO screen appears
6. Change the Status to Closed using the drop-down menu in the Status line.
7. Choose Save to close the work request


