SOP-42Q-MES0026 Shop Order Control
42Q Home > Shop Floor Control > Production Control > Shop Order Control
Contents
- 1 Introduction
- 2 Shop Order Release
- 3 Shop Order Browser
- 4 Serial Number Maintenance
- 5 Serial Number Assignment
- 6 Sales Order Browser
Introduction
Shop Order Control is a powerful tool that allows for the creation and management of Shop Orders. A Shop Order is a group of serial numbers assigned to the same part number and revision. Shop Order Control provides a system to aid in the assignment of materials related to a BOM and build quantity, thus allowing material and labor tracking for the completion of a customer order. With the portlets provided in Shop Order Control, users can create shop orders, release shop orders, maintain serials associated with shop orders, and manage sales orders. Shop Order Control also allows the receiving of discrete jobs or work orders from ERP when interfaced, which triggers the creation of a shop order for the work order.
To access Shop Order Control, from the 42-Q portal navigate to Shop Floor Control > Production Control > Shop Order Control
Figure 1: Shop Oder Control Menu
Shop Order Control contains the following modules:
- Shop Order Release: Provides access to create and release Standard Shop Orders, as well as Map and release ERP Shop Orders
- Shop Order Browser: Provides access to general Shop Order information as well as Edit, Delete, Shop Order Linkage, and Generic Attributes
- Serial Number Maintenance: Maintains released Shop Order serial numbers
- Serial Number Assignment: Attaches serial numbers to a released Shop Order
- Sales Order Browser: Provides access to general Sales Order information as well as serial number maintenance
There are two types of Shop Orders available in Shop Order Control:
- Standard Shop Order - Shop orders created in MES that are not controlled by ERP.
- ERP Shop Order - Shop orders passed to MES via ERP.
As a general rule, ERP Shop Orders are preferred over Standard Shop Orders. ERP Interfaced Shop Orders provide better inventory control over Standard Shop Order tracking, as ERP will reflect the actual SFDC WIP. Depending on the ERP Category Set defined at the Item Level in ERP, the following features are enabled:
- Automatic Shop Order creation
- BOM Recipe and Substitute components
- ERP WIP moves, completions, and automatic back-flush
- Deviations
- Traveler Print
- Tracking critical components
- ATO Processing
The ERP Category Set must be configured in ERP to utilize the interface functionalities, and are defined as follows:
- SFDC.DEFAULT: ERP sends the Discrete Job header only. (No BOM Components)
- This is the standard solution when a part number does not require BOM Component traceability, Traveler printing, Deviations, or Substitute Items processes, yet WIP Move/material back-flush is desired.
- SFDC.SYSTEM-BUILD: ERP sends the Discrete Job header and BOM Components enabling the following features:
- Deviations
- Traveler Print
- Substitute Items
- Tracking Critical Components
- ATO Proceeding
- SFDC.TRACED-ITEMS: ERP sends the Discrete Job header and BOM Components with only the Traceability flag assigned enabling only the tracking of critical components.
Note: Keep in mind that Assembly Maintenance configuration is required for the traceability of components.
Shop Order Release 
The Shop Order Release module allows users to perform the following functions:
- Filter by Shop Order Number, Part Number, Revision, Shop Order Type, Status, Start Date, Completion Date and Priority.
- Add Standard Shop Order
- Edit Standard Shop Order
- Map ERP Shop Order
- Release Shop Orders
- Delete Standard Shop Order
- Close Standard Shop Orders
- Print/Export Filtered Shop Orders
Note: The Priority filter and the column Priority will be available only when the Flags “shop_order_priority_management” and “shop_order_scheduling” are enabled by Generic Attribute Maintenance.
- To access Shop Order Release, navigate to Shop Floor Control > Production Control > Shop Order Control, and then select the Shop Order Release icon.
- All Shop Orders with status “N”, or status “R” with increased quantities, are displayed:
Figure 2: Shop Order Release List
The Shop Order Release Control list is displayed using colors for easy identification of Release status:
- Black: Non-Partial Released.
- Red: Partial released but not completed.
- Green: Some Serial Numbers have been generated but the Shop Order status was not changed to “Released.”
Note: To sort (ascending or descending) the list, click on the column headers.
In the Shop Order Release module, the user has the ability to prioritize shop orders (work orders) and drive manufacturing to produce based on a defined priority list of shop orders. It is possible when the Flags “shop_order_priority_management” and “shop_order_scheduling” are enabled by Generic Attribute Maintenance.
After these configurations are enabled, the field Priority will be displayed.
The priority can't be changed for a released shop order.
See in the next steps how to prioritize the Shop Order.
Filter
The filter options in Shop Order Release allow the user to filter Shop Orders. The following fields are available:
- Shop Order Number
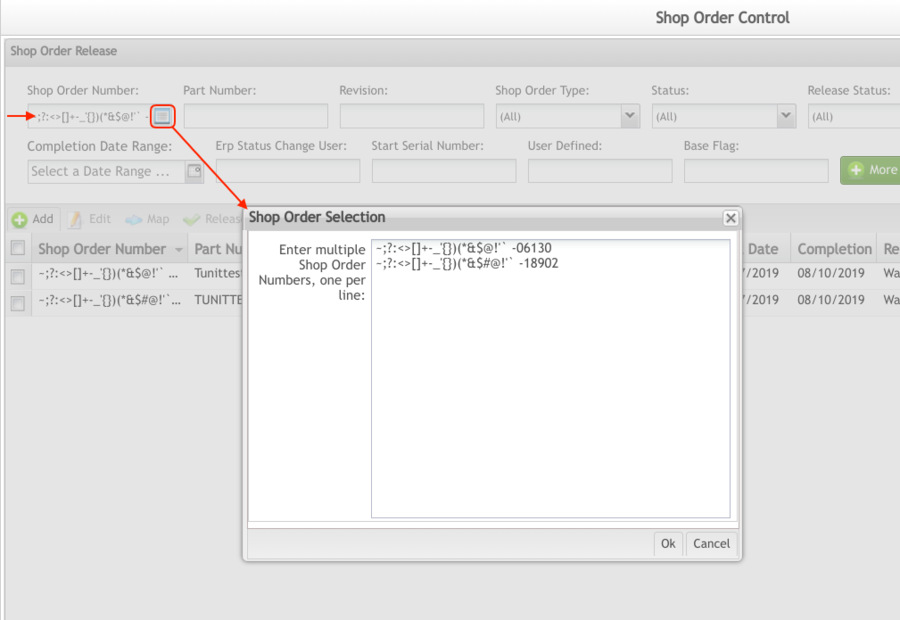
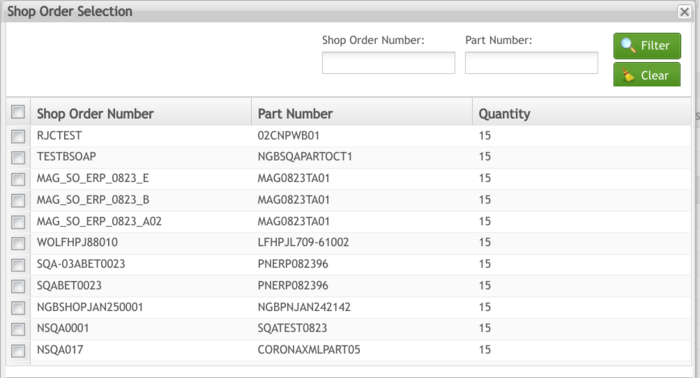
- Shop Order Selection: Filter multiple Shop Orders at once (50 max). Users can write down or copy-paste a list of shop order numbers.
Figure 3: Shop Order Selection
- Part Number
- Revision
- Shop Order Type
- ERP Shop Order: Shop orders passed to MES via ERP.
- Standard Shop Order: Shop order created in MES that is not controlled by ERP.
- Status
- Releasable: ERP or Standard shop orders that are ready for release.
- Not Releasable: ERP Shop Orders that are not ready for release.
- Mapped: ERP Shop Orders that have been previously mapped.
- Unmapped: ERP Shop Orders that require mapping.
- Start Date
- Shop Order creation date;
- Completion Date
- Shop Order completion Data
- Priority
- High
- Medium
- Low
- Release Status
- Failed Release
- Releasing
- Waiting Release
Figure 4: Shop Order Filter
Notes:
A) The Priority filter and the column Priority will be available only when the Flags “shop_order_priority_management” and “shop_order_scheduling” are enabled by Generic Attribute Maintenance.
- Enter or select the desired filter information.
- Select Filter to filter the list, or Clear to clear the fields. The filtered results are displayed.
B) The Release Status column allows the user to put the mouse over the status and a tooltip with the error message is displayed if the Release status is Failed Release.
Print/Export Filtered Shop Orders
The print icon at the bottom of the page allows the user to print or export filtered Shop Orders from the Serial Number Assignment list.
- Select the Print/Export Filtered Shop Orders icon from the Top or Bottom of the page to print a list of filtered shop orders.
Figure 5: Print Filtered Shop Orders List
A report (pdf)is generated with the same fields that are displayed in the shop order List.
Add Standard Shop Order
The Add function allows users to create Standard Shop Orders. ERP Shop Orders are the preferred methodology for grouping and tracking serial numbers, yet a Standard Shop Order is useful when tracking product that does not exist in ERP, such as a purchased sub-assembly.
- To add standard Shop Orders, select the Add icon.
- The Add Standard Shop Order form displays:
Figure 6: Add Standard Shop Order
- Enter information into the mandatory fields:
- Shop Order Number: The unique name or number of the Shop Order to be created.
- Part Number: Enter at least three characters to select the desired part number.
- BPP: Borders per Panel. It is not possible to edit this field. It comes from the part number quantity selected during the Shop Order Release.
- Quantity: The number of serial numbers to release (X the boards per panel).
- For panelized part numbers, insert the number of serial numbers to release, and the application will calculate the correct quantity for release.
- Enter information into the following optional fields if desired:
- User Defined: Text string to define Shop Order.
- Revision: This field is mandatory if the Part Number selected in the previous step is Revision Controlled. Revisions are maintained in Part Maintenance.
- Completion Date: The date of the desired completion.
- Priority: prioritize shop orders (work orders) based on a defined priority list of shop orders.
Note: The Priority field will be available only when the Flags “shop_order_priority_management” and “shop_order_scheduling” are enabled by Generic Attribute Maintenance.
- Select OK to add the Shop Order. The new Shop Order will display in the Shop Order Release list.
Flex Field Form
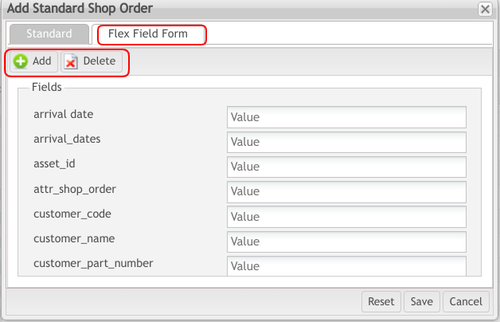
The FlexField Form tab helps to create new fields in an existing form. When the user adds a new field in this form, the field will be reflected in all forms of the Shop Order Control Maintenance.
Figure 7: Flex Field Tab
It is possible to add or delete fields by selecting Add/Delete buttons.
Flex Field Form - Add Field
To add a new field, enter the attribute name and the respective value for it. The new attribute is considered a generic attribute but is not displayed in the Generic Attribute module.
To edit the attribute, click over it. If the user edits the attribute name, it will be reflected in all show orders that have this field. The value is not affected due to the value being unique for each created field.
Note: If there is a generic attribute with the same name that the user is creating, an error message is displayed informing that it is not possible to create the attribute.
Flex Field Form – Delete Field
Figure 8: Delete Item From All Records
There are two options to delete the field:
- The generic attribute will be removed from the database: click on Yes.
- The generic attribute will be removed only from the page: click on Yes and Keep Values.
Edit Standard Shop Order
This Edit function allows users to change or update Standard Shop Orders. ERP Shop Orders cannot be changed or updated in MES.
Figure 9: Edit Standard Shop Order
To edit a Standard Shop Order, select a shop order from the Shop Order Release List and then select Edit.
- To edit a Standard Shop Order, select a shop order from the Shop Order Release List and then select Edit.
- The' 'Edit Standard Shop Order form displays:
- The following fields are available to edit
- Shop Order Number
- Quantity
- User Defined
- Revision
- Completion Date
- Priority
- Flex Fields
- Select Save to commit changes, or Cancel to exit. The Shop Order is updated with the modifications.
Note: The Priority field will be available only when the Flags “shop_order_priority_management” and “shop_order_scheduling” are enabled by Generic Attribute Maintenance.
ERP Shop Order Mapping
The Map function is available for ERP Shop Orders only after a discrete job is created and released in ERP for the interfaced part number. This portlet enables the user to map ERP Operation Sequences to SFDC Processes or Locations which, in turn, enables real-time back-flush as serial numbers are scanned through the SFDC Route.
To Map a Shop Order it cannot be status “R” (already released), it must have a Part x Route Assignment, and it must be an ERP Shop Order.
The mapping process is only required once for each part, and any time the ERP and/or SFDC route is modified.
Note: The generic attribute no_mapped_shop_order_release may be used to configure whether the release of non-mapped ERP Shop Orders is allowed. This generic attribute can be found in the portal at Administration > Generic Attribute Maintenance.
One benefit of ERP mapping is to have back-flush and completion transactions in real-time, therefore, it is not recommended to leave route mapping undefined.
- To map an ERP Operation Sequence to an SFDC Process/Location, select the ERP Shop Order from the list, and then select the Map icon.
- Shop orders listed in red indicate that the Shop Order has been partially released and cannot be mapped.
- Shop orders listed in black indicate that the Shop Order has not been released and are available to be mapped.
Figure 10: Map Shop Orders
Note: When mapping an ERP Shop Order the first time, the Select the mapping type pop-up is displayed.
Figure 11: Select the Mapping Type
2. Select the desired mapping type, and then select OK to continue. Select Cancel to close the form.
Note: As a general rule, users should map the ERP Operation Sequence to an SFDC Process in Route by Process configurations. The WIP moves/back-flush is then functional for every location assigned to the same process name. If mapping ERP Operation Sequence to SFDC Location, keep in mind that WIP moves will not take place when a unit is scanned at a location that is not specifically defined in the mapping.
1. The Shop Order Mapping screen is displayed:
Figure 12: Shop Order Mapping (Location)
Operation Sequence Mapping
Users have the ability to map the Operation Sequence to an SFDC location and are the only ones that can see the operation sequence that was mapped in a specific location in Shop Order.
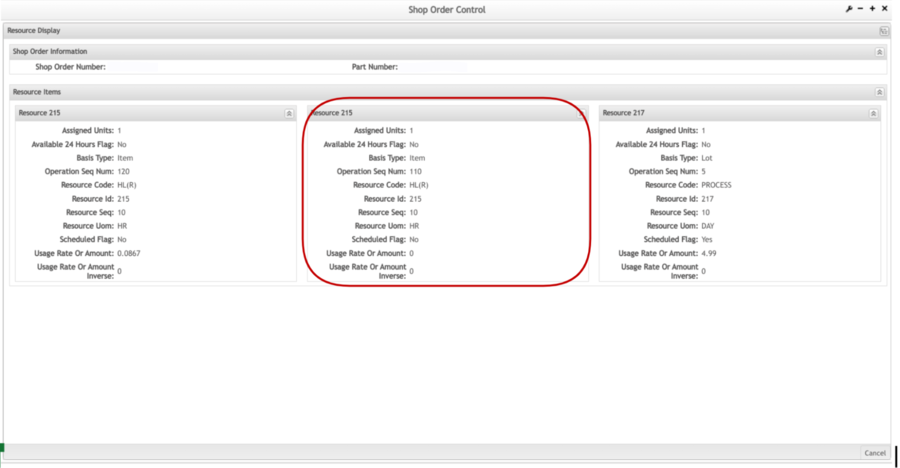
Figure 13: Resource Items
Note: This option displays all the operation sequences that belong to the Shop Order with detailed information of each operation sequence item.
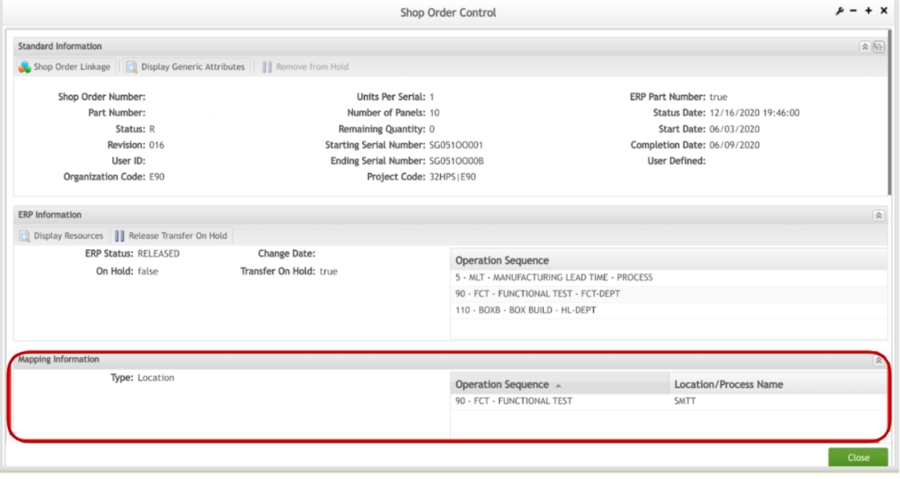
Figure 14: Mapping Information
Note: This displays the Mapping Information for the Operation Sequence that has been already mapped.
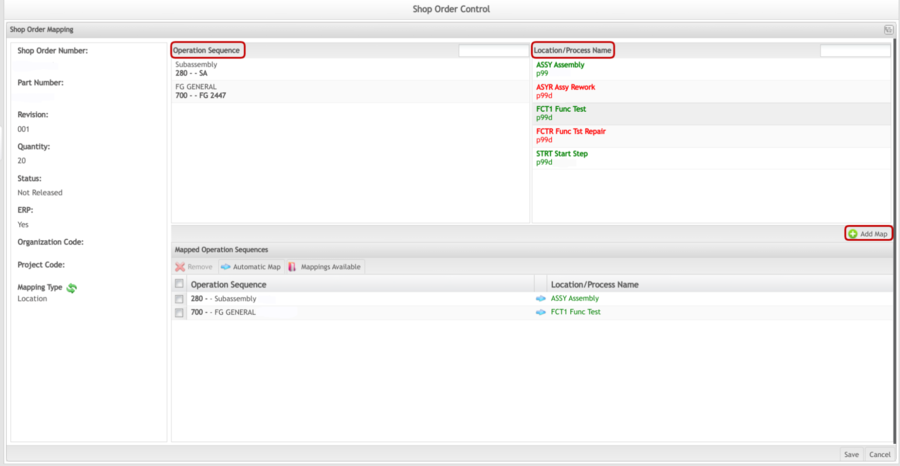
All ERP Operation Sequences for the selected Shop Order are populated in the Operation Sequence list. All SFDC/MDS process names or locations assigned to the part number of the selected Shop Order are populated in the Process Name or Location list (depending on the mapping type selected).
On the mapping screen, the locations are displayed in the list with the corresponding color based on part number and serial number location.
Color Table:
Note: The colors are defined when configuring the Location in the Location Maintenance module.
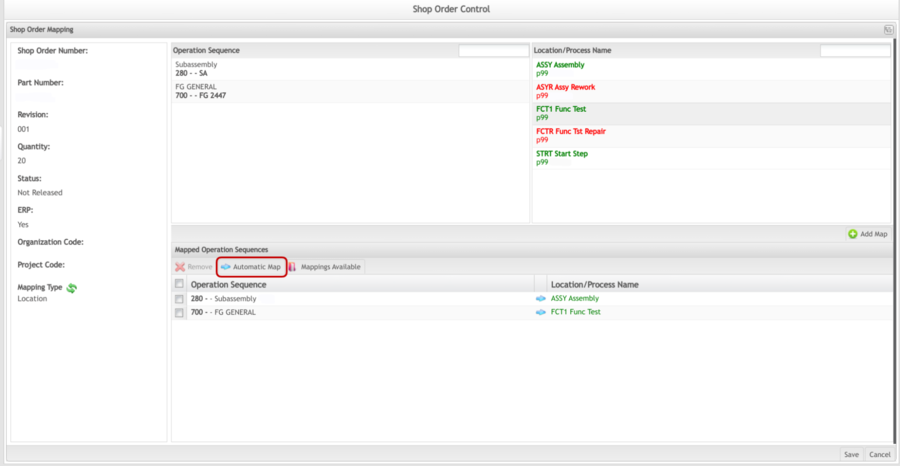
2. To perform automatic mapping, click the Automatic Map icon. Automatic mapping attempts to link Operation Sequence with Locations automatically, where Operation Sequence and Location name are the same.
Figure 15: Automatic Map
Note: Be cautious of undesired results when using Automatic Map. Verify results prior to saving.
Figure 16: Mapping Process
Figure 17: Remove Operation Sequence
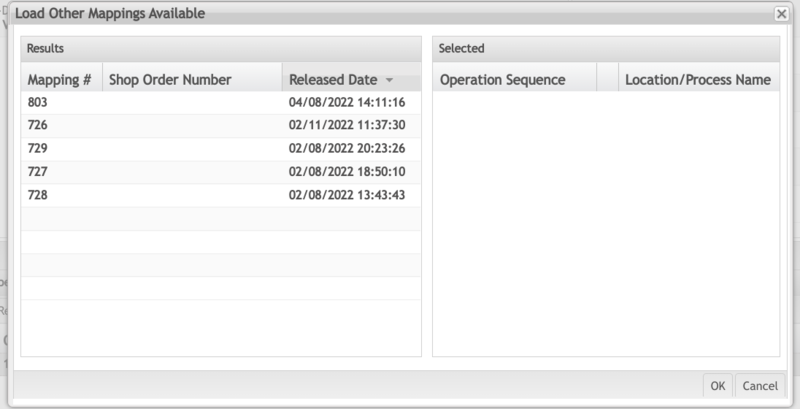
The Mappings Available function allows the user to select previously configured mappings. When selecting this option, a list of all mappings previously configured is displayed.
Figure 18: Load Other Mappings Available
Figure 19: Changing Mapping Type
Shop Order Release
The Release function allows users to release Standard and ERP Shop Orders. The Release Wizard guides the user through the Shop Order Release process.
General Notes:
- The part numbers and algorithms used in creating a shop order must be defined prior to releasing the shop order.
- Each serial number will have the Revision set with Shop Order Revision, and the User Defined set with the Shop Order User Defined field; except in Batch Release, the other releases will set the Serial Quantity with the Shop Order's Boards Per Panel field.
- The user is not able to release an ERP Shop Order with an On Hold status.
- When utilizing USL (Unit Start Location) for a part number, all serial numbers generated by the Shop Order Release process are only able to start at the location defined in the route with a Source Location as the USL.
- In order to use USL, a status 15 location must be defined. Enter the following format into the NAME TYPE field in the dpart table: <USL>XXXX (where XXXX is the four-character location name of the status 15 location that the serial numbers are to start). Define the status 15 location as a source location for the start station in the product route.
- During the Shop Order Release process, the user may define an alternate USL location by checking the Define USL option on the first screen of the Release Shop Order Wizard.
Note: See below different behaviors according to the different scenarios presented for single releases:
ERP Shop Order per default has the “Internal” revision, but there are many customers that will request to have the SN and/or labels with their revision (Customer revision - Rev. Description) instead. The customer revision is saved as a Shop Order, Generic Attribute, customer_part_revision.
A new configuration per site needs to be configured to determine the customer_codes that the customer_part_revision will be used as default to release ERP Shop Orders:
Table: shop_order
Attribute Name: default_customer_revision_by_customer_code
This functionality will ONLY work with the following preconditions:
- Shop Order is ERP
- Shop Order has the Generic Attribute customer_part_revision
The site has the generic attribute :
Table: shop_order
Attribute Name: default_customer_revision_by_customer_code
Value: A list of customer codes split by a comma without space, for example, customer_code1,customer_code2
Expected Behavior for:
- Shop Order Release Filter and Reports (Shop Order Status N)
- The filter will continue to display the current revision assigned to that Shop order (NO Changes)
- Shop Order Browser Filter and Reports (Shop Order Status N)
- The filter will continue to display the current revision assigned to that Shop order (NO Changes)
Single Release - Scenario 1
The user selects one Shop Order on Shop Order Release List:
Shop Order: SOTEST001
Current Shop Order Revision: 0000
Part Number: PNTEST
Part Number Revision List: (EMPTY)
Shop Order Generic Attribute: customer_part_revision: 001
Shop Order Generic Attribute: customer_code: customer_code1
The system will display the Release page with:
- Shop Order: SOTEST001
- Revision: 001
- Part Number: PNTEST
The user checks the Manually assign a revision to the Shop Order and in the Define the Revision Information step, a drop-down list will be displayed with the following option(s):
- 001
Single Release - Scenario 2
The user selects one Shop Order on Shop Order Release List:
Shop Order: SOTEST001
Current Shop Order Revision: 0000
Part Number: PNTEST
Part Number Revision List: A, B
Shop Order Generic Attribute: customer_part_revision: 001
Shop Order Generic Attribute: customer_code: customer_code1
The system will display the Release page with:
Shop Order: SOTEST001
Revision: 001
Part Number: PNTEST
User check the Manually assign a revision to the Shop Order and in the Define the Revision information step, a drop-down list will be displayed with the following option(s):
- A
- B
- 001
Single Release - Scenario 3
The user selects one Shop Order on Shop Order Release List:
Shop Order: SOTEST001
Current Shop Order Revision: 0000
Part Number: PNTEST
Part Number Revision List: A, B
Shop Order Generic Attribute: customer_part_revision: 001
Shop Order Generic Attribute: customer_code: customer_code3
The system will display the Release window with:
Shop Order: SOTEST001
Revision: 0000
Part Number: PNTEST
User checks the Manually assign a revision to the Shop Order and in the Define the Revision information step, a drop-down list will be displayed with the following option(s):
- A
- B
- 0000
Releasing Mapped/Unmapped Shop Orders
One benefit of the ERP interface is to have back-flush and completion transactions in real-time, therefore, it is not recommended to leave route mapping undefined or releasing an Unmapped Shop Order.
1. To Release a Shop Order, select a Shop Order from the Shop Order Release list and then select Release.
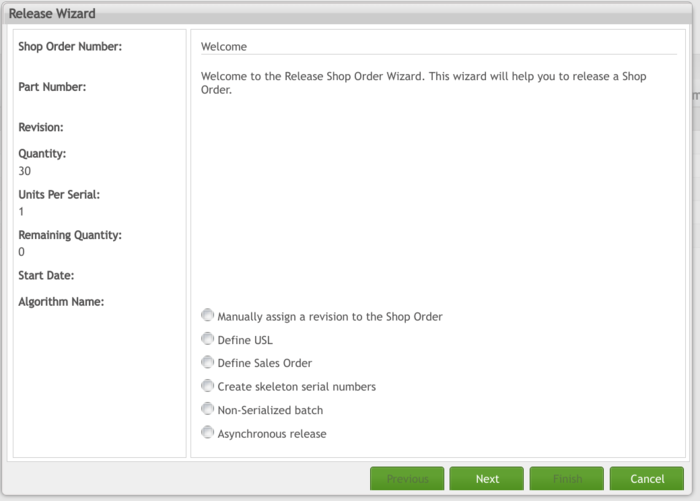
2. The Release Wizard screen is displayed:
Figure 20: Release Shop Orders
Note: If the Shop Order is interfaced with ERP and the BOM item has a traceability code, the system will display a warning in the first release step if there is not an Assembly configuration for that BOM item.
Note: If the part number has no routing assigned a warning message is displayed.
3. The following release options are available:
- Manually assign a revision for the Shop Order (Standard Shop Orders Only): Select to manually assign a revision for the Shop Order. If the part number is revision controlled, the user is only able to choose from a predefined list of revisions. Revisions are defined in Part Maintenance.
- This option is not available for ERP Shop Orders.
- Define USL: Select this option to define a Unit Start Location.
- If this option is selected, the Create skeleton serial numbers and Non-Serialized batch options are not available.
- This option is not available if Create skeleton serial numbers or Non-Serialized batch option is selected.
- Create a skeleton serial number: Select this option to create skeleton serial numbers instead of release serial numbers by an Algorithm.
- Skeletons can be replaced with actual serials utilizing Serial Number Maintenance.
- If this option is selected, the Define USL or Non-Serialized batch option is not selected
- This option is not available when Define USL or Non-Serialized batch option is selected.
- If this option is selected, the Select a starting serial number screen is not displayed.
- Non-Serialized batch: Select this option to set the Shop Order to release non-serialized batch serials. Production is able to manage the quantity of units without serial numbers.
- If this option is selected, the user is not able to create skeleton serial numbers or Define USL.
4. Select Next to continue or Cancel to exit.
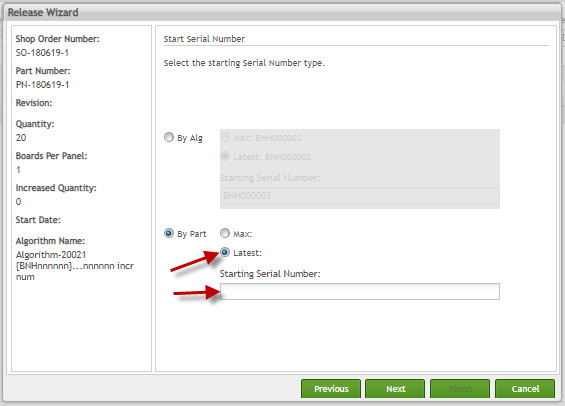
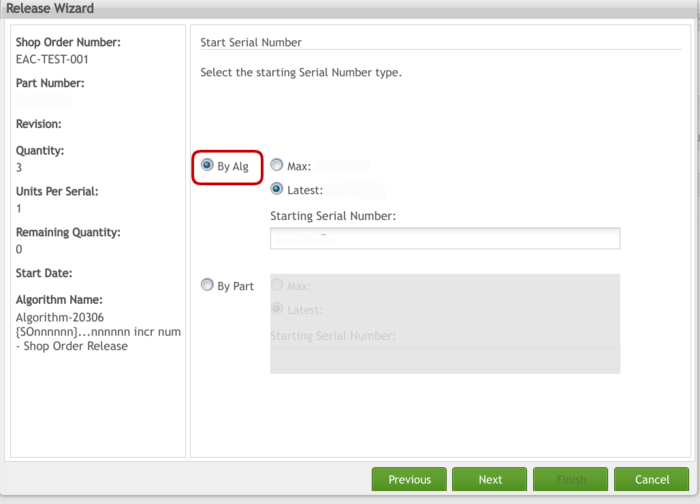
5. Select the starting serial number type (By Alg or By Part) then enter the Starting Serial Number.
Figure 21: Release Shop Order by Part
If the part number has been previously released with the same algorithm, the Starting Serial Number field may already be populated. Otherwise, the user must populate the Starting Serial Number to continue.
Note: This screen is not displayed if:
- Create Skeletons check-box was checked in the previous step.
- Part Number does not have an algorithm assigned; generic serial numbers will be generated.
- The generic serial number format is <Shop Order #>-<a counter with mask 9999999>
If the Shop Order part number is associated with a part based algorithm, the application allows the user to generate serial numbers By Part or By Algorithm. Both options allow the user to input a Starting Serial Number. If the Shop Order algorithm is not part based the user can generate serial numbers only by Algorithm.
When generating serial numbers by Part or Algorithm, the application displays the Max and the Latest serial number generated and allows the user to change it manually.
The application may return errors or warnings when attempting to generate the Starting Serial Number:
- When the part based starting serial number fails.
- When the algorithm based fails.
- When both fail. If one or both fail, a warning is displayed and the user is then able to enter the Starting Serial Number manually.
- If the part number is Part Based and By Algorithm option is selected.
- If the part number is not assigned to any algorithm, a warning is displayed indicating generic serial numbers will be generated.
6. Select Next to continue or Cancel to exit.
7. Select the release type:
- Full release: All serial numbers are generated and the entire Shop Order quantity is released.
- Partial release: The defined quantities of serial numbers are generated, and the defined quantity is released.
- The defined quantity cannot be less than 1 but must be less than the quantity available.
- The Shop Order is changed to "R" (released) status, and the remaining quantity of serials may be released at a later time following this same process.
Figure 22: Release Shop Orders –Release Type
8. Select Next to continue or Cancel to exit.
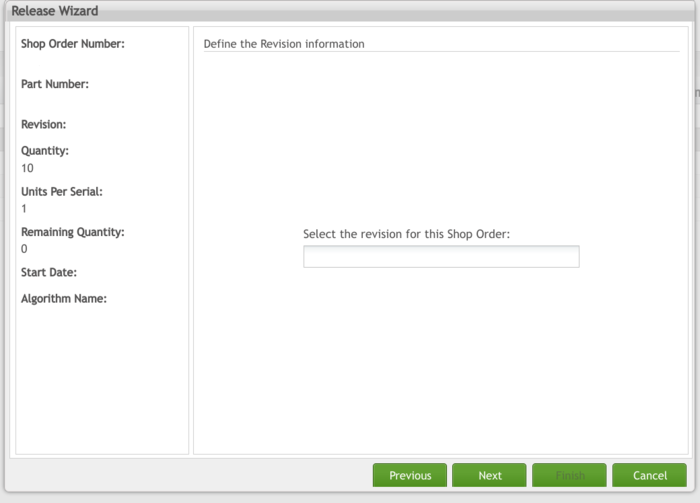
9. Select the revision for this Shop Order. (This option is only available for Standard Shop Orders.)
This screen is only displayed if the Manually Assign Revision option was selected on the initial release screen. If the part number is revision controlled, the user is only able to select a revision from the drop-down menu. If the part number is not revision controlled, the user may enter any valid value.
10. Select Next to continue or Cancel to exit.
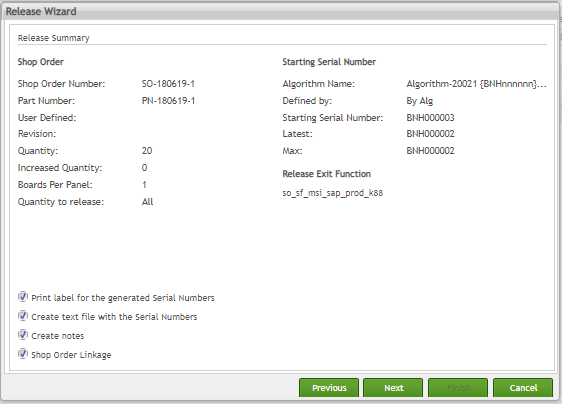
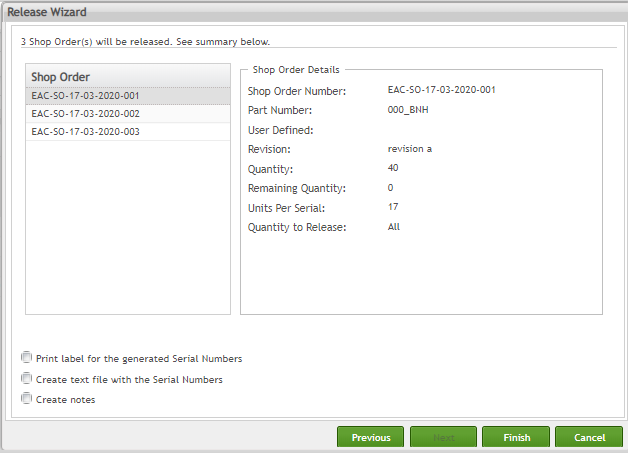
11. The Shop Order Release summary screen is displayed:
Figure 23: Releasing Shop Orders-Summary
12. Review the Shop Order Release Summary for accuracy.
13. The following options are available:
- Create Assemblies from BOM
- Print label for generated serial numbers: Select if labels will be printed directly from MDS.
- The Label Type must be configured and released for the part number in Label Maintenance prior to Shop Order release.
- Create a text file with the serial numbers: Select if an output file of released serials is desired.
- This file can be used for import into label print software (Label Matrix, Bar Tender, etc.) to avoid the risk of releasing incorrect serial format and/or sequence.
- Create notes: Select to add release notes to Shop Order.
- Add notes in regards to the Shop Order release for future reference. For example if partial release was requested for a specific reason.
- All Release Notes are available for viewing and editing in Shop Order Browser.
- Print WIP Traveler – Per Unit: Select if Traveler will be printed per unit.
- Only available if part number is configured to print traveler per unit.
- Shop Order Linkage: Select if this Shop Order will be linked to another Shop Order.
- This option is useful when a part number is changed to another part number on a different Shop Order during production.
- Shop Order Linkage can be managed in Shop Order Browser.
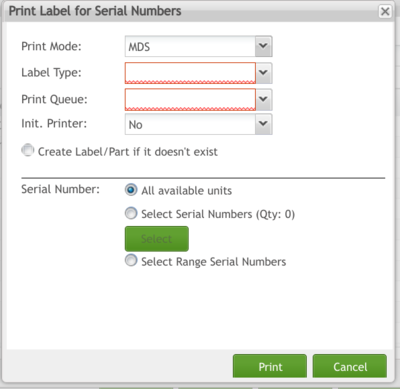
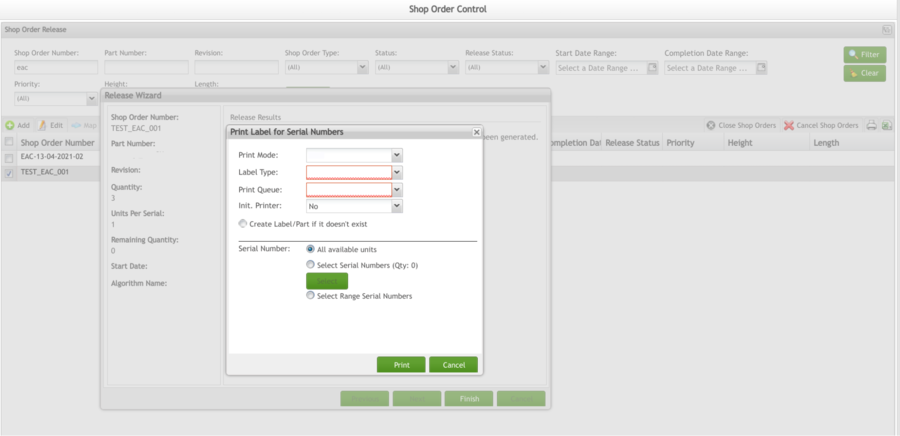
14. If the Print label for the serial numbers generated is selected, the print label dialog is displayed. Select the Print Mode, Label Type, and Print Queue and then select Print to send the label to the printer.
Figure 24: Print Label for Serial Numbers
Note: For further information, please see the Print Labeltopic.
15. If Create a text file with serial numbers is selected a prompt will display to aid in saving the output file. Select the program with which to open the file, and then select Save.
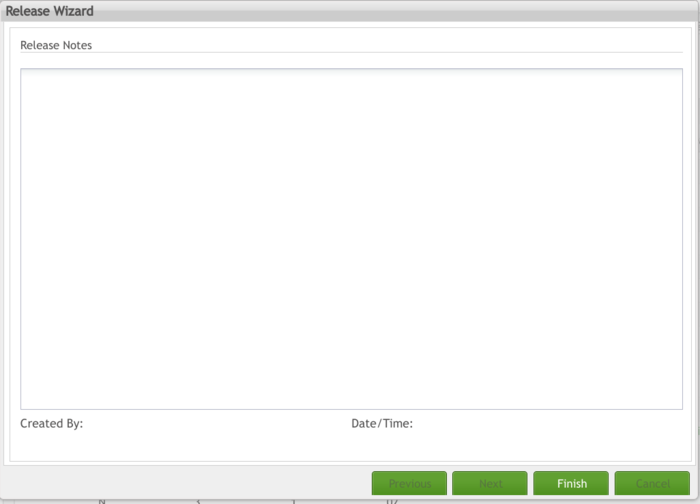
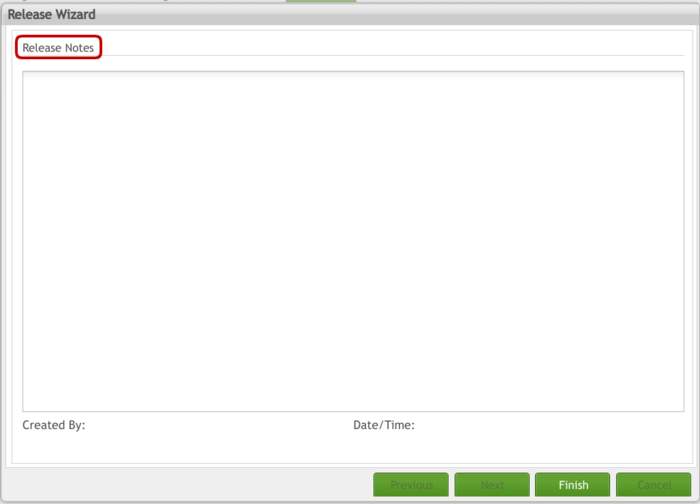
16. If Create Notes is selected the release notes screen will display. Enter release notes into the space provided and then select Finish to proceed.
Figure 25: Release Shop Orders – Release Notes
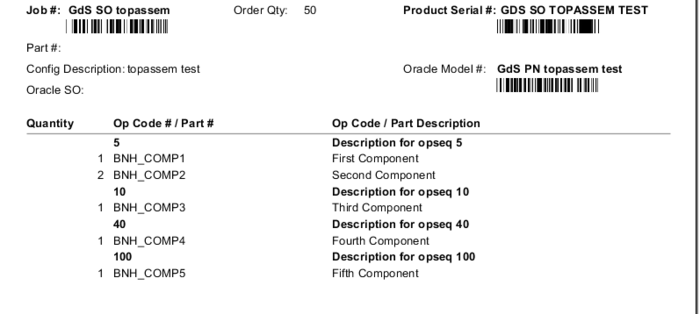
17. If the Print WIP Traveler – Per Unit option is selected, a traveler is automatically generated and sent to the default printer.
Note: This option is only available if the part number is configured to print a WIP Traveler per unit.
Figure 26: Print Traveler – WIP Traveler per Unit
18. If Shop Order Linkage is selected, the Shop Order Selection screen is displayed.
Figure 27: Shop Order Selection
19. Enter the Shop Order Number or Part Number and then select Filter to find the Shop Order with which to link. Select Ok to continue, or Cancel to exit. A message is displayed. Select OK to continue.
20. Select Yes to Link the Shop Orders and continue or No to cancel linking the Shop Orders. The final screen of the Release Wizard is displayed.
21. Select Finish to complete the release process.
22. The Shop Order is released and removed from the Shop Order list if a Full Release was performed. If a partial release was performed, follow the same process to release the remaining quantities.
Note: A new functionality called Release Exit Function was added and allow to execute Shop Order /Serial operations after released. This functionality is configured in thePart Number Portlet, during part number creation or edition. An error message is displayed if the Release Exit Function is not installed in the Database since the function is not found. In this case, the user must contact the MES Support team.
Release Multiple Shop Orders
The Release Multiple Shop Orders allows the users to release multiple shop orders as a batch at one time using the Shop Order Release Module.
The selected ERP interfaced Shop Orders with the same part number not mapped with an operation sequence will display a warning message and follow an existing functionality.
The selected ERP interfaced Shop Orders some part numbers have sequence mapping. It will display an error and allow the user to deselect the shop orders part numbers without operational mapping.
The users can filter by shop order status to make it easier to find the releasable shop orders.
Figure 28: Multiple Shop Order Release List
1. To release multiple shop orders, select the shop orders to be released in the Shop Order Release List and select Release;
Figure 29: Selecting Multiple Shop Orders
2. The Release Wizard screen is displayed to the user:
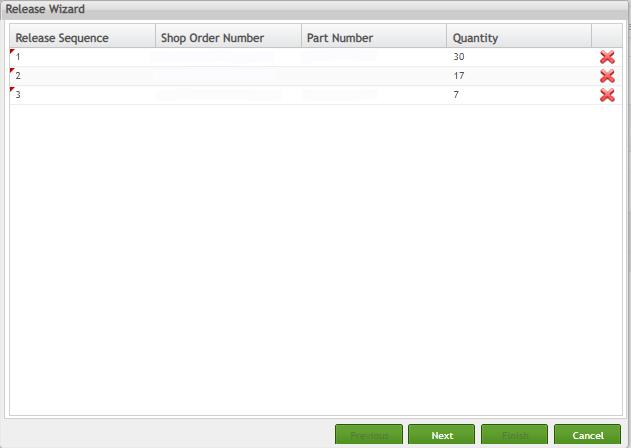
Figure 30: Release Wizard
The user is able to see the shop order information as part number and quantity and, also to update the release priority or remove shop orders from the released list if necessary;
3. To rearrange the shop order priority, drag and drop the shop order to the correct position.
Figure 31: Multiple Shop Order Priority List
4. To delete the shop orders within the list by selecting the "X" icon and it will be removed from the list.
Figure 32: Delete SO From List
5. Select Next to go to the next release steps.
Figure 33: Release Wizard List
The selected shop order will be locked until the user cancels/finishes the release process.
6. The following release options are available:
- Manually assign a revision for the Shop Order (Standard Shop Orders Only): Select to manually assign a revision for the Shop Order. If the part number is revision controlled, the user is only able to choose from a predefined list of revisions. Revisions are defined in Part Maintenance. If the user selects Manually assigns a revision to the Shop Order option in the release wizard step, on the next step, the user has an ability to add/select the revision for the shop orders by part.
Figure 34: Group by Part Number
Note: If the selected shop order is not eligible for the release, the respective error information will be displayed and the invalid shop orders are removed for the upcoming release steps.
- Define USL: Select this option to define a Unit Start Location. If this option is selected, the Create skeleton serial numbers and Non-Serialized batch options are not available. This option is not available if Create skeleton serial numbers or Non-Serialized batch option is selected.
- Create a skeleton serial number: Select this option to create skeleton serial numbers instead of releasing serial numbers by an Algorithm. If this option is selected, the Define USL or Non-Serialized batch option is not selected. This option is not available when Define USL or Non-Serialized batch option is selected.
- Non-Serialized batch: Select this option to set the Shop Order to release non-serialized batch serials. Production is able to manage the quantity of units without serial numbers. If this option is selected, the user is not able to create skeleton serial numbers or Define USL.
Note: If the selected shop order is not eligible for the release , respective error information will be displayed and the invalid shop orders are removed for the upcoming release steps.
Figure 35: Multiple Release Error Message
Release By Algorithm:
7. On the next step, the user is able to select the starting serial number for the shop orders by the algorithm.
Figure 36: Group By Algorithm
Notes:
- Select the Starting Serial Number, display the information into the panel grouped by Algorithm.
- Select the Revision, ability to select a different revision by Part number, Shop Order panel should be grouped by part number.
- Unit Started Location, this option should be configured in the Part Number Maintenance, we can select the Unit Started Location, the information in the Shop Order panel should be grouped by part number.
8. Select Next to go to the Release Summary;
Figure 37: Multiple Release Summary
Release Summary displays information about the selected shop order information.
Partial Release is allowed for the multiple shop order release, the user is able to release the remaining full quantity of the partially released shop orders.
General Notes:
- When selecting Create Text File With the Serial Numbers, an email is sent along with the generated serial numbers.
- When selectedPrint Label for the Generated Serial Number, on the next step the printing label option is displayed.
Figure 38: Multiple Release Print Label
Print Screen will be displayed based on the group by part number.
- When selected Create Notes, the Generic Release note is added for the released shop order.
Figure 39: Multiple Release Notes
Once finished, the shop order will be scheduled for the release and the release status column changed from Waiting for Release to Releasing.
Auto Refresh Release (Countdown) List
The shop order release list is refreshed after every x minutes, based on the configured generic attribute value. If the value is empty or not a number then the system is considered the default value is 0.5.
auto_refresh_shop_order_release_list = x minutes
Figure 40: Multiple Shop Order Release Auto Refresh
Generic Attribute Configuration
Generic attribute values is added for the siren notifications,
a. multiple_release_notification_rule_id (for successful release)
b. multiple_release_error_notification_rule_id (for release failure)
c. multiple_release_print_error_notification_rule_id (for print failure)
Tinmon tasks will pick up the scheduled shop order and release it for every 5 sec (default).
Once the release task process is completed, the system will send a status mail to the configured recipient.
a. On Success - the email with the following release information has been sent.
Part Number: {&part_number}
Shop Order: {&shop_order_number}
Revision: {&revision}
Serial Number: {&serial_numbers}
b. On Failure - the email with the following error message has been sent.
The shop order {&shop_order} release failed due to the following reason {&error_message}.
Note: See below different behaviors according to the different scenarios presented for multiple releases:
Multiple Release - Scenario 1
The user selects one Shop Order on Shop Order Release List:
Shop Order A: SOTEST001
Current Shop Order Revision: 0000
Part Number: PNTEST
Part Number Revision List: A, B
Shop Order Generic Attribute: customer_part_revision: 001
Shop Order Generic Attribute: customer_code: customer_code1
Shop Order B: SOTEST002
Current Shop Order Revision: 0000
Part Number: PNTEST
Part Number Revision List: A, B
Shop Order Generic Attribute: customer_part_revision: 002
Shop Order Generic Attribute: customer_code: customer_code2
The system will display the Release window with:
Shop Order: SOTEST001
Revision: 001
Part Number: PNTEST
Shop Order: SOTEST002
Revision: 002
Part Number: PNTEST
The user checks the Manually assign a revision to the Shop Order and in the Define the Revision information step, a drop-down list will be displayed with the following option(s):
- A
- B
- 001
- 002
Note: If the Shop Order is Standard or the Generic Attribute default_customer_revision_by_customer_code is empty, the system will not set the customer revision to the Shop Order automatically, and neither the value will be displayed in the Drop-down list.
Delete Standard Shop Order
The Delete function allows users to delete Standard Shop Orders with an unreleased status.
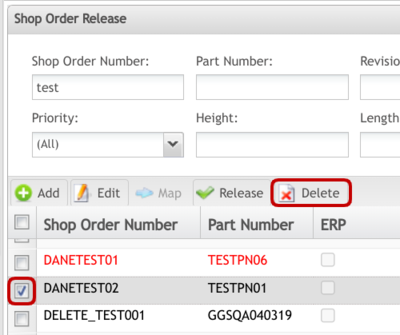
1. To delete a standard shop order, select an unreleased Shop Order from the Shop Order Release List and then select Delete.
Figure 41: Delete Standard Shop Order
2. A confirmation displays. Select Yes to confirm or No to cancel.
3. If the Shop Order is at "N" status and has no serial numbers, the Shop Order is deleted.
NOTE: ERP Work Orders cannot be released in 42Q. Cancel the Work Order in the ERP system to cancel it in 42Q.
Close Shop Orders
The Close Shop Orders function allows users to close multiple Standard Shop Orders. A Standard Shop Order is available to close when it has an "R" (released) status, all serial numbers have been generated, and their status is >30. The Close Shop Order portlet is also available through Shop Order Browser/Shop Order Viewer/Close Shop Order.
Note: ERP Shop Orders are not available to close as this task is performed in ERP.
1. To close Shop Orders, select the Close Shop Orders icon.
Figure 42: Close All Shop Orders
2. The Shop Orders available to be closed displays:
Figure 43: Close Shop Order
3. Select the Shop Orders to Close and then select Close Shop Orders. The selected Shop Orders status is now changed to "C" (Closed).
Shop Order Browser 
This portlet enables the following capabilities:
- View Shop Order information
- View/edit/add Release Notes
- Manage Shop Order Linkage
- View Location and Serial Number information
- Print labels
- Close a selected Shop Order
- View Recipe Display and Substitute components
- Edit and Update the Shop Order Priority
- Allow users to manually create BOM for Standard Work Orders(Shop Orders).
To access the Shop Order Browser, navigate to Shop Floor Control > Production Control > Shop Order Control and then select the Shop Order Browser icon.
Filter
1. To filter the list of Shop Orders, enter information into one or more of the following fields:
- Shop Order Number
- Part Number
- Revision
- Shop Order Type
- Status
- Start Date Range
- Completion Date Range
- Priority
Note: See Fields description in Shop Order Release.
2. Select Filter to filter the list, or Clear to clear all of the filter fields.
The following columns are available in the shop order list:
- Shop Order Number
- Part Number
- ERP
- Status
- Qty
- BPP
- Revision
- Start Date
- Completion Date
- Status Updated/Time
- Status Time Upd.
- Priority
Click on the columns individually and the list is sorted ascending/descending.
To go through the pages, click on the paginator.
Shop Order Information
The Shop Order Information feature is used for viewing Standard and ERP Shop Order information, as well as the release notes, location, serial number information and scheduling Shop Orders.
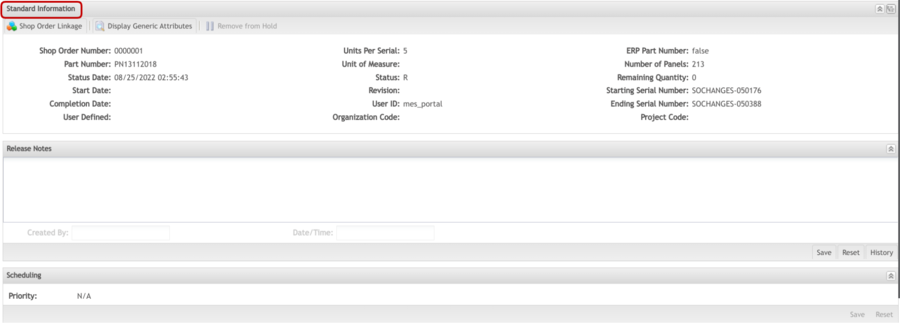
- The Standard Information section contains basic shop order information, such as the Part Number, Revision, Order Status, etc.
- The ERP Information section contains basic ERP information for the selected shop order. This section is not displayed for standard shop orders. The user is able to view the resource item for the selected ERP shop order by clicking on Display Resources.
- The Mapping Information section displays the ERP Operation Sequence to MDS/SFDC Location/Process Name mapping details. This section is not displayed for standard shop orders.
- The Release Notes section contains any notes added during the release process or other notes added to the shop order. Release notes may be added to a shop order at any time by entering the desired notes and selecting Save. Release Notes history is also available by selecting Show History.
- The Linkage Information section (if applicable) displays the Next (Linked) Shop Order Number, Part Number, and Quantity. The Linkage Information may be updated or removed by selecting the respective option.
- The Location Information section displays the Location Name, Serial Status, and Serial Qty for all serials for the selected Shop Order.
- The Serial Number Information section displays Serial Number, Status, Location, Scan Date/Time for all serials on the selected Shop Order.
- The Scheduling section allows the user to update the Shop Order Priority added during the Shop Order creation. To update the priority, select the desired priority and select the Save button. Note that the Priority for a Shop Order can only be changed prior to release in MES.
1. To display Shop Order information, select a Shop Order from the Shop Order Browser list and then select Shop Order Information.
Note: The Scheduling panel will be available only when the Flags “shop_order_priority_management” and “shop_order_scheduling” are enabled by Generic Attribute Maintenance.
Figure 44: Standard Shop Order Information
ERP Information:
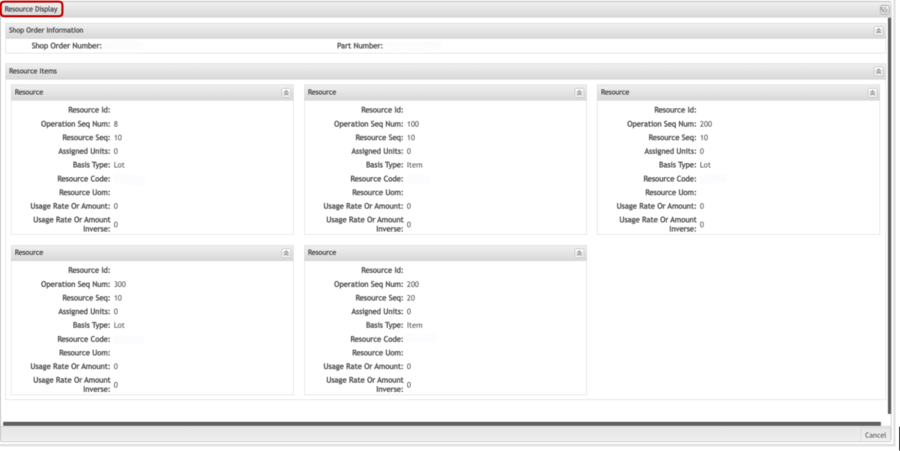
The user is able to view the resource item for the selected ERP shop order by clicking on Display Resources. The Resouce Display screen is displayed with all resources available for the selected ERP shop order.
Figure 45: Resource Display
2. The following functions are available from within the Shop Order Information panels:
- Shop Order Linkage: This function enables the user to link shop orders to one another. When shop orders are linked, serials with a status of 30 on the Unit Shop Order are automatically moved to the Linked Shop Order. Skeleton serials will be created on the Unit Shop Order to replace the moved unit serial numbers. The two shop orders maybe for different part numbers, in which case the serial part number will automatically change when moved to the Linked Shop Order. The serials moved to the Linked Shop Order will become status 15 and the route-key is cleared. The Unit Shop Order will automatically Close Standard Shop Orders after all unit serial numbers have been moved to the Linked Shop Order. For ERP Shop Orders, ERP is back-flushed and closed automatically.
- Display Generic Attributes: This function lists all Generic Attributes for the Shop Order.
- Remove From Hold: This function allows the user to remove a Shop Order from the On-Hold status.
- Auxiliary Release: This function is used to release additional serial numbers for standard shop orders that have been partially released. This option is only available for standard shop orders that are not batch released. This task button is displayed only if the user has permission to perform the auxiliary release. The users can auxiliary release using skeletons, or a part number, with or without an Algorithm. The conditions and processes are the same as described in the Standard Shop Order Release, increasing the shop order quantity by the entered quantity.
- Auxiliary Release in a Shop Order with no increased quantity: The Auxiliary Release function releases additional units for a shop order and increases its panel quantity. After entering the number of serials to release and complete the release process the inserted quantity of serials should be released and the Released Shop Order Wizard will be displayed.
- Auxiliary Release in a Shop Order with increased quantity: The Auxiliary Release function releases additional units for a shop order and increases its panel quantity. After entering the quantity of serials to release and complete the release process the inserted quantity of serials should be released and the Released Shop Order Wizard will be displayed. The Auxiliary Release must release all the previous increased quantity.
Note: The application prompts for the path to create the .txt file when performing the auxiliary release operation.
- Delete Unstarted Units: This function enables the user to delete serial numbers of units that have not yet been started in SFDC. The Delete Unstarted Units functionality will only delete units (serial numbers) that are Status 15. All other serial numbers will remain in SFDC.
- Print/Export Unit Status Details: This function provides a report with basic Shop Order unit status details. This report contains the Serial Numbers, current Location, Unit Status, Quantity, Revision and User Defined values for each serial number on the selected Shop Order.
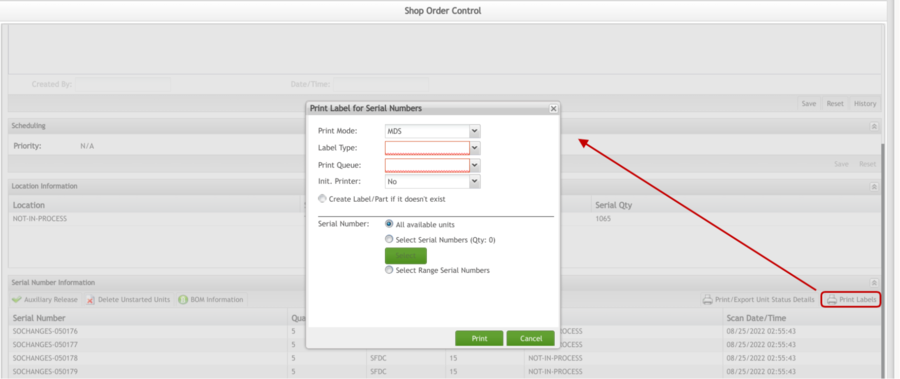
- Print Labels: This function enables a user to print serial number labels for a selected Shop Order. The labels may be printed for all available units, single or a range of serials. When printing labels via Shop Order browser (SO Information) the user can see the pre-configured label name, print mode and print queue info. The application will print the label for each serial number that was generated according to the selected options. The default print settings to be used on Shop Order Release Information is defined in the Generic Attribute Configuration module, in the shop_order table. If no value is defined in the Generic Attribute, the fields will be displayed empty to be filled by the user. The default configuration includes:
- default_label_name
- default_label_print_mode
- default_label_print_queue
Figure 46: Define Default Print Settings - Generic Attribute Maintenance
Figure 47: Print Label for Serial Numbers
Note: The predefined options in the Generic Attribute Maintenance are loaded in the Shop Order Print Label functionality.
BOM Information
The BOM Information feature is used for viewing and modifying recipe configurations for Shop Orders and Units. Recipes are unit configuration information including BOM (with substitute parts), reference designators, software load, and hardware test information. A default recipe is assigned to Shop Orders as it is received in MES from ERP.
Recipes can be modified in MES at the Shop Order and Unit level per the following conditions:
- The entire Shop Order if no units are completed for that Shop Order yet.
- An individual serial number or a select number of serial numbers from a list of serial numbers that are not complete yet (paddle boxes will be used to select the serial numbers).
- All serial numbers on the Shop Order that have not been completed (serial.unit_status-key < 30).
- All serial numbers on the Shop Order that have not been released (serial.unit_status-key = 15).
ERP Shop Orders have the BOM Information and Shop Order Information icons displayed in the Shop Order browser page. Standard shop order BOM Information icon is disabled as these shop order types do not have recipe information.
NOTE: The application does not allow the user to access the recipe display if the BOM information is empty.
1. To display the BOM Information page, select a Shop Order from the Shop Order Browser list and then select BOM Information. The Recipe Display form appears:
Figure 48: Recipe Display
NOTE: QC Checkpoint - the quality checkpoint feature was created to compare MES work order’s current bill of material with the sales order definition outlining the differences in order to facilitate manual WO updates. This could be accessed through the Shop Order Browser and/or Sales Order Browser.
Add BOM Item
The Add function allows users to add a BOM Item by Shop Order or Serial Number in a pre-WIP or WIP status.
1. To add a BOM Item, select Add.
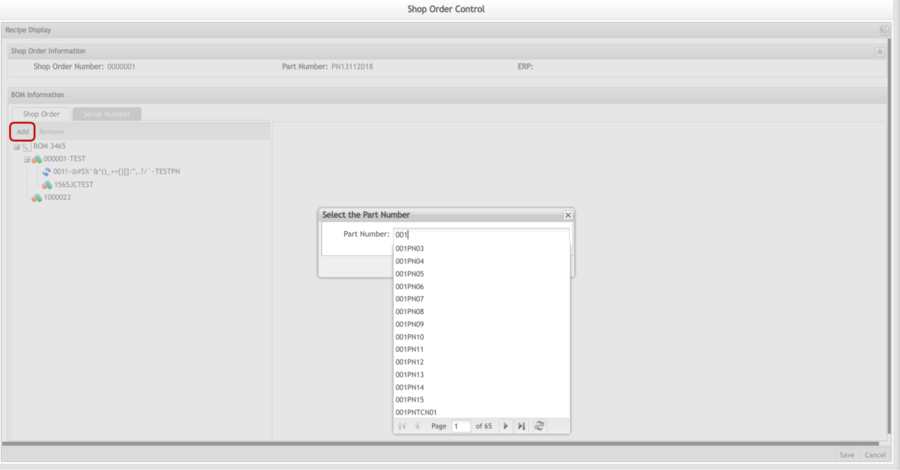
2. The Select the Part Number page is displayed:
Figure 49: Add BOM Item
3. Filter by an existing part number by entering a part number into the Part Number field.
4. Select OK to confirm or Cancel to exit. The part number selected will appear in the list:
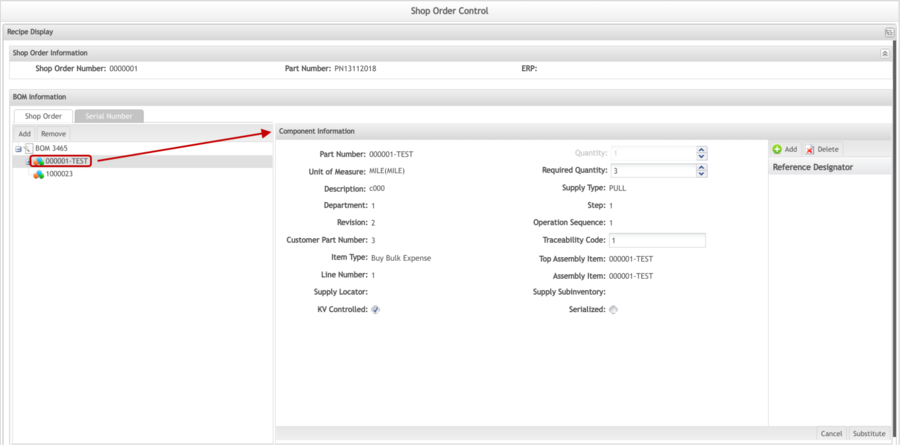
Figure 50: Component Information
5. Enter information into the following fields:
- Quantity: Numeric field, spaces validation and >=0 (mandatory field).
- Supply Type: PUSH or PULL (mandatory field).
- Department: Max size = 20 characters and spaces validation.
- Revision: Max size = 8 characters and spaces validation.
- Customer Part Number: The original part number on the customer end. The field provided for in the event is helpful to utilize this information in a report.
- Item Type: Select the item type from the drop-down menu.
- Line Number: Reference number linking a Sales Order item with a BOM item.
- Quantity: Required number to be manufactured at the Top Level Assembly.
- Operation Sequence: Numeric, spaces validation and >=0.
- Traceability Code: Three-segment code that defines whether traceability defines the item for (1) Serial (i.e., S), Date (i.e., D), Lot (i.e., L) tracking or some combination thereof (e.g., SD); (2) MPN tracking (i.e., NOMPN or MPN); and (3) label printing (i.e., Yes, or No). An example of a traceability code is S.NOMPN.No.
- Sequence: The item sequence – i.e. the order that the component is added. If this is not added, it will default to the largest another sequence + 1, unless it is defined as a substitute, in which case it will be set to the same sequence as the part that it will substitute for.
- KV Controlled: Checked by default. This indicates that Kit Verify manages the part.
- Serialized: This is checked automatically when the traceability code begins with S, which indicates that this part will have serials. The serialized checkbox also displays in the Part Number Form. When selected, the part will have serials for any MES module.
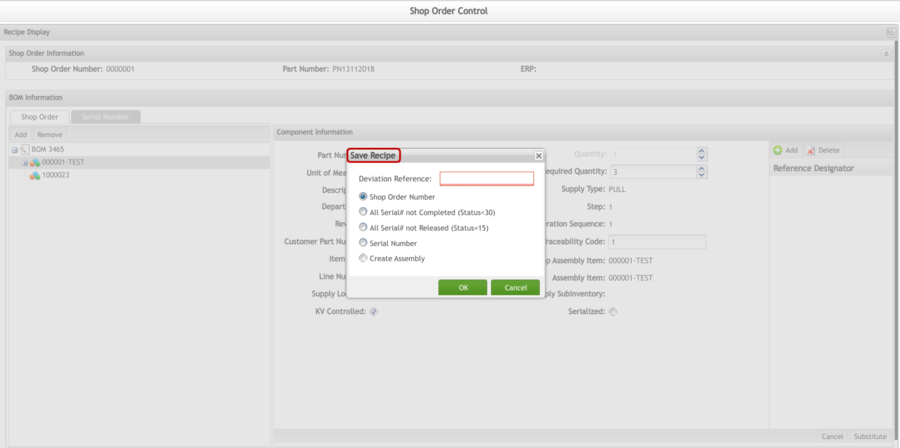
6. Select SAVE to save the Recipe based on the following options:
- Shop Order Number: The application records the BOM configuration for the current Shop Order.
- All Serial# not Completed (status<30): The application records the BOM configuration for all serial numbers in the Shop Order which have status <30.
- All Serial# not Released (status=15): The application records the BOM configuration for all serial numbers in the Shop Order which have status = 15.
- Serial Number: The application records the BOM configuration for the selected serial number from the Shop Order assignment link. The user must first assign Serial Number(s) by clicking on the Assign Serial Number(s) link.
Figure 51: Save Recipe
Note: A deviation is when a standard BOM must be modified or updated due to part changes. There are many reasons for part changes, but a common situation is when a specific part number is not available, yet another part is acceptable. The Deviation Reference is a mandatory field when a BOM is changed in the Portal.
7. Select OK to save the Deviation Reference and complete the BOM Item addition.
Remove BOM Item
The Remove function allows the user to remove a BOM Item by shop order or serial number in a pre-WIP or WIP status. BOM item removal is only available for Supply Type PUSH components. Supply Type Operation Pull components are not available for removal in MES.
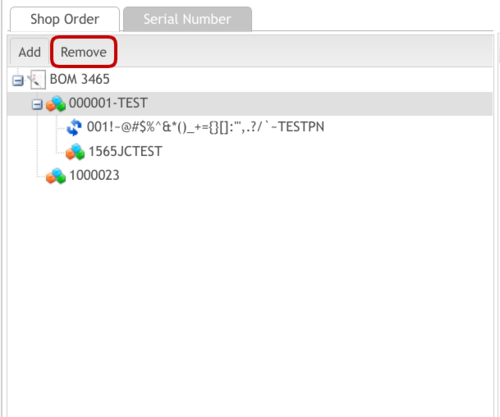
1. To remove a BOM Item, select the desired item component to remove from the BOM Information list and select Remove. The BOM Item selected will be removed from the list.
Figure 52: Remove BOM
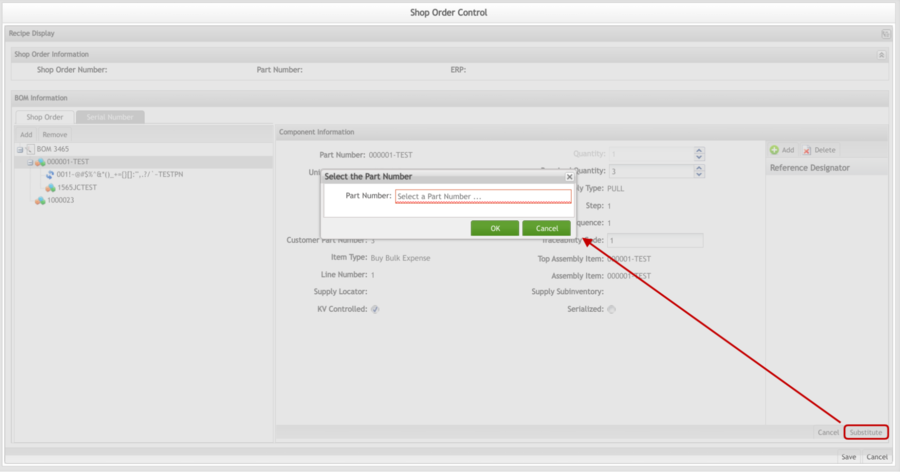
Substitute a BOM Item
The Substitute function allows users to substitute a BOM Item in the event a specific part number is not available, yet another part is acceptable as a substitute. BOM Item Substitution is only available for Supply Type PUSH components. Supply Type "Operation Pull" components are not available for substitution in MES.
1. To substitute a BOM item, select the item from the list, modify the Quantity, and then select Substitute.
2. The Select the Part Number page is displayed:
Figure 53: Recipe Display-Select Part Number
3. Select the part number to substitute the BOM Item, and then select OK to accept, or Cancel to exit.
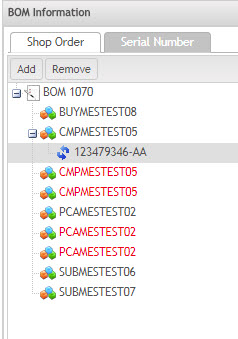
4. The part is now an acceptable substitute for the previously selected BOM Item.
Figure 54: Recipe Display-Part Substitutes
Edit the Quantity of a BOM Item
The only field available to edit for BOM items by shop order or serial number in a pre-WIP or WIP status is the Quantity field. BOM Item quantity editing is only available for Supply Type PUSH components. Supply Type Operation Pull component quantities are not available to edit.
1. To edit the quantity, select the BOM item from the list, and then modify the quantity using the up and down arrows.
2. Select OK to save.
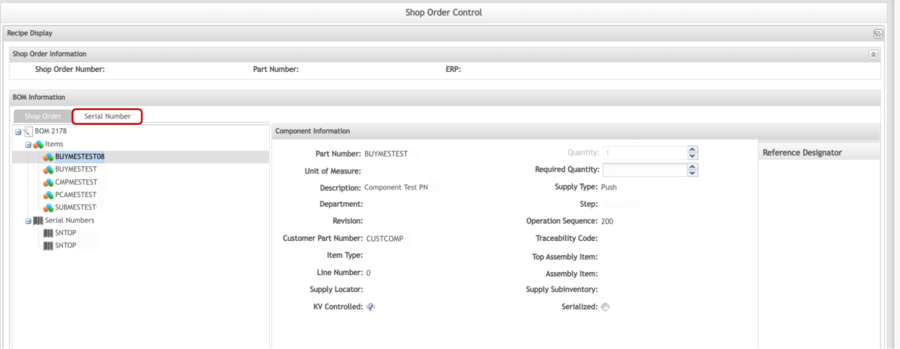
Serial Number Tab
The Serial Number tab displays the serial numbers in which BOM Item edits have been performed. The features (add, remove, substitute) are the same as they are for Shop Order, except that the BOM Items are listed by serial number instead of Shop Order.
Figure 55: Serial Number Tab
Create BOM
Shop Order Browser Portlet did not allow users to create BOM for Standard and ERP Work Orders, it only was allowed visualization and edition.
To meet our customers' needs, Shop Order Browser now allows users to manually create BOM for Standard and ERP Work Orders (Shop Orders).
If the shop order does not have a BOM, the Create BOM button is displayed. If the BOM already exists, the BOM Information is displayed instead.
Figure 56: Create BOM
To create a BOM, follow the steps below:
1. Access the Shop Order Browser.
2. Selects a Standard Shop Order (ERP column unchecked).
3. Click on Create BOM.
4. The Recipe Display is displayed with two panels: Shop Order Information and BOM Information:
Figure 57: Recipe Display
A. Shop Order Information
The following information is displayed:
1. Shop Order Number 2. Part Number 3. ERP: this is a new field that refers to whether the Shop Order is ERP or not. As this form is already used by ERP Work Orders, the ERP info was added.
B. BOM Information
The Shop Order tab is displayed with the BOM top-level content in the tree view. Users are able to add as many items as they need and as many levels as they want.
Figure 58: Add Items to the BOM
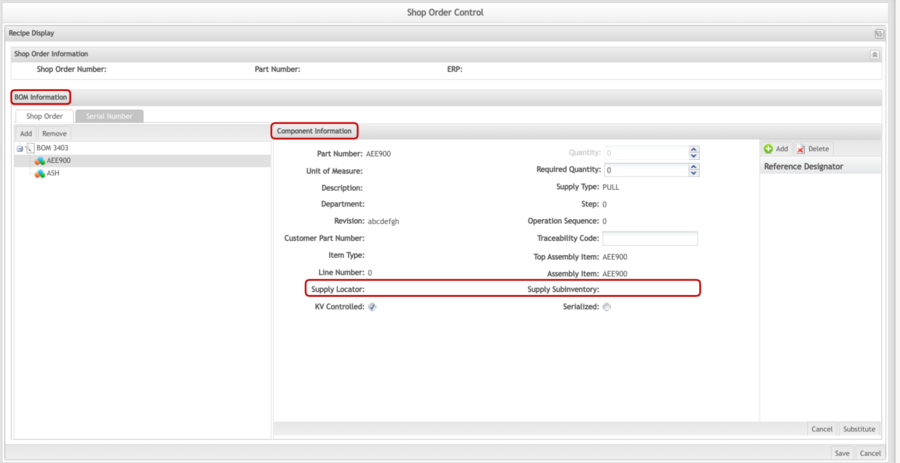
When the user clicks on the Add button and informs the Part Number, the Component Information form is displayed.
To remove a component, select the component and click Remove.
Figure 59: Component Information
The Supply Locator and Supply Subinventory fields were added to the Recipe form for both Standard and ERP work orders.
Serial Number Maintenance 
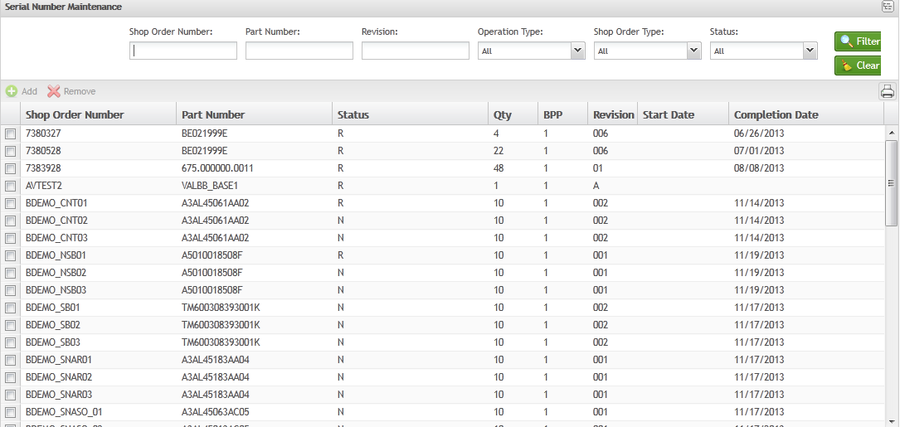
This portlet enables the user to add or remove serial numbers from Shop Orders. If a shop order has at least one skeleton and one removable serial number, the application displays the shop order on both lists (add and remove).
1. To add or remove serial numbers from a shop order, navigate to Shop Floor Control Production Control > Shop Order Control, and select the Serial Number Maintenance icon.
2. The Serial Number Maintenance main screen displays all Shop Orders with at least one skeleton and one removable serial number.
Figure 60: Serial Number Maintenance List
Add Serial Number
The Add function allows users to add serial numbers to a shop order. This activity puts a real serial number in place of a skeleton serial number. This action is only available if serials were previously removed from a shop order leaving room to add serials to it. When adding a serial number to a shop order, an Activity 76 (Assign to SO) record is added to the unit history. The serial number is no longer available to be added to another Shop Order after this operation.
It is possible to filter by Shop Order Number, Part Number, Revision, Shop Order Type, Operation Type, and status. In addition, the user can check one or a set of checkboxes: Show Released, Opened, Closed, Canceled, or On Hold status.
1. To add serial numbers to a Shop Order, select the desired shop order from the list in the Serial Number Maintenance screen, and then select Add.
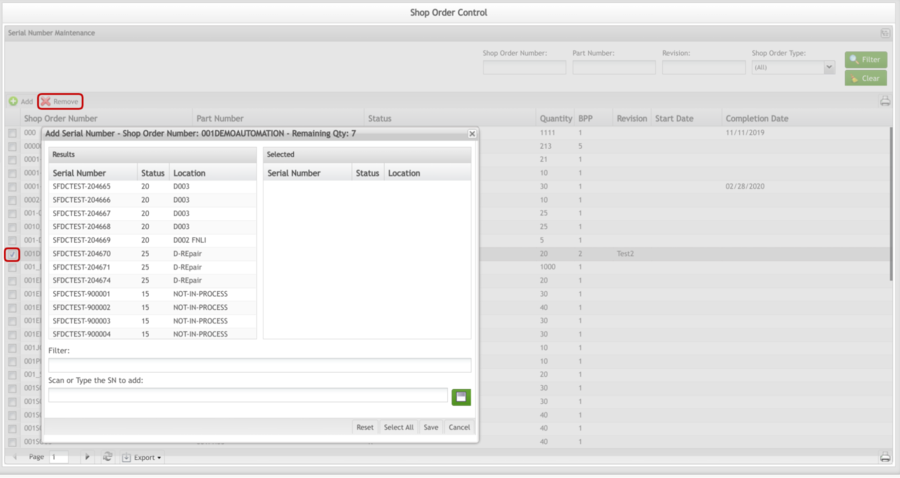
2. The Shop Order Maintenance / Add Serial Number for Shop Order form is displayed:
Figure 61: Adding Serial Numbers for Shop Order
3. Select the Add icon to add serial numbers to the Shop Order.
4. The Add Serial Numbers screen is displayed:
5. To add serial numbers to the Shop Order
- Select the desired serial number from the Results panel
- Scan or Type the SN
- Type valid serial information in the Filter provided
Add Multiple Serials by clicking on the add serials icon
Note: When the user scans or enters a serial number, the serial number will be automatically added in the Selected Items field.
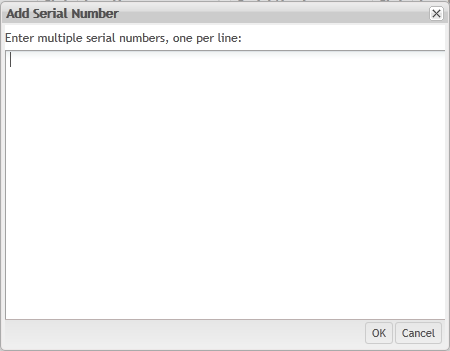
The Add Multiple Serial icon allows users to add multiple serial numbers at the same time.
Figure 62: Add Multiple Serial Numbers
6. Select or enter the desired serial numbers to add to the Shop Order and select OK to finish, or Cancel to exit.
Note: If the user enters or scans an invalid serial number, a warning message will be displayed.
Note: If all serials were added to the shop order, it is no longer displayed in the Add Serial Numbers list. The user is not able to add more serial numbers than skeletons available.
Remove Serial Number
The Remove function allows the user to remove serial numbers from a Shop Order. This activity removes a real serial number and replaces it with a skeleton serial number. This action is only available if serials were previously added to a Shop Order. When removing a serial number from a Shop Order, an Activity 77 (Removed from SO) record is added to the unit history. The serial number is then available to be added to another shop order after this operation.
It is possible to filter by Shop Order Number, Part Number, Revision, and Operation Type. In addition, the user can check one or a set of checkboxes options: Show Released, Opened, Closed, and Canceled or On Hold status.
1. To remove serial numbers from a shop Order, locate the desired shop order in the list, and then select Remove.
2. The Shop Order Maintenance / Remove Serial Number for Shop Order page is displayed:
Figure 63: Serial Number Maintenance List
3. Double-click on the desired serial numbers to remove;
Note: The user may also Scan or Type the SN in the field provided, or use the remove Multiple Serial Numbers feature to remove multiple serial numbers simultaneously.
4. Select Save to remove (or Cancel to abort). The selected serial numbers are removed from the shop order and these serials will be available to be added to another shop order for the same part number. If all the serial numbers were removed, the shop order is not displayed in the Remove Serial Numbers list.
Serial Number Assignment 
The Serial Number Assignment portlet allows the user to manually assign new serial numbers to a generic (released without serial numbers) shop order. To assign a serial number, the shop order must have at least one generic serial number (released with a part number without algorithm associated).
A (generic) shop order is also able to receive serial numbers from another shop order (released with a part number assigned to an algorithm, meaning that the serial numbers generated are real serial numbers) using custom commands. The old shop order will have a skeleton serial number assigned to replace the removed one assigned to the generic shop order. The removed serial number may be added to the shop order with the generic serial number via custom commands (i.e. !!1CHGSO2).
When assigning serial numbers to a generic shop order:
- If the serial number to be assigned does not exist, it will take the place of the generic serial number.
- If a serial already to be assigned exists, the shop order key is assigned to it and the generic serial number is deleted from the shop order.
- The serial number is added to the shop order, and an activity record will be created with action 76 (Assign to SO).
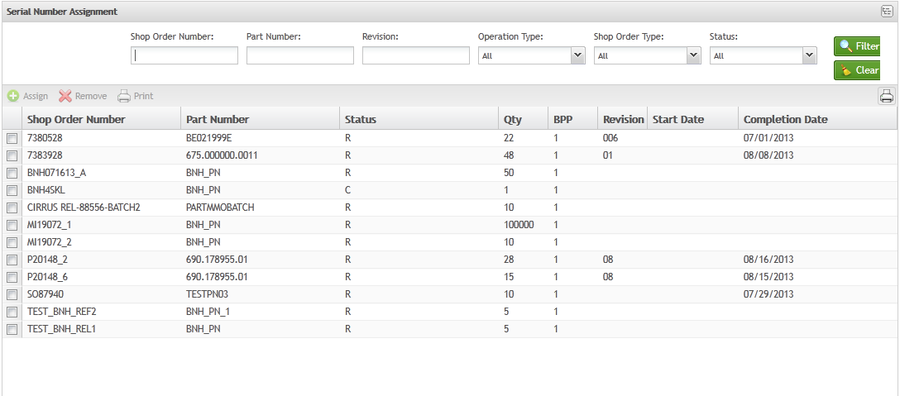
1. To assign a serial number to a generic shop order, navigate to Shop Floor Control >Production Control >Shop Order Control, and select the Serial Number Assignment icon.
Figure 64: Serial Numbers Assignment Main Page
Assigning Serial Numbers
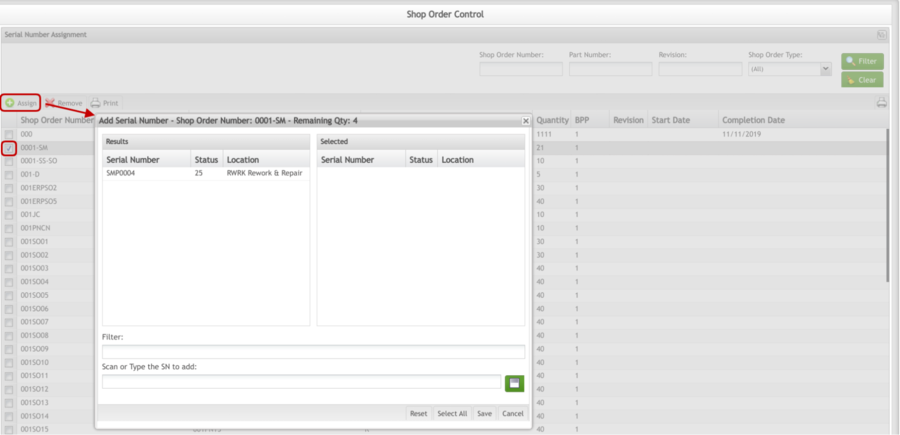
The Assign function allows users to add serials to a Shop Order that has generic serials.
1. To assign serials, select a Shop Order from the Serial Number Assignment list, and then select Assign.
2. The Add Serial Number- Shop Order Number: form is displayed.
Figure 65: Assign Serial Number
3. To select the serials displayed, the user can double-click on the serial number or select all serials in the displayed list, click-on Select All on the page bottom.
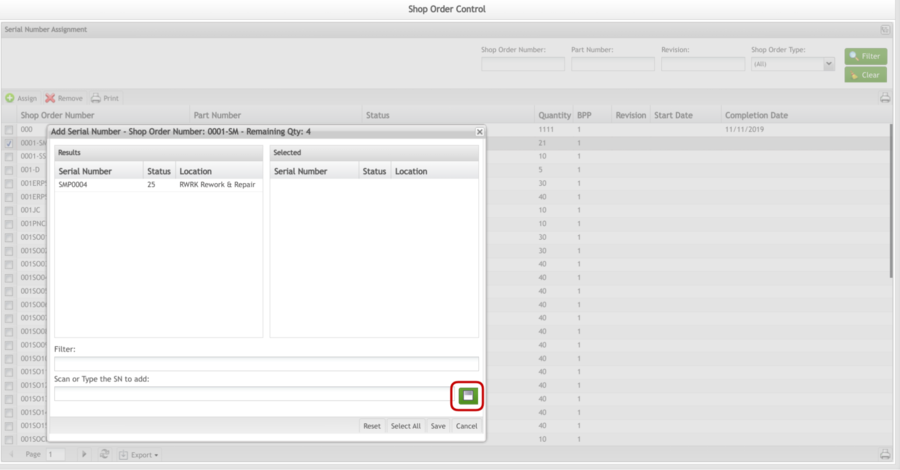
Note: It is possible to add multiple serial numbers to a shop order by clicking the Scan or Type SN icon.
Figure 66: Scan Several Serial Numbers to Shop Order
3. To remove a serial number that has been added, select/highlight the serial number and then select the Delete icon.
4. Select Save to save the serial number for the Shop Order.
Remove Serial Number
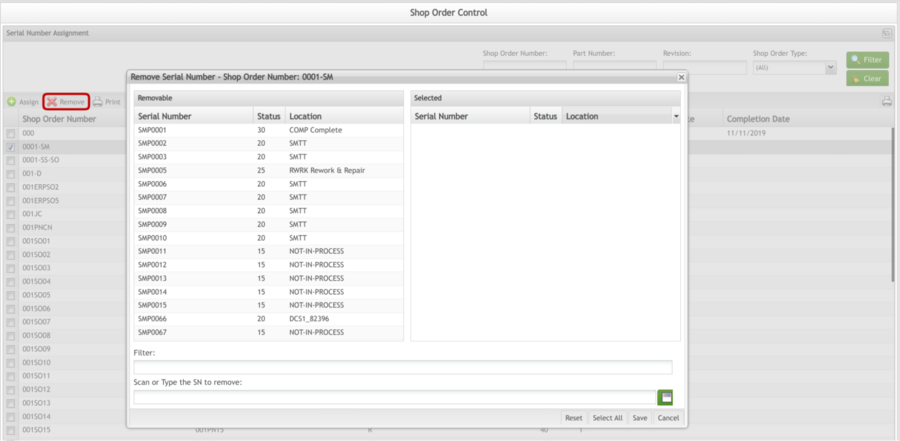
The Remove function allows the user to remove serial numbers from shop orders. The removed serial number is no longer assigned to a shop order. When removing a serial number, an activity record is created with action 77 (Removed from SO).
1. To remove a serial number from a Shop Order, select the shop order from the Serial Number Assignment list and then select Remove. The Remove Serial Number form displays:
Figure 67: Remove Assigned Serial Numbers
2. Double click on the serial number(s) to be removed. The serial will be moved to the Removed Items list.
3. Select OK to save the update, or Cancel to exit.
Print/Export Assigned Serial Numbers
The Print function allows users to print or export the Serial Numbers assigned to the Shop Order.
1. To print a list of assigned serial numbers, select a Shop Order from the Serial Number Assignment list, and then select Print.
Figure 68: Print Serial Numbers Assigned
Print/Export Filtered Shop Orders
The print icon at the bottom of the page allows the user to print or export filtered Shop Orders from the Serial Number Assignment list.
1. Select the Print/Export Filtered Shop Orders icon from the bottom of the page to print a list of filtered shop orders.
Figure 69: Print Filtered Shop Orders
A report (pdf)is generated with the same fields that are displayed in the shop order List.
Sales Order Browser 
***NOTE*** Sales Order Browser requires a new web service to be enabled with ERP to obtain Sales Order information.
Sales Order Browser is a tool that aids in sales order management. Sales orders are created when a purchase order is received from a customer through EDI or E-mail. ERP is responsible for the creation of sales orders. Once a sales order has been created in ERP, Sales Order Browser interfaces with ERP to manage sales orders and the serial numbers associated with them. Sales Order Browser allows users to request sales orders, view sales order information, print sales orders, and manage serials. The ERP MES interface handles Sales Order Changes and new Sales Orders. It provides the ability for MES to pull Sales Order information from ERP only when needed.
From the Sales Order Browser, the user is able to see the Sales Order Information, Manage Serials, Print Sales Orders, Request Sales Orders and through the QC Checkpoint the user is able to compare MES work order’s current bill of material with the sales order definition outlining the differences in order to facilitate manual WO updates.
See below the details of each feature.
Request Sales Order
Sales Order information is transferred to MES from ERP in the following ways:
- When a Shop Order is released, MES requests sales order information from ERP for that part number.
- Sales order information can be requested manually, by sales order number or by part number.
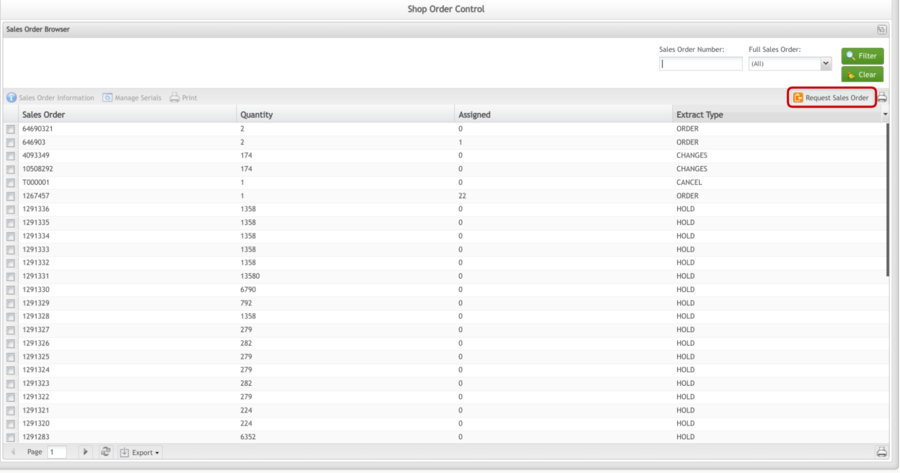
1. To request a sales order by order number or part number, select the Request Sales Order icon from the Sales Order Browser main screen.
Figure 70: Request Sales Order
2. The Request Sales Order form displays:
Figure 71: Request Sales Order Form
3. Choose to request by Part Number or Sales Order Number from the Choose the Field drop-down box.
4. Enter the Part Number or Sales Order Number in the second field.
5. Select Request to submit the Sales Order request, or cancel to exit the form.
6. A confirmation message will display:
Figure 72: Successful Request for Sales Order
Note: The retrieval process for the Sales Order could take a few minutes to complete.
Sales Order Information
1. To view the Sales Order Information, select a Sales Order from the Sales Order Browser list, and then select the Sales Order Information icon.
Figure 73: Sales Order Information
2. The Sales Order Details page displays:
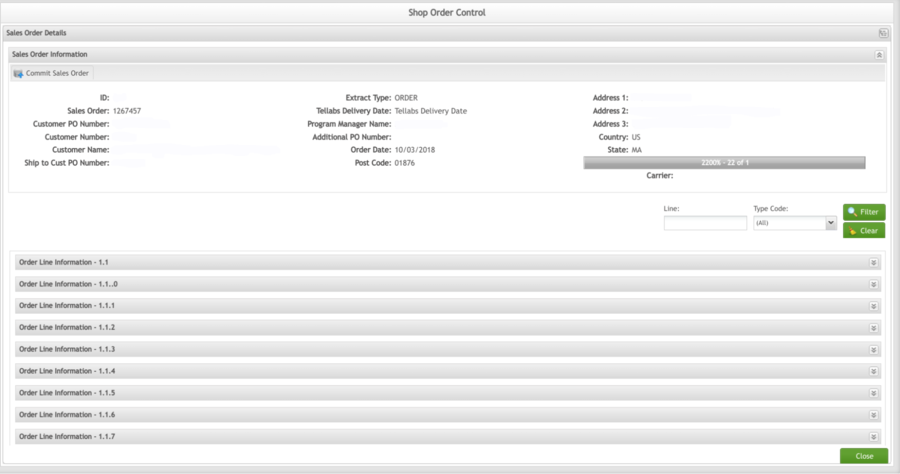
Figure 74: Sales Order Details
3. The Sales Order Information panel is read-only. Below the Sales Order Information, the panel are expandable panels for each Order Line. Serials can be managed or removed from the Order Line Info panels.
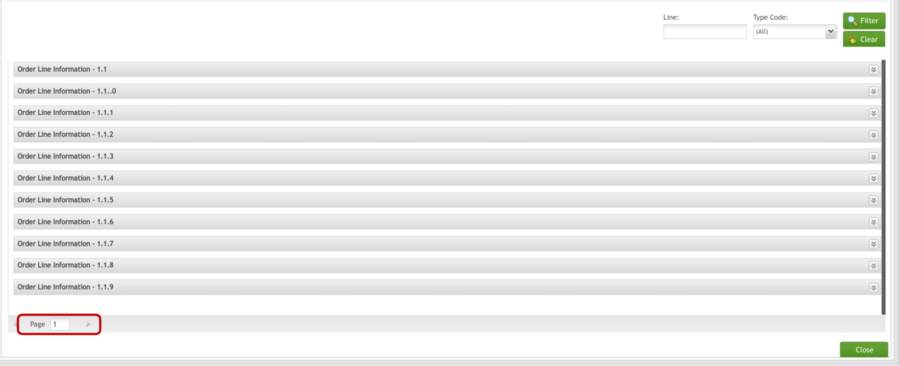
Note: For sales orders that have more than 50 lines, the shop order information browser will display the Information per page and the user can select the Next or Previous page at the bottom of the page to see the information. This provides better performance and the information is displayed in a few seconds.
Figure 75: Sales Order Pagination
Manage Serials from Sales Order Information
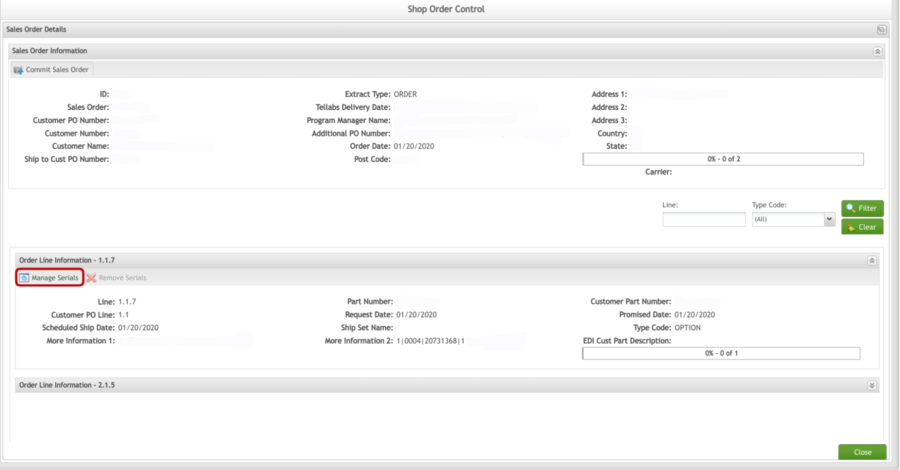
1. To manage serials from the Order Line Info panel, expand the panel by selecting the double arrows from the right of the screen.
Figure 76: Expand Order Line Info.
2. The order line information is displayed.
3. Select the Manage Serials icon located at the top of the panel.
Figure 77: Manage Serials
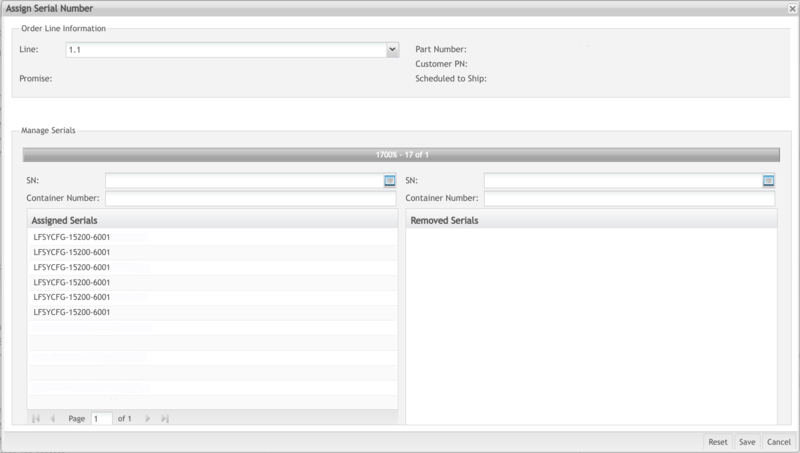
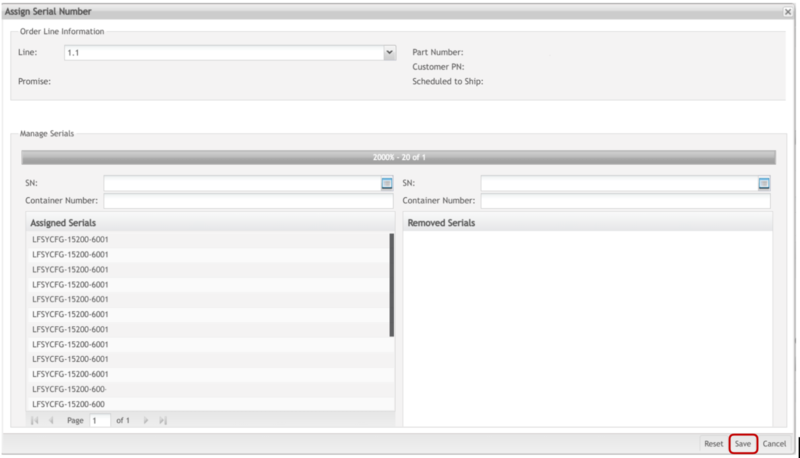
4. The Assign Serial Number form displays:
Figure 78: Assign Serial Number
5. All assigned serials will appear in the column on the left.
6. To add serials, select the icon to the right of the SN field.
7. The Add Serial Number form displays:
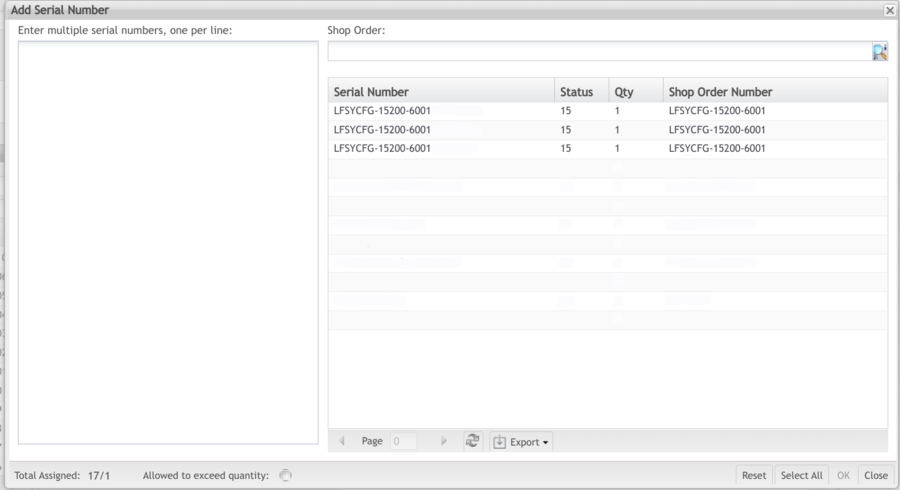
Figure 79: Add Serial Number Form
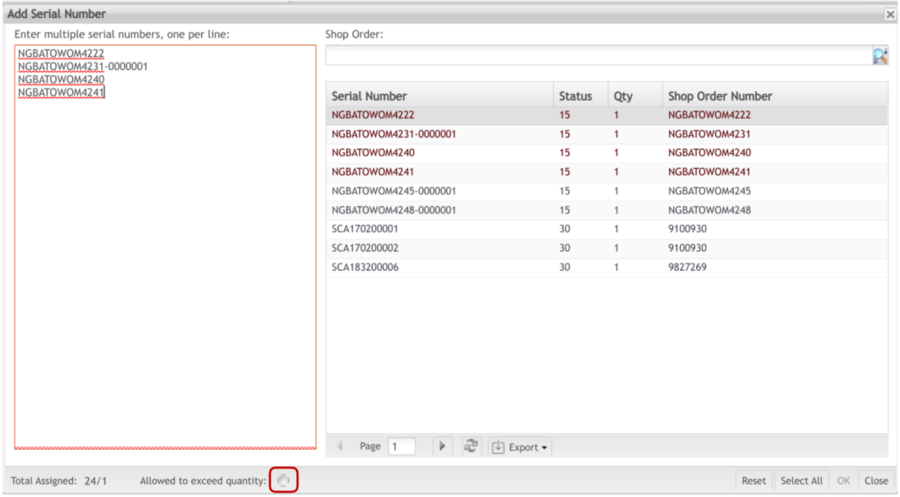
8. All available serial numbers are displayed in the right panel. Enter multiple serial numbers, one per line, into the left panel or double-click on a serial number from the right panel to add it to the left panel.
Note: In order to assign serials to the Sales Order, they must belong to the same Part Number.
Note: If the quantity exceeds the capacity, a warning box displays. To allow the quantity to exceed the capacity, the generic attribute order_line_qty_chk_warning needs to be enabled. Once the attribute has been enabled, the Allowed to exceed quantity radio button will be available for selection.
Figure 80: Quantity Exceeds Capacity
9. Select OK to add the serials in the left panel to the Sales Order.
10. The serials appear in the Assigned serials column in the Assign Serial Number form.
11. Select Save to add the serials to the Sales Order.
Figure 81: Add Serials to Sales Order
12. A confirmation is displayed and the serials are added to the Sales Order.
Remove Serials from Sales Order Information
1. To remove serials from the Order Line Info panel, expand the panel by selecting the double arrows from the right of the screen.
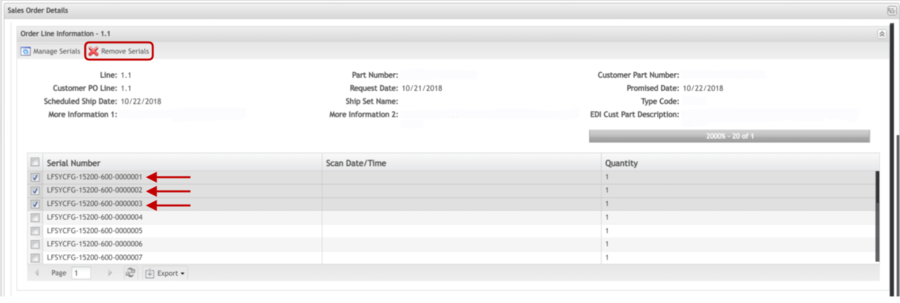
2. Select the serials to remove from the Serial Number list.
3. Select the Remove Serials icon located at the top of the panel.
Figure 82: Remove Serials
4. A confirmation box displays: will appear to confirm the deletion of the Serial Number from Sales Order.
5. Select Yes to confirm or No to cancel.
Manage Serials
Serials can also be managed using the Manage Serials function from the Sales Order Browser main screen. Serial number association is completed in MES as part of the Roboship or completion process. MES sends this information to ERP to define the serials associated with Sales Orders.
1. To manage serials from the Sales Order Browser main screen, select the Sales Order from the list, and then select the Manage Serials icon.
Figure 83: Manage Serials
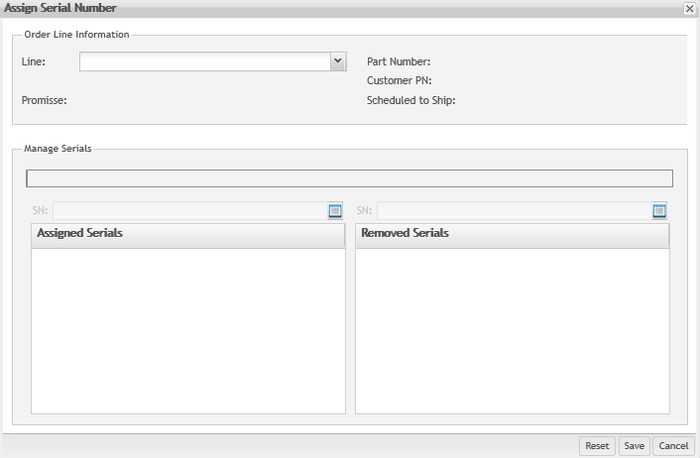
2. The Assign Serial Number form displays:
Figure 84: Assign Serial Number Form
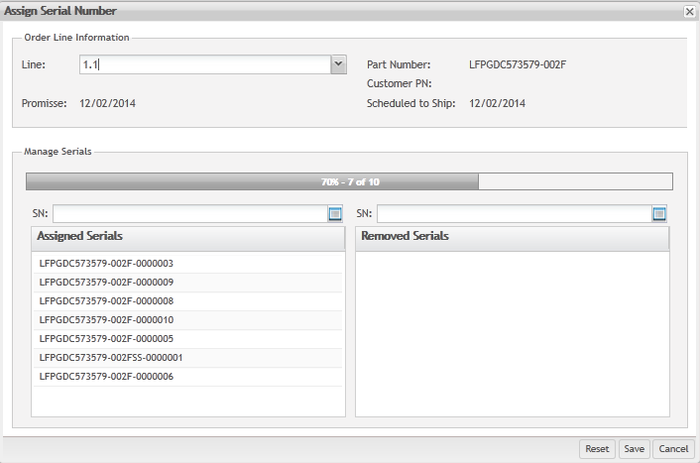
3. Select a Line from the Line drop-down box.
4. The assigned and removed serials are displayed for the Sales Order Line:
Figure 85: Assigned and Removed Serials
Add Serials to Sales Order
1. To add serial numbers to the Sales Order, select the icon to the right of the SN field.
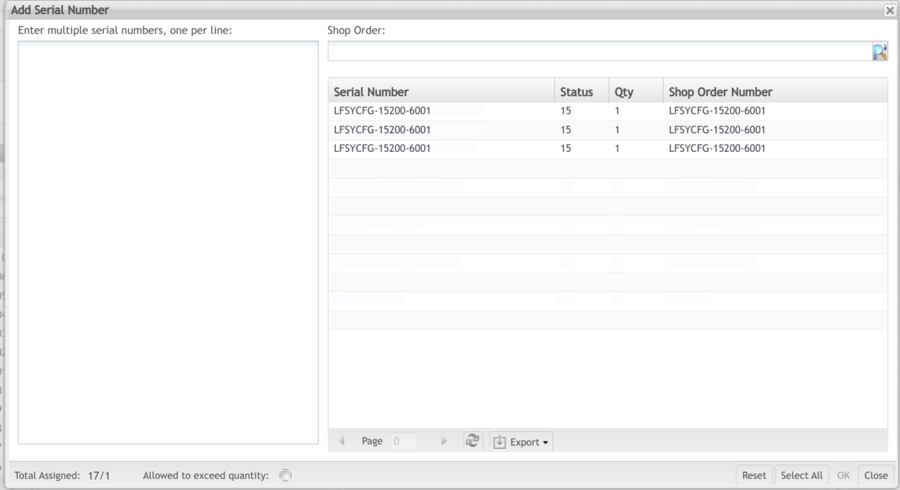
2. The Add Serial Number form displays:
Figure 86: Add Serial Numbers
3. All available serial numbers are displayed in the right panel. Enter multiple serial numbers, one per line, into the left panel or double-click on a serial number from the right panel to add it to the left panel.
Note: In order to assign serials to the Sales Order, they must belong to the same Part Number.
Note: If the quantity exceeds the capacity, a warning box displays.
4. Select OK to add the serials in the left panel to the Sales Order.
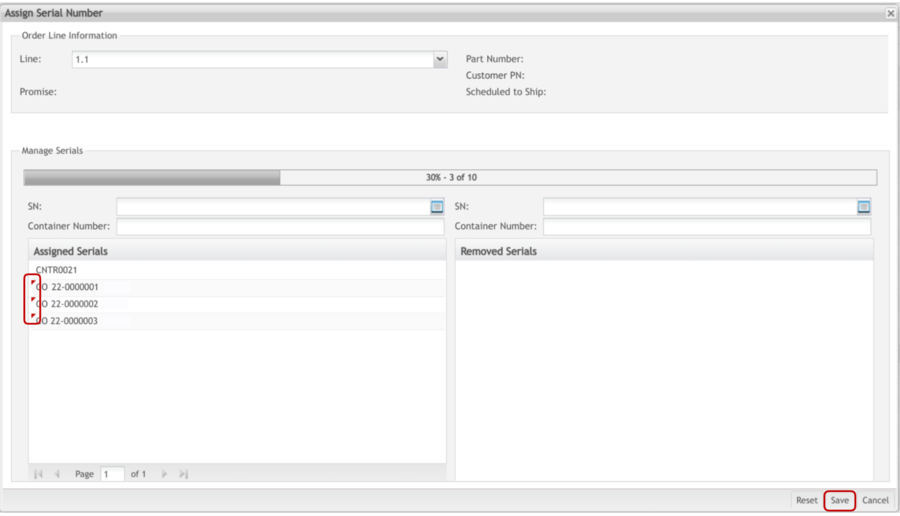
5. The serials appear in the Assigned serials column in the Assign Serial Number form.
Figure 87: Add Serials to Sales Order
6. Select Save to add the serials to the Sales Order.
7. A confirmation is displayed and the serials are added to the Sales Order.
Remove Serials from Sales Order
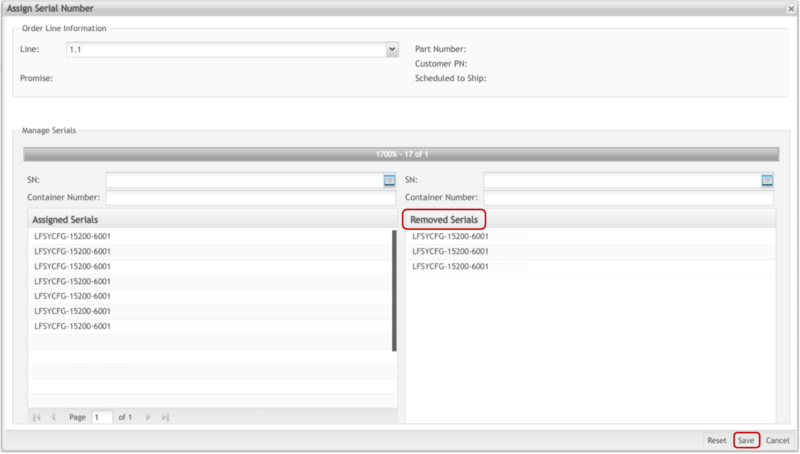
1. To remove serials from the Sales Order, double click the serials from the Assigned Serials column to move them to the Removed Serials column.
2. Select Save to remove the serials from the Sales Order.
Figure 88: Remove Serials from Sales Order
7. A confirmation displays and the serials are removed from the Sales Order.
Print Sales Order
1. To print a Sales Order, select the Sales Order from the list, and then select Print.
Figure 89: Print Sales Order
2. Select the program with which to open the file, and then select OK.
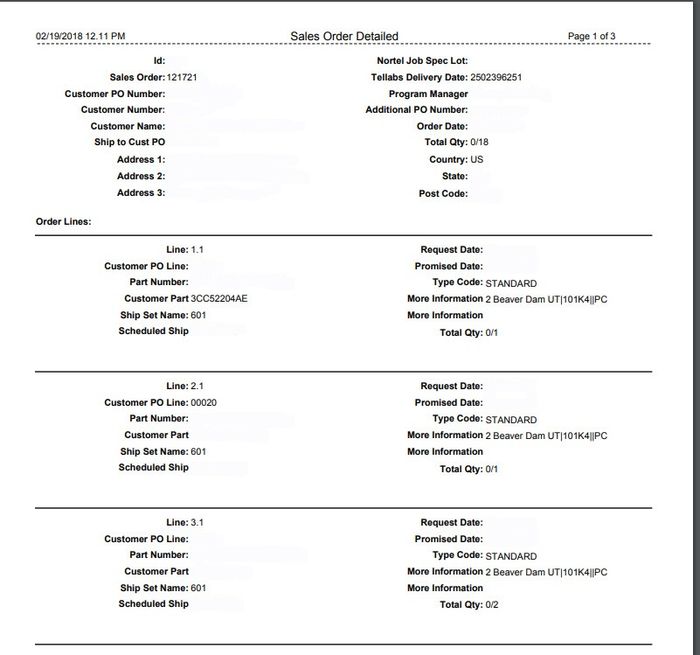
3. The document displays in the external program:
Figure 90: Sales Order Report
4. Select Print from the external program and follow the instructions provided to print the Sales Order.


