SOP-42Q-MES0075 CMMS Spare Parts
42Q Home > Production > CMMS > Spare Parts
Contents
- 1 Spare Parts
- 2 Part List
- 2.1 Search/Filter Part List
- 2.2 Add a Part
- 2.3 Edit Part List
- 3 Receive Parts
- 4 Issue Parts
- 5 Return Parts
- 6 Adjust Parts Submodule
- 7 Subinventory Submodule
- 8 Scrap Parts Submodule
- 9 Reuse Parts Submodule
- 10 Cycle Count Submodule
- 11 Inventory View Submodule
- 12 Transfer Parts
- 13 Transaction Logs
- 14 Purchase Request
- 15 Part Category
Spare Parts
The Spare Parts portal of CMMS provides a comprehensive tracking system to manage the parts needed to maintain a plant’s assets. Administrators and operators receive, issue, and return parts; maintain warehouse stock; create purchase orders; and manage vendor information.
To navigate: Production > CMMS > Spare Parts
Spare Parts Submodule Icons
User-friendly icons help users navigate through the Spare Parts portal.
Figure 1: Spare Parts Main Page
Part List 
Within the Part List submodule, users can view all parts pertaining to site equipment and machinery, and perform functions related to those parts.
1. Users can complete the following actions in the Part List submodule:
- Search/Filter part entries
- Add parts
- Edit parts
- Export parts
Note: Abbreviations located within this module are defined as follows:
- QOH: Quantity on Hand
- QIT: Quantity in Transit
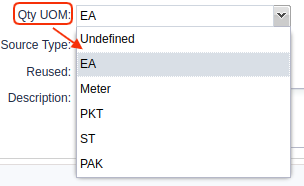
- Qty UOM: Quantity Unit of Measure: UOMs enable plants to quantify and track inventory items according to their packaging. For example, singular parts are listed as EA (each), while parts that remain packaged together are noted as PAK.
Search/Filter Part List
1. Users may search for specific parts according to the following criteria, located on the top menu bar of the Part List Submodule:
- Part Number: Enter a partial or complete Part Number.
- Part Name: Enter a partial or complete Part Name.
- Manufacturer: Select a Manufacturer from the drop-down list.
- Model: Search for a specific Model.
- Active/Inactive/All: Search by Active or Inactive or all Part Numbers.
- Project: Search by Project associated with the product the Asset builds. Projects are defined in CMMS Admin > Project.
2. Select filtering options.
3. Select the search icon (e.g. magnifying glass).
Figure 2: Part List Screen
3. The figure above shows a typical part list and its subsequent categories.
Note: The Column "AVL's" (Available Vendor List) is highlighted. In an effort to keep costs low, plants are encouraged to monitor warehouse inventory. Because plants can easily purchase necessary parts from Approved Vendors it is advisable to maintain an updated and complete list of multiple vendors in case of unexpected problems. Red cells indicate that only one vendor is available. Yellow cells indicate 2 vendors, and Green cells indicate 3 or more. Because this information is critical to busy plant administrators, it is highlighted for easy reference.
Add a Part
To add a part to the Part List:
1. Select Add from the Part List menu. The Add a New Part Number pop-up window displays, which is comprised of five tabs: General, Alternative Parts, Sub Inventory & Locator, Part Categories, and AVL (Approved Vendor List).
Add Part List: General Tab
Figure 3: Add a New Part Number Window
Within the General tab, complete the following fields. Fields noted with a red asterisk * are Mandatory.
- *Enter a Part Number.
- Upload a Part Image Part Images allow employees to quickly identify parts for part replacment and quick identification at the warehouse level. The Enlarge feature allows users to expand the image for better viewing.
- *Enter a Part Name.
- *Enter a Manufacturer. Note: This field lists all available companies in a drop-down menu format. To add, edit, or delete a company from this list, return to the Spare Parts main screen and select the Company Submodule submodule (Shop Floor > Configuration >CMMS - Admin > Company).
- Enter Model: The unique name or number for the specific part, provided by the manufacturer.
- Enter Unit Weight: A numeric value that corresponds with Unit weight UOM. Drop-down menu provided.
- Enter Unit Weight UOM: Select the unit of measure for the PN's Unit Weight from the drop-down menu.
- Options include:
- Undefined
- LB
- G
- KG
- Enter Project associated with the Asset’s production.
- *Enter MFG PN. This field denotes the part number - that is, the part ID for the manufacturer.
- Enter the Default Sub Inventory: This field allows users to identify one Sub Inventory as the primary location within the Locator for the PN.
- *Enter Max Inventory. This field denotes the maximum inventory. Max value should be higher or equal than minimum and minimum should be higher or equal than safe.
- Enter the Default Locator: This field allows users to identify one Locator as the primary physical location for the PN.
- *Enter Min Inventory. This field denotes the minimum inventory.
- *Enter Safety Stock: Safe inventory (safety stock) must be less than the value entered in minimum inventory .
- Enter QTY UOM from the drop-down list. This field denotes the unit of measure for the part, according to how the part is packaged and counted. Options configured for this instance include: Undefined; EA; Meter; PKT; ST; PAK.
Note: Plants defineQTY UOM (Quantity Unit of Measure) based on their unique parts inventory. The following figure shows possible QTY UOM (Quantity Unit of Measure) examples.
Figure 4: QTY UOM Drop-down Menu
- Enter Part Type from the drop-down list. Select whether the part is "Easy-expendable" or "None-easy-expendable." Default is Easy-expendable. See Glossary of Terms for further explanation of these terms.
- Select Source Type from the drop-down list. Options include: Internal or External. Default value is External.
- Check whether part number is In Stock
- Check if Reused/Refurbished.
- Check if Active.
- Enter a Description.
Add Part List: Alternative Parts Tab
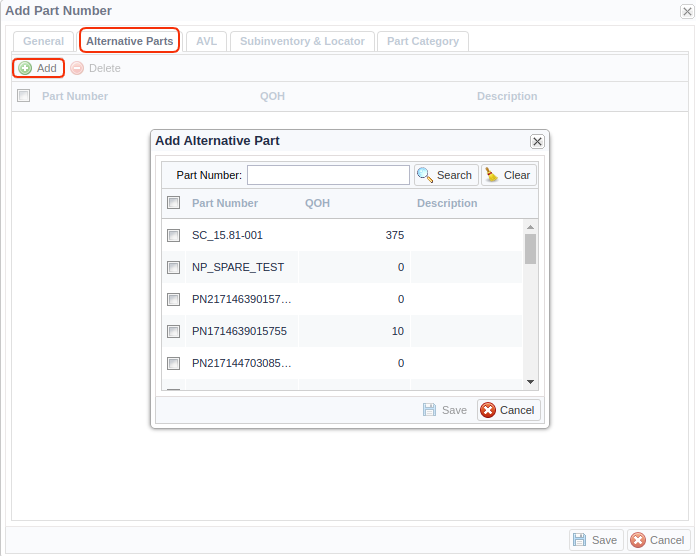
Under the Alternative Parts tab, users can add or delete alternative parts. The main purpose of this feature is to associate parts with alternative part choices. NOTE: These actions refer to the selection of fungible parts.
Add Alternative Parts
- Select Add from the Alternative Parts menu. The Add Alternative Part pop-up window appears (see Figure, below).
- Type a part number in the search bar or select an item from the list.
- Select Save to finish or Cancel to abort.
Figure 5: Add a New Alternative Part
Delete Alternative Parts
- Select an alternative part from the list.
- Select delete from the Alternative Part menu. This removes the selected alternative part from the list.
Add Part List: AVL (Approved Vendor List)
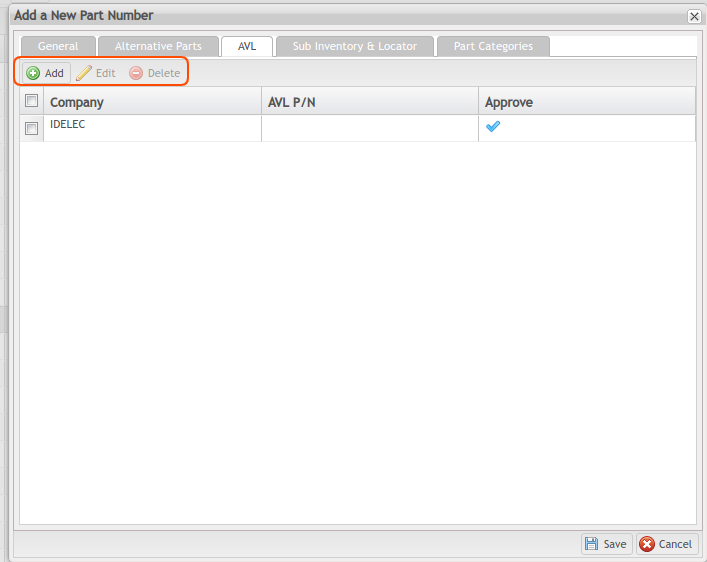
Under the AVL (Approved Vendor List) tab, users may add, edit, or delete approved vendor information.
Figure 6: AVL (Approved Vendor List) Tab Functions
Add an AVL (Approved Vendor List)
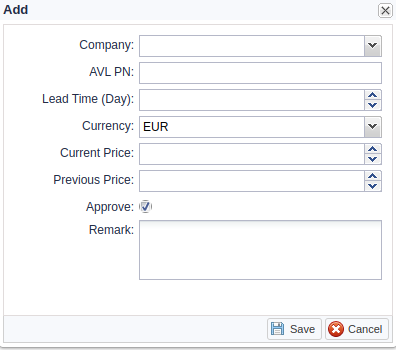
1. Select Add from the menu. The Add pop-up window displays.
2. Complete the fields provided:
- Select a Company from the drop-down list.
- Enter an AVL PN (Approved Vendor List Part Number).
- Enter a Lead Time. Note: Lead Time refers to the delivery time (in days) of the given part.
- Select Currency from the drop-down list (according to country)
- Enter Currency Price.
- Enter a Previous Price.
- Check to Approve.
- Enter a Remark.
3. Select Save to finish or Cancel to abort.
Figure 7: Add an AVL (Approved Vendor List)
Edit an AVL (approved Vendor List)
1. To edit an AVL (Approved Vendor List), select an AVL from the list and choose Edit. The Edit pop-up menu appears.
2. The user may edit any of the fields provided:
- Company
- AVL (Approved Vendor List) PN
- Lead Time (Day)
- Currency
- Current Price
- Previous Price
- Approve
- Remark
3. Select Save to finish or Cancel to abort.
Delete an AVL (Approved Vendor List)
1. To delete an AVL, select an AVL from the list and choose Delete. This removes the AVL from the list.
Add Part List: Subinventory & Locator Tab
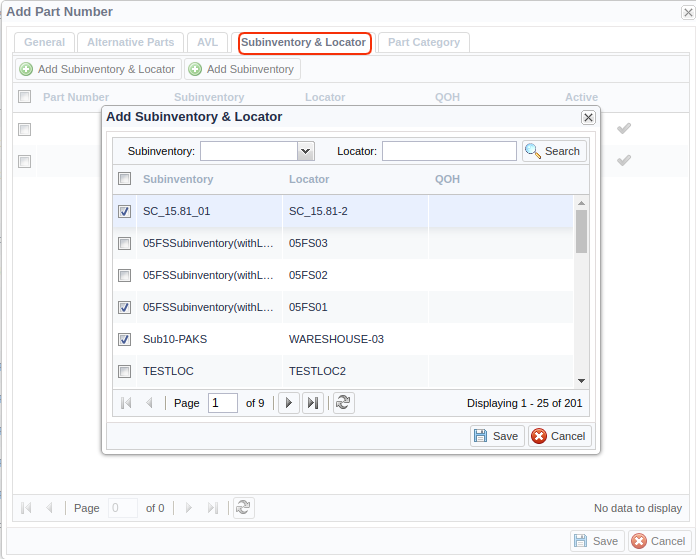
Within the Subinventory & Locator Tab, users can specify the exact location of the Spare Part being catalogued into the system. There are three functions available in the Subinventory & Locator Tab
Add Sub Inventory & Locator
- Search by Sub Inventory or utilize the drop-down feature
- Search by Locator.
- Scroll through the list provided to select Sub Inventory & Locator
- Select the Search icon (magnifying glass).
- Select Save.
- Each Sub Inventory & Locator pair must be added and saved one at a time.
- Please Note that locations must be selected as pairs. Users cannot select a Locator individually; nor can they select a Sub Inventory individually.
Figure 8: Subinventory & Locator Tab
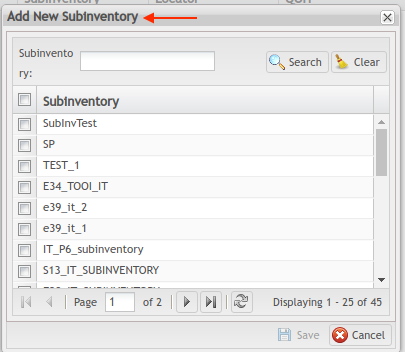
Add Sub Inventory
To add an individual Sub Inventory without a Locator:
- Select Add Sub Inventory.
- Check the Sub Inventory of choice from the list.
- Save.
Figure 9: Add New Sub Inventory
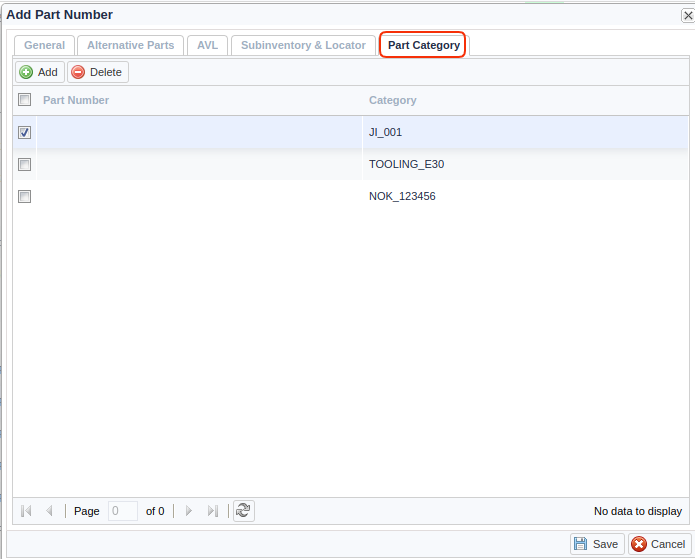
Part List: Add Part Category Tab
Users can add the PN to one or multiple Part Categories. This option allows plants to efficiently apply changes to multiple parts in the same category based on the asset the spare part belongs to.
Figure 10: Add Part Category Tab
There are 2 functions available in the Add Part Category Tab:
Add a Part Category
- Select Add.
- Select the Part Category entry line from the list provided by activating the checkmark.
- Select Save.
Figure 11: Add Part Categories to PN
Delete a Part Category
- Check the Part Category to be removed from the PN.
- Select Delete.
Edit Part List
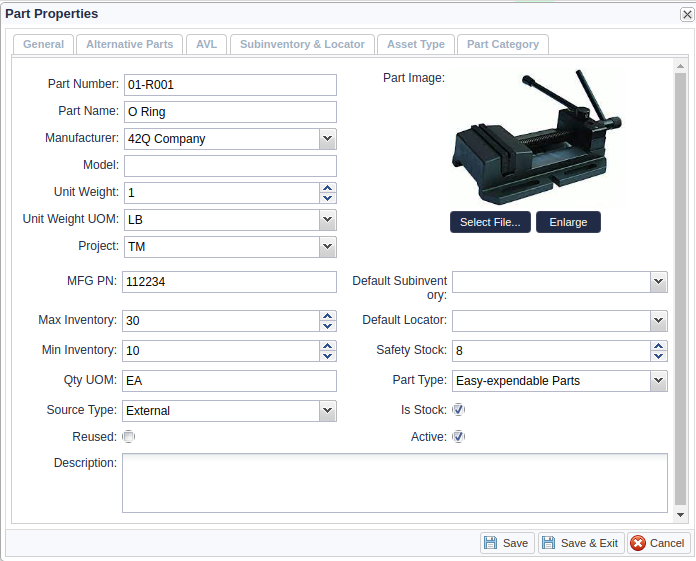
Users can modify any of the part properties from the Part List sub-module page. To edit a part:
- Select a part from the list. The Edit function becomes available.
- Select Edit. The Part Properties pop-up window appears which is comprised of five tabs: General, Alternative Parts, AVL; Sub Inventory & Locator; Asset Type, and Part Categories.
Figure 12: Edit a Part: General Tab
Part Properties: General Tab
Under the General tab, users may edit the following fields for the selected part:
Note: The fields mirror those populated in the Add Part List: General Tab. Refer above for detailed explanation of the fields. Or reference the Glossary of Terms
Part Properties: Alternative Parts Tab
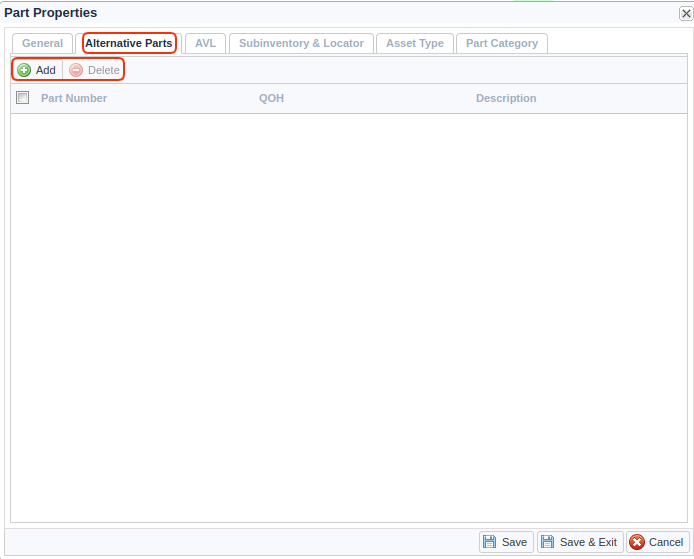
Under the Alternative Parts tab, users can add and delete alternative parts assigned to a given part.
Add an Alternative Part
1. Select Add from the Alternative Parts menu.
2. Type the Part number in the text provided and select the search icon (e.g. magnifying glass); or scroll the list to select the alternative part number.
3. Select the Add icon to complete.
Delete an Alternative Part
1. Select a part from the Alternative Parts list. The Delete function becomes available.
2. Select Delete to remove the part from the list.
Figure 13: Alternative Parts Tab
Part Properties: AVL (Approved Vendor List) Tab
Within the AVL tab, users can add, edit, and approve available part numbers (AVLs) for the selected part.
Add an AVL (Approved Vendor List):
1. Select Add from the AVL menu. The Add pop-up window appears.
2. Complete the information for the fields provided:
- Select a Company Name from the drop-down list.
- Enter Lead Time.
- Select Currency according to country from the drop-down list.
- Enter Current Price.
- Enter Previous Price.
- Check if Approved.
- Enter a Remark about the AVL.
- Select Save to finish; or Cancel to abort.
Note: The fields will mirror those populated in the Add Parts: AVL Tab
Edit an AVL (Approved Vendor List):
- Select an AVL from the list. The Edit function activates.
- Select Edit. The Edit pop-up window displays.
- Edit any of the provided fields as needed.
- Select Save to finish or Cancel to abort.
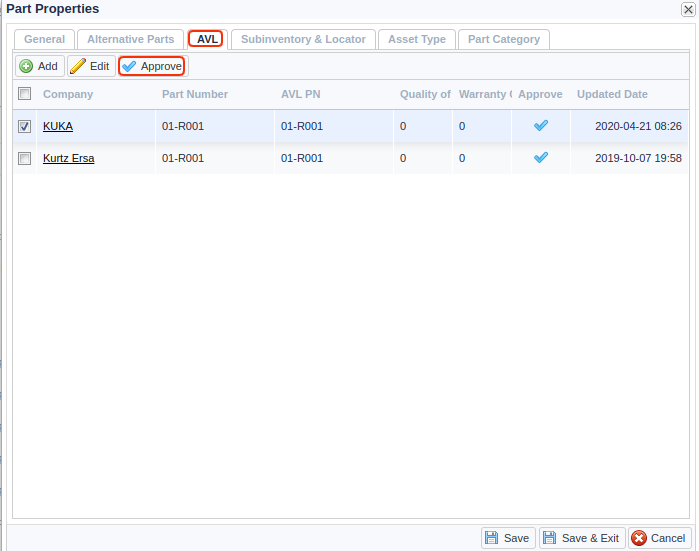
Approve an AVL (Approved Vendor List):
- Select an AVL from the list. The Approve function activates, as noted by a blue checkmark.
- Select Approve to approve the AVL for the selected part.
- Note: If the AVL was already approved, this action will render the AVL as unapproved. Approved AVLs are denoted with a blue checkmark under the AVL list; unapproved AVLs are denoted with a grey checkmark.
Figure 14: Approve AVL
Part Properties: Sub Inventory & Locator Tab
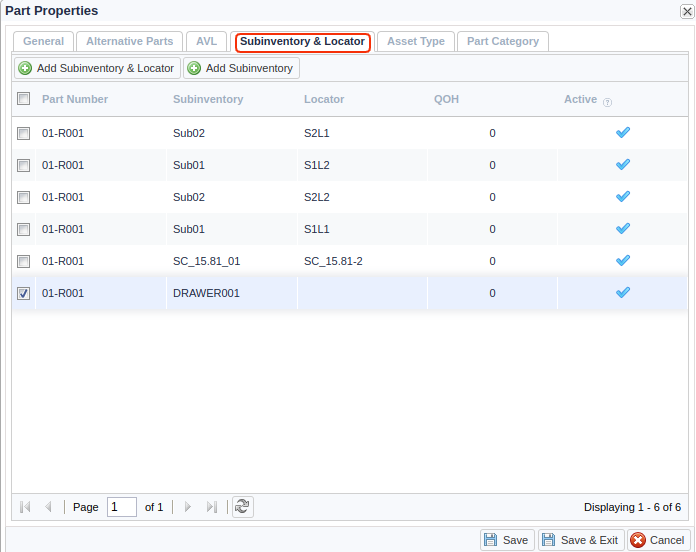
A sub inventory is a location where parts are stored (e.g., a warehouse). Locators are the shelf ID within a sub inventory. Plants may opt to omit the locator in the description. Plants often make this choice in situations where there are so many of a given part that plant operators do not need a shelf ID to locate the part. In such cases, only the sub inventory field is selected.
Within this tab, users can add a sub inventory and/or locator.
Figure 15: Sub Inventory & Locator Tab
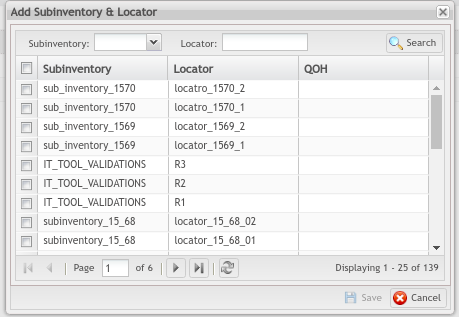
Add a Sub Inventory and Locator
- Select Add Sub Inventory & Locator from the menu. This opens the Add New Sub Inventory & Locator pop-up window.
- Select one or more items to add.
- Select Save to finish or Cancel to abort.
Figure 16: Add New Sub Inventory and Locator
Add a Sub Inventory
Users may also add a sub inventory (without a locator). To add an individual sub inventory to the PN selected:
- Select Add a Sub Inventory.
- Select the desired sub inventory from the drop-down list provided.
- The new sub inventory will populate on the screen.
Part Properties: Asset Type Tab
Under the Asset Type Tab, users can add and delete asset types assigned to a part number.
Add an Asset Type
- Select Add from the menu tab.
- Select the asset type from the list that populates in the pop-up window.
Figure 17: Add Asset Type
Delete an Asset Type
- Select the asset type by activating the checkbox next to its name.
- Select Delete.
- The asset type is now removed from the given part.
Part Properties: Part Categories
Users can Add or Delete Part Categories from the Part Categories Tab while editing a specific Part.
Add Part Categories
- Select Add from the menu tab.
- Select the part category from the list that populates in the pop-up window.
Figure 18: Add Part Category in Edit Part List
Delete a Part Category
- Select the part category by activating the checkbox next to its name.
- Select Delete.
- The part category is now removed from the given part.
Export Part List
To export the part list into an external file:
- Select Export from the Part List menu.
- The part list automatically downloads as a .csv file onto the local drive.
- Name, save, print, or share the .csv file as desired.
Figure 19: Export Part List
Receive Parts
Within the Receive Parts submodule users receive deliveries and increase cycle counts.
Within Receive Parts, users can search/filter the part listing; add received parts; edit received parts, and export received part information.
Figure 20: Receive Parts Filtering Option
Search/Filter Receive Parts
Users may search according to the following criteria, located on the top menu bar of the Receive Parts Submodule:
- Receive #: This number is assigned to the part upon receipt in the warehouse. Enter the Receive# in the text box or scan the Receive# from the bar code.
- Part Number: Enter the Part Number in the text box. More Part Number search options are available by selecting the Part Number drop-down menu.
- Received Date: Enter the time span during which the part was received in the set of calendar drop-downs.
- Received Date To: Enter the end time span during which the part was received in the set of calendar drop-downs.
- Status: Enter the part number status; users may choose from Pending, Completed, or Cancelled.
- Subinventory: Enter the sub inventory where the part number is located. Users may scroll through sub inventories using the drop-down menu provided.
- PO #: Enter the Purchase Order#
- Created By: Users may search for received parts according to the employee who received them. Enter an employee ID.
Note: Individual company naming conventions apply (e.g.: george_lee; george.lee; George.Lee).
Add Receive Parts
Figure 21: Add Receive Parts Pop-up Window
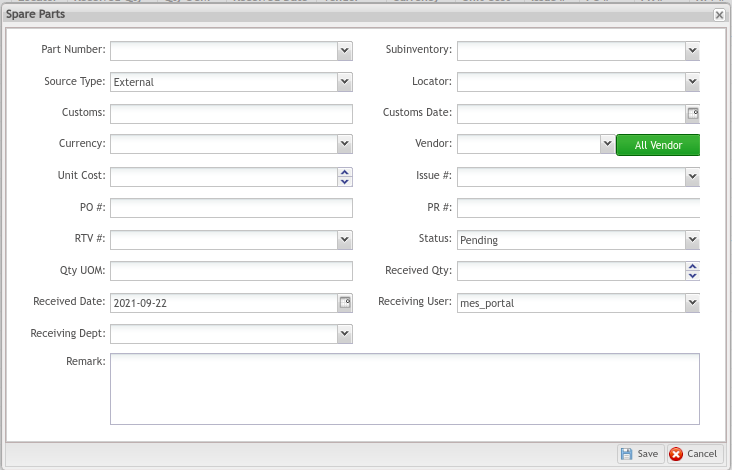
To add received parts:
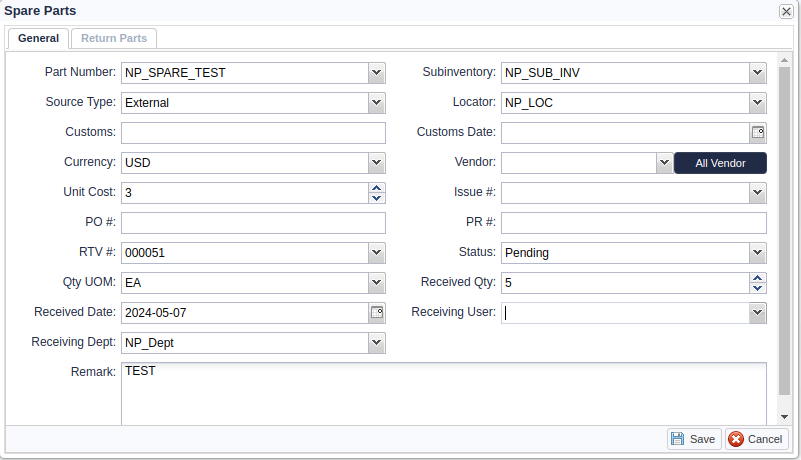
1.From the Receive Parts sub-module page, select'Add'. TheAdd Receive Parts pop-up menu displays.
2. Complete the fields provided:'
- Part Number: (Mandatory) A drop-down screen displays; users can search by: Part Number, MFG Part Number, or AVL MFG.
- Sub Inventory: (Mandatory) Scroll bar allows users to search lists.
- Source Type: (Mandatory) Note: Select Internal, External., or WR. Internal denotes inside the company; external denotes outside the company.
- Locator: (Mandatory) Users can scroll lists using the provided drop-down scroll bar.
- Customs: When External is selected, the Customs field is available. Enter the Customs #.
- Customs Date: Select the Customs Date with the drop-down calendar.
- Currency: Only required if the Source Type is External.
- Vendor: Enter specific vendor information into the text field or select the green All Vendors icon to scroll the complete vendor list.
- Unit Cost: Only required if the Source Type is External.
- Issue #: Denotes the recorded ID# when the goods are shipped from the warehouse (this list can be accessed in the Issue Parts submodule).
Note: If a PO# is selected, an Issue# is not needed.
- PO #: denotes the Purchase Order number.
- PR #: denotes the Purchase Request number.
- RTV #: denotes the Return to Vendor number.
Note: Issue #, PO #, and RTV # cannot all be blank. At least one must be populated.
- Status: Choose Pending or Completed.
- Qty UOM: Enter the unit of measure for the quantity received.
- Received Qty: Enter the quantity of PNs being received.
- Received Date: (Mandatory). The current date is populated by default.
- Receiving User: The current user is populated by default.
- Receiving Dept: Select the department that received the PN from the drop-down menu.
- Remark: Add any additional comments.
3. Select'Save to finish or'Cancel to abort.
Note: Items in pending status do not have a Receive# assigned. If an item is in pending status, the Receive# field will remain blank.
The cycle counts/QOH(Qty on Hand) will increase after the receive parts process.
Edit Receive Parts
To edit received parts:
1. From the Receive Parts sub-module page, select an entry from the list. The Edit function displays.
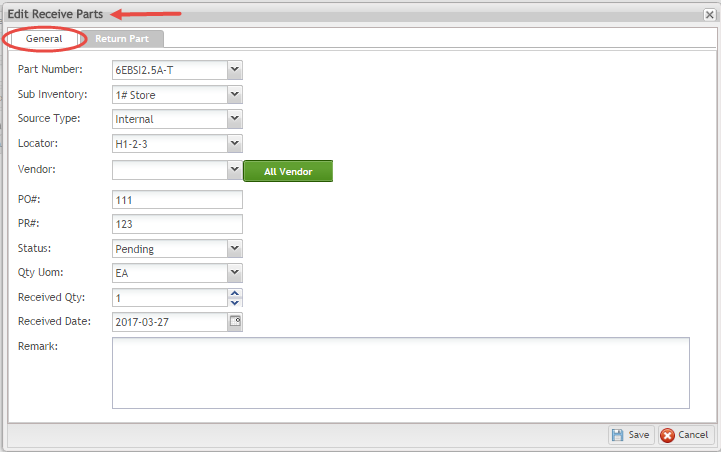
2. Select Edit. The Edit Receive Parts pop-up window appears, which is comprised of two tabs: General, and Return Part. The Return part Edit field mirrors those used in Receive Parts and Trasaction Log submodules.
Edit Receive Parts: General Tab
3. The General tab displays detailed information about the part selected. Users may not edit within theGeneral Tab.
Figure 22: Edit Receive Parts Pop-up Window
Edit Receive Parts: Return Part Tab
This tab allows the user to complete a part return while working in the Receive Part submodule, thereby saving time. All actions in this tab will be reflected in the Return Parts submodule as well as the Transaction Log submodule. Users may add a part for return, edit the action, or export the details in .csv form onto their local drive.
Note: Only Receive Parts incomplete status can be returned (e.g. they are noted as received in the system). Upon entering this Return Part tab, the field will be empty, until a part is added for Return.
- To return a received part, select Add
- Complete the fields:
- Returned Qty (drop-down)
- Qty UOM (automatically populates)
- Returned by: Enter your name in the field provided (mandatory)
- Returned date: Select the date for return with the drop-down calendar.
- Status: If today’s date is selected, choose Complete. If a future date is selected, the user will need to return to the portal at a later date to mark the action complete; the system will not send items to return automatically.
- Remark: Enter the remark/reason for these return parts.
- Click Save to submit the Return Parts or Cancel to cancel return parts.
Note: The cycle counts/QOH(Qty on Hand) will decrease after the return part process.
Figure 24: Add Return Parts
Edit Return Part
- Select the Edit icon. Users may change:'Returned Date''''''
- Returned Qty
- Qty UOM
- Status
- Remark Fields
Note: Users cannot change the quantity within the edit feature. If the return quantity must be changed, change the status to canceled and return to the add button to create a new order.
Export Receive Parts
To export information about a received/returned part onto a local hard drive:
- Choose the information desired by activating the checkbox next to its entry.
- Select Exportfrom the Receive Partssub-module main page.
- A .csv file automatically downloads onto the user’s local drive.
- Open the file to name, save, or print as desired.
Issue Parts 
TheIssue Parts submodule is used to dispatch parts in and out of the manufacturing system. Parts may be removed from the system due to poor quality (poor quality parts are scrapped or refurbished); or dispatched into production. Issue Parts and Cycle Counts are connected submodules; as parts are issued, inventory in the cycle count is reduced to reflect the transaction. From the Issue Parts sub-module page, users can search/filter the listing; or add, edit, or export issue parts data.
Search/Filter Issue Parts
- Users may search according to the following criteria, located on the top menu bar of the Issue PartsSubmodule:
- Issue #: Issue numbers are generated automatically once the issues parts record moves to completed status.
- Part Number: Drop-down menu allows the user to search more selectively by Part Number, Part Name, MFG PN, or AVL PN.
- Received Date From/Received Date To: Use the provided calendars to enter the time span during which parts were issued.
- Status: Drop-down menu includes: Pending/Completed/Cancelled.
Note: By default, Pending status will be selected as a filtering option. To view Issue Parts records in Completed or Cancelled statuses, select the desired category from the top menu bar and select the search icon (e.g. magnifying glass).
3. Choose the search icon(e.g. magnifying glass).
Add Issue Parts
To add an entry to the Issue Parts page:
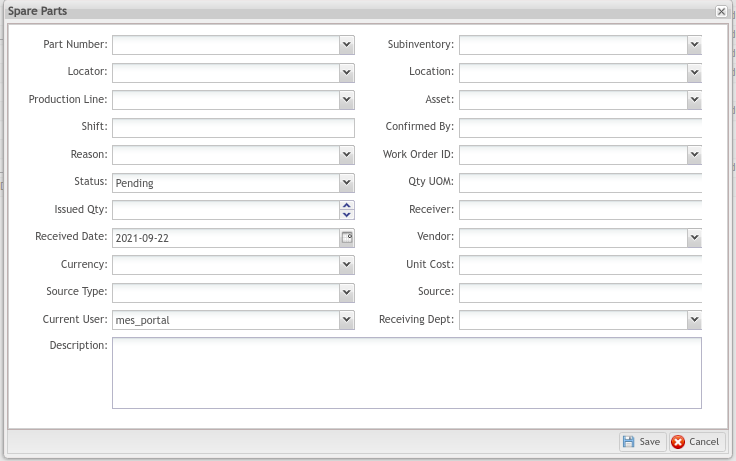
- Select Addfrom the menu. The Add Issue Partspop-up window appears.
- Complete the fields provided: (Refer to the Glossary of Termsfor more information)
- Part Number: (Mandatory) Drop-down menu provides a list of part numbers to further limit the search: Part Number, Part Name, MFG PN, or AVL PN.
- Sub Inventory: (Mandatory) Scroll sub inventorylocations with the drop-down menu provided.
- Locator: (Mandatory) Scroll locators (buildings) with the drop-down menu provided.
- Location: Drop-down menu provides a list of buildings and floors in a tree format.
- Production Line: Enter the number or name of the production linethe machine associated with the issued PNoperates
- Asset: Select the Asset(machine) to which the PN is associated.
- Shift: Enter the shiftduring which the part was issued, if applicable.
- Confirmed By: Name of the employee issuing the PN
- Reason: (Mandatory) Choose Poor Qualityor Issued to Production.
- WO#: If the Part is being rebuilt, enter the Work Ordernumber assigned to the task.
- Status: Pending/Completed
- Qty Uom: PN’s quantity Unit of Measure
- Issued Qty: (Mandatory)
- Receiver: (Mandatory)
- Received Date: Add the date the PN was received.
- Vendor: (Mandatory) Choose the Vendorfrom the drop-down menu. Only vendors associated with the given part are available for selection.
- Currency: The type of currency according to country. The Currencyfield automatically populates based on the part number selected.
- Unit Cost: The Unit Costfield populates based on the PN selected.
- 'Source Type: Select from the drop-down list. Options include: Internal or External. '
- External: Refers to items manufactured by an outside vendor.
- Internal: Refers to items manufactured within the parent company.
- Source: The company or department that supplies the part based on External or Internal selection. Utilize the drop-down menu to select the desired source.
- Current User: The current user is displayed by default. Alternately, users may select another user from the drop-down menu.
- Receiving Dept: The department where the part will be issued. Select the department from the drop-down list; the list is displayed in tree format.
- Description: Provide any extra information that might be helpful to plant personnel.
Figure 25: Add Issue Parts Pop-up Window
Note: The cycle counts/QOH(Qty on Hand) will decrease after the issue parts process.
Edit Issue Parts
To edit issue parts:
- From the Issue Parts page, select an entry from the list.
- Select Edit.
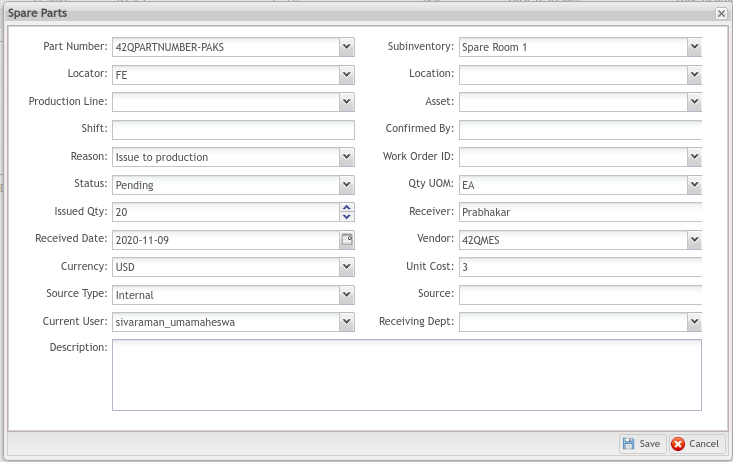
- The Edit Issue Parts pop-up window displays.
- Edit any of the fields provided as needed:
- Select Save to finish or Cancel to abort.
Note: By default, Pending status will be selected as a filtering option. To view Issue Parts records in Completed or Canceled statuses, select the desired category from the top menu bar and select the search icon (e.g. magnifying glass).
Figure 26: Edit Issue Parts
Export Issue Parts
To export information onto a local device:
- Activate the checkbox next to the line of information you’d like to export.
- Select Export from the Issue Parts sub-module page.
- A .csv file automatically downloads onto the user’s local drive.
- The user may open and rename, save, or print as desired.
Return Parts 
Return Parts submodule is used to record those parts sent back to the vendor. Changes in the Return Partssubmodule are reflected in the Cycle Countinventory. In the Return Partsmodule, users can search/filter, add, edit,or exportinformation about returned parts.
Search/Filter Return Parts
1.Users may search according to the following criteria, located on the top menu bar of the Return PartsSubmodule:
- RTV# (Return to Vendor)
- Receive#
- Returned Date From
- Returned Date To
- Status'
2.Select filtering options.
3. Choose the search icon (e.g. magnifying glass).
Figure 27: Return Part Main Menu
Add Return Parts
'To Return a received part:'
- Select theReceive Partfrom the list of entries by activating the checkmark.
Note: Only parts in received status may be returned. If a complete list is not available, the status filter may have been applied. Users may need to refresh the screen to view parts in all status conditions.
- Select the Add icon
- A pop-up window displays (Add Return Parts), allowing the user to select the received part(s).
- Complete all fields provided:
- Receive#: Number assigned to the part being returned: choose from the list available in the drop-down menu. NOTE: Recieve numbers are generated automatically after the return parts record moves to completed status.
- Returned Qty: # of parts being returned to vendor (Mandatory)
- Qty Uom: The Qty Uomfield automatically populates based on the part number. Qty Uomrefers to the part’s unit of measure, or how the part is packaged. For example, EA (each) defines the part as a separate item. Qty Uom is plant specific based on part size, shape, and packaging.
- Returned By: Identify the person completing the return (Mandatory)
- Returned Date: Choose the date the part is to be returned from the drop-down calendar (Mandatory)'
- Status: Enter the status of the return: (e.g. pending; or completed) (Mandatory)
- Remark: Enter any additional information in the textbox provided (Optional)
6. Select Save to finish or Cancelto abort.
Note: If the system will not accept a return, it is possible the part has already been returned. Navigate to the Receive module to check the part's history.
Figure 28: Add Return Parts
Edit Return Parts
- After Return Partsare added, they can similarly be edited.
- Select an entry from the Return Partslist.
- Select Edit. The Edit Return Parts pop-up window displays.
- Edit the fields provided
- Select Save to finish or Cancel to abort.
Figure 29: Edit Return Parts
Export Return Parts
To export Return Parts data onto a local device:
- Select the information by activating the checkbox next to the entry.
- Select Export from the Return Parts sub-module page.
- A .csv file automatically downloads onto the user’s local drive.
- Open the file to rename, save, share, or print as desired.
Adjust Parts Submodule
'The Adjust Partssubmodule is used to record any discrepancies in the actual number of parts recorded in the CMMS system.'
'In the Adjust Parts submodule, users can search/filter, add, or edit data.'
''Figure 50: Main Menu: Adjust Parts''
Search/Filter Adjust Parts
- 'Users may search for Adjust Partsentries according to the following criteria, located on the top menu bar of the Adjust PartsSubmodule:'
- ''Adjust#: Search by the number assigned to the Adjust Partsentry. NOTE: This number is automatically assigned when the entry is created.'
- ''Part Number: A drop-down menu is available.'
- ''Sub Inventory: Select the sub inventory using the drop-down menu.'
- ''Update Date From/Update Date To: Select the time span the parts were adjusted by populating the drop-down calendars.'
- ''Status: Search by the status of the Adjust Partsrecord: Pending, Rejected, or Cancelled.'
' 2. Select filtering option(s).
3. Choose the search icon(e.g. magnifying glass).'
' '
Add Adjust Parts
'To addan entry to Adjust Parts:'
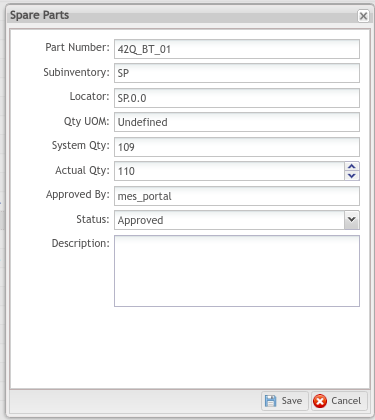
- 'Select Add from the Adjust Parts menu.'
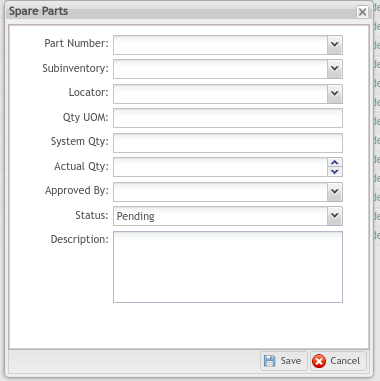
- 'The Add Adjust Partspop-up window displays.'
- 'Complete the provided fields:'
- ''Part Number (Mandatory) Select the PN from the drop-down list'
- ''Sub Inventory (Mandatory) Select the Sub Inventory from the drop-down list'
- ''Locator (Mandatory)'
- ''Qty Uom (Optional)'
- ''System Qty: This field is automatically populated when the user selects the location(s).'
- ''Actual Qty: (Mandatory)'
- ''Approved By: Select the administrator with approval permissions from the drop-down menu. NOTE: Approvers are added to the system within the CMMS Admin portal: (Shop Floor Control > Configuration > CMMS Admin > Group > Add User)'
- ''Status: Select: Pending, Rejected, or Cancelled'
- ''Description (Optional)'
' 4. Select Saveto finish or Cancelto abort.'
''Figure 51: Add Adjust Parts''
' '
' '
Edit Adjust Parts
'To editan Adjust Partsentry:'
- 'Select an entry from the Adjust Partspage. The Editfunction is now available.'
- 'Select Edit. The Edit Adjust Partspop-up window displays.'
- 'Complete the provided fields.'
''Note': Fields are the same as those configured in the Add Adjust Partsfunction:
- ''Part Number''
- ''Sub Inventory''
- ''Locator''
- ''Qty Uom''
- ''System Qty''
- ''Actual Qty''
- ''Approved By''
- ''Status''
- ''Description''
' 4. Select Saveto complete or Cancel to abort.'
'Note: 1. The approver cannot be the person who requests this adjustment.'
' 2. Only the creator and approver can edit the requested adjustment.'
''Figure 52: Edit Adjust Parts''
Subinventory Submodule
'The Subinventorysubmodule of Spare Parts is useful for managing sites that house parts at multiple locations. In the Subinventorysubmodule, users can addand editsub inventory locations; and mark sub inventory locations as Active/Inactive.'
Add Subinventory
'To addan entry:'
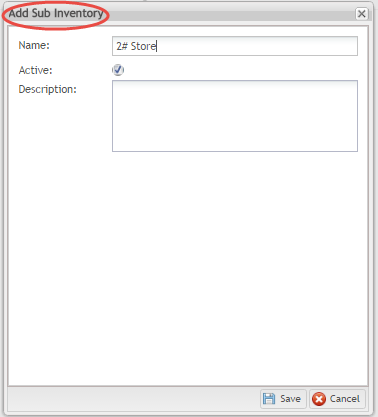
- 'Select Addfrom the Subinventorymenu. The Add Subinventorypop-up window displays.'
- 'Complete the fields provided:'
- ''Name: Assign a title to the sub inventory. (e.g. Shelf 1A; Store#2; Row 4; etc.)'
- ''Active: Activate the checkbox to assign Active/Inactive status. Active = checked.'
- ''Description: Add any description that may be helpful to plant personnel.'
' 3. Select Saveto finish or select Cancelto abort.'
''Figure 54: Add Subinventory''
' '
Edit Sub Inventory
'To edit Sub Inventoryentries:'
- 'Select an entry from the Sub Inventorylist.'
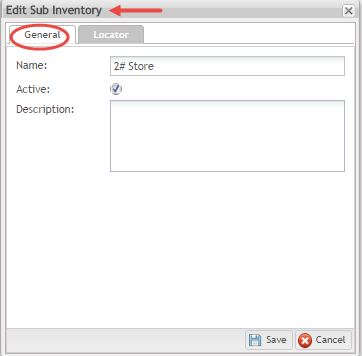
- 'Select Editfrom the menu. The Edit Sub Inventory pop-up window appears. This window is comprised of two tabs: Generaland Locator.'
Edit Sub Inventory: General Tab
''Figure 55: Edit Sub Inventory: General Tab''
- 'Under the General tab, editany of the fields as needed:'
- ''Name''
- ''Active/Inactive [checkmark]''
- ''Description''
' '
Edit Sub Inventory: Locator Tab
'Within the Locator tab, users may change Locator information connected to the selected Sub Inventory. The following functions can be performed: Add, Edit, mark as Inactive/Active, and Export.'
''Figure 56: Edit Sub Inventory: Locator Tab''
' '
Add a Locator to the Sub Inventory
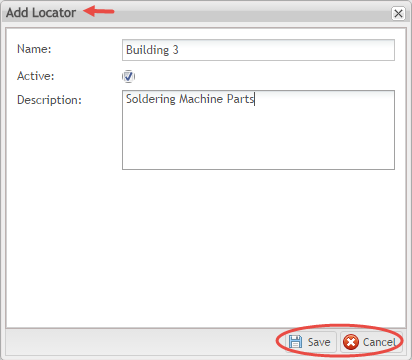
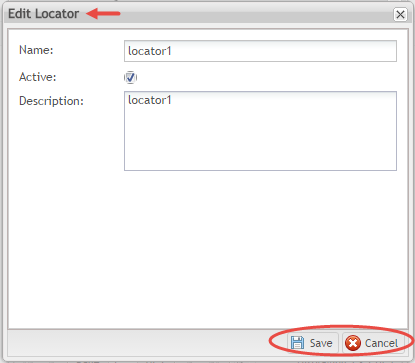
- 'Select Addfrom the Locator tabmenu. The Add Formpop-up window appears.'
- 'Complete the provided fields:'
- ''Name: Assign a title to the location. (e.g. Line 1; Building 3; Floor A; etc.)'
- ''Active: Activate the checkbox to assign Active/Inactive status. Active is checked.'
- ''Description: Add any description that may be helpful to plant personnel.'
' 3. Select Saveto complete or Cancelto abort.'
''Figure 56a: Add Locator to Sub Inventory''
Edit a Locator in the Sub Inventory
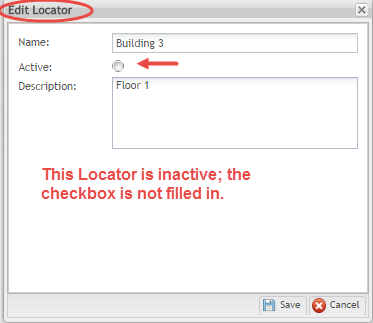
'Select an entry from the Locator tab listby activating the checkmark next to the entry.'
- 'Select Edit; the Edit Formpop-up window displays.'
- ''Edit the provided fields as needed:'
- ''Name''
- ''Active [checkbox]: To change the status to inactive, remove the checkmark. NOTE: Completing this action will remove the blue checkmark in the sub Inventory list for that Locator.'
- ''Description''
' 4. Select Saveto finish or Cancelto abort.'
''Figure 56b: Edit Locator in Sub Inventory''
' '
''Figure 57: Change Active/Inactive Status''
' '
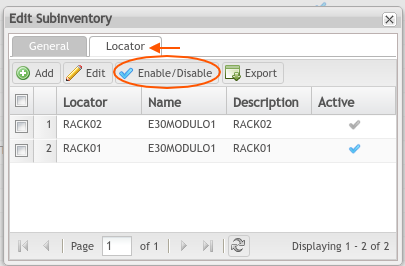
Change Active Status: Menu Bar
'Locator Status can alternatively be changed from the Enable/Disable Iconlocated on the top menu bar of the Edit Sub Inventory Tab. To change the active status: '
- 'Select an entry from the Locator tab listby activating the checkmark next to the entry.'
- 'Select the Enable/Disable icon.'
''Note': Within the Locator tab, active/inactive status is selected by marking the checkmark on the top menu bar.
''Figure 57a: Active/Inactive Status''
Export Sub Inventory Information
- 'Select the desired information by activating the checkbox next to the entry.'
- 'Select Exportfrom the Locator tabmenu.
 '
' - 'The exported file will automatically download onto the local drive in .csv format.'
- 'Open the .csv and rename, save, file, or print as desired.'
' '
' '
Scrap Parts Submodule
Damaged parts that cannot be reused must be removed from the Cycle Count. The Scrap Partssubmodule manages these unusable parts. Scrap Partnumbers are reflected in the Cycle Countsubmodule. Within the ScrapParts submodule, users can perform the following functions: search, add, edit, and export.'
'Note: Scrap parts action happened at the shop floor, which means it won’t reduce qty again when scraped at Shop Floor, because the qty changed at the time of issuing parts.'
''Figure 59: Scrap Parts Main Menu''
' '
Search/Filter Scrap Parts
' 1. Users may search according to the following criteria, located on the top menu bar of the Scrap PartsSubmodule:'
- ''Scrap #''
- ''Part Number''
- ''Scrapped Date From/Scrapped Date To: Drop down calendars allow the user to select the time frame when parts were scrapped.'
' 2. Select filtering option(s).
3. Choose the search icon(e.g. magnifying glass).'
' '
' '
Add Scrap Parts
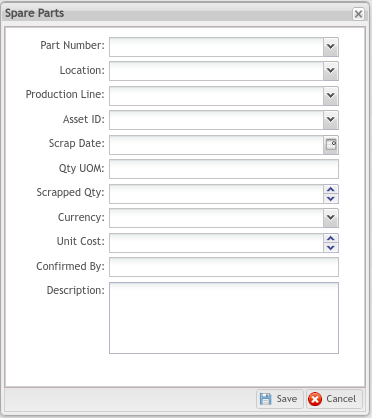
'To adda Scrap Part entry:'
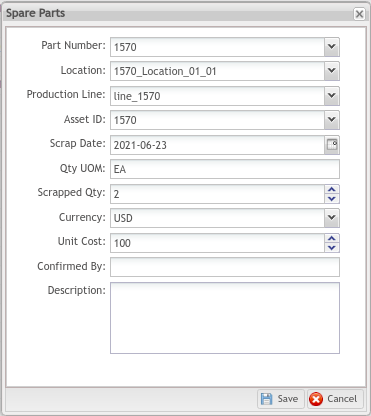
- 'Select Addfrom the Scrap Part menu. The Add Scrappingpop-up menu appears.'
- 'Complete the fields provided. Drop-down menus are available to aid some selections.'
- ''Part Number: (Mandatory) Select the PN from a drop-down menu list.'
- ''Location: (Mandatory) Floor or building where the parts are housed. The drop-down menu bar provides a diagram with departments in a tree format.'
- ''Production Line: (Optional) Production line associated with the scrapped part(s).'
- ''Asset: (Mandatory) Machinery or equipment the scrap parts are assigned'
- ''Scrapped Date: (Mandatory) Date the part was removed from the system.'
- ''Qty Uom: (This field automatically populates) Quantity Unit of Measure.'
- ''Scrapped Qty: (Mandatory) # of PN being removed from inventory.'
- ''Currency: (Optional)Select the type of currency per country.'
- ''Unit Cost: (This field automatically populates) Cost per unit.'
- ''Confirmed By: (Optional)The operator completing the part transfer.'
- ''Description: (Optional) Additional information that may be useful to plant personnel.'
' 3. Select Saveto finish or Cancelto abort.'
''Figure 60: Add Scrap Parts''
' '
Edit Scrap Parts
'To edit Scrap Partentries:'
- 'Select an entry from the Scrap Partslist by activating the checkmark next to the line of data.'
- 'Select Edit. The Edit Scrappingpop-up window appears.'
- 'Edit any of the fields from the preceding Add Scrap Partsaction:'
- ' 4. Select Saveto finish or Cancelto abort.'
''Figure 61: Edit Scrap Parts ' Note: This information mirrors the information in Figure 60.
Export Scrap Parts
'To exportinformation onto a local device:'
- 'Activate the checkbox next to the line of information you’d like to export.'
- 'Select Exportfrom the Scrap Partssub-module page.'
- 'A .csv file automatically downloads onto the user’s local drive.'
- 'The user may open and rename, save, or print as desired.'
Reuse Parts Submodule
'Previously scrapped parts that have been refurbished for use and moved back into active inventory are managed within the Reuse Partssubmodule.'
'Note: Activity within the Reuse Partssubmodule is reflected in the Cycle Countsubmodule; adding a shelved part to the Reusecategory increases inventory in Cycle Count.'
- 'On the Reuse Partspage, users can perform the following functions: search,add, edit, and export.'
''Figure 63: Reuse Parts Menu Bar''
Search/Filter Resue Parts
- 'Users may search according to the following criteria, located on the top menu bar of the Reuse Partssubmodule:'
- ''New PN: Drop-down menu offers additional choices: Part Number, MFG PN, or AVL MFG.'
- ''Old PN: Drop-down menu offers additional choices: Part Number, MFG PN, or AVL MFG.'
- ''Status: Drop-down calendar offers additional choices: Pending, Completed, or Cancelled.'
- ''Reuse#: Enter the quantity of Reused partsassociated with the PN'
- ''Updated Date From/Updated Date To: Drop-down calendar is available.'
' 2. Select filtering option(s).
3. Choose the search icon(e.g. magnifying glass).'
' '
Add Reuse Parts
'To add a Reused Partentry:'
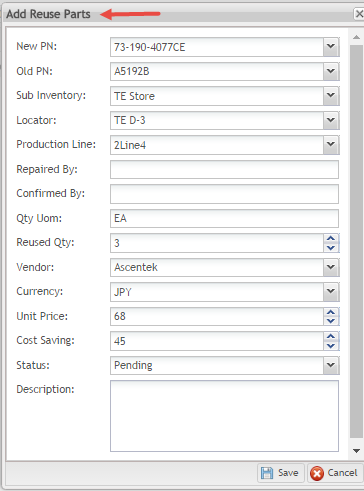
- 'Select Addfrom the Reused Partsmenu. The Add Reuse Partspop-up menu displays.'
- 'Enter the Old PNor choose from the list of Part Numbersprovided in the drop-down menu.'
- 'Additional fields are populated by selecting a PN.'
''Figure 64: Add Reuse Parts Drop-down Menu'
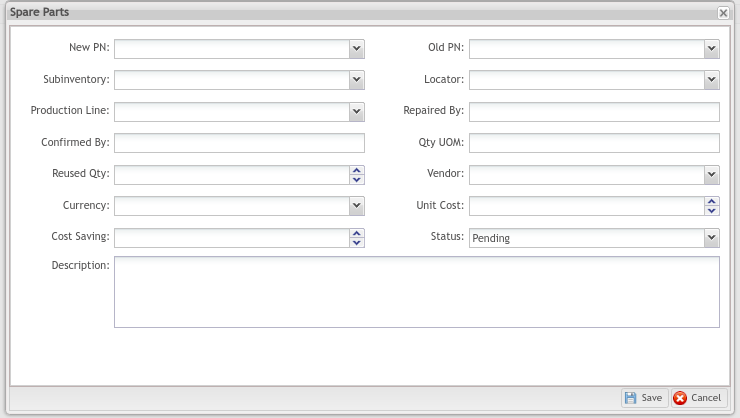
' 4. Complete the fields provided. Drop-down menus are available to aid some selections.
5. Mandatory fields are Sub Inventoryand Locator.'
- ''New PN: (Mandatory field) Select the new PN to assign to the refurbished part'
- ''Old PN: (Mandatory field) Select the PN assigned to the original part from the drop-down menu'
- ''Sub Inventory (Mandatory field)'
- ''Locator (Mandatory field)'
- ''Production Line''
- ''Repaired By''
- ''Confirmed By''
- ''Qty Uom''
- ''Reused Qty''
- ''Vendor Currency''
- ''Unit Price''
- ''Cost Saving''
- ''Status: Choose Pendingor Completed.'
- ''Description''
' 6. Select Saveto finish or Cancelto abort.'
''Figure 65: Add Reuse Parts''
Edit Reuse Parts
'To editentries:'
- 'Select an entry from the Reuse Partslist.'
- 'Select Edit. The Edit Reuse Partspop-up window appears.'
- 'Users may edit any of the fields associated with a given Part Number:'
Export Reuse Parts
'To Export:'
- 'Select the file by activating the checkmark next to the entry.'
- 'Select Exportfrom Reuse Part’s main menu.'
- 'The exported file will automatically download onto the local drive-in .csv format.'
- 'The user may open the .csv file and rename, save, or print as desired.'
Cycle Count Submodule
'The Cycle Count submodule provides a paperless solution for the inventory process. Cycle counts are completed on a regular basis (e.g. daily, weekly, every third Monday, etc.) as determined by the needs of the plants. Within Cycle Count, employees count and record their plant’s machine parts. Cycle counts are always completed based upon the sub-inventory locations where machine parts are located within the manufacturing plant. Administrators can restrict access to approved users to control inventory costs.'
'From the Cycle Count page, users can perform the following functions: search, add, operate, delete, and export.'
Search/Filter Cycle Count
'A list of all Plan Items (Planned Cycle Counts) displays. Plan Items are listed by the name designated.'
''Figure 67: Cycle Count Menu Bar''
'Users may limit their search with the following filter options, located on the screen’s top menu:'
' '
- ''Plan Name: Search by the Plan Name’s Title.'
- ''Approve By: A drop-down menu allows the user to select Plan Names according to the employee who approved the Plan Item. NOTE: The “Approve By”column in the Cycle Countpage refers to the user authorized to approve the cycle count. Typically, this user will hold an administrative position.'
- ''Status: Search for the Plan Name by its status. A drop-down menu offers the following choices:'
- ''Planned''
- ''Opening''
- ''Planned Items Generated''
- ''Closed''
' '
Add Cycle Count
'Here, Users create the general parameters for their cycle count and create a name for the Cycle Count.NOTE: The actual tallying process is not completed in this field. Only the Cycle count plan name and parameters are selected here.'
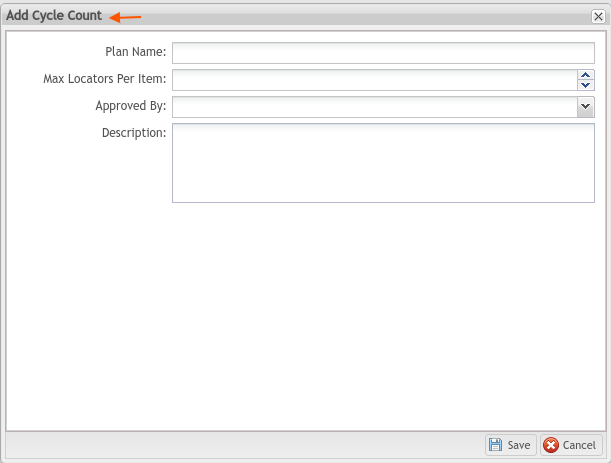
- 'Select Addfrom the Cycle Countmenu bar. The Add CycleCount pop-up window displays.'
- 'Complete the fields provided. Drop-down menus are available to aid some selections.'
- ''Plan Name: (Mandatory) Enter a Title for the inventory being counted. Plan Name is based on the location of the items being counted (i.e. Floor #1)'
- ''Max Locators Per Item: (Optional) Enter the total number of physical locations within the subinventory where the parts to be counted reside (e.g. If parts being counted are located on 3 shelves in Building 1; and 2 shelves in Building 2, the Max Locator = 5).'
- ''Approved By: (Mandatory) Select the supervisor who will approve the cycle count after it is completed.NOTE: The employee who creates the cycle count cannot select himself as the Approverfor that cycle count.'
- ''Description: (Optional) Add any other directions needed to complete the cycle count.'
' 3. Select Saveto finish or Cancelto abort.'
''Figure 68: Add Cycle Count''
Operate Cycle Count
'After users define a plan, they may Operate the Cycle Countand begin the inventory process. To operatea Cycle Count Plan:'
- 'Select an entry from the Plan Namelist.'
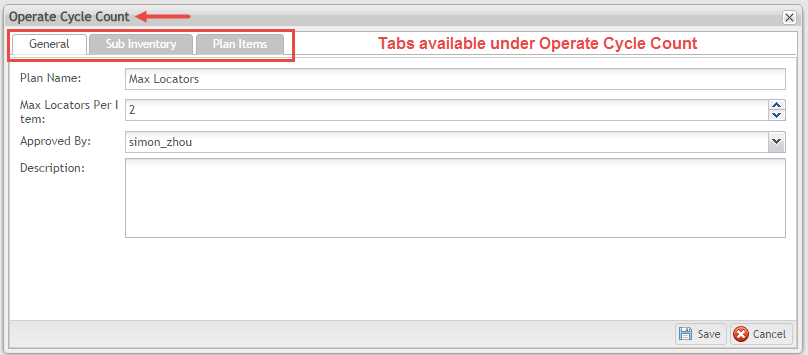
- 'Select Operatefrom the top menu bar menu. The Operate Cycle Countpop-up window displays. (see Figure 69). The Operate Cycle Countwindow is comprised of the following tabs: General, Sub Inventory, and Plan Items.'
Operate Cycle Count General Tab
- 'Under the Generaltab, the user may edit any of the fields completed when the Cycle Count Plan was originally added to the system:'
- ''Plan Name''
- ''Max Locators''
- ''Approve By''
- ''Description''
''Figure 69: Operate Cycle Count: General Tab''
' '
Operate Cycle Count: Sub Inventory Tab
'Under the Sub Inventory tab, users may addor deletesub inventory locations associated with the Locator.'
- 'To Add:'
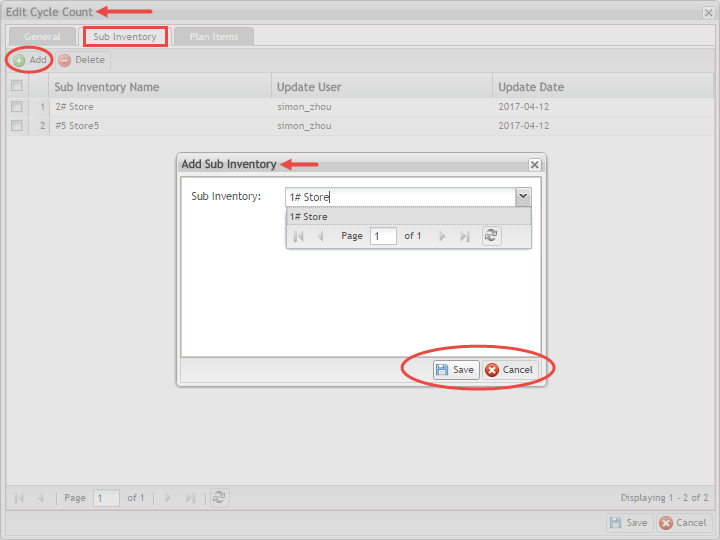
- 'Select Addfrom the Sub Inventory tab menu. The Add Sub Inventorypop-up window appears (Figure 70).'
- 'Select a Sub Inventoryfrom the drop-down list.'
- 'Select Saveto finish or Cancelto abort.'
'Note: If no sub inventory locations are added to the Plan Item, the user cannot Create a Plan Item.'
''Figure 70: Operate Cycle Count Plan: Sub Inventory Tab: Add a Sub Inventory''
' '
' 2. To Delete a Sub Inventory:'
- 'Select an entry from the Sub Inventory tablist.'
- 'Select Delete. The selected entry is now removed from the list.'
''Figure 71: Delete Sub Inventory''
' '
' '
Operate Cycle Count: Plan Items Tab
'The Plan Items Tabis the powerhouse of the Cycle Countssubmodule. Within the Plan Itemstab, cycle counts are recorded and approved. Here, users can edit plan items, create a plan item, approve plan items, export plan items, or delete plan items.'
''Figure 72: Actions available in Edit Cycle Count: Plan Items Tab'

- 'To Create a Plan Item:'
- 'Choose the Add icon.'
- 'A message window displays, allowing users to confirm the action.'
- 'Choose Yesto create a plan item or Noto cancel the action.'
- 'A new Plan Item with the predefined parameters will display on the list page. '
'Note: Plan Items can only be created from Plans in Opening or Planned status.'
'Note: Users must first assign a Sub Inventory to a Plan Item before the system allows them to Create a Plan Item.'
' 2. To Exporta Plan Item:'
- 'Select the entry by activating the checkbox next to its name.'
- 'Choose the Export icon.'
- 'Information will automatically download as a .csv file onto the user’s local drive.'
- 'Users may open, rename, share, or print as desired.'
'Note: Plants may use the export feature to print the list of parts to be counted for operators to attach to a clipboard.'
' 3. To Delete a Plan Item:'
- 'Select the entry by activating the checkbox next to its name.'
- 'Choose the Delete iconon the top menu bar.'
- 'A message window displays, allowing users to confirm the action.'
- 'Select Yesto confirm or Noto cancel the action.'
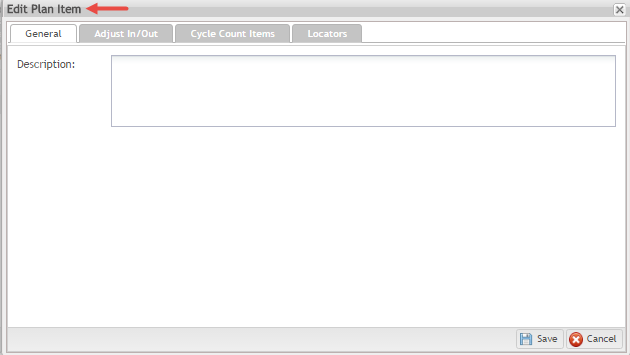
' 4. Edit a Plan Item: Whereas previous Cycle Count tabs are used to configure Cycle Count information, the Edit feature is used to execute a cycle count, and is comprised of four subtabs:General, Locators, Cycle Count, and Adjust In/Out. Some of the tabs need to be completed in a specific order (see notes below). TheEditfeature allows users to adjust quantities (Cycle Count), approve cycle counts (Adjust In/Out), add descriptions (General), and export locator details (Locators).'
''Figure 73: Edit Plan Item Sub-Tabs''
' '
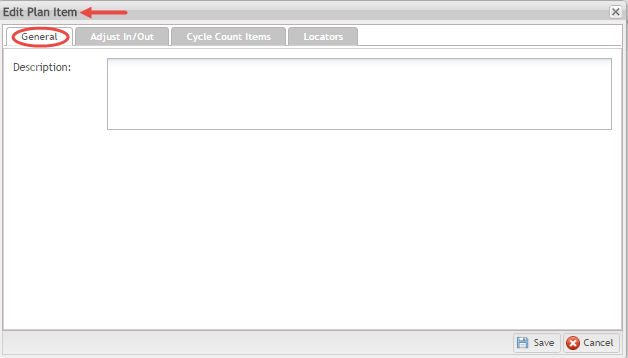
Edit Plan Item Sub-Tab: General Tab
'TheGeneral Tabis comprised of an open text box with a Descriptionlabel. Here, operators may include any special notes pertaining to the cycle count.'
Edit Plan Items Sub-Tab: Locators
'Within the Locatorstab, users can export information about a selected Locatorand its corresponding Sub Inventory in a .csv file onto their local drives.'
- 'Mark the entry by activating the checkbox next to the line of information.'
- 'Select the Exportfunction.'
- 'Information will automatically download in a .csv file onto the user’s local drive.'
- 'Users may open the file, rename, save, share, or print as desired.'
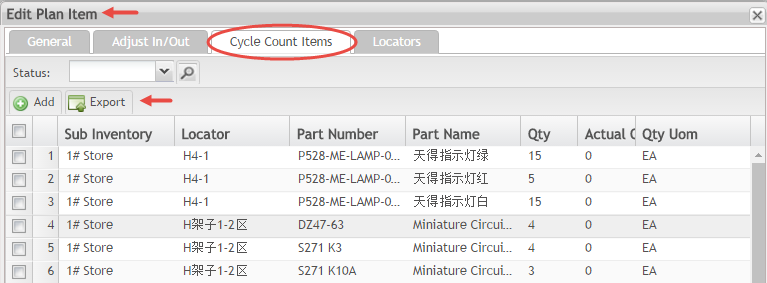
Edit Plan Items Sub-Tab: Cycle Count Items
'Within the Cycle Count Itemssub-tab users complete the inventory process. Users can:'
- ''Search for a Cycle count according to its status: Planned/Completed''
- ''Export a .csv file of Cycle Count details onto their local drive to print, share or save. Plants may use this feature to print a hard copy of the items for inventory, and tally using traditional pen and paper in the physical location.'
''Figure 75: Edit Plan Item: Cycle Count Menu''
' '
'If additional part numbers not specified in the original Plan Item require counting, users may add them to the Plan Item using theAddfeature.'
- 'ToAdd Part Numbersto a Cycle CountItem:'
- 'Select the Plan Item by highlighting the entry.'
- 'Choose the Add iconfrom the top menu bar.'
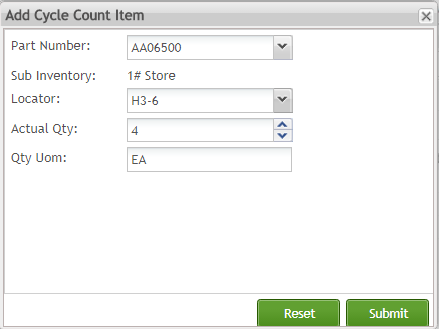
- 'This choice activates a pop-up window: Add Cycle Count Item(see Figure, below)'
- 'Complete the fields provided:
- ''Part Number''
- ''Sub Inventory Locator (NOTE: Only the Sub Inventory/Locatorsdefined in the Plan Item are available for selection).'
- ''Actual Qty''
- ''Qty Uom: (Quantity Unit of Measure) This field automatically populates when Part Number is selected.'
'Note:All fields are mandatory.'
- 'Select Submit to add the Cycle Count Itemor Resetto cancel.'
' '
''Figure 76: Add Cycle Count Item'
' 2. To Complete the Cycle Count:'
- 'Activate the checkmark next to the Sub Inventory to be counted.'
- 'Double click on the Actual Qty text field '
- 'A new drop-down bar is activated, allowing the user to increase/decrease the quantity (see below).'
- 'Select Enter''
- ''Message Screen prompts the user to Save Changes.'
- 'Select Yes.'
''Figure 76a: Actual Quantity Drop-Down''
' '
Edit Plan Items Sub-Tab: Adjust In/Out
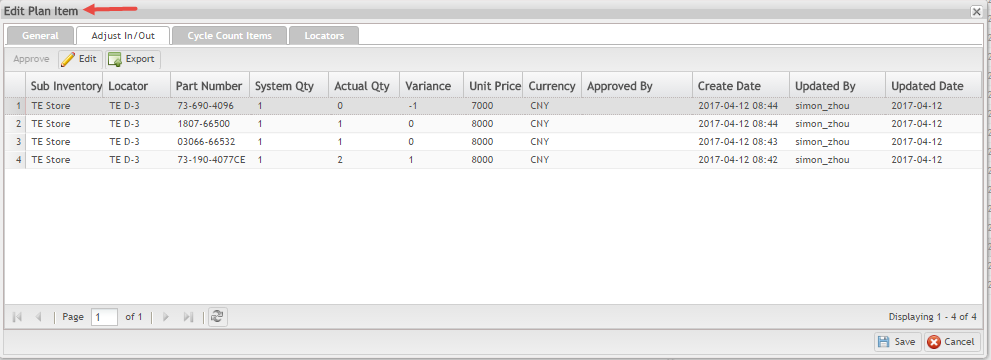
'Within the Adjust In/Outsub-tab, operators enter the actual quantity of parts being counted/inventoried for the selected Plan Item, or make a quantity adjustment using the Edit Tab.'
''Figure 77: Adjust In/Out''
' '
- 'To enter cycle countquantity:'
- 'Select the Location of the parts being counted by highlighting the line of information.'
- 'Choose the Editfunction.'
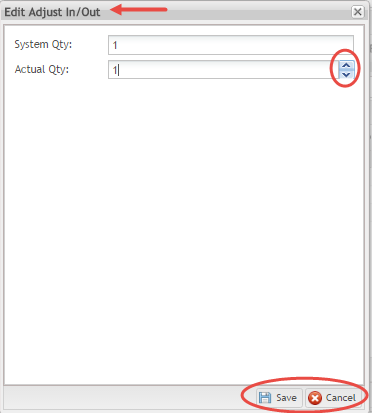
- 'A pop-up window displays: Edit Adjust In/Out(Figure, below)'
- 'Enter the quantity of the item using the Actual Qtydrop-down menu bar.'
- 'Select Saveto complete or Cancelto abort.'
''Figure 78: Edit Adjust In/Out''
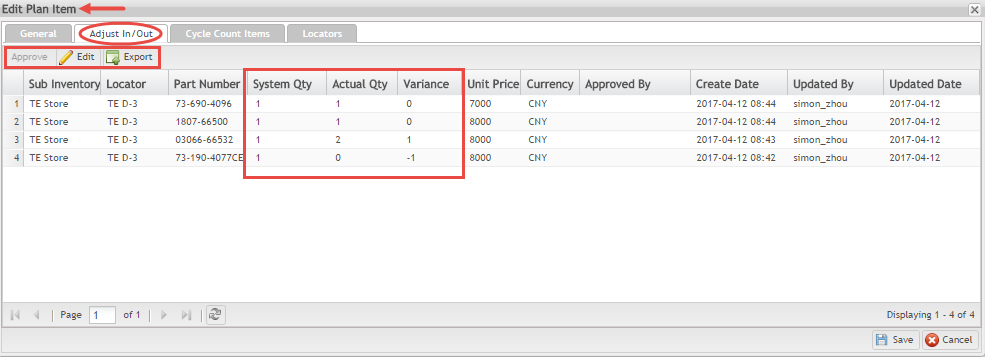
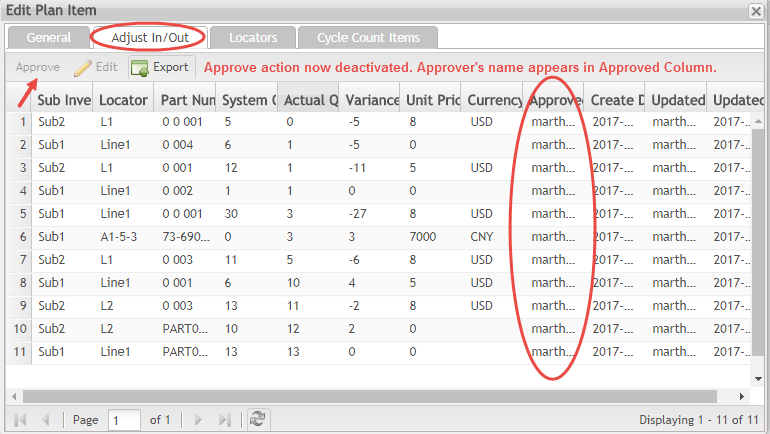
'NOTE: Once all inventory is recorded, the new totals are reflected in the list (See Actual Qtyand System Qtylines in Figure, below.)'
''Figure 79: Adjust In and Out''
' 2. To Export a Cycle Count List:'
- 'Select the Sub Inventory by activating the checkmark next to an entry.'
- 'Select the Exporticon from the top menu bar.'
- 'A list of parts to be counted automatically downloads in .csv form onto the local drive.'
- 'Users may open to save, print, or share as desired.'
' 3. Approve a Cycle Count: This is the most important feature of the Cycle Count submodule. There are several prerequisites that apply:'
- 'Only users assigned “Approver” may approve a cycle count. The Approve byfeature in the top menu bar will be deactivated if an unapproved user is working in the system.'
- 'Users may not assign themselves to approve aCycle Count. (Usually, the operator creates the cycle count and assigns the approver at the same time, selecting his/her supervisor as the approver.'
- '***Quantitiesmustbe updated and saved in the Cycle Count Items tabbeforethey are available for approval in the Adjust In/Out Tab. The two steps cannot be completed in the opposite order.'
' 4. To approvethe Cycle Count Quantity:'
- 'Highlight thePlan Name.'
- 'Select theApprovebutton and choose Enter.'
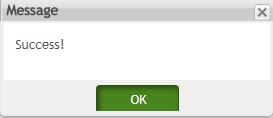
- 'A success message displays (seeFigure, below).'
''Figure 80: Approve a Cycle Count''
'
Figure 80a: Success Message for Approve Function: Adjust In/Out Tab'
''NOTE': Once approved, the approve button will again be deactivated and the Approver’s name will display in the Approve Column (see below).
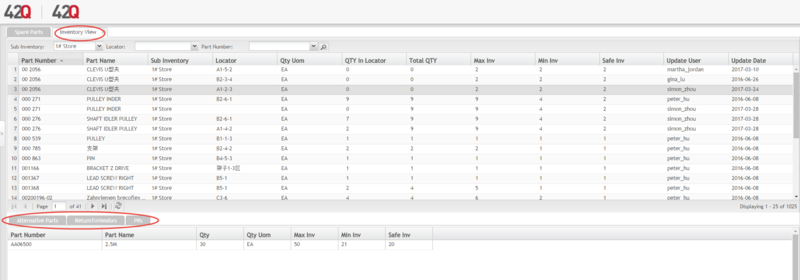
Inventory View Submodule
'Inventory View allows users to conduct inspections of the various part numbers according to the exact location in the plant.'
'Note:' This submodule is view only.'
'Figure 83: Inventory View Main Menu Bar'
Search/Filter Inventory View
'Users may limit their search by choosing from the following filter options:'
- ''Sub Inventory: Select the Sub Inventory using the drop-down menu bar.'
- ''Locator: Select the Locator using the drop-down menu bar.'
- ''Part Number: Select the Part Number using the drop-down menu bar.'
- ''Part Name: Enter the Part Name.'
- ''Model: Enter the Model.'
Additional Inventory View Tabs
'Users may view additional information about the Part Numbers selected, and their status in the manufacturing process.'
- 'Select the entry from the list by highlighting the desired line of information.'
- 'A window displays on the bottom portion of the screen, allowing users to view the following additional information associated with the part number selected: Alternative Parts, Return to Vendors, and PRs(Purchase Requests).'
Additional Inventory View Tabs: Alternative Parts Tab
'Within the Alternative Parts Tabusers may view the following information associated with the part number selected:'
- ''Part Number''
- ''Part Name''
- ''Qty''
- ''Qty Uom''
- ''Max Inventory''
- ''Minimum Inventory''
- ''Safe Inventory''
Additional Inventory View Tabs: Return to Vendors Tab
'Within the Return to Vendors Tabusers may view the following information associated with the part number selected:'
- ''RTV#''
- ''Receive #''
- ''Part Number''
- ''Sub Inventory''
- ''Locator''
- ''Returned Date''
- ''Returned By''
- ''Returned Qty''
- ''Qty Uom''
' '
' '
Transfer Parts
'The Transfer Parts submoduleallows plants to transfer parts between sub-inventories and locations. Within this portal, users may search/filterfor specific parts; addtransfer parts; edittransfer parts; or exporttransfer part information to a local drive.'
'Figure 86: Transfer Parts Main Menu'

Search/Filter Transfer Parts
- 'Users may search for a specific part according to the following criteria, located on the top menu bar of the Transfer Parts Submodule:'
- ''Created Date From/Created Date To: Drop-down calendar menus allow users to search for Part Numbers according to the time period they were received in the system.'
- ''Part Number: Drop-down menu allows the user to further limit the search according to: AVL PNand MFG PN.Users may also scroll the list provided in the drop-down menu.'
- ''Status: Drop-down calendar allows the user to choose: Pending, Completed, Cancelled.'
- ''From Sub Inventory''
- ''From Location''
- ''To Sub Inventory''
- ''To Location''
' 2. Select filtering options.
3. Choose the search icon(e.g. magnifying glass).
4. Selected information is now in the list below the top menu bar.'
''Figure 86a: Transfer Parts List''
Add Transfer Parts
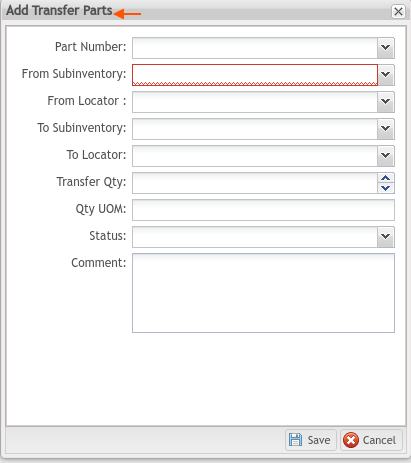
'To adda new Transfer Partsentry:'
- 'Select Addfrom the Transfer Partsmenu bar. The Add Transfer Partspop-up menu appears.'
- 'Complete the fields provided. Drop-down menus are available to aid some selections.'
- ''Part Number''
- ''From Sub Inventory''
- ''From Locator''
- ''To Sub Inventory''
- ''To Locator''
- ''Transfer Qty''
- ''Qty UOM''
- ''Status: Pending, Completed''
- ''Comment '
' 'Note': Sub Inventories and Locations are associated with part numbers in the Part List submodule of Spare Parts. If the desired Sub Inventory or Locator is not available from the drop-down list return to thePart List >Part Number > Edit > Sub Inventory & Locator Tab.
' 4. Select Saveto finish, or Cancelto abort.'
'Figure 87: Add Transfer Parts'
' '
Edit Transfer Parts
'To edita Transfer Partentry:'
- 'Select an entry from the Transfer Partslist.'
- 'Select Edit. The Edit Transfer Partspop-up window appears.'
- 'The following fields are available for edit: Locator; Sub Inventory; and Status.'
''Note': Users may select a different part from the drop-down menu and change sub inventory and locator.
Export Transfer Parts
'To Export:'
- 'Select the desired information to export to the local drive by activating the checkbox next to the entry.'
- 'Select Exportfrom Transfer Parts''
- 'The exported file will automatically download onto the local drive-in .csv format.'
- 'Open the .csv and rename, save, file, or print as desired.'
Transaction Logs
'The Transaction Log submoduleallows plants toviewthe activity of part numbers actively being moved within the system. All transactions completed inReceive Parts, Return Parts, or Transfer Partsare available. Received parts may be moved within the Transaction Log module. All other transaction types are view only.'
'Figure 89: Transaction Logs Main Menu'
Search/Filter Transaction Logs
- 'Users may search for part numbers by selecting any of the criteria located on the top menu bar of the Transaction LogsSubmodule:'
- ''Part Number: Drop-down menu allows the user to further limit search: AVL; PN; MFG PN''
- ''Sub Inventory''
- ''Locator''
- ''Transaction Date From/Transaction Date To''
- ''Transaction Type Drop-down menu allows the user to further limit the search: Receive Parts; Issue Parts; Return Parts; Adjust Parts; Reuse Parts; Sub Inv Transfer''
' 2. Select filtering options.
3. Choose the search icon(e.g. magnifying glass).'
' 4. The selected entries are now displayed in list form beneath the top menu bar.'
View Transaction Logs
- 'To view:'
- 'Highlight the data in the list.'
- 'Double click on the highlighted entry.'
- 'A text box displays that shows complete transaction details of the selected Part Number, consisting of two tabs: General& Return Parts.'
' '
Edit Receive Parts: General Tab
'TheGeneral Tabdisplays information about the location of the selected Part Number. This tab is aView Onlyfeature.'
''Figure 89a: Edit Receive Parts''
- 'If the Part Number is inReceived Status, users may use the Return Parts tabto move the Part back into inventory. If the selected Part Number however, has already been returned, this tab is unavailable.'
- 'Select theReturn Part Tab. The following Window becomes available:'
''Figure 89b: Return Part Tab''
- 'With theReturn Part Tab, Users may add, edit, or exportParts.'
'Note: This window provides the same actions as the Return Partssubmodule; all activity completed here will also be reflected in the Return Partsubmodule.'
''Note': Only Receiveparts Transaction Types can be moved within this submodule
' Figure 89c: Add Return Parts Window'
Export Transaction Logs
- ''Export any Transaction Log:'
- 'Select the desired Transaction Log by highlighting the line of data in the list.'
- 'Select Exportfrom Transaction Log's main menu.'
- 'The exported file will download onto the local drive in .csv format.'
- 'Open the .csv and rename, save, file, or print as desired.'
Purchase Request
'Within the Purchase Request submodule, plants build Purchase Requests to order new parts for their equipment. Users may search; create; or edit PRs (Purchase Requests). Multiple screens within this submodule provide a work area for users to record and adjust order details, thus eliminating the need for paper scratch pads.'
' '
'Figure 91: Procurement Workbench Main Menu'
' '
Search/Filter Procurement Workbench
- 'Users may search according to the following criteria, located on the top menu bar of the Purchase Requestsubmodule:'
- ''Part Number: Scroll entries with the available drop-down menu or type the Part Numberin the field.'
- ''Status: Drop-down menu limits the search by: New, Approved, Closed, or Cancelled.'
' 2. Select filtering option(s).
3. Choose the search icon(e.g. magnifying glass).'
''Note': To move to the next page of part numbers: type a page number in the scroll bar at the bottom of the drop-down menu and select enter on the keyboard.
'To Create a Suggested PR Purchase Request:'
- 'Select the Add icon.'
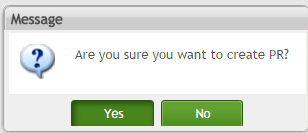
- 'A message screen displays. (see figure, below)'
''Figure 92: Create PR Message''
'' ' 3. Choose Yesto create a PR, or Noto cancel the activity.
4. The system assigns a new PR#, and the entry now displays on the list below the main menu.
''Figure 93: Create Suggested PRs''
' '
''Note': The following information displays in blue text on the top of the menu bar: (Stockable & Status(Active)&Source Type(External)&Reused Flag(False)And Qty(QOH+In Transit Qty) is lower than Safety Stock).
- 'This information details the prerequisites required to create a suggested Purchase Request (PR). Only part numbers that meet the required prerequisites will be accepted as part of a suggested PR. Following is an explanation of each requirement:'
- ''Stockable: Parts must be marked as “in stock” to be part of a suggested PR'
- ''Status: Part Status must be marked “active” to be part of a suggested PR'
- ''Source Type (External): Only external parts will be accepted as part of a suggested PR'
- ''Reused Flag (False): Reused parts are not accepted as part of a suggested PR'
- ''Qty (QOH+In Transit Qty) is lower than Safety Stock: The part’s quantity on hand combined with the part’s quantity in transit (on the way) must be lower than the part’s safety stock in order to be accepted as part of a suggested PR.'
''Note: Part Number properties are managed within the first submodule of Spare Parts ('Part List) under the Editfunction.
Edit Workbench
'To edit:'
- 'Select an entry from the list by activating the checkbox next to the listing.'
- 'Select the Editicon from the top menu bar.'
- 'A new window now displays (Edit Workbench) that provides necessary details and a workspace to build a PR (Purchase Request).'
' '
Edit a Purchase Request
'To edita Purchase Request:'
- 'Select a Suggested PRfrom the list by activating the checkmark next to the line of information.'
- 'Select the Editicon.'
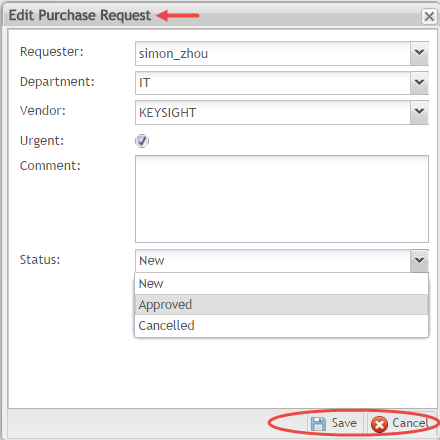
- 'Selecting Editpopulates data into the side panel and also displays a pop-up window (Edit Purchase Request) that allows the user to change the following elements of the PR:'
- ''Requester: Select from the drop-down menu'
- ''Department: (shown in tree format with parent and children departments demarcated)'
- ''Vendor: (select the vendor from the drop-down menu)'
- ''Urgent Status: (activate the checkbox if the change is urgent. Default is not urgent.)'
- ''Status: Drop-down menu provides choices: New; Approved; Cancelled''
' 4. Select Saveto complete, or Cancelto abort the action.'
''Figure 95: Edit Purchase Request''
PR Items
'The Purchase Request submodule provides a workspace (PR Item) where employees can add, edit, or deletePR items associated with a selected Purchase Request (see Figure, below).'
'For reference purposes, the bottom portion of the screen displays additional information associated with the selected Purchase Request to include: Alternative Parts, Return to Vendor, PRs, and AVLs.
NOTE: Fields in the bottom portion of the screen are view only.'
''Figure 96: PR Items available for Edit and View''
Add PR Items to a Purchase Request
'To build a Purchase Request:'
- 'Select the Purchase Requestfrom the left-hand side of the Edit Workbenchpage by activating the checkbox next to its listing.'
- 'Select the Add iconfrom the PR Item screenon the right-hand side of the Edit Workbenchpage.'
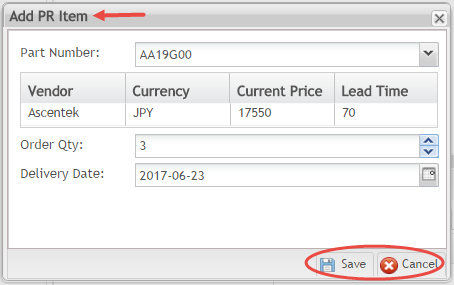
- 'A pop-up window displays: Add PR Item''
''Figure 97: Add PR Item Pop-up Window''
' 4. Select the Part Numberfrom the provided drop-down menu bar.
5. A table below the part number automatically populatesbased on the Part Number selection.
6. The following data is available for reference/viewonly:'
- ''Vendor''
- ''Currency''
- ''Current Price''
- ''Lead Time''
' 7. Complete the Order Qty: Select the quantity of parts to order with the drop-down menu barprovided.
8. Select Delivery Date: Select the delivery date with the drop-down calendarprovided. NOTE: A delivery date is automatically populatedbased on Part Number availability; however, users may change delivery date as needed.
9. Select Saveto add the Part number to the selected Purchase Request or Cancelto abort the action.
10. Added Part Numbers display in list format within the PR Itemworkspace.
11. On the bottom portionof the Edit Workbench page, reference information pertaining to the PR Item selected is available for reference. To activate the information, select the PR item by activating the checkmark next to the data entry. Corresponding information in the bottom field will display. The screens are view-only; users may not editthis field. The following information is available:'
- ''Alternative parts''
- ''Return to Vendors''
- ''PRs''
- ''AVLs''
'Note: Some fields will be empty, based on Part Number selected.'
Edit a PR Item
'To Edita PR Item:'
- 'Select the Purchase Request Item by activating the checkbox next to the line of data.'
- 'Select the Editicon.'
- 'The Edit PR Itempop-up window displays the same fields as the Add function.'
- 'The following fields are available for edit: Order Qty; Delivery Date''
- 'Choose Saveto complete the change, or Cancelto discard the action.'
- 'Similar to the Add PR Itemwindow, the following information associated with the Part Number is available for referencein a view onlyformat: Vendor; Currency; Current Price; Lead Time''
'To Deletea PR Item:'
- 'Select the Purchase Request Item by activating the checkbox next to the line of data.'
- 'Select the Deleteicon.'
- 'The PR Item will be removed, and no longer display in the PR Item list.'
Export Purchase Request
Users may exportthe details of a purchase request in a .csv format.
To Export:
- Select the Purchase Request(located on the left-hand side of the Edit Workbench page) by activating the checkbox next to the line of data.
- Select the Export icon.
- The system automatically downloads information in a .csv file onto the user’s local drive.
- Users may rename, save, share, or print the .csv file as desired.
Part Category
The Part Category submodule assists administrators in organizing their assets’ spare parts. Once parent categories are defined, users can quickly move, count, and purchase multiple parts. Users can link multiple categories to individual spare parts from the Part List submodule/Part Category Tab.
Available Features
Users may Add, Edit, or Enable/Disablea Part Category within this submodule.
Add A Part Category
- Select Add
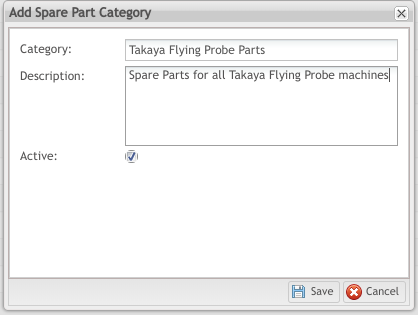
- 'The Add Spare Part CategoryForm displays. The following fields are available:
- *Category:(Mandatory) Add the parent name of the Spare Part Category. (e.g. ICT Parts, Belts, Fixture Parts, Fuji Parts)
- Description:' (Optional) Add a brief description of the Spare Part Category.
- *Active:(Mandatory) Check the box to mark the Category as active. The default value is checked (Active). Active fields are denoted by a blue checkmark; inactive fields are denoted by a grey checkmark.
Figure 99: Add Spare Part Category
Edit a Part Category
- Select any Part Category by highlighting the entry in the Part Categorylist.
- Select Edit.
- Any of the fields can be modified.
Enable/Disable a Part Category
Users may change the status of any part category from active to inactive or inactive to active.
- Select the Part Category by highlighting the entry in the Part Category list.
- Select Enable/Disable.
- The Active status reflects the change.


