42Q-MES0190-A Oracle Adapter Configuration Guide
42Q Home > Tools > Oracle Adapter Configuration Guide
Tools
Oracle Adapter Configuration Guide
Version MES15.80
Revision A1
Contents
Introduction
This guide is designed to assist the users with the Post-Installation steps after installing the XX42Q Oracle Adapter.
Post Installation Setup
After installation, users need to set up the Attribute Lookup form and API program defaults form, and then schedule the Concurrent Managers.
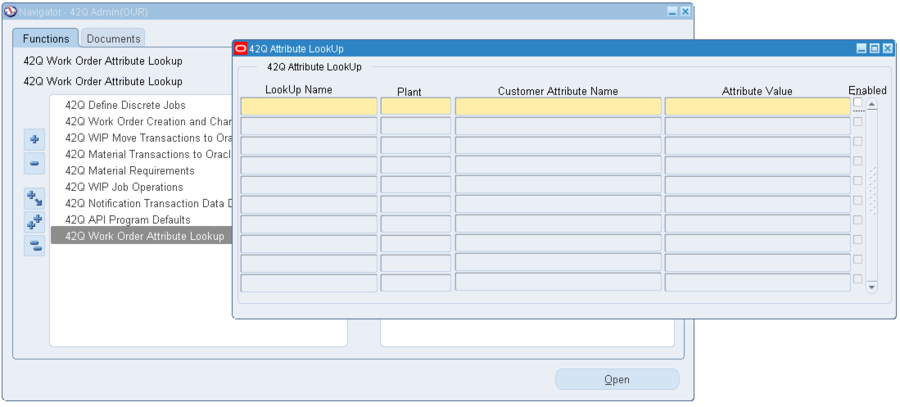
42Q Attribute Lookup Form
- Custom attributes are used to send additional fields to 42Q in the WO create/change XML in addition to the standard fields that are mapped in the 42Q Define Discrete Job form.
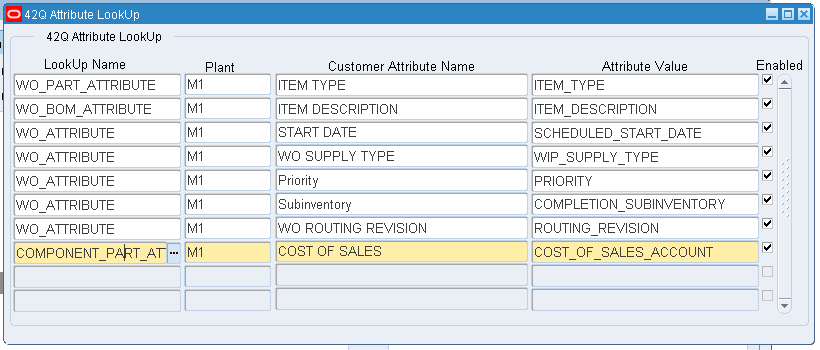
- The 42Q Attribute Lookup form maps the custom attributes with the 42Q Attribute Name.
- As it is plant-specific, if the customer is required to map the same field for different organizations, they should add them in the new line.
- 42Q Attribute lookup form is also used to map the additional attribute information that 42Q sends to the ERP in the WIP or Mat move transaction.
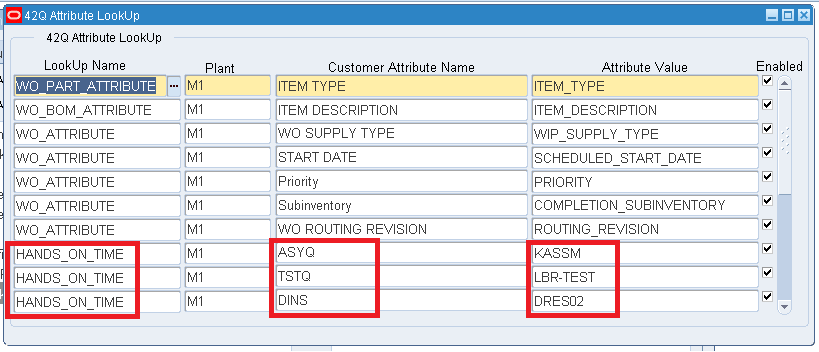
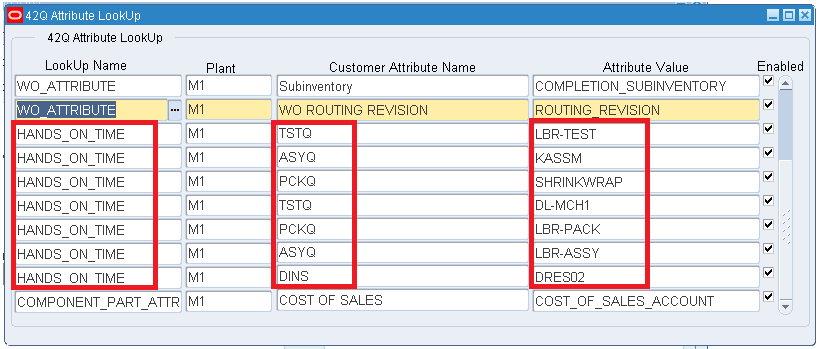
- HANDS_ON_TIME is used as a custom attribute in the lookup form as it sends the time taken to complete each operation during the WIP Move in 42Q.
- Users can add, delete, or update the required attribute tags as required.
Figure 1: 42Q Attribute Lookup
|
|
|
|
|
|
|
|
|
|
|
|
|
|
|
|
|
|
|
|
|
|
|
|
The 42Q Attribute Lookup Form maintains four types of attributes depending on the location of the field. They are as follows:
WO_ATTRIBUTE
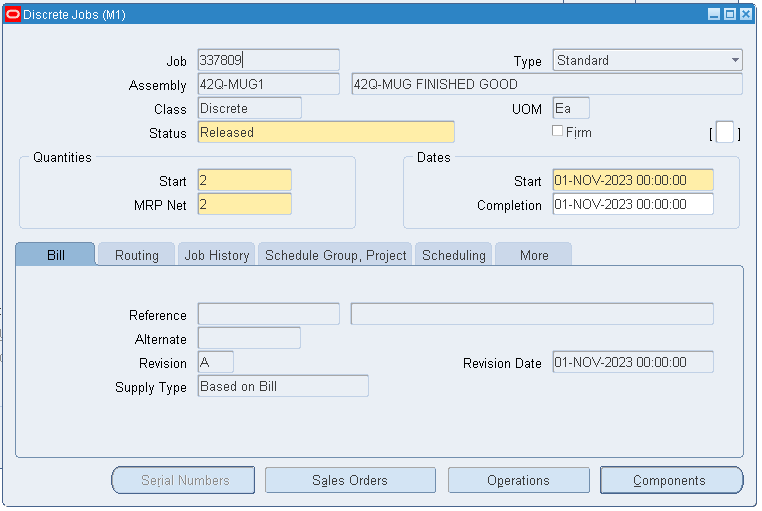
- The fields are available at the WO header level.
- To access navigate to 42Q Admin(OUR) > Discrete Jobs form.
- Enter the WO number and click Find.
Figure 2: Discrete Jobs Form
WO_PART_ATTRIBUTE
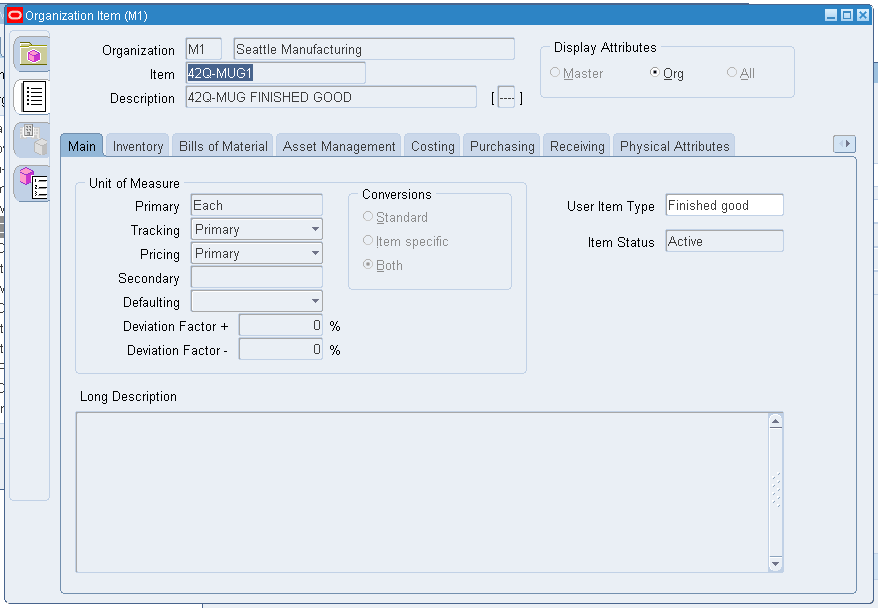
- The fields that are available in the Organization item form for the assembly item, are used in the work order.
- To access navigate to Inventory > Items > Organization Items.
- Enter the Part number, and click Find.
Figure 3: Organization Item Form
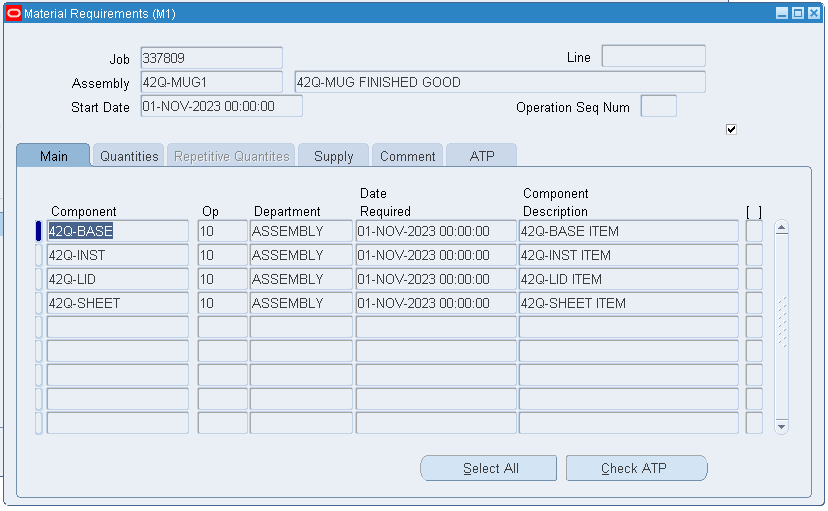
WO_BOM_ATTRIBUTE
- The fields that are available and used in BOM are specific to the work order.
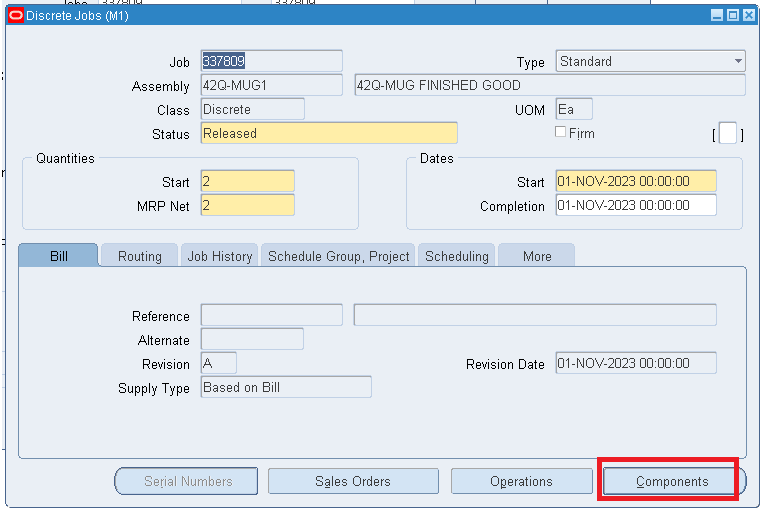
- To access navigate to 42Q Admin(OUR) > 42Q Define Discrete Jobs form
- Enter the WO number, click Find, and click Components.
Figure 4: Components- Discrete Jobs form
Figure 5: Material Requirement
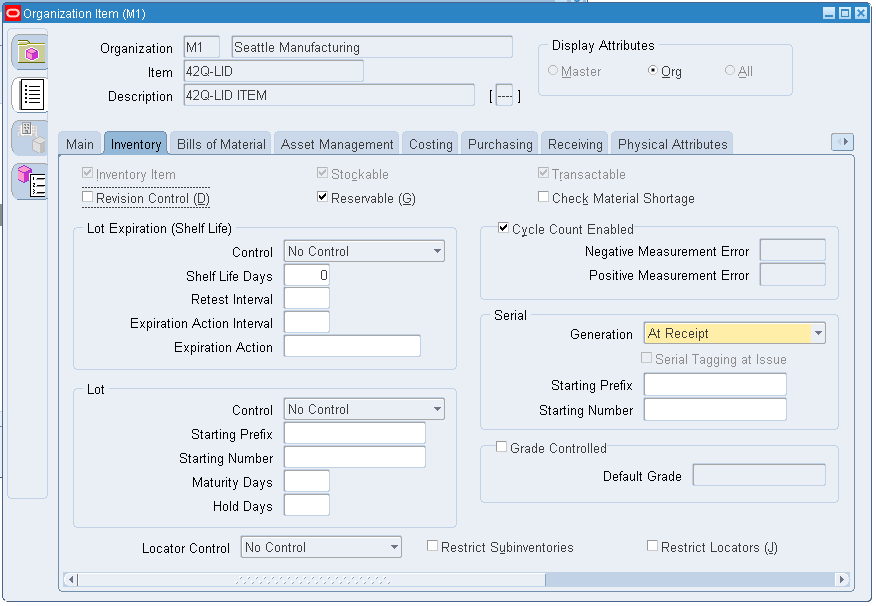
COMPONENT_PART_ATTRIBUTE
- It contains the fields that are available in the Organization item form for each component used in the work order.
- To access navigate to Inventory > Items > Organization Items
- Enter the Component Item, and click Find.
Figure 6: Inventory tab
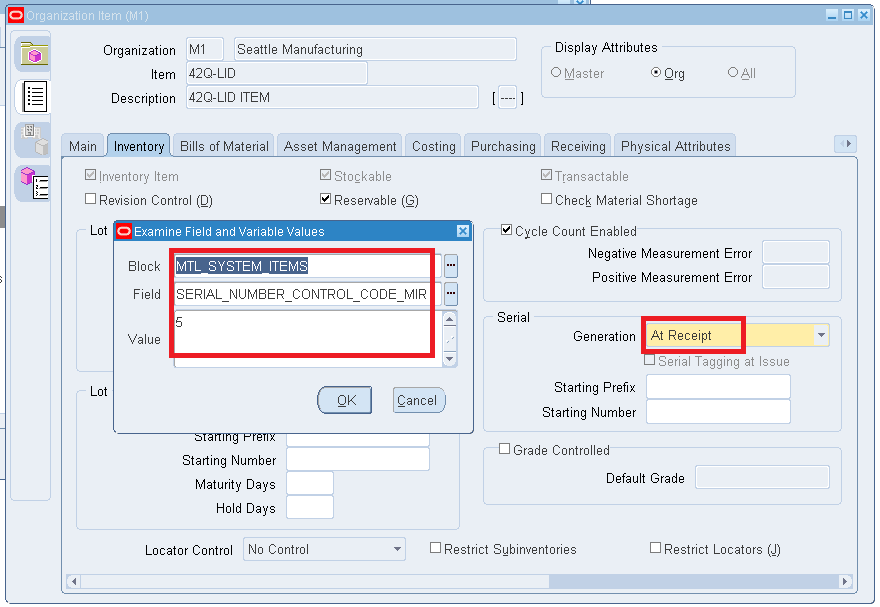
4. To find the Field name and value for all the forms, Select the field and navigate to Help > Diagnostics > Examine.
Figure 7: Examine the Field name and Value
HANDS_ON_TIME
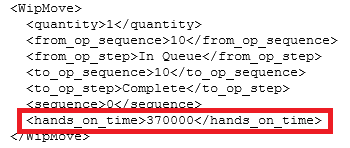
- This attribute mapping is used to select the HANDS_ON_TIME from XML and post it in the mapped resources for each operation.
- HANDS_ON_TIME in the Lookup form consists of Organization, Operations, and Resources which are displayed in the Plant, Custom Attribute Name, and Attribute Value fields.
Figure 8: 42Q Attribute Lookup Form
3. While the 42Q performs WIP moves, each operation contains different resources.
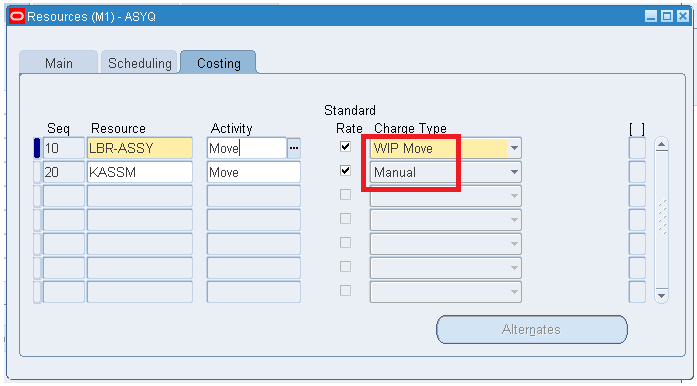
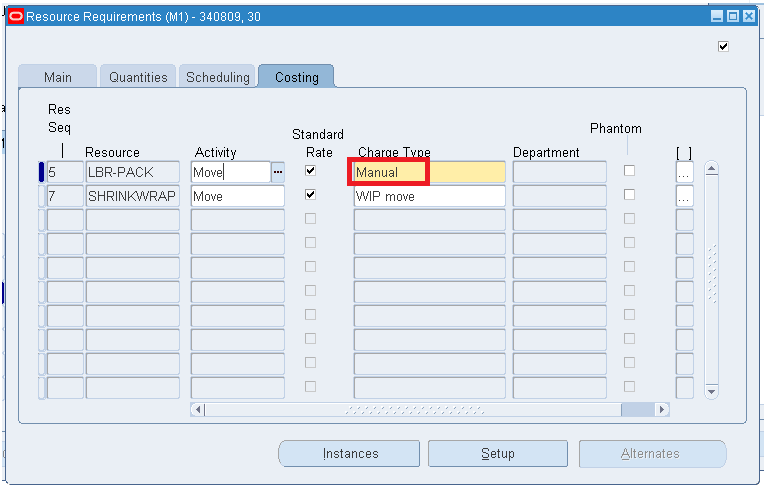
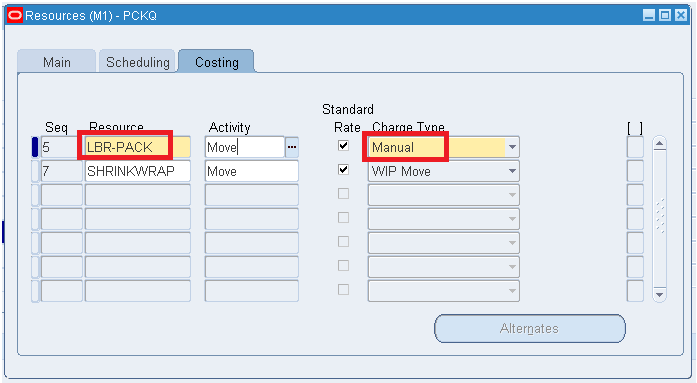
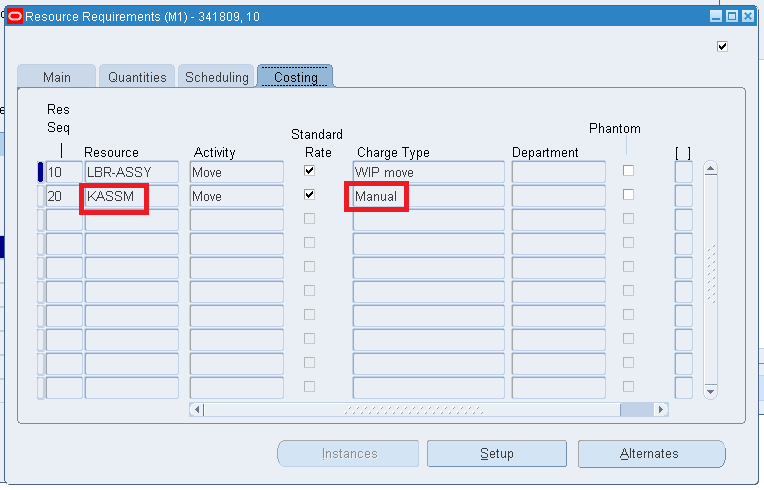
4. The HANDS_ON_TIME value of the resources has been updated based on two charge types: Wip Move and Manual.
- If the Charge type is WipMove, no action will occur from the adapter. The oracle will post the standard WO resource value. To access, navigate to Manufacturing Manager> Bill of Materials > Routing > Standard Operations > Click the form button Operation Resources.
Figure 10: WIP Charge type
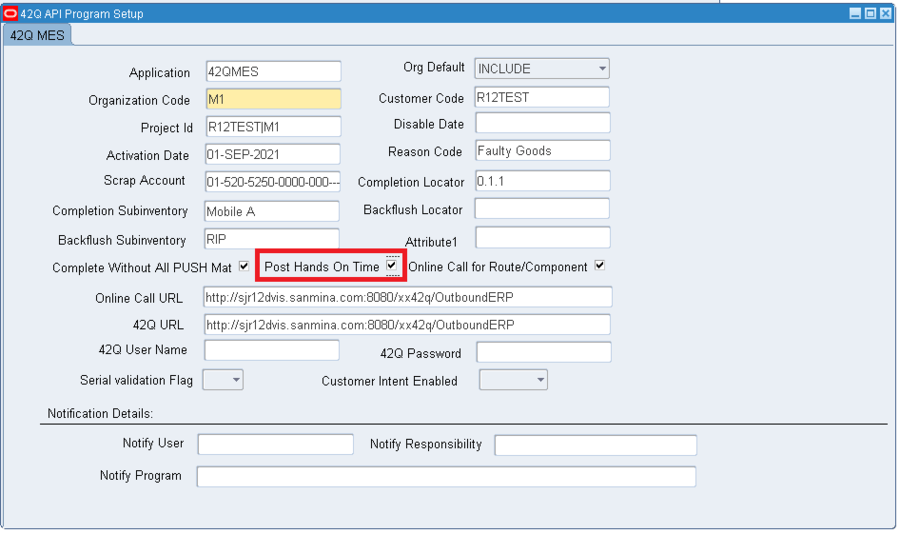
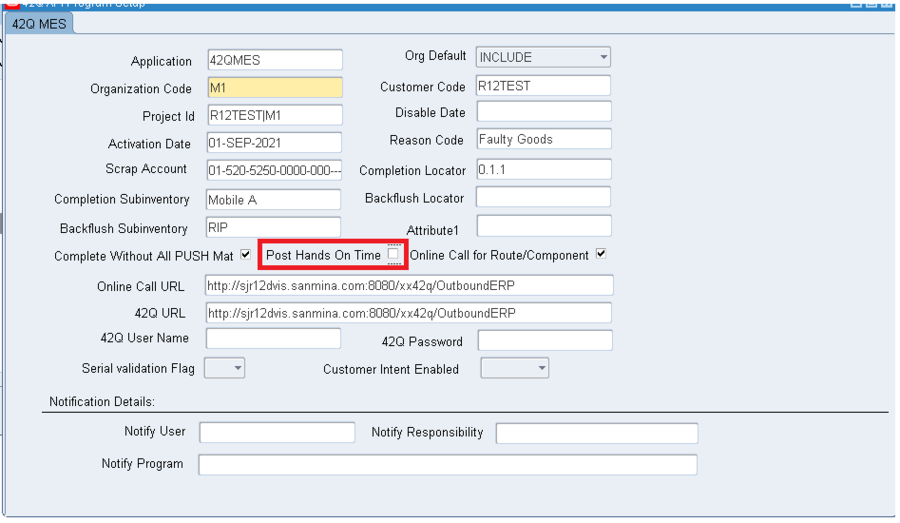
- If the Charge type is Manual, the adapter will check for the toggle ‘Post Hands on Time’ in the 42Q API Program default form.
Figure 11: Post Hands on Time
If ‘Post Hands on Time’ is enabled, the adapter will check whether the resources are mapped in the lookup form.
Figure 12: 42Q Attribute Lookup form
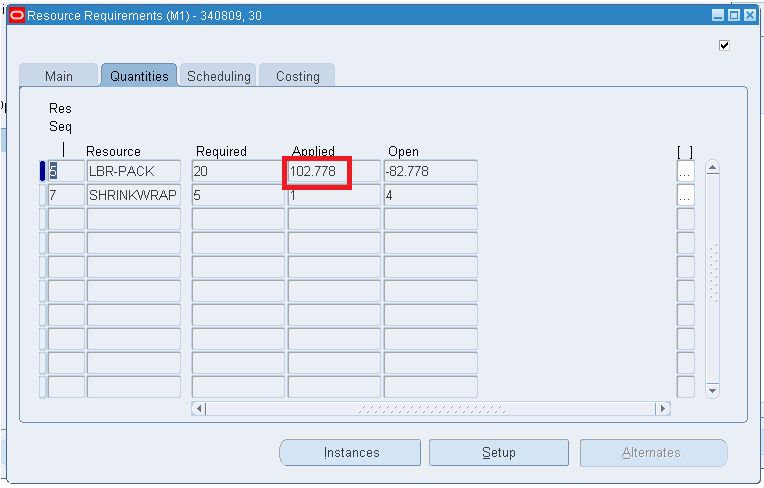
The HANDS_ON_TIME value from 42Q will be updated in the WO resource field, only for the mapped resources.
Figure 13: Costing Tab
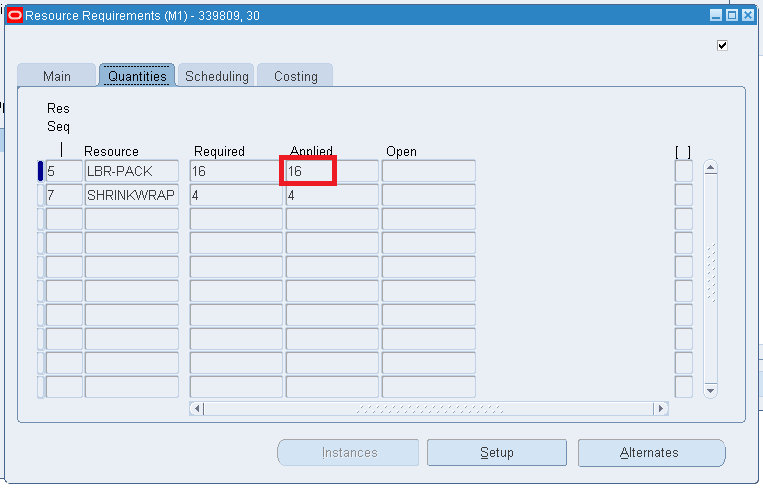
Figure 14: Quantities Tab
The HANDS_ON_TIME value from the WipMove XML will be converted from seconds to hours and posted in the resource field.
If the resources are not mapped in the lookup form, then the standard resource value will be updated in the WO.
Figure 15: 42Q Attribute Lookup form
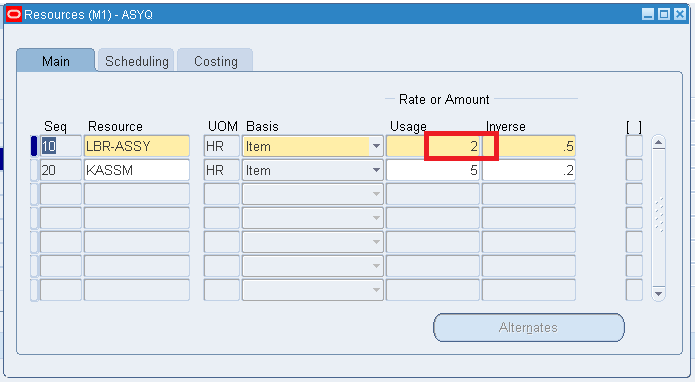
To access, navigate to Manufacturing Manager> Bill of Materials > Routing > Standard Operations > Click the form button Operation Resources.
Figure 16: Manual Charge Type
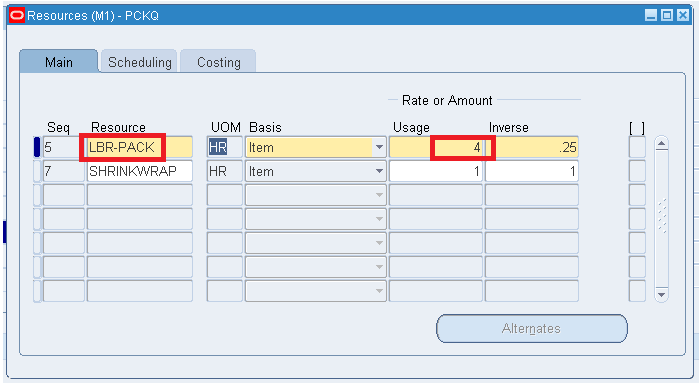
Figure 17: Main Tab
In the WO Resource field
Figure 18: Main Tab Setup
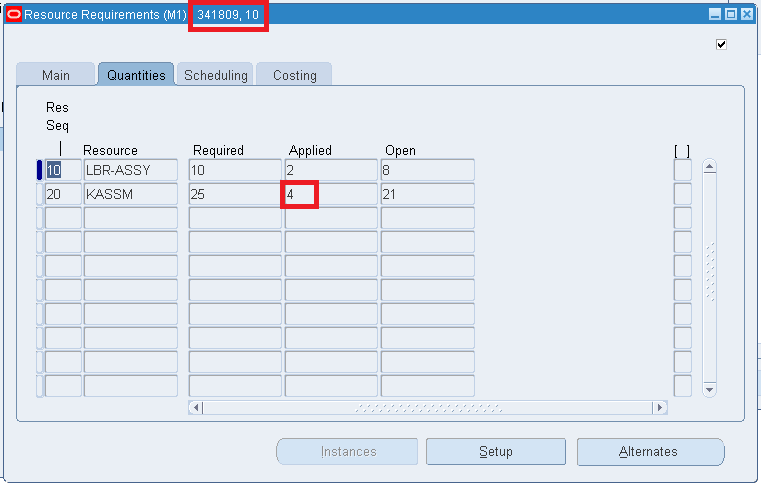
Figure 19: Quantities Tab
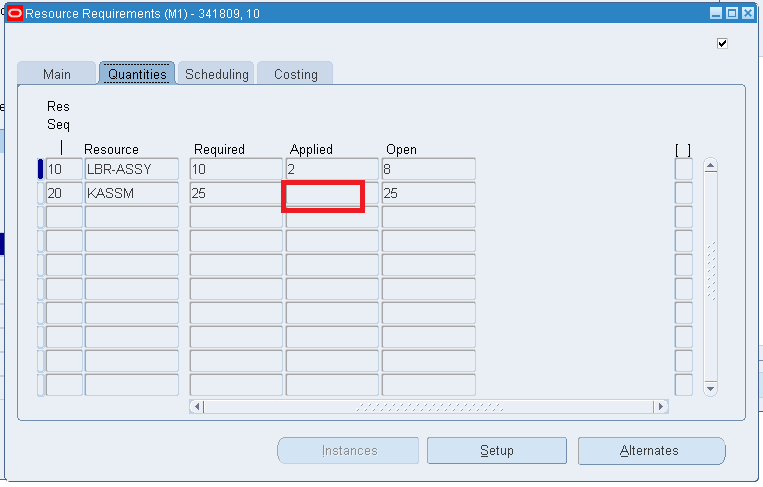
If ‘Post Hands on time’ is not enabled, users should manually enter the resource value. Thus, no action will be taken by the adapter for the ‘HANDS_ON_TIME’ sent from the 42Q WIP move.
Figure 20: Post Hands on time check box
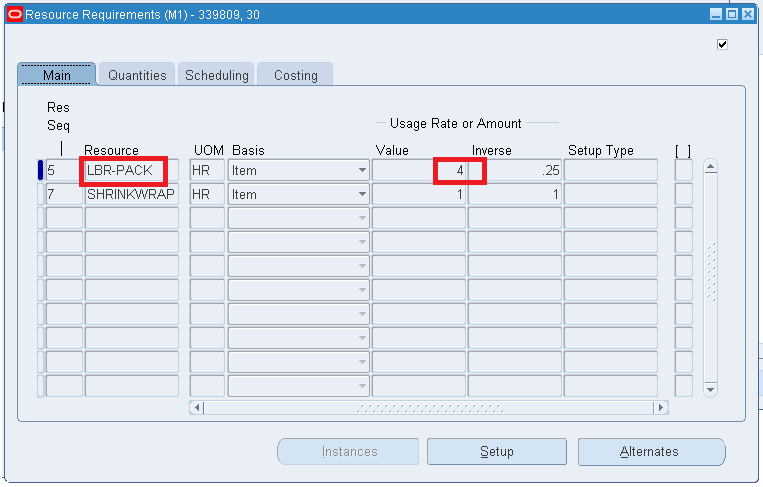
Before entering the values manually,
Figure 21: Resource Requirement Coasting Tab
Figure 22: Resource Requirement Quantities Tab
Enter the values manually for resources
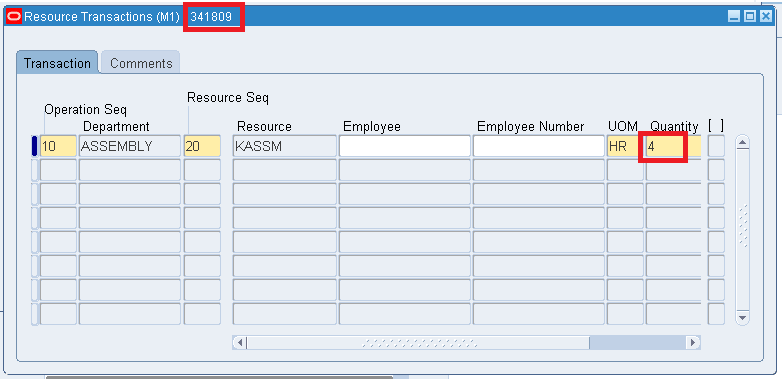
To access, navigate to Order Management Super User, Vision Operations(USA) > WIP> Resource Transactions.
Figure 23: Transaction Tab
In the WO Resources:
Figure 24: Resource Requirement Quantities Tab
42Q API Program Defaults Form
- The 42Q URL field is used to send each outbound transaction from Oracle.
- After the WO creation, the preliminary validation will happen in the table XX42Q_MDSWIP_DEFAULT_PARAMS by using fields such as Org ID, Application, and Project ID.
- Only after the preliminary validation, the adapter will allow inbound and outbound transactions.
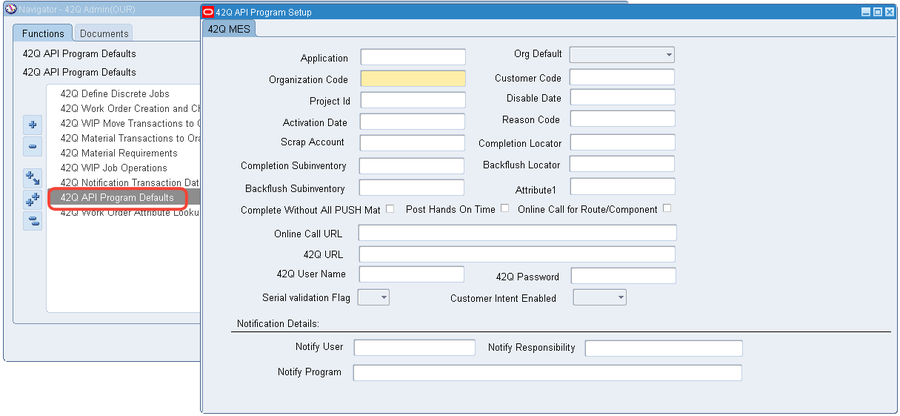
- To access, navigate to 42Q Admin(OUR) > 42Q API Program Defaults.
Figure 25: 42Q API Program Defaults Form
|
|
|
|
|
|
|
|
|
|
|
|
|
|
|
|
|
|
|
|
|
|
|
|
|
|
|
|
|
|
|
|
|
|
|
|
|
|
|
|
|
|
|
|
|
|
|
|
|
|
|
|
|
|
|
|
|
|
|
|
|
|
|
|
|
|
|
|
|
|
|
|
|
|
|
|
|
|
|
|
|
|
|
|
|
|
|
|
Schedule Concurrent Managers
This action is intended for Oracle DBA/SysAdmin only, once this option is selected, follow the next steps:
Setting up of XX42Q concurrent managers
- Navigate to Inventory > Setup > Transactions > Interface Managers
Figure 26: Navigation to Interface Managers
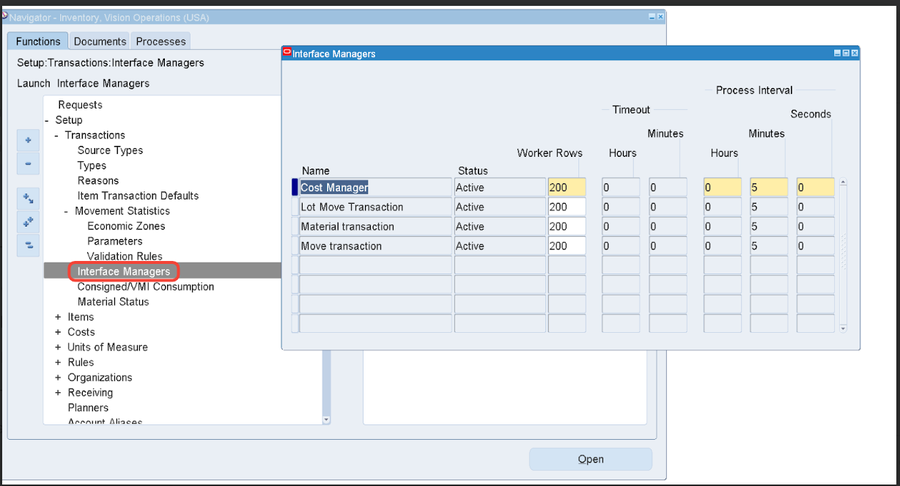
2. Select Material Transaction > Tools
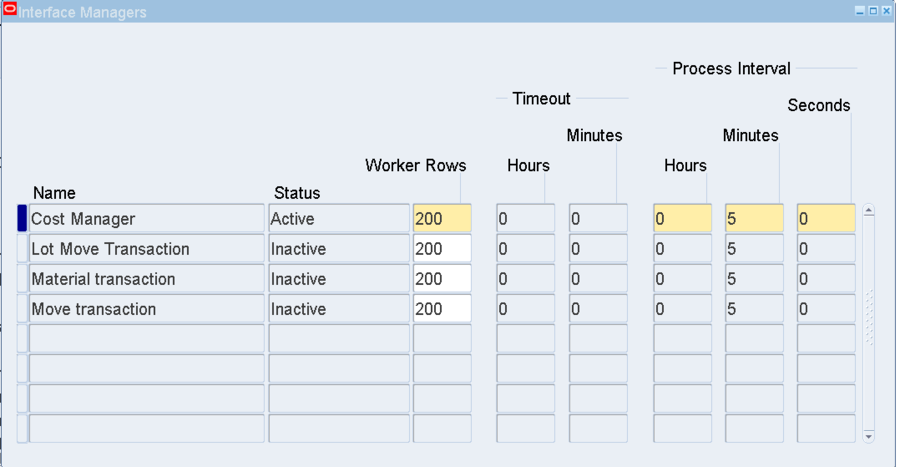
3. Ensure the below Managers are active.
Figure 27: Interface Managers
Schedule the below Concurrent programs from 42Q Admin(OUR)
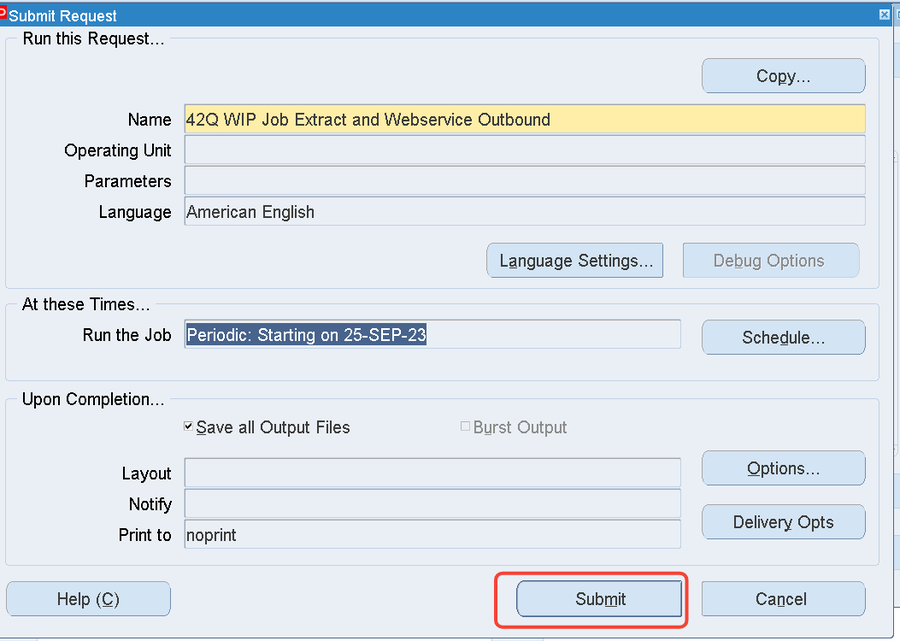
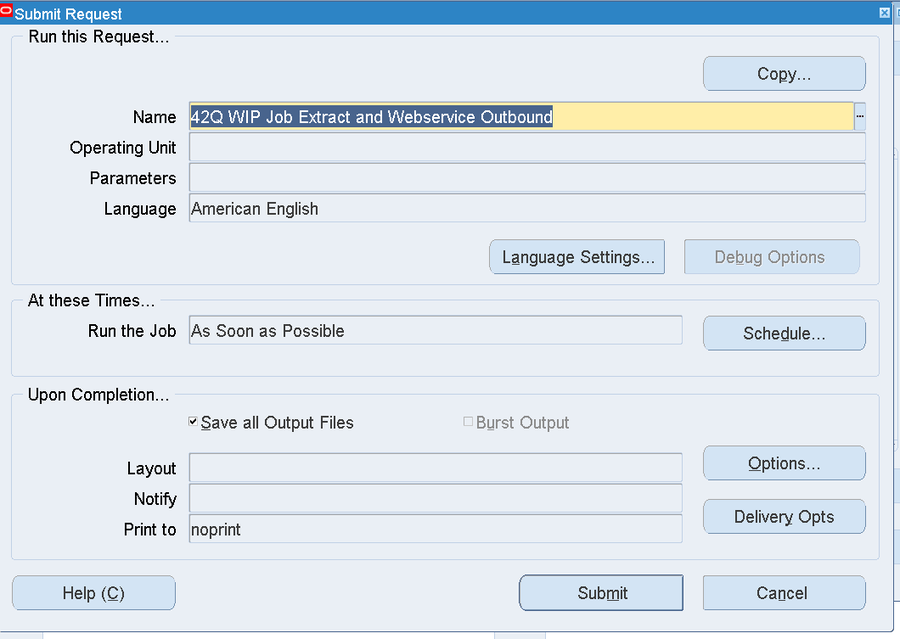
- 42Q WIP Job Extract and Webservice Outbound
- 42Q Shipment Notification Extract and Webservice Outbound
- 42Q WIP Move and Material Issue Inbound Processing with ACK
Scheduling the Concurrent Programs
- Navigate to the respective responsibility where the concurrent program is to be scheduled exists.
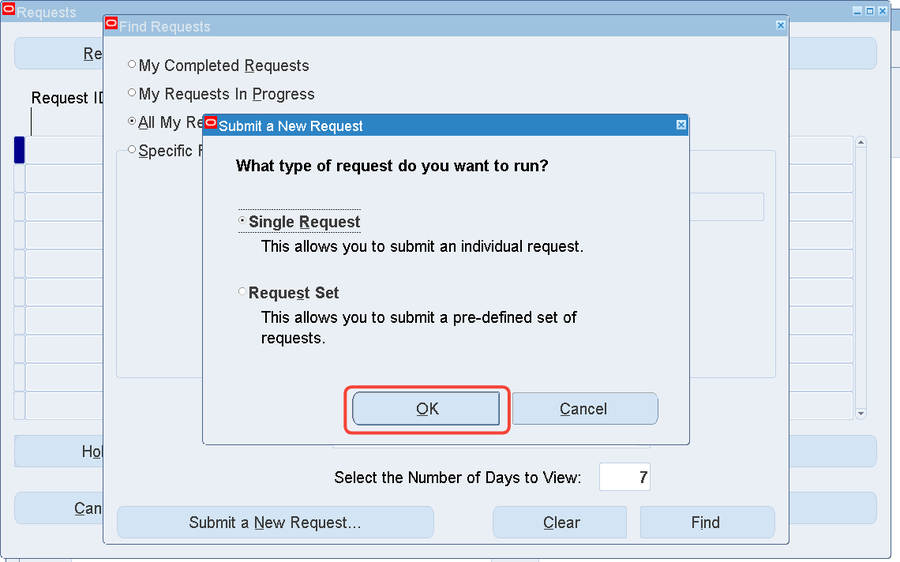
- Then, navigate to View > Requests and click on Submit a New Request
Figure 28: Submitting a New Request
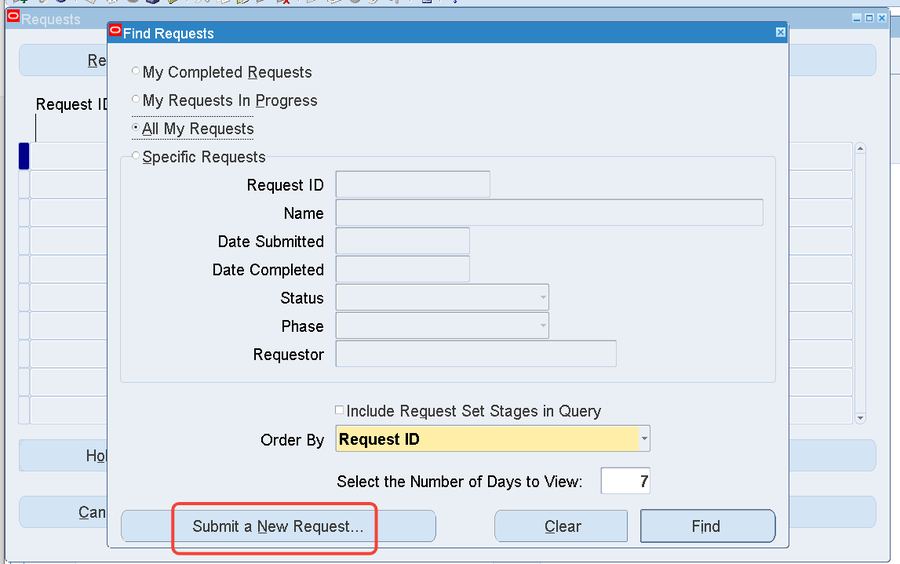
Figure 29: New request confirmation
3. Enter the concurrent program name to be scheduled and the respective parameters and click Schedule.
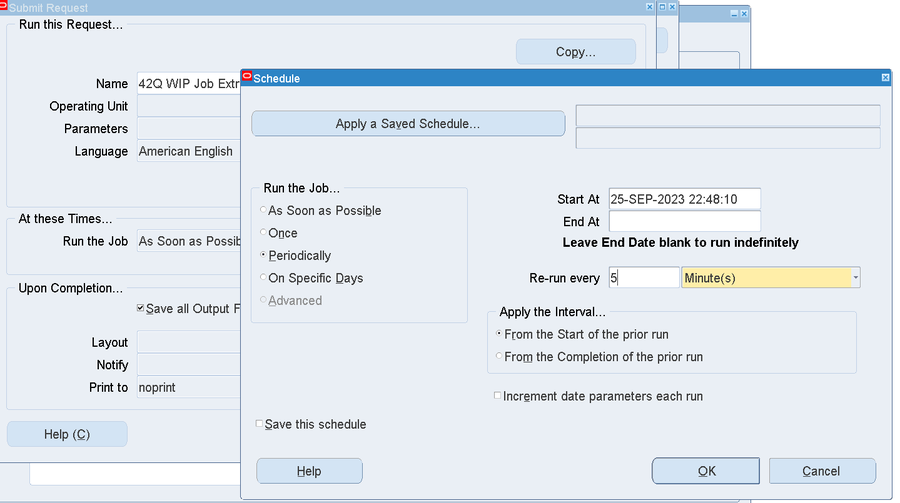
4. A Schedule window will appear.
Figure 31: Schedule Window
5. The user has to specify the interval/frequency that requires the program to run and click OK.
6. Then, Click on the Submit.
Figure 32: Submit the schedule
