How to Multiscan in Production Workbench
Contents
Summary
Multi Scanning functionality, featured in Production Workbench, allows users to scan a batch of serial numbers at one common use.
Users use multiscan to quickly scan multiple barcodes or groups of codes. With multiscan, users can also input information for their assets faster than manual entry or just doing individual scans.
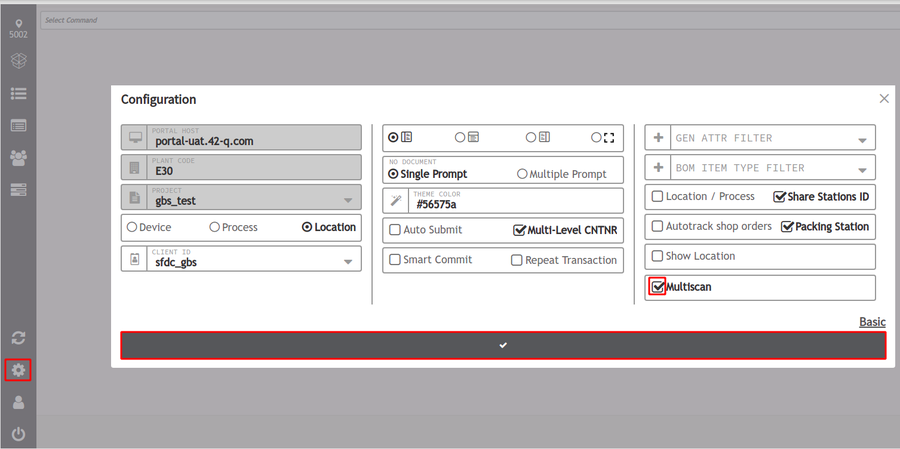
Before the functionality of multi-scanning can be used, the feature must be enabled beforehand using the Configuration tool located within the side toolbar of Production Workbench.
How to enable Multiscanning
- To enable this functionality, click on the Configuration icon.
- Select Advance to continue on to another configuration section.
- Check the Multiscan checkbox.
- Click the check to save the changes.
Figure 1: Configuration Tool
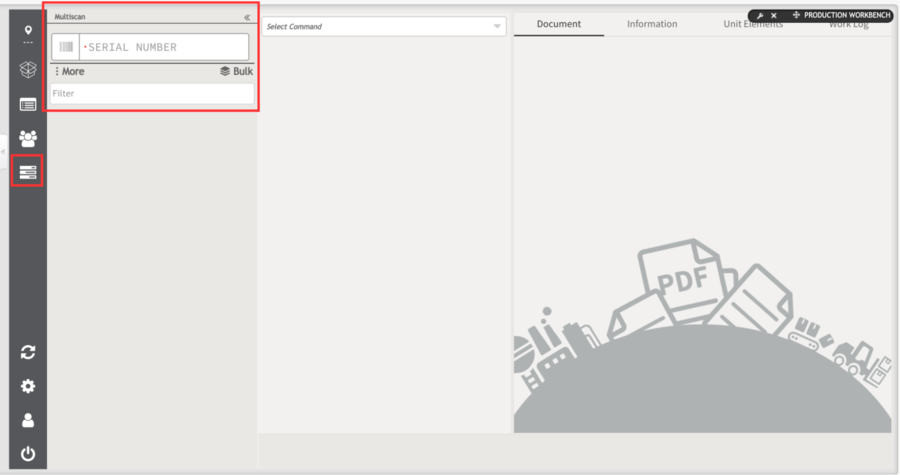
Once the feature is activated, the inputs for scan units will be replaced with a new panel that can be opened on the vertical icon bar.
- Click the checkbox for the Multi-Scan icon to open the interface.
Multiscan Icon will look exactly like the icon presented on the screen below.
Figure 2: Multiscan Icon
MultiScan Input Page
- Click on the Multiscan Icon located in the side toolbar to open the MultiScan serial number page.
Figure 3: Multiscan Input Page
Within the Multiscan section, users have the option in the serial number input field to scan a serial number by typing, or the mobile scanning functionality.
- Click within the Serial Number input box.
- Insert orscan the serial number desired.
- Press the “Enter” key.
Multi Scanning Tools
Figure 4: Multi Scanning Tools
The panel presented on the previous screen each account for a different component :
A. Serial Number Input: The serial number input is used to scan with this barcode icon, which incorporates the scandit functionality to use device cameras.
B. “More” Button: The more button allows users to expand the upper input panel and preview the complete input form.
C. Filter: The filter input box can be used over the elements that are already scanned. It can also be used to look for a specific serial number.
D. “Bulk” Button: The bulk button allows users to add multiple serial numbers at a time.
How to scan a single serial umber
There are multiple ways to scan or add the serial number(s) to the Production Workbench system.
Some of the ways that serial numbers can be added are by 'scanning and/or entering' a single serial number.
Below are listed other multiple ways that users can add serial numbers to the system :
- Using the Inputs: Scan inputs in the input box with the necessary information to retrieve a serial number and press the enter key.
Figure 5: Single Scanning Inputs
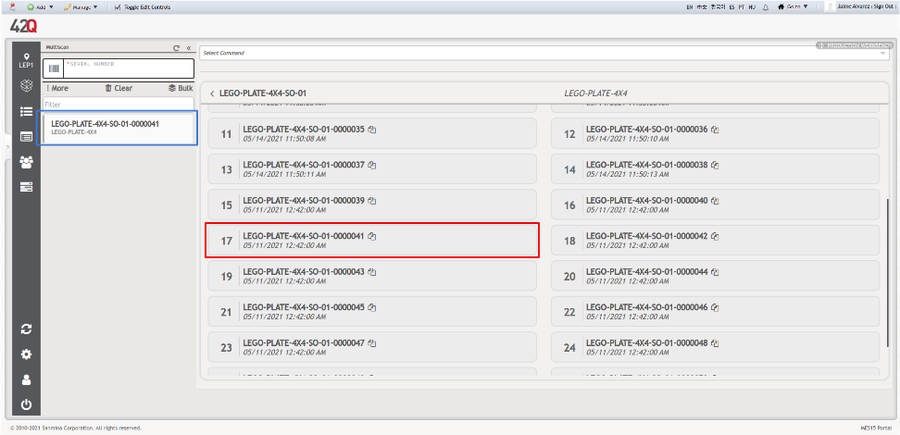
Once the serial number is inserted in the input box, the information can then be retrieved from Conduit and added onto the new card within the panel.
Figure 6: Multiscan Panel
- Shop Order Scheduling: if the shop order scheduling panel is available, the operator could click on an element from this panel, it could be a simple serial number or a Non-Serial Batch element.
Figure 7: Scheduling Panel
As the panel is not hidden after the user scans a serial element. The operators could continue to select elements as long as they desire.
- By selecting a serial number from the labor tracking panel: If the operator opens the labor tracking panel and there are serial numbers available to scan, the operator could select one and there will be two scenarios after the scan:
- If the serial number already exists on the multiscan elements, the serial number will be selected to focus on it.
- If the serial number does not exist on the multiscan elements, the current elements of the multiscan panel will be removed and the selected serial will be scanned.
Figure 8: Labor Tracking Panel - 1
How to scan Bulk of Serial Numbers
Figure 9: Labor Tracking Panel - 2
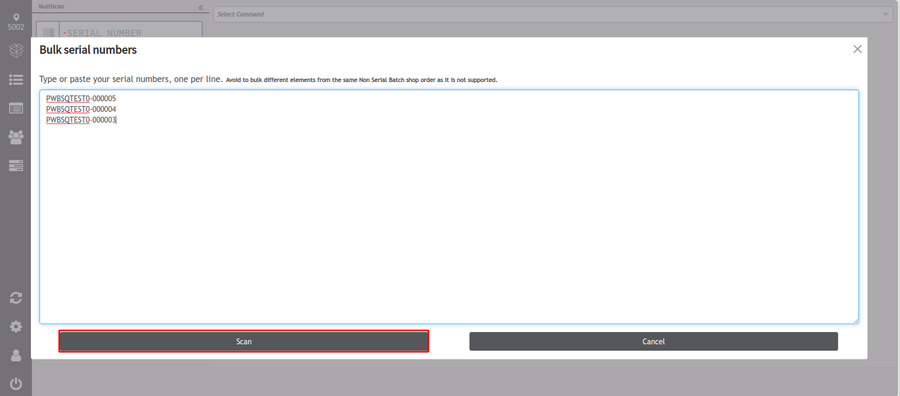
By Bulk Scan: Users can add multiple serial numbers at a time by clicking on the “Bulk” button.
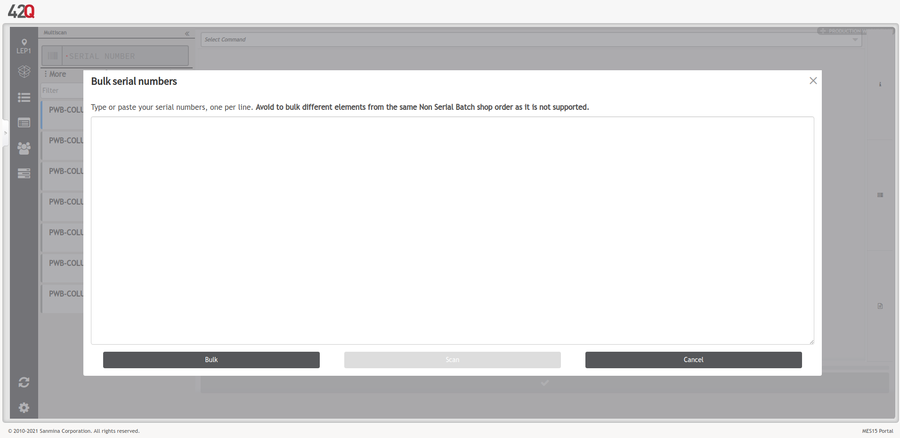
- Select the Bulk option, and a pop-up window will appear.
- Enter the serial numbers(one per line).
- Click the Scan button to scan all the serial numbers, or click the Cancel button to abort.
Figure 10: Bulk Insert Box
The system will retrieve the information of each serial number, and all serial numbers will be listed.
By Bulk: The operators will open the Bulk modal the same as in the previous model but this time they will press the “Bulk” button instead.
Figure 11: Bulk Scanning
Note: In Bulk elements; autocommands, command templates, documents, and attribute decoration will not be available.
Figure 12: Bulk Serial Numbers
Note: Multiple scanning and bulk can not be mixed so whenever one of them is used the other will be unavailable. The previous image is an example of the use of bulk.
Apply to All/ Override Commands
Along with the ability to Multiscan, users also have the ability to use the “Apply to All” and “Override” commands to every serial number listed within the panel.
Figure 13: Apply to All/Override
The “Apply to all” feature is activated by default in every command once the user unchecks the box. This will allow users and/or operators to apply a command to a specific serial number(s).
To disable the “Apply to all” feature :
- Select desired serial number.
- Uncheck the Apply to all checkbox.
The“Apply to all” feature is not available for command templates, autocommands, or defined attributes.
The“Override” feature enables the user the ability to fill out the command with different information for a serial number, as long as this option is enabled. When this option is disabled, it will mean that whenever a command from the command template and/or autocommands matches between the serial the information will be filled out for all by filling out the information for one.
Split Non-Serial Batches
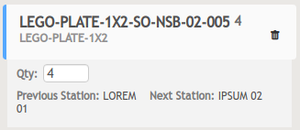
When a unit of type 7 or 8 is scanned, a number will be included right to the serial number in the card, indicating the quantity of serials that this batch contains.
Figure 14: Non-Serial Batch QTY 4
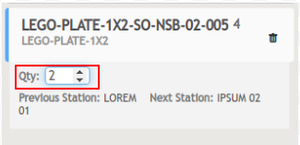
Additional to this; in the extra information panel, an input for the quantity will be displayed in order to let the operator to change the number of serials and split this batch.
Figure 15: Non-Serial Batch QTY 2
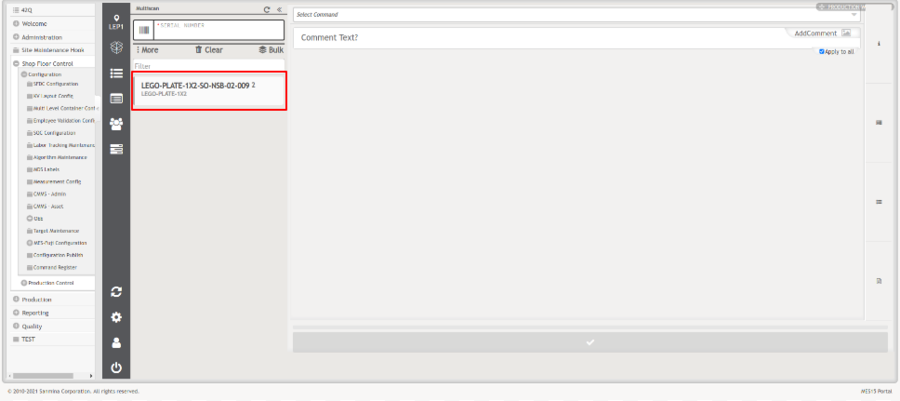
Once the user changes the quantity for a valid one and types enter, the current serial will be removed and the new one will be scanned.
Figure 16: Non-Serial Batch New Scan
Errors
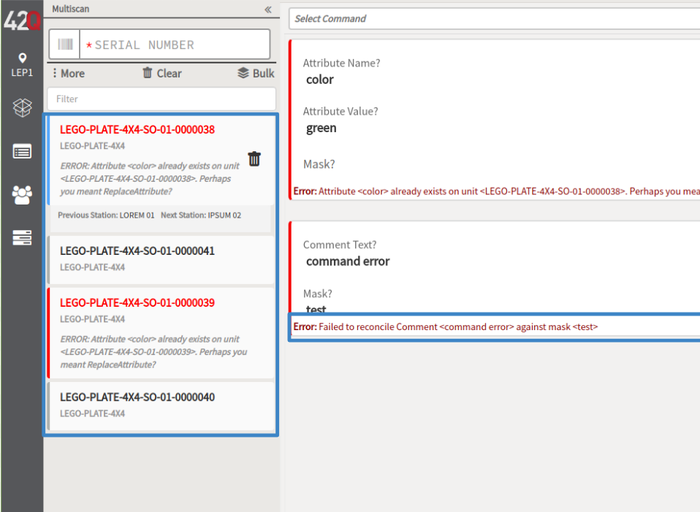
If a user submits something to the conduit database and it fails, every error will be displayed on the corresponding command. Additionally, every card corresponding to a serial that has failed will change border color. Any error message that corresponds to the first error found will be displayed at the bottom of the card.
Figure 17: Error Messages
When the user modifies a command that contains an error, the error will be removed from the command and the serial card but if a serial card contains another error, the next error will be displayed on the card.
