How to access PanaCIM traced data in MESWeb
Contents
Summary
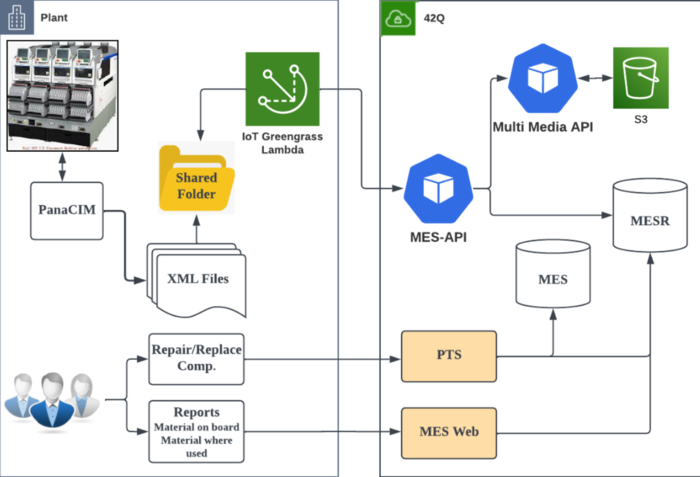
42Q MES has the ability to import PanaCIM Traceability data into 42Q via MESWeb. To do so, users must configure an Edge Device to upload XML documents generated by the Panasonic server to PTSR (via MES-API) and then, formulate MESWeb reports that may be searched and accessed. There are three different kinds of PTSR reports to be consulted:
- Material on Board
- Material on Board by Batch
- Material Where Used
Figure 1: PanaCIM Traceability
Previous configurations
Previous to install and configure a File Uploader Edge Device, ask help to the support team to perform the following three configurations:
- Server information configuration for Multimedia, CMMS, and MES-API (For detailed information, please refer to the SOP Server Maintenance)
- Tenant configuration with the tenant type Plant
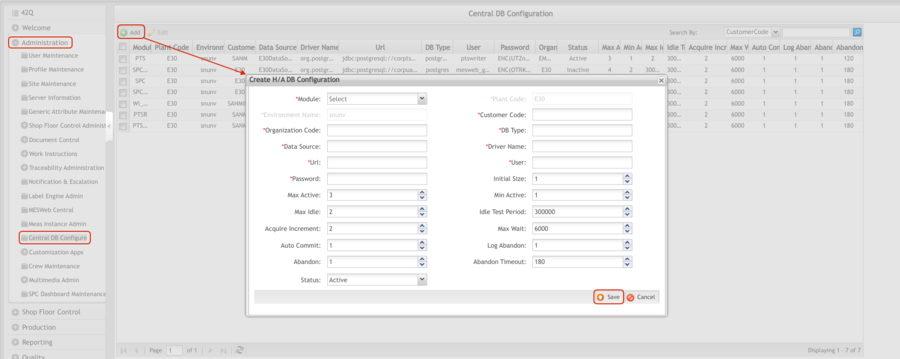
- PTSR DB in the Central DB Configure module. For PTSR DB Configuration, please ask help to the support team to perform the following steps:
- Navigate to Administration > Central DB Configure.
- Select the Add button. The Create H/A DB Configuration window will be displayed.
- Input the required information. Fields with a red asterisk are mandatory.
- Select Save to proceed or Cancel to quit.
Figure 2: Create H/A DB Configuration
How to install and configure a File Uploader Edge Device
- Download fileUploader.sh and smb.config and save them in one folder.
Figure 2: Saved Folders
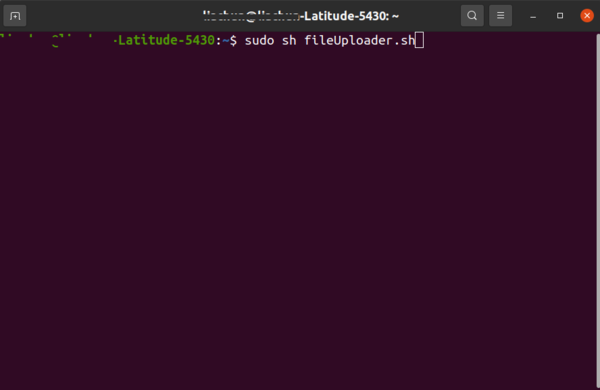
- Open the terminal, execute the command sudo sh fileUploader.sh and press Enter.
Figure 3: Opened Terminal
File Upload edge device creation or update
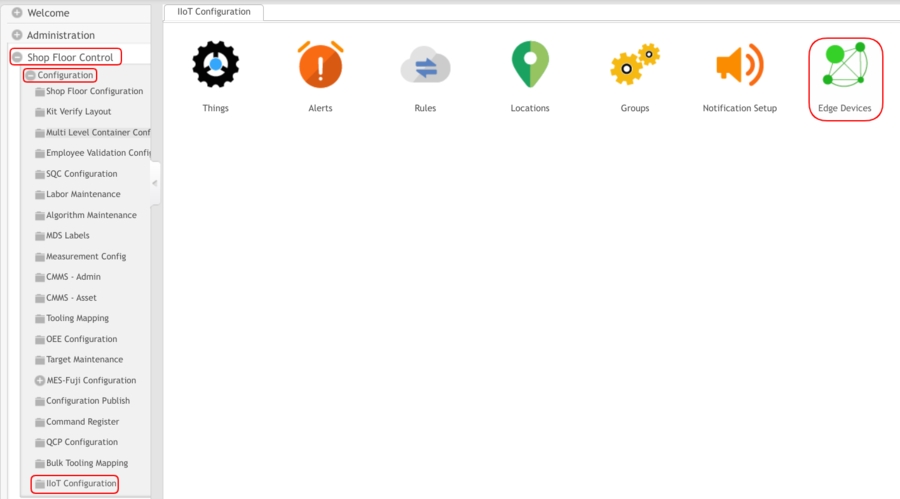
- Access to 42Q portal and navigate to Shop Floor Control > Configuration > IIoT Configuration (first time to install).
- Select the Edge Devices icon from the panel.
Figure 4: IIoT Configuration Menu
- Then, select the CREATE EDGE DEVICE button, located at the top right of the panel. The Create Edge Device window will be displayed.
Figure 5: Create Edge Device Button
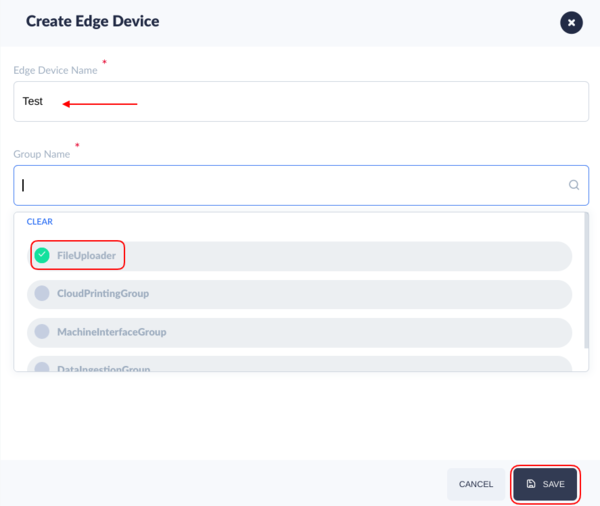
- Write down an Edge Device Name.
- Select the option “FileUploader” from the Group Name drop-down list.
- Click SAVE to proceed or CANCEL to quit.
Figure 6: Create Edge Device
A success message will appear after the creation of the edge device:
Figure 7: Create Edge Device Success Message
Edit Existing Edge Device
If there is an existing edge device, it can be added to a group, just follow the steps below:
- Check the corresponding box of the edge device to edit.
- Then, select the Edit icon located at the bottom of the list or at the end of the corresponding row. The Edge Device Info window will be displayed.
Figure 8: Edit Edge Device
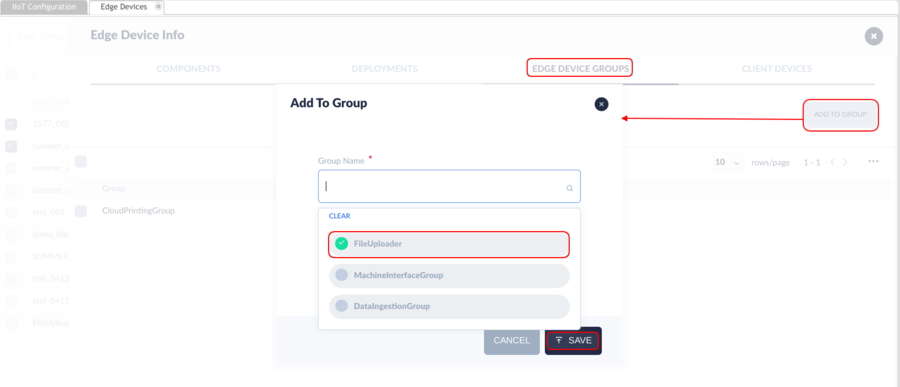
- Open the EDGE DEVICE GROUPS tab.
- Select the ADD TO GROUP button to display the corresponding window.
- Select “FileUploader” from the Group Name drop-down list.
- Click SAVE to proceed or CANCEL to quit.
Figure 9: Add To Group
Created Edge Device download and installation
Once a new edge device is created, it needs to be installed and configured in the computer, to establish a connection between the computer (device) and the 42Q portal to send the XML files data. To do so:
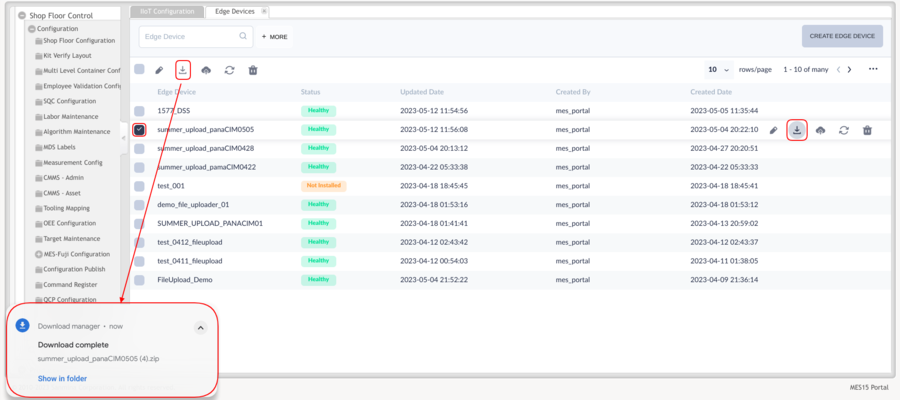
- Check the corresponding box of the edge device that will download.
- Then, select the Download icon located at the bottom of the list or at the end of the corresponding row.
Figure 10: Download Edge Device
- Navigate to the Document folder of the computer to locate and unzip locally the Green Grass package file.
- Right-click on the ZIP file.
- Select “Extract Here” to unzip the file.
- Ask the 42Q MES Support team to provide you a Palindrome Client ID and Secret to access the MES-API and PTSR database.
- To edit core_config.json, add Client Id and Secret as below. The other parameters do not need to be changed.
Figure 11: Edit core_config.json
Note: The existing Edge Devices do not need to be installed again. If an existing one is used, please stop Green Grass by the command: sudo systemctl stop greengrass.service
How to install a PanaCIM XML file
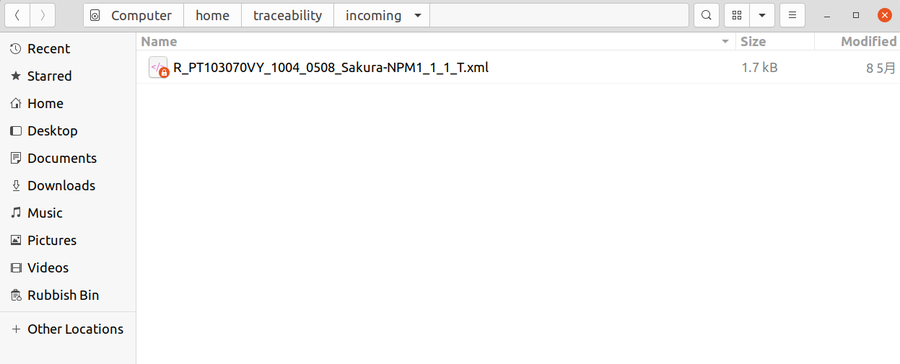
- Open the Document folder of your computer.
- Copy a selected XML file.
- Then, paste the selected file into the corresponding Traceability folder.
Figure 12: Traceability Folder
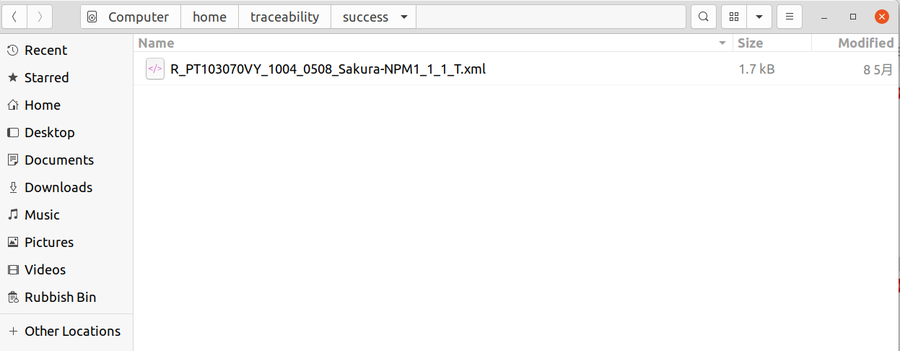
- Once the XML file is uploaded successfully, Check the Success folder.
Figure 13: Success Folder
How to access PTSR reports
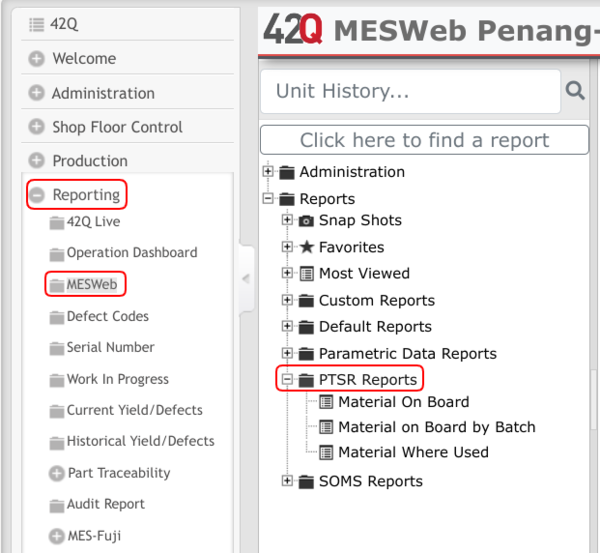
- Navigate to: Reporting > MESWeb > PTSR Reports.
Figure 14: PTSR Reports Menu
How to access PTSR Material On Board reports
- Display the Material On Board report fields by selecting the option from the PTS drop-down menu. The data source will appear by default.
- Enter the information of a Board Bar Code as this field is mandatory.
There are other optional fields that will detail more of the displayed information.
- Select the GO'button.
- The information will appear on the right side of the panel.
Figure 15: Material On Board PTSR Reports
How to access PTSR Material On Board by Batch reports
Display the Material On Board by Batch report fields by selecting the option from the PTS Reports drop-down menu. The data source will appear by default.
- Enter one or more Board Serial Numbers (the limit is 50 entries).
- Select the GO button.
- The information will appear on the right side of the panel.
Figure 16: Material on Board by Batch PTSR Reports
How to access PTSR Material Where Used reports
- Display the Material Where Used report fields by selecting this option from the PTS reports drop-down menu. The data source will appear by default.
- Optionally, enter the information of a Component Barcode and/or a Component Part Number.
- Select a date range.
- Click the GO button.
- The information will appear on the right side of the panel.
Figure 17: Material Where Used PTSR Reports
