SOP-42Q-MES0153 Solder Paste Material Control
42Q Home > Production > Solder Paste Material Control
Introduction
Solder Paste is an application able to help plants to control the storage and use of Solder Paste materials to avoid human errors and lapses. The project has the standard process and creates error-proofing of Solder Paste control, to ensure plants comply with the varying Solder Paste part number’s storage life and use life limits, and ensuring a constant environment, to stop out-of-specs solder paste from being used in production.
This System provides a standard process that includes the following steps:
- Refrigeration In
- Refrigeration Out
- Thaw Start
- Thaw End
- Stirring
- Open Jar
- Load Solder-Paste
- Unload Solder-Paste
- Scan board
- Solder-Paste Scrap
Also supplies reports for Solder Paste status view and Solder Paste tracking.
In order to avoid solder paste waste, the standard solder paste control process also applies to the First In First Out approach. This solder paste FIFO control is very flexible and it could be configured by the plant level. The Refrigerator & Thawing process applies this FIFO control by user pre-configuration in the system setting.
Configuration
Before starting the Solder Paste process, there are some system settings and material control to configure first;
The following are the detailed configurations:
- System Setting:
- Solder Paste Refrigeration/Thaw Process.
- Solder Paste Refrigeration/Thawing FIFO setting.
- Material Labeling: Generate/print solder paste barcode/PN
- Solder Paste Material Control: Set the control parameters of the solder paste material.
System Setting
There are switches in the System Setting function.
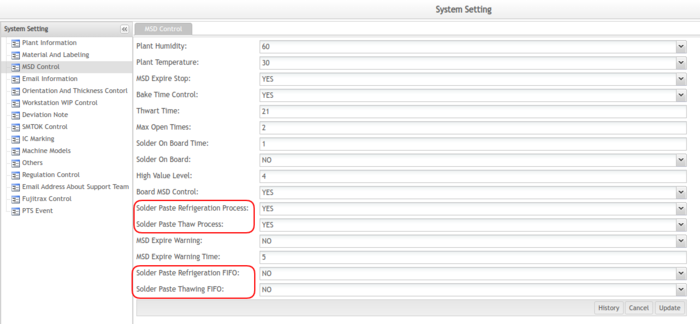
- Solder Paste Refrigeration Process: To define whether to control the solder paste refrigeration process.
- Solder Paste Thaw Process: To define whether to control the solder paste thawing process.
- Solder Paste Refrigeration FIFO: If the value of the item is YES then the Refrigeration FIFO(First In First Out) will be controlled.
- Solder Paste Thawing FIFO: If the value of the item is YES then the Thawing FIFO will be controlled.f
To set the switches, follow the steps below:
- Select Administration --> Traceability Administration --> System Setting.
- Select the MSD Control tab.
- Set the value of Solder Paste Refrigeration process, Solder Paste Thaw Process, Solder Paste Refrigeration FIFO, Solder Paste Thawing FIFO.
- Click the Update button.
Figure 1: System Setting - Solder On Board
- If the switch ‘Solder Paste Refrigeration/Thaw Process’ is opened (Yes) then all solder paste Refrigeration/Thaw related functions (steps) can be used normally ( the pages show, and can edit).
- If the switch ‘Solder Paste Refrigeration/Thaw Process’ is closed (No) then all solder paste Refrigeration/Thaw related functions (steps) can not be used ( the pages show, but can not edit).
Material labeling
Material Labeling is the function of printing material barcodes.
Note: There is one interface to import materials into the 42Q Solder Paste database for some plants that do not use this material labeling function to generate material barcodes.
- Select Shop Floor Control--> Incoming Traceability --> Material Labeling.
- Select the Receipt Traveler No./ Number, press Enter key.
- Set the values of the material.
- Click the Submit button.
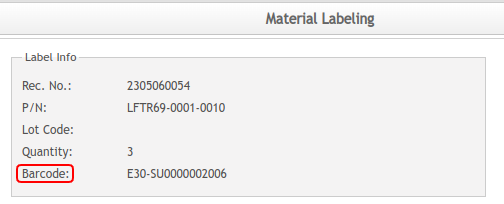
- The material barcode will be generated and the label printed successfully.
Figure 2: Material Barcode
Solder Paste Material Control
Solder Paste Material Control is the function that users can set or configure the Solder Paste material, such as Storage Temperature, Min storage time, ambient humidity, and floor life, etc.
- Select Shop Floor Control--> Production Control --> Solder Paste Material Control.
- Select the Add/Edit/Delete to set the solder paste material control setting.
Figure 3: Solder Paste Material Control Main Page
Users can add, edit, and delete the Solder Paste material control settings.
Add Solder Paste Control
- Select the Add button to add one new Solder Paste control.
- Input the values of items.
- Click Save to submit the solder paste control.
- Or click Reset to clean all the text fields.
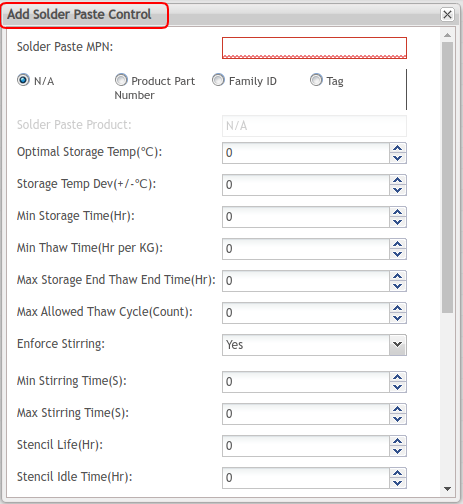
Figure 4: Add Solder Paste Control
- Solder Paste MPN: The manufacturer Part Number of Solder Paste material. It can not be blank.
There are four levels of Solder Paste control.
- N/A
- Product Part Number
- Family ID
- Tag
For the same MPN (Manufacturer Part Number), the priority of the Solder Paste material control is; Production part number, tag, family ID, then N/A. That means the system will first use the Product/BOM part number level Solder Paste material control if it is blank, then use the Tag level Solder Paste material control, then use Family ID level solder paste material control, and to use the N/A level Solder Paste material control the last.
Following is the description of the priority.
| Priority | Type | Description | Comment |
|---|---|---|---|
| Pri(1) | Product Part Number | The product Part Number is the BOM Part Number.
This option means all the materials from this manufacturer part number (MPN) and in the Product/BOM part number use this solder paste material control setting. |
|
| Pri(2) | Tag | This option means all the materials from this manufacturer part number(MPN) and with this tag use this solder paste material control setting. | Tag must have been defined at MDS. |
| Pri(3) | Family ID | This option means all the materials from this manufacturer part number(MPN) and with this Family use this solder paste material control setting. | Family ID must have been defined at MDS. Users need to define the Conduit and Conduit_ShopFloorID
At server information module. |
| Pri(4) | N/A | This option means all the materials from this manufacturer Part Number(MPN) use this solder paste material control configuration/setting. |
|
If users select the radio button ‘Tag’, then there will be a text field item named ‘Tag’ and the values will show in a dropdown list.
Note: The Tag is maintained at Part Maintenance in Shop Floor Control configuration. Users need to define the Conduit and Conduit_ShopFloorID at the Server information module.
Figure 5: Server information example
- Optimal Storage Temp: The optimal storage temperature of the Solder Paste material.
- Storage Temp Dev(+/- ): Storage temperature deviation. This is the deviation temperature that can be upper or lower than the optimal storage temperature. If the real storage temperature for the Solder Paste material is not between (Optimal Storage Temp - Storage Temp Dev) and (Optimal Storage Temp + Storage Temp Dev), the system will pop up error information.
- Min Storage Time(Hr): The min time of the storage for the solder paste material. If the storage time is less than the mini-storage time, the system will pop up error information for it.
- Min Thaw Time(Hr per KG): The min time of the thaw for the solder paste material. If the thaw time is less than the mini thaw time, the system will pop up error information for it.
- Max Storage End Thaw End Time(Hr): This time is the max time of all the processes for the solder paste material. From refrigeration in, refrigeration out, thaw start, thaw end, open Jar, load material till to scan board.
- Max Allowed Thaw Cycle(Count): The max thaw times for the solder paste material. For example: if the max allowed thaw cycle set to 2, that means this solder paste material can have 2 thaw processes. If more than 2, the system will pop up with error information.
- Enforce Stirring: Yes/No.
- If set to Yes, the function Stirring (Production > 100% Traceability > Production Part Traceability > Touch Solder paste) is enabled. And if the solder paste material was not stirring, it cannot do the next process (open jar) directly.
- If set to No, The solder paste material no need to do the stirring process, can be the next process ( open jar) directly.
- Stencil Life(Hr): This time is the Solder Paste material that stays at the stencil. Once the Solder Paste material is loaded on the production line workstation, the system will start to count the time.
- Stencil Idle Max Tim(Hr): This time is to control the time between scanning two boards. The system will start to count time once the first board is scanned.
- Floor Life(Hr): The floor life of the Solder Paste material. The system will start to count the time when the material was opened (open jar).
- Shelf Life(Day): The shelf life of the Solder Paste material. The system will start to count the time when the material label generated (The create time of the material barcode).
- Ambient Humidity Low Limit(%): The lowest ambient humidity of the solder paste material.
- Ambient Humidity High Limit(%): The highest ambient humidity of the solder paste material.
- Ambient Temp Low Limit(%): The lowest ambient temperature of the solder paste material.
- Ambient Temp High Limit(%): The highest ambient temperature of the solder paste material.
Edit Solder Paste Control
- Select Shop Floor Control-->Solder Paste Material Control.
- Select one of the Solder Paste control records, then click the Edit button.
- Change the special values of Solder Paste control.
- Click the Save button.
Delete Solder Paste Control
- Select Shop Floor Control-->Solder Paste Material Control.
- Select one of the Solder Paste control records, then click the Delete button.
- It prompts a message to confirm the deletion.
- Click the Yes button to delete the selected Solder Paste control.
Standard process
Users can do the Solder Paste process through the Solder Paste Touch menu after the configurations are done. There are 6 submodules :
- Refrigeration In
- Refrigeration Out
- Thaw Start
- Thaw End
- Stirring
- Open Jar
- Solder-Paste Scrap
- Select Production--> 100% Traceability --> Production Part Traceability -->Touch(Solder Paste)
- The Solder Paste Touch App Navigator show.
Figure 6: Solder Paste Touch App Navigator Main Page
Refrigeration In
- Click Refrigeration In Icon
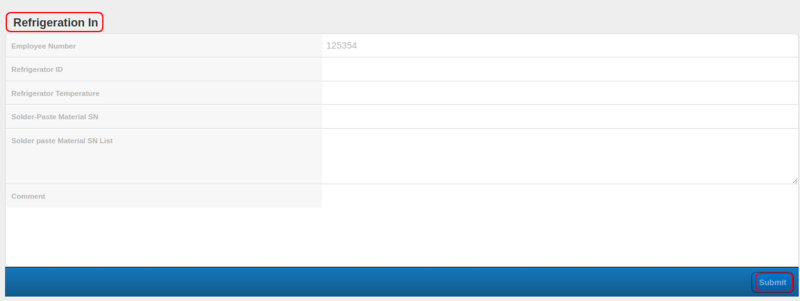
- Input Employee Number, Refrigerator ID,Refrigerator Temperature, Solder-Paste Material SN, then press Enter key
- Input Comment, then click Submit button
Figure 7: Refrigeration In
- Employee Number: The ID/number of employees, for the current version, this employee number is to call the login user information automatically. On the pad/Touch side, it can be used to scan the user code. Employee Number can not be empty and must be valid.
- Refrigeration ID: The number of the refrigeration. Refrigeration ID can not be empty and must be valid.
This refrigeration ID is an Asset ID managed by the CMMS system.
Note: In order to get/verify the refrigeration ID/Asset ID, users need to set the CMMS web server information at the system setting (Others > CMMS Web Service URL).
- Refrigeration Temperature: The temperature of refrigeration.
- Solder-Paste Material SN: The barcode of solder paste material.
- Solder Paste Material SN List: This application supports putting more than one solder paste materials in refrigeration at one time. Once users scan/input the solder paste material barcode at the Solder-Paste Material SN text field and press Enter key, the material barcode will show on this list line by line.
- Comment: Comment on the refrigeration in action.
Note:
- If the value of ‘Refrigerator Temperature’ for corresponding MPN is not between the value of ‘Optimal Storage Temp - Storage Temp Dev’ and ‘Optimal Storage Temp + Storage Temp Dev’ (Optimal Storage Temp and Storage Temp Dev can be configured in function ‘Solder Paste material Control’) then the system will prompt error message such as ‘Incorrect Storage Temperature’.
- If shelf time of current solder paste material is more than ‘Shelf-Life’ configured in function ‘Solder Paste material Control’ then the system will prompt error messages such as ‘Shelf Time Expired’.
- If the count of ‘Thaw Cycle’ is more than ‘Max Allowed Thaw Cycle’ configured in function ‘Solder Paste MPN Control’ then the system will prompt error messages such as ‘Count of Max Allowed Thaw Cycle is reached’.
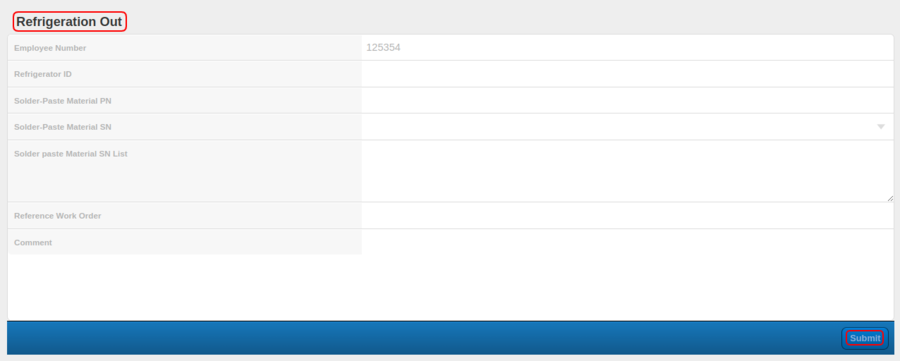
Refrigeration Out
- Click Refrigeration Out Icon
- Input Employee Number, Refrigerator ID, Solder-Paste Material PN, then press Enter key
- Input Reference Work Order, Comment, then click Submit button
Figure 8: Refrigeration Out
- Employee Number: The ID/number of employees, for the current version, this employee number is called the login user information automatically. On the pad/Touch side, it can be used to scan the user code. Employee Number can not be empty and must be valid.
- Refrigeration ID: The number of refrigeration can not be empty and must be valid.
This refrigeration ID is an Asset ID managed by the CMMS system.
Note: In order to get/verify the refrigeration ID/Asset ID, users need to set the CMMS web server information at the system setting (Others > CMMS Web Service URL).
- Refrigeration Temperature: The temperature of refrigeration.
- Solder-Paste Material PN: The part number of the solder paste material.
- Solder-Paste Material SN: The barcode of solder paste material.
- Solder Paste Material SN List: This application supports putting more than one solder paste materials out of refrigeration at one time. Once users scan/input solder paste material barcode at the Solder-Paste Material SN text field and press Enter key, the material barcode will show at this list line by line.
- Reference Work Order: The work order of the solder paste.
- Comment: Comment of the refrigeration in.
Note:
- ‘Employee Number’ ,‘Refrigerator ID’,‘Solder Paste Material PN’,‘Solder Paste Material SN’ can not be empty, and if the value is invalid, the system will pop up an error message.
- Reference Work Order can be null, if it is null, it will map to theN/A level solder paste control. If it is not Null,it must exist in the system. If the solder-paste material PN has been changed must input refrigerator ID first.
- Once users input the Refrigerator ID, all the Solder Paste in this refrigeration will list. The Part Number put in the refrigerator first will be in front. We recommend taking the first one (material PN) in order.
The system supports taking out more than 1 solder paste materials of the refrigeration at one time. Once users change the value of ‘Solder Paste Material PN’ (must input ‘Refrigerator ID’ first) then the further refrigeration in value of ‘Solder Paste Material SN’ can be displayed the first automatically according to the FIFO rule.
- The ‘Reference Work Order’ item can be empty. If this is empty, it will map to N/A level for the one Solder Paste MPN control.
- The ‘Reference Work Order’ item is related to the part configured in the ‘Solder Paste MPN Control’ function.
- If shelf time of current solder paste material is more than ‘Shelf-Life’ configured in function ‘Solder Paste MPN Control’ then the system will prompt an error message such as ‘Shelf Time Expired’.
- If the storage time of the current solder paste material in the refrigerator is less than ‘Min Storage Time’ configured in function ‘Solder Paste MPN Control’ then the system will prompt an error message such as ‘Not Reach Min Storage Time’.
- If the Solder Paste Refrigeration FIFO is ‘YES’, the solder paste was put into the same refrigerator earlier than that solder pastes with the same MPN will be allowed to take out from the same refrigerator. Otherwise, the system will prompt a warning message to remind the user to take out the earlier solder paste
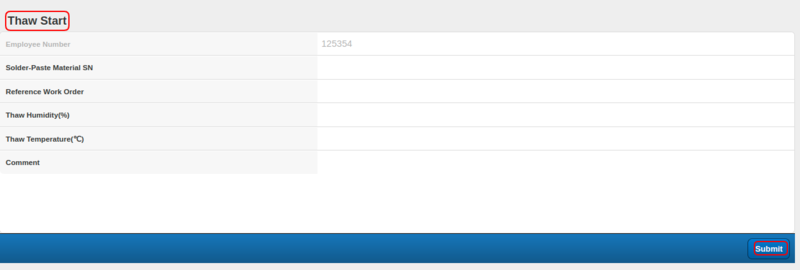
Thaw Start
- Click Thaw Start Icon
- Input Employee Number, Solder-Paste Material SN, then press Enter key
- Input/select Reference Work Order, Thaw Humidity ,Thaw Temperature, Comment, then click the Submit button.
Figure 9: Thaw Start
Note:
- ‘Employee Number’, ‘Solder Paste Material SN’ items can not be empty.
- The ‘Reference Work Order’ item can be empty.
- If the previous step (Refrigerator Out) has already mapped ‘Solder-Paste Material SN’ and ‘Reference Work Order’ then the value of ‘Reference Work Order’ will display automatically after the user completes inputting ‘Solder Paste Material SN’ item.
- If shelf time of current solder paste material is more than ‘Shelf-Life’ configured in function ‘Solder Paste MPN Control’ then the system will prompt an error message such as ‘Shelf Time Expired’.
- If the value of ‘Thaw Humidity’ is not between the value of ‘Ambient Humidity Low Limit’ and the value of ‘Ambient Humidity High Limit’ (Ambient Humidity Low Limit and Ambient Humidity High Limit can be configured in function ‘Solder Paste MPN Control’) then the system will prompt an error message such as ‘Incorrect Thaw Humidity’.
Thaw End
- Click Thaw End Icon
- Input Employee Number, Solder-Paste Material SN, then press Enter key
- Input/select Reference Work Order, Comment, then click the Submit button.
Figure 10: Thaw End
Note:
- ‘Employee Number’ ,‘Solder Paste Material SN’ can not be empty.
- The ‘Reference Work Order’ item can be empty.
- If the previous step has already mapped ‘Solder-Paste Material SN’ and ‘Reference Work Order’ then the value of ‘Reference Work Order’ will display automatically after users complete inputting ‘Solder Paste Material SN’ item.
- If the shelf time of the current solder paste material is more than‘Shelf-Life’ configured in function ‘Solder Paste MPN Control’ then the system will prompt an error message such as ‘Shelf Time Expired’.
- If the Thaw time of current Solder Paste material is less than ‘Min Thaw Time’ configured in function ‘Solder Paste MPN Control’ then the system will prompt an error message such as ‘Not Reach Min Thaw Time’.
- If the Solder Paste Thawing FIFO is ‘YES’, the solder paste that is taken out from (or put into) the same refrigerator earlier than the solder pastes with the sam MPN will be allowed to do the ‘Thaw End’ action, otherwise the system will prompt a warning message such as ‘It is not the correct FIFO solder paste’ to remind the user.
Stirring
- Click Stirring Icon
- Input Employee Number, Solder-Paste Material SN, then press Enter key
- Input/select Reference Work Order, Comment, then click Submit button.
Figure 12: Stirring
Note:
- ‘Solder Paste Material SN’ item can not be empty.
- The ‘Reference Work Order’ item can be empty.
- If the previous step has already mapped ‘Solder-Paste Material SN’ and ‘Reference Work Order’ then the value of ‘Reference Work Order’ will display automatically after the user completes inputting ‘Solder Paste Material SN’ item.
- If shelf time of current solder paste material is more than ‘Shelf-Life’ configured in function ‘Solder Paste MPN Control’ then the system will prompt an error message such as ‘Shelf Time Expired’.
Open Jar
- Click Open Jar Icon
- Input Employee Number, Solder-Paste Material SN, then press Enter key
- Input/select Reference Work Order, Comment, then click Submit button.
Figure 13: Open Jar
Note:
- ‘Solder Paste Material SN’ item can not be empty.
- The ‘Reference Work Order’ item can be empty.
- If the previous step has already mapped ‘Solder-Paste Material SN’ and ‘Reference Work Order’ then the value of ‘Reference Work Order’ will display automatically after the user completes inputting ‘Solder Paste Material SN’ item.
- If shelf time of current solder paste material is more than ‘Shelf-Life’ configured in function ‘Solder Paste MPN Control’ then the system will prompt an error message such as ‘Shelf Time Expired’.
Solder Paste Scrap
- Click Solder-Paste Scrap Icon.
- Input Employee Number, Solder-Paste Material SN, then press Enter key
- Input Scrap Reason, then click the Submit button.
Figure 14: Solder Paste Scrap
Note:
- ‘Solder Paste Material SN’ can not be empty.
- If any step of all above solder paste control steps prompt ‘Warning Message’ or ‘Error Message’ then the system prompts an alert message such as ‘Do you want to scrap current solder-paste material?’ at the same time.
Production Setup
Before load, unload Solder Paste material and scan board, users need to config the production line and workstation through the Production Setup module.
Load/unload material
- Select Production-->Production Part Traceability-->Touch (combines load/unload materials) (PTS).
- Click Load Material Icon.
- Input Workstation, Solder Paste material, New Feeder Barcode, Station Location, then click Send button.
Figure 16: Load Material
- Select the Report to show the detailed load material information.
Figure 17: Load Material Report
PTS loading material function has the Solder Paste material control as follows:
- The status of current Solder Paste material must be ‘Open Jar’ status (otherwise the system will prompt a warning message).
- The shelf-life of the current Solder Paste material must not be reached.
- The floor-life of the current Solder Paste material must not be reached.
- If the first loading material operation is successful the status of the current solder material needs to be changed to ‘Load Solder-Paste to Stencil’ status and write related process operation data to related DB new process operation table.
PTS unloading material function has the solder paste material control as follows:
- The status of current solder paste material must be‘Load Solder-Paste to Stencil’ status (otherwise system prompt warning msg).
- If the unloading material operation is successful the status of the current solder material needs to be changed to ‘Unload Solder-Paste from Stencil’ status and write related process operation data to related DB new process operation table.
Scan Board
- Select Production-->Production Part Traceability-->Touch (combines load/unload materials) (PTS)
- ClickScan Board Icon
- Input Workstation Available
- Input Board Barcode, then press Enter
Figure 18: Scan Board
- Select the Scanned button and show the scan board history.
Figure 19: Scan Board History
PTS scanning board function has Solder Paste material control as follows:
- If the shelf life of the current location Solder Paste material is reached then scanning board operation prompts an error message such as ‘Solder Paste material shelf life is reached’.
- If floor life of current location Solder Paste material is reached then scanning board operation prompts an error message such as‘Solder Paste material floor life is reached’.
- If the stencil life of the current location Solder Paste material is reached then scanning board operation prompts an error message such as ‘Solder Paste material stencil life is reached’.
- If stencil idle max time of current location Solder Paste material is reached then scanning board operation prompts an error message such as ‘Solder Paste material stencil idle max time is reached’.
Figure 20: An Example for Scan board of Solder Paste Control
Reports
There are two reports for the solder paste material.
- Solder Paste Status Report
- Solder Paste Process Tracking Report
