How to Manage a Customized Work Request
Contents
Work Request with WR Design name Summary
42Q’s Work Request customization function supports the CMMS application. The feature provides an additional layer of visibility and control for work requests that involve sensitive (compliant) and/or costly materials. Once the Work Request is approved and closed, the system automatically triggers the corresponding action(s) in the CMMS application, thereby saving time and money for busy plants, and providing an extra layer of control for regulated industries governed by compliance standards.
Design
Each Work Request with WR Design name is unique to the individual plant, providing a solution to asset-related status changes and updates.
Note: Standard WR refers to the Work request without the WR Design name. Customized WR refers to the work request with the WR Design name.
Standard WR vs. Customized WR
The standard CMMS Work Request user interface differs slightly from the customized version. A comparison follows.
| Standard Work Request | Customized Work Request |
|---|---|
| WR Design Name field remains empty in CMMS Admin > Work Request Category. | Four WR Design Names are available in the drop-down menu in CMMS Admin > Work Request Category. |
| When adding a new work request, only the General Tab is available. | When adding a new work request, a second customized tab is available with additional information for selection. Here, the plant can define which assets or spare parts require approval and/or additional control.
|
| After the standard work request is approved and completed, the supervisor and the assignee must then perform the tasks outlined in the work request. | After the customized work request is approved and closed, the CMMS API system processes the work request to reflect values defined in the customized tab(the tab name is the same as the WR category name) of the Work Request module. The supervisor and assignee do not to perform any additional actions. |
Overview
- This document describes four existing customized work designs.
- The process of creating a customized work request requires movement between several modules. Steps to configure and manage a customized work request are outlined in Customized Work Request Steps.
Business Use Case
Plant A builds optical devices; it must adhere to strict pharmaceutical guidelines as outlined by Gamp5. Additionally, the assets used to build Plant A’s optical devices are highly sensitive and require expensive replacement parts. There is little room for error at Plant A. Plant A uses four different customized WR designs to control and track asset activity.
The CMMS system will bring four WR design names once deployed.
- Issue New Parts
- Multi Asset Transfer
- Return Old Parts
- Update Asset Status
Customized Work Request Steps:
To create, approve, and complete a customized Work Request, users must move between several CMMS modules. The steps to create and complete a customized work request are outlined below.
- Define the Customized Work Request Category with WR Design name
- Manage the Customized Work Request with WR Design name
- Approve the Customized Work Request
- Close the Customized Work Request
1. Define the Customized Work Request Category
The Work Request Category module allows users to define the Work Request Category, including WR Category Name, Approval path and Approval groups. See also: CMMS Work Request.
- Navigate to: Shop Floor Control > Configuration > CMMS - Admin.
- Select the WR Category ICON.
- See also: CMMS Admin > Work Request Category.
Figure 1: Navigation Path to Configure Work Request Category
- The Work Request Category's main page displays.
- Click Add to open the Add Work Request Category subpage.
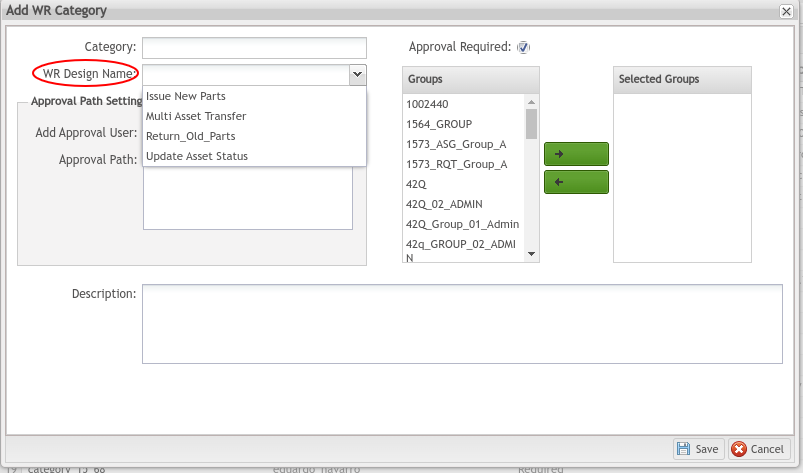
- Select the WR Design Name from the drop-down list.
Note:WR Design Names are predefined by the CMMS system.
Figure 2: Select Update Asset Status WR Category as the WR Design Name
- Set the Approval Path, Approval Groups, and Description. Refer to the example in the figure below to set approvals.
- Read more about WR Category approvals here.
Figure 3: Add Work Request Approvals for Category - An Example
- Click Save: a new Work Request Category is successfully created (Our example is : HW Issue new Parts).
- Select the Work Request.
- Click Edit to edit the Customized Work Request Category. For additional information, please see CMMS - Admin > WR category .
Figure 4: Customized Work Request Category Created Successfully
2. Manage the Customized Work Request
Move to the Work Request module to manage the Work Request.
- Navigate to Production > CMMS > Work Request.
- Select My Requested ICON, then open the My Requested subpage. Users can Add a new Work Request or Edit their own Work Requests.
- Click Add.
- The General Tab displays by default.
- Select the customized Work Request category (previously added in CMMS Admin > WR Category > WR Design Name) from the Category drop-down list.
Figure 5: Add Work Request General Tab
Customized Tabs
Once the category is selected, the attributes linked to the WR Category will display in a new tab. (see figure below). The tab name is the same as the WR Category name.
Figure 6: Add Work Request - Customized Tab.
- Complete the columns in the general tab and Customized Tab (e.g. our example is: HW Issue new Parts).
- Click Save.
- The new customized Work Request is successfully created and now displays on the main list.
Figure 7: Customized Work Request Successfully Added
Edit a Customized Work Request
- Users may modify any of the fields with the Edit icon. Note: Work Requests in Approved or Canceled status cannot be edited.
- Select the WR, then click Edit to open the Edit Work Request sub-page.
- Change the Category, Due Date, Status, or Description in the General tab.
- Then use the Customization tab to adjust the values of the associated custom columns.
3. Approve the Customized Work Request
- Select My Approvals ICON to open the My Approval submodule.
- Users can approve and reject the Work Request, or view their approval history.
Note: Both Tabs require approval before the customized Work Request is complete.
Figure 8: My Approval main page
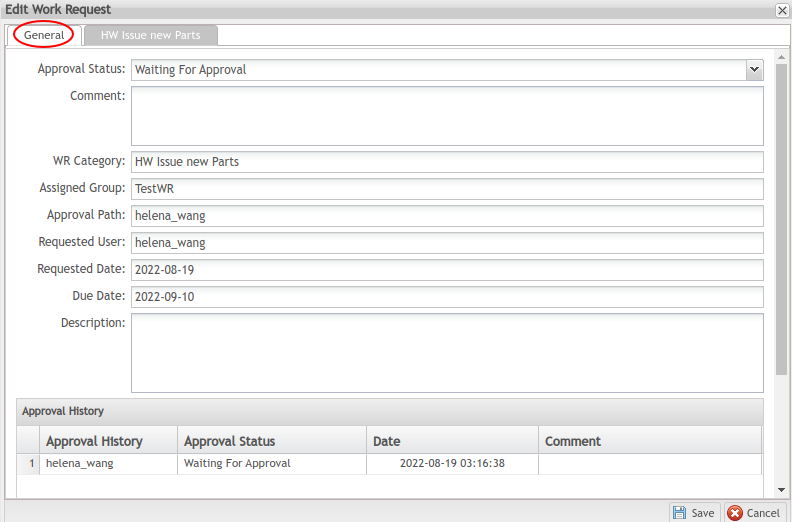
- Select the hotlink on the WR#, will open the Edit Work Request sub-page.
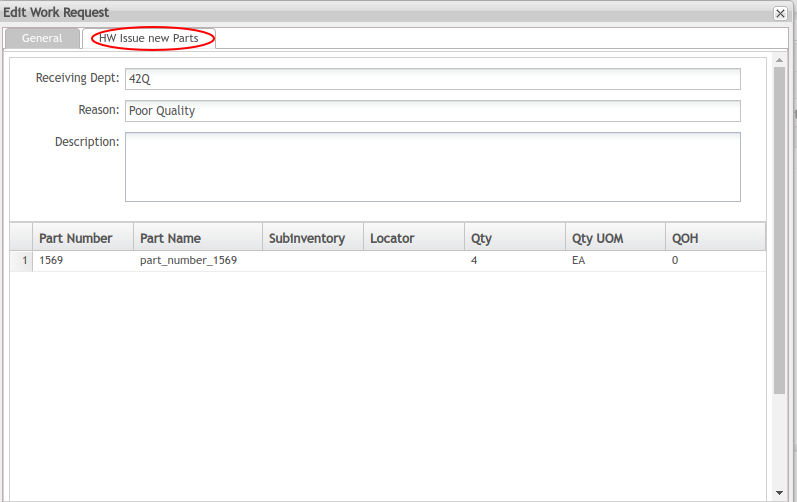
- The work request's details now display at the General tab and the Customization Form tab. (e.g. HW Issue new Parts).
Figure 9: My Approval - Edit Work Request - General Tab
Figure 10: My Approval - Work Request - other Tab
- Change the Approval Status at the General tab.
- Select Approved to approve the work request, or Rejected to reject the work request.
Figure 11: Change the Approval Status
- Select Save.
4. Close the Customized Work Request
Changing the Work Request status to Closed is the final step in a customized Work Request. Once a customized Work Request is Approved and Closed, the system will automatically update the data according to values selected in the customized Work Request form.
- Navigate to: Production > CMMS > Work Request > My Assigned. Choose the My Assigned icon.
- All work requests that have been approved and assigned to the current user are listed in the My Assigned submodule. From this submodule, users can close a work request or search a work request by Status.
- To close a work request, select one work request, then click the Edit icon.
- Change the Status to Closed using the drop down menu in the Status line at Edit WO screen .
- Choose Save to close the work request
- Once the Work Request moves to Close status, the CMMS application will trigger the system to return the spare parts to the defined locations. CMMS Spare Parts will automatically adjust the inventory count.
- For forward information, please see CMMS -Work Request .
Figure 12: My Assigned-Close Work Request
Four Types of WR Design
The CMMS system will bring four WR design names once deployed.
- Issue New Parts
- Multi-Asset Transfer
- Return Old Parts
- Update Asset Status
The steps are the same as the Work Request Steps
- Define the Work Request Category with WR Design Name.(See Figure 13).
- Manage the Work Request
- Approve the Work Request
- Close the Work Request
Figure 13: Four WR Categories examples
Following are the details of the columns for every WR Design.
WR Design 1: Issue New Parts
Spare parts for a Plant's assets are extremely valuable. The plant can utilize a customized work request to restrict permissions so that only the warehouse supervisor can issue parts to the shop floor.
- Navigate to Shop Floor Control > Configuration > CMMS Admin > WR Category to create a WR category(e.g HW Issue new Parts) with WR Design name Issue New Parts.
- Navigate to Production > CMMS > Work Request > My Requested.
- Click the Add icon and select HW Issue New Parts (see step 1)in the Category drop-down list.
- Fill out all the necessary data in the General tab.
| Note: These parts might be spare parts for a high-value tool, the tool itself, or any part identified for special approval. Once their supervisor or warehouse administrator approves the WR, the warehouse will issue the parts or high-value tool to production and change the WR status to close, then the system will update the parts quantity record automatically. |
- Click the Add icon to identify the parts which need to be issued.
- Fill out all the necessary data in the HW Issue new parts tab.
Figure 14: Issue New Parts Tab
- The supervisor approves the Work Request.
- Once the Work Request moves to Close status, the CMMS application will trigger the system to return the spare parts to the defined locations. CMMS Spare Parts will automatically adjust the inventory count.
WR Design 2: Multi Asset Transfer
GAMP medical compliance rules require plants to track the physical location of all assets on the factory floor. A customized work request demands that any asset movement between departments must receive supervisory approval.
- Navigate to Shop Floor Control > Configuration > CMMS Admin > WR Category to create a WR category(e.g HW Multi Asset Transfer) with WR Design name Multi Asset Transfer.
- Navigate to Production > CMMS > Work Request > My Requested.
- Select the Add icon.
- Select HW Multi Asset Transfer Category from the drop-down menu.
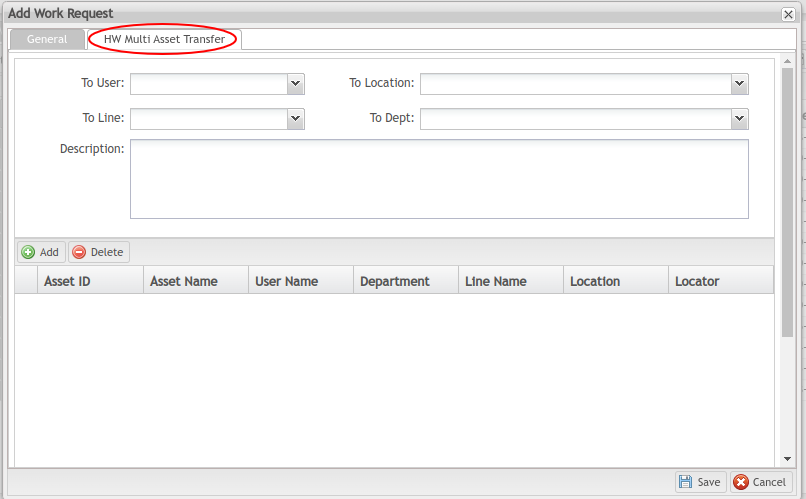
- Fill in all the fields in the General tab.
- Select the correct information from the drop-down lists.
Figure 15: Multi-Asset Transfer Tab
- Click the Add icon.
- Select the Asset ID to transfer to another location.
- Fill in all the fields in the HW Multi Asset Transfer tab.
- The supervisor approves the Work Request.
- Once the assigned person closes the work request, the asset status will be updated and the new location will be reflected in the database.
WR Design 3: Return Old Parts
By setting a customized WR, Plant A relies on the system to automatically record (and track) the number of parts returned, and their exact location, leaving less room for human error.
- Navigate to Shop Floor Control > Configuration > CMMS Admin > WR Category to create a WR category(e.g HW Return Old Parts) with WR Design name Return Old Parts.
- Navigate to Production > CMMS Work > Request > My Requested.
- Click the Add icon and select HW Return Old Parts in the Category drop-down list.
- Fill out all the necessary data in the General tab.
- Go to the HW Return Old Parts tab.
- Click the Add icon to identify the spare part or high value tool that needs to be returned to the warehouse.
Figure 16: Return Old Parts tab
- The supervisor approves the Work Request.
- The warehouse operator returns the spare part or high value tool to the warehouse.
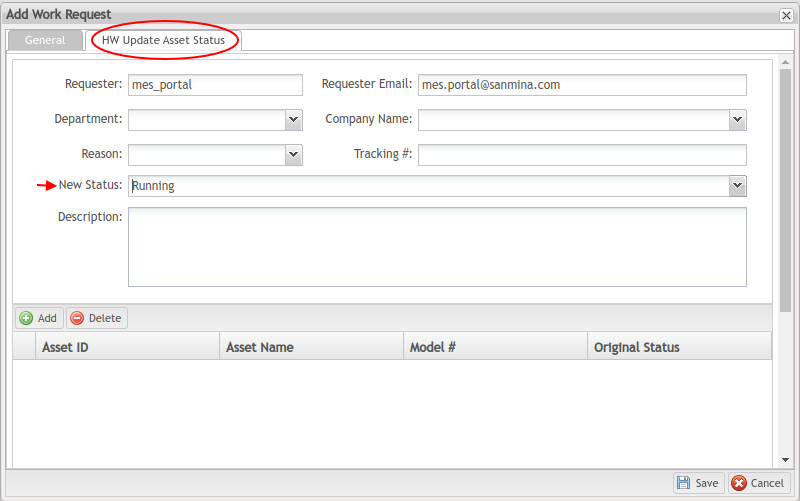
WR Design 4: Update Asset Status
According to GAMP guidelines, plants building optical devices are required to control and track asset status at all times. A customized work request helps Plant A manage asset status by setting two different controls in place:
- Asset status changes require approval by the assigned supervisor
- Once approved and closed, the system automatically updates the asset status according to data defined in the customized work request.
- Navigate to Shop Floor Control > Configuration > CMMS Admin > WR Category to create a WR category(e.g HW Update Asset Status) with WR Design name Update Asset Status.
- Navigate to: Production > CMMS > Work Request > My Requested.
- Click the Add icon and select HW Update Asset Status in the Category drop-down list.
- Fill out all the necessary data in the General tab.
- Click the second tab - HW Update Asset Status - and complete the fields. This new value will be updated in the database after the Work Request is approved.
Figure 17: Update Asset Status tab
- Click the Add icon and select the asset that requires a status update.
- The supervisor approves the Work Request.
- The asset status will be automatically updated after the assigned person closes the work request.
