SOP-5-I-MES0020-C Oracle-MES
42Q Home > Tools > Oracle-MES Integration
Contents
Introduction
Note: This procedure covers a general scope; a customer-specific scenario should be developed at the plant location.
The Oracle to MDS interface for Work Orders using industry-standard Web Service will allow data to be processed more efficiently using standard XML and eliminate the complicated parsing and mapping inherent to an FTP process. Web services pass data seamlessly and get responses back easily and support centralization of troubleshooting and issue handling.
With Oracle ESB in the middle, we can create entire business flows without having to have a plethora of polling processes or scheduled jobs that are customized for each customer or plant.
With service-oriented architecture, multiple systems can easily access the same information without any knowledge of what the system is actually doing to retrieve or update the data.
The following requirements have been added to the interface,
- Work Order Create / Change (Oracle - 42Q)
- Work Order Move / Completion (42Q - Oracle)
- Work Order Cancellation / Quantity Decrease Online call (Oracle – 42Q, 42Q - Oracle)
Process Flow
Figure 1: Oracle-42Q Process Flow
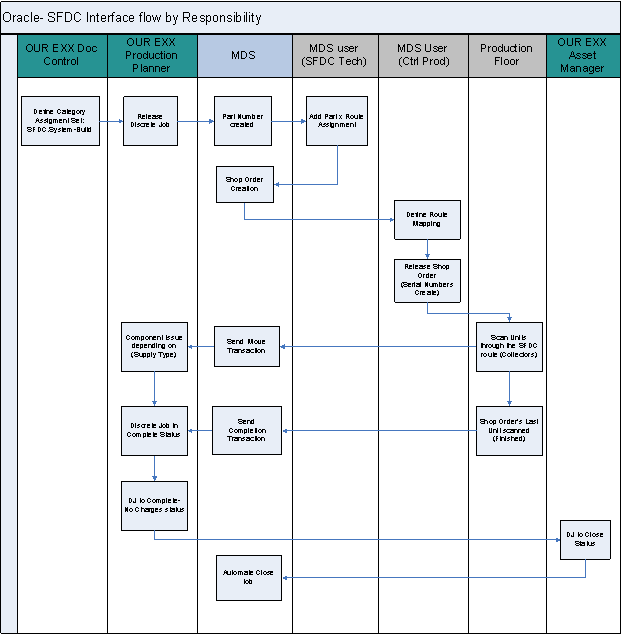
Note: OUR EXX Production Planner and MDS User (Ctrl Prod) can be same person, depending on each plant decision.
Design Considerations
Basic Setup
- The main selection criteria default will be based on the assignment of either the category "42Q.DEFAULT", "42Q.SYSTEM-BUILD" or "42Q.TRACED-ITEMS" from the "SANM INTERFACE" category-set to the Item used as the Assembly in the Oracle work-order. The difference between these two Categories is explained in section 6.1.
Figure 2: Interface Item's Category Set Value
- When creating a new work-order in Oracle (Discrete Job), the operator can override the defaults for that specific work-order. The override flag should be used on an exception basis only.
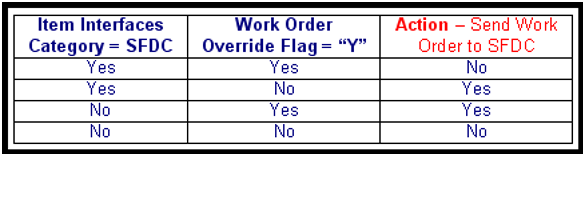
The following table explains the defaults and logic used by the program to determine if a specific work-order should be sent to the shop-floor via the interface.
The key is the item category setup. The org default determines if items that have the category assigned, should be included in the interface or not. Then the final check is at the work-order level; if the defaults say to send and the override flag is set, then the opposite will be done and we will not send it. The table shows all the different combinations and the resulting action.
Figure 3: Item's Category Set VS Discrete Job Override Flag Criteria
General Process Rules
- The selection criteria will be controlled at the Item attribute level although it could be overridden at the Discrete Job level. The decision to use the interface to create a Shop Order in 42Q is governed by the criteria indicated in the table represented in Figure 3.
- When creating a new item, users will populate the Category Set for parts they want to be sent to 42Q.
Note: It is possible to use a data loader for a mass load update for new plant implementation.
- The Top Level Assembly item has to be setup in 42Q with a Route Assignment prior to using the interface. This is a one-time setup per item (42Q standard setup).
- Discrete Jobs in Oracle can be created manually or by using the MRP planner's work-bench.
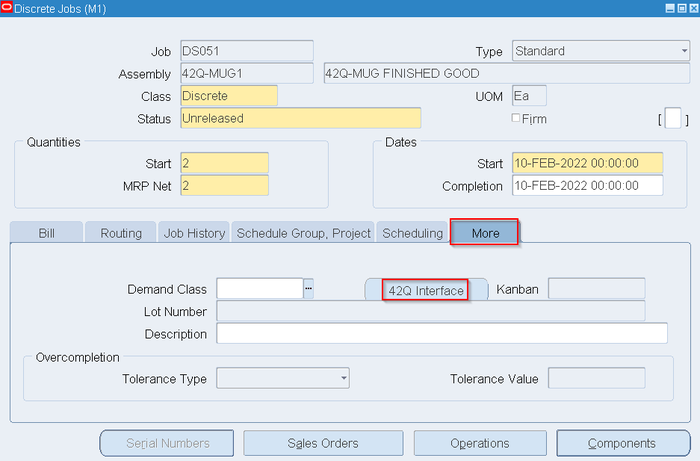
- A new button "Interface Override" was added to the "More" tab in the Discrete Job screen.
- Before the Discrete Job is Released, Production Control will have the ability to override the 42Q attribute at the Discrete Job level.
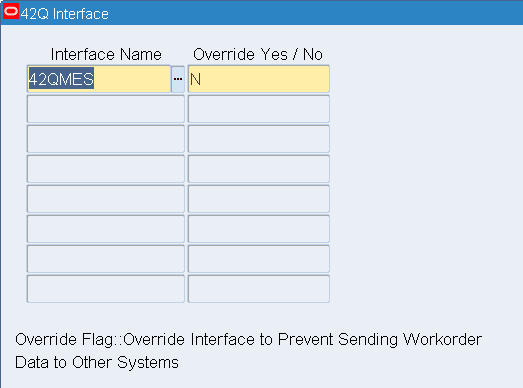
- "42Q" Interface Name will be selected. The second field is not being used yet and can be left at the default (N).
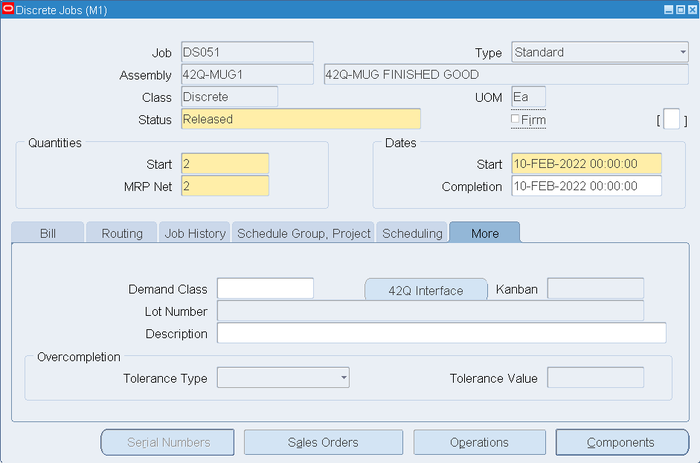
- Once the Discrete Job-status is changed to "Released" the "Interface Override" button is grayed out and can not be used anymore for that job.
- Shop Order will be created in 42Q only when the Discrete Job is changed to Released status.
- Oracle will use the Work Order selection criteria outlined in Figure 3 for determining which jobs are sent to 42Q.
- Oracle Discrete Jobs and 42Q Shop Orders will have a one-to-one relationship.
- Shop Order number will be the Discrete Job number.
- Oracle Routing and 42Q Route should be mapped at this point, but only during the first time that an Assembly item is being sent through the interface. Future Discrete Jobs for the same Assembly item will have the Routing links defaults from previous jobs.
- Shop Order will be released in 42Q to enable shop floor collector move operations.
- All move operations in 42Q will be sent as WIP-Move transactions to Oracle periodically.
- When the last move operation is recorded in 42Q a Completion transaction is sent to Oracle and the Discrete Job changes to Complete status.
- Standard and Non-standard Job types can and will be sent to 42Q depending on the selection criteria in Figure 3.
- Oracle is the system of record, only changes originating in Oracle are sent to 42Q, so in order to make changes to the Shop-Order in 42Q, changes need to be made in Oracle first.
- Cancellation and quantity decrease request will trigger Oracle to perform an online call to 42Q, users will need to wait for a response back from 42Q before the request is executed or declined.
Note: Fields triggering a change transaction; "Header Level" - Discrete Job Status, Start Quantity, Start & Completion Date. "Routing Level" - Sequence, Operation Code, Department and Description. Changes will only be sent for fields just listed.
Oracle Discrete Job (Create / Change) Field data Transfer to 42Q
- Job Number – sent to 42Q.
- Job Type
- Standard – sent to 42Q
- Non-Standard – sent to 42Q
- Assembly
- Assembly Number – sent to 42Q. If the part number is not setup in 42Q the system will automatically create the part number.
- Assembly Revision – sent to 42Q.
- Discrete Job Status.
- No WS Message Sent
- Unreleased – will not be sent to 42Q
- Complete – No Charges (From Complete Status) – If the work-order is complete (Qty completed = Initial Qty) Oracle will not send a message to 42Q.
- Discrete Job Response to Create / Change WS (Oracle to 42Q)
- Released –Triggers Oracle to send the Work Order to 42Q via the WO Create / Change WS. If the WO does not exist, 42Q will create a Work Order in an ‘unreleased’ status. If the Work Order already exists and is ‘on hold,’ 42Q will release the order from hold. If the WO already exists and is in a ‘Cancelled’ status, 42Q will reopen the WO with the quantity provided from Oracle in the message.
- On Hold – Triggers Oracle to send a ‘Hold’ message to 42Q via the WO Create / Change WS. 42Q will put the Work Order on hold until the Oracle Discrete Job is changed back to a status of ‘Released’. 42Q should prevent the user from manually removing a hold. Holds will be controlled by Oracle.
- Closed – Triggers Oracle to send ‘Closed’ change to 42Q via the WO Create / Change WS. 42Q will then put the order in a ‘Final Closed’ status.
- Discrete Job Response to WIP Move / Completion WS (42Q to Oracle)
- Complete – 42Q will send WIP move-to-completion transaction to Oracle for the last serial number in the WO WIP Move / Completion WS. If a user manually changes the Work Order in Oracle to a status of Complete, this change will not be sent to 42Q. If a user changes a Discrete Job from a ‘Complete’ status back to ‘Released’, the change will not be sent to 42Q.
- Completion of a Work Order in 42Q moves it to a ready to close status.
- Discrete Job Response to WO Cancel / Qty Decrease Online Call WS (Oracle to 42Q / 42Q to Oracle)
- Cancelled – Triggers Oracle to send an online call cancellation request to 42Q. 42Q in turn puts the order in a special status “X” so a user cannot make a change to the order while the system is determining if the order can be cancelled.
- If the shop order has no material in WIP, 42Q will answer back that the order can be cancelled, Oracle will then cancel the order, and in MES the shop order will display an “X” status.
- If the order has material in WIP, 42Q will return a message saying the WO cannot be cancelled. Manual intervention is required on the material in WIP. Users should either:
- Scrap the material in WIP, which will create a scrap transaction in Oracle. Once the last unit is scrapped, the Oracle WO will auto complete.
- Finish building the assembly. Once the assembly is complete, materials move to Work Order Excess in 42Q. Users can use this excess on other orders and, if required, change the serial number.
- Put the S/N units to a status of 64 in 42Q by moving the S/N off the job.
- Finish building the assembly. Once the assembly is complete, materials move to Work Order Excess in 42Q. Users can use this excess on other orders and, if required, change the serial number.
- Scrap the material in WIP, which will create a scrap transaction in Oracle. Once the last unit is scrapped, the Oracle WO will auto complete.
- Complete – No Charges (From Released Status) – Triggers Oracle to send an online call request to 42Q. 42Q in turn puts the order in a special status so a user cannot make a change to the order while the system is determining if the order can be put on hold.
- If the shop order has no material in WIP, 42Q will answer back that the order can be changed to a Complete – No Charges status. Oracle will then change the status of the order.
- If the order has material in WIP, 42Q will return a message to Oracle not allowing the status change. Users will need to remove the qty’s from WIP in order to change the status.
- Quantities
- Start – sent to 42Q
- MRP Net – not sent to 42Q
- Dates
- Start – sent to 42Q
- Completion – sent to 42Q
- Flex Field (Header level)
- Sales Order Number – sent to 42Q
- Sales Order Line Number – sent to 42Q
- Priority Code – sent to 42Q
- Comments – sent to 42Q
- KronosStat – sent to 42Q
- Ship To Location – sent to 42Q
- Context – sent to 42Q
- Schedule Group, Project (TAB)
- Schedule Group – sent to 42Q
- Line – sent to 42Q
- Project – sent to 42Q
- Task – sent to 42Q
- Unit Number – sent to 42Q
- Build Seq – sent to 42Q
- Routing (TAB): Routing steps must be set up and mapped in 42Q.
- If the mapping is inaccurate, the DJ will end up in the 42Q error queue.
- 42Q will create a project setup flag for plants that want to put serial numbers associated with the shop orders on hold due to sequence routing changes.
- If routing sequence changes are sent to 42Q, 42Q will send an email alert to the PC/Planning department. PC/Planning will be responsible for working with Engineering and Quality to ensure the routing is mapped correctly.
- Routing Revision – sent to 42Q
- Routing : Operations
- Seq – sent to 42Q
- Operation Code – sent to 42Q
- Department – sent to 42Q
- Description – sent to 42Q
- Sales Order (Button)– sent to 42Q
- Line – sent to 42Q
- Demand Class – sent to 42Q
- Primary Qty Reserved – sent to 42Q
- Primary UOM – sent to 42Q
- Quantity Reserved – sent to 42Q
- Line UOM – sent to 42Q
- The business requested to include resource and time data from Oracle to 42Q interface so in the future we can run reports to track actual vs. standard.
- Resources – sent to 42Q
- UOM – sent to 42Q
- Basis – sent to 42Q
- Usage – sent to 42Q
- Inverse – sent to 42Q
- Available 24 Hours – sent to 42Q
- Assigned Units – sent to 42Q
- Schedule – sent to 42Q
Oracle-42Q Routing Mapping
Route assignment should be done in 42Q before Shop Order Release. The Routing mapping can be performed after the Shop Order is created in 42Q and it is needed in order to establish a relationship between Oracle Routing and 42Q Route.
It will be a one time setup per Assembly number, once defined it will not be required for new Discrete Jobs for the same Assembly number unless there´s a change at the routing level.
Note: if a Non-standard Discrete Job is created, the resources should have to be edited at the Discrete Job level to comply with the proper Lead Time and Labor charges.
This work instruction does not cover the creation of the route in 42Q, consult the proper documentation for that purpose.
42Q Item Parameters (MES)
Fill in the proper Item values as per MDS definition, refer to MDS documentation.
Figure 4: Part Number Form
Route Assignment
In order to perform below instructions, the Assembly item should already exist in 42Q.
Note: 42Q Route should be done in advance as per MES standard workaround, refer to MES documentation.
Figure 5: Shop Floor Configuration
- To access the 42Q Modules, navigate to: Shop Floor Control > Configuration > Shop Floor Configuration.
- Select the Product Route.
Figure 6: List Route
- Select Part x Route Assignment icon.
- Select the proper Line to select the Route.
Figure 7: Part x Route Assignment

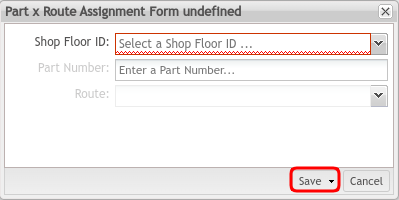
- Select Add Part x Route Assignment icon.
Figure 8: Add Part x Route Assignment Form
- Select Part and Route then select OK.
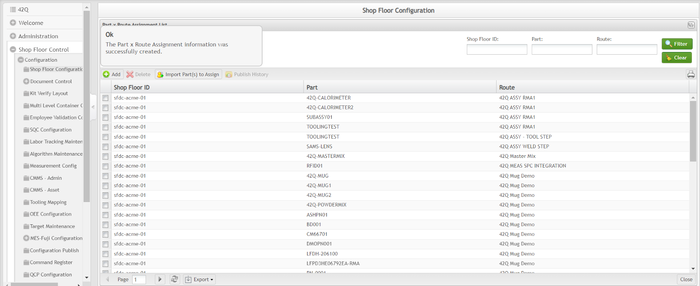
Figure 9: Confirmation
- A confirmation to create that Part x Route Assignment appears. Select Yes.
- Select Close.
Routing Mapping
In order to perform below instructions, the Shop Order should be listed for Release in 42Q as a prerequisite.
- Navigate to: Shop Floor Control > Production Control > Shop Order Control > Shop Order Release to list the Releasable Shop Orders
- Select the Shop Order where the new Assembly item is, and select hte Map icon on the right to start the Routing Mapping.
Figure 10: Shop Order Release List
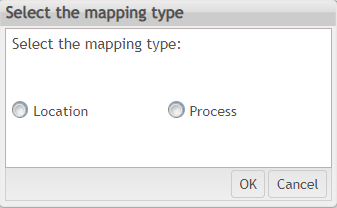
- Select the Mapping Type that better fits your Manufacturing process and select OK
Figure 11: Mapping Type
- Define the Mapping operations; select from the "Operation Sequence" (Oracle Routing Operations) list of values the first Operation to map versus "Location" (42Q) section then click on Add Map icon.
Figure 12: Shop Order Mapping
- Repeat previous instruction to map as many operations required.
Note: the important Operations to Map are those ones where you have material allocation.
- Click on Save button.
- A confirmation screen will pop up asking whether to release the Shop Order at the same time. For this explanation select No, (Section 6.2 will be explained the way to Release the Shop Order).
- Click No.
Oracle-42Q Process
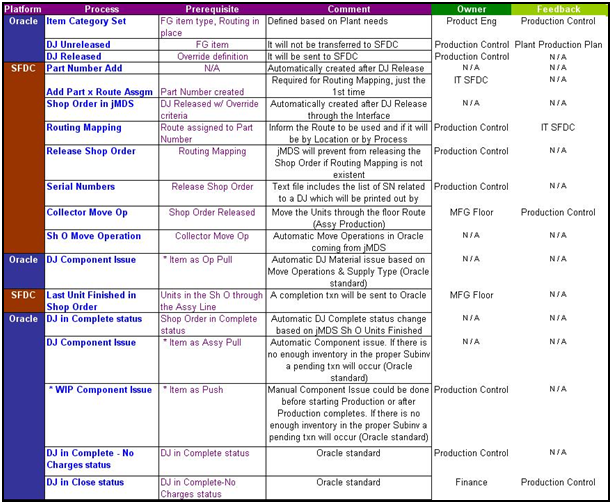
Displayed in the chart below, the step process shows the sequence of actions for regular order. The Owner and Feedback columns may differ among the plants.
Figure 13: Step Process
Discrete Job Create
The WO creation explanation below is for the predefined setup scenario, which will be used more frequently.
- Item Category Set setup = XX42Q_MES_INTERFACE
- Item Category = 42QMES.SYSTEM-BUILD
- Discrete Job Override flag = 42Q – No
Note: The different combinations of scenarios can be found in Figure 3.
- Set up the Assembly Item Category Set that better fits your process with the OUR Doc Control.
- XX42Q_MES_INTERFACE (42QMES.SYSTEM-BUILD) ): BOM information is also sent to MES in addition to the previous choice.
Figure 14: Item Category Set – SANM_INTERFACE Value
- Create the Discrete Job as a normal process and save it to Unreleased status. Notice the “Interface Override” button that has been added to the form in the More tab.
- If you want to Override the Item Category definition, select the Interface Override button, and then select 42Q MES under the Interface Name, and Y in the Yes/No field; close the window. Otherwise, jump to the step below to create the DJ based on the Item Category definition.
Figure 15: Override Values
Figure 16: Interface Data
- Change the Discrete Job-status to Released, and save your work.
Figure 17: Discrete Job Released
- Follow the Routing Mapping process explained in Section 5.3.
- Make sure the Discrete Job has been sent to 42Q. Verify Section 7.1.
Shop Order Release
- Return to the MES Modules screen and select Shop Order Control.
- Shop Orders will be listed based on the filter settings selected.
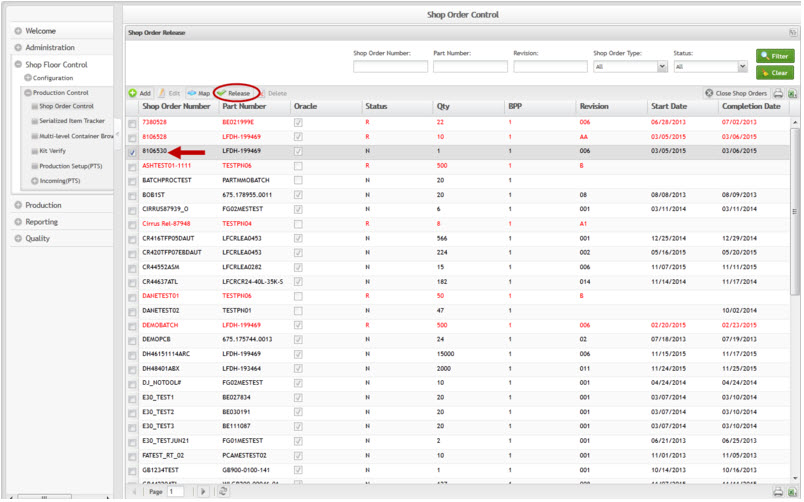
Figure 18: Shop Order Release
- Select the Shop Order to be released and select the green check icon on the right side.
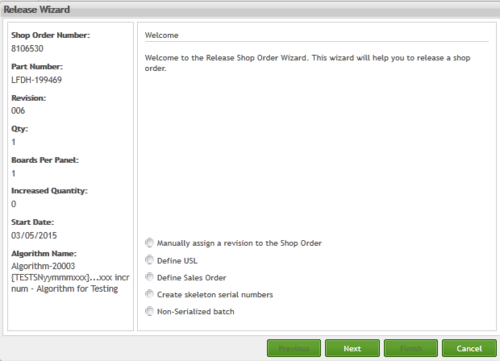
- Select Next.
Figure 19: Release Wizard
- (Optional) Select the ‘Manually assign a revision to the Shop Order’ box and select Next to continue with the Release process.
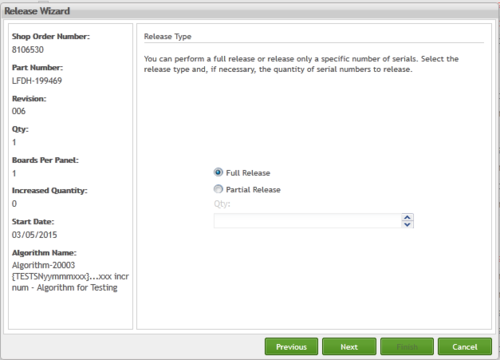
Figure 20: Full/Partial Release
- (Optional) Perform a Full Release or a Partial Release (enter in Quantity field the partial amount to release) and select Next to continue with the Release process.
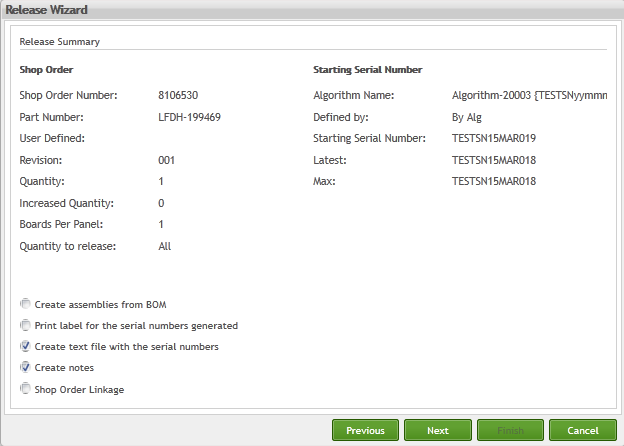
Figure 21: Release Summary
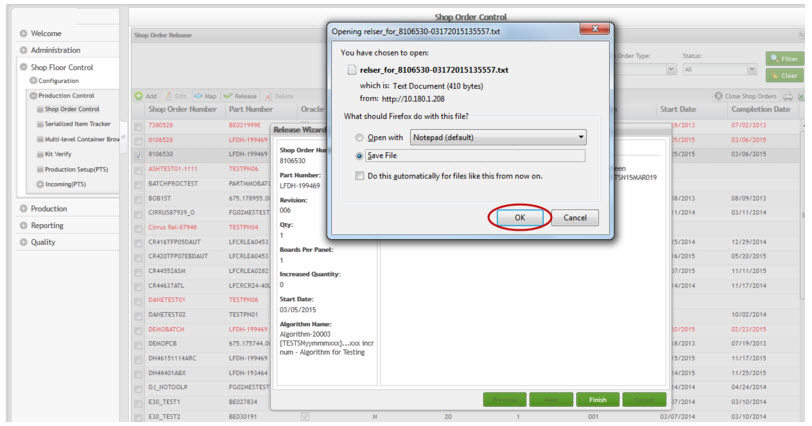
- (Optional) Select the ‘Create text file with the serial numbers’ box and select Next to continue with the Release process.
Note: If Partial Releases are going to be performed, notice the text file name will default to the same Shop Order number; so make sure a prefix or suffix is added—otherwise it will be overwritten and previous Serial Numbers in the file will be lost.
Figure 22: Save File
- Specify the path on your computer to save the text file that contains the Serial Numbers.
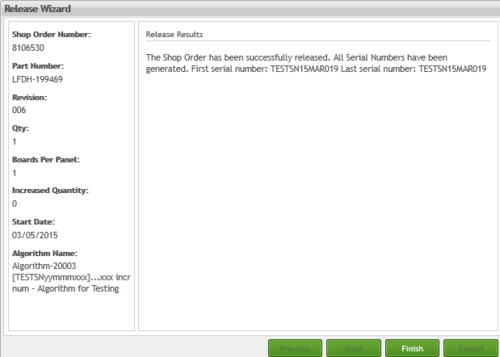
Figure 23: Release Results
- A new screen will confirm a successful Shop Order Release. Select Finish.
Figure 24: Shop Order in Release Status
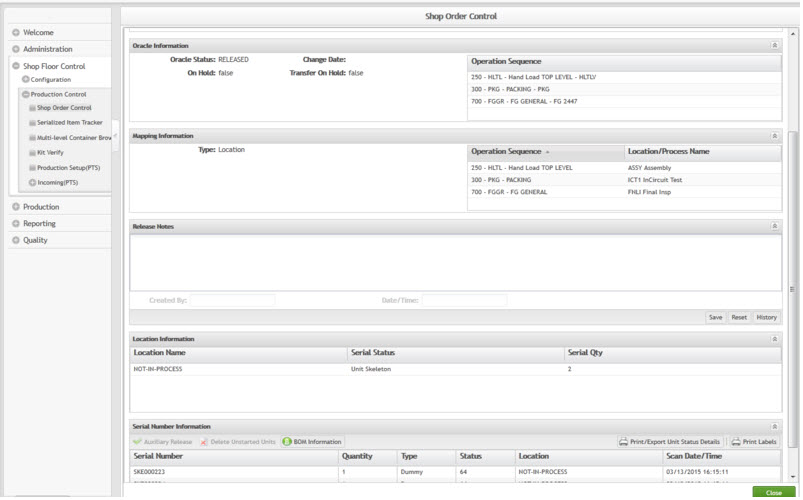
- Serial Numbers can be found through the Shop Order browser and selecting the blue Information icon.
Figure 25: Mapping and Serial Number Information
Shop Floor Collector Move Operation
The user will proceed with the shop floor move operation based on the standard process (not covered in the present work instruction; consult the proper documentation for that purpose).
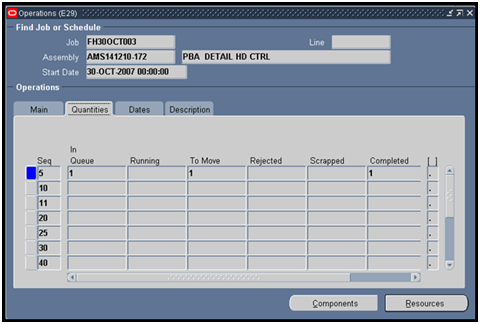
Whenever an Assembly Unit is moved to the next Shop Floor Operation, it is also recorded in the Oracle Discrete Job. In order to guarantee data integrity between the two systems, that WIP Move transaction will involve two actions:
- The shop order in MES will go on hold while the transaction is sent to and performed in Oracle.
- Once the transaction is done in Oracle, a WIP Move Acknowledgement will be sent back from Oracle to MES, clearing the hold.
No manual move operation transactions should be done in Oracle for Work Orders using the interface or else the interface will try to process it again. If someone makes a manual WIP Move or WIP Completion by mistake, the corrective action will be to perform a reversal of the manual transaction to allow the automatic transaction from the interface to process.
Note: Moves backwards are NOT sent to Oracle for cost accounting reasons.
Figure 26: Move Operation Recorded in Oracle
Note: Serial Number can be tracked in jMDS through the "Information" icon.
Figure 27: Serial Number Operation Status in 42Q
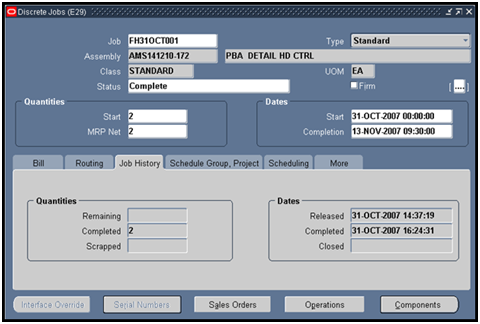
Once the Assembly units reach the last operation through42Q, a Completion transaction is triggered to Oracle and the Discrete Job changes its status to Complete. Verify the way to validate the Complete transaction from 42Q to Oracle through the ‘42Q WIP Move Transactions to Oracle’ explained in Section 7.2.
Figure 28: Serial Numbers in Complete Status
Figure 29: Discrete Job in Complete Status
Discrete Job Component Issue
There is no change on the Component Issue transaction to the Discrete Job. It will happen as the regular process in Oracle depending on the WIP Supply Type involved.
If for some reason there is not enough inventory in the proper sub-inventory, the Discrete Job will not be completed until the component issue is resolved (standard Oracle).
Discrete Job Exceptions
Immediate ECO Implementation including rework on process.
- The workaround is explained as follows:
- 42Q: change shop order revision as usual and, if needed, the items to be scanned.
- Oracle: change the material requirements of the discrete job to reflect the change and ensure accurate material management.
- Floor: physically swap the parts in the kit and transact in Oracle.
Oracle Related Process Exceptions
- Physical Inventory
If the plant wants to suspend the "WIP Move" and "WIP Completion" transactions (disconnect Oracle-42Q Interface) during physical inventory, an approval will be required from Corporate Finance department, until then a trouble ticket could be submitted to the MES support with the approval attached as reference. To reestablish the service, another trouble ticked should be submitted by the plant as well.
- Month End
Interface should not be turned off during Month End.
Oracle Shop-Floor Monitoring Screens
SANM 42Q WIP Jobs Creation and Change to 42Q
This screen helps the user to verify the Discrete Job in Released status was sent via the Web Services to 42Q for shop order create.
- Open the form.
Figure 30: Shop-Floor Interfaces Monitoring Path
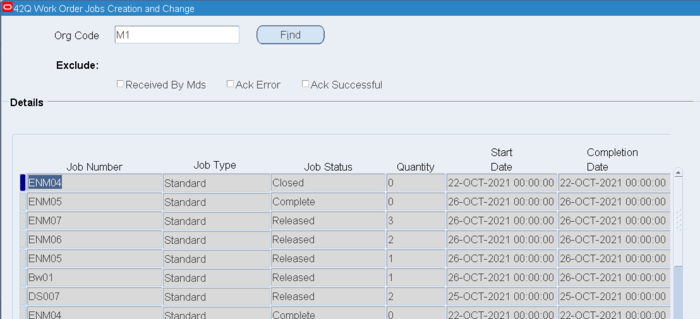
- Select the Plant Org Code and select Find. The form will display the orders to be sent for creation to 42Q.
Figure 31: Company 42Q WIP Jobs Creation and Change to 42Q Screen
- Resources and Routings displays the current values of the Assembly item by the time the Discrete Job was created.
- Status shows the Discrete Job-status after it is Released. Below are the different Process Statuses.
0 > Ready To Process
2 > Being Processed
3 > Failed
7 > Processed
8 > Ack Error
10> Ack Successful
Figure 32: 'Resources' from SANM 42Q WIP Jobs Creation and Change to 42Q Screen
Figure 33: 'Routing' from SANM 42Q WIP Jobs Creation and Change to 42Q Screen
- When the Shop Order has been created in 42Q, the Process Status will report ‘7’ as shown below.
Figure 34: Status Processed
Company 42Q WIP Transactions to Oracle
This screen will display the To Move transactions based on the steps mapped between Oracle Routing and 42Q Route as well as Assembly Complete transactions.
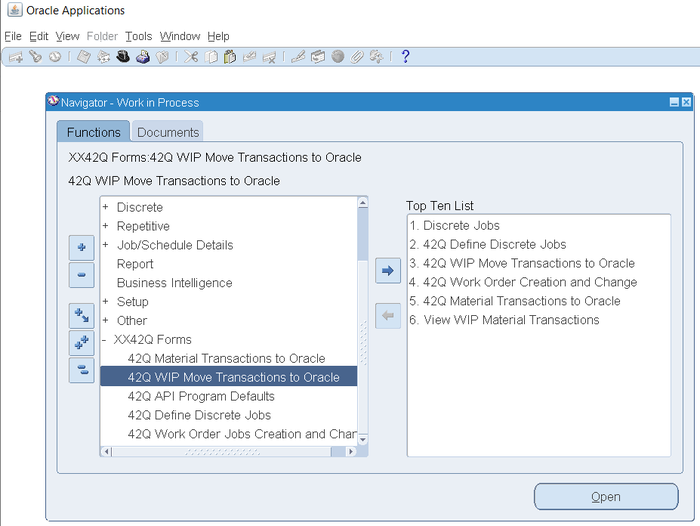
- Open the form.
Figure 35: Functions Tab
Figure 36: SANM 42Q WIP Transactions to Oracle Screen
- The Process Statuses available for this form are listed below.
1 > In Process
2 > Pre-Validation Error
3 > Move Error
4 > Processed
9 > Ignored
Blank > Pending
11 > In Process
33 > Backflush Error
Remarks:
- No one at the plant should ever do a manual WIP-Move, WIP-Completion, or reversal of any of these transactions for items that are set to use the interface because this will cause the interface to stop working and transactions to fail.
- Each plant or program should clearly identify which Work Orders go through the interface by defining a naming convention. The use of a suffix is recommended. This is critical especially during the initial transition from a manual process to the interface.
- When an error happens in the processing of a transaction in Oracle, such as when there is a shortage of back-flush components that does not allow completing the units (it is expected that the user will resolve this issue immediately), the interface programs will attempt to re-process the transaction automatically every few minutes for one full day and then put it in error state. The transaction will remain in Status 3: Move Error until they manually re-process the transaction again after fixing the underlying issue.
Standard Oracle Transaction Errors
| Error | Description | Possible Causes | Solution |
| 1 | No charges allowed for this job/schedule | These will be transactions where the job is not in Released or Completed status. You can perform transactions only against jobs which have status of Released or Complete. | Change the status of the job to either Released or Complete. If the job is closed, then unclose the job. Then resubmit the transaction. |
| 2 | No open period found for date entered | The Inventory period of the transaction date is not opened yet (Next Period). | Open a P2 Trouble Ticket to the help-desk. To open the corresponding inventory period and resubmit the transactions. 1. Check that the period is open. 2. Check that the date is a date between the open and close period. |
| 3 | No open period found for date entered | Transaction stuck in the previous Inventory period already closed (Previous Period). | Open a P2 Trouble Ticket to the help-desk to change the transaction date to the current inventory period and resubmit the transactions (standard pending transaction solution). |
| 4 | The transaction quantity exceeds the over completion tolerance set for the Job, Repetitive Line/Assembly, or the Organization | The transaction quantity exceeded the over completion tolerance defined in the ’
More ’ tab of the Discrete Jobs form or the over completion tolerance set in the WIP Parameters. |
Go to pending move transactions form and reduce the transaction quantity to a quantity that is within over completion tolerance limit and also change the over completion quantity accordingly and then resubmit. |
| 5 | Negative Balances not allowed | This message will be prompted if there is not enough on hand quantity to satisfy all the transactions within a batch. Therefore, ensure that the transaction quantity is enough to satisfy the sum of all the transaction quantities for a particular batch. | |
| 6 | Transaction quantity must be less than or equal to quantity available to move | This also happens when you try to process a move transaction from say op 20 to op 30 even before the transaction from op 10 to op 20 got processed. | Make sure that enough quantity is present in the from operation sequence and from interoperation step and then resubmit the error transaction. |
| Error | Description | Possible Causes | Solution |
| 7 | TRANSACTION_QUANTITY must be greater than zero | Go to pending move transactions form and enter the transaction quantity you actually want to move instead of zero and then resubmit. Resubmit the transactions through forms only. | |
| 8 | You cannot move assemblies within the same operation and step. Cause: You tried to perform a shop floor move within a single operation and interoperation step. You can only move assemblies between distinct operations | You tried to perform a shop floor move within a single operation and interoperation step. | Change the operation sequence / interoperation step appropriately and then resubmit the transactions. Resubmit the transactions through forms only. |
| 9 | Transaction date precedes release date for the job/schedule | You would have entered a transaction date that precedes the release date for your job or schedule. The transaction date for any WIP transaction must always be greater than the Released date of the work order. | Change the transaction date of that error transaction in the pending resource transactions form and then resubmit. Resubmit the transactions through forms only. |
| 9 | Invalid transaction UOM | Check the UOM measure being used and find out if valid for the organization source. If not set up the UOM. It may also be a case where the conversion classes have not been set-up. |
Business Requirements – Service Level Agreement
Oracle ESB On Fault Processing
If Oracle or 42Q is unable to send/receive a message through Oracle ESB after 30minutes, a help desk trouble ticket should be opened.
Abbreviations
- ESB – Enterprise Service Bus
- Dataloader – tool used to massively update Oracle Item parameters
- MDS – Manufacturing Data Systems
- jMDS – MDS supported in JAVA
- DJ – Discrete Job
- WO – Work Order
- SO – Shop Order
- WS – Web Services
Appendix
- This Work Instruction is a basic navigation-training guide and is not meant to teach the process flow for individual department functionality. Individual company sites may have minor or specific process changes that will be documented at the site level.
- Fields that reference “Optional” require System Administration to set up or update and may vary at the plant level. Individual plant setup and plant-specific processes determine whether these fields are required.
- Fields that do not reference “Optional” are currently considered required. A required field may be at the system level or a field that 42Q required when the process was created.
- Glossaries for Oracle terminology are available within the Oracle Application by selecting from the pull-down menu “Help” – Oracle Applications Library - Glossary.

