SOP-5-I-42Q0094-C Migration Assistant
42Q Home > Tools >Migration Assistant
Contents
Migration Assistant
Migration Assistant moves plant information from one portal to another, thus eliminating manual configuration tasks.
- This new tool is available to the MES support team and the GBS team.
- Migration Assistant is located within the Administration menu of 42-q.com or Sanmina.com
There are totally five modules to be migrated from one MES Portal Server to another, including User (LDAP user and Non-LDAP user), Profile, Assignment (Relationship between User and Profile under Site), Device (Device configuration for Shop Floor ID), and Android Device (Android Devices maintained at Android Device Maintenance connected to Shop Floor by AppGarden APK). The following will cover User, Profile, Assignment, and Device as requested.
Figure 1: Migration Assistant Main Page
Note: Migration Assistant intends for MES support and Plant admin with Menu can only be found at Site 42Q.com. If your own user account has no access to 42Q.com, please ask MES support team if necessary.
How to Move Data
Data is transported through two basic actions:
- Export: Export data from a specific/source Plant and Site by downloading a Text(.csv) or Excel(.xls) onto your device’s local drive.
- Import: Import .csv or .xls information from your drive onto the desired instance/portal.
Types of Data Available to Move
Export or import the following sets of data according to Plant and Site using the same-named Tabs provided (see Figure 1):
- User
- Profile
- Assignment
- Shop Floor Device
- Android Device
Figure 2: Tabs and Location
Plant: The Plant List. Users can select the source plant/destination plant from here.
Site: The Site list. Users can select the source site/desired site from here.
User Tab
1. Search by:
- Screen Name: Type the name into the field; no drop-down is available
- Email: Enter the address; no drop-down available
- Status: Choose from the drop-down menu: All/Active/Inactive
- User Type: Choose from the drop-down menu: All/LDAP/Non-LDAP
2. Select the green Search button; the screen will populate.
Export User List
3. To Export the User list as a .csv or .xls file, choose the green Export button (Figure 3).
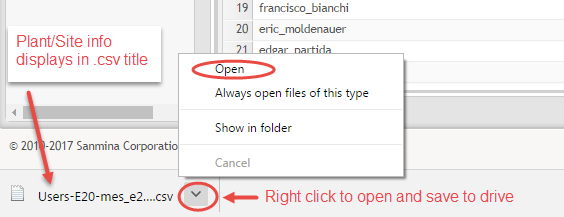
4. Save to drive.
Figure 2: Export Users
Import Users
5. To Import the Users to a different portal, navigate to the new portal you would like to move data into
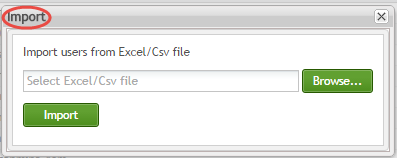
6. Choose the Import button in the desired portal
7. Browse the drive of the device you saved the file onto for the .csv
8. Choose Import (see Figure 4).
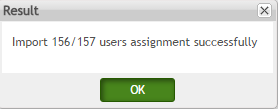
9. When the file is imported successfully, a Result screen displays (Figure 5).
Figure 5: Result Screen
Note: This process is identical for any location, with different data displayed.
Profile Tab
1. Export/Import Profiles for the Plant and Site in the same way.
Figure 6: Export/Import Plant Profiles
Assignment Tab
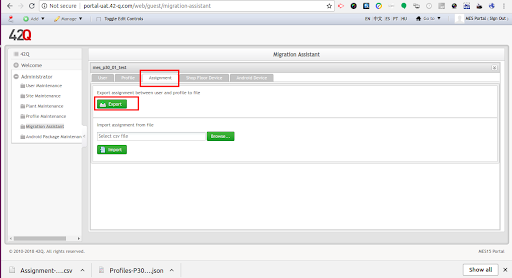
1. The Assignment Tab looks different from the other Tabs because there is no list to display; assignments are based on the relationship between the Users and Profiles.
Figure 7: Assignment Tab
Shop Floor Device Tab
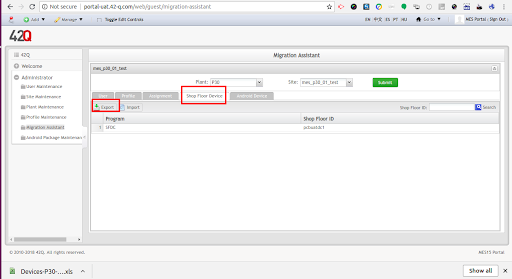
1. Export/Import Shop Floor Device information for the Plant and Site in the same way.
Under the Shop Floor Device tab, click Export to generate Device configuration as Xls to local PC. It’s possible more than one Shop Floor ID is configured at one site, Export will be all devices but Shop Floor ID will be verified to match at importing.
Figure 8: Shop Floor Device Tab
Note: Exported files remain on the desktop. Once opened, they will be saved to the device’s hard drive to import to a news portal.
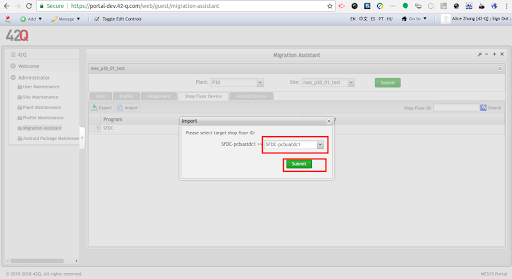
Click Import, Browse to Local PC’s storage, and Import. Shop Floor ID will be matched to import to the right one. This device configuration is mainly for SFDC Data Collector and Production Scanning tools.
Figure 9: Import Shop Floor Device
Android Device Tab
Under Android Device tab, this is to directly copy Android devices and configuration from other portal server for Android device management. No actions are needed for export.
Figure 10: Android Device Tab
Android Device Import
Under the Android Device tab, after selecting the target Plant and Site, Enter the source DB host, and source site name, click Migrate, and then you’ll see the Android device migration results.
Figure 11: Import Android Device
Please note, when we’re developing these functions, H/A is still not supported at that time, which means Portal Server Host and Portal DB is the same, but now, all MES Portal had been deployed with H/A, we need to put DB host here instead to make it work. For example, in this screenshot, the portal host is portal.42-q.com, but I need to mesportal.sanmina.com instead. We could change the label in the future to make more sense, but I believe this migration tool is only for MES Support who should already have such environment information.


