How to use Production Scheduling Tool
Contents
- 1 Summary
- 2 Access to Production Scheduling
- 3 Export Scheduled Information
- 4 Import Schedules
- 5 Add a Shop Order to Calendar
- 6 Search a Shop Order
- 7 Filter Shop Order Information
- 8 Switch Calendar to Day, Week, or Month
- 9 How to Schedule Non-Production Time at the OEE plant calendar
- 10 Edit, Unschedule, Split, Merge a Shop Order
- 11 Edit or Color MFG Lines
- 12 How to See Action and Changes in the Performed Shop Orders
- 13 How to Search Active or Inactive MFG Lines
- 14 Activate or Inactivate manually an MFG Line
- 15 How to view the percentage of completion of each schedule or sub-schedule in real-time
- 16 How to see the calculated time that is necessary to complete a production schedule or sub-schedule
Summary
This How-to document for Production Scheduling will help you know more quickly the steps to use this tool more quickly, allowing users to schedule when shop orders are expected to run in the Manufacturing Lines. It presents a calendar view where users can see their MFG Lines capacities and set them by Day, Week, or Month. The following are some of the features:
- Manually scheduling Shop Orders by line
- Personalization of the configuration
- Access to the Targets and Cycle time information
- Import and export schedules
- Display the percentage of completion of each sub schedule and more
Please use the table of contents to locate what you need to know, and for more detailed information, refer to the Production Scheduling SOP.
Access to Production Scheduling
Navigate to: Shop Floor Control > Production Control > Production Scheduling.
Figure 1: Access Production Scheduling
Export Scheduled Information
Select the download icon to download the scheduled information such as Shop Orders, Preventative Maintenance, etc. A window will appear at the bottom of the screen confirming that the action was completed.
Figure 2: Export Schedule
Import Schedules
- Select the upload icon. The Bulk Upload window will appear.
- Drag and drop a selected .csv file from the device or browse it.
- Select Validate Records to proceed or Cancel to exit.
- If the Cancel button is selected, a pop-up window will appear to confirm the action. Select ‘Yes’ to cancel or ‘No’, to go back.
Figure 3: Bulk Upload
Add a Shop Order to Calendar
- Select the Shop Order button. A list of Shop Orders will be displayed on the right side of the screen.
- Select a Shop Order to drag and drop into the calendar.
Figure 4: Drag and Drop Shop Order
PS6 Production Scheduling Drag and Drop.png
Search a Shop Order
To do a simple search
- Write down the Shop Order and the Start and End date.
- Then select the Search button.
Figure 5: Search Fields
To do specific searches
Searches by Shop Order, Status, Part Number, Part Family, Priority, and/or Customer:
- Select the Shop Order button to display the searching window.
- Then write down the information in the corresponding field.
- When the searching window is opened, only the Shop Order and the Status fields are visible. Add more searching fields with the +More button.
Figure 6: +MORE Options for Searching
PS6 More Options for Searching.png
- To display the Status options (All, Scheduled, Unscheduled), select the arrow at the right side of the field.
Figure 7: Searching Status Options
PS7 Searching Status Options.png
Filter Shop Order Information
- Select the Shop order button. A new window will be displayed with the searching fields and the list of scheduled Shop Orders (if there is no schedule, the list will be empty).
- Select three dots icon to display the View Shop Order window with the following options information to see in the list:
- Shop Order
- Part Number
- Part Family
- Quantity
- Priority
- Status
- Start Time
- End Time
- Customer
- Duration (Mins)
- Release Time
- Select all the filters that users need.
Figure 8: View Shop Order Information
PS8 View Shop Order Information.png
Switch Calendar to Day, Week, or Month
Select one of the three options located on the top right corner of the calendar to see the calendar by day, week, or month.
Figure 9: Day, Week, or Month Visualization Options
PS9 Day, Week or Month Visualization Options.png
Figure 10: Day - Shift
Figure 11: Week or Month - Date
How to Schedule Non-Production Time at the OEE plant calendar
- Go to: Shop Floor Control > Configuration > OEE Configuration, at the OEE Configuration page, select Plant Calendar.
- On the Plant Calendar page, set the shift date not working.
Figure 12: Plant Calendar in OEE Configuration
PS12 Plan Calendar OEE Configuration.png
Figure 13: Scheduled Non-Production Time
Figure 6a- scheduled non-production date.png
Edit, Unschedule, Split, Merge a Shop Order
To execute any of these actions:
- Right-click on the Shop Order Menu.
- Then, select the desired action. In every case, a pop-up window will appear where the user should:
- Complete the required information to proceed.
- Or confirm the action.
Figure 14: Shop Order Menu
PS7 Production Scheduling SO Edit menu.png
Edit a scheduled Shop Order:
- Select the Edit option that is displayed from the Shop Order menu.
- The ‘Edit Production Scheduling’ window will be displayed where users can:
- Select the Process.
- Change the Duration, Status, Start Date, and the Color.
- And add Comments to it.
- Select the Save button to proceed or Cancel to quit the process.
Figure 15: Edit Production Scheduling Pop-up
PS15 Edit Production Scheduling pop-up.png
Unschedule a Shop Order
- Select the Unschedule option from the Shop Order menu. A pop-up window will be displayed with a warning message to confirm the action.
- Select Save to proceed or Cancel to quit.
Figure 16: Unscheduling Confirmation Message
Split a Shop Order
- Select the option from the Shop Order menu. A new page will be displayed with all of the information related to the Shop Order.
- Select another MFG Line, Process, Status, Duration, Start Date, End time, Quantity, and Color (color provides visibility to the changes helping to identify the split cell in the calendar).
- Select Save to proceed or Cancel to quit the process.
Figure 17: Split Production Scheduling pop-up
PS10 Production Scheduling Split.png
Merge Scheduled Shop Orders
- Select the Merge option from the Shop Order menu.
- Then select the MFGLine.
- Any of the following options can be selected from Merge:
- Merge From
- Merge To MFG Line
- Status, (it can be Schedule or Unschedule)
- Duration
- End Time
- Quantity
- Color.
- The ‘Edit Production Scheduling’ window will be displayed where users can:
- Select the Process.
- Change the Duration, Status, Start Date, and the Color.
- And add Comments to it.
- Select Save to proceed or Cancel to quit.
Figure 18: Merge Production Scheduling pop-up
PS11 Production Scheduling Merge.png
Note: Users can only merge schedules that are in the same Shop Order.
Edit or Color MFG Lines
Color MFG Lines
- Select ‘Color’ from the Shop Order Menu. The Activity Display Options menu will open; assign a color to any of the available options:
- Types
- My Schedules
- MFG Line
- Select the Save button to proceed or Cancel to quit the process.
Figure 19: Activity Display Options
PS12 Production Scheduling Edit Color .png
Edit an MFG Line and its processes
- Select Edit from the Shop Order Menu. The Edit Production Scheduling will be displayed.
- To see the list of available processes, click on the Process field and select one.
- Select the Save button to proceed or Cancel to quit the process.
Figure 20: Edit Production Scheduling - MFG Line
How to See Action and Changes in the Performed Shop Orders
- Select the Activity Log button to display the Activity Log List.
- Find specific Shop Orders searching by Shop Order, Action Type, Start time, and/or End Time.
Figure 21: Activity Log List
How to Search Active or Inactive MFG Lines
- Select the MFG Line option from the top menu. A window will open with the MFG Line list.
- Search an MFG Line by name or by status Active/Inactive. The searched MFG Line will appear in the list.
Figure 22: MFG Line Window
Activate or Inactivate manually an MFG Line
- Select an MFG Line from the list. A checkmark and a cross will appear at the right side of the selected MFG Line.
- Choose cross for Inactivate or check for Activate. The color of the status will change. Green for Active or Red for Inactive.
Figure 23: Active and Inactive Options
PS23 Active and Inactive options.png
How to view the percentage of completion of each schedule or sub-schedule in real-time
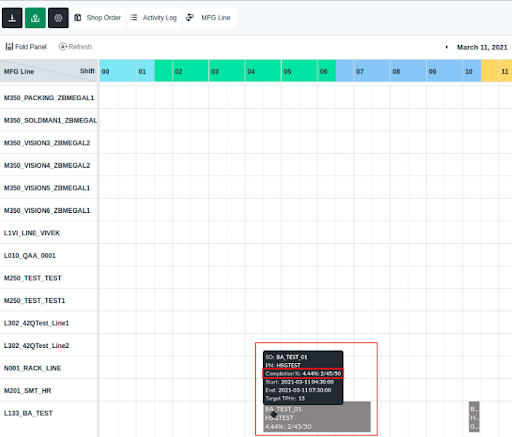
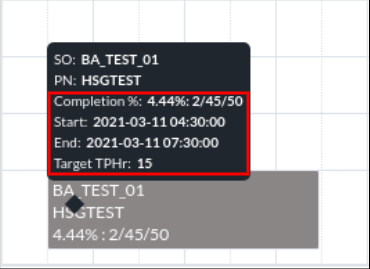
- Locate the cursor over the scheduled or sub-schedule. A window will display the following information:
- Total number of units of the whole Shop Order
- Units that belong to the sub-schedule
- Total number of units completed at that time
- Completion percentage of the selected sub-schedule at that moment
Figure 24: Sub-schedule
How to see the calculated time that is necessary to complete a production schedule or sub-schedule
- Select the Shop Order button to display a new window with the Shop Order list.
- Use the search fields in case you want to find a specific Shop Order. Different filters can be added with the +MORE button.
- Select any Shop Order.
- Drag and drop the selected Shop Order to the Production Scheduling Panel.
- Read the length of time that was automatically calculated according to the Target TPHr necessary for the schedule to be completed.
Note: To visualize the calculation of the time it is necessary to configure correctly the location associated with the selected MFG Line in Shop Floor Configuration.
Figure 25: Scheduling a Shop Order
PS25 Scheduling a Shop Order.png
Figure 26: Target and Cycle Information
Note: To visualize the value of Target TPHr when a Shop Order is scheduled, users must do some configuration or make sure is configured correctly. For more information refer to Production Scheduling SOP.


