SOP-MES0029 Admin Document Control
42Q Home > Administration > Admin Document Control
Contents
- 1 Administration
- 2 Document Control
- 2.1 Document Type
- 2.2 Document Mapping
- 3 Production
Administration
Administrative privileges in 42Q are located in the Administration menu heading. With the portal, Administrators are able to access privileges from one convenient location.
Privileges include:
- User Maintenance
- Plant Maintenance
- Site Maintenance
- Profile Maintenance
- Generic Attribute Maintenance.
Also located in the Administration menu heading are Shop Floor Control Administrator, Document Control, Traceability Administrator, and Label Engine Administration
This SOP is intended to guide administrators on how to manage and maintain the 42Q Portal, as well as to provide specific user groups a common sense of portal operation.
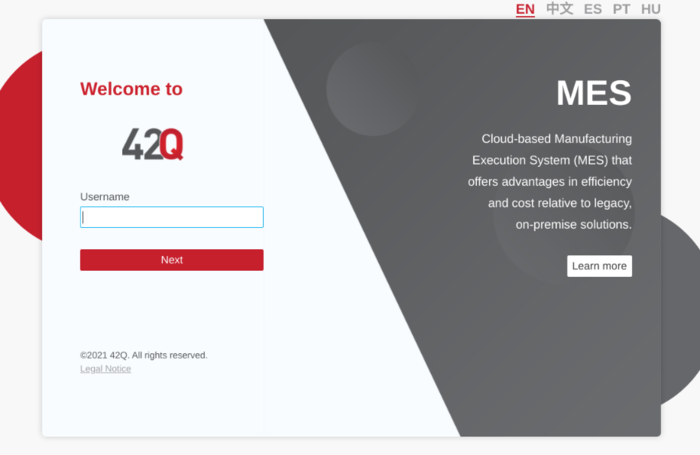
To access any of the Administration functionalities, the user must sign in to 42Q and then select the Administration expandable heading located in the menu on the left of the screen.
Figure 1: User Sign-In
Figure 2: Administration
Document Control
This section covers how local administrators can maintain document file types. This is the prerequisite configuration before users can upload documents, as all uploaded documents will be categorized and displayed by their document type.
Document Type
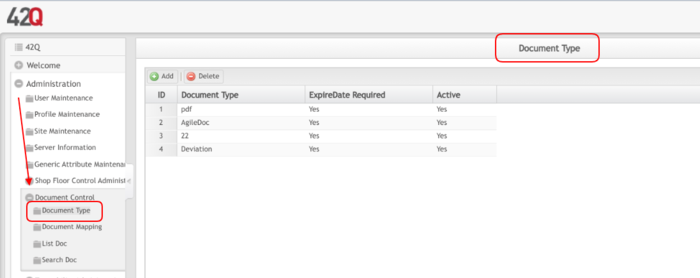
1. To access the document type page, navigate to Administration> Document Control> Document Type.
Figure 3: Document Type Main Page
All existing document types will be listed on the Document Type Main Page.
Add Document Type
1. To add a new document type, select the Add button, and a new row will be added. Enter the Document Type and the Update button will be enabled to save.
Figure 4: Add Document Type
- Document Type: the document type name to add to the local repository.
- ExpireDate Required: This allows the user to define if there is a valid date required for the document type. If this option is checked, the Start Date and End Date options in the Document Mapping page will be activated.
- Active: Allows the user to enable or disable the document type in the system. If this option is checked, the user can view and select the document type when mapping documents.
2. Enter the appropriate information and select Update to confirm or Cancel to exit.
Delete Document Type
1. To delete a document type, select the document type and then select Delete. Deleting a document type will not affect the display of existing documents that are of this document type in the repository.
Figure 5: Delete Document Type
Document Mapping
The Document Mapping portlet allows users to maintain documentation by uploading documents via Agile, local networks, or URLs. It also allows users to map documents or deviation attachments to specific part numbers and processes. The goal of these instructions is to outline the steps to assign appropriate documentation to the end-user regarding a process or part for which they require work instructions or deviation information.
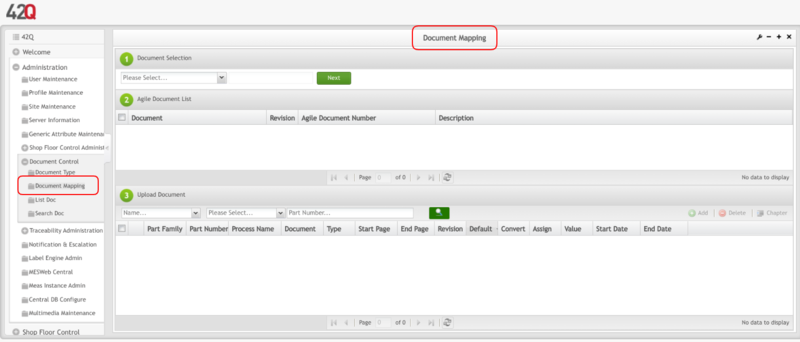
1. To access the Document Mapping page, navigate to Administration>Document Control>Upload Document.
Figure 6: Document Mapping Main Page
Document Selection: Agile Versus Local
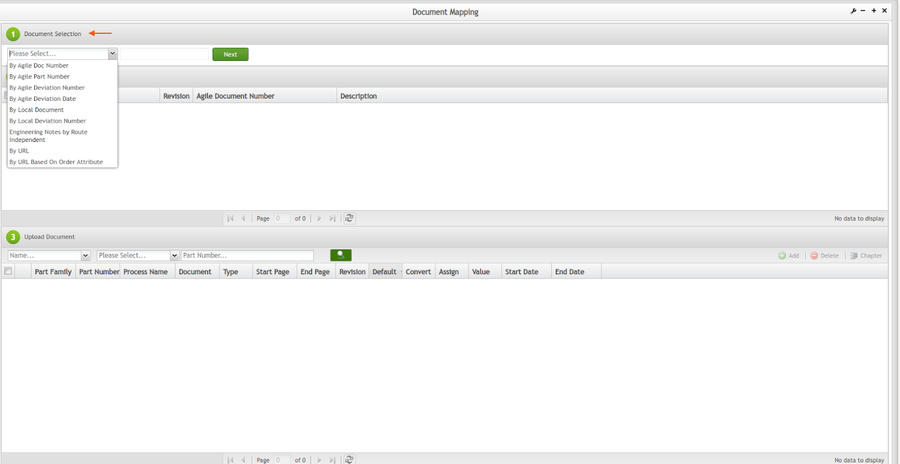
The Document Mapping portlet allows documents and deviations (PDF attachments) to be uploaded from Agile as well as from a local drive. The benefit of uploading documents from Agile is that the documents are published in full compliance with company standards and procedures. Retrieving a document from Agile also ensures that it is the latest version. Documents can also be uploaded for display from a local computer or network. However, local documents are less controlled and it is difficult to ensure the latest version is available for display. We will expound upon each option for uploading documents below:
- By Agile Doc Number
- By Agile Part Number
- By Agile Deviation Number
- By Agile Deviation Date
- By Local Document
- By Local Deviation Number
- Engineering Notes by Route Independent
- By URL
- By URL Based On Order Attribute
Figure 7: Document Selection
Uploading From Agile
Agile Document Number
The first option that may be selected is the Agile Document Number. This number will correspond with a document number that exists in Agile.
1. When mapping by Agile Document Number, the user will enter the number of an Agile document (e.g., E51-DOC-000081) into the search field under Document Selection. The user will then enter next to pull any documents that are associated with that number in Agile.
Figure 8: Document Selection
2. Mappable document results will now appear in the Agile Document List section. Those that have already been mapped are designated by blue font and are marked with a green check icon. Only entries that are active are displayed; implemented or canceled documents are not shown.
Figure 9: Agile Document List
3. To map a document, select the box for the document in the Agile Document List by checking its corresponding box.
4. Move down to the Upload Document section and select a Shop Floor ID, Part Family, or Number, and then enter a 42Q Part Number. Any documents that have been mapped to the selected part number will be listed in the Upload Document section when you select Search. A window opens where the user enters the specifications of the mapped document.
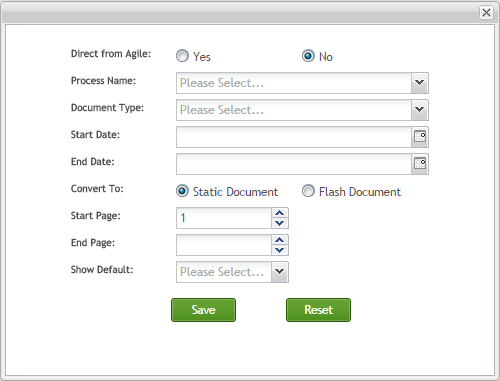
Figure 10: Mapped Document Specifications
5. In the window select the Direct from Agile option. When Yes is selected, 42Q will pull the document from Agile on demand as required by the user. When No is selected, the document is cached in 42Q, but the document will be updated after any ECO or DCO which could impact the document is processed in Agile.
6. Select Process Name, which refers to the production process at which the document is called.
7. Specify the Document Type.
8. Enter the Start Date and End Date range for the document to be called, if applicable.
9. In the Convert To selection, choose Static Document if the document to be presented is non-interactive and is to be delivered exactly as it was uploaded. Flash Document is for displaying active documents.
10. Set the Start and End Pages to be viewed for the document when it is called. This option is ideal for certain multi-page documents, such as when a single work instruction document is used for multiple processes.
11. Determine whether the document will be the default document from the Show Default options.
12. Select Save to complete the mapping.
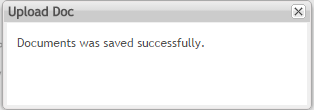
Figure 11: Upload Doc
Agile Part Number
Users may also select to map a document by Agile Part Number.
1. To map by Agile Part Number, select By Agile Part Number in the Document Selection section of the Document Mapping module, and enter an Agile Part Number in the adjacent field. Select Send.
Figure 12: Document Selection
2. Under Agile Document List, a list of documents that are associated with the Agile part number is displayed in the list of results.
Figure 13: Document List
3. To map a document, select the box for the document in the Agile Document List by checking its corresponding box.
4. Move down to the Upload Document section and select a Shop Floor ID, Part Family, or Number, and then enter a 42QPart Number. Any documents that have been mapped to the selected part number will be listed in the Upload Document section when you select search. A window opens where the user specifies the specifications of the mapped document.
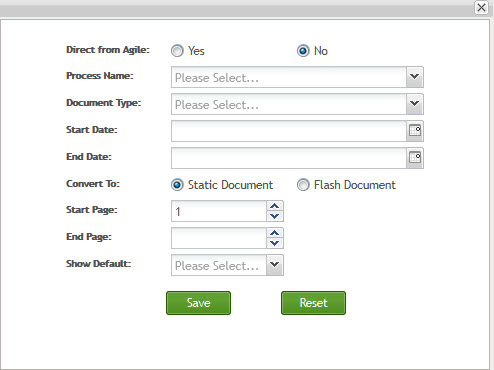
Figure 14: Upload Document
5. In the window select the Direct from Agile option. Yes, will pull the document from Agile and maintains the document so that it remains updated per Agile. Select No to keep the document in its original format so that it does not undergo any updates from Agile.
6. Select Process Name, which refers to the production process at which the document is called.
7. Specify the Document Type.
8. Enter the Start Date and End Date range for the document to be called, when applicable.
9. In the Convert To selection, choose Static Document if the document to be presented is non-interactive and is to be delivered exactly as it was uploaded. Flash Document is for displaying active documents.
10. Set the Start and End Pages to be viewed for the document when it is called. This option is ideal for certain multi-page documents.
11. Determine whether the document will be the default document from the Show Default options.
12. Select Save to complete the mapping.
Figure 15: Upload Doc Pop-up
Agile Deviation Number
Users may map a document by Agile Part Deviation Number. Deviation mapping operates via backend Agile-MES synchronization logic.
1. To map by Agile Deviation Number selection By Agile Deviation Number from the Document Selection Dropdown and enter the deviation number in the adjacent field. Then, select Next.
A list of documents that are associated with the Agile Deviation Number is then listed under the Agile Document List.
Figure 16: Document List
2. To map a document, select the box for the document in the Agile Document List by checking its corresponding box.
3. Move down to the Upload Document section and select a Shop Floor ID, Part Family, or Number, and then enter a 42QPart Number. Any documents that have been mapped to the selected part number will be listed in the Upload Document section when you select search. A window opens where the user specifies the specifications of the mapped document.
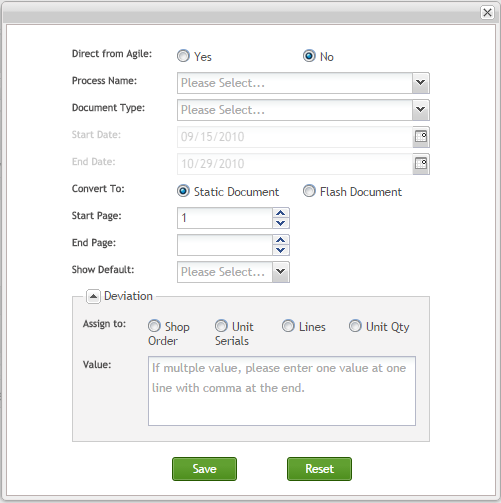
Figure 17: Mapped Document Specifications (Deviation)
4. In the window select the Direct from Agile option. Yes, will pull the document from Agile and maintains the document so that it remains updated per Agile. Select No to keep the document in its original format so that it does not undergo any updates from Agile.
5. Select Process Name, which refers to the production process at which the document is called.
6. Specify the Document Type.
7. Enter the Start Date and End Date range for the document to be called, when applicable.
8. In the Convert To selection, choose Static Document if the document to be presented is non-interactive and is to be delivered exactly as it was uploaded. Flash Document is for displaying active documents.
9. Set the Start and End Pages to be viewed for the document when it is called. This option is ideal for certain multi-page documents.
10. Determine whether the document will be the default document from the Show Default options.
11. In the Deviation section of the window, select the Assign to and enter an applicable value.
12. Select Save to complete the mapping.
Agile Deviation Date
Users can map documents according to the Agile Deviation Date.
1. In the Document Selection section, select By Agile Deviation Date. In the adjacent fields enter the From Date and the To Date.
Figure 18: Document Selection
2. A list of documents that are associated with the Agile Deviation Date range will then be listed in the Agile Document List section.
Figure 19: Document List
3. To map a document select a document from the Document Selection list by checking the corresponding box.
4. Move down to the Upload Document section and select a Shop Floor ID, Part Family, or Number, and then enter a 42QPart Number. Any documents that have been mapped to the selected part number will be listed in the Upload Document section when you select search. A window opens where the user specifies the specifications of the mapped document.
5. In the window select the Direct from Agile option. Yes, will pull the document from Agile and maintains the document so that it remains updated per Agile. Select No to keep the document in its original format so that it does not undergo any updates from Agile.
6. Select Process Name, which refers to the production process at which the document is called.
7. Specify the Document Type.
8. Enter the Start Date and End Date range for the document to be called, when applicable.
9. In the Convert To selection, choose Static Document if the document to be presented is non-interactive and is to be delivered exactly as it was uploaded. Flash Document is for displaying active documents.
10. Set the Start and End Pages to be viewed for the document when it is called. This option is ideal for certain multi-page documents.
11. Determine whether the document will be the default document from the Show Default options.
12. In the Deviation section of the window, select the Assign to enter an applicable value.
13. Select Save to complete the mapping.
Figure 20: Document Mapping Details
Note the following characteristics pertaining to the different document types, particularly as it related to the Affected Items in Agile that are MES:
Note: Deviation documents will automatically display as the default document.
- Quantity-Based: Auto-populates the quantity value.
- Serial-Based: Does NOT auto-populate the Unit Serial, which must be manually entered.
- Time-Based: Auto-populates the Start Date and End Date fields according to the Effective From and Effective To dates in Agile.
1. If applicable, under the Deviation section, select the kind of category to which the document is being assigned using the Assigned to radio buttons. You will then enter the respective information for the selection made in the Value box.
2. Select Save to map the document to the properties selected.
3. After saving, select Reset to clear the fields and map the document to a different process, or exit the form.
4. The mapped document will appear in the Upload Document list.
View Mapping Properties
Once a Search has been selected in the Upload Document section of the page, the properties of pending mapping can be viewed by selecting the blue box for the respective mapping.
Figure 21: Mapping Properties Icon
The Show Mapping Properties window will appear. This window displays information pertaining to the respective deviation type, such as the Agile quantity, the effective serial numbers, assign value, existing implemented quantity, and implemented values thereof.
Uploading By Local Computer or Network
Users can select to upload documents from a local computer or network by document or deviation number.
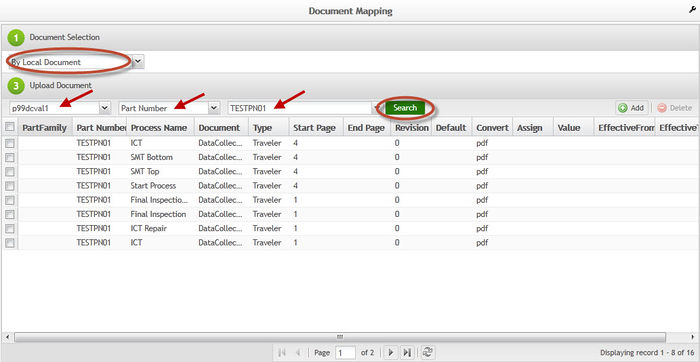
1. Under Document Selection, select whether to search by Local Document or Local Deviation Number.
2. Enter the corresponding local deviation if that option was selected
3. Select the Deviation Document from the Agile Document List, if a Local Deviation was selected.
4. Select the Shop Floor ID from the Upload Document panel. Select whether to upload the document to a part number or part family in the middle drop-down box. In the drop-down box on the right, select a part number or part family.
5. Select Search and then select the appropriate item from the search results.
Figure 22: Map Local Document
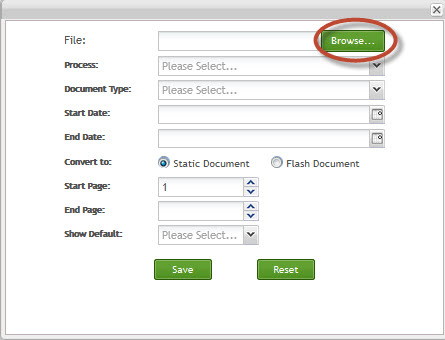
6. Select Add.
7. If Local Document was selected, select the Browse icon to search for the document on the Local Computer or Network. Select the desired document and then select Open.
Figure 23: Browse for Local Document
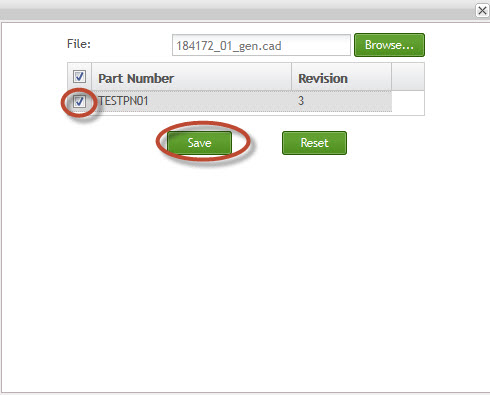
8. If the file is CAD, select the Part Number and Revision to map the document to and then select Save.
Figure 24: CAD Mapping
9. If the local document is not a CAD, complete the following fields in the form to map the document to the Part Number or Part Family:
- Process Name- Select the Process or Processes to which the document will be mapped.
- Document Type- Select the document type.
- Start Date/ End Date- If the selected Document Type has the ExpireDate enabled, then a start date and end date need to be selected to define the document's available date range. This option will be greyed out if the ExpireDate=No for the Document Type.
- Start Page/End Page- Select a start page and end page if only specific pages of the document need to be displayed to the user.
- Show Default- Select Yes to display the document to the user immediately, as the default document. Select No to allow the document to be displayed according to its type.
Note: Deviation documents will automatically display as the default document.
A deviation document can be uploaded into the MES document repository from a local drive without retrieving it from the Agile system. This also requires the mapping of an MES part number and process name, as well as defining the shop order, or serial number.
Note: When uploading a deviation document, the Documentation Type selected must be Deviation. This allows the deviation to be displayed to the end-user by default.
Note: The local deviation number needs to be entered by the user. The naming convention is usually different from the Agile deviation number, which is to be defined at the time of upload and maybe inconsistent from one document to another.
Uploading By Engineering Notes by Route Independent
Uploading by Engineering Notes by Route Independent is an option that was implemented for PCB customers. The descriptions are as follows:
- By Engineering Notes: Will create a text note that will be displayed similar to a document for a specific Item, where the mapping is by Shop Floor ID + Part Number + Tool/Cam Number + Work station/Location or Shop Floor ID + Tool/Cam Number + Workstation/Location.
- Note: Tool/Cam# is The best way that I can explain it is, each Oracle item has a unique Tool #. This tool # is what Engineering uses to identify parts for the plant. The tool # is tied to BOM and Route revisions, CAM drawings, test fixtures, drill tapes, engineering notes, etc. With the tool #, they can review what revisions of fixtures, tapes, etc were used. Each item should be linked to only 1 Tool #. 1 part number/ 1 Tool# could have several work orders, the Tool # is the identifier used to group all that is needed to build a PCB, Tool#/Cam#/Eng. job names are the same thing.
Uploading by Engineering Job Number or Tool/Cam Number
Selecting Uploading by Engineering Notes by Route Independent, The user can check a new field created in the Flex Field tab in the Part Number SOP. For further information about Flex Fields, please refer to SOP-5-I-MES0011-C RA1 Part Maintenance documentation. When the user adds a new field in this form, the field will be reflected in all forms of the Part Number Maintenance.
Note: The new field is tool_cam_number always synced from MDS, but if users need to create it manually, they can follow the operations below.
Figure 25: Part Maintenance - Flex Field Tab
1. Before the user can type/select the tool_cam_number within the Document Mapping field, the user must set the tool_cam_number in the Part Number Form.
2. Within the Part Number Form, use the Flex Field Form tab to set the tool_cam_number field attribute in order for it to display in the Document Mapping->Tool/Cam number drop-down box.
Figure 26: Tool Cam Number Field
3. Once the tool_cam_number attribute has been set, the user can see the newly created attribute in the Document Mapping when uploading documents.
Figure 27: Uploading by Engineering Notes by Route Independent
4. Now the user can select the values and select Search.
5. Type in the correct Tool/Cam Number within the selection box and select search.
Figure 28: Uploading by Engineering Notes by Route Independent Error Message
6. The Tool/Cam number can not be displayed if the format is incorrectly created within the Part Number Field.
7. The correct formatting is tool_cam_number.
8. A pop-up error message will occur in the Document Mapping module /Part Number module when users input the incorrect format of the tool_cam_number.
Mapping By URL
Users can map a document from a URL by defining the document's address and naming the document in the system.
To access the Document Mapping Portal, navigate to Administration > Document Control > Document Mapping.
Figure 29: Document Mapping
Document Mapping is divided into three steps:
- Document Selection.
- Agile Document List
- Upload Document
Document Selection
To be able to map a document by URL, users have to select step ![]() Document Selection; and select the URL option; a drop-down menu with the following options will be shown inside Document Selection.
Document Selection; and select the URL option; a drop-down menu with the following options will be shown inside Document Selection.
- By Agile Doc Number
- By Agile Part Number
- By Agile Deviation Number
- By Agile Deviation Date
- By Local Document
- By Local Deviation Number
- Engineering Notes by Route
- Independent
- By URL
Once the option By URL is selected, the user will be able to see only two steps:
- Document Selection
- Map URL
Figure 30: By URL
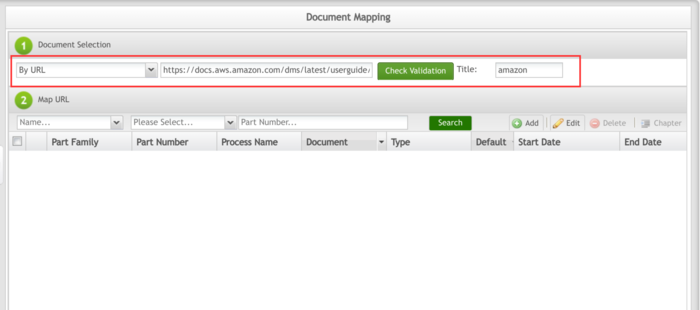
Note: Once By URL is selected, the page will allow users to insert a URL Link to check for validation.
To map a document, first; users have to enter the corresponding URL path for the PDF document being mapped, and add a Title for the document, then select the Check Validation button.
Figure 31: Check Validation
Note: Once Check Validation is selected, the system will migrate to the website in a different tab and display it.
Pdf URL supports HTTPS and HTTP, but other URLs support only HTTPS.
Users have to pay close attention to the prefix and the suffix of the URL they use. (HTML, .pdf, .mp4, .jpg, .jpeg, .gif, .png, .bmp, .webm, .swf, .ogv, .txt, .xml, .htm, .cn, .com), once the system checks validation it will successfully navigate the user to the proper website.
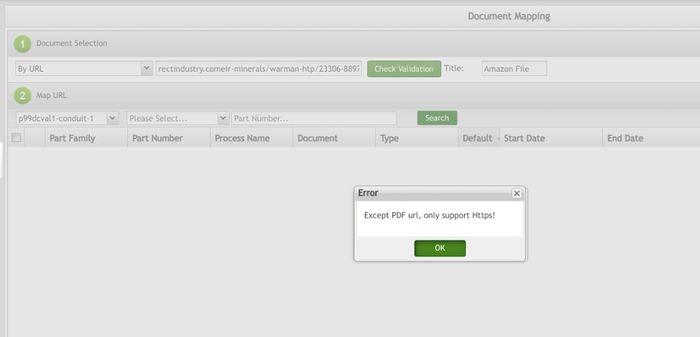
Figure 32: Error Invalid URL
Note: If users place an invalid URL, a window with the following error message will occur, “Except PDF URL, only support HTTPS!”.
Once everything is validated in step 1, users can move to step 2 and Map URLs.
Map URL
To map an URL, users have to first select the Shop Floor ID followed by Part Number or Part Family, from the drop-down from the <a href="Map URL panel.
Figure 33: Map URL Shop Floor ID
Note: The Shop Floor ID will allow users to select from a dropdown list, but does not allow users to type it in.
Figure 34: Map URL - Part Number and Part Family
In the header menu below, the users can see the following fields :
- Part Family
- Part Number
- Process Name
- Document Type
- Default Start Date
- End Date
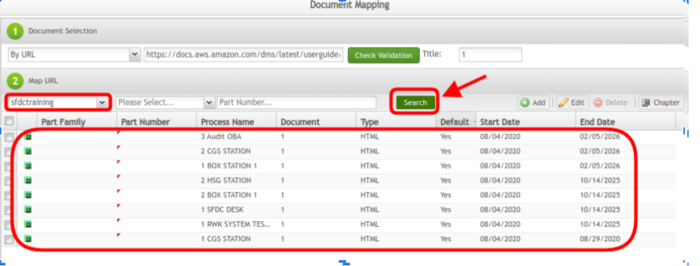
Note: If users only enter the Shop Floor ID and then click the Search button, the system will list all the records mapped by the Process Name Only.
Figure 35: Process Name
Mapping by Part Number and Part Family
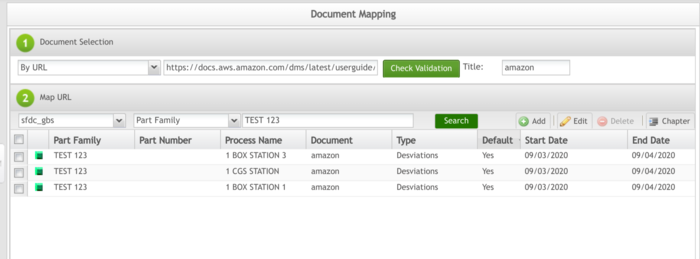
Users can choose to Map URL by Part Number or Part Family. Once one of these options is selected users have to complete the next field, by adding either the Part Number or the Part Family, then click on the Search button.
Figure 36: Part Number
Figure 37: Part Family
Once users click on the Search button, the results will display in the field below.
Figure 38: Search Result
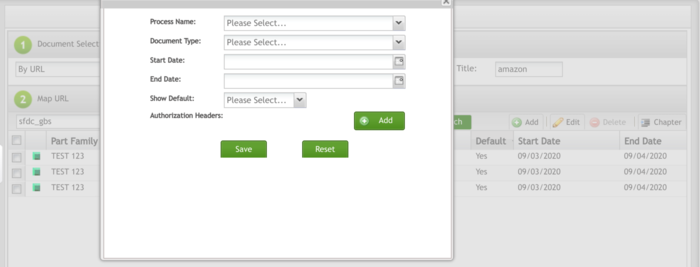
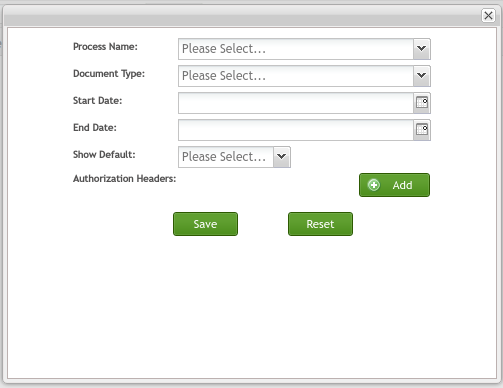
The Add button, allows users to add a record of the selected Part Number or Part Family of the already mapped URLs, once users click to add, a window will pop-up with the following fields:
- Process Name
- Document Type
- Start Date/ End Date
- Show Default
- Authorization Heathers
And the buttons Add, Save and Reset.
Figure 39: +Add
Users have to select the Process Name and the Document Type to be able to Map the URL.
Note: If the user does not have a certain document type in the drop-down, the user must then go to Administration > Document Control > Document Type to add the Document Type that is needed and it will then be available to select. Also, depending on the Document Type that users select, the menu on the screen can display an email field.
Users have to select a Start Date/ End Date to map the time for the document. If the selected Document Type has the ExpireDate enabled, then a start date and end date need to be selected to define the document's available date range. This option will be greyed out if the ExpireDate=No for the Document Type.
When users select Show Default, they will be able to see the options Yes and No. If users select Yes, it will display the document to the user immediately, as the default document. If users select No, this will allow the document to be displayed according to its type.
Figure 40: Show Default
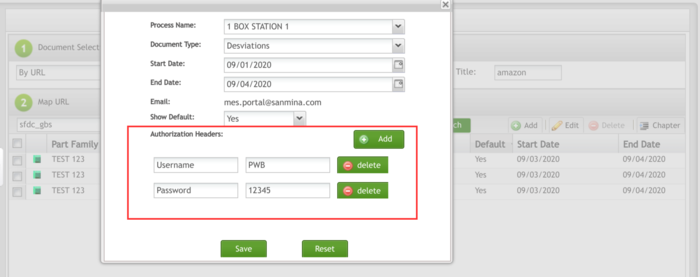
In the Authorization Headers, users are able to Add credentials to manage authentication and the header for the mappings, when users select the Add button, new fields will appear at the bottom of the screen, as shown in the image below.
Once users finish with the setup of the headers they can Save the changes to map the URL according to the properties selected.
Figure 41: Authorization Headers
Map By URL Based On Order Attribute
To map an URL Based on Order Attribute, users have to enter the Attribute name/attribute names.
Note: Users can enter multiple attribute names separated by a comma.
Select the Shop Floor ID followed by Part Number or Part Family, from the drop-down from the Map Order Attribute panel.
Figure 42: Map Order Attribute Shop Floor ID
Note: The Shop Floor ID will allow users to select from a dropdown list. Case sensitive for the Shop Floor.
Figure 43: Map Order Attribute - Part Number and Part Family
In the header menu below, the users can see the following fields :
- Part Family
- Part Number
- Process Name
- Attribute Name
- Type
- Default
- Start Date
- End Date
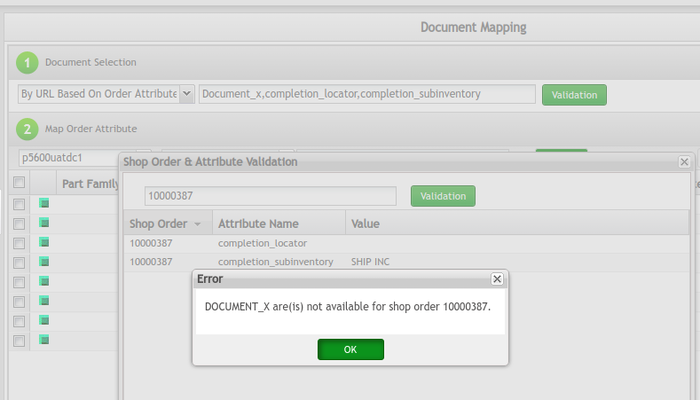
Users can validate the configured attribute by clicking the Validation
- Input multiple Attribute Name separated by a comma
- Input the shop order
- Click Validation (System will list out all the found attribute names which users have inputted)
Figure 44: Shop Order & Attribute Validation
Note: 1. Case insensitive for the attribute name. If users input several duplicate attribute names with the uppercase and lowercase,since the attribute name validation is case insensitive, the system will remove the duplicate attribute names to do the validation. Such as below three duplicate attributes, it will only verify the first attribute name.
Figure 45: Case insensitive for the attribute name
2. If users left attribute names blank, then click “Validation”, the Shop Order & Attribute Validation window pops up. Users can input a valid shop order (e.g. 10000387), the system will list all the attribute names related to the shop order.
Figure 46: List all the attribute names
3. If users input more than one attribute name, some of the attribute names are transferred with the Shop order (e.g. 10000387), it will list out the attribute names which have been found by the attribute, and alert those attributes can’t be found for this shop order.
Figure 47: Invalid attribute names
- Mapping by Part Number and Part Family
Users can choose to Map Order Attribute by Part Number or Part Family. Once one of these options is selected users have to complete the next field, by adding either the Part Number or thePart Family, then click on the Search button.
Figure 48: Part Number
Figure 49: Part Family
Once users click on the Search button, the results will display in the field below.
Figure 50: Search Result
The Add button, allows users to add a record of the selected Part Number or Part Family of the already mapped Order attributes, once users click to add, a window will pop-up with the following fields:
- Process Name
- Document Type
- Start Date/ End Date
- Show Default
- Authorization Heathers
And the buttons Add, Save and Reset
Figure 51: +Add
Users have to select the Process Name and the Document Type to be able to Map the Order Attribute.
Note: If the user does not have a certain document type in the drop-down, the user must then go to Administration > Document Control > Document Type to add the Document Type that is needed and it will then be available to select. Also, depending on the Document Type that users select, the menu on the screen can display an email field.
Users have to select a Start Date/ End Date to map the time for the document. If the selected Document Type has the ExpireDate enabled, then a start date and end date need to be selected to define the document's available date range. This option will be greyed out if the ExpireDate=No for the Document Type.
When users select Show Default, they will be able to see the options Yes and No. If users select Yes, it will display the document to the user immediately, as the default document. If users select No, this will allow the document to be displayed according to its type.
In the Authorization Headers, users are able to Add credentials to manage authentication and the header for the mappings, when users select the Add button, new fields will appear at the bottom of the screen, as shown in the image below.
Once users finish with the setup of the headers they can Save the changes to map the order attribute according to the properties selected.
Figure 52: Open Document
Production
The Parts Traceability System (PTS) is one of the applications within the MES suite of tools. It was developed to meet the demands of customers to provide component-level traceability as well as to provide some required quality controls. This system plays a very important role in automating the production lines and raising productivity as well as enforcing rigorous product quality control. It has been implemented in many 42Q plants across the globe. This application and the features it provides continue to evolve, as the changing technologies used for the SMT process equipment tools become more detailed and rich in functionality. There is and will continue to be a requirement to support the older technology tools. We strive to provide the flexibility to support each of the line types and provide the different and many levels of traceability required for the business.
Documentation
The Production Documentation module described here is where the user can search and list work instruction documents without having to perform SFDC scanning.
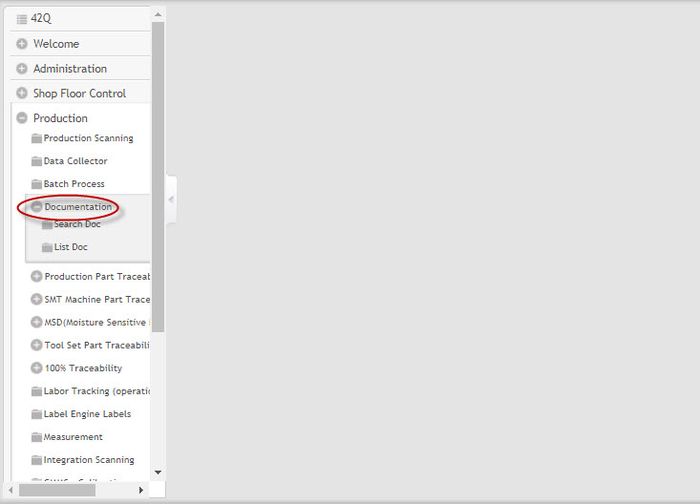
1. To access the Documentation page, navigate to Production > Documentation.
Figure 53: Documentation
Search Documentation
This section explains how the user can search for work instruction documents without having to perform SFDC scanning. The user needs to take note that deviation documents (both agile deviation and local deviation documents) cannot be searched under this page.
Prerequisite Configuration
Upload Agile Document / Upload Local Document
Below are features of the Search Document page:
Display work instruction documents without performing SFDC scanning.
By inputting the SFDC part number and process name, work instruction documents will be displayed instantly.
Support multiple work instruction documents.
- Based on the configuration in Upload Agile Document / Upload Local Document.
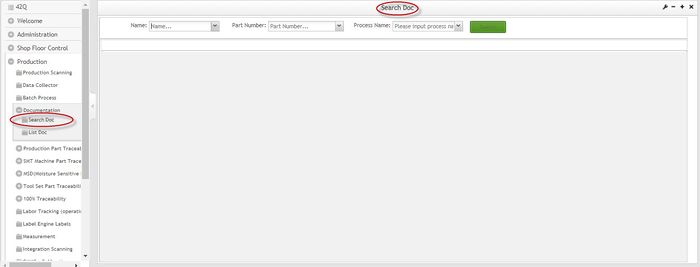
- To access the Search Doc page, navigate to'Production > Documentation > Search Doc.
Figure 54: Search Doc
- Shop Floor ID (Mandatory): Enter the Shop Floor ID of the document. The user must enter at least one digit. The system will automatically retrieve all matched customers for the user's selection. No search is allowed if this option is left blank.
- Part Number (Mandatory): Enter the SFDC part number of the document. Input at least 4 digits. The system will automatically retrieve all matched part numbers for the user's selection. No search is allowed if this option is left blank.
- Process Name (Mandatory): System automatically retrieves all matched process names to the entered part number. Select the process to search the document from the drop-down list.
- Search: Search and display work instruction documents in eManual document repository by Customer, Part Number, and Process Name. All matched work instruction documents will be displayed accordingly. In case there are multiple documents, the default document will be displayed while all subsequent documents can be viewed in tabs.
List Documentation
This section explains how a user can review all work instruction documents in the eManual document repository and search work instruction documents by filtering using part number and/or process name. When the user accesses the List Document page, eManual will display a list of work instruction documents uploaded via Upload Agile Document/Upload Local Document. The documents will be displayed according to their created date.
Prerequisite Configuration
Upload Agile Document / Deviation or Upload Local Document / Deviation
Features of the List Document page:
- Lists out all work instruction documents in eManual document repository.
- Search capability. Allows the user to input SFDC part number and/or process name. The system will return a list of documents with associated SFDC part numbers and/or process names.
- Allows users to view work instruction document PDF attachments.
- To access the List Doc page, navigate to Production > Documentation > List Doc.
Figure 55: List Doc
Entry Fields
- Shop Floor ID
- Part Family (optional): Input SFDC Part Family. Fuzzy Search is supported.
- Part Number (optional): Input SFDC Part Number. Fuzzy Search is supported.
- Process Name (optional): Input SFDC process name. Fuzzy Search is supported.
- Category: All, Agile Doc, Deviation Doc, Local Doc, URL Doc can be selected and fuzzy search is supported.
- Agile Doc Number: All documents uploaded from the Agile system have corresponding Agile document numbers listed in this column. For work instruction documents uploaded using Upload Local Document, this column will be left empty. This is how users can differentiate between work instruction documents uploaded from the Agile system or non Agile systems.
- Agile deviation number: Deviation number from Agile. Fuzzy search is supported.
- Document: Uploaded PDF attachment name. Single-click on the file name to view the content.
Commands
- Search: Search documents in the eManual document repository based on Part Family and/or Part Number and/or Process Name.
- Clear: Clears all entered information.
Displayed Categories
- Revision: Current revision number of the agile document number uploaded in eManual document repository. For work instruction documents uploaded using Upload Local Document, this column will be left empty. This is how users can differentiate between work instruction documents uploaded from Agile system or the non Agile system.
- Part Family: SFDC part family that has been pre-mapped with the PDF attachment. This column matches with the above Part family field entered by the user if there is any.
- Part Number: SFDC part number that has been pre-mapped with the PDF attachment. This column matches with the above Part Number field entered by the user if there is any.
- Process Name: SFDC process which has been pre-mapped with the PDF attachment. This column matches with the Process Name field entered by the user if there is any.
- Creator: Indicates the user that uploaded the work instruction documents.
- Created Date: the date the work instruction document was uploaded.
