42Q-MES0166 Customization Platform
42Q Home > Administration > Customization Platfom

Administration
Crew Maintenace
Version MES15.69
This SOP is 42Q’s corporate standard.
This document is under revision control. The latest revision is located on Intranet.
Once printed it is an uncontrolled copy. All alterations to this work instruction require approval.
Contact the IT Global Education and Training Department to submit suggested alterations and or updates.
This edition applies to MES15.69 and all subsequent releases and modifications until otherwise indicated in new revisions.
Contents
Introduction
The Customization Application Platform provides a platform that allows customization teams or customers to develop customized applications that can access MES data through an API.
Process of Customization Platform for External Customers:
- Developer Register
- Support team configures the app and assign the APIs to the developer
- Developer develop the custom apps
- Dev-Ops run Terraform script to create a Sandbox server to host custom apps
- Support team configures the Sandbox information into the Server Information
- Site admin uploads and deploys the custom apps
- Site admin configures the Launchpad
- Site staff runs Launchpad to launch the custom apps
Process of customization platform for 42Q:
- Customization team develops custom apps
- Dev-Ops run TF script to deploy the custom apps to a Sandbox server
- Customization team configures the Launchpad
- Site staff run Launchpad to launch the custom apps
Server Information Configuration
The Server Information form must be filled in by the 42Q support team.
Below are the steps listed to set up the configuration for Server Information:
From the menu panel, navigate to Administration > Server Information
Figure 1: Accessing The Server Information Portlet
To add new server information, click the Add button.
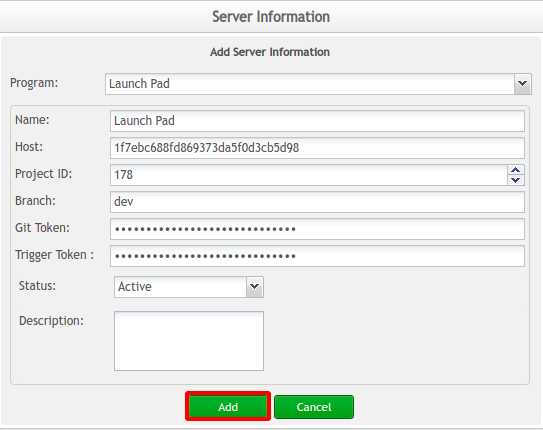
Figure 2: Adding New Server Information
- Fill in the fields with the corresponding information.
- To save the server information, click the Save button or Cancel to abort
Figure 3: Filling In The New Server Information
Launchpad Maintenance Configuration
The Launchpad Maintenance Configuration Portlet is used by the 42Q support team, site admin, and customization team to maintain the custom app entry in the MES Portal.
Add a New Application
From the menu panel, navigate to Administration > Customization Apps > LaunchPad Maintenance
Figure 4: Access LaunchPad Maintenance Portlet
To add a new application, click the Add button.
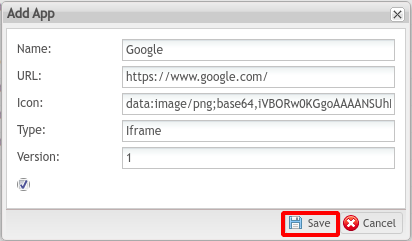
Figure 5: Adding a New Application
- Enter a name for the application.
- Enter the URL of the application.
- In the Icon field, enter the image address of the application icon.
- Notice that the Type field is filled in automatically with the default value ‘Iframe’.
- Enter the application’s version
- Click the Save button to save the information or Cancel to abort
Figure 6: Filling In The App Information
Edit an Application
- Select an application from the list.
- Click the Edit button.
Figure 7: Selecting an App From The List
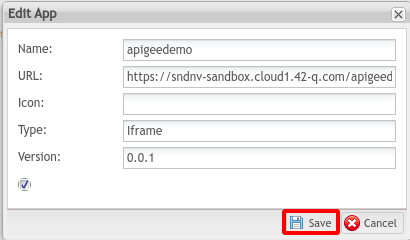
- Change the information of the app.
- Click the Save button to save the information or Cancel to abort.
Figure 8: Editing The Application Information
Active / Disable an Application
Users are able to activate or disable current applications listed in the Launchpad Maintenance portlet.
In order to activate or disable an application, users must follow the next steps below:
- Select an application from the list.
- Click theActive/Disable button to activate or disable the selected application.
Figure 9: Disabling an Application
Note: Applications that are currently active are marked with a blue checked icon under the“Active” column.
Figure 10: Application Disabled
Custom Apps Management
The Site administrator uses this portlet to upload and deploy the custom apps.
Deploy All Custom Apps
To access the Custom Apps Management portlet, navigate to Administration > Customization Apps > Custom Apps Management.
To deploy all the custom applications, click on the Deploy All button, a pop-up window will display as in Figure 12, users may notice that the column Status indicates whether the deployment was successful (blue tick icon) or not (red ex icon).
Figure 11: Deploying All The Custom Apps


