How to Leak Scan Board
Contents
Background
42Q PTS production scanning has a strong process(need scan the board at the previous workstation first, can not skip workstation when scan board ) that can avoid scanning board records missing. Most PTS plants are fine with this function.
But some plants use two PTS production lines to produce the PCB board top & bottom side separately (In different lines).
For example, a Product has B and T two sides. Plants need to create two workstations separately for the B / T side. Sometimes they already processed the B side in another production line(Line1) and then they just need to process the T side in the current line(Line2) and the current workstation with others workstation not scan board.
Detailed production lines setting:
PTS Production Line 1
First Workstation: L1 SP (Scanned By Later Workstation)
Second Workstation: L1 AIMEX_B (Scan For Previous Workstation) First Scanning
Third workstation: L1 AIMEX_T (Scan For the Previous Workstation)
PTS Production Line 2
First Workstation: L2 SP (Scanned By Later Workstation)
Second Workstation: L2 AIMEX_B (Scan For the Previous Workstation)
Third workstation: L2 AIMEX_T (Scan For the Previous Workstation) Second Scanning
Before this enhancement, production will prompt a "Previous WS not scanned." error message when scan the board in line2.
Solution
- First, supply a new configuration item ‘Allow Leak Scanning Board‘ in PTS System Setting function.
- PTS Workstation Setup function to add a new configuration switch item named 'Allow Leak Scanning Board'.
- Improve the Scan Board function, and only when switch 'Allow Leak Scanning Board' in System Setting function and switch 'Allow Leak Scanning Board ' in Workstation Setup function are all in opened status(Value is Yes) the scanning board allows leak scanning for the current workstation.
How to operate in 42Q
System Setting
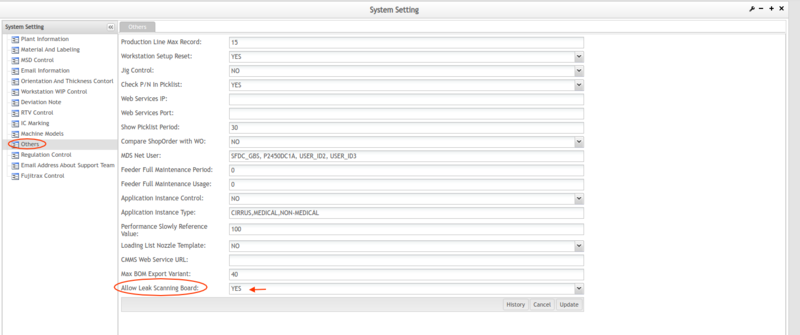
Go to Administration > Traceability Administration > System Setting, at the Others tab, set the Allow Leak Scanning Board =YES
Figure: System Setting - Allow Leak Scanning Board
Workstation Setup
Go to: Shop Floor Control > Production Control > Traceability Setup.
At the module, manage the Production lines and workstations.
For a Leak scanning board, this setting is important for all workstations.
Right-click on the workstation to open the menu, then select Workstation Setup to set the workstation configuration.
Figure: Workstation Setup
After setting all the workstations, please set the lines on line.
This is an example of the two production lines with three workstations each.
Figure: An Example Leak scanning Production Line
Touch
- Load all the materials to all workstations at the Load material function.
Figure: Touch Main Page
- Scan one Board for the B side at the station L1AIMEX-B (Production Line1 TestLine1, B side) at the Scan board function.
- Scan one Board with the same barcode of the B side for the T side at the station L2 AIMEX-T (Production Line2 TestLine2, T side) at the scan board function.
- Go to the Load material report to check the material quantity for the Production line2(TestLine2), the quantity of the material for station L2 AIMEX-T is reduced, but the quantity of the material for the other two stations (L2 SP, L2 AIMEX-B) is not reduced. This step is optional.
Figure: An example for scan board
Document Revision History
| Date | Author | Title | Version | Change Reference | Approved by |
|---|---|---|---|---|---|
| 04/16/2020 | Helena Wang | Technical Writer | A | Initial Draft |


