SOP-42Q-MES0154 Production Scheduling
This edition applies to MES 15 Portal 1.0 and all subsequent releases and modifications until otherwise indicated in new revisions.
Contents
Introduction
Production Scheduling is a 42Q portlet, which provides the users with the ability to schedule when shop orders are expected to run in the Manufacturing Lines. It presents a calendar view where the users can see their MFG Lines capacities and set them up by Day, Week, or Month; the different shifts are layout in different colors.
To access Production Scheduling, navigate to Shop Floor Control > Production Control> Production Scheduling.
Figure 1: Production Scheduling
Note: Production Scheduling has integration with CMMS, allowing users to see when maintenance or calibration is scheduled or if machinery is down.
See the next topics for further details on how to use Production Scheduling.
Production Scheduling
At the top of the Production Scheduling landing page, the header displays the following options:Shop Order, Activity Log, andMFG Line;
Production scheduling allows users to perform the following functions:
- Download the scheduled Shop Orders by selecting the download icon;
- Upload Shop Orders by selecting the upload icon;
Figure 2: Production Scheduling Menu
Note: This can be one done one by one or by mass upload.
Users are able to see the schedule by Day, Week, or Month
Figure 3: Day, Week, Month
Shop Order
To add Shop Orders to the calendar, select the Shop Order button.
A new section is displayed on the right side of the page displaying the list of Shop Orders released in Oracle and available in 42Q.
Figure 4: Shop Order List
Shop Order Search
The Shop Order menu is equipped with a search engine on top of their screen; users can search for a specific Shop Order, the Status or Part Number, and the +More button allows them to search by Priority or Customer.
Figure 5: Search Shop Order
RTENOTITLE
Note: All three options can be selected at the same time and they will be added to the search menu.
Add Shop Orders
To add the Shop Orders to the Production Scheduling view users need to select the Shop Order, drag it from the window and drop it to the calendar.
Figure 6: Drag and Drop Shop Order
Note: Shop Orders cannot overlap in the line.
Once the Shop Order is added to the calendar, users are able to Edit, Unschedule, Split, Merge and modify the Color by right-clicking on the Shop Order.
Figure 7: Shop Order Menu
Edit
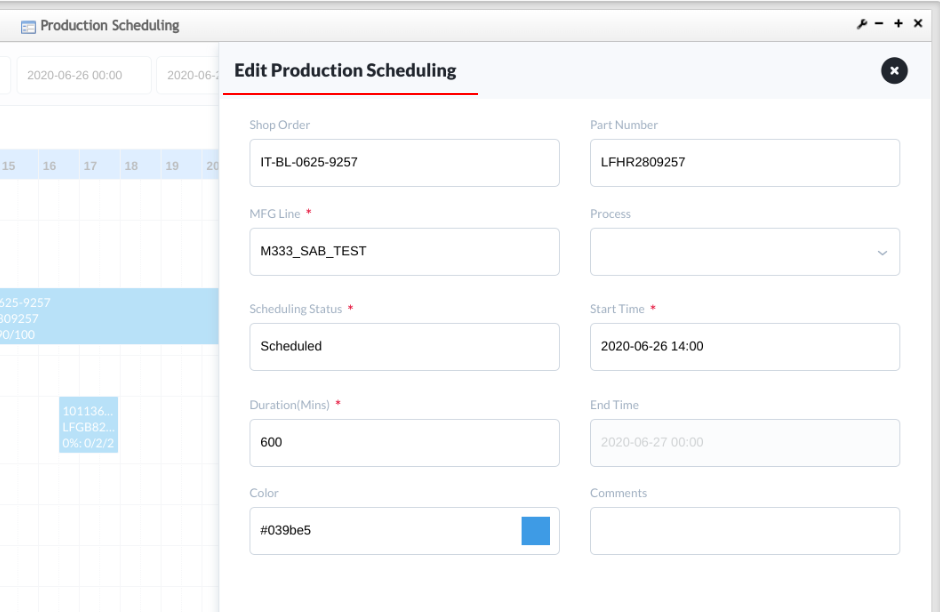
To edit a Shop Order; select the Edit option inside the Shop Order menu as displayed in the image above: Users are able to see all the information related to the Shop Order and select the Process, change the Duration, Status, Start Date, the Color and add Comments to it.
Figure 8: Shop Order Edit Menu
Unschedule
To Unschedule the Shop Order; select this option from the menu. A pop-up window is displayed with a warning message to make sure the users really want to Unschedule it.
Cancel orSave thechanges.
Figure 9: Shop Order Unschedule
Split
To Split Shop Orders, select the option from the menu. A new page is displayed with all of the information related to the Shop Order. Users are able to select another MFG Line, Process, Status, Duration, Start Date, End time, Quantity and Color; the color provides visibility to the changes to help users to identify the split cell in the calendar.
Figure 10: Shop Order Split
Merge
Users can also Merge back together with the Shop Order by right-clicking the Shop Order and select the MFG Line again; the following options can be selected from Merge:
Merge From, Merge To MFG Line, Status, (it can be Schedule or Unschedule), Duration, End Time, Quantity, andColor.
Note: The fields marked with a red star * are mandatory
Figure 11: Shop Order Merge
Color
The Color can be modified to provide visibility to the different MFG Lines and Shop Orders in order to help users to easily identify any changes.
Right-click the Shop Order, and from the menu select Color, and the Activity Display Options menu will open; the following options are available.
- Types
- My Schedules
- MFG Line.
Figure 12: Shop Order Edit Color
Note: Users can fold and unfold the all Shop Order menus for screen visibility, and the options Cancel and Save are available at the bottom of every Menu.
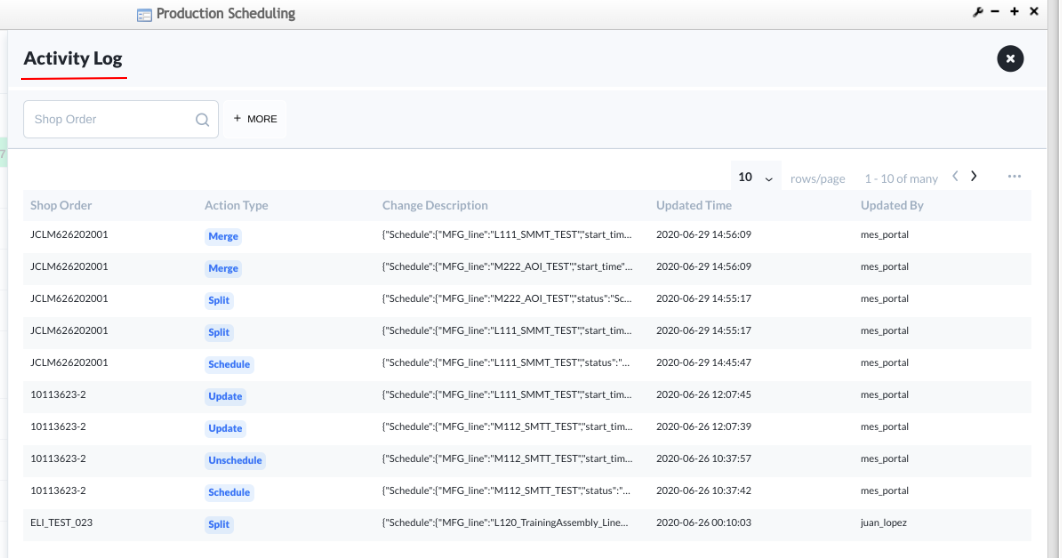
Activity Log
The Activity Log allows the user to see the Action and Changes performed in the Shop Orders.
Figure 13: Activity Log
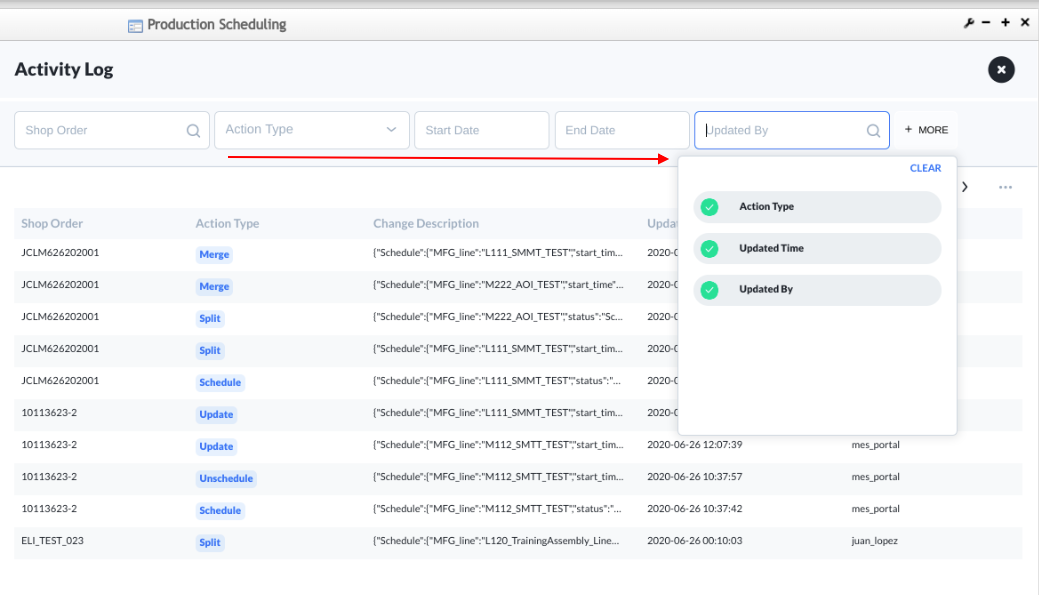
Inside the Activity Log menu, users can find specific Shop Orders using the Search field, and the+More button allows them to search byAction Type, Updated Time, and Updated By.
Figure 14: Activity Log +More Menu
Note: The three options can be selected at the same time as displayed below.
Figure 15: Activity Log, Action Type, Updated Time, Updated By
MFG Line
The Manufacturing Line section displays the MFG Lines that are previously set up in the Shop Order Configuration, where users can assign the Process, or Location to track in Production Scheduling.
Note: The MGF Line List only displays the active Shop Orders.
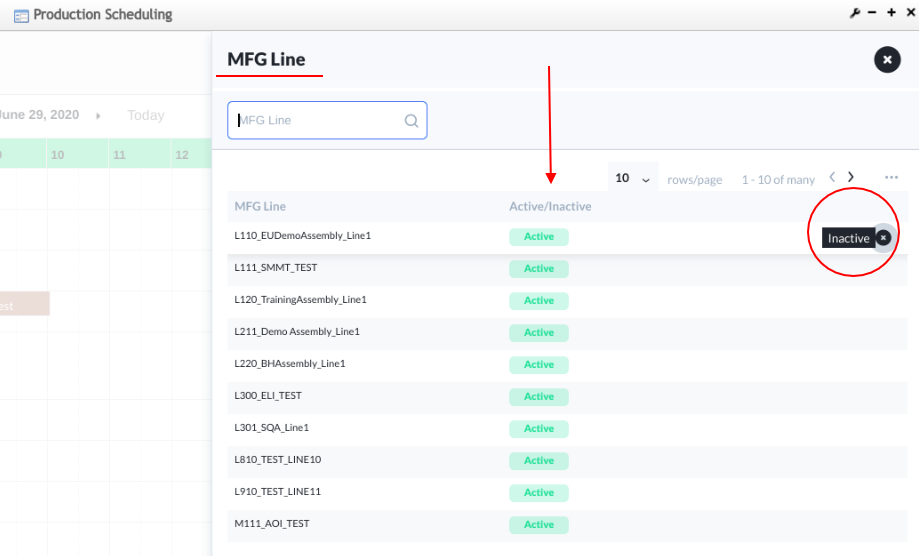
To open the MFG Line List, select the MFG Line option from the top menu, once opened the List displays only the active ones with the option to manually Inactivate them.
Note: The Inactivated Shop Order will disappear from the calendar view.
Figure 16: Manufacturing Line
If the users place the cursor on the selected Line the following icons appear ![]()
To Inactivate, users must select the X, after this option is selected the Line will automatically be removed from the main page.
Revision History


