How to create a Basic Route PN SN
Contents
- 1 How To: Create a Basic Route, PN, SN# and Scan SN#s
- 2 Basic Flow
- 3 Prerequisites
- 4 Before you Begin
- 5 Create an Algorithm
- 6 Test Algorithm
- 7 Create Part Numbers (PNs)
- 8 Map the PN to a Route
- 9 Create Routes
- 10 Part X Route Assignment
- 11 Add an Attribute
- 12 Create A Shop Order
- 13 Release SNs
- 14 Scan SN
- 15 Flowchart: Route Steps
- 16 Revision Log
How To: Create a Basic Route, PN, SN# and Scan SN#s
Basic Flow
This document outlines how to create a very basic route according to the following steps:
- Create Algorithm
- Create PNs
- Map PN to a Route
- Add Attribute (Optional)
- Create Shop Order (with PN)
- Release SNs (for Shop Order)
- Scan SNs
Prerequisites
All Devices, Locations, and Data Collectors are already configured.
Before you Begin
- Station ID has to be linked to the Location you plan to use. (Our Example: Location: p99dcval1)
- Check to make sure the Station ID you plan to use is Active.
- Activate or Add a Station ID here: Administration > SFDC Admin > Device Maintenance.
Screenshot: Activate or Add Station ID
- For this example, we are using VALIDATION as our Station ID.
Note: It's helpful to jot down the configurations on a post-it or notebook, as you will need to move between several portlets to get everything set up.
Create an Algorithm
- Go to: Shop Floor Control > Configuration > Algorithm Tool
- Select Create Algorithm
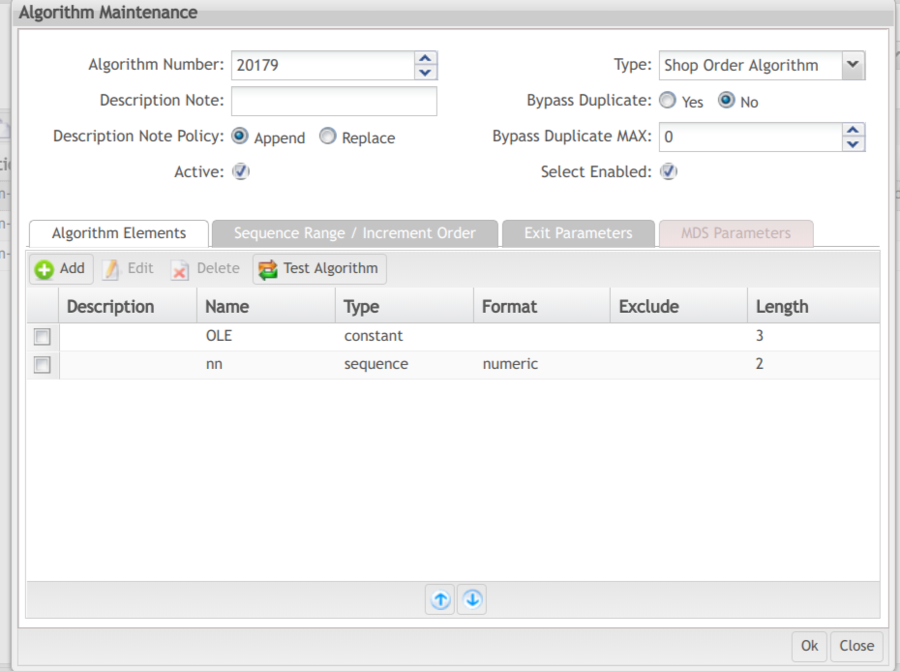
- The next available Algorithm Number is automatically displayed. Use the dropdown if you'd like a different one. (Our Example: 20179: You will need this number to create PNs)
- Select Type from dropdown. (Our Example: Shop Order Algorithm).
- Select Add.
- Select Element Type (Our Example: constant)
- Add Element Name (Our Example is OLE: This means that the name of each SN will begin with OLE)
- Select OK
- Select Element Type again to define the second part of your algorithm. (Our Example is: sequence.)
- Select Element Name. (Our Example is nn: This means that the sequence will contain 2 numbers together).
- Fill in the Minimum/Maximum Values. This sets the beginning and ending SNs that can be assigned. (Our Example: 01-99). You could choose 00-99; 11-22; 01-09; etc.
- Click OK.
- Click Test Algorithm.
Test Algorithm
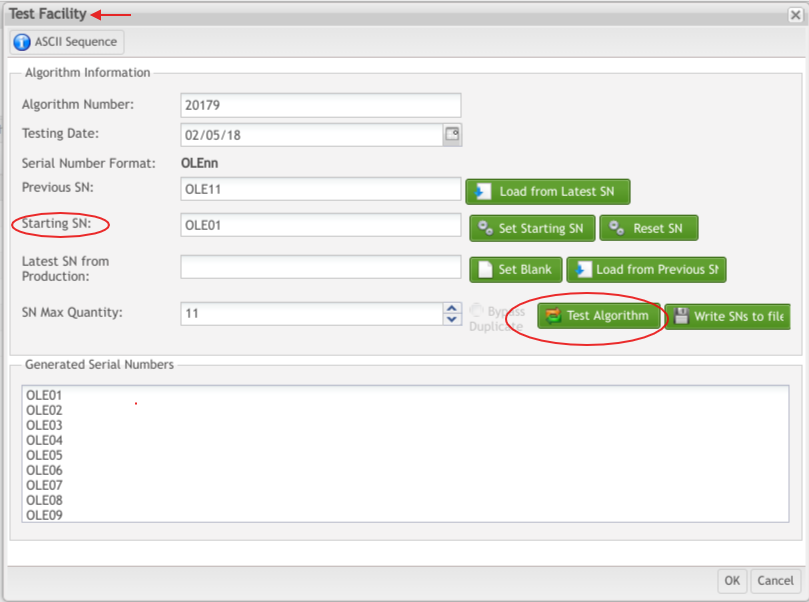
Screenshot: Test Algorithm
- Enter the Starting SN (Our Example: OLE01)
- Click Test Algorithm
- System generates a list of SNs.
- Click OK
- You MUST test the algorithm to assign the SNs as Active (next step).
- Tick Active.
- Tick Enabled.
- Click OK.
Screenshot: Create an Algorithm
Create Part Numbers (PNs)
SNs are linked to PNs. In order to release SNs, you must first create a PN. PNs are the foundation for traceability.
- Go to: Shop Floor Control > Configuration > SFDC Configuration > Part Number
Screenshot: Part Number Icon
- Add Part Number
- Complete the Mandatory Fields:
- Part #: Enter a PN. (Our Example: OLE001)
- Description: Enter a Description Title. (Our Example: Documentation)
- SN Algorithm: (Our Example: 20179)
- Serialized Item: Tick the Serialized Item box.
- Project ID: Pick from the drop-down list. (Our Example: Docs) Define your own (4 characters or less) by selecting the management icon next to Project ID:
Screenshot: Project ID Management Icon
Screenshot: Create PN (TOP of the FORM)
Screenshot: Create PN (BOTTOM of the FORM)
- Check it. (Type your PN in the filtering fields)
- There it is…..
Screenshot: PN Successfully Created
Map the PN to a Route
- Go to: Shop Floor Control > Configuration > Product Route
Screenshot: Product Route Icon
- Select Add
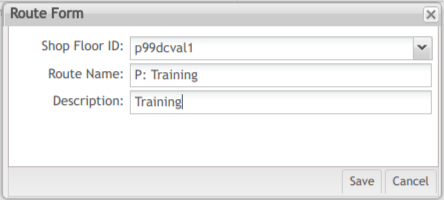
- Every field is mandatory.
- Best practice naming conventions are noted in this document.
Screenshot: Route Name: Our Example
- Hit Save.
- The Route Step screen automatically displays.
Create Routes
Route Step 1
- To create the first step in your production route:
- Select the following:
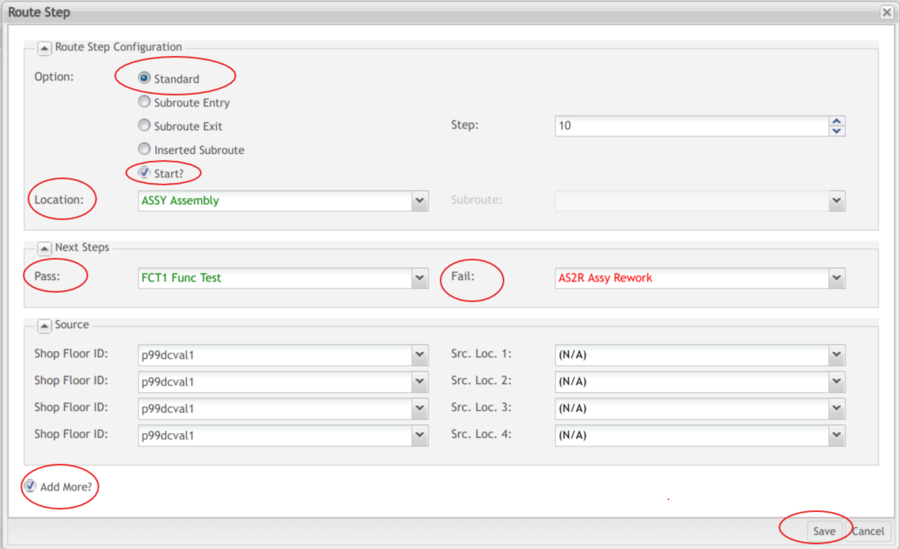
- Tick Standard
- Check Start
- Location: Select the first step. (Our Example: ASSY Assembly)
- Pass: Select where you want your product to go next. "where you want your product to pass to…" (Our Example: FCT1 Func Test. We want our product to move to a test station after it is built.)
- Fail: Select where you want your product to go if it fails. (Our Example: AS2R AssyRework. We want our product to move to an Assembly Rework Station if it fails.)
- If the location route steps you want aren't in the drop-down list, go back to the main page in SFDC Configuration and configure them: Shop Floor Control > Configuration > Location
Screenshot: Location Icon
- Tick Add More if you want to add another Step. (Our Example: We selected Add More because we are going to add a second step. It is going to be our Test Station that we defined in Pass.)
- Reminder: Don’t forget to write down your configurations.
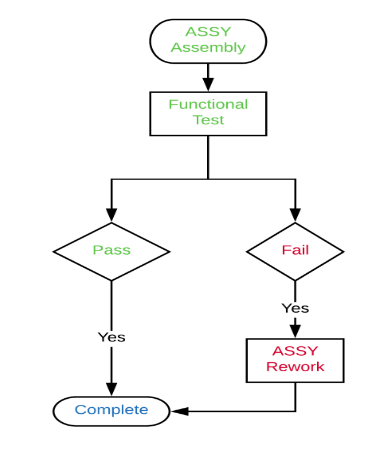
- NOTE: An even better idea is to create a Flowchart to mimic your production. Do this before you even log into the portal. Bring a clipboard to the factory floor and draw it there. Think about what you’re making and how you want things to move. Talk it out loud with other managers and operators. The Flowchart for Our Example is here.
Screenshot: Route Step 1 (This is the Route Step Screen)
Create Route Step 2
After you save the first step, system sends a success message.
The screen automatically refreshes.
Begin Step 2.
This time, leave Start unticked.
Select the Location. (Our Example: FCT1 Func Test).
Steps build on each other. In Step 1, we told the product to pass to FCT1. So, FCT1 becomes the start location for Step 2.
Select the Pass location (Our Example:COMP Complete. We are saying that if this product passes the first inspection, it is complete - there are no other steps.)
Select Fail location (Our Example: AS2R AssyRework. We are directing defective products to a rework station. This station becomes the first step of Route Step 3.)
Tick Add More.
Save
Screenshot: Create Route Step 2
Create Route Step 3
Screenshot: Create Route Step 3
Screenshot: Route Steps Successful
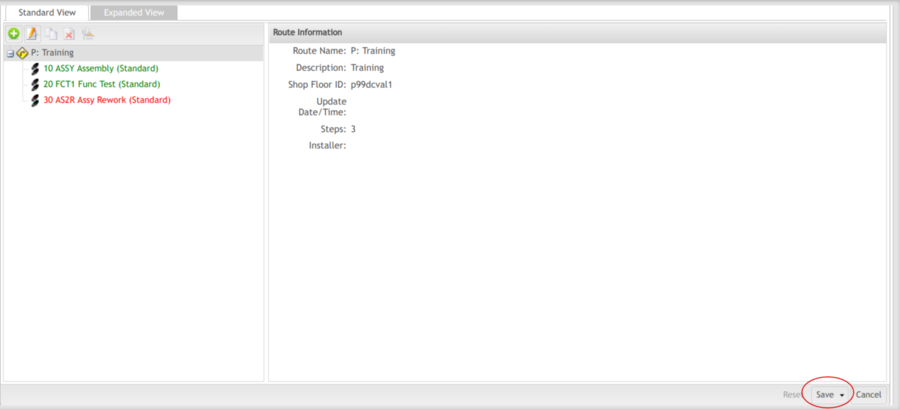
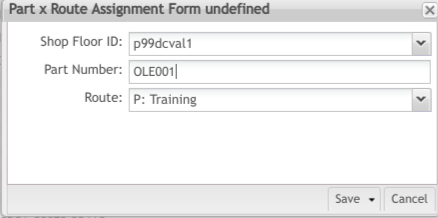
Part X Route Assignment
Screenshot: Part x Route Assignment
Screenshot: Add Part X Route Assignment: Our Example
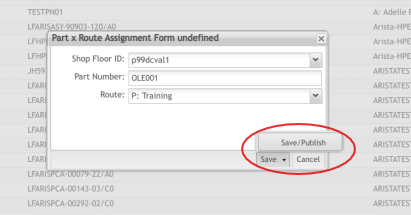
Screenshot: Save/Save & Publish
Add an Attribute
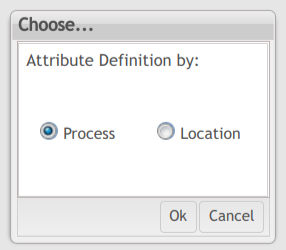
Screenshot: Process/Location
Screenshot: Attribute: Our Example
Screenshot: Step List
Screenshot: Attribute Step Form
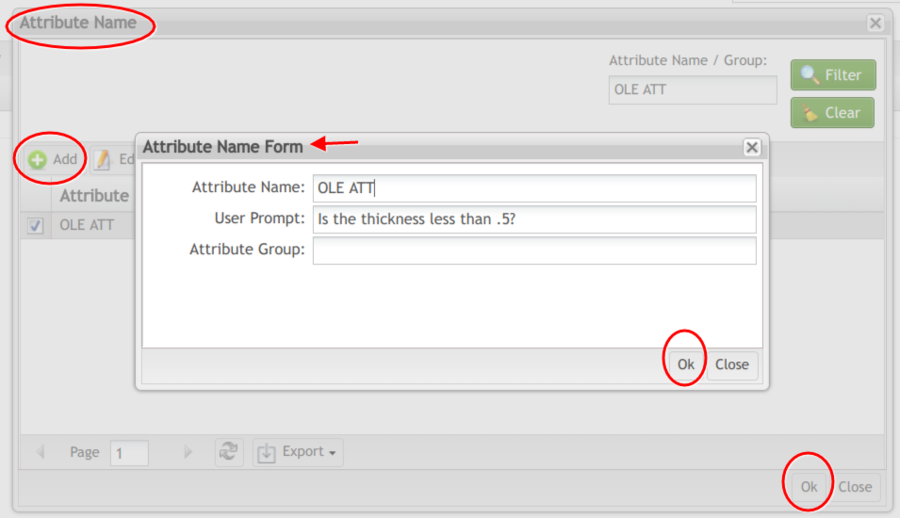
Screenshot: Attribute Name and Prompt
Note: It is best practice to use a specific Attribute Name - it becomes a reference designator for bang bang commands, which you may decide to use at a different time.
Screenshot: Complete Attribute Step Form
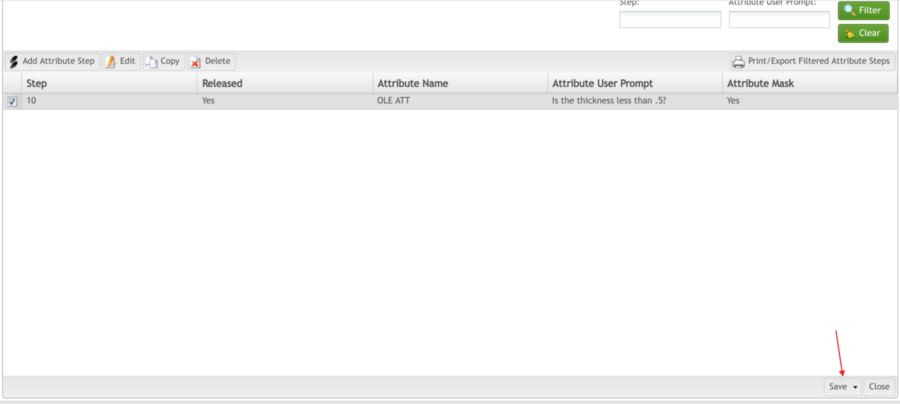
Screenshot: Save Attribute Again
Create A Shop Order
- You will create your Shop Order and Release the SNs in the same place.
- Go to: Shop Floor Control > Production Control > Shop Order Control
- Pick Shop Order Release.
- It looks like this:
Screenshot: Shop Order Release Icon
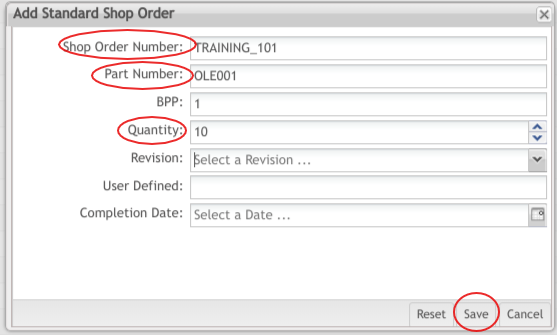
- Add the Mandatory fields:
- Shop Order Number (Our Example: TRAINING_101)
- Part Number (Our Example: OLE001). There is no drop-down. Did you jot it down?
- Quantity: Select the number of SNs you want to release (Our Example: 10)
- Save
Screenshot: Add Shop Order
Release SNs
- Locate the Shop Order you just created with the search filter (Our Example: TRAINING_101).
- Pick Release.
- Follow the prompts at the bottom of each pop-up screen.
Screenshot: Release SNs
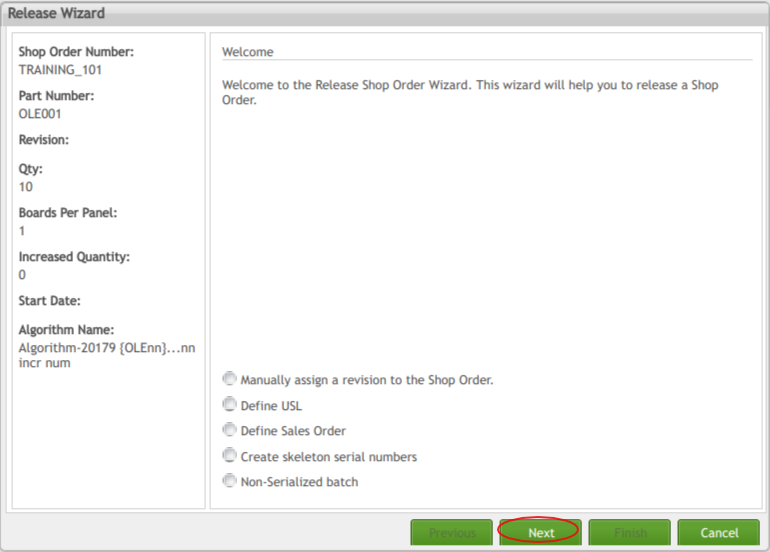
Screenshot: Release Wizard
- Click Next
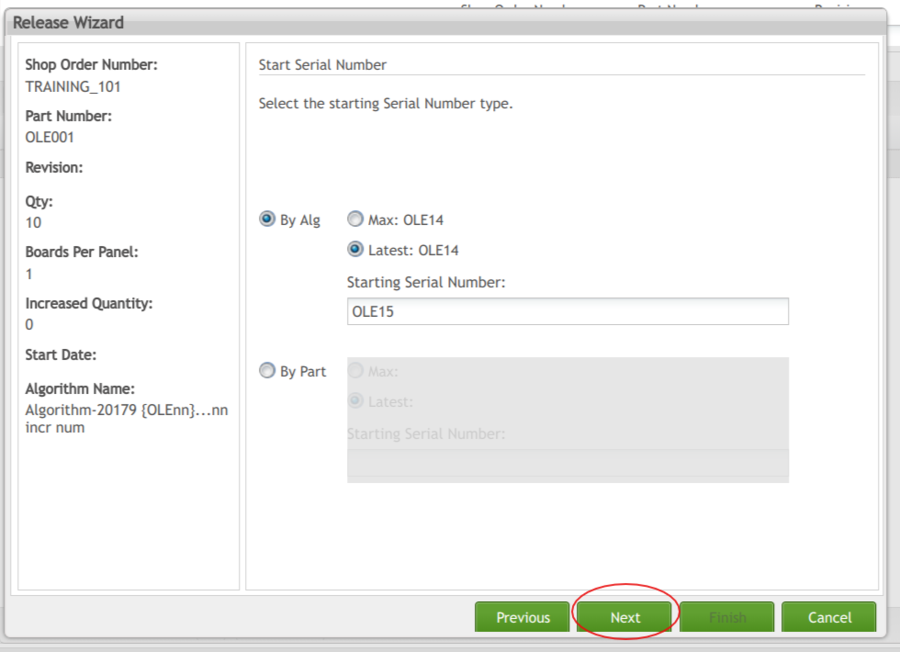
Screenshot: Release by Algorithm
- Choose By Algorithm (Our Example: SNs OLE15 - OLE25 will be released because we specified 10 SNs to be released and the first one was OLE15)
- Click Next
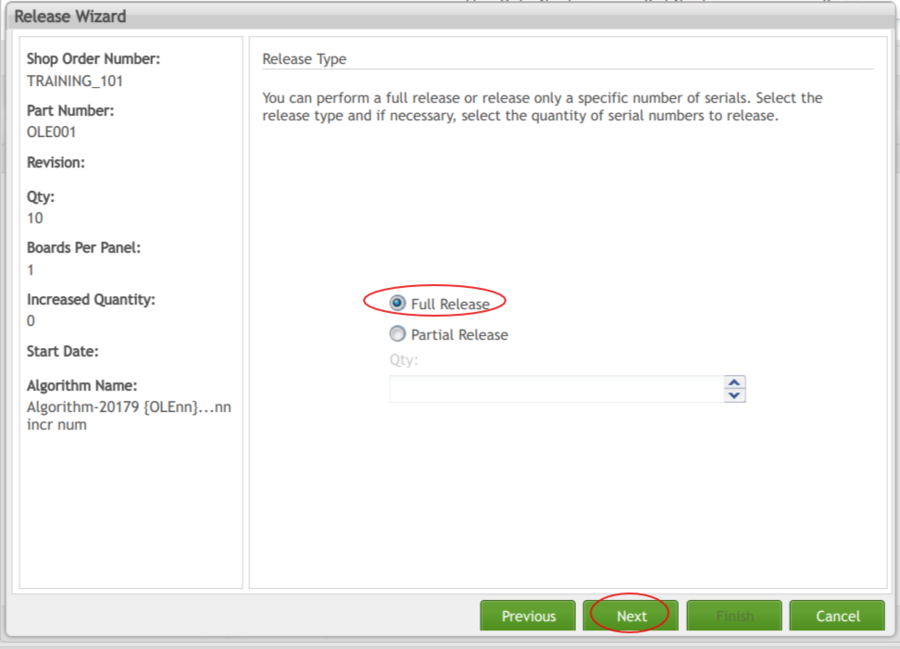
Screenshot: Full Release (10)
- Choose Full Release or Partial Release. (Our Example: Full Release of all 10 SNs).
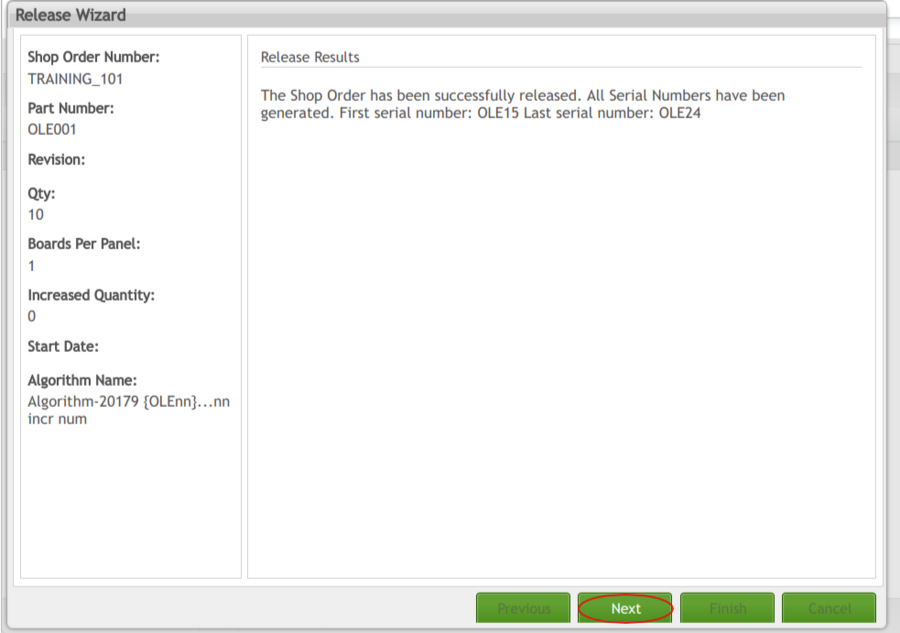
Screenshot: Release Summary
- Click Next.
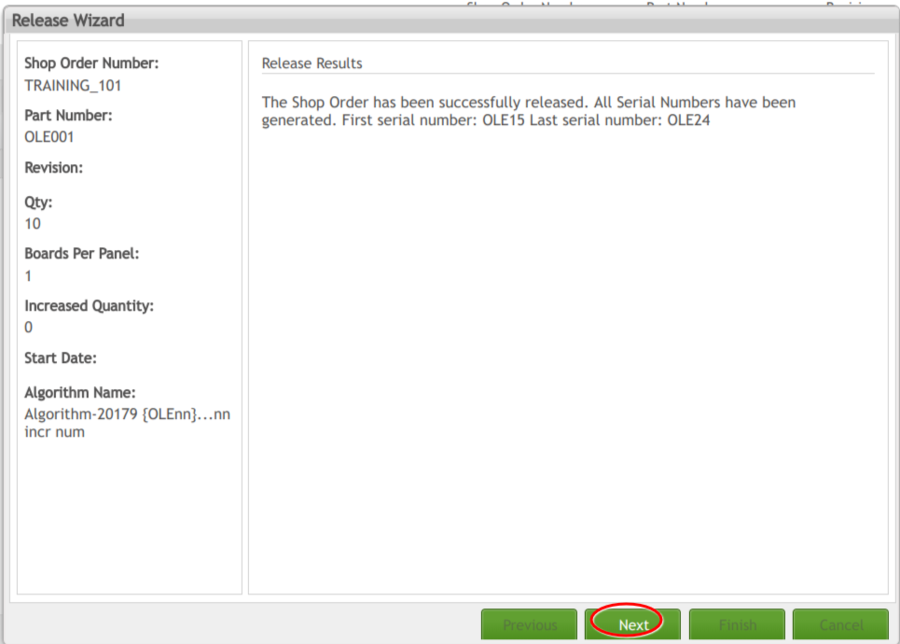
Screenshot: Release Results
- Click Next
- Click Finish.
Save Everything!!!!
- If you're working in SFDC, you will need to save everything by updating the server.
- NOTE: Production Scanning (Conduit) saves within the application itself as the final configuration step. All other steps prior to Saving are the same in SFDC and Production Scanning.
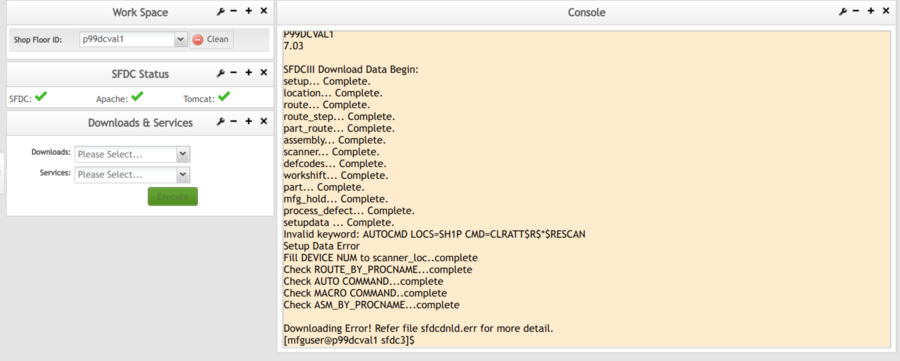
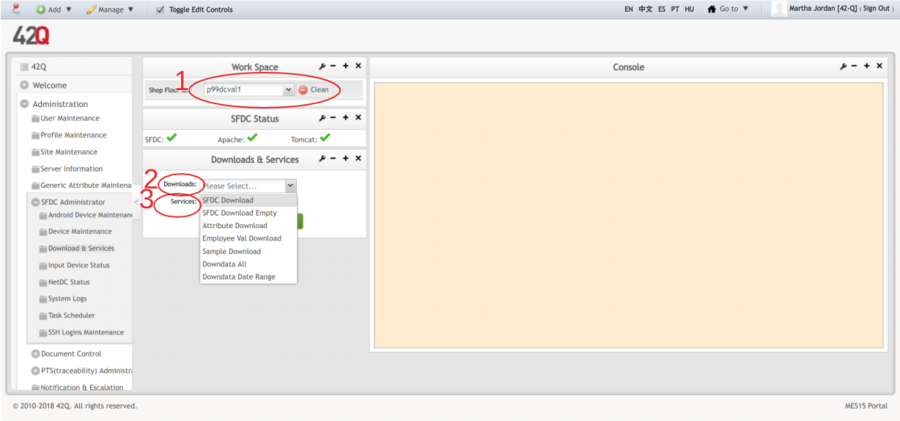
- Go here: Administration > SFDC Administrator > Download & Services
- Pick the Shop Floor ID from the drop-down (Our Example: p99dcval1)
- Pick the Download (Our Example: SFDC Download)
- Execute
- It takes a while. Don't leave the screen.
- You have to execute the Download and the Service separately.
Screenshot: Download Complete
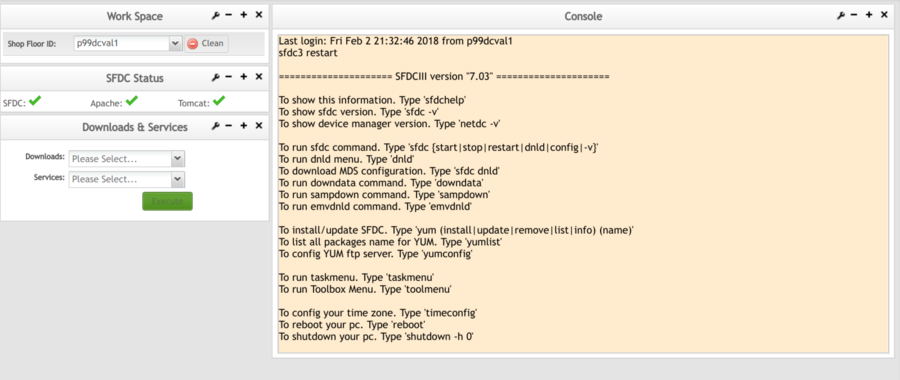
- Pick the Service (Our Example: SFDC Restart)
Screenshot: Restart Complete
- Attention: If you go back and add anything else to your Route or PN, or etc. you need to do this whole step again, or configurations will not be saved.
Screenshot: Download Your Data
Scan SN
- It is time to "move to production" and scan those SNs you just created.
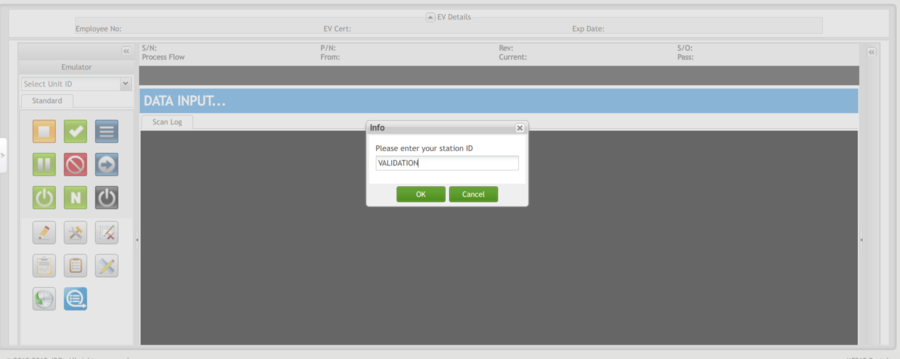
- Go to: Production > Data Collector
- Enter Station ID (It was VALIDATION). No Drop-down menu.
Screenshot: Enter Station ID in Data Collector
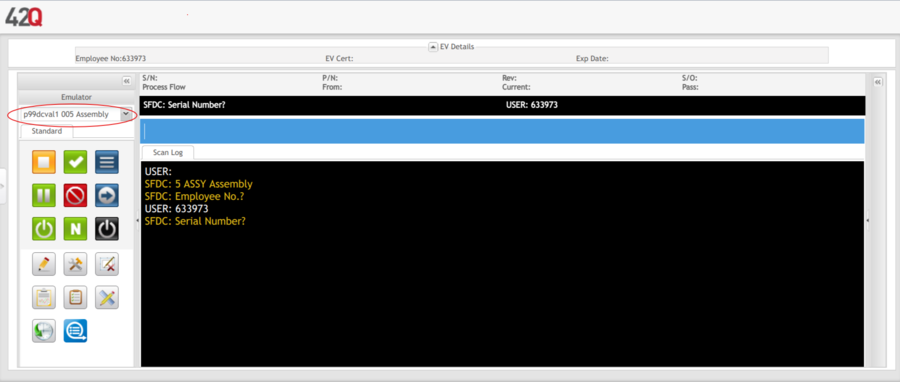
- Select Unit ID from drop-down (Location/Process + First Step of your Route.)
- Our Example: p99dcval1 005 Assembly
Screenshot: Select Unit ID
- Enter/Scan SN
Screenshot: Scan/Enter SN
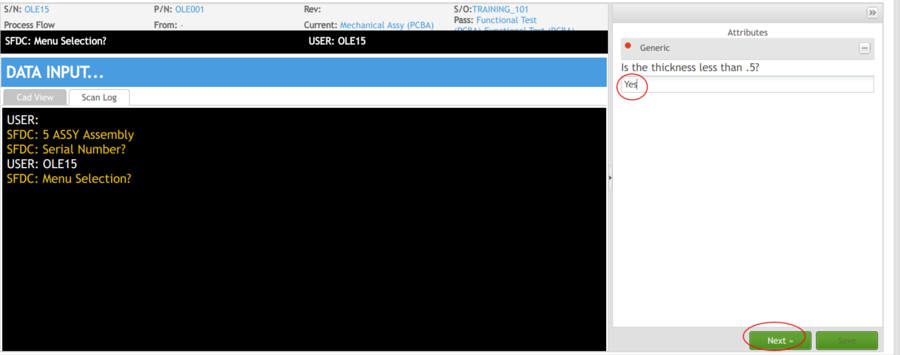
- If you have an attribute defined to the step, it will display on the right.
- You can't move any further until you answer the question with the right mask. (Our Example was Yes). Remember that we added the attribute to make the shop floor operator pay attention.
Screenshot: Attribute Prompt
- Click Next.
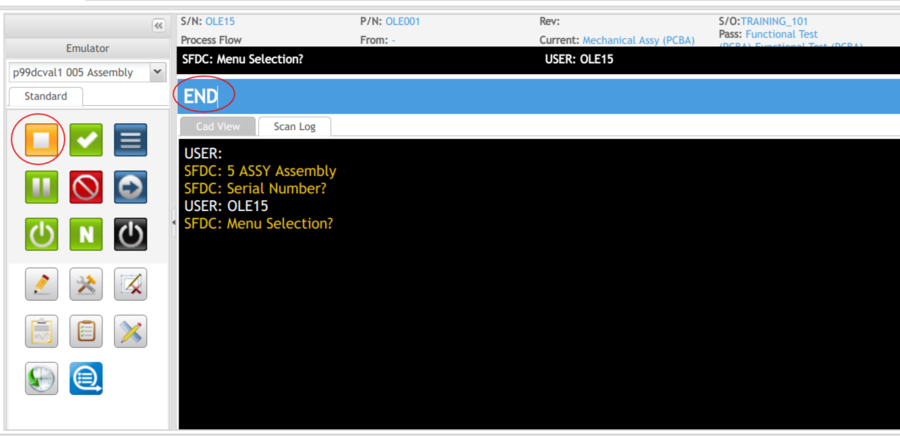
- End Transaction (ASSY Step) (Enter End or click the orange end icon)
Screenshot: End Transaction
- Enter the next Step for SN OLE15 (Our Example: Functional Test)
- Scan/Enter SN (Our Example: OLE15)
- Save.
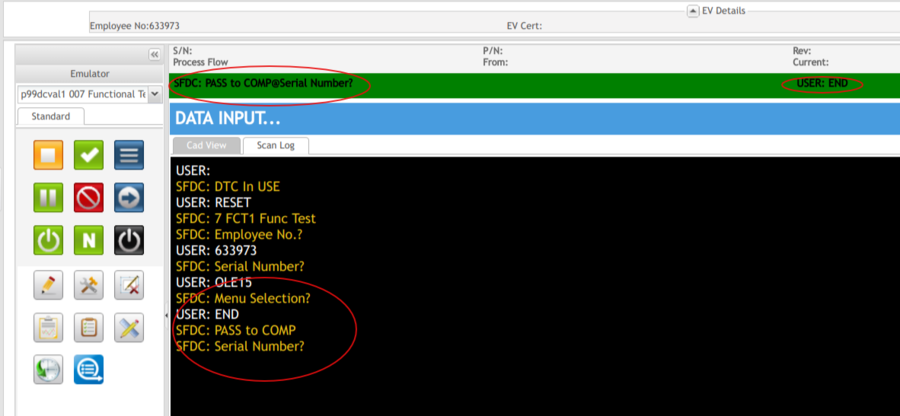
- Success Message displays. Your SN moved to the next step.
Screenshot: Success Message: Pass to FCT1
- Scan SN at next Step (FCT1 Functional Test).
Screenshot: Scan OLE15 SN at Functional Test
- End Transaction (Type End or click the orange End icon).
- In Our Example, we passed the SN to Complete after it was tested (FDC1 Func Test). (see the below screenshot).
Screenshot: Success Message: End Functional Test
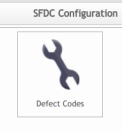
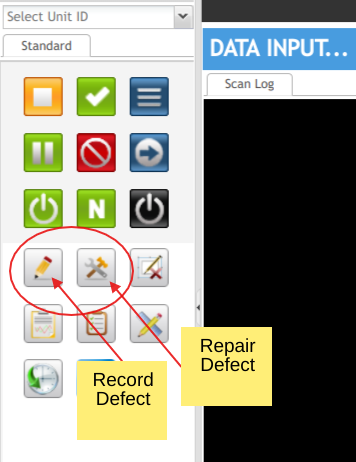
- However, If the SN had failed inspection and needed to move to the ASSY Rework station, we would need to Record the Defect, then Repair the Defect. To complete those defect operations, we would need a pre-configured defect code. Defect codes are configured similar to the Attribute Definition in: Shop Floor Control > Configuration > Defect.
Screenshot: Record/Repair Defect Options
Flowchart: Route Steps
Revision Log
| Rev # | Revision Date | Section(s) Modified | Updated by | Reviewed & Approved by | Published by |
| A | 2/2/2018 | Initial Document | Martha Jordan | ||

