SOP 42Q-MES0091-C OWMS-42Q Integration
42Q Home > Tools > OWMS-42Q Integration

This edition applies to MES15 Portal 1.10 and all subsequent releases and modifications until otherwise indicated in new revisions.
Contents
Introduction
Material labelling plays an important role in PTS(Part Traceability System) as it configures the attributes of each part with a barcode which realizes the possibility to trace parts by barcode scanning in production line. However, this process will soon be streamlined into a customized warehouse management system - WMS. Then how to make sure MES works normally without being impacted? That's how WMS-PTS Integration comes. WMS-MES Integration is a program that joins WMS and MES by transferring all label data information generated in WMS to MES. It's a web service without any user interface.Each label printing action in WMS, either newly printed or changes to existing ones, will trigger the generation of a record file in xml format which will be sent to PTS via WMS-MES Integration.
Capabilities
- Seamless integration of WMS and MES
- Backend running without extra operation
Label Printing in WMS
This section takes the example of two label printing forms in OWMS to demo how OWMS is customized for PTS, so that user gets a better understanding of the communication between the two systems. In both forms,when user hits the Print/Submit button to print labels, a record(.xml file) will be created for the label printed and sent to WMS-MES Integration, which will then trigger a separate program to transfer the record to PTS.
Mobile Receiving Form
Mobile receiving form is a standard Oracle form to record and generate labels for incoming materails. It's a customized form allowing user to key in all the necessary information to be used in PTS for a specific item. Below are screenshots for printing labels in this form, for reference only:
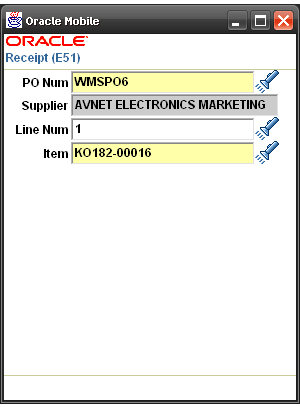
Figure 1: Enter PO and PO Line
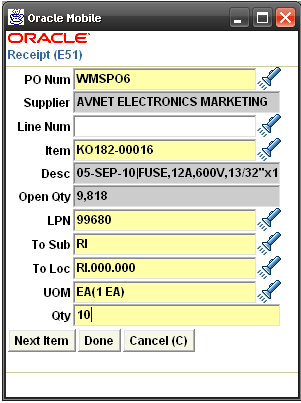
Figure 2: First Receiving Form
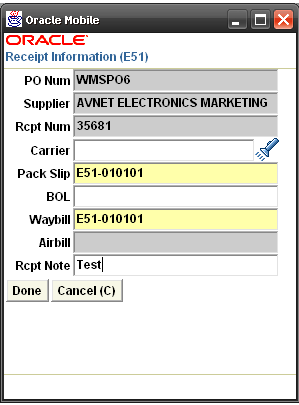
FIgure 3: Second Receiving Form
Figure 1: Enter Line Num, Item will be displayed and if Item is entered first, Line Num will be displayed.
Figure 2: Enter LPN, To Sub, To Loc and Qty. Hit Done button to move on to next screen.
Note: If item is lot controlled, user must also enter lot number and any lot attributes, such as date code, MFG, etc.
Figure 3: Enter Pack Slip and Waybill. Carrier and BOL are optional. Hit Done button when this screen is completed.
Figure 4: Third Receiving Form PTS Enabled
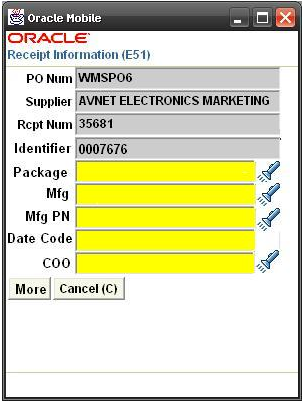
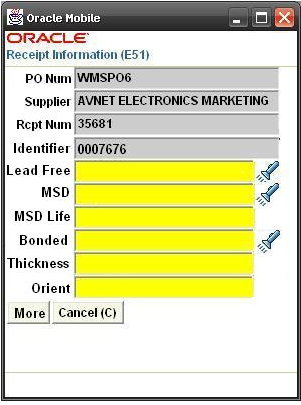
Figure 5: Fourth Receiving Form PTS Enabled
Figure 4: (This screen will only be shown in a PTS-enabled plant to provide the information of Mfg, Mfg PN, Date Code and COO for PTS.)
- PO Num, Supplier, Rcpt Num will be displayed from precious screen (Figure 3).
- Identifier: It's a sequential numeric if item is NOT lot controlled. Otherwise it is a lot number.
- Package: This value is selected from a list of values (LOV) which includes reel, tray, tube, etc.
- Mfg: This value can come from LOV, however, if item is lot controlled, it will come from Lot attribute, in which case the field would be display only.
- Mfg PN: This value can come from LOV, however, if item is lot controlled, it will come from Lot attribute, in which case the field would be display only.
- Date Code: This value is in free form and formatted as YYWW. However, if item is lot controlled this value can come from a Lot attribute, in which case the field would be display only.
- COO (Country of Origin): This value can come from LOV, however, if item is lot controlled, it will come from Lot attribute, in which case the field would be display only.
- Hit More button to process to next screen.
Figure 5: (This screen will only be shown in a PTS-enabled plant to provide the information of MSD,Thickness, Orientation etc. for PTS.)
- PO Num, Supplier, Rcpt Num, and Identifier
- Lead Free: Select Yes or No.
- MSD: This is MSD Level, which is 1, 2, 2a, 3, 4, 5, 5a, or 6.
- MSD Life: This is an integer number of days.
- Bonded: Select Yes or No.
- Thickness: It's a number with 3 decimal places
- Orient (Orientation), This is also a number.
- Hit More button to begin Label Split.
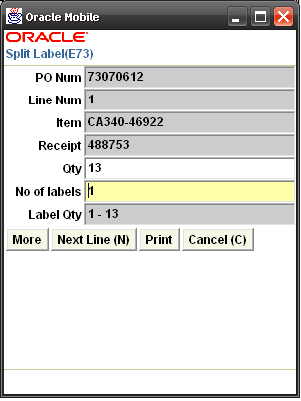
Figure 6: This is for label splitting in OWMS. In a PTS-enabled plant, NO of Labels field will indicate the total number of packages.
Stock Label Form
The stock label form is a standard Oracle form which allows users to print multiple labels for an on-hand item. This form also allows the user to specify the exact quantity to be displayed on the label. Again it's a customized form allowing user to enter all the values and attributes required by PTS for a specific item. Below is an example of how the Stock Label form will be used in a PTS enabled plant.
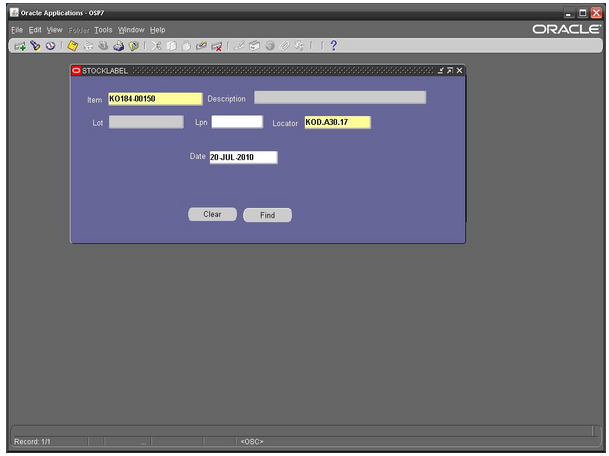
Figure 7: Stock Label Form, First Screen
The first step in entering information into the stock label form is to enter the item requiring labels. Enter following values to determine on-hand material to print labels for.
- Item number: The item number which user wants to print labels for. Select from a list of values
- Lot: Enter corresponding lot number for above item if there is.
- LPN(Liscence Plate Number): If material is packed, enter the specific LPN requiring labels.
- Locator: List all locators with on-hand quantities.
- Date: Enter a date in the Date field (Optional).
- Hit the Find Button, if on-hand exists, a new form will be displayed. If not, a message will be displayed on the status bar.
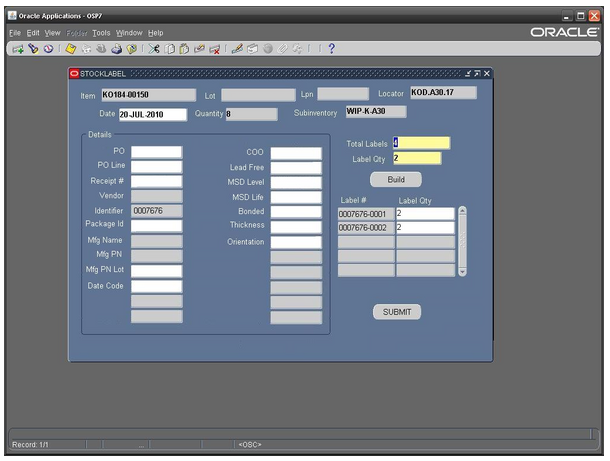
Figure 8: Stock Label Form, Second Screen
- The Item, Lot, Lpn, Locator, Date, and Subinventory fields are brought over from the first screen(Figure 7).
- Quantity: It's populated based on the values entered in the first screen.
- Details grid: This grid allows user to key in further item attributes required by PTS. If PTS is not enabled, all fields in this grid are disabled.If PTS is not enabled, but item is lot controlled, Lot number will be displayed in identifier field. Mfg Name, Mfg PN, Date Code, and COO will be enabled based upon lot attributes enabled.Fields which are greyed out are either disabled or display only. Not all fields will be used for all plants. Below is a description of each field:
- PO: Purchase Order. Entered automatically from Receipt Number or entered manually with LOV.
- PO Line: Purchase Order Line. Entered automatically from receipt number or entered manually with LOV.
- Receipt#: Receipt Number. Entered manually with LOV, then PO, PO Line, Mfg Name, MFG PN, COO may all be displayed automatically.
- Vendor: Vendor Name. It will be entered automatically if Receipt #, or PO and PO Line are entered manually.
- Identifier: Id or lot number.If item is lot controlled, lot number is displayed, otherwise sequential number is displayed. Either way this is a display only field.
- Package Id:Package type. This should be Package Type Id which would be reel, tube, etc
- Mfg Name: Manufacturer. Automatically displayed if Receipt # or PO and PO Line
- Mfg PN: Mfg Part Number. Automatically displayed if Receipt # or PO and PO Line entered. Otherwise LOV based on Mfg and item.
- Date Code: Mfg Date Code. Manually entered, YYWW will be the only format used.
- COO: Country of Origin. Displayed automatically if receipt # or PO and PO Line are manually entered,otherwise entered using LOV.
- Lead Free: Enter Yes/No.
- MSD Level: MSD 1, 2, 2a, 3, 4, 5, 5a, 6.
- MSD Life: MSD Floor Life. Enter an integer number of days.
- Bonded: Enter Yes/No.
- Thickness: Thickness Number with 3 decimal places.
- Orientation: Enter item orientation value.
- Total Labels: Total Packages. Total labels should be the same as total packages (or total reels). One label will be printed for each package. If entered, then quantity per label is entered as a default in the Label Qty field.
- Label Qty: Quantity calculated based on total quantity and total labels. If entered manually, label quantity will be divided into total quantity to obtain total labels.
- Build button: When user hits the button, a list of labels will be displayed based on the value in the total labels field. The Label # is display only but the label quantity can be changed.
- SUBMIT button: Once label quantities are set, hit this button to print the labels and send information of each label to OWMS-PTS Interface.
NOTE: Label # will only be an incremental if PTS is not enabled or Lot control is off.
NOTE: If the information has already sent to PTS, then it will reprint only.
OWMS-PTS Interface Configuration
OWMS-PTS Interface will be released at PTS IV. As for how to install PTS, pls refer to PTS installation(VMvare Image installation). Once the PTS is installed, user needs one further step to configure below property item so that the Interface can work properly:
- owms.xml.backup.folder (Path: /pts/WEB-INF/application.properties)
This is a property setting item which can be found out in the file application.properties under web service repository. It's to specify a folder for PTS to back up received items and user needs to pre-configure this item before the running of OWMS-PTS Interface. Input a path right after the equal mark and save the configuration, then PTS will backup each received record there in txt format.
OWMS-PTS Interface Maintenance
Since it's totally backend running course and no user interface is involved, user may worry if the label data in OWMS has been transferred properly to PTS. Here comes the tips for user to check it out:
- Material Report & Receipt Traveller Report (PTS Web)
This is the most efficient and easiest way to check if the information of an OWMS item has been tranferred to PTS. Just navigate to Material Report or Receipt Traveller Report page on PTS Web and search the item either by part number, receipt traveller number, barcode or by time.
- OWMS XML backup folder
This is a way allowing user to view all the details of a transferred item from OWMS to PTS.The folder should have been pre-configured by user in above configuration process. Navigate to the specified folder and choose corresponding txt file to view the details.
- ptsws.html (Path: /pts/log)
This is a way that user can look up errors when the label data information is failed to be transferred to PTS. It's a log file under web service repository.Navigate to the log folder to access this file.
Revision History
| Date | Author | Title | Version | Change Reference |
| 03/06/17 | Benjamin Cavanaugh | Technical Writer | v 1.10 | Copied from legacy wiki. Minor revisions. |
