How to use Target Maintenance
Contents
Summary
Target Maintenance is a powerful portlet designed to streamline the management and maintenance of spreadsheets with enhanced speed and efficiency. It offers robust support for customization within any MES application. With features like pagination, filtering, and easy data handling, Target Maintenance simplifies operations involving large datasets and custom data creation.
Benefits
- Efficient Spreadsheet Management: Accelerates spreadsheet handling tasks.
- MES Application Customization: Assists with application-specific customizations.
- Flexible Data Handling: Allows creation of data and specification of data types.
- Pagination Support: Opens targets with thousands of lines using configurable pagination.
- Comprehensive Target Management: Enables users to add, filter, rename, and delete targets, among other operations.
|
Manage and Maintain spreadsheets faster and more efficiently |
Help with any MES Application customization |
Create data and define the data type |
Accessing the Target Maintenance Portlet
- Sign in: Log in to the 42Q Portal.
- Navigate: From the left-hand menu, expandShop Floor Control > Configuration >Target Maintenance
- Select: Click on Target Maintenance.
Using Target Maintenance
Filter a Target
- Enter the Target Name in the search field.
- Click Filter to display matching results.
- To clear the search, select Clear and re-enter new criteria.
Figure 1: Filter Targets
Add a Target
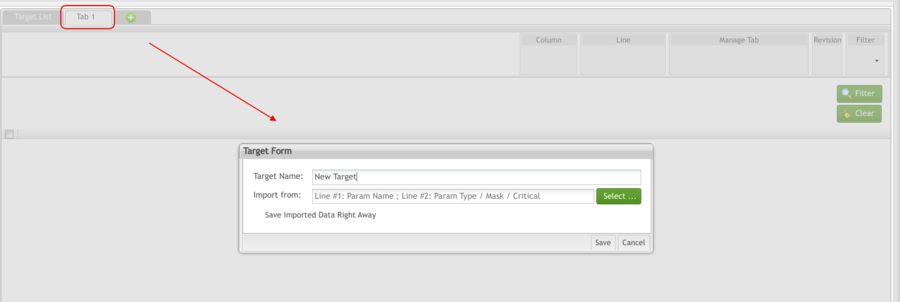
- Click the Add icon near the Target List tab.
- In the pop-up Target Form:
- Enter the Target Name (avoid using the “/” character).
Figure 2: New Target
- If importing a target, select the file from the local path.
When Save Imported Data Right Away is checked (default), the imported target includes all filled lines and columns. If unchecked, only the columns are imported without values.
- Click Save to finalize.
Managing Targets
- Double-click a target name in the Target List.
Figure 3: Target List main page
- The Target Maintenance Page will display, enabling management options.
TARGET MENU OPTIONS
ACTION |
FUNCTIONALITY |
|
Create column |
Creates a column. |
|
Create line |
Creates a line that will be inserted at the end of the table. |
|
Delete line |
Deletes a selected line. |
|
Copy line |
Copies a selected line. |
|
Reset table |
Clears any update performed and restores the original table values. |
|
Delete table |
Deletes a table. |
|
Save table |
Saves any changes made in the target. |
|
Export table |
It downloads a table as a CSV file that will be saved locally by the user. |
|
Import table |
Uploads a selected target. |
Note: To save any table update, the user needs to select Save in the Manage Tab section.
Deleting a Column
- Hover over the column name.
- Select Delete Column from the drop-down menu.
- Click Save in the Manage Tab section to confirm.
Note: For tables under "Verification In Progress," only the 2nd user entries will be deleted.
Editing a Column
- Hover over the desired column name.
- Select Edit Name Column from the drop-down menu.
- Update the necessary fields in the Edit Column Form.
Click Update to save changes.
Figure 4: Edit Column


