SOP-42Q-MES0078 Kit Verify
42Q Home > Shop Floor Control > Production Control > Kit Verify
Kit Verify
Kit Verify allows users to consolidate, integrate, inspect, and repair kits. The Kit Verify module contains two separate portlets, Kit Browser and Kit Processing.
Kit Browser allows the user to search for the correct Shop Order by Shop Order Number, Part Number, or Revision before performing any task in the Kit Processing portlet.
Kit Processing allows the user to perform all kitting activities for a Shop Order.
For Kit Control, there are two customizations available for Genband and NSN customers and this will be explained in the next topics.
Kit Browser
Kit Browser allows the user to view and search all available Shop Orders in Kit Verify. This is a convenient way to access Shop Orders without having all of the information that is needed to utilize Kit Processing.
To access Kit Browser, navigate to Shop Floor Control
>
Production Control
>
Kit Verify, and then select the Kit Browser icon.
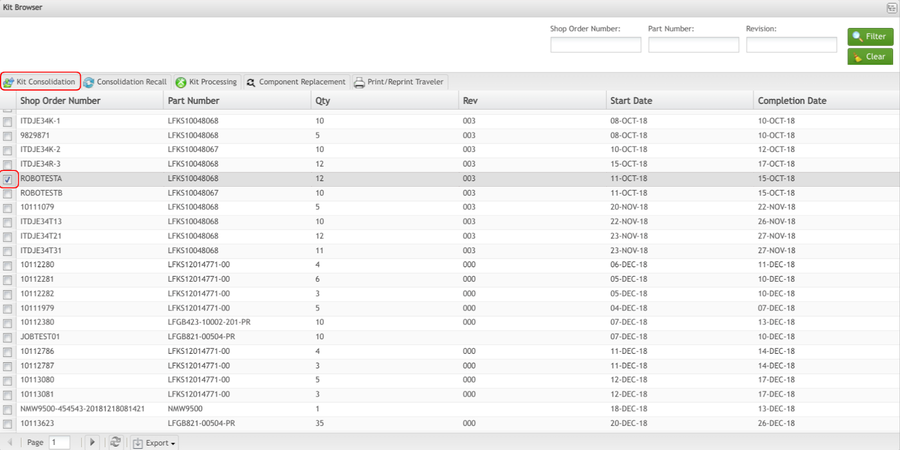
Figure 14: Kit Browser
Filter
Users can filter the Shop Order list by Shop Order Number, Part Number, and/or Revision. Filtering for specific Shop Orders simplifies the process of identifying the correct Shop Order for kitting.
To filter the Shop Order list, enter a Shop Order Number, Part Number, and/or a Revision into the filter fields provided and then select Filter.
Figure 15: Filter Shop Order List
Note: To begin a new search, select Clear to empty the fields and re-enter information into the available fields.
Export
The user is able to EXPORT the Shop Order Number List as it is displayed on the page in several formats (.CSV, .HTML, .PDF, .XLS).
Figure 16: Export Shop Order List
To Export the Shop Order Number List, select the file type (.CSV, .HTML, .PDF, .XLS), the page orientation (portrait or landscape), and the fields to be displayed in the file to be exported by double clicking on the field or selecting the green arrows. Click on Export to save the file.
Consolidation
The first step in the kitting process is Consolidation. This process consolidates all of the components in a kit. Once a kit is provided to the floor by a warehouse, all of its components must be consolidated to ensure there are no missing units.
1. To consolidate a kit from Kit Browser, select the Shop Order from the list and then select Kit Consolidation.
Figure 17: Kit Consolidation
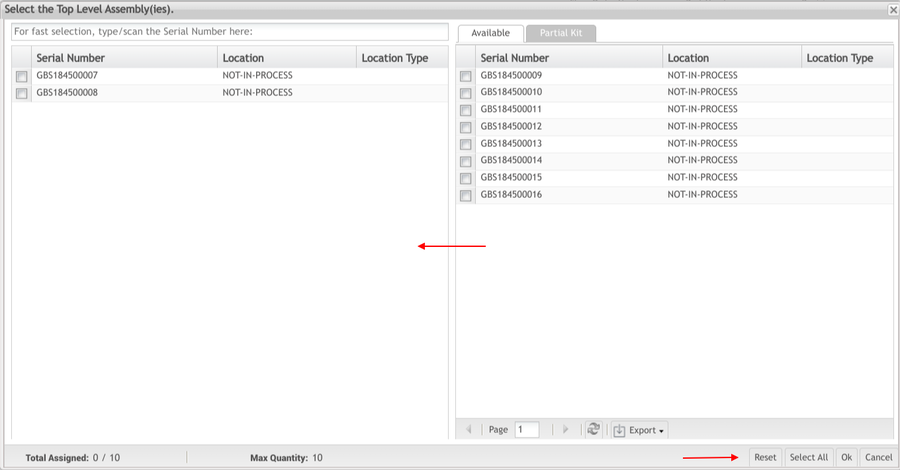
2. The Select the Top-level Assembly(ies) form displays. All available serials are listed in the right column. The user can enter the serial into the field provided, or select the serial from the available column by double-clicking on it.
3. Once the serial is in the left column, select the Serial Number and then select OK to open the Kit Processing portlet.
Figure 18: Top Level Assemblies
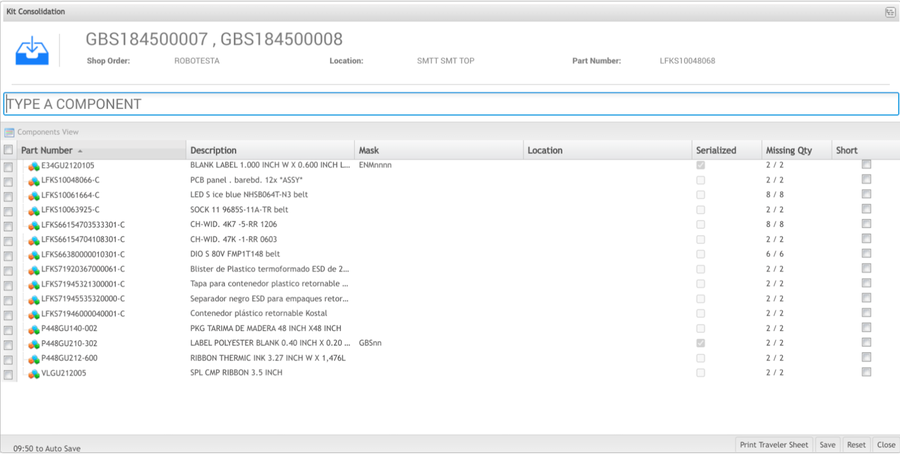
4. The Kit Processing portlet displays in the Kit Consolidation step.
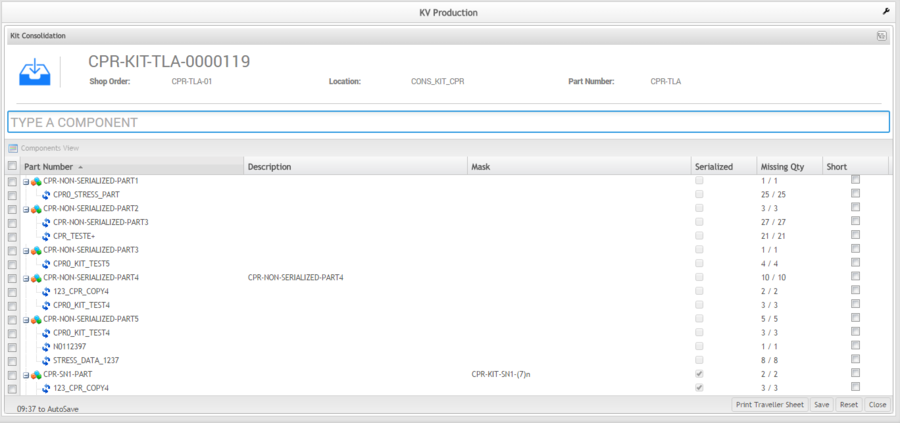
5. All associated Part Numbers are listed for consolidation.
Figure 19: Kit Processing- Consolidation
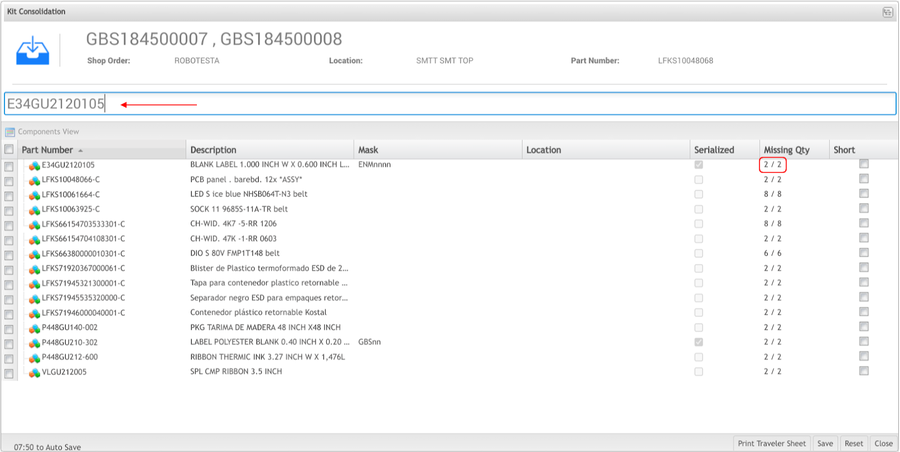
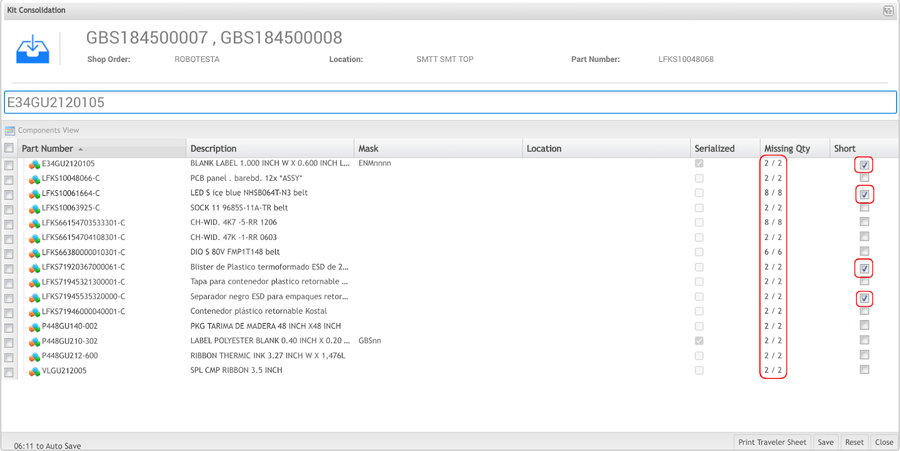
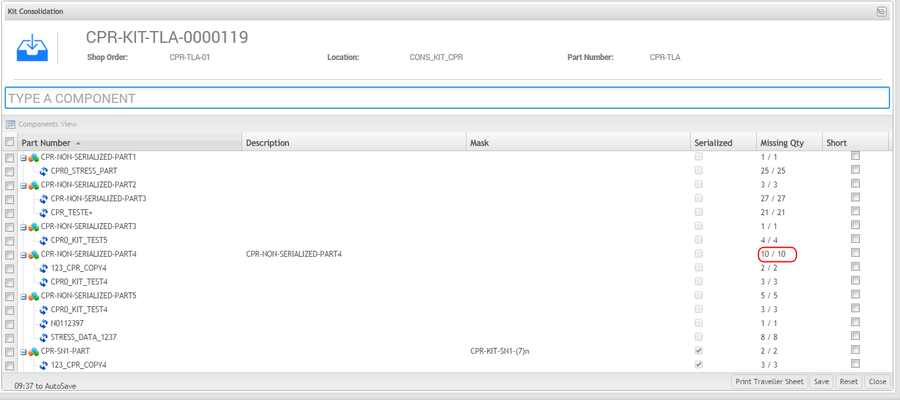
6. To consolidate the components, select each part number and then enter or scan the Part Number (for Non-Serialized components) or the serial that fits the mask (for Serialized components).
Figure 20: Consolidation
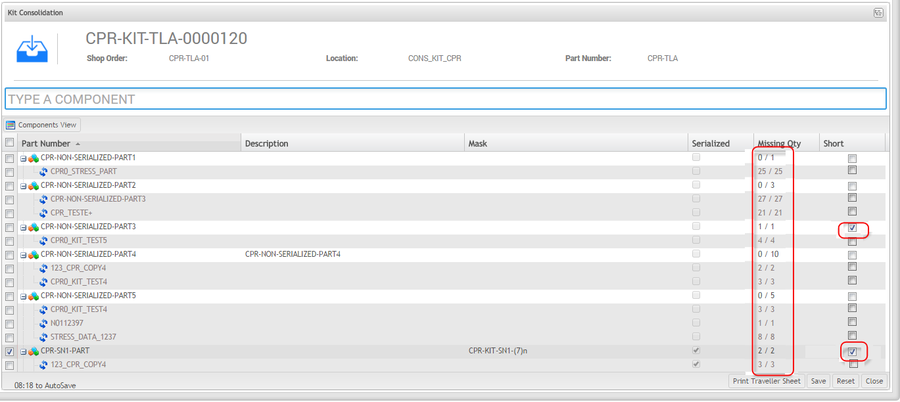
7. This process zeros out the Missing Quantity, thus consolidating all the components in the kit.
8. If there are missing components, mark the item as short by selecting the Short checkbox in the far right column.
Figure 21: Consolidated with Short Items
9. After consolidating all of the components, select Save to confirm.
10. Select Close to return to the Kit Browser main page.
Consolidation Recall
Consolidation Recall removes the consolidation link between a kit's components and its Top-Level serial number. A consolidation recall would be necessary for a Work Order cancellation or a decrease in quantity.
1. To perform a consolidation recall in the Kit Browser portlet, select a Shop Order from the list that has been consolidated and then select Consolidation Recall.
Figure 22: Consolidation Recall
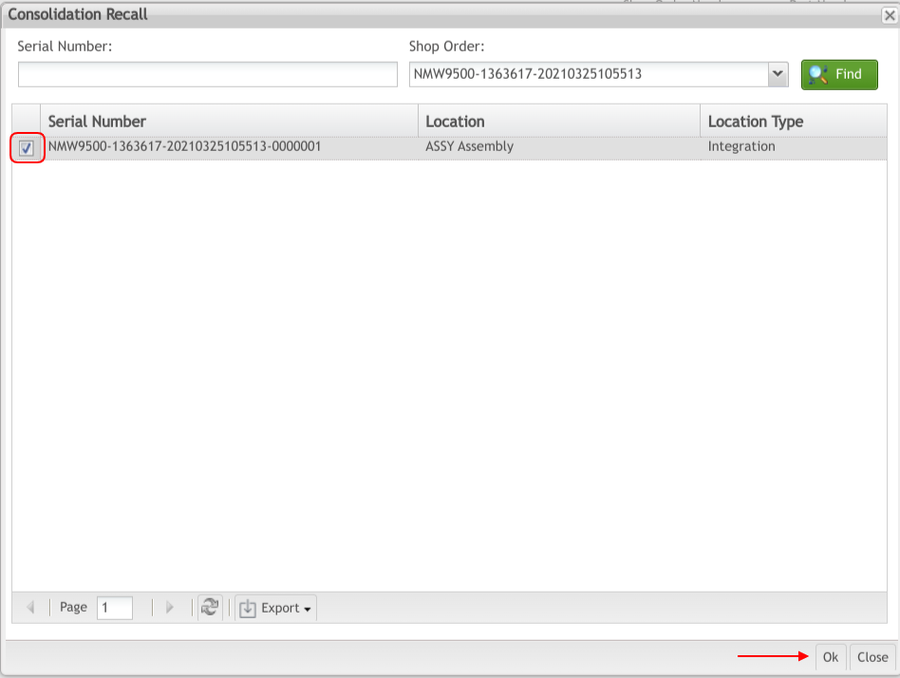
2. The Consolidation Recall form displays. Select a Top Level serial and then select OK.
Figure 23: Top Level Serial
3. A confirmation pop-up displays. Select Yes to continue.
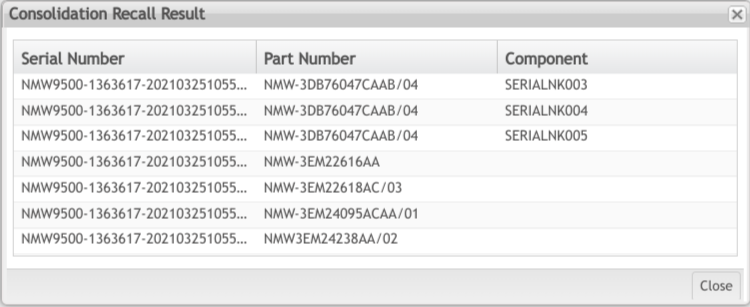
4. The Consolidation Recall Result pop-up displays the Serial Number, Part Number, and Component information that has been recalled.
Figure 24: Consolidation Recall Result
Print/Reprint Traveler
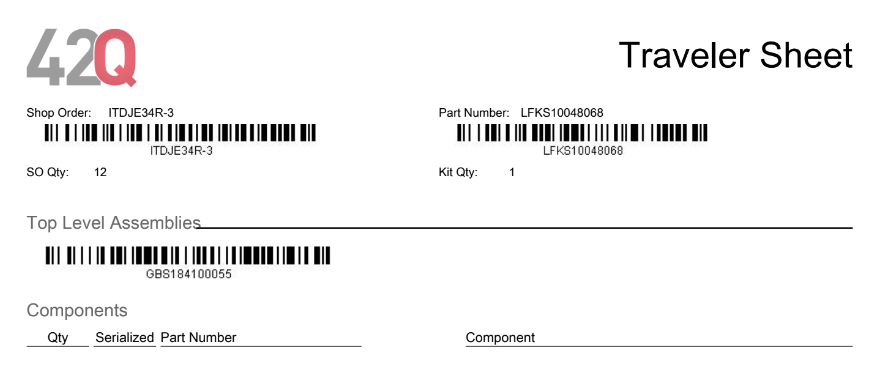
A traveler sheet provides a historical record of the items in a kit. The Shop Order, Part Number, quantity, Top Level Assembly, and all components are provided by the traveler.
1. To print a traveler, select the Shop Order from the Shop Order Number list and then select Print/Reprint Traveler.
Figure 25: Print/Reprint Traveler
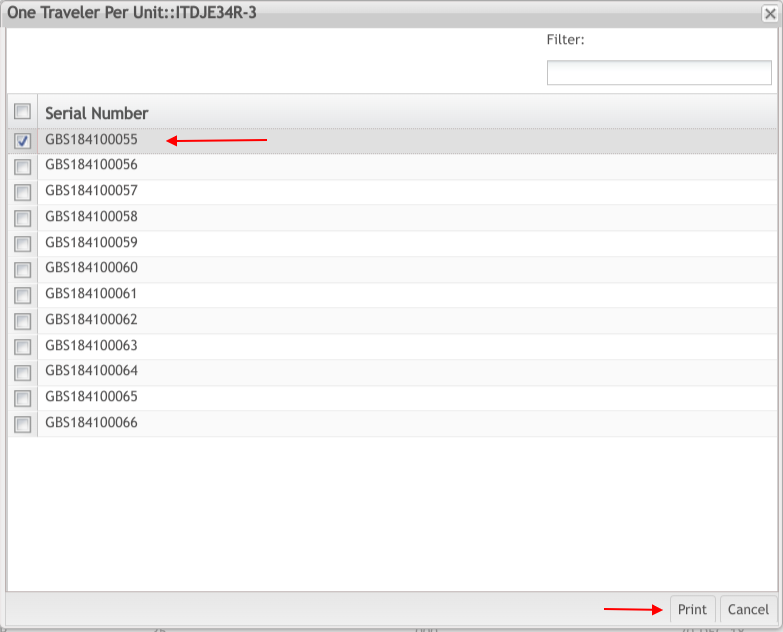
2. The One Traveler Per Unit:: form displays. Select the Top Level Assembly serial number and then select Print.
Figure 26: Top Level Assembly
3. The traveler will be prompted to be opened with an external program. Select the program with which to open the file and then select OK.
4. The traveler will open the external program for the user to print.
Figure 27: Traveler Sheet
Kit Processing
Kit Processing allows the user to perform Consolidation, Integration, Inspection, and Repair without having to navigate to the Kit Browser portlet to search for the correct Shop Order. If the Top Level Assembly is available for the Shop Order, it can be entered into the Serial Number field. The kit will display in the proper step in the kitting process and the user can complete the kit from the Kit Processing portlet.
Consolidation
The first step in the kitting process is Consolidation. This process consolidates all of the components in a kit. Once a kit is provided to the floor by a warehouse, all of its components must be consolidated to ensure there are no missing units.
Note: Best Practice- Before Consolidation, the Assembly Tables for all Serialized Components must be configured with Part Number masks.
1. To consolidate a kit, enter the Top Level Assembly into the field provided.
2. The Kit Processing portlet displays in the Kit Consolidation step.
3. All associated Part Numbers are listed for consolidation.
Figure 28: Kit Processing- Consolidation
4. To consolidate the components, select each part number and then enter or scan the Part Number (for Non-Serialized components) or the serial that fits the mask (for Serialized components).
Figure 29: Consolidated
5. This process zeros out the Missing Quantity, thus consolidating all the components in the kit.
6. If there are missing components, mark the item as short by selecting the Short checkbox in the far right column.
Figure 30: Consolidated with Short Items
7. After consolidating all of the components, select Save to confirm.
8. "The record has been successfully saved" displays.
Integration
The second step in the kitting process is Integration. Integration is responsible for the assembly of the previously consolidated components.
1. To integrate a kit, enter the Top Level Assembly into the field provided
2. The Kit Processing portlet displays in the Integration step.
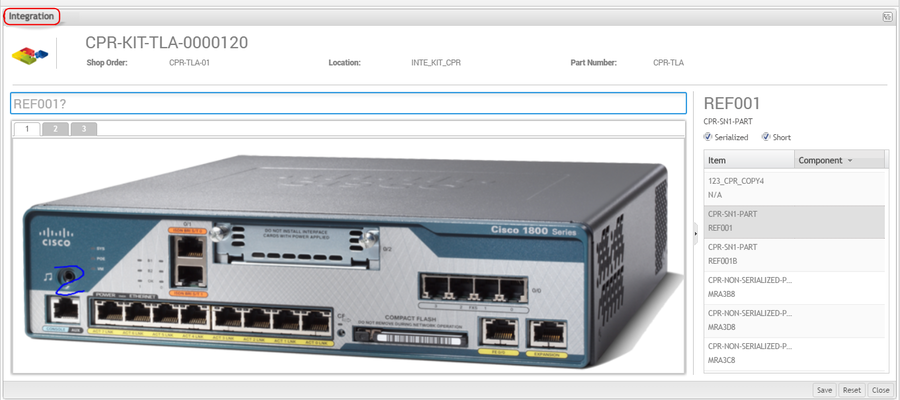
Figure 31: Integration
3. To integrate the components, select each item in the Item list and scan/enter the previously consolidated part number for non-serialized components or the serial that complies with the mask for serialized components.
Note: For non-serialized components with reference designators, the user will have to enter/scan the part number as many times as there are reference designators.
4. For short items, enter a serial that complies with the mask to integrate the component.
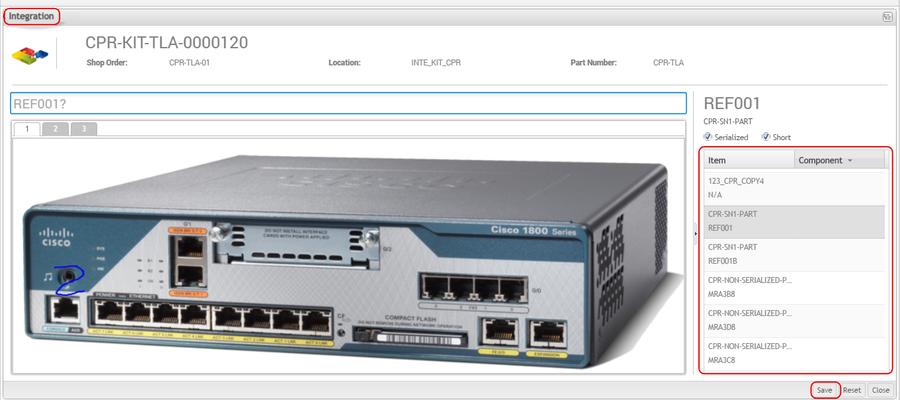
Figure 32: Integrated Kit
5. Once all items have been integrated, select Save to confirm.
6. The record has been successfully saved" displays.
Inspection
The third step in the kitting process is Inspection. This step verifies that all previously integrated components are in the correct physical location.
1. To inspect a kit, enter the Top Level Assembly into the field provided
2. The Kit Processing portlet displays in the Inspection step.
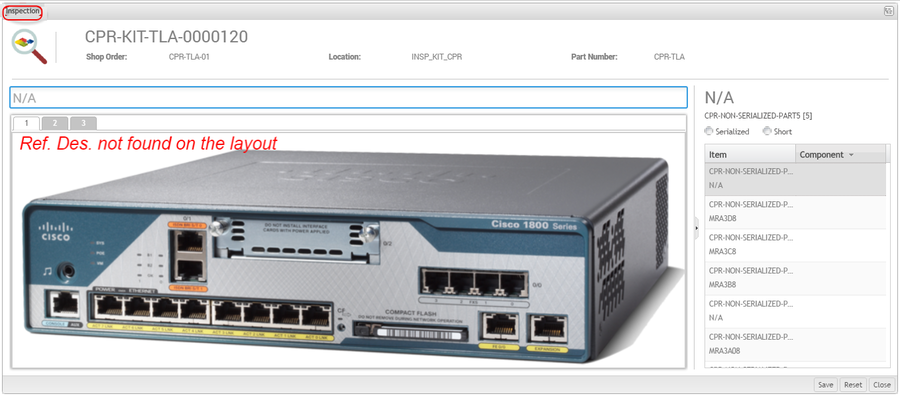
Figure 33: Inspection
3. To inspect the components, select each item in the Item list and scan/enter the previously consolidated part number for non-serialized components or the serial that complies with the mask for serialized components.
Note: For non-serialized components with reference designators, the user will have to enter/scan the part number as many times as there are reference designators.
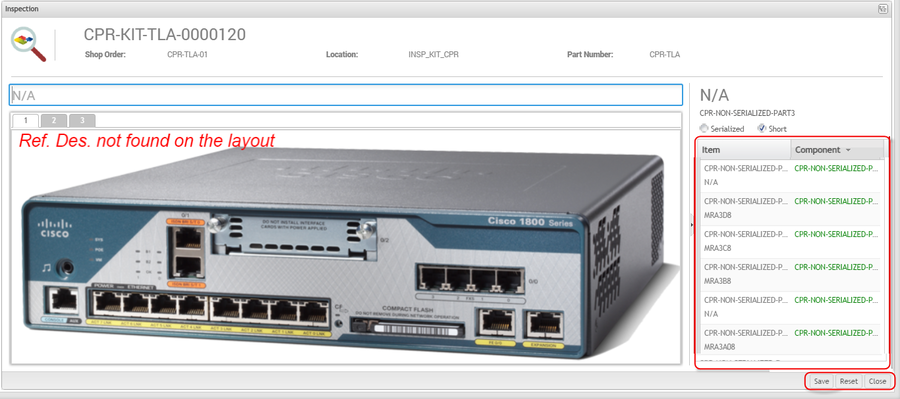
Figure 34: Inspected Kit
4. Once all items have been inspected, select Save to confirm.
5. "The record has been successfully saved" displays.
Note: If there are failed components in a kit, they will display in red when entered/scanned and the kit will be sent to Repair when saved.
Repair
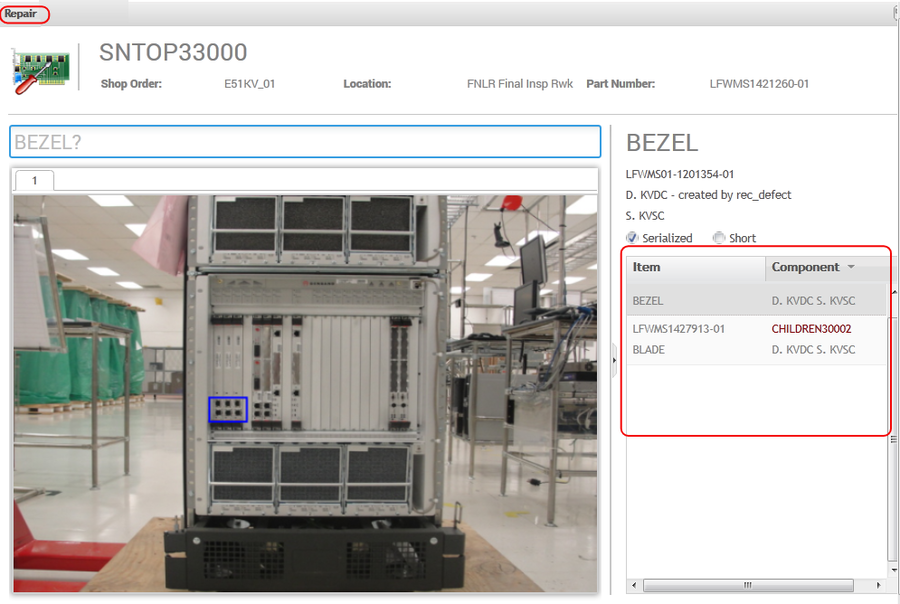
The fourth step in the kitting process is Repair. Repair allows for the repairing or replacing of failed components in the kit.
1. To repair a kit, enter the Top Level Assembly into the field provided
2. The Kit Processing portlet displays in the Repair step.
3. Only the components that have failed during the inspection step will display in the repair step.
Figure 35: Repair
4. To repair the components, select each item in the Item list and scan/enter the correct serial or part number that is displayed in the Component list.
5. Once all items have been repaired, select Save to confirm. This sends the kit back to the inspection step.
6. Complete the Inspection step again after repairing the failed items.
7. Once all items have been successfully inspected, the kit is complete and will no longer display in the Kit Processing portlet.
Appendix A - Customizations
Kit Verify – Customization for Genband
Genband (General Bandwidth) is an existing customer for Guadalajara Plant 2 (E30). They have announced the new award to increase the Business by bringing new family products.
The main new family is the CVAs (C15, PAF, CSF, CSLAN, C20, and SPDC) where the business model is with specific configurations per Purchase/Sales order and without a Pre-defined BOM, having also Direct Order Fulfilment with possible Drop Shipment to Genband End Customers.
The process as per now, begin when the customer place a Purchase Order to 42Q for these products, they will be also placing a Configuration file or Data File from their system CADES (Computer-Aided DMS Engineering System) on an FTP server, this Data file contains mainly the BOM and the instructions (reference designators) to build their specific configurations.
Per the nature of the Customer process, there won’t be fixed BOMS previously loaded in the ERP for these families, as every order would contain a specific new configuration based on their main Base Frames systems (C15, PAF, CSF, CSLAN, C20, SPDC ), so the Purchase order will contain an exploded BOM where the BOM lines are the Purchase order lines (including Ship Loose items and Assembly items).
According to the previous scenario, the proposed was the use of the CADES Data file as source to the MES module Kit Verify, as a pretending BOM & Pick List so we could use the whole Kit verify functionality plus adding the ability to start the Unit with an existing Tracked Serial Number in MES (Base Frame SN) that will be previously assembled as a normal FG through a Discrete job/Shop order.
The first step to be verified before access the Kit Verify for Genband is to set the generic attribute Kit as TRUE in the Attribute Configuration Module.
Kit Consolidation - Genband
The Kitting Consolidation functionality is responsible for verifying if all components (serial and non-serial) for a Shop Order are in a complete Kit. It has the function to add component serial numbers to MES tables.
The Consolidation component is responsible for consolidating all components that warehouse users grouped on the Kit to complete the Shop Order
Note: Best Practice- Prior to Consolidation, the Assembly Tables for all Serialized Components must be configured with Part Number masks.
- To consolidate a kit, enter the Top Level Assembly into the field provided.
- The Kit Processing portlet displays in the Kit Consolidation step.
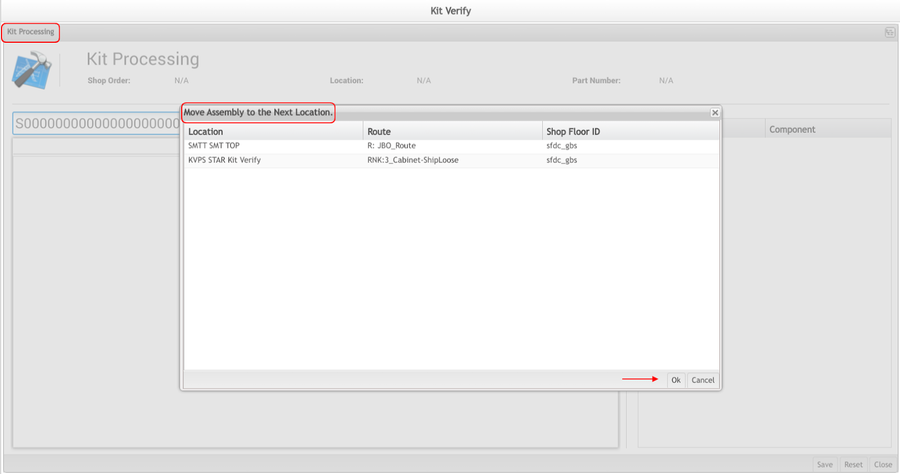
- Select the location to continue.
Figure 36: Move Assembly to Next Location
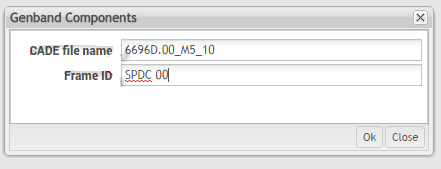
- The Genband Components screen displays and the user needs to type the CADE file name and Frame Id.
Figure 37: Genband Components
If the entered combination is valid:
- CADE Data file must exist already on the MES Server
Note: There is a scheduled process to run every hour to pull out the CADES Data files from the FTP Genband site to the Plant MES server ;
- The Frame ID must exist on the entered CADEs Data file;
- It should be the first time this combination is used (CADES Data file + Frame ID);
- The Serial number extended Part number must match with the Frame PEC on the selected Data file;
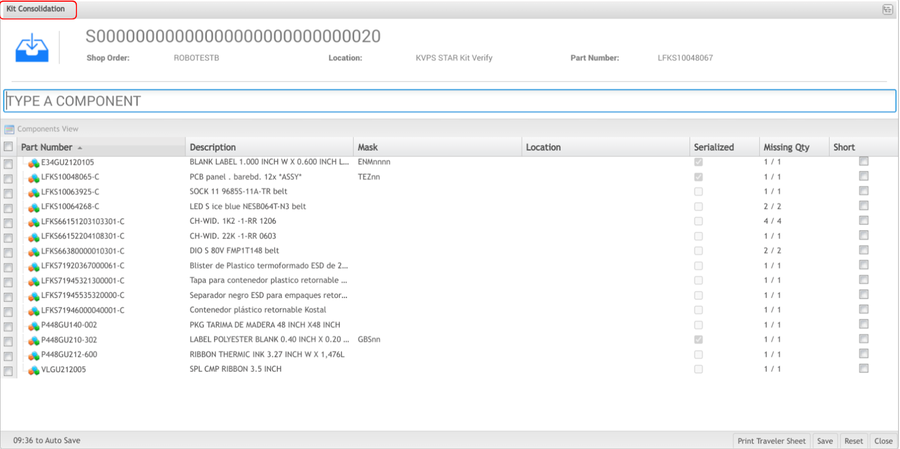
The Consolidation page will display and if there are new items not existing on MES they will be created:
Figure 38: Kit Consolidation Page
This process consolidates all of the components in a kit. Once a kit is provided to the floor by a warehouse, all of its components must be consolidated to ensure there are no missing units.
To consolidate the components, select each part number and then enter or scan the Part Number (for Non-Serialized components) or the serial that fits the mask (for Serialized components). The user is able to choose the original PN or a substitute of this in case of any problem with the original.
This process zeros out the Missing Quantity, thus consolidating all the components in the kit.
If there are missing components, mark the item as short by selecting the Short check box in the far right column.
After consolidating all of the components, select Save to confirm.
The next step (Integration) is displayed and all other steps are the same as all the executed steps for standard Kit processing.
Kit Integration - Genband
Kit Verify Integration process will be the guideline to assembly the configured Frame, with the material or components that were already consolidated previously and the defined layout of the product.
It will also attach those consolidated serialized components to the Top Serial Number (This relation will be shown on the Unit history).
It will display the BOM Item (from CADES Data file) plus all the reference designators per each component (if existing on the Data file) and associate them with the defined references on the layout setup. See Kit standard process for further information.
Kit Inspection - Genband
After finish the Integration, the next step is the Inspection.
The function of this interface is to allow the user to validate all components that have been registered into the MES Database.
If all the components and SN were entered correctly, the unit must continue to its next Location according to its route. See Kit standard process for further information.
Kit Repair -Genband
When performing the Inspection step if the user has scanned all components the application moves the assembly to the next location according to its SFDC route but in case that one or more components were wrong the system will move the assembly to the repair location.
After the Kit Verify Repair location, the unit will follow its route as programmed. See Kit standard process for further information.
Kit Verify – Customization for NSN
The Kit Verify for NSN (Nokia System Network) is under constant updates, so, it will be described as soon as possible we have a stable version.
This module is very similar to the standard Kit Verify, with some differences in the business rules:
- The first step to be verified before access the Kit Verify for NSN is to set the generic attribute kv_nsnbcn_unit_refdes as TRUE in the Attribute Configuration Module.
- It is necessary for the PTS-ID, that links the MES P/N with the PTS database. The PTS P/N is not generated by Corp.
- Mask: used to validate the SN that is in use (if this serial belongs to the used P/N.
- After the user informs the PTS-ID, the system inform the COO (Country of Origin) that inform the component part number origin (EUA, China...). It was developed to inform the component traceability. This will be used during the Integration phase, and if is not OK, the user could not complete the Integration step.
QC Checkpoint
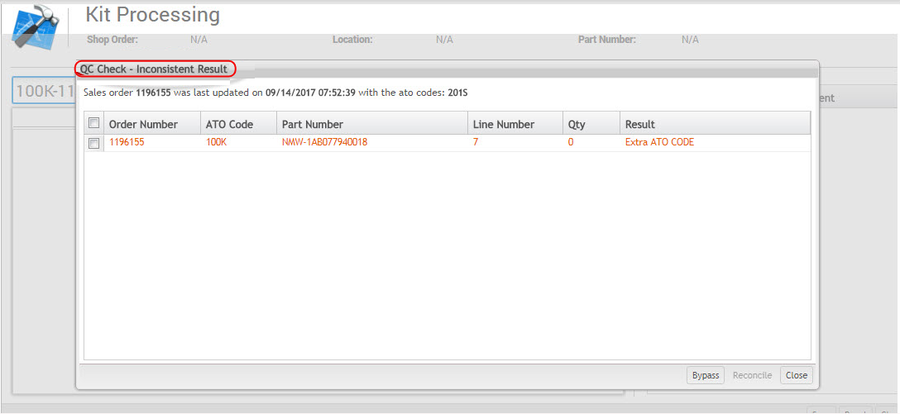
The QC checkpoint feature (for NSN Customer) was created to compare the MES work order’s current bill of material with the sales order definition outlining the differences in order to facilitate manual WO updates.
A comparison function was developed to compare sales order line detail with the bill of materials, at the most generic level the sales order (all ato codes) or a specific ato code, and return the list of discrepancies.
Figure 39: QC Checkpoint Result
The validation of ERP Sales Order Lines vs MES BOM validates the following list of discrepancies:
- Missing Line
- Extra Line
- Missing ATO code
- Extra ATO CODE
- Wrong Quantity
- Wrong Part number
- Unmatched ATO Code vs Part number
Through the Sales Order interface, the ERP provides most of the SO LINE information needed, with the exception of the item level (ie: top assembly item) and type information (ie: Make and Buy Items).
MES displays the discrepancies between the work order’s bill of material and the sales order lines with the appropriate descriptions and background colors.
A feature called Reconcile allows operators (a supervisor role) to reconcile the changes in MES by clicking on the Reconcile button, all at once or one-by-one.
Note: Only top assembly items are sent with the sales order/order line information, if the auto reconciliation feature is used, sub-assemblies won’t be available in the MES bill of material.
Clicking on Bypass, the Inconsistent Result will be ignored.


