SOP-MES0003 Attribute Def Maintenance
42Q Home > Shop Floor Control > Configuration > Attribute Def Maintenance
Contents
Introduction
Attribute Definition Maintenance defines attributes in the Attribute table. SFDC assigns attributes to products as specified.
This module creates attributes that are tied to specific products during the manufacturing process. It also creates the steps that should occur at the attribute check/validation.
To access the Attribute Maintenance, navigate to Shop Floor Control > Configuration > Shop Floor Configuration > Attribute Def.
Note: A user only has access to the modules assigned to his/her profile.
Attribute Definition Maintenance
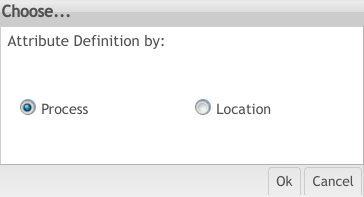
Upon accessing Attribute Def Maintenance, the user is prompted to select attribute definition by Process Name or by Location.
Attribute Definition by Process: enables any/all locations assigned to the process name to capture the defined attribute data.
Note: As a general rule, it is best to create Attribute Definitions by Process Name in a “Route by Process” configuration. Attributes will then be captured for each location assigned with the defined process name. The exception to this rule is when it is desired to only capture unique attribute data specific to a single location versus generic attribute data for each location of a process.
Attribute Definition by Location: enables ONLY the location defined to capture the attribute definition data.
List Attribute Definitions
Based on the actual Shop Floor Configuration, the application displays a list with all attribute definitions.
To open the Attribute page:
- Select the Attribute Def menu from the Shop Floor Configuration Maintenance module.
- Choose the attribute definition scope (by Process or by Location). This displays the Attribute List page.
Figure 1: Choose the Attribute Definition
Figure 2: Attribute List
From the Attribute List, the user is able to manage attributes as Add, Copy, Delete, Import, Print/Export, Publish History, Export all Attribute List, and displays a list of steps for a specific Attribute Definition (Step List).
The user is able to use the pagination feature to navigate between the Attribute pages.
Figure 3: Attribute Filter
From the Attribute List, users can filter results by Part Number, Shop Floor ID, and Process Name.
Filter the list by entering the desired filter criteria and select Filter. Select Clear to clear the filter fields.
Note: If the user already has an attribute to work with, skip the sections until
Create Attribute
In order to add an Attribute Definition, an attribute must be created first. To create an Attribute, select a Step List
- Select a Part from the Attribute List. Select the
 Step List button. For more information about the Step List check the section Step List.
Figure 4: Create Attribute
- Select the Add Attribute Step button. An Attribute Step Form window will appear, select the Manage Icon.
Figure 5: Create Attribute from Manage Icon
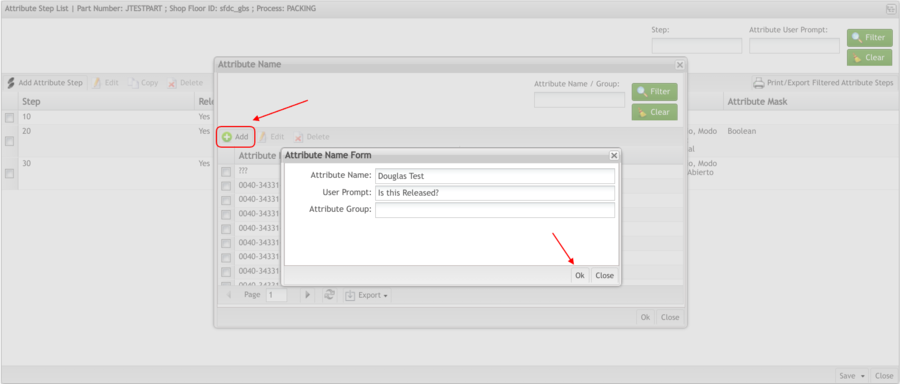
- An Attribute Name pop-up window will appear. Select the Add button to create the Attribute. Enter the Attribute Name and the User Prompt information. SelectOK to Save or Cancel to abort.
Figure 6: Creating Attribute
Note: The Attribute Group field can be associated with a group, it is not a mandatory field such as Attribute Name or User Prompt.
Edit Created Attribute
- Select on the Attribute Name Manage Icon.
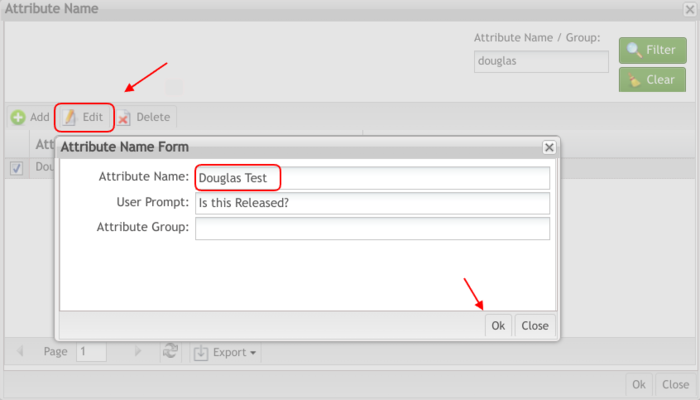
- Select the Attribute Name to edit and select the Edit icon. The Edit Attribute Name window is displayed.
Figure 7: Edit Attribute Name
- Edit theAttribute Name, User Prompt, and Attribute Group as desired.
- Select Ok to confirm the creation action. SelectClose to cancel the action.
Note: Changes are verified after editing attributes. If the Attribute Name has activity, only the User Prompt can be edited.
Delete Attribute Name
- Select the Attribute, then select the Manage icon.
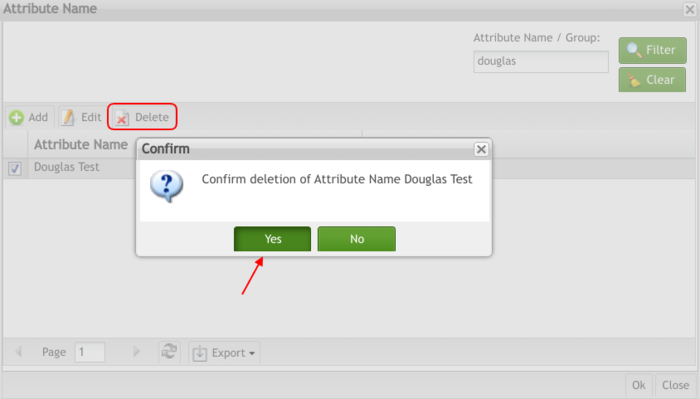
- Select the Attribute Name to delete and select the Delete icon. The Confirm deletion window will be displayed.
- Select Yes to confirm delete. Select No to cancel the action.
Figure 8: Delete Attribute Name
Note: It is not possible to delete an attribute name that has previously recorded activity, and/or is assigned to an attribute step.
Attribute List
The Attribute List allows the user to Add, Step List, Edit, Copy, steps from the Lists of Attributes.
Add Attribute Definition
To add Attributes, select Add from the Attribute module. Remember that the scope is selected when the user enters the Attribute Definition module. The attribute page will display according to the selected scope.
- Select Add.
The Attribute Form is displayed:
Figure 9: Attribute Form
Note: The Process Name and Shop Floor ID fields are mandatory and must be populated. Otherwise, if the Attribute Definition By Location was selected, the Location field becomes the mandatory field.
2. Populate mandatory fields (indicated in red above) and select Save.
Note: Process Name field has the Manage icon that enables the user to manage these fields during attribute creation.
- Shop Floor ID: Select the appropriate shop floor ID from the drop-down box. This defines the SFDC ID applicable to the Attribute Definition.
Note: Every attribute definition is attached to a Shop Floor ID. The Shop Floor ID is defined in the Miscellaneous Configuration Setup. If an existing attribute definition is copied into the Local Attribute Definition, the Shop Floor ID data field updates automatically. If creating a new attribute definition, select the Shop Floor ID from the Shop Floor ID Table.
- Process Name: Select a process from the drop-down box. This defines the process name applicable to the attribute definition.
Note: The Process Name is defined in Process Maintenance and/or Locations Maintenance. If an existing Attribute Definition is copied into the Local Attribute Definition, the process data field updates automatically. If creating a new Attribute Definition, select the Process Name from the Process Table.
- Part Number: Enter the part number. This defines the product applicable to the attribute definition.
Note: The part number must exist in the part table or be defined in the Setup Data Editor. When a unit with the specified attribute passes through the Data Collection Process Name or location defined, Shop Floor prompts to capture the defined attribute(s). This field must be entered before running Install. A blank part number is used as the default attribute for a unit not matching any other part in the Attribute Table.
The Attribute Step List page is displayed, which will be empty for new attributes. The Step List and its functions are reviewed in more detail below. You may skip ahead if you wish to learn more. In the intervening text, we will first review the various remaining functions that are listed on the Attribute Definition Maintenance main page.
- Select Save to keep the changes or Cancel to abort.
Note: Steps must be added to the new attribute to save it to the system. In turn, all changes made to the attribute steps must be installed locally. For instructions about these processes please see the respective discussion below.
Step List
This functionality displays a list of steps for a specific Attribute Definition.
Figure 10: Attribute List - Step List
- The Attribute Step List page displays.
Figure 11: Attribute Step List
From the Attribute Step List, the user is able to Add Attribute Step, Edit, Copy, or Print/Export Filtered Attribute Steps. Use the available icons on the menu. The following section defines the execution of these sub-modules.
Add Attribute to Step List
This functionality adds an Attribute Step. One or more steps must be added to an attribute to save an attribute to the system.
- To add an attribute step, select
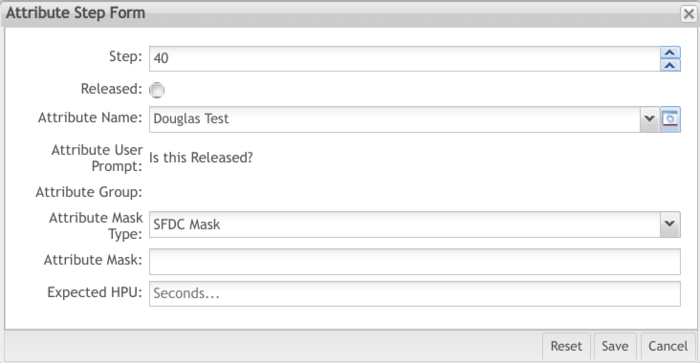
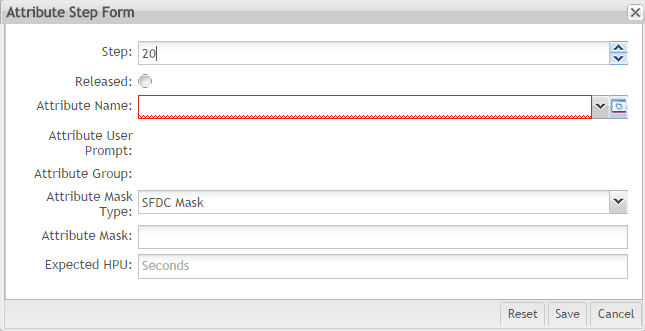
 Add Attribute Step in the menu. The Attribute Step Form is displayed:
Figure 12: Attribute Step Form
- Input the required Attribute Step Form fields. The Attribute Step Form fields are described below:
Note: The user must enter all mandatory fields (indicated in Red) when adding attribute steps.
- Step: Number automatically generated by the Step Number function.
- Released: Check to Release. If left unchecked, the attribute for the step will not be prompted or captured as the step is in an unreleased state.
- Attribute Name: The name of the attribute that will be collected for the attribute definition. Select the desired Attribute Name from the drop-down box, or select the Manage icon to create a new one.
- Attribute User Prompt: This field defines the text prompt displayed to the operator when a unit is scanned at the defined process/location. This field is populated automatically when selecting the Attribute Name and cannot be edited on this screen. The User Prompt is defined when creating the Attribute Name.
- Attribute Group: This field defines the group to which the selected Attribute Name is associated. This field is populated automatically when selecting the Attribute Name and cannot be edited on this screen. The group is defined when creating the Attribute Name.
Note: For more information about the Attribute, please refer to Create Attribute
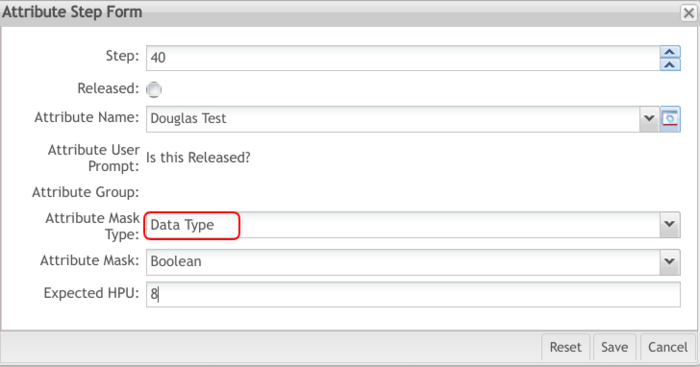
- Attribute Mask Type: The attribute mask type defines the format for the mask entered in the Attribute Mask field. If SFDC Mask is selected, the users will manually input the Attribute Mask. If Data Type is selected, a drop-down will be available in the Attribute Mask field with the following data types available for selection:
- Boolean
- Character
- Date (yyyy-mm-dd)
- Decimal
- Integer
- Text
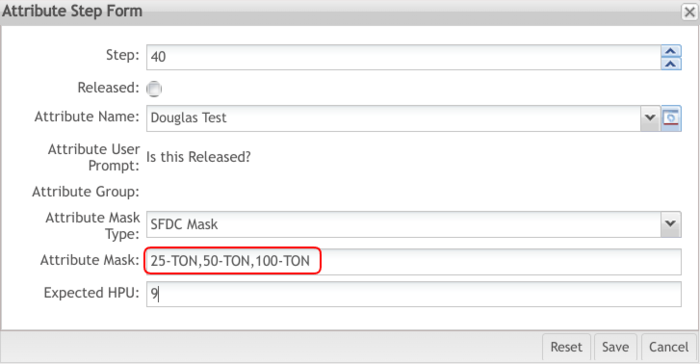
- Attribute Mask: The input mask for the attribute definition. The maximum length of the data field is 40 characters. The maximum length of a single ID mask is 20 characters. Multiple ID masks are separated by a comma (,).In the next image, users can see an Attribute Mask, which will require users to enter three possible values due to the functionality of the mask character: comma (,):
- 25 (number),T (uppercase letter),o (lowercase letter o), n (any number from 0 to 9).
- 50 (number), - (dash),T (uppercase letter),o (lowercase letter o), n (any number from 0 to 9).
- 100 (number), - (dash),T (uppercase letter),o (lowercase letter o), n (any number from 0 to 9).
Figure 13: Attribute Mask Example 1
In the next image, users can see an Attribute Mask, which will require users to enter three possible values due to the functionality of the mask character: comma (,):
- 25 (number),T (uppercase letter), O (uppercase letter O), N (uppercase letter N).
- 50 (number), - (dash),T (uppercase letter), O (uppercase letter O), N (uppercase letter N).
- 100 (number), - (dash),T (uppercase letter),O (uppercase letter O),N (uppercase letter N).
Figure 14: Attribute Mask Example 2:
Expected HPU: Insert expected HPU in seconds.
The new Attribute Step is created and displayed in the Attribute Step List.
Note: For further information concerning mask characters and their respective definitions, see Mask Characters documentation for reference. Documentation applies to Assembly, Attribute Definition Maintenance, and SDE (sub)modules.
Edit Attribute Step List
This functionality enables users to edit Attribute Steps. If mandatory fields are not populated an error message is displayed.
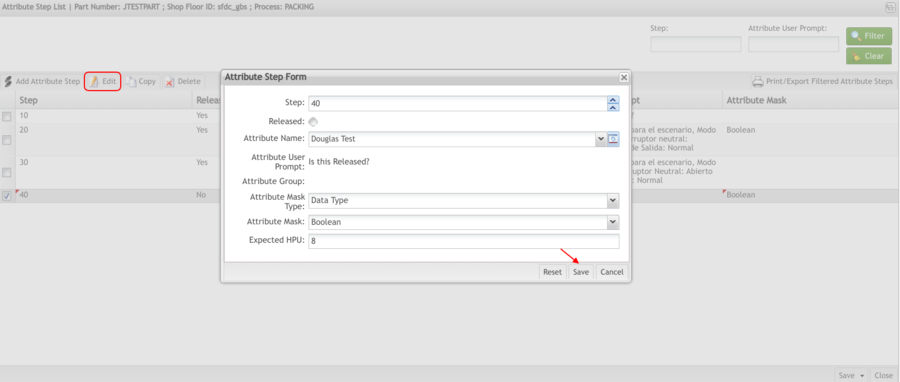
To edit an Attribute Step, select the Edit icon. The Attribute Step Form displays.
Figure 15: Save Attribute Step Form
- Make the necessary changes and selectSave to update, or Cancel to cancel the update. SelectReset to clear all form contents. The changes will be updated.
Copy Attribute Step List
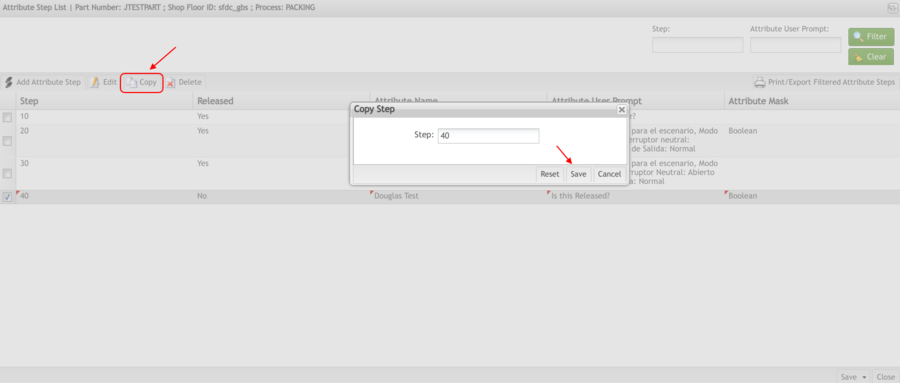
This portlet allows the user to Copy the Attribute Step from the Step List. To copy an attribute step:
Select an attribute from the Attribute Step List by checking the box, and select Copy.
Figure 16: Copy Attribute Step
- Enter the step number in the Step field within the Copy Step pop-up menu.
- Select Save to complete the process; press Cancel to exit the process.
Delete Attribute Step
This portlet allows the user to delete the Attribute Step from the Step List. To delete an attribute step:
- Select an attribute step from the list by checking the box, and selectDelete.
- To confirm the delete, selectYes. To cancel, selectNo.
Figure 17: Delete Attribute Step
Print/Export Filtered Attribute Steps
This portlet prints or exports filtered Attribute steps. The report prints to the default printer for the workstation. The system displays print result information.
- Select the Print All Attribute Steps icon in the Tasks window. A PDF report is generated and the user is able to print it.
Figure 18: Attribute Step List - Print Filtered Attribute Steps
Note: For more information reference to Unit Status Definition Work Instruction.
Copy Attribute List
To copy an attribute:
Select a Part Number, then select Copy. The Assembly Form pop-up window appears.
Enter a Part Number into the field provided. Select Save to continue or Cancel to abort.
Figure 19: Copy Attribute
Delete Attribute List
Deleting attributes works similarly to copying attributes, as the user must first select an entry from the list on the Attribute Definition Page. Thereafter, the function becomes available. Select Delete.
Note: Attributes with activity recorded against them cannot be deleted.
Figure 20: Delete Attribute
Import Attribute
A user may import multiple attributes by the use of a CSV file. The file must conform to a specified template; therefore, if the user is not familiar with the required template he or she can obtain this template using the Import function.
1. To use the function, select Import. A pop-up menu appears for selecting a CSV file from the local directory. Inside the pop-up window is the option Get Template. By selecting this, the user is prompted to save a file to the local directory that provides instructions on how to properly enter information into the file.
2. Once the user obtains a functional file with one or more data rows populated, the file can then be imported. Use Select in the pop-up window to select the file from the local directory and import it to the system. Note there are two options the user must select when importing a file: Skip when exists means that the system will not override or change the data of an imported entry that already exists. Update when exists DOES mean that the system will override or change the data of an imported entry that already exists.
3. Select Ok. The system will attempt to import the information. A pop-up window will subsequently appear showing the results of the import.
Figure 10: Import Attribute Definition
Publish History
For sub-modules that use Conduit, the Publish History functionality can also be found in the menu bar by users with the appropriate permissions. The Publish History function shows the action history of an item. With this functionality, the user can publish an action history record to Conduit.
Figure 11: Publish History - Conduit Function
Figure 11 Attribute Publish History.jpg
Export Attribute
The Export function can be used to package the Attribute Definition data from the system into an external CSV file.
1. Select Export from the menu bar. A window pops up.
2. Select either to open or save the file.
3. This performs the export, and the file will either save or open as was selected.
Figure 12: Export Attribute Definition
Additional Print Options
The user will note four additional printer icons that may be selected from the menu bar. These functions allow the user to save, open, and print the Attribute Definition Maintenance information as a separate file. Of these functions, the user’s selection will vary depending upon the kind of information he or she wishes to view or save.
The four functions breakdown as follows:
- Print Attribute List Definition for Current Shop Floor ID: Select the corresponding print icon. Then select the Shop Floor ID from the dropdown menu and select Print. Choose whether to open or save the output file and select Ok to complete, or select Cancel to abort.
- Print All Steps for Current Shop Floor ID: Select the corresponding print icon. Then select the Shop Floor ID from the dropdown menu and select Print. Choose whether to open or save the output file and select Ok to complete, or select Cancel to abort.
- Print Filtered Attribute Definition List: Select the corresponding print icon. Choose whether to open or save the output file and select Ok to complete, or select Cancel to abort.
- Print All Installed Attribute Definition Steps: Select the corresponding print icon. Choose whether to open or save the output file and select Ok to complete, or select Cancel to abort.
Note: If the icons do not contain text that identifies which function each represents, the problem can be circumvented by hovering the cursor over a given icon momentarily. This will generate pop-up help text that identifies the icon.
Figure 13: Print List Definition for Current Shop Floor ID
Print Attribute List Definition for Current Shop Floor ID.jpg
Figure 14: Print All Steps for Current Shop Floor ID
Print All Steps for Current Shop Floor ID.jpg
Figure 15: Print Filtered Attribute Definition List
Print Filtered Attribute Definition List.jpg
Figure 16: Print All Installed Attribute Definition Steps
Print All Installed Attribute Definition Steps.jpg
Step List
This functionality displays a list of steps for a specific Attribute Definition.
1. To list steps, select a list item then select the Step List icon in the Attribute List Page.
Figure 17: Attribute List - Step List
2. The Attribute Step List page displays.
Figure 18: Attribute Step List
SOP-5-I-MDS0030-C MDS Attribute Definition 08.jpg
From the Attribute Step List user is able to Add Attribute Step, Edit, Copy, or Print/Export Filtered Attribute Steps. Use the available icons on the menu. The following section defines the execution of these sub-modules.
Add Attribute Step
This functionality adds an Attribute Step. One or more steps must be added to an attribute to save an attribute to the system.
1. To add an attribute step, select Add Attribute Step in the menu.
The Attribute Step Form is displayed:
Figure 19: Attribute Step Form
2. Populate the required Attribute Step Form fields. The Attribute Step Form fields are described below:
Note: The user must populate all mandatory fields (indicated in Red) when adding attribute steps.
Step: Number automatically generated by the Step Number function.
Released: Check to Release. If left unchecked, the attribute for the step will not be prompted or captured as the step is in an unreleased state.
Attribute Name: The name of the attribute that will be collected for the attribute definition. Select the desired Attribute Name from the drop-down box, or select the Manage icon to create a new one. Refer to section Managing Attribute Name.
Attribute User Prompt: This field defines the text prompt displayed to the operator when a unit is scanned at the defined process/location. This field is populated automatically when selecting the Attribute Name and cannot be edited in this screen. The User Prompt is defined when creating the Attribute Name. Refer to section Managing Attribute Names to edit User Prompt.
Attribute Group: This field defines the group to which the selected Attribute Name is associated. This field is populated automatically when selecting the Attribute Name and cannot be edited in this screen. The group is defined when creating the Attribute Name. Reference section Managing Attribute Names.
Attribute Mask Type: The attribute mask type defines the format for the mask entered in the Attribute Mask field. If Data Type is selected, a drop-down will be available in the Attribute Mask field with the following data types available for selection:
• Boolean
• Character
• Date (yy-mm-dd)
• Decimal
• Integer
• Text
Attribute Mask: The input mask for the attribute definition. The maximum length of the data field is 40 characters. The maximum length of a single ID mask is 20 characters. Multiple ID masks are separated by a comma (,).
In the next image, users can see an Attribute Mask, which will require users to enter three possible values due to the functionality of the mask character: comma (,):
- 25 (number), T (uppercase letter), o (lowercase letter o), n (any number from 0 to 9).
- 50 (number), - (dash), T (uppercase letter), o (lowercase letter o), n (any number from 0 to 9).
- 100 (number), - (dash), T (uppercase letter), o (lowercase letter o), n (any number from 0 to 9).
Figure 20: Attribute Mask Example 1
Figure 20 Attribute Mask Example 1.png
In the next image, users can see an Attribute Mask, which will require users to enter three possible values due to the functionality of the mask character: comma (,):
- 25 (number), T (uppercase letter), O (uppercase letter O), N (uppercase letter N).
- 50 (number), - (dash), T (uppercase letter), O (uppercase letter O), N (uppercase letter N).
- 100 (number), - (dash), T (uppercase letter), O (uppercase letter O), N (uppercase letter N).
Figure 21: Attribute Mask Example 2
Figure 21 Attribute Mask Example 2.png
Expected HPU: Enter the expected HPU in seconds.
The new Attribute Step is created and displayed in the Attribute Step List.
Note: For further information concerning mask characters and their respective definitions, see SOP-5-I-42Q-MES0099-C Mask Characters for reference. Documentation applies to Assembly, Attribute Definition Maintenance, and SDE (sub)modules.
Edit Attribute Step
This functionality enables users to edit Attribute Steps. If mandatory fields are not populated an error message is displayed.
1. To edit an Attribute Step, select the Edit icon. The Attribute Step form displays.
Figure 22: Save Attribute Step Form
2. Make the necessary changes and select Save to update, or Cancel to cancel the update. Select Reset to clear all form contents.
Note: Upon Attribute Name selection, the Attribute User Prompt and Attribute Group are auto-populated.
Note: The Manage icon enables the user to configure the Attribute Name.
Copy Attribute Step
To copy an attribute step,
1. Select an attribute from the Attribute Step List by checking the box, and select Copy.
Figure 23: Copy Attribute Step
SOP-5-I-MDS0030-C MDS Attribute Definition 11.jpg
2. Enter the step number in the Step field in the Copy Step pop-up menu.
3. Select Save to complete the process; press Cancel to exit the process.
Delete Attribute Step
To delete an attribute step,
1. Select an attribute step from the list by checking the box, and select Delete.
2. To confirm the delete, select Yes. To cancel, select No.
Figure 24: Attribute Step List - Delete Attribute Step
SOP-5-I-MDS0030-C MDS Attribute Definition 12.jpg
Install Local Attribute
If the local attribute is not installed, all changes are lost when Shop Floor Configuration exits. This functionality installs the Local Attribute.
1. To Install Local Attribute, select Save
Figure 25: Attribute Step List - Install Local Attribute
SOP-5-I-MDS0030-C MDS Attribute Definition 13.jpg
2. A confirmation message displays when complete.
Note: If the local attribute is not installed, all changes are lost when Shop Floor Configuration exits.
Note: After adding attribute steps, the steps are displayed in the Attribute Step List and the user is able to edit/copy/delete and change step number.
Manage Icon
The Manage icon is available in the Attribute Form and Attribute Step Form when adding or editing an attribute or attribute step. The features of the Manage icons are discussed below:
Manage Icon – Step List
This section covers the Manage icon as it functions in the Step List portlet. When the Manage icon is selected in the process of adding or editing an attribute step, the user can perform the following actions:
- Add Attribute Name
- Edit Attribute Name
- DeleteAttribute Name
Figure 26: Create Attribute Name
SOP-5-I-MDS0030-C MDS Attribute Definition 14.jpg
Add Attribute Name
1. Select the Attribute Name Manage icon, and then select the Add icon. The Create Attribute Name window is displayed.
Figure 27: Add Attribute Name Form
2. Enter the new Attribute Name, User Prompt, and if desired the Attribute Group.
Attribute Name: The name of the attribute that will be collected.
User Prompt: This field defines the text prompt displayed to the operator when a unit is scanned at the defined process/location. The prompt should be intuitive so the operator understands what data they are to enter.
Attribute Group: This field defines the group that the selected Attribute Name is associated with.
3. Select Ok to confirm the creation action. Select Cancel to cancel the action. A new Attribute Name is created.
Editing Attribute Name
1. Select on the Attribute Name Manage icon.
2. Select the Attribute Name to edit and select the Edit icon. The Edit Attribute Name window is displayed.
Figure 28: Edit Attribute Name
SOP-5-I-MDS0030-C MDS Attribute Definition 15.jpg
3. Edit the Attribute Name, User Prompt, and Attribute Group as desired.
4. Select Ok to confirm the creation action. Select Close to cancel the action.
Note: Changes are verified after editing attributes. If the Attribute Name has activity, only the User Prompt can be edited.
Delete Attribute Name
1. Select on the Attribute Name Manage icon.
2. Select the Attribute Name to delete and select the Delete icon. The Confirm deletion window is displayed.
Figure 29: Confirm Deletion Message
3. Select Yes to confirm the delete. Select No to cancel the action.
Note: It is not possible to delete an attribute name that has previously recorded activity, and/or is assigned to an attribute step.
Manage Icon – Add Attribute
This section covers the attribute icon as it functions under the Add Attribute portlet. Using the Manage icon here is almost the same as using it is in the Step List portlet (see above), however, there is some difference in terminology.
Using the Manage icon, users can
- Add Process
- Edit Process
- Delete Process
Add Process
To add a process,
1. From the Attribute List main page, select Add. Then select the Manage icon in the Attribute Form pop-up.
Figure 30: Add Process - Manage Icon
2. From within the Process List, popup select Add to generate the Process Form popup.
3. Enter the new Process, Global Process Name, and Sequence. Once entered, click Save.
Edit Process
To edit a Process navigate to the Process List. Then,
1. Check the box of a process to be edited and select Edit.
Figure 31: Edit Process – Manage Icon
2. In the Process Form, edit the Process, Global Process Name, and Sequence as desired.
Global Process Name: The process name for which the attribute will be executed.
Sequence: The sequence in which the attribute will be executed.
3. Click Save.
Delete Process
To delete a process, navigate to the Process List. Then,
1. Check the box of the process to be deleted.
2. Select Delete.
3. In the pop-up, select Yes to confirm the delete. Select No to cancel the delete.
Figure 32: Delete Process – Manage Icon
SOP-5-I-MDS0030-C MDS Attribute Definition 20.jpg
Print/Export Filtered Attribute Steps
This functionality prints or exports filtered Attribute steps. The report prints to the default printer for the workstation. The system displays print result information.
1. Select the Print All Attribute Steps icon in the Tasks window.
Figure 33: Attribute Step List - Print Filtered Attribute Steps
SOP-5-I-MDS0030-C MDS Attribute Definition 21.jpg
A PDF report is generated and the user is able to print it.
Figure 34: Print Setup & Print
SOP-5-I-MDS0030-C MDS Attribute Definition 22.jpg
Save/Publish
The Save/Publish Conduit-based function at the bottom of the Attribute Step List screen is available to users with the appropriate permissions and can be used by selecting the down arrow adjacent to the Save button. WhereasSave gives the record a pending status relative to Conduit, Save/Publish saves the record and publishes it to Conduit.
Figure 35: Save/Publish - Conduit Function
SOP-5-I-MES0003-C RA1-Save-Publish.jpg
The username is the SiteMinder username (or a partial string).
Note
Unit Status definitions Deprecated from Assembly Maintenance, Attribute Maintenance, MFG Hold, MFG Line, Location Maintenance, Data Collector Maintenance they are used/assigned by the system for internal purposes.
- In Container (36)
- In Transit (37)
- Temporary Ship Status (45)
- CRM Received (46)
- CRM Released (47)
- CRM RESERVED (48)
- CRM Finished (49)
- Killed (51)
- Killed RBF (52)
- Killed (56)
- Batch Old ID (63)
- Not DB of Record (70)
For more information please visit the 42Q-MES0160-C Unit Status Definition Work Instruction
