SOP-42Q-MES0045 Labor Tracking
42Q Home > Production > Labor Tracking
Contents
Introduction
The Labor Tracking portlets manage employee work time. Labor Tracking is accessible from three different locations based upon user permissions: Labor Tracking Maintenance, Labor Tracking Operations, and MESWeb Labor Reports. Within Labor Tracking Maintenance, supervisors can add departments and indirect labor activities, make adjustments to an employee’s hours, or adjust absent hours. Conversely, employees utilize the Labor Tracking Operations portal to record direct and indirect labor hours in a traditional clock-in method. For administrators, the 42Q solution provides Labor Tracking reports through MESWeb, which displays labor records for a specified date range. These portals are described within this work instruction.
To access the maintenance feature of Labor Tracking supervisors navigate to Shop Floor Control > Configuration > Labor Tracking (Maintenance).
Figure 1: Labor Tracking (Maintenance)
To utilize Labor Tracking to record labor hours employees navigate to Production > Labor Tracking (Operation).
Figure 2: Labor Tracking (Operation)
To access labor statistics, administrators may navigate to Reporting > MESWeb.
Figure 3: Labor Tracking Reports (MESWeb)
4. Select a Labor Tracking sub-module.
Note: Only Supervisor users have access to Labor Tracking Maintenance.
Note: Only Administrators have access to Labor Tracking Reports in MESWeb Reports.
Labor Tracking Maintenance
Users with appropriate privileges can select the Labor Tracking Maintenance portlet to manage employees, add labor, and apply search filters in Labor Tracking.
Labor Maintenance allows administrators to maintain the department for a direct labor type.
Note: Generic attributes are used to define what information (including department) will be mandatory or optional, with optional being the default setting.
The generic attribute name that specifies which fields are mandatory islabor_tracking_mandatory_fields and the default value: direct[job];indirect[indirect labor type].
The generic attribute value is composed of two parts:
Direct[]
Inside the brackets, the field name is specified (more than one field could be specified separated by commas.
Possible values: Job, Department
Indirect[]
Inside the brackets, the field name is specified (more than one field could be specified separated by commas.
Possible values: Department, Indirect Labor Type.
If no value is specified in brackets it means that no fields will be mandatory.
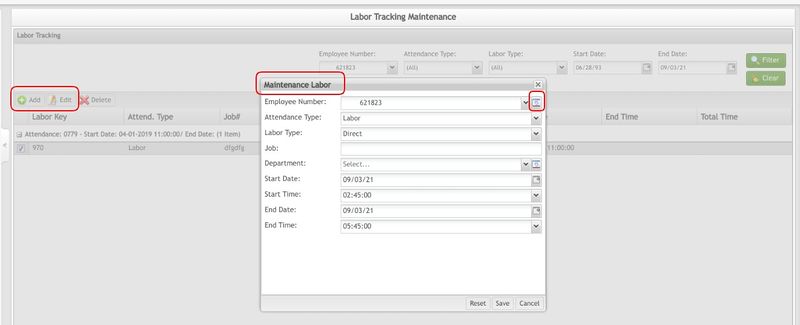
It is possible to add, edit, or delete labor entered by selecting their respective buttons.
Figure 4: Add, Edit, and Delete Labor
Note: Only supervisors may update the date and time ranges.
Managing the Employee Number, Department, and Indirect Labor Type Fields
The Labor Tracking Maintenance portlet provides users with the ability to Add, Edit, and Delete labor entries. Within the Add and Edit functions, Employees, Departments, and Indirect Labor Types can also be managed. Selecting the Management ![]() icon for any of these fields opens a new pop-up window with a list. This window gives users the ability to Add, Edit, or Delete items to the respective list. Any items added here are populated in their respective drop-down menus for selection. Employees added to the Employee List as well as any Departments or Indirect Labor Types added to their lists will also be added for users to select in the Labor Tracking Operations portlet.
icon for any of these fields opens a new pop-up window with a list. This window gives users the ability to Add, Edit, or Delete items to the respective list. Any items added here are populated in their respective drop-down menus for selection. Employees added to the Employee List as well as any Departments or Indirect Labor Types added to their lists will also be added for users to select in the Labor Tracking Operations portlet.
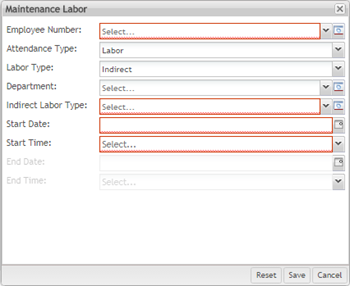
Figure 5: Maintenance Labor
Managing Employee Number
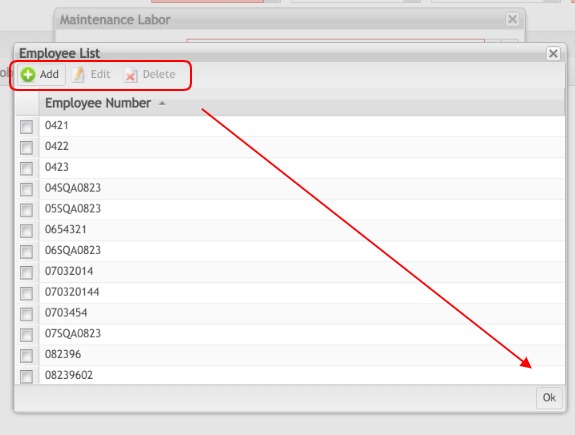
1. To manage the Employee Number, select the Maintenance ![]() icon to the right of the Employee Number field. A new window will display an Employee list with the Ability to Add, Edit, or Delete Employee Number entries.
icon to the right of the Employee Number field. A new window will display an Employee list with the Ability to Add, Edit, or Delete Employee Number entries.
2. Select Add, Edit, or Delete from the menu, then enter, update, or delete the Code and Code Name fields. Select Ok.
Note: Code has used a reference designator for the Labor Type, where Code Name is the general name for the Labor Type itself (i.e. Meeting, Lunch, etc.).
Note: Any changes made to the Employee List will be reflected in their respective drop-down menus as well as in Labor Tracking Operations.
Figure 6: Employee List
Managing Indirect Labor Type
1. To manage the Indirect Labor Type select the Maintenance icon.
2. Select Add, Edit, or Delete from the menu.
3. Enter, update, or delete the Code and Code Name fields. Select Ok.
Figure 7: Indirect Labor Type
Managing Department
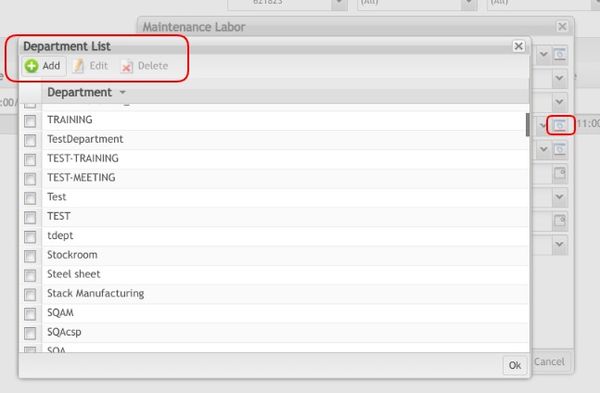
1. To manage the Department, select the Maintenance icon.
2. Select Add, Edit, or Delete from the menu.
3. Enter, update, or delete the Department field. Select Ok.
Figure 8: Department List
Add Labor
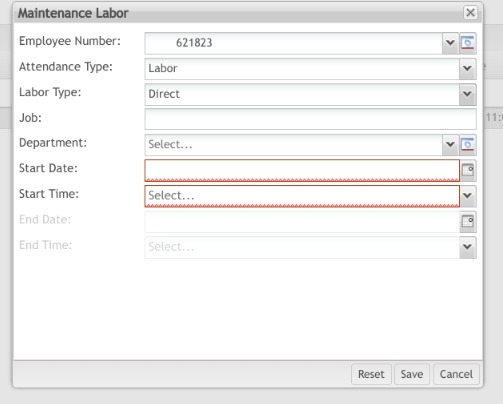
The Add function displays a pop-up window allowing supervisors to manage Labor with the ability to create Labor for an employee, as well as add the employee’s badge number and the Job number if it is Direct labor, etc.
1. To Add Labor, select the Add Labor button from the Labor Tracking Maintenance functions menu. A Maintenance Labor pop-up window displays.
Figure 9: Add Labor
2. Enter the Employee number or select the Maintenance ![]() icon to open the Employee List window, which provides the ability to Add, Edit, and Delete Employee Numbers. Any changes in this list will be reflected in the Employee Number drop-down menu.
icon to open the Employee List window, which provides the ability to Add, Edit, and Delete Employee Numbers. Any changes in this list will be reflected in the Employee Number drop-down menu.
3. Select either Labor or Absence in the Attendance Type drop-down menu.
4. Select either Direct or Indirect for Labor type.
- If Direct was selected, enter the Job number (WO#).
- If Indirect was selected, the Department and Indirect Labor Type fields display. Only Indirect Labor Type is a mandatory field.
5. Select the Start Date by selecting the Calendar ![]() icon and the Start Time from the drop-down menu.
icon and the Start Time from the drop-down menu.
6. Select theEnd Date by selecting the Calendar ![]() icon and the End Time from the drop-down menu.
icon and the End Time from the drop-down menu.
Figure 10: Maintenance Labor - Expanded Menu
Add Indirect Labor
Users with the appropriate permissions are able to Add, Edit, or Delete.
1. To add new Indirect Labor codes, select the List ![]() icon to open the Indirect Labor Type List window.
icon to open the Indirect Labor Type List window.
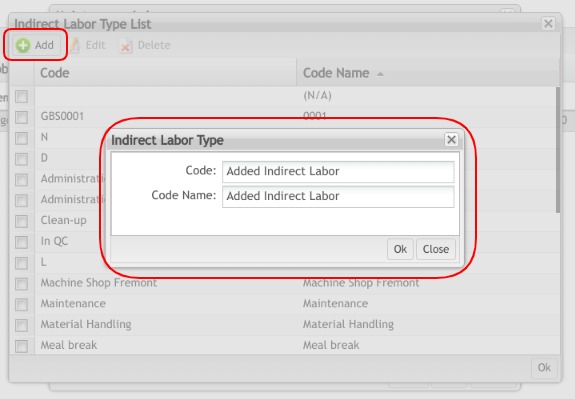
2. Select the Add icon located at the upper-left corner of the Indirect Labor Type List. The Indirect Labor Type window will be displayed.
3. Write down the Code and Code Name.
4. And select Ok to proceed, or Close to cancel and close the window.
Figure 11: Indirect Labor Type Window to Add a New Code
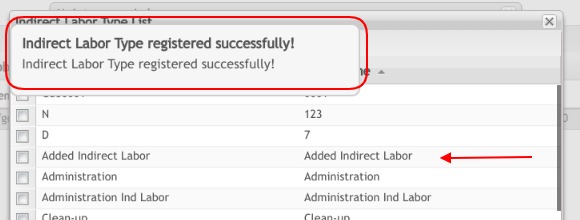
5. A message window will appear confirming that the new Indirect Labor code was registered.
Figure 12: Registered Indirect Labor Message
6. Once the new Indirect Labor code has been added, it will appear in the Indirect Labor drop-down list of the Labor Tracking module in Production Workbench. For more information, please refer to the Production Workbench SOP.
Edit Labor
The Edit function can be used to modify the Maintenance Labor information of a previous entry.
1. First search for an entry by using the Filter function (See Filter functions below).
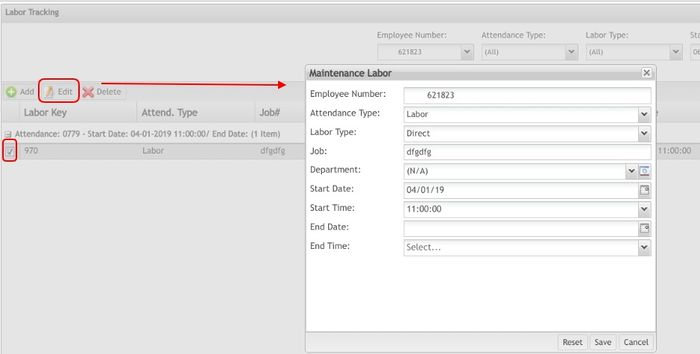
2 Select an entry from the list by selecting the “+” to expand the entry. Then select the checkbox for the entry.
3. Select Edit from the Functions menu. The Maintenance Labor pop-up displays, where the provided fields can then be edited.
4. Once the desired changes have been made, select Save to finish or Cancel to abort.
Note: The Employee Name cannot be edited.
Figure 13: Edit Labor
Delete Labor
Labor entries can be deleted with the Delete function. To perform this operation:
1. Search for the entry you wish to delete using the Filter function (see Filter below).
2. Select the entry by clicking the “+” to expand the entry’s information, then select the checkbox. The Delete function becomes available for selection.
Figure 14: Delete Labor
3. Select Delete. A confirmation dialogue box displays.
4. Select Yes to continue.
Filter
1. To filter, complete the mandatory fields (i.e. Employee Name, Start Name, and End Date) and select Filter. The results are displayed in the Labor History.
Figure 15: Filter Settings
Labor Tracking Operations
The Labor Tracking portlet allows the employees to log the worked hours.
To Clock In:
- Select the Labor Type:
- Direct Labor: Used for specific activities involving a Job (WO#) number. For this labor type, enter the Job Number in the Job field that displays after the Direct Labor Type is selected.
Labor tracking reports direct labor via the department field too. Selecting the Labor Type = Direct, the user can select a specific Department.
Figure 16: Direct Labor Type - Clock-in
Direct Labor Type clock in.png
The same rule is applicable for clock out too.
Figure 17: Direct Labor Type - Clock-out
Direct Labor Type clock out.png
- Indirect Labor: Used for generic activities. For this labor type, select the Department and the Indirect Labor Type from the drop-down menus that are generated after the Indirect Labor Type is selected.
Figure 18: Indirect Labor Type
2. Once the fields have been completed, select Clock In.
Labor Tracking - MESWeb Reports
MES Web's Labor Tracking report allows administrators to track employee labor records from a 90-day span. Administrators can then Print, Export, Share via Email/Link, or create a SnapShot.
To view the Labor tracking report:
Allows users to Print the report locally. To Print the report:
1. Select the Print button.
A window will display according to the user's specific print configuration and the file can be printed.
Export
The Export feature supports exporting the report to Google Sheets, Excel, CSV, or Plain Text.
To export to Google Sheets:
1. Select the Export drop-down menu. Then select Google Sheets.
2. Enter your Google credentials into the Google Drive Sign-In pop-up window.
Once permission has successfully been granted, reports can be exported to Google Sheets.
To export to Excel, CSV, or Plain Text:
1. Select the Export drop-down menu, then select the desired output format.
The report will be automatically downloaded as the correct format.
To share the report via link:
1. Select the Share drop-down menu, then select Link.
A URL will be generated for the report that users can share.
To share the report via email:
1.Select the Share drop-down menu, then select Email. The Email Report window displays, which allows users to send the report as a .xls, CSV, XML, or text file.
2. Select a format from the Format drop-down menu.
3. Enter information for the To:, Subject:, and Body fields, then select Send.
Snapshot
This tool allows the user to create Snap Shots of a report within the Selected Parameters for a specified time. These Snap Shots can be configured to run on a schedule. For more information on Snap Shots, refer to Snap Shots.
Labor Tracking - Using SFDC Commands
SFDC commands can be used to clock in or clock users. A !!1 command is used at the Menu Selection prompt, and a !!2 is used in the Serial No? prompt.
- The clockin command is run at a data collector at any time after the operator logs in. If an operator is already clocked in, running the command again will automatically end the previous labor record and begin a new record.
The format of the command is:
!!1clockin.1.(WO#)-(Process_Name)
!!2clockin.2.(Description)
labor_type labor_data
1 (Direct Labor) Job number (Work Order#)
2 (Indirect Labor) Department
For example, to start a labor record for Shop Order 100501, scan:
!!1clockin.1.100501
or for a labor record for the Indirect Labor Type “Meeting,” scan:
!!2clockin.2.meeting
- The clockout command is run at a data collector at any time after the operator logs in when there is an open labor record.
It is run as a !!2 command, which means that it is entered at the Serial Number? prompt.
The format of the command is:
!!1clockout
or
!!2clockout


