42Q-MES0186-A-PTS Mobile
42Q Home > Production > 100% Traceability> PTS Mobile
Contents
- 1 Introduction
- 2 PTS Mobile
- 3 Re-Validate Material
- 4 Load/ Unload Materials
- 5 Appendix A: Load Material Error and Resolution List
- 6 Appendix B Scan Board of Error Message and Suggested Solutions
Introduction
The Part Traceability System (PTS) is an essential component of the MES suite of tools, designed specifically to meet the growing demands of customers. Its primary objective includes offering comprehensive traceability at the component level and ensuring strict quality controls. By automating production lines and enforcing rigorous product quality control, this system plays a pivotal role in enhancing overall productivity. its successful implementation has been witnessed across numerous plants worldwide.
As technology continues to evolve and SMT process equipment tools become increasingly intricate and feature-rich, the PTS application and its accompanying features consistently advance. However, our commitment remains to provide support for all technology tools. 42Q prioritizes offering the necessary flexibility to accommodate various line types and deliver diverse levels of traceability that are crucial to the success of your business.
PTS Mobile
PTS Mobile is specifically designed to be compatible with handheld devices, recognizing that operators may not always be in front of a computer and require the convenience of using a handheld device for operation.
To access PTS Mobile, navigate to Production > 100% Traceability > PTS Mobile
Re-Validate Material 
Whenever material is going to be exhausted, splicing is required to ensure production is able to proceed without interruption. However, there is a small chance that splicing was mistakenly done to the wrong feeder slot and it can’t be detected by the normal part verification process.
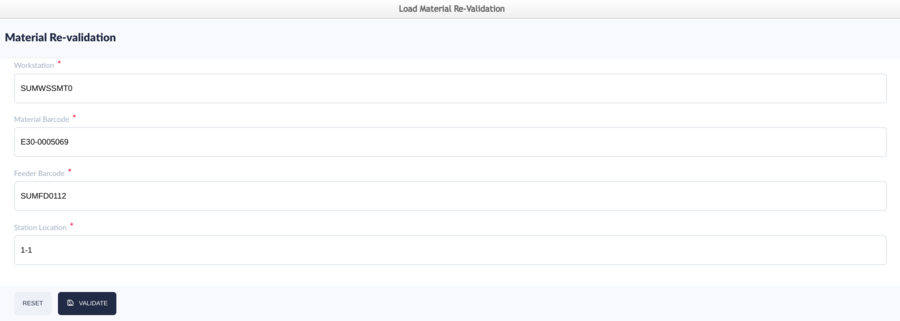
Therefore, a material re-validation is required to handle this scenario. By re-validate material (just re-scan material barcode, without interrupting the current production run), chances of splicing material to the wrong feeder slot can be avoided. The Re-Validate Material is a mobile solution (GUI) to handle the situation of Component Reset and Re-validation for traditional SMT Machines. The users can validate the materials with the Workstation, Material Barcode, Feeder Barcode, and Station.
To access Re-validate, navigate to theProduction > 100% Traceability > PTS Mobile > Re-validate Material
The main screen will request the user to input or scan theWorkstation, Material Barcode, Feeder Barcode, and Station Location.
Figure 1: Re-validate Materials
Load/ Unload Materials 
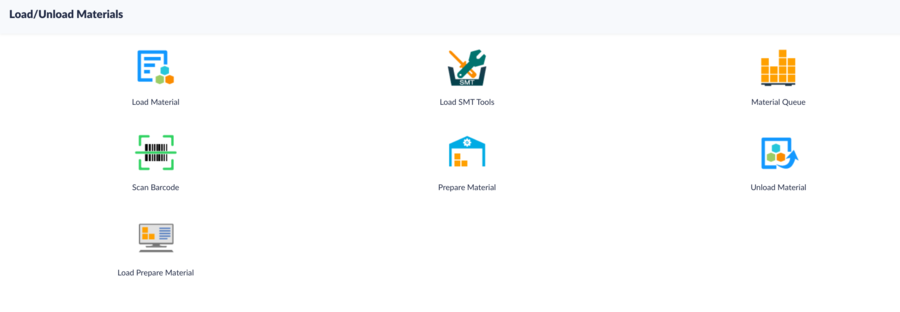
It is mainly used for material loading and unloading materials and SMT tools, including the following subpages:
- Load Material
- Load SMT Tools
- Material Queue
- Scan Barcode
- Prepare Material
- Unload Material
- Load Prepare Material
Figure 2: Load / Unload Materials page
Load Material 
This function is used to load material to the workstation.
- Input the Workstation name and select a workstation, and the detailed items for load material will display.
Figure 3: Load to Workstation
AI Workstation
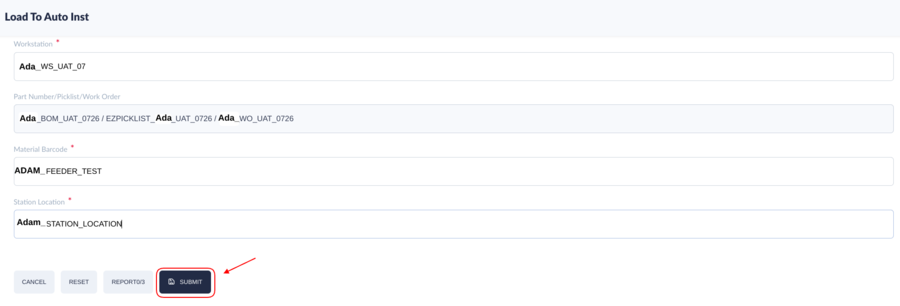
For the AI workstation, the fields will contain the Material barcode and workstation. AI workstation means Auto Insert workstation.It is one of the workstation types.The user will manually input the Material Barcode and the Station Location.
Figure 4: AI Workstation
SMT Workstation
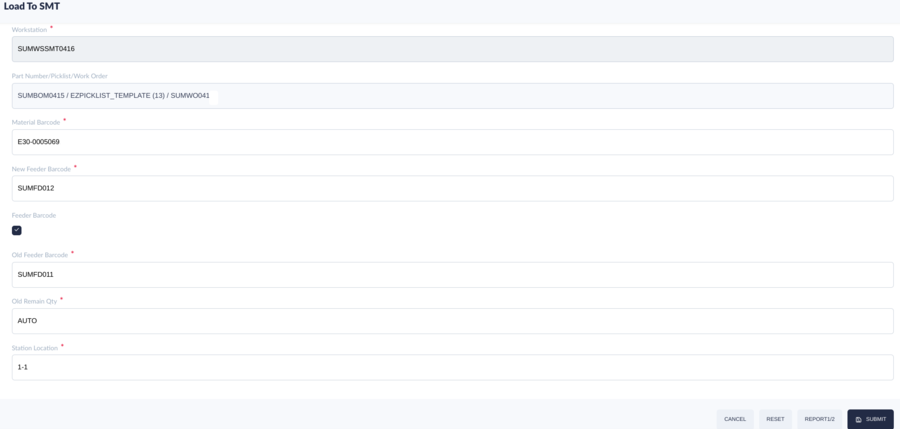
For the SMT workstation, the fields displayed will contain the Material barcode, feeder barcode, and station;
- Input the following information according to the field:
Figure 5: Load Material to an SMT Workstation
- Material Barcode: Scan (or Input manually) the material barcode.
- New Feeder Barcode: Scan (or Input manually) New Feeder Barcode. (Apply to the feeder which will be loaded to the defined SMT machine slot).
- Feeder Barcode: The Feeder Barcode checkbox is unchecked by default. If the "Feeder Barcode" checkbox is checked, then the "Old Feeder Barcode" and "Old Remaining Quantity" input boxes will be displayed.
- Old Feeder Barcode: Scan (or Input manually) Old Feeder Barcode.
- Old Remain Qty: Input Old Remain Qty.
- Station Location: Scan the station barcode. gram.)
- Select Submit. “ Load Material Successfully” will display after the material loads successfully. Detailed information can be seen on the “Load Material Report” page.
- To close the current page, select theCancel button. To see the loaded detailed information, select the Report button. To clear the content of the input box by selecting the Reset button.
HL Workstation
For the HL workstation, the fields will contain a Material barcode.
- Input the Material Barcode, Scan (or Input manually) the material barcode.
Figure 6: Load Material to an HL Workstation
- Select Submit after the material barcode has been scanned or inputed manually, a “Load Material Successfully” will display after the material loads successfully.
- To close the current page, select the Cancel button. To see loaded detailed information, select the Report button. The information will be displayed on the “Load Material Report” page. To clear the content of the input box, select the Reset button.
Load SMT Tools 
This function is used to load and unload Jig.
Prerequisites
- Set Jig Control=Yes under the System Setting(Traceability) page
- A Jig barcode has been created
Figure 7: Load SMT Tools
- Input the Workstation name and select a Workstation Available.
- Input the corresponding jig barcode in the Jig Barcode textbox.
- Select Submit, “Load SMT Tool” will be displayed in the Load SMT Tools page.
- To close the current page by selecting the Cancel button. To clear the content of the input box by selecting the Reset button.
Note: The system will auto-verify whether the jig barcode can be loaded to the selected workstation based on the defined mapping. If the jig barcode is correct, it will then be loaded successfully. An error message will show up at the top side if the system fails to load the jig.
- If the JIG has been loaded to the workstation, then the user can enter the workstation and JIG barcode again to unload the Jig from this workstation.
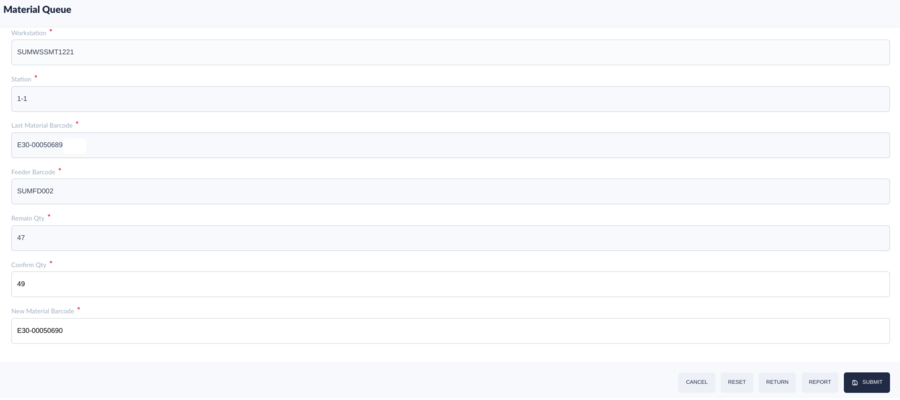
Marial Queue 
This function is used to batch joint materials.
- Input a Workstation Name and Select the Workstation Available. Select a Station.
Figure 8: Material Queue Prerequisites
- Select Submit to finish inputting the following information according to the field:
- Workstation: Scan or (input manually) the Workstation name and select a Workstation Available
- Station: Scan or (input manually) the Station and press the enter key. The loaded material will show automatically.
- Last Material Barcode: Scan or (input manually) the Last Material Barcode
- Feeder Barcode: Scan or (input manually) the Feeder Barcode
- Remain Qty: Scan or (input manually) the quantity of the materials that have remained
- Confirm Qty: Scan or (input manually) the quantity of the materials that are going to change
Note: The portal will send a warning message, in case the quantity does not meet the Confirmed Quantity box.
- Confirm Material Barcode: Scan or (input manually) the Confirm Material Barcode
- New material Barcode: Scan or (input manually) the New material Barcode
- Select Submit, after the Workstation Station name
- Select the Cancel button, to close the current page. To clear the content of the input box, select theReset button. To return to the previous step by selecting theReturn button.
Figure 9: Material Queue
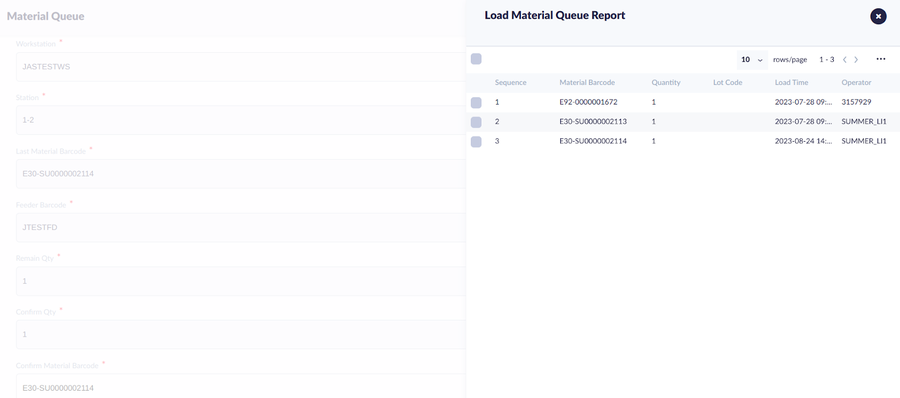
To view the Material Queue Report by selecting the Report button. To edit the Material Queue Report follow the following steps: Note: The first material cannot be deleted from the Material Queue Report.
- Select the box of the Material Barcode that needs to be edited.
- Select Delete to delete the material barcode that is no longer required.
Figure 10: Material Queue - Material Queue Report
Note: Material queue max reels and Material queue max Boards cannot be larger than the values set at the system settings page if Allow Material Queue isYES.
Scan Barcode 
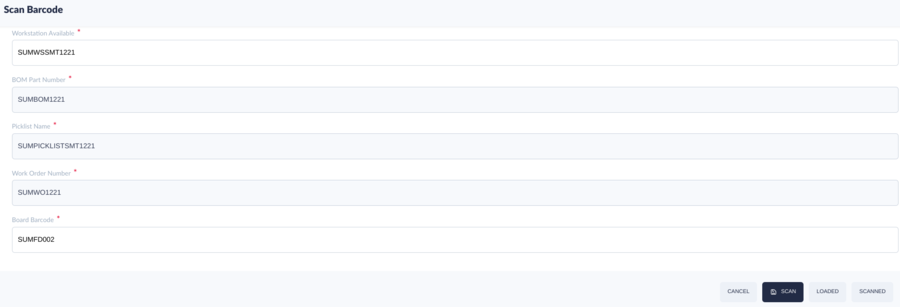
After the production line has been activated the materials loaded in Traceability, go to the Scan Barcode module.
- Add the Workstation name and Select a Workstation.
- Input the following information according to the field:
- BOM Part Number: Scan or (input manually) the BOM Part Number
- Picklist Name: Scan or (input manually) the Picklist Name
- Work Order Number: Scan or (input manually) the Work Order Number
- Board Barcode: Scan or (input manually) the Board Barcode
- The PCB board/panel/serial barcode will need to be Scan as per Workstation Setup defined in the Production Setup module.“Scan board barcode successfully” will display after the scan barcode successfully.
Figure 11: Scan Barcode
- To view the Loaded Material report, select the Loaded button and to view the Scanned Board Report select the Scanned button. To close the current page, select the Cancel button.
Figure 12: Loaded Material Report
Figure 13: Scanned Board Report
Prepare Material 
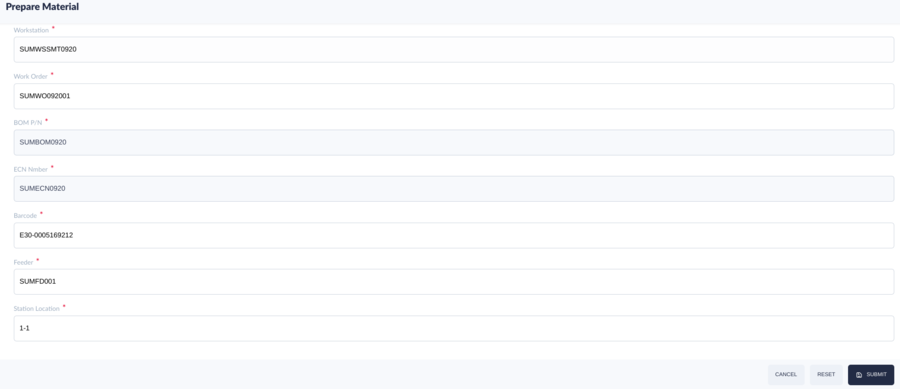
To prepare material in advance while the production line is either in offline mode or online mode.
- Input the following information according to the field:
- Workstation: Scan or (input manually) the Workstation name and select a Workstation Available.
- Work Order: Scan or (input manually) the Work Order.
- BOM P/N, ECN Number: If the workstation and work order are correct, BOM P/N and ECN numbers will show automatically.
- Barcode: Scan or (input manually) the material barcode.
- Feeder: Scan or (input manually) the new feeder barcode.
- Station Location: Scan or (input manually) the station barcode. (I.e. SMT machine slot, as formatted in SMT placement program.)
Figure 14: Prepare Material
- Select Submit to send the material. If prepared successfully, the user can search for the information on the “Prepare Material Report” page.
- To close the current page, select the Cancel button. To clear the content of the input box select the Reset button.
Unload Material 
Unload Material from Workstation. To Unload a specific item of the material, make sure the Unload All is not checked.
- Input the following information according to the field:
- Workstation: Scan or (input manually) the Workstation name and select a Workstation Available.
- Barcode: Scan or (input manually) the Barcode
- High-Value: Check the High-Value box to input the Confirm QTY if needed.
- Select Submit to unload material.
Figure 15: Unload Material
To Unload All the Material, make sure the Unload All is checked.
- Input the Workstation name, Scan or (input manually)the Workstation name and select a Workstation Available.
- Select Submit to unload all materials.
Figure 16: Unload All Material from the Workstation
Load Prepare Material 
Load prepare material sing.
- Input the following information according to the field:
- Workstation: Scan or (input manually) the Workstation name and select a Workstation Available.
- New Feeder: Scan or (input manually) the New Feeder Barcode. (Apply to the feeder which will be loaded to the defined SMT machine slot).
- Station: Scan or (input manually) the Location number.
Figure 17: Load Prepare Material
- Select Submit. The successful prompt information will be displayed at the top of the page. The user could also go to the “Load Material Report” web page to check if the load material was successful by entering the same information as the preparation material. If load preparation material was successful, the information (before prepared material) will disappear from the “Prepare Material Report.”
Note: Prepare material before loading prepared material or the user can load the material directly.
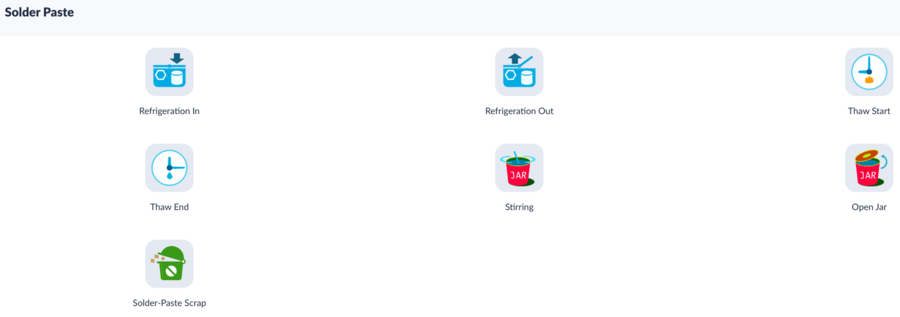
Solder Paste
This module is used to manage solder paste, including the following subpages:
- Refrigeration In
- Refrigeration out
- Thaw Start
- Thaw End
- Stirring
- Open Jar
- Solder-Paste Scrap
Figure 18: Solder Paste
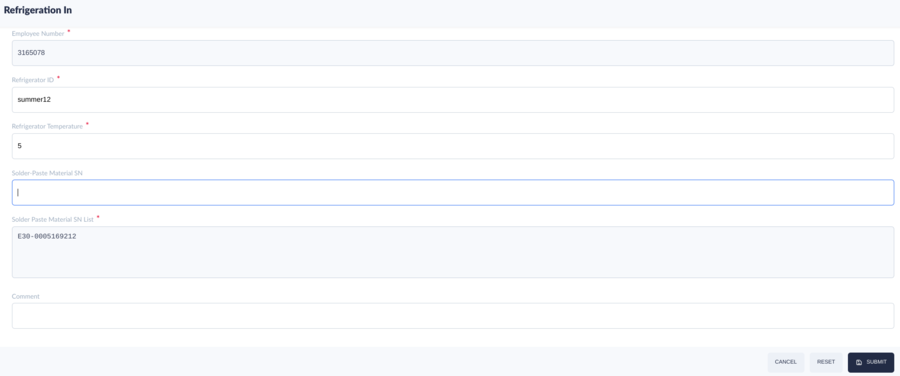
Refrigeration In 
This function is used to put the solder paste into the refrigerator.
- Select Refrigeration In Icon
- Input the following information according to the field:
- Refrigerator ID: Scan or (input manually) the Refrigerator ID
- Refrigerator Temperature: Input the temperature
- Solder-Paste Material SN: Scan or (input manually) the Solder-Paste Material SN
- Comment: Input a comment
- Select Submit.
Figure 19: Refrigeration In
Note:
- Employee Number: The ID/number of employees, this employee number is to call the login user information automatically. On the pad/Touch side, it can be used to scan the user code. Employee Number can not be empty and must be valid.
- Refrigeration ID: The number of refrigeration. The refrigeration ID can not be empty and must be valid. This refrigeration ID is an Asset ID managed by the CMMS system.
Notes: In order to get/verify the refrigeration ID/Asset ID, users need to set the CMMS web server information in the system setting (Others > CMMS Web Service URL).
- Refrigeration Temperature: The temperature of refrigeration.
- Solder Paste Material SN: The barcode of solder paste material.
- Solder Paste Material SN List: This application supports putting more than one solder paste material in refrigeration at one time. Once users scan/input the solder paste material barcode at the Solder-Paste Material SN text field and press the Enter key, the material barcode will show on this list line by line.
- Comment: Comment on the refrigeration in action.
Notes:
- If the value of ‘Refrigerator Temperature’ for the corresponding MPN is not between the value of ‘Optimal Storage Temp - Storage Temp Dev’ and ‘Optimal Storage Temp + Storage Temp Dev’ (Optimal Storage Temp and Storage Temp Dev can be configured in function ‘Solder Paste material Control’) then the system will prompt error message such as ‘Incorrect Storage Temperature’.
- If the shelf time of the current solder paste material is more than ‘Shelf-Life’ configured in the function ‘Solder Paste material Control’ then the system will prompt error messages such as ‘Shelf Time Expired’.
- If the count of ‘Thaw Cycle’ is more than ‘Max Allowed Thaw Cycle’ configured in function ‘Solder Paste MPN Control’ then the system will prompt error messages such as ‘Count of Max Allowed Thaw Cycle is reached’.
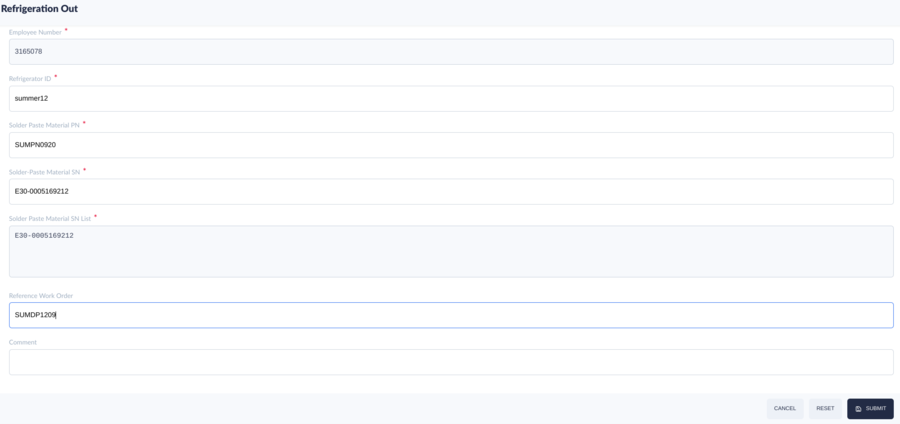
Refrigeration Out 
This function is used to take the solder paste out of the refrigerator.
- Select Refrigeration Out Icon
- Input the following information according to the field:
- Refrigerator ID: Scan or (input manually) the Refrigerator ID
- Solder-Paste Material PN: Scan or (input manually) the Solder-Paste Material PN
- Solder-Paste Material SN: Scan or (input manually) the Solder-Paste Material PN
- Solder-Paste Material SN List: Scan or (input manually) the Solder-Paste Material SN List
- Reference Work Order Comment: Scan or (input manually) the Reference Work Order Comment
- Select Submit.
Figure 20: Refrigeration Out
Note:
- Employee Number: The ID/number of employees, this employee number is called the login user information automatically. On the pad/Touch side, it can be used to scan the user code. Employee Number can not be empty and must be valid.
- Refrigeration ID: The number of refrigeration can not be empty and must be valid.
- This refrigeration ID is an Asset ID managed by the CMMS system.
Note: In order to get/verify the refrigeration ID/Asset ID, users need to set the CMMS web server information in the system setting (Others > CMMS Web Service URL).
- Refrigeration Temperature: The temperature of refrigeration.
- Solder Paste Material PN: The part number of the solder paste material.
- Solder Paste Material SN: The barcode of solder paste material.
- Solder Paste Material SN List: This application supports putting more than one solder paste material out of refrigeration at one time. Once users scan/input the solder paste material barcode at the Solder-Paste Material SN text field and press the Enter key, the material barcode will show on this list line by line.
- Reference Work Order: The work order of the solder paste.
- Comment: Comment on the refrigeration in.
Note:
‘Employee Number’, ‘Refrigerator ID’, ‘Solder Paste Material PN’, and ‘Solder Paste Material SN’ can not be empty, and if the value is invalid, the system will pop up an error message.
Reference Work Order can be null, if it is null, it will map to the N/A level solder paste control. If it is not Null, it must exist in the system. If the solder-paste material PN has been changed, it must input the refrigerator ID first.
The system supports taking out more than 1 solder paste material of the refrigeration at one time. Once users change the value of ‘Solder Paste Material PN’ (must input ‘Refrigerator ID’ first) then the further refrigeration in value of ‘Solder Paste Material SN’ can be displayed first automatically according to the FIFO rule.
- The ‘Reference Work Order’ item can be empty. If this is empty, it will map to the N/A level for the one Solder Paste MPN control.
- The ‘Reference Work Order’ item is related to the part configured in the ‘Solder Paste MPN Control’ function.
- If the shelf time of the current solder paste material is more than ‘Shelf-Life’ configured in the function ‘Solder Paste MPN Control’ then the system will prompt an error message such as ‘Shelf Time Expired’.
- If the storage time of the current solder paste material in the refrigerator is less than ‘Min Storage Time’ configured in the function ‘Solder Paste MPN Control’ then the system will prompt an error message such as ‘Not Reach Min Storage Time’.
- If the Solder Paste Refrigeration FIFO is ‘YES’, the solder paste was put into the same refrigerator earlier than that solder pastes with the same MPN will be allowed to take out from the same refrigerator. Otherwise, the system will prompt a warning message to remind the user to take out the earlier solder paste.
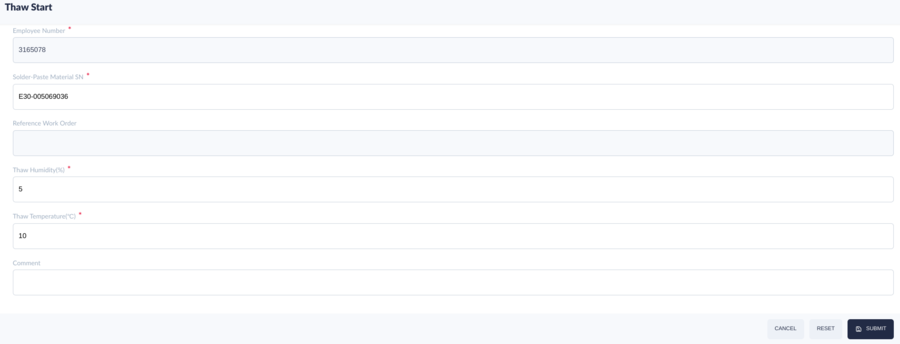
Thaw Start 
This function is used to start thawing solder paste.
- Select Thaw Start Icon.
- Input the following information according to the field:
- Employee Number: Input the Employee Number
- Solder-Paste Material SN: Scan or (input manually) the Solder-Paste Material SN
- Reference Work Order: Scan or (input manually) the Reference Work Order
- Thaw Humidity(%): Input the humidity
- Thaw Temperature (°c): Input the humidity
- Comment: Input a comment
- SelectSubmit.
Figure 21: Thaw Start
Notes: If the previous step (Refrigerator Out) has already mapped ‘Solder-Paste Material SN’ and ‘Reference Work Order’ then the value of‘Reference Work Order’ will display automatically after the user completes inputting‘Solder Paste Material SN’ item.
- If the shelf time of the current solder paste material is more than‘Shelf-Life’ configured in the function ‘Solder Paste MPN Control’ then the system will prompt an error message such as‘Shelf Time Expired’.
- If the value of ‘Thaw Humidity’ is not between the value of ‘Ambient Humidity Low Limit’ and the value of ‘Ambient Humidity High Limit’ (Ambient Humidity Low Limit and Ambient Humidity High Limit can be configured in the function ‘Solder Paste MPN Control’) then the system will prompt an error message such as ‘Incorrect Thaw Humidity’.
- If the Solder Paste Thawing FIFO is ‘YES’, the solder paste that is taken out from (or put into) the same refrigerator earlier than the solder pastes with the sam MPN will be allowed to do the ‘Thaw Start’ action, otherwise the system will prompt a warning message such as ‘It is not the correct FIFO solder paste’ to remind the user.
Thaw End 
This function is used to end the thawed solder paste.
- Select the Thaw End icon.
- Input the following information according to the field:
- Solder-Paste Material SN: Scan or (input manually) the Solder-Paste Material SN
- Reference Work Order: Scan or (input manually) the Reference Work Order
- Comment: Input a comment
- Select Reference Work Order, inputComment, then select the Submit button
Figure 22: Thaw End
Notes:
- ‘Employee Number’, and ‘Solder Paste Material SN’ can not be empty.
- The ‘Reference Work Order’ item can be empty.
- If the previous step has already mapped the‘Solder-Paste Material SN’ and ‘Reference Work Order’ then the value of ‘Reference Work Order’ will display automatically after users complete inputting the ‘Solder Paste Material SN’ item.
- If the shelf time of the current solder paste material is more than ‘Shelf-Life’ configured in the function‘Solder Paste MPN Control’ then the system will prompt an error message such as ‘Shelf Time Expired’.
- If the Thaw time of the current Solder Paste material is less than‘Min Thaw Time’ configured in the function ‘Solder Paste MPN Control’ then the system will prompt an error message such as‘Not Reach Min Thaw Time’.
- If the Solder Paste Thawing FIFO is ‘YES’, the solder paste that is taken out from (or put into) the same refrigerator earlier than the solder pastes with the sam MPN will be allowed to do the ‘Thaw End’ action, otherwise, the system will prompt a warning message such as ‘It is not the correct FIFO solder paste’ to remind the user.
Stirring 
This function is used to stir the solder paste.
- Select the Stirring Icon
- Input Solder-Paste Material SN, then press theEnter key
- Select Reference Work Order
- Input Comment and Select Submit
Figure 23: Stirring
Notes:
- The ‘Solder Paste Material SN’ item can not be empty.
- The ‘Reference Work Order’ item can be empty.
- If the previous step has already mapped the ‘Solder-Paste Material SN’ and‘Reference Work Order’ then the value of ‘Reference Work Order’ will display automatically after the user completes inputting the‘Solder Paste Material SN’ item.
- If the shelf time of the current solder paste material is more than ‘Shelf-Life’ configured in the function ‘Solder Paste MPN Control’ then the system will prompt an error message such as ‘Shelf Time Expired’.
Open Jar 
This function is used to open the solder paste and prepare it for use.
- Select theOpen Jar Icon is selected
- Input the following information in the fields:
- Solder-Paste Material SN: Scan or (input manually) the Solder-Paste Material SN, then press Enter key.
- Reference Work Order: Scan or (input manually) the Reference Work Order, then select the Reference Work Order.
- Comment: Input a comment
- Select Submit.
Figure 24: Open Jar
Notes:
- The Solder Paste Material SN item can not be empty.
- The ‘Reference Work Order’ item can be empty.
- If the previous step has already mapped the ‘Solder-Paste Material SN’ and ‘Reference Work Order’ then the value of ‘Reference Work Order’ will display automatically after the user completes inputting the ‘Solder Paste Material SN’ item.
- If the shelf time of the current solder paste material is more than ‘Shelf-Life’ configured in the function ‘Solder Paste MPN Control’ then the system will prompt an error message such as ‘Shelf Time Expired’.
Solder Paste Scrap 
This function is used to Scrap expired or unusable solder paste.
- Select the Solder Paste Scrap Icon
- Input Solder-Paste Material SN, then press theEnter key
- Input Scrap Reason and Select Submit.
Figure 25: Solder Paste Scrap
Note: Solder Paste Material SN can not be empty.
Appendix A: Load Material Error and Resolution List
Error Prompt |
Comment (R:Reason, S: Solution) |
| Feeder does not match! |
R: Feeder type mismatches what is defined in the feeder picklist. S: To check the feeder type this is defined in Feeder Maintenance. or S: To check the feeder type associated with this material in the SMT placement program. |
| Feeder is now in use! Material is now in use! |
R: Feeder or Material is still in use or loaded at the affected online or offline workstation. S: Unload the affected feeder by first finding out which production line and what workstation has such feeder loaded then unload the feeder through the proper unloading process as described in section 6. |
| Station does not exist! |
R: Invalid or Mismatch material loading location as defined in the feeder picklist. S: To check the station (or slot) location this is defined in the feeder picklist. |
| Feeder does not exist! Old feeder does not exist! |
R: Feeder barcode record is not found in Traceability. S: To insert the feeder barcode and assign the feeder type in Feeder Maintenance. |
| Station or Designator does not match! |
R: Defined picklist (material p/n and reference designator based on station setup) is different than BOM (material p/n and reference designator). S: To check and compare the consistency of feeder picklist and production BOM. |
| Old feeder does not match! |
R: Feeder barcode record is not defined or found in Traceability. S: To check if such an old feeder barcode is been used at the same station. Or S: To check if such an old feeder barcode record is been defined in TraceabilityWEB > Feeder Maintenance. |
| Material barcode not found! |
R: As prompted. S: To check if the affected material barcode exists in TraceabilityWEB > Material Report. Consult with material labeling team for re-labeling if necessary. |
| No old feeder in workstation! |
R: As prompted. S: Not required to scan any feeder in “Old Feeder Barcode”. |
| The new feeder needs to be reworked! |
R: Affected feeder is required for feeder maintenance. S: See PTS0015- Feeder Maintenance. |
|
Material isn't in AML! |
R: Such material is not in BOM’s Approved Material List. S: Enable AVL after obtaining approval from Quality team. |
| Old feeder must be released! |
R: As prompted. S: Re-input the old feeder in “Old Feeder Barcode”. |
| No BOM item |
R: Incorrect BOM loaded when set Traceability production online. S: To check if the work order has been assigned to the correct BOM p/n. |
| No material in picklist! |
R: As prompted. S: Re-define the picklist by first set the affected production offline. |
| Material has been run out |
R: Attempted new input material has been recorded as zero quantity in Traceability. S: Cycle-count the material and update the material in TraceabilityWEB > Reprint Material Label. |
| Material has been expired |
R: Attempted new input material has expired. S: Baking process and history required in TraceabilityWEB > Unfinished MSD Handling. |
| Material not found in BOM |
R: Attempted new input material (its SSCI P/N) is not found in BOM. S: To check if the work order has been assigned to the correct BOM p/n. |
Appendix B Scan Board of Error Message and Suggested Solutions
Error Prompt |
Comment (R:Reason, S: Solution) |
| Feeder does not match! |
R: Feeder type mismatches what is defined in the feeder picklist. S: To check the feeder type this is defined in Feeder Maintenance. or S: To check the feeder type associated with this material in the SMT placement program. |
| Feeder is now in use! Material is now in use! |
R: Feeder or Material is still in use or loaded at the affected online or offline workstation. S: Unload the affected feeder by first finding out which production line and what workstation has such feeder loaded then unload the feeder through the proper unloading process as described in section 6. |
| Station does not exist! |
R: Invalid or Mismatch material loading location as defined in the feeder picklist. S: To check the station (or slot) location this is defined in the feeder picklist. |
| Feeder does not exist! Old feeder does not exist! |
R: Feeder barcode record is not found in Traceability. S: To insert the feeder barcode and assign the feeder type in Feeder Maintenance. |
| Station or Designator does not match! |
R: Defined picklist (material p/n and reference designator based on station setup) is different than BOM (material p/n and reference designator). S: To check and compare the consistency of feeder picklist and production BOM. |
| Old feeder does not match! |
R: Feeder barcode record is not defined or found in Traceability. S: To check if such an old feeder barcode is been used at the same station. Or S: To check if such an old feeder barcode record is been defined in TraceabilityWEB > Feeder Maintenance. |
| Material barcode not found! |
R: As prompted. S: To check if the affected material barcode exists in TraceabilityWEB > Material Report. Consult with material labeling team for re-labeling if necessary. |
| No old feeder in workstation! |
R: As prompted. S: Not required to scan any feeder in “Old Feeder Barcode”. |
| The new feeder needs to be reworked! |
R: Affected feeder is required for feeder maintenance. S: See PTS0015- Feeder Maintenance. |
|
Material isn't in AML! |
R: Such material is not in BOM’s Approved Material List. S: Enable AVL after obtaining approval from Quality team. |
| Old feeder must be released! |
R: As prompted. S: Re-input the old feeder in “Old Feeder Barcode”. |
| No BOM item |
R: Incorrect BOM loaded when set Traceability production online. S: To check if the work order has been assigned to the correct BOM p/n. |
| No material in picklist! |
R: As prompted. S: Re-define the picklist by first set the affected production offline. |
| Material has been run out |
R: Attempted new input material has been recorded as zero quantity in Traceability. S: Cycle-count the material and update the material in TraceabilityWEB > Reprint Material Label. |
| Material has been expired |
R: Attempted new input material has expired. S: Baking process and history required in TraceabilityWEB > Unfinished MSD Handling. |
| Material not found in BOM |
R: Attempted new input material (its SSCI P/N) is not found in BOM. S: To check if the work order has been assigned to the correct BOM p/n. |
