SOP-MES0032 Server Information
42Q Home > Administration > Admin Server Information
Contents
Administration
Administrative privileges in 42Q are located in the Administration menu heading. With the portal, Administrators are able to access privileges from one convenient location.
Privileges include:
- User Maintenance
- Plant Maintenance
- Site Maintenance
- Profile Maintenance
- Generic Attribute Maintenance.
Also located in the Administration menu heading are Shop Floor Control Administrator, Document Control, Traceability Administrator, and Label Engine Administration
To access any of the Administration functionalities, the user must sign in to 42Q and then select the Administration expandable heading located in the menu on the left of the screen.
Server Information
This section covers how to add, edit, and delete server information and details of Shop Floor Control/SPC/Traceability/MES to the server information portlet.
This portlet allows Admins to add, edit, and delete a server.
To access Server Information, navigate to Administration > Server Information.
Figure 1: Server Information Main Page
Add Server
1. To add a server, select the ![]() button located at the top left-hand side of the Main Screen.
button located at the top left-hand side of the Main Screen.
2. On the following screen, enter the Program,Plant, Name, Customer, IP, AppServer Port, Context Path, Status, and Description of the server.
Note: Depending on the Program, specific fields may be filled in automatically.)
Figure 2: Add Server Information
3. When all the required information is entered, select the Add button.
![]() TIP: Each program selected has a different configuration. For more information, please refer to the following applications.
TIP: Each program selected has a different configuration. For more information, please refer to the following applications.
For the Traceability server info configuration, please refer to Traceability User Guide (WIP, Traceability Team will provide after server info configuration post to wiki)
For SPC server info configuration, please refer to Create SPC Server under SPC User Guide
For Shop Floor Configuration, please refer to Shop Floor Configuration Admin under eManual User Guide
For Measurement server info configuration, please refer to Measurement Guide
ForMES Server Info configuration, please refer to MES Guide
For PTS Server info configuration, please refer to PTS User Guide (WIP, PTS Team will provide after the server info configuration post to the wiki.
'Note: 'Context Path is the patch that the Application server is deployed on the Tomcat server. After the system is refactored, the system should have only one program that supports all sites/plants. In this way, the Context path of server information for each site/plant should be /[application]-server.
Add A Multimedia API Server
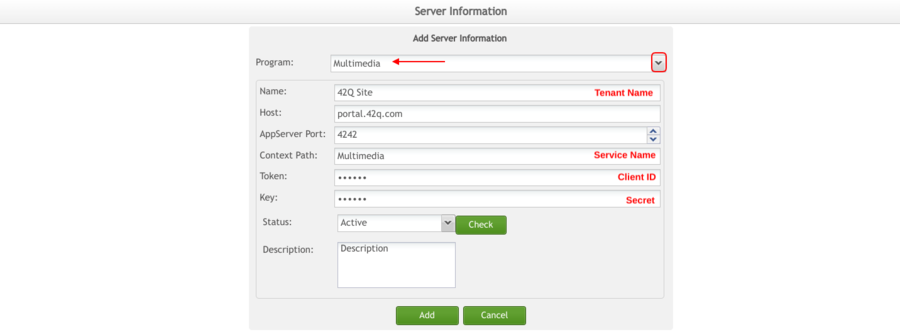
Multimedia API Services provide users with the ability to add the new program called "Multimedia" for configuration. This allows users to configure the Server/Host and tenant to connect the Multimedia-API data source.
1. To add Multimedia to Server Information, users have to select the add button.
Once Add is selected, a new page will open with the following segments :
- Program = Multimedia
- Name = a Site Tenant name
- Host = 42Q portal site
- AppServer Post Number = 4242
- Service Name/Context Path = Multimedia
- Token = Client ID
- Key = Secret ID
- Status = Active
- Description of the Server.
2. Select the drop-down and choose ''Multimedia''''''. Choosing Multimedia will change the fill-in options and allow the user to add the Multimedia program.
Figure 3: Multimedia - Add Server Information
Note: All fields in the server information screen are mandatory.
3. Once the information is added to the corresponding box, users can then click Add and a pop-up window will appear with the following message: “Successfully add server”.
4. Users have to Press “Ok” to continue.
Note: If the Server Information entered is duplicated, the following error message will occur: “Duplicate Conduit context path”.
5. Press “Ok”. The original Server Information screen will appear and the user will be able to try and add the Multimedia to the Server Information.
Once the information is successfully entered and the menu screen reappears, users will then be able to check the status of the previously entered program.
6. Find the name of the server program and click the check box to select.
7. Once the box is selected, click the edit button.
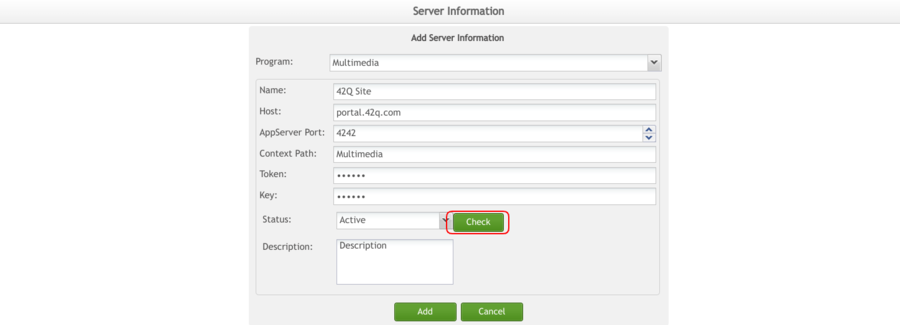
Figure 4: Multimedia - Check Status
8. The “'Check” box shown here can only be used for other servers, except Multimedia'. Click Save to save any changes or to return back to the menu page for Server Information.
Note: Multimedia server can only be labeled as an ‘Active’ status, except when the server is deleted when it is not in use.
Edit Server
1. To edit a server, check the box to the left of the desired server name, then select Edit.
Figure 5: Edit Server
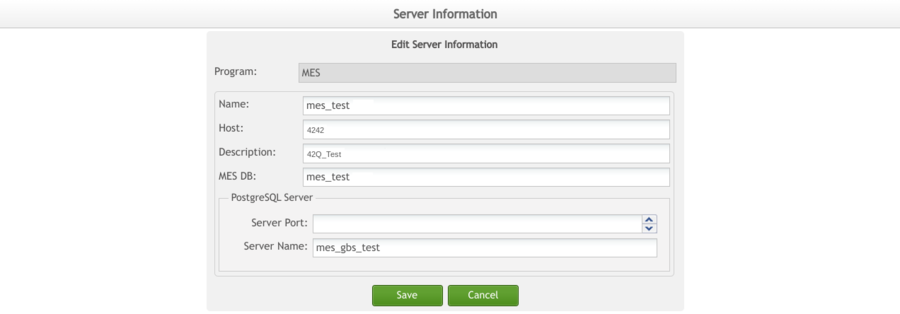
2. The Edit Server Information form will display.
Figure 6: Edit Server Tab
3. All fields are available to edit. After the desired changes have been completed, select Save to confirm or Cancel to exit.
Delete Server
1. To delete a server, check the box to the left of the desired server name, and then select Delete.
Figure 15: Delete Server
A confirmation message will display. Select Yes to confirm or No to cancel.


