SOP-42Q-MES0016 Sampling Plan Configuration
42Q Home > Shop Floor Control > Configuration > Sampling Plan Configuration

This edition applies to MES15 Portal 1.0 and all subsequent releases and modifications until otherwise indicated in new revisions.
Contents
- 1 Configuration Setup
- 2 Sampling Plan
- 2.1 Searching Sample Plans
- 2.2 Creating Sample Plans
- 2.3 Create Process
- 2.4 Creating Sequences
- 2.5 Editing an Existing Sequence
- 2.6 Deleting a Sequence
- 2.7 Redo Sequences
- 2.8 Print/Export to Local Buffer
- 2.9 Print from Database
- 2.10 Printing Sample Plans
- 2.11 Editing Sample Plans
- 2.12 Copying Sample Plans
- 2.13 Deleting Sample Plans
- 2.14 Publish History
- 2.15 Plan Summary
- 2.16 Sampling Plan Details
- 2.17 Sampling Config Summary
- 3 Appendix A
- 4 Appendix B
- 5 Document Revision History
Configuration Setup
42Q’s powerful data collection system collects critical information from a plant’s shop floor, utilizing shop floor data collector, an intuitive tool developed by 42Q’s experienced manufacturing team. The aggregate information is stored in a cloud database, and available to MESWeb, where quality reports are generated. The 42Q system uses manual and automated barcode scanning to collect data for a product line or plant. Thus, 42Q plays an important role in maintaining unit histories and directing product movement on the manufacturing floor. The current version of 42Q includes configuration capabilities, which provide access to all sub-modules pages and their functionalities (view, add, edit, print/generate output files).
NOTE: A user only has access to the modules assigned to his or her profile.
Sampling Plan
The Sampling Plan module provides the ability to define new sampling plans, modify existing sampling plans used for SFDC sampling rate management, and expand current plans.
The application provides two levels of definition:
- Master Data: The default sampling conditions and sampling rates.
- Instance Data: Specific sampling conditions for particular data instances.
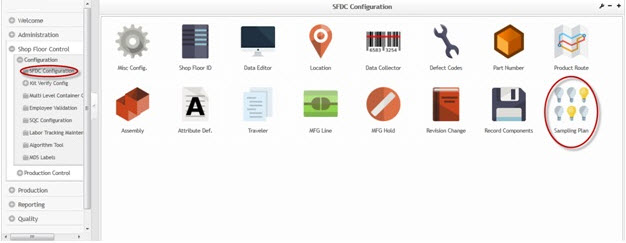
1. Users may access the Sampling Plan main page by navigating to Shop Floor Control >
SFDC Configuration >
Sampling Plan.
Figure 1: Navigating to the Sampling Plan Module
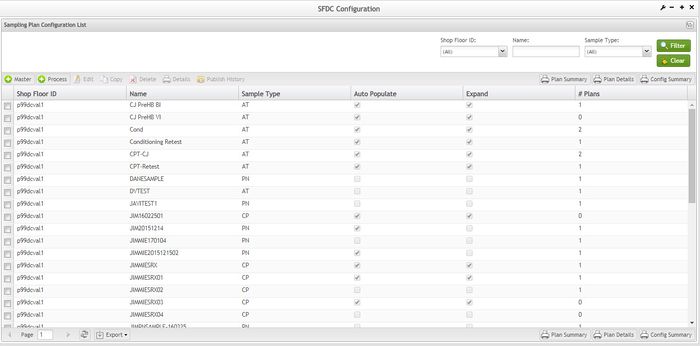
Figure 2: Sampling Plan Main Page – Sampling Plan Configuration List
Searching Sample Plans
On the main page, called Sampling Plan Configuration List, a list of all existing sample plans is displayed. The user may search the list for particular entries. To search the list,
1. Enter information into the SFDC ID,Name, and Sample Type fields.
2. Select Filter to view results. Select Clear to clear the filter fields.
Figure 3: Filter Settings - Sampling Plan Configuration
Creating Sample Plans
1. To create a Sample Plan, select Create Sample Master on the main page. The Master Sample Plan Form window is displayed.
Figure 4: Create Sample Master
SOP-5-I-MDS0044-C RA1 MES Sampling Plan Configuration 04.jpg
Figure 5: Master Sample Plan Form
SOP-5-I-MDS0044-C RA1 MES Sampling Plan Configuration 05.jpg
NOTE: The fields displayed vary depending on the Style Type that is selected. Please see Appendix A for more information about the various sample types and their respective fields.
Figure 6: Sample Type List
SOP-5-I-MDS0044-C RA1 MES Sampling Plan Configuration 06.jpg
Sampling Plan Definition Options:
- Auto Create: When checked, the Sample Engine automatically creates the plan instances when the conditions meet the sampling plan configuration. Otherwise, user must edit the created master plan to create an instance.
- Expand: When checked, tracks the Sample/Accumulate by Part Number.
- Disable Duplicate: When checked, prevents the sampling of the same unit more than once for the same sample plan.
- Log: When checked, enables the Sample Engine to record sampling activities.
2. Populate mandatory fields in red and click Ok to confirm. A confirmation message displays.
Figure 7: Confirmation Message
SOP-5-I-MDS0044-C RA1 MES Sampling Plan Configuration 07.jpg
3. Select Yes to create the Sample Plan Instances, or No to cancel.
Creating Sample Plan Instances:
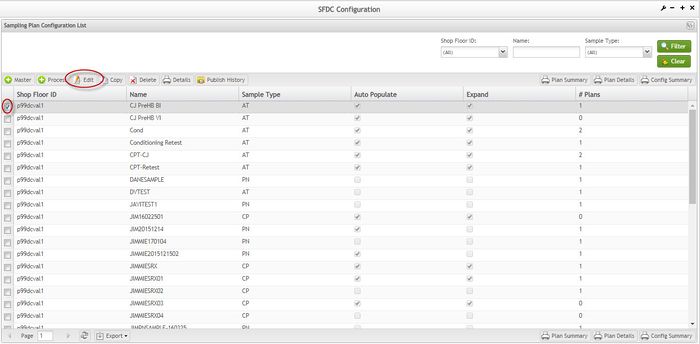
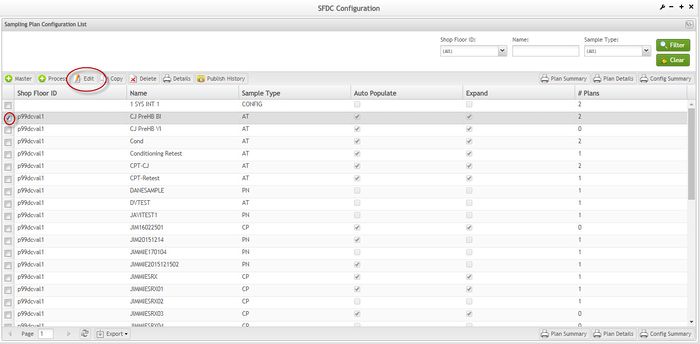
1. To create instances for the master plan, select shop floor ID from the Sampling Plan Configuration List, then select Edit. This takes the user to the Master Sample Plan Form.
Figure 8: Creating Sample Plan Instances - Selecting Edit
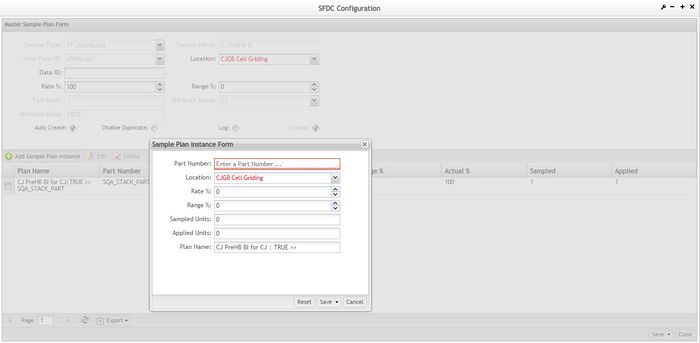
2. From the Master Sample Plan Form page, select Create Sample Plan Instance. The Sample Plan Instance Form pops up.
Figure 9: Sample Plan Instance Form
NOTE: The fields in the form change depending on the specified sample type.
3. Populate the necessary and preferred sampling plan instance information (mandatory fields appear as red boxes).
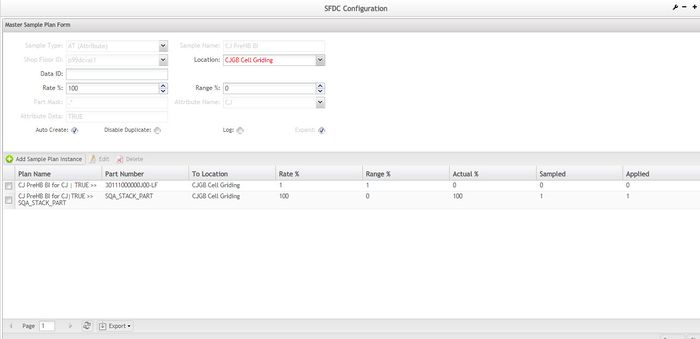
4. Select Save. The user returns to the Master Sample Plan Form page where the new instance plan is listed.
Figure 10: Master Sample Plan Form
Editing Sample Plan Instances:
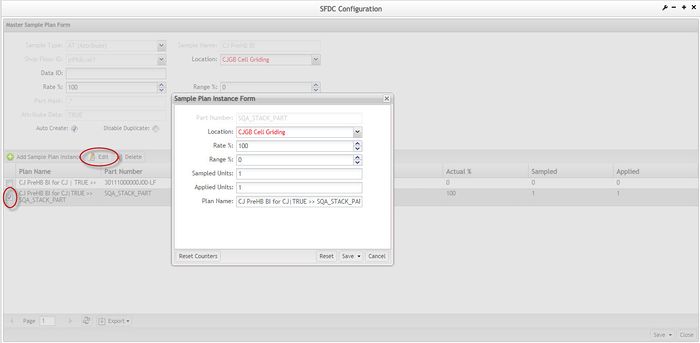
1. On the Master Sample Plan Form page, select an existing plan instance and click the Edit button from the list.
Figure 11: Master Sample Plan Form - Edit
2. Make the preferred changes in the Sample Plan Instance Form.
3. Click Save to complete the edit, or Cancel to abort.
Deleting Sample Plan Instances:
1. To delete Sample Plan Instances, select an instance from the Master Sample Plan list and then select Delete. A confirmation message is displayed.
Figure 12: Master Sample Plan Form - Delete
SOP-5-I-MDS0044-C RA1 MES Sampling Plan Configuration 12.jpg
2. Click Yes to confirm, or No to cancel.
Save/Publish
Note that the Save/Publish Conduit-based function is available to users with the appropriate permissions and can be used by selecting the down arrow adjacent to the Save button. Note that this functionality is available under Master, Process, Edit, Add and Edit Sample Plan Instance, and Copy functions. Whereas Save gives the record a pending status relative to Conduit, Save/Publish saves the record and publishes it to Conduit.
Figure 13: Save/Publish - Conduit Function
Create Process
The Process portlet is allows users to create configurations (or sequences) for a defined process.
NOTE: Process must have the CONFIG type set.
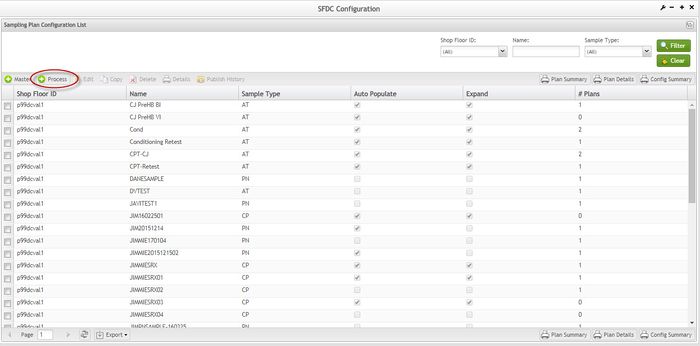
1. To create Processes, click the Create Process button in the Sampling Plan Configuration List. The SFDC Process Sampling Configuration screen is displayed.
Figure 14: Create Process
Figure 15: Process Sampling Configuration List
SOP-5-I-MDS0044-C RA1 MES Sampling Plan Configuration 14.jpg
2. Select a process under which to create a sequence using the At Process drop-down box.
3. Select Load Config from DB to load sequences from Data Base and complement the initial list.
4. Select Yes to install the sample configuration in the Data Base.
NOTE: This process will install the sample configuration in the Database.
Creating Sequences
Figure 16: Create/Edit Sequence
SOP-5-I-MDS0044-C RA1 MES Sampling Plan Configuration 15.jpg
To create or edit a sequence
1. From the Process Sampling Configuration page select Create Seq.:
- Fill the mandatory fields in blue (Sequence and Config. Name)
- Define the Status for the sequence selecting the status (Pass to, Fail to,or NA)
NOTE: It is mandatory to select a Master Plan. The Process can use the default value.
2. Select Save to save the sequence, or Cancel to abort. The sequence will now be displayed in the sequence list.
Sequence list:
After creating a sequence, the new sequence will be displayed in the sequence list, which the user can sort, edit or delete.
Sorting Sequences in the list:
Multi-column sorting (ascending/descending) was developed by clicking on the column header with the Ctrl key pressed (the arrow size is different according to the sorting priorities). Click in the columns title to change the sort criteria.
Figure 17: Sequence List – Multi-column Sort
SOP-5-I-MDS0044-C RA1 MES Sampling Plan Configuration 16.jpg
Editing an Existing Sequence
1. On the Sequence list, select a sequence to be updated and click the Edit icon button. The Create/Edit Sequence page is displayed.
Figure 18: Edit an Existing Sequence
SOP-5-I-MDS0044-C RA1 MES Sampling Plan Configuration 17.jpg
2. Make any changes and select Save.
Deleting a Sequence
1. On the Sequence list, select a sequence to be deleted and click Delete. A confirmation message is displayed.
Figure 19: Delete an Existing Sequence
SOP-5-I-MDS0044-C RA1 MES Sampling Plan Configuration 18.jpg
2. Click on Yes to confirm delete, or No to cancel.
Redo Sequences
The Redo Sequence feature reordered Sequences.
1. From the SFDC Process Sampling Configuration, select Redo Seq.
Figure 20: Redo Sequence
Print/Export to Local Buffer
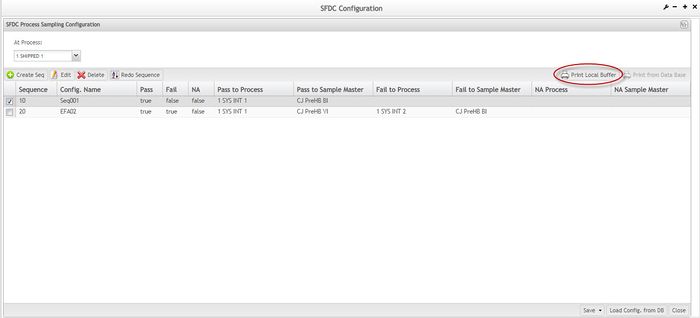
1. Select Print to Local Buffer on the Tasks window to generate a report containing information that are displayed in the sequence list.
Figure 21: Print Local Buffer
2. A PDF report is generated that the user may save or print.
Figure 22: Local Buffer Report
Print from Database
1. Click on Print from Database to generate a report containing information from the Data Base.
Figure 23: Print from Data Base
2. A PDF report is generated that the user may save or print.
Figure 24: Print from Database Report
Printing Sample Plans
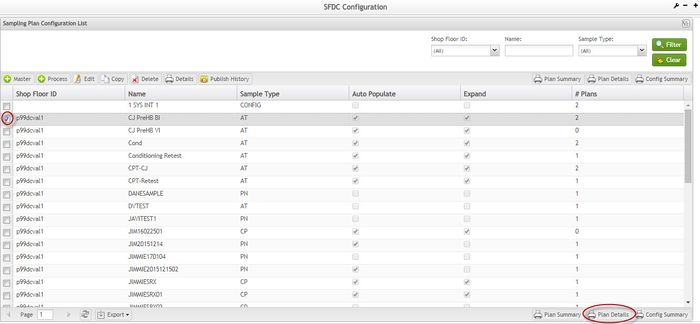
1. On the Sampling Plan Configuration List page, select an existing sample plan and click Print Details to output the Sampling Plan Details report.
Figure 25: Print Sampling Plan
Figure 26: Detail Report
Editing Sample Plans
1. In the Sampling Plan Configuration List page, select an existing sample plan and select Edit from the list. The Master Sampling Plan Form is displayed.
Figure 27: Edit Sampling Plan
NOTE: The form is displayed according to the selected Sample Type.
Figure 28: Master Sample Plan Form
NOTE: For more information about fields ’
description, please refer to Creating a Sample Plan.
2. Update the Master Plan and modify the Sample Plan Definitions as preferred.
3. Select Save to confirm, or Close to cancel.
Copying Sample Plans
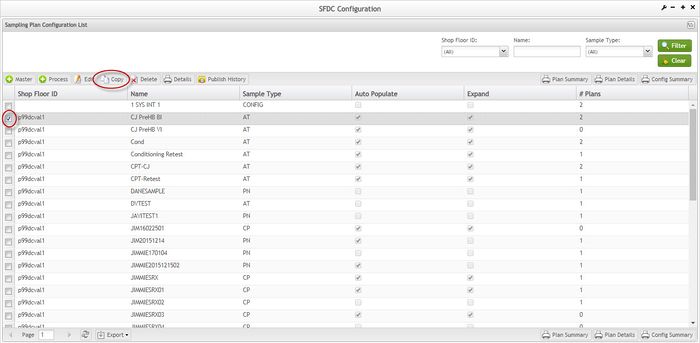
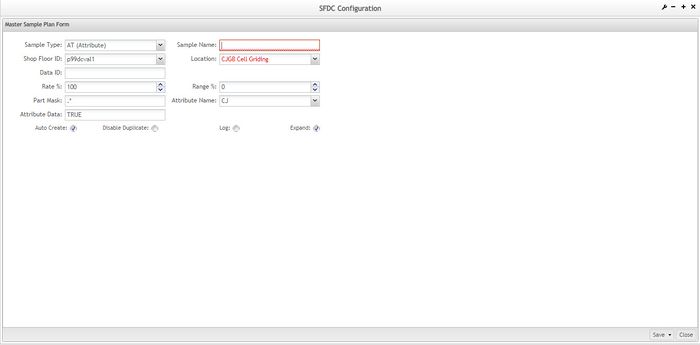
1. On the Sampling Plan Configuration window, select an existing Sample Plan and click the Copy button. The Master Sample Plan Form displays.
Figure 29: Sample Plan Configuration - Copy
Figure 30: Master Sample Plan Form
3. Enter the Sample Name and update any information as needed.
4. Select Save to confirm, or Close to cancel.
Deleting Sample Plans
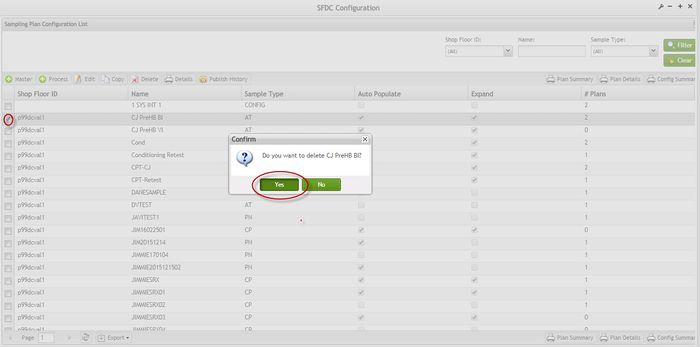
1. From the Sampling Plan Configuration List page, select an existing sample plan and select Delete. A confirmation message displays.
Figure 31: Sample Plan Configuration - Delete
2. Select Yes to confirm, or No to cancel.
Publish History
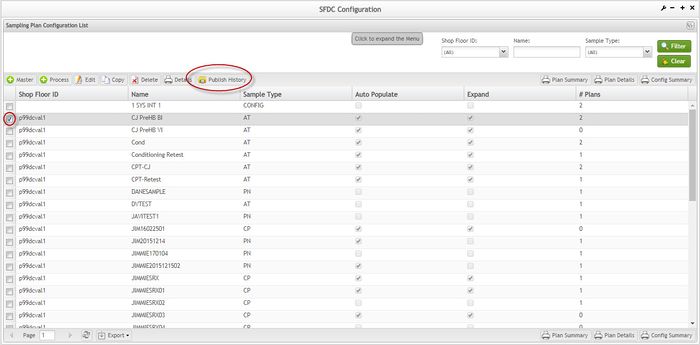
For sub-modules that use Conduit, the Publish History functionality can also be found in the menu bar by users with the appropriate permissions. The Publish History function shows the action history of an item. With this functionality, the user can publish an action history record to Conduit.
Figure32: Publish History - Conduit Function
Plan Summary
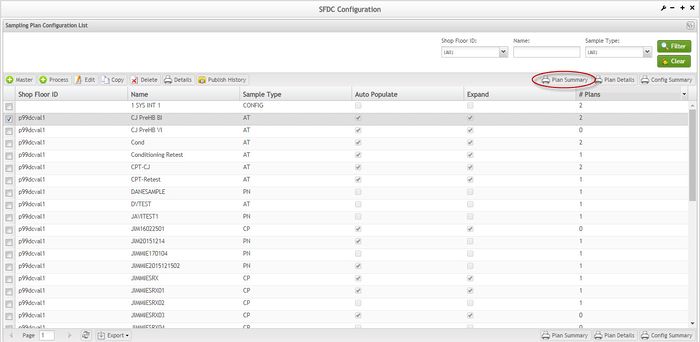
1. To print a summary of Sampling Plans, click the Plan Summary button in the Tasks window. A report is generated that the user may save or print.
Figure 33: Plan Summary
Sampling Plan Details
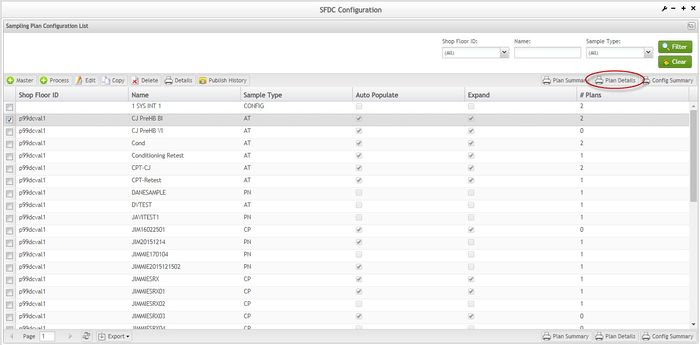
1. To print Sample Plan details for a specified line, from the Sampling Plan Configuration List click the Sampling Plan Details button in the Tasks window. A report is generated that the user may save or print.
Figure 34: Sampling Plan Details
Sampling Config Summary
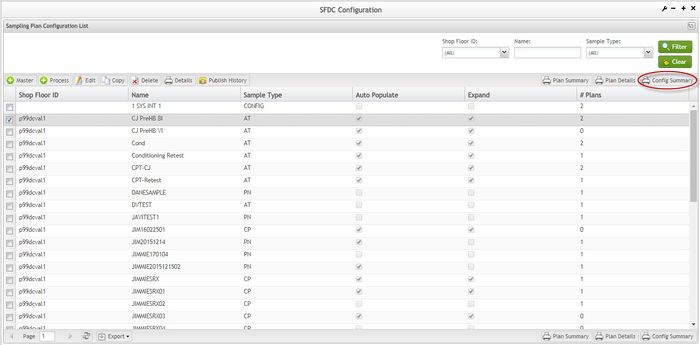
1. From the Sampling Plan Configuration List select Sampling Config Summary. A report is generated that the user may save or print.
Figure 35: Sampling Config Summary
Appendix A
Data Fields and Sample Types used for Sampling Plan Definition:
This appendix describes the data fields used for Sampling Plan Definitions that are relevant to creating sample plans.
Sample Type: Specifies the sampling type being created. Click the drop-down box to display the list of sample types that can be created. NOTE: The Sample Types are described in detail below.
Sample Name: Required. Specifies a unique name for a master sampling plan.
Sample Types and Features:
AT (Attribute): The sample count is accumulated based on each input attribute matching the value specified. The AT sample plan form includes an Attribute Name field for specifying the attribute name to use when sampling. The Attribute Data field is also included for entering further information about the attribute used for the sampling plan.
CP (Component): The sample count is accumulated based on each input component matching the specified component ID and reference designator. The Sampling Plan Definition window updates to include the Reference Designator and Component ID fields.
CO (Customer Order): The sample count is accumulated based on each input customer order number defined in the plan instance. This plan only applies to projects using COPS.
- Auto Create: If the Auto Create box is checked, the sample engine creates a sample plan for each customer order considered for sampling. Sample plans accumulate separately for each customer order.
- Disable Min Qty: Only customer orders with a units-in-order quantity larger than this value are sampled. For example, setting the value to 99 will sampls customer orders with a unit-in-order quantity of 100 or more. Use this setting to prevent the sampling load from becoming too heavy when a large number of customer orders contain a small quantity of units.
- Min. of Samples: This field specifies the minimum number of samples that must occur by a specified point in the order.
- % of Order: This field is only available for Shop Order or Customer Order sample types. The value specifies the point in the order where at least the minimum number of samples must occur. For example, suppose the number of units in an order is 100 with a Sample Rate of 10%. If Min. of Samples is set to 5 and % of Order is set to 25, then 5 units (1/2 of all units to be sampled) are sampled from the first 25%. This results in an accelerated sample rate of 20% for the first of the order. After the minimum number of samples has occurred, the sample plan drops back to a computed rate which samples the remaining units from the remaining units in the order to achieve the required 10% sample rate.
FIO (Factory Installed Option): The sample count is accumulated based on the part number of an FIO part. Sampling can be accumulated by the FIO part number or the part number of the base part. The part number in the master sample plan record is the part number of the FIO. Each master sample plan can target a single FIO part number.
- Expand: If the Expand box is checked, the sample plan accumulates sample counts by the base part number where the FIO is installed. If the Expand box is left unchecked, the samples accumulate by FIO part number.
- Auto Create: If the Expand box is checked, Auto Create is enabled. If the Auto Create option is checked, the Sample Engine enables Part Numbers to be entered for base parts containing the FIO part as sampled. If the Auto Create option is unchecked, the sample plan only applies to the specified base part numbers.
PFM (Part Family Mask): This option creates plans for all parts of a given part family.
PM (Part Mask): The sample count is based on the Expand option setting. Part Mask sampling is similar to Serial Mask sampling. See Serial Mask for more information. See UNIX Regular Expressions for information on correct formatting for part masks.
- Expand: If the Expand box is checked, the sample plan accumulates based on the part numbers specified in the plan instances matched with the part mask. If the Expand box is unchecked, the sample count is accumulated based on the input part mask.
PN (Part Number): The sample count is accumulated based on the base part number of the unit being sampled. If a sample plan exists for the target part number, the unit is sampled according to the sample plan.
- Auto Create: If the Auto Create box is checked, a sample plan is created automatically if one does not already exist. If the Auto Create is unchecked and no sample plan exists, no sampling is performed.
PRO (Procedure): The sample count is based on the results of a custom algorithm applied to each unit being considered. If the unit passes consideration, it is sampled. Accumulation of sample counts is based on the Expand option setting.
- Expand: if the Expand box is checked, the default procedure name is recorded in the master sample plan. A sample plan exists for each part number sampled. If the Expand box is unchecked, the procedure name is established in the master sample plan. A single sample plan exists and accumulation is based on the procedure running.
- Auto Create: if the Expand box is checked, Auto Create is enabled. If the Auto Create box is checked, the Sample Engine creates default sample plans when the sample plan is first applied to the target part number. If the Auto Create option is unchecked, only the specified part numbers are sampled.
SM (Serial Mask): The sample count is accumulated based on the Expand option setting. The serial mask type allows configuration of a sampling plan triggered by the serial number of the unit being considered for sampling. If the serial number of the unit matches the serial mask provided in configuration, the unit is sampled. See UNIX Regular Expressions for information on correct formatting of serial masks.
- Expand: If the Expand box is checked, the sample plan accumulates sample counts based on the part number of the base being sampled if the serial number matches the mask. If the Expand box is unchecked, a single sample plan accumulates sample counts based on the specified sample plan.
- Auto Create: If the Expand box is checked, Auto Create is enabled. If the Auto Create box is checked, the Sample Engine creates sample plans automatically for each part number as sampled. If the Auto Create box is unchecked, only the part numbers entered into the sample plan with serial numbers matching the serial mask are sampled.
SO (Shop Order): The sample count is accumulated based on each input shop order number defined in the plan instance. Shop Order sampling is similar to Customer Order sampling. The only difference is that the Sample Engine looks at the Shop Order Number instead of the COPS Order Number.
WS (Workstation): The sample count accumulates based on target units at a workstation where the Sample Engine is executed. Suppose a line exists with three pack workstations receiving units from final QA. The work stations are PCK1, PCK2, and PCK3. All three workstations execute the following custom command line at the end of the packing process: !!1SAMPLE.PACK.OBA. The Expand and Auto Create option descriptions and the Examples below show what happens with the sample counts.
- Expand: if the Expand box is checked, the sample plan is based on the base part number passing the workstation. When expanding the sample plan, the sample plans track part numbers. If the Expand box is unchecked, the sample plan applies to specified workstations. For instance, sample plans could be created for PCK1, PCK2, and PCK3. Each workstation has its own sample plan and accumulates counts independent of the other workstations. When the plan is not expanded, the sample plans track workstations.
- Auto Create: If the Expand box is checked, Auto Create is enabled. If the Auto Create box is checked, the Sample Engine automatically creates sample plans based on the master sample plan.
Location: Required. Specifies the default Move To location for a unit if it is to be sampled. Enter a valid location name, or click the To Location button to display the Location Selection window.
Data ID: Optional. If a !!2 command is used, the serial number scanned could contain a prefix data identifier. This field specifies the data ID dropped from the serial number if necessary.
Attribute Name and Attribute Data: Required for Attribute sample type only. Specifies the attribute name and data to use in sampling.
Ref Designator and Component ID: Required for Component sample type only. Specifies the component to use in sampling.
Procedure: Required for Procedure sample type only. Specifies the procedure to use in sampling.
Part Number: When the sample type is FIO and the Expand box is checked. Requires the FIO part number. Enter a valid FIO part number, or click the Part Number button to display the Part Table window.
Part Mask: When the sample type is Part Mask and the Expand box is checked. Requires a Part Mask using UNIX Regular Expressions.
Serial Mask: When the sample type is Serial Mask and the Expand box is checked. Requires a Serial Mask using UNIX Regular Expressions.
Sampling Rate %: Required. Specifies the default sampling rate. It is the number of units out of one hundred to be sampled.
Range %: Optional. Specifies the deviation used for the sampling rate. It is the number of units out of one hundred which will randomly deviate from the specified sample rate. See Understanding How Range Works for more detailed information.
Min. of Samples: Optional. For Shop Order or Customer Order types only. Specifies the minimum number of samples that must occur by a set point in the order process.
% of Order: Optional. For Shop Order or Customer Order types only. Specifies the point in the order where at least the minimum number of samples must occur.
Disable Min. Qty.: Optional for Shop Order or Customer Order types using the Auto-populate option only. Specifies a number to be sampled smaller than the unit-in-order quantity. This setting is used to prevent too many samples when a large number of orders contain a small quantity of units. See Sample Types for more information on this field.
Appendix B
Glossary
Access Control
A module that will set the permissions for users and external customers of 42Q
administrator
The System Administrator has full access - all plants, all reports, all users.
Component
A component is a specific piece of data that appears on a label, for example: bar code, part numbers, graphic images, line or text. Hence, label components are broken down into several different types: text, graphic images, MDS database values, or a combination of text and database values.
Framework
In software development, a framework is a defined support structure in which another software project can be organized and developed. A framework may include support programs, code libraries, a scripting language, or other software to help develop and glue together the different components of a software project.
SFDC Configuration
The rules used to define how SFDC collects data, provides analysis, controls processing and maintains unit histories
Site Minder
Universal login of 42Q
Username
The username is the siteminder username (or a partial string)
Document Revision History
| Date | Author | Title | Version | Change Reference | Approved by |
| 12/13/09 | Elaine Fonaro | Technical Writer | v 1.0 | This is the first revision of MDS User ’
s Guide | |
| 17/13/09 | Ashley Martin | Technical Writer | v 1.0 | General Review and new screen captures | |
| 19/13/09 | Elaine Fonaro | Technical Writer | v 1.0 | Formatting for WIKI | |
| 04/3/17 | Martha Jordan | Technical Writer | v 1.0 | Rewrite SFDC introductory paragraph according to current 42Q functionality | Bob Moss |
| 08/02/17 | Lucas Hopkins | Technical Writer | v 1.0 | Minor consistency edits |
