SOP-MES0029 Admin Document Control
Cirrus > Administration > Admin Document Control

This edition applies to MES15 Portal 1.0 and all subsequent releases and modifications until otherwise indicated in new revisions.
Contents
Administration
Administrative privileges for the Cirrus portal are located in the Administration menu heading. With the portal, Administrators are able to access privileges from one convenient location. Privileges include User Maintenance, Plant Maintenance, Site Maintenance, Profile Maintenance, and Generic Attribute Maintenance. Also located in the Administration menu heading are SFDC Administrator, Document Control, PTS Administrator, and LE Administration.
This work instruction is intended to guide administrators on how to manage and maintain the Cirrus Portal, as well as to provide specific user groups a common sense of portal operation.
System Requirements
Hardware Requirements (minimum)
Server requirement
- with VM ESXi
- Preferably 64 bit machine
- Core Duo processor
- 2GB RAM
- 80GB hard disk space
Client requirement
- Core Duo processor
- 1GB RAM
- 20GB hard disk space
- Minimum resolution at 1024x768 (17"/19" monitor is recommended)
- Support smart terminals (Linux LTSP, WYSE and Expension terminals)
Software Requirements
- Windows XP or Ubuntu
- Chrome 12.0 or newer (Recommended browser)
- Firefox 7.0 or newer, with Adobe Reader disabled (if it’s installed), and the extension pdf.js installed.
- MDS deployed with at least 1 SFDC Host PC
To access any of the Administration functionalities, the user must sign into the Cirrus Portal and then select the Administration expandable heading located in the menu on the left of the screen.
Figure 1: User Sign-In
Figure 2: Cirrus Welcome
File:02 Admin Welcome Screen.jpg
Document Control
This section covers how local administrators can maintain document file types. This is the prerequisite configuration before users can upload documents in the Document Mapping portlet, as all uploaded documents will be categorized and displayed by its document type.
Document Type
1. To access the document type page, navigate to Administration > Document Control > Document Type.
Figure 3: Document Type Main Page
All existing document types will be listed on the Document Type Main Page.
Add Document Type
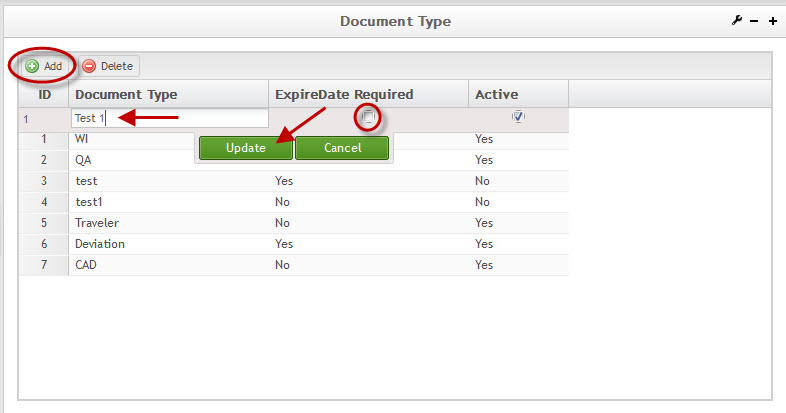
1. To add a new document type, select the Add button, and a new row will be added.
Figure 4: Add Document
- Document Type: the document type name to add into the local repository.
- ExpireDate Required: Allows the user to define if there is a valid date required for the document type. If this option is checked, the Start Date and End Date options in the Document Mapping page will be activated.
- Active: Allows the user to enable or disable the document type in the system. If this option is checked, the user can view and select the document type when mapping documents.
2. Enter the appropriate information and select Update to confirm or Cancel to exit.
Delete Document Type
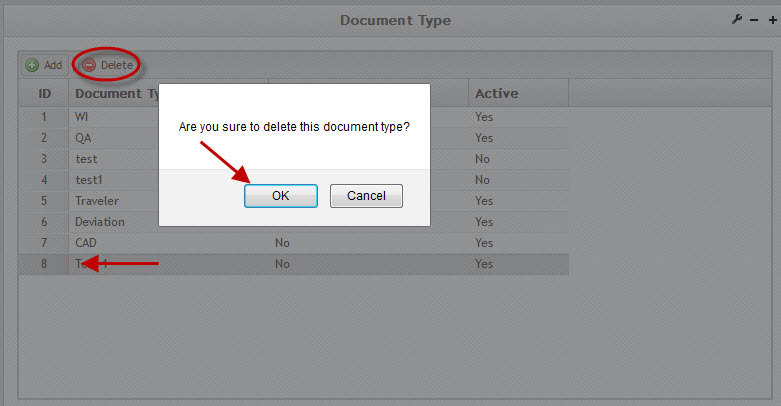
1. To delete a document type, select the document type and then select Delete. Deleting a document type will not affect the display of existing documents that are of this document type in the repository.
Figure 5: Delete Document Type
Document Mapping
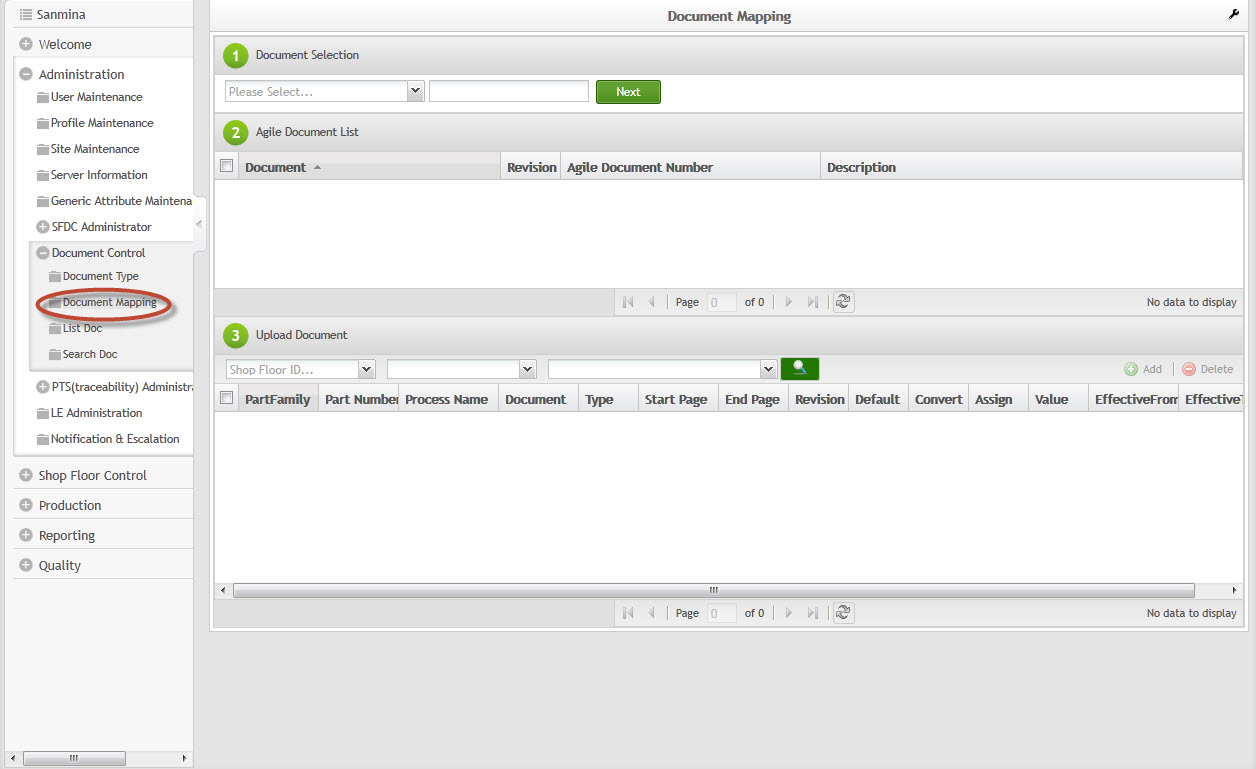
The Document Mapping portlet allows users to maintain documentation by uploading documents via Agile, local networks, or URLs. It also allows users to map documents or deviation attachements to specific part numbers and processes. The goal of these instructions is to outline the steps to assign appropriate documentation to the end user regarding a process or part for which they require work instructions or deviation information.
1. To access the Document Mapping page, navigate toAdministration > Document Control > Document Mapping.
Figure 6: Document Mapping
Document Selection: Agile Versus Local
The Document Mapping portlet allows documents and deviations (PDF attachments) to be uploaded from Agile as well as from a local drive. The benefit of uploading documents from Agile is that the documents are published in full compliance with company standards and procedures. Retrieving a document from Agile also ensures that it is the latest version. Documents can also be uploaded for display from a local computer or network. However, local documents are less controlled and it is difficult to ensure the latest version is available for display.
Uploading By Agile
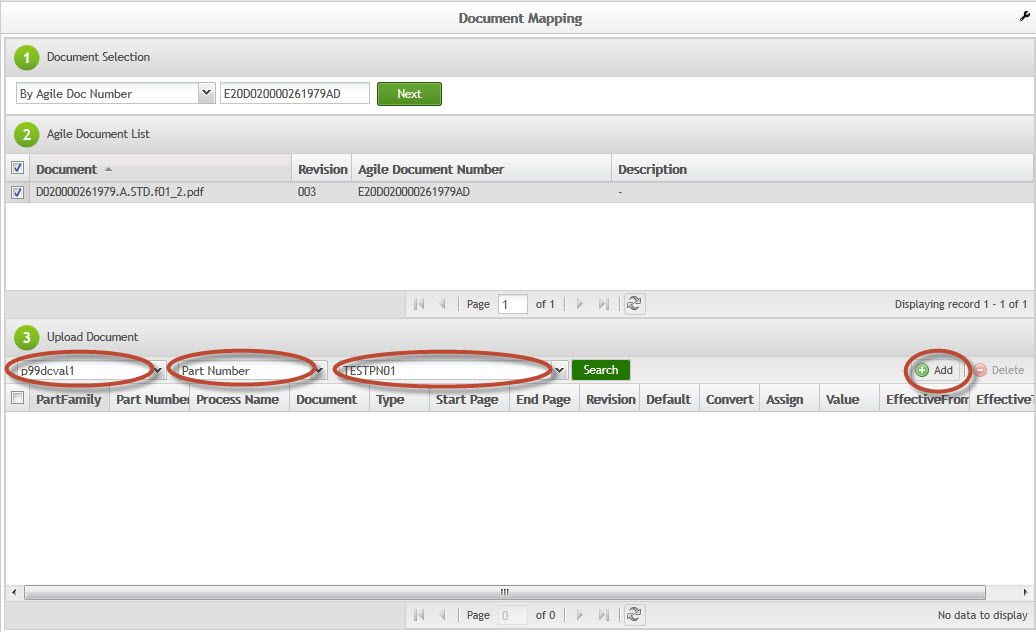
Users can select to upload documents from Agile by using a document’s assigned Agile Document Number, Part Number, or Deviation Number.
1. Under the Document Selection panel , select whether to search by Agile Doc Number,Agile Part Number,or Agile Deviation Number.
2. Enter the corresponding Agile document number, part number, or deviation number in the adjacent search field and select Next.
3. Select the appropriate document from the Agile Document List panel.
4. From the Upload Document panel, select the Shop Floor ID. Select whether to map the Agile document to a part number or part family from the middle dropdown box. In the dropdown box on the right, select a part number or part family.
5. Select Search and then select the appropriate item from the search results.
Figure 7: Map Agile Document
6. Select Add.
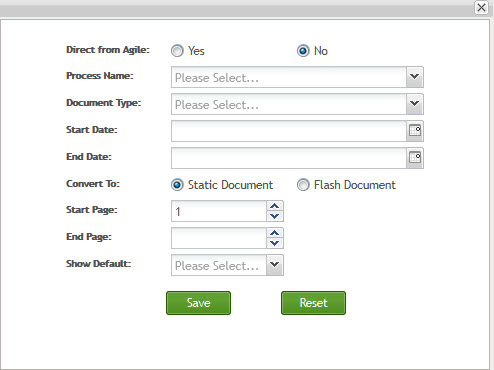
7. In the pop-up window provided, select Process, Document Type, Start Date (if applicable), End Date (if applicable), Convert to, Start Page, End Page, and Show Default to apply to the document.
8. Select Save.
Figure 8: Map Document Details
9. If mapped successfully, the document will be displayed in the list in the Upload Document panel.
Figure 9: Successful Mapping
MES retrieves Agile deviation documents by using the Agile deviation number. Deviation attachments are displayed along with the work instructions, therefore each attachment has to be mapped to an existing MES (SFDC) process name and Part Number so that it can be displayed properly during production scanning. A deviation is a temporary change in the process, therefore, it requires an expiration date, along with other defined parameters.
NOTE: When uploading a deviation document, the Documentation Type selected must be Devation. This allows the deviation to be displayed to the end user by default.
Uploading By Local Computer or Network
Users can select to upload documents from a local computer or network by document or deviation number.
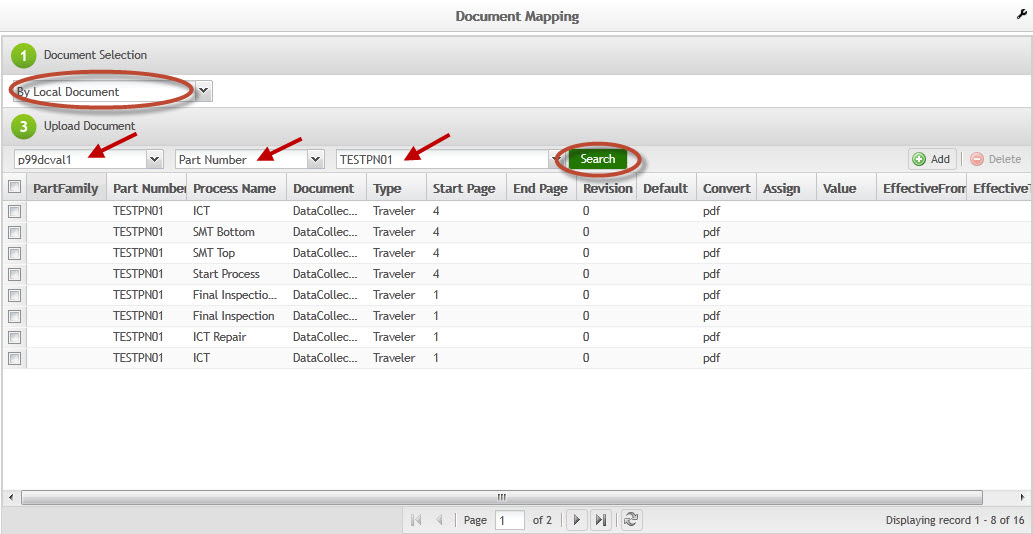
1. Under Document Selection, select whether to search by Local Document or Local Deviation Number.
2. Enter the corresponding local deviation if that option was selected
3. Select the Deviation Document from the Agile Document List, if a Local Deviation was selected.
4. Select the Shop Floor ID from the Upload Document panel. Select whether to upload the document to a part number or part family in the middle dropdown box. In the dropdown box on the right, select a part number or part family.
5. Select Search and then select the appropriate item from the search results.
Figure 10: Map Local Document
6. Select Add.
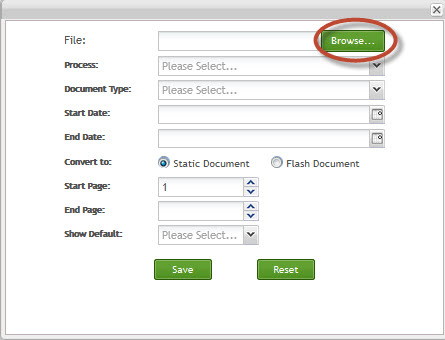
7. In the pop-up window provided, select the File, Process, Document Type, Start Date (if applicable),End Date (if applicable), Convert to, Start Page,End Page, and Show Default to apply to the document.
8. If Local Document was selected, select the Browse icon to search for the document on the Local Computer or Network. Select the desired document and then select Open.
Figure 11: Browse for Local Document
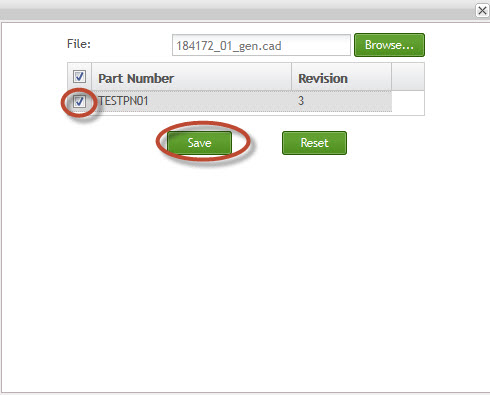
9. If the file is a CAD, select the Part Number and Revision to map the document to and then select Save.
Figure 12: CAD Mapping
A deviation document can be uploaded into the MES document repository from a local drive without retrieving from the Agile system. This also requires the mapping of an MES part number and process name, as well as defining the shop order, or serial number.
NOTE: When uploading a deviation document, the Documentation Type selected must be Deviation. This allows the deviation to be displayed to the end user by default.
NOTE: The local deviation number needs to be entered by the user. The naming convention is usually different from the Agile deviation number, which is to be defined at the time of upload and may be inconsistent from one document to another.
Uploading By Engineering Job Number or Engineering Notes
Uploading by Engineering Job Order and By Engineering Notes are options that were implemented for PCB customers. The descriptions are as follows:
- By Engineering Job Num: Will upload documents from a local defined directory and the lookup is by that Engineering Job Num (a PCB Item attribute).
- By Engineering Notes: Will create a text note that will be displayed similar to a document for a specific Item, where the mapping is by Item+Location+Shop order.
Uploading By URL
A user may upload a document from a URL:
1. Under Document Selection, select By URL.
2. Enter the corresponding URL path for the PDF document being uploaded, and then select Next. Title the URL Document in the Title field.
3. Select the Shop Floor ID from the Upload Document panel. Select whether to upload the document to a part number or part family in the middle dropdown box. In the dropdown box on the right, select a part number or part family.
4. Select Search and then select the appropriate item from the search results.
5. Select Add.
6. In the pop-up window provided, select the File, Process, Document Type, Start Date (if applicable), End Date (if applicable), Convert to, Start Page, End Page, and Show Default to apply to the document.
7. Select Save. This maps the URL according to the properties selected.
List Document
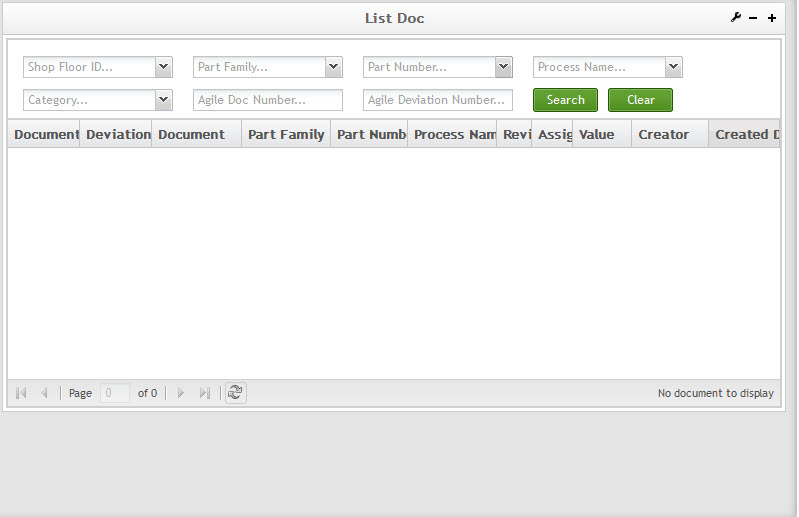
This section explains how a user can review all work instruction documents in the document repository and search work instruction documents by filtering using part number and/or process name. When the user accesses the List Document page, work instruction documents uploaded in the Document Mapping portler will display by Created Date.
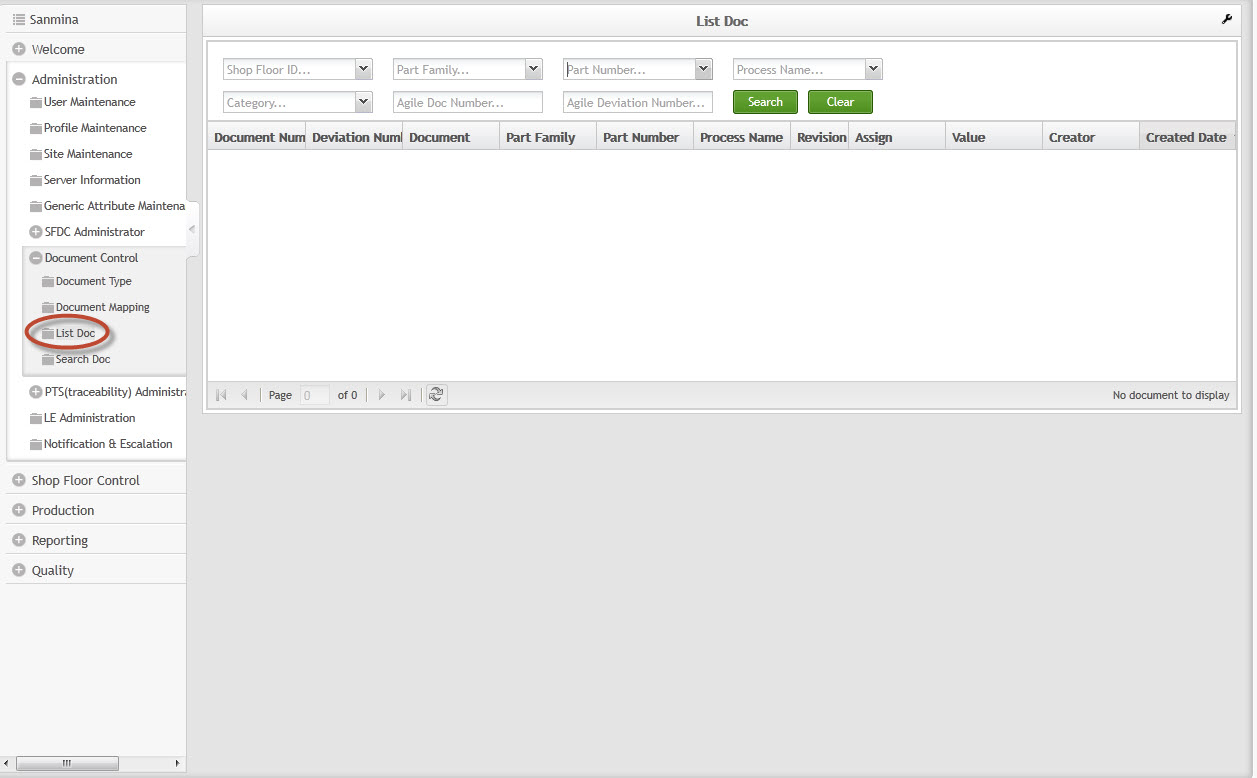
1. To access the List Document page, navigate to Administration > Document Control > List Doc.
Figure 13: List Doc
Prerequisite Configuration
- Upload Agile Document / Deviation or Upload Local Document / Deviation
Below are features of the List Document page:
- Lists all work instruction documents in the document repository.
- Search capability. Allows users to enter the SFDC part number and/or process name. The system will return a list of documents with associated SFDC part number and/or process name.
- Allows the user to view work instruction document PDF attachments.
2. To search for a specific document, select from the following categories:
- Shop Floor ID
- Part Family (optional): Input SFDC Part Family. Fuzzy Search is supported.
- Part Number (optional): Input SFDC Part Number. Fuzzy Search is supported.
- Process Name (optional): Input SFDC process name. Fuzzy Search is supported.
- Category: All, Agile Doc, Deviation Doc, Local Doc, URL Doc can be selected and fuzzy search is supported.
- Agile Doc Number: All documents uploaded from the Agile system have corresponding Agile document numbers listed in this column. For work instruction documents uploaded using Upload Local Document, this column will be left empty. This allows the user to differentiate between work instruction documents uploaded from the Agile system and those uploaded from a non-Agile system.
- Agile deviation number: Deviation number from Agile. Fuzzy search is supported.
3. Select Search to initiate a search based on the defined parameters.
4. Select Clear to clear all fields.
The following are heading descriptions for the listed documents:
- Document Number
- Deviation Number
- Document: Uploaded PDF attachments name. Single-click on the file name to view the content.
- Part Family: SFDC part family that has been pre-mapped with the PDF attachment. This column matches with the above Part family field entered by user if there’s any.
- Part Number: SFDC part number that has been pre-mapped with the PDF attachment. This column matches with the above Part Number field entered by user if there’s any.
- Process Name: SFDC process which has been pre-mapped with the PDF attachment. This column matches with the above Process Name field entered by user if there’s any.
- Revision: Current revision number of the agile document number uploaded in eManual document repository. For work instruction documents uploaded using Upload Local Document, this column will be left empty. This is how user can differentiate between work instruction documents uploaded from Agile system or non Agile system.
- Assign
- Value
- Creator: Indicate the user that uploaded the work instruction documents.
- Created Date: It refers to the date of uploading the work instruction documents.
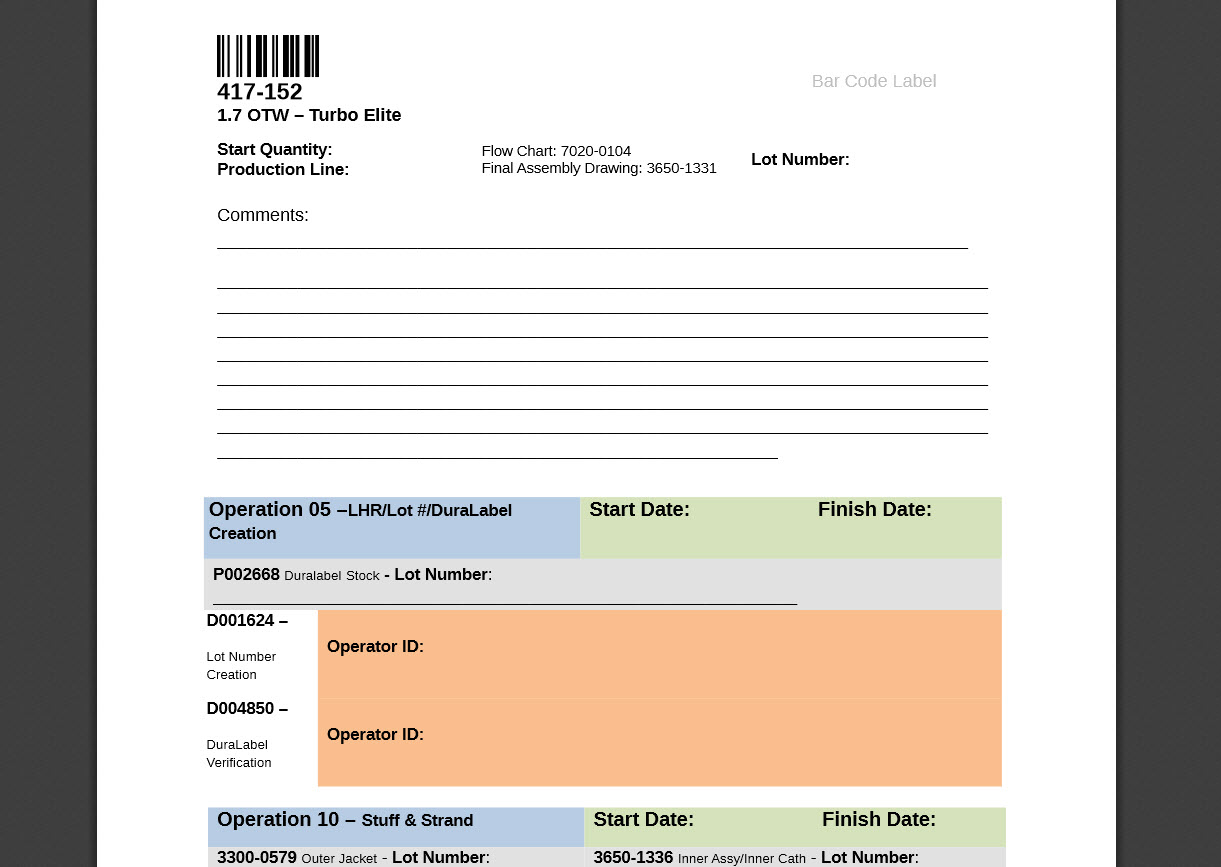
5. To view the document, select the Document title in the Document heading. (the title will be in blue)
6. Once selected, the document will display in a new window.
Figure 14: Open Document
Search Doc
1. To access the Search Doc page, navigate to Administration > Document Control > Search Doc.
Figure 15: Search Doc
2. Select a Shop Floor ID, Part Number, and Process Name, and then select Search.
3. The mapped document will display in the document viewer below the filtering fields. If there are multiple documents, the subsequent documents will be available in tabs located above the document viewer.
Figure 16: Document Display
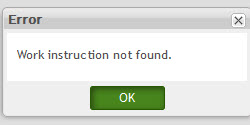
NOTE: If the Shop Floor ID, Part Number, or Process Name is incorrect the following error will display:
Figure 17: Error Message
Document Revision History
| Date | Author | Title | Version | Change Reference |
