SOP-42Q-MES0071 Employee Validation Maintenance
Contents
Certificate Maintenance
The next step to configuring Employee Validation is to create the Certificates. Toaccess theCertificates, click on Certificate Maintenance.
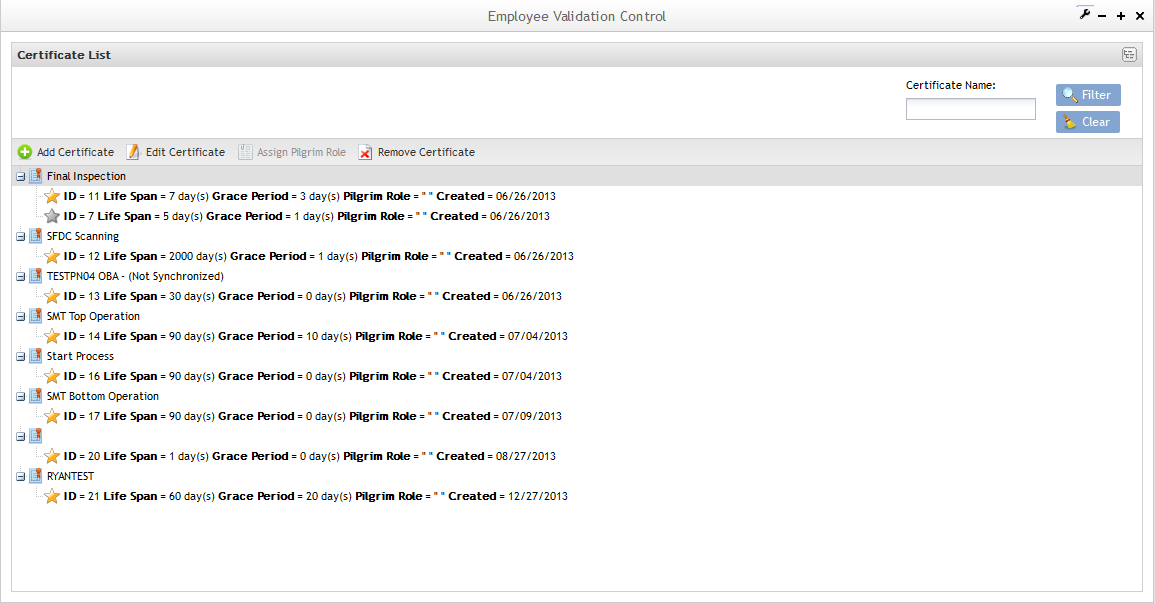
The main certificate maintenance page displays:
Certificate List
Figure 27: Certificate List
Note that in the Certificate list, it is possible to see some unsynchronized certificates, which means that it has at least one process group that is out of date. In the next steps, the user will be able to turn non synchronized certificates into synchronized certificates.
Adding Certificates
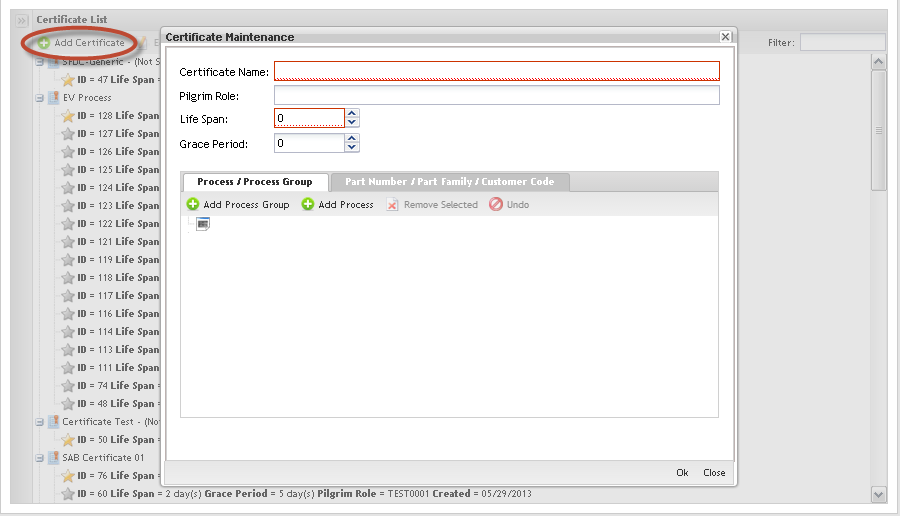
1. ToAdd Certificates and associate processes and process groups or Part/Family to Certificates, click on Add Certificate in the Tasks area.
Figure 28: Add Certificate
The Certificate Maintenance screen displays:
Follow the steps below to add a certificate:
1. Fill in the fields:
Certificate Name: The name of the new certificate;
Pilgrim Role: this field is used to associate the Certificate to a Pilgrim role. It was created to maintain a list of the ’Roles’ in Pilgrim that require training for EV purposes, linked to the EV certificate associated with that role.
Life Span: # of days the certificate is valid;
Grace Period: # of days allowed after expiration (can not be grater than 30);
2. Click on Ok to confirm. The new certificate must display in the Certificate list.
3. Click on the Add Process / Process Group button to define the process (es) and/or groups that are associated to the certificate.
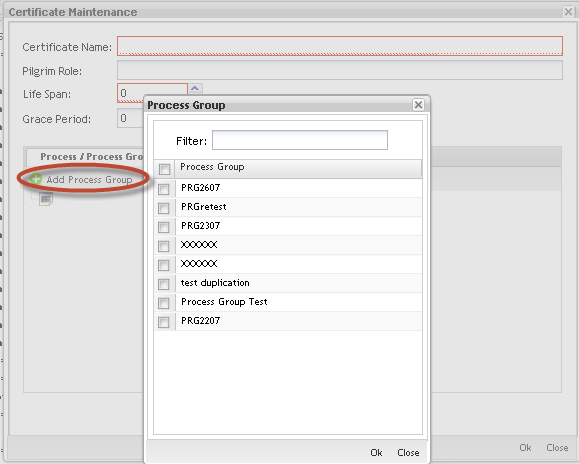
Adding Process/Process Group to the certificate:
Figure 29: Certificate X Process/Process Group
The Certificate X Process / Process Group page displays:
Select the Process Groups check box to add process groups available in the list. Do the same steps to Processes and click on the Add button.
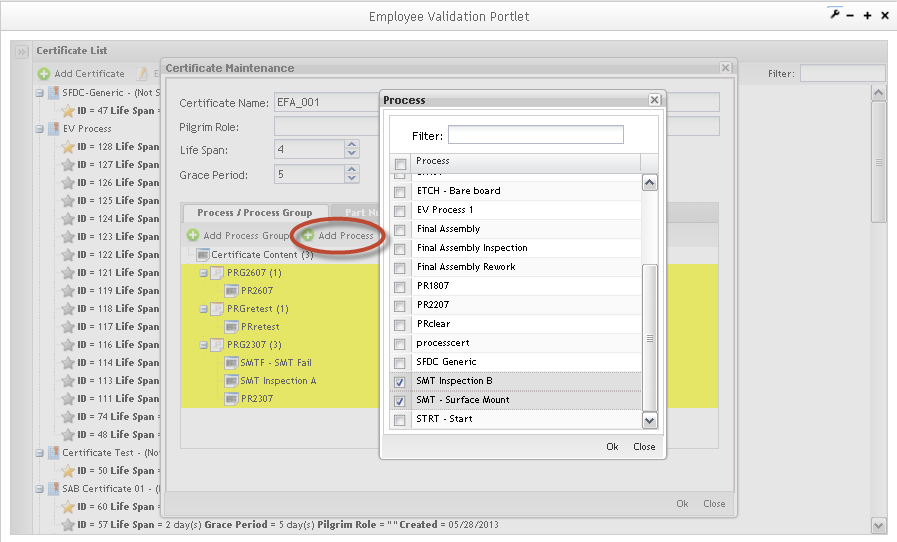
The inserted process/process group is displayed in the Process/Process Group tab.
NOTE: You cannot create a certificate without having at least one process or group assigned.
Figure 30: Certificate Maintenance Process/Process Group Tab
To add Process to the process groups, click on Add Process. The added processes/process groups are displaying highlighted.
a)Creating generic certificates.
If multi-pass device numbers are used in SFDC, then it is recommended to create a generic certificate and assign some process to it. The process does not have to exist in any route. An example would be SFDC Training for the process. The process is not used for any locations or in any route. The process is controlled by Employee Validation and a generic certificate is created for this process.
All employee numbers are associated to this certificate/process. The reason for this is to allow any employee to log into a device number that has one or more EV controlled processes. Without a generic certificate/process, employees would not be able to log into the device number to perform the non-EV controlled processes that are assigned to the multi-pass device number. Employee validation insures that serial numbers that are at a controlled process can only be scanned by employees that have the necessary certification for the controlled process. Without the generic certificate/process, non certified employees will not be able to log into multi-pass device numbers.
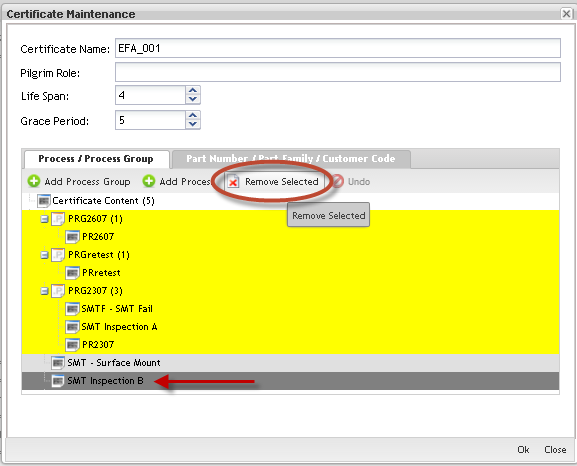
b) To Remove 'CERTIFICATE 'Process/Process Group:
Figure 31: Remove Process Group
Click the process/process group to select it and click on Remove Selected button. The removed process/process group displays in dark gray in the list. To Undo Delete 'CERTIFICATE 'Process/Process Group, select it from list and click on Undo button.
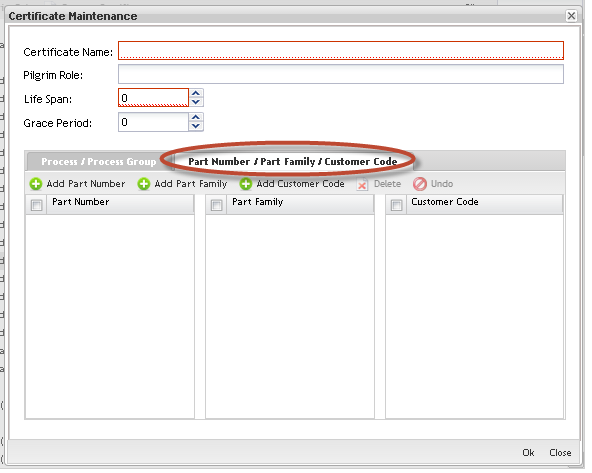
c)Adding Part Number/Part Family/Customer Code to the certificates:
Figure 32: Part Number/Part Family/Customer Code Tab
In addition, users can add Part Numbers/Family and Customer Codes to the Certificate. The rules to add, remove and undo remove are the same described for Process and Process Group.
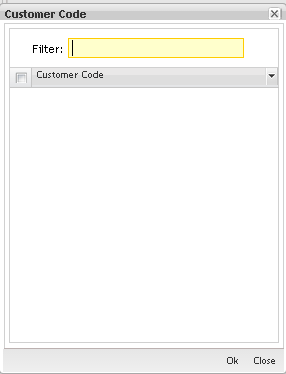
Figure 33: Customer Code
To add customer code, select the item (s) in the list and click on OK.
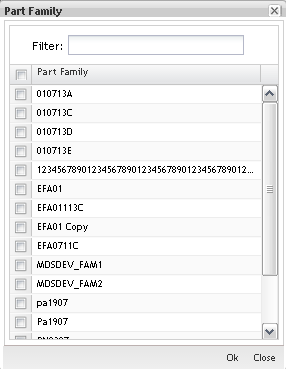
Figure 34: Part Family
To add part numbers/family, select the item (s) in the list and click on OK.
Editing Certificates
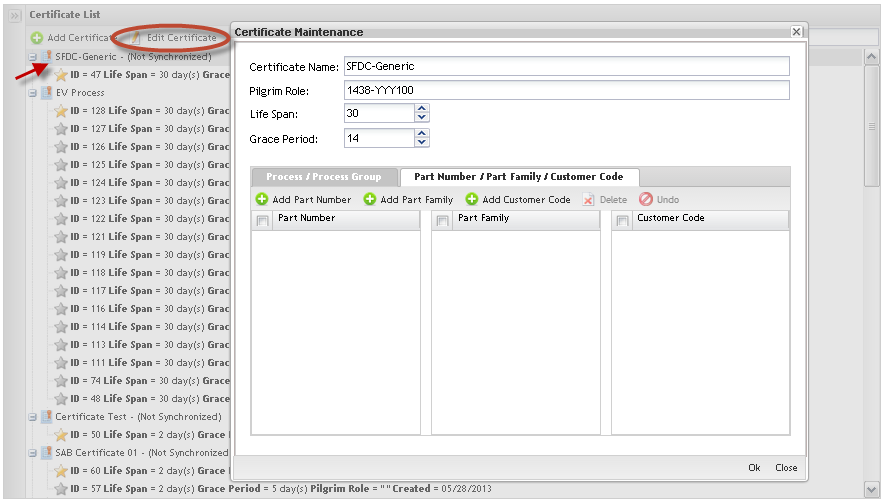
1. To Edit Certificates, select the certificate in the Certificate List and follow the same instructions to Add Certificates: update the mandatory fields and click on OK to commit the change.
Figure 35: Certificate Maintenance
NOTE: Every time the user adds a new Process on the Certificate, the application creates a new instance of that Certificate. All classes created before the Certificate changes will be linked to the old Certificate instance.
See the example:
1- Create Certificate CERT with process "A" and "B";
2- Create a Class for CERT with employee Y and Z;
3- Edit CERT and add the new Process "C";
On this example the employees Thomas and Keith will be trained only on the processes "A" and "B". If the certificate is changed, they need to be trained on "C", therefore another class will need to be created for the same CERT.
Figure 36: Certificate Instances
GOLD STAR represents the last update;
SILVER STARS are the old instances that are associated to the classes already created.
Removing Certificates
To Remove Certificates from the list, follow the steps below:
1. Select the certificate to be removed;
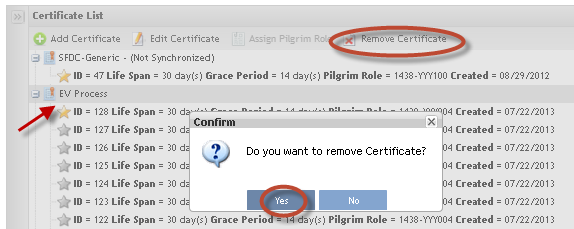
2. Click on Remove Certificate button. A popup message displays to confirm the certificate removal.
3. Click onYes to confirm or click on No to cancel the removal.
Figure 37: Remove Certificate from List
NOTE: Certificates already associated with classes can not be removed.
Class Maintenance
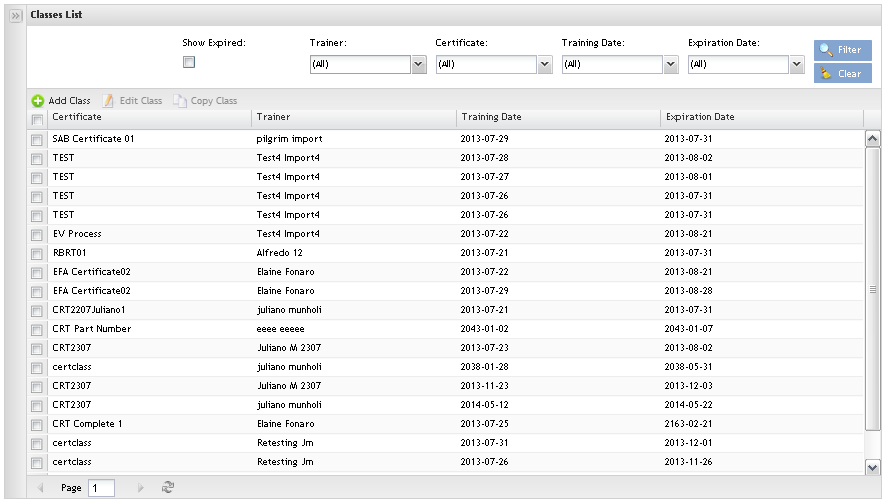
To access the Class Maintenance, click on Class Maintenance option. The Class Maintenance main page is displayed:
Figure 38: Class Maintenance
The user is able to add, copy or edit classes and perform searches from the main class page.
Adding Classes
Figure 39: Add Class
1. Click on Add Class in the Menu bar.
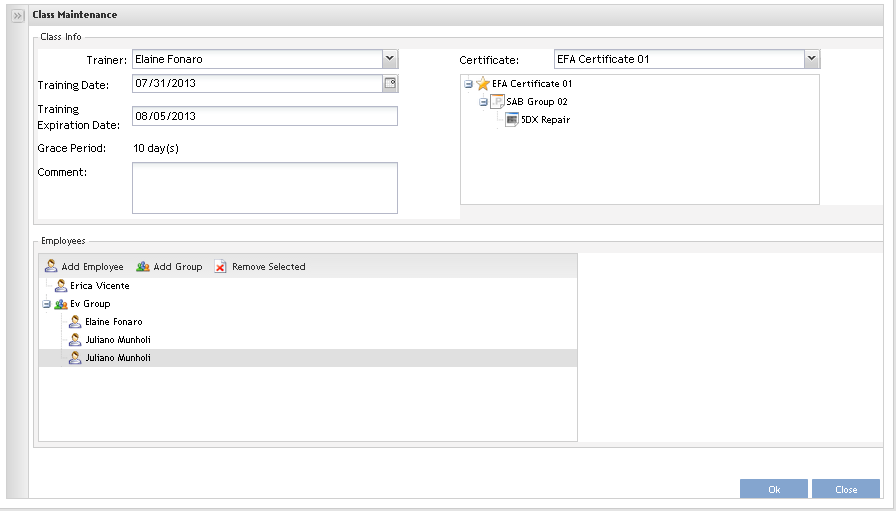
The Class Maintenance page displays:
Figure 40: Class Maintenance
1. Select the trainer, the certificate and the date for training from the drop down list. Selecting the certificate, the Grace Period and Training Expiration Date will be automatically filled.
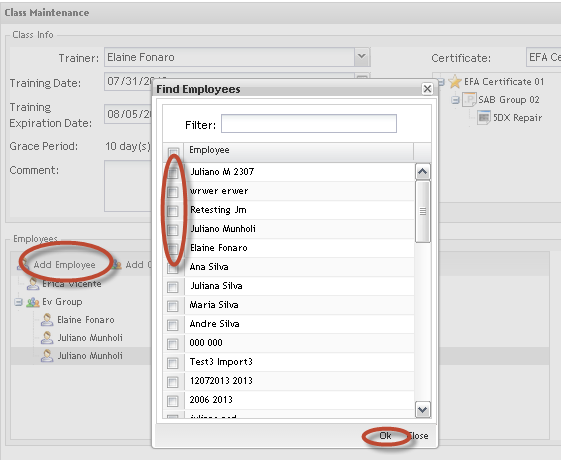
2. Go to Employees maintenance and add the employees who have taken the class, by clicking on the Add Employee button.
NOTE: The class must have at least one associated certificate.
Figure 41: Add Employees
1. Add the Employees clicking on Add Employee.
The Find Employees popup displays to find Employees.
2. Select the Employee (s) and click on OK to commit the inclusion.
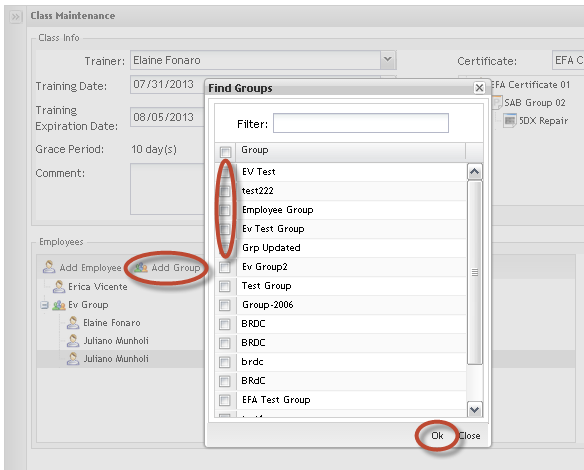
To add employee groups:
Figure 42: Add Employees Groups
1. Click on Add Group.
The Find Groups popup displays to find Groups.
2. Select the Group (s) and click on OK to commit the inclusion.
Both, groups or employees are displayed in the Employees list.
NOTE: The add Employees by group is a way to make adding employees fast and EV does not store group information, i.e. if the selected group has a new employee added in the future, he/she won’t be added to the class.
Editing Classes
To Edit Classes, select the class to be edited and click on Edit icon. Follow the same steps performed to add classes. Click on Ok button to commit the changes.
NOTE: Classes cannot be deleted.
