Difference between revisions of "SOP-MES0017 Traveler Maintenance"
| Line 268: | Line 268: | ||
| − | === <span class="mw-headline" id="Print_Traveler"><span class="mw-headline" id="Print_Traveler"><span class="mw-headline" id="Print_Traveler"><span class="mw-headline" id="Print_Traveler"><span class="mw-headline" id="Print_Traveler"><span class="mw-headline" id="Print_Traveler"><span class="mw-headline" id="Print_Traveler"><span class="mw-headline" id="Print_Traveler"><span class="mw-headline" id="Print_Traveler"><span class="mw-headline" id="Print_Traveler"><span class="mw-headline" id="Print_Traveler"><span class="mw-headline" id="Print_Traveler"><span class="mw-headline" id="Print_Traveler"><span class="mw-headline" id="Print_Traveler"><span class="mw-headline" id="Print_Traveler"><span class="mw-headline" id="Print_Traveler"><span class="mw-headline" id="Print_Traveler"><span class="mw-headline" id="Print_Traveler"><span class="mw-headline" id="Print_Traveler"><span class="mw-headline" id="Print_Traveler"><span class="mw-headline" id="Print_Traveler"><span class="mw-headline" id="Print_Traveler"><span class="mw-headline" id="Print_Traveler"><span class="mw-headline" id="Print_Traveler"><span class="mw-headline" id="Print_Traveler"><span class="mw-headline" id="Print_Traveler"><span class="mw-headline" id="Print_Traveler"><span class="mw-headline" id="Print_Traveler"><span class="mw-headline" id="Print_Traveler"><span class="mw-headline" id="Print_Traveler"><span class="mw-headline" id="Print_Traveler">Print Traveler</span></span></span></span></span></span></span></span></span></span></span></span></span></span></span></span></span></span></span></span></span></span></span></span></span></span></span></span></span></span></span> === | + | |
| + | === <span class="mw-headline" id="Print_Traveler"><span class="mw-headline" id="Print_Traveler"><span class="mw-headline" id="Print_Traveler"><span class="mw-headline" id="Print_Traveler"><span class="mw-headline" id="Print_Traveler"><span class="mw-headline" id="Print_Traveler"><span class="mw-headline" id="Print_Traveler"><span class="mw-headline" id="Print_Traveler"><span class="mw-headline" id="Print_Traveler"><span class="mw-headline" id="Print_Traveler"><span class="mw-headline" id="Print_Traveler"><span class="mw-headline" id="Print_Traveler"><span class="mw-headline" id="Print_Traveler"><span class="mw-headline" id="Print_Traveler"><span class="mw-headline" id="Print_Traveler"><span class="mw-headline" id="Print_Traveler"><span class="mw-headline" id="Print_Traveler"><span class="mw-headline" id="Print_Traveler"><span class="mw-headline" id="Print_Traveler"><span class="mw-headline" id="Print_Traveler"><span class="mw-headline" id="Print_Traveler"><span class="mw-headline" id="Print_Traveler"><span class="mw-headline" id="Print_Traveler"><span class="mw-headline" id="Print_Traveler"><span class="mw-headline" id="Print_Traveler"><span class="mw-headline" id="Print_Traveler"><span class="mw-headline" id="Print_Traveler"><span class="mw-headline" id="Print_Traveler"><span class="mw-headline" id="Print_Traveler"><span class="mw-headline" id="Print_Traveler"><span class="mw-headline" id="Print_Traveler"><span class="mw-headline" id="Print_Traveler">Print Traveler</span></span></span></span></span></span></span></span></span></span></span></span></span></span></span></span></span></span></span></span></span></span></span></span></span></span></span></span></span></span></span></span> === | ||
This portlet enables the user to print an existing traveler configuration. | This portlet enables the user to print an existing traveler configuration. | ||
Revision as of 17:59, 17 January 2024
42Q Home > Shop Floor Control > Configuration > Traveler Maintenance
Introduction
A traveler is a source of information for installing each part of a unit. It provides:
- A view of each unit structure, and control over parts released to the manufacturing floor.
- A list for checking-off parts during the assembly of individual units.
- Improves control of manufacturing workflow and allows for better planning of product assembly.
The Traveler Maintenance application builds and maintains the traveler configurations for orderable part numbers. A traveler configuration is a defined list of parts required to build an orderable unit or an Internally Configured Part (ICP).
Each line item on a traveler is an entry from the General Parts and Bases list. Part numbers can be added or deleted from a traveler configuration depending on the manufacturing procedure required for unit assembly. Any changes to a traveler configuration are pending until approved by engineering personnel and released to manufacturing.
All traveler configurations contain the following information:
- Part Number
- Part Description
- Traveler Configuration Status
To access Traveler Maintenance navigate to Shop Floor Control > Configuration > Traveler.
Traveler Main Page
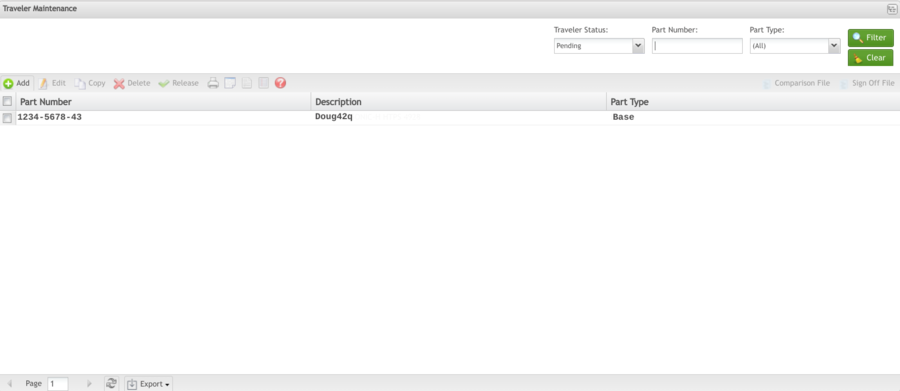
Figure 1: Traveler Maintenance Main Page
The main page, called Traveler Maintenance, displays all defined travelers. The user is able to execute the following actions:
Filter results, Edit, Copy, Delete, Print/Export, Release, Exploded View, Indented View, Single Level View and Where Used, Add Traveler, Comparison File and Sign Off portlets.
Traveler Filter
The Filter allows the user to filter results by Traveler Status, Part Number, or Part Type. Enter desired criteria into the filter fields and select Filter. The filter results are displayed. Select Clear to clear the filter fields.
Figure 2: Traveler Filter
Add Traveler Configuration
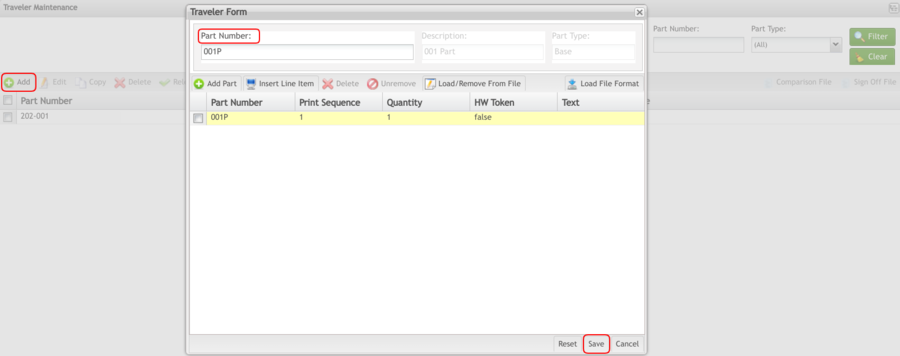
1. To add a traveler, select Add from the Traveler Maintenance page. The Add Traveler Config page is displayed.
Figure 3: Traveler Configuration
2. Enter a part number into the Part Number field. Select Save to finish, or Cancel to abort.
Note: Upon entering three characters into the Part Number field, a drop-down box will appear that auto-generates a list of part numbers consistent with what the user has already entered.
Add Part
Once a traveler configuration has been created, the user may now add parts to the list:
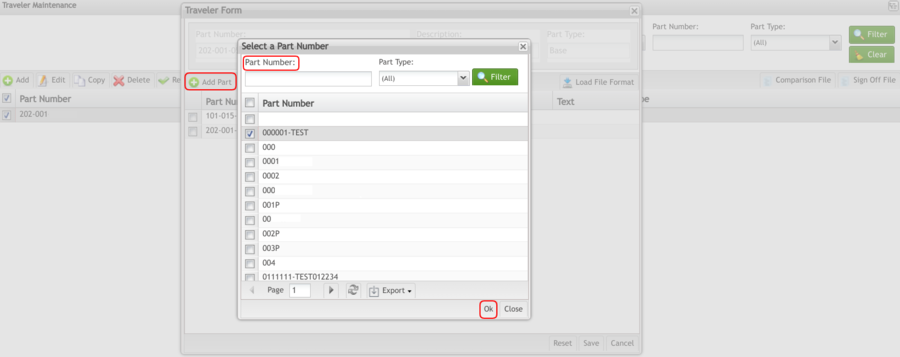
1. Select on Add Part button to insert parts to the list.
Figure 4: Add Parts to Traveler Configuration
2. Enter the Part Number using the available filter (part type).
3. Select OK to confirm. The part number is now listed under the Traveler Form.
Insert Text Line Item
This portlet enables the user to manually add a Text Line Item.
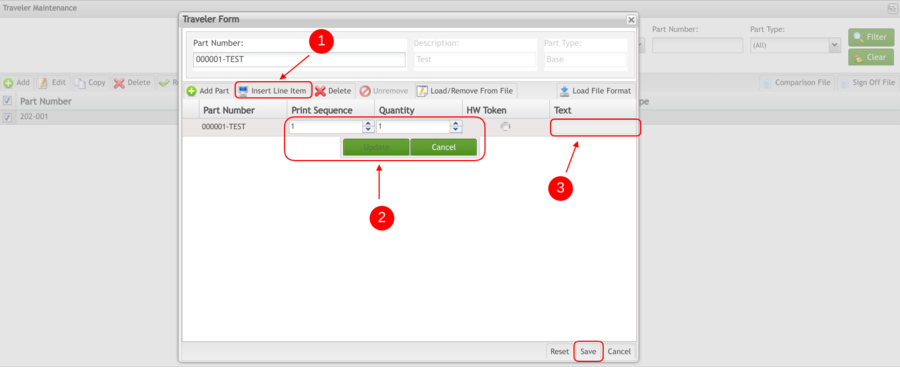
1. To add a Text Line Item, select Insert Line Item in the Traveler Form. A new Text-Line-Item line is created in the Traveler Form List.
Figure 5: Insert Line Item
2. Enter Print Sequence and Quantity by double-clicking the desired field. Enter the values, and then select Update.
3. Select Update to save the Traveler Configuration, after finishing entering the values.
4. Enter a comment describing the line item into the Text field.
5. Select Cancel to closethe Traveler Details screen and return to the Traveler Configuration List.
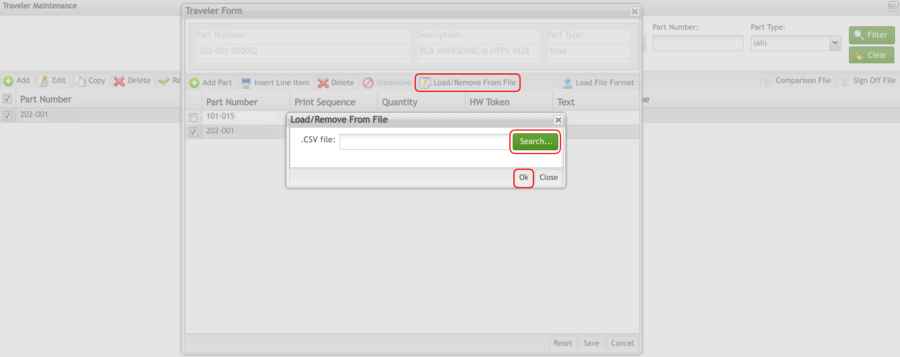
Load/Remove from File
This portlet enables the user to specify a CSV file from which to load or remove parts. Only valid part numbers can be loaded. If any part numbers are found to be invalid, an error message is displayed.
The Load/Remove file format is as follows:
Part Number, Quantity,AddOrDelete
part_number1,3,A
part_number2,1,A
1. To load or remove part numbers from a file, select L'oad/Remove from File'.
Figure 6: Load/Remove from File
2. Select Search under Load/Remove From File. Then navigate to the desired CSV file.
3. Select Ok to Save or Close to Cancel. The part numbers from the file are now added or deleted (depending on the file data) to the list.
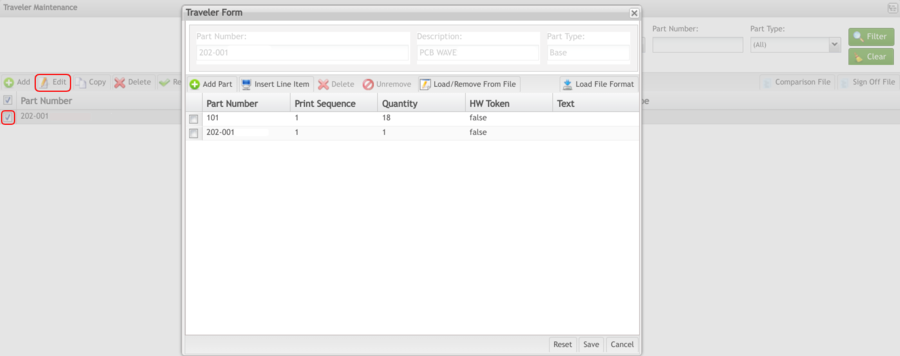
Edit Traveler Configuration
This portlet enables the user to edit an existing traveler configuration.
1. To edit, select the desired Traveler Configuration and click Edit. The Traveler Form is displayed for the selected part number.
Figure 7: Editing Traveler – Traveler Form
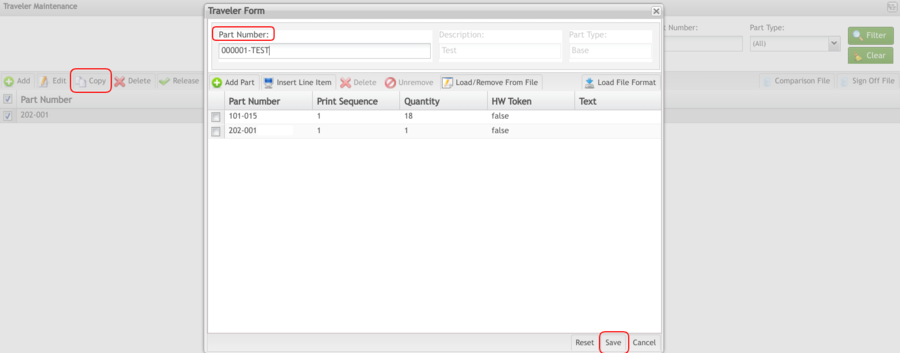
Copy Traveler
This feature allows the user to copy an existing traveler configuration.
1. To copy an existing Traveler Configuration, select the desired configuration.
2. Select Copy. The Copy Traveler Config window is displayed.
Figure 8: Traveler Copy with Traveler Form
3. Enter the desired Part Number. Select Save to complete the action (or Cancel to abort). The Traveler Form for the new part number is displayed. The Traveler Configuration Form has been copied for use with the new part number. Select Save to finish, or Select Cancel to abort and return to the Traveler Maintenance list.
Note: Reference section 1.1.3 Add a Traveler Configuration as the steps and information are the same.
Delete Traveler Configuration
This portlet enables the user to delete an existing traveler configuration. Traveler configurations are only able to be deleted when viewing the Traveler Status Pending display.
1. To delete an existing traveler configuration, select the desired configuration and select the Delete button in the list.
2. Select Yes to delete, or No to abort.
Figure 9: Delete Traveler
Release Traveler
This portlet enables the user to release a traveler configuration. A traveler must be released to production prior to use.
Note: Once a traveler configuration has been released, it is not possible to edit the details when accessed via the Traveler Status Released display.
1. To release a pending traveler configuration, select the desired configuration and click the Release button. A PDF report is generated.
Figure 10: Traveler Release
Figure 11: Traveler Release Report
Print Traveler
This portlet enables the user to print an existing traveler configuration.
1. To print a traveler configuration, select the desired configuration and click the Print button. A PDF report is automatically generated and downlooaded to the user's desktop that the user may print or save.
Figure 12: Print Traveler Configuration
View Traveler Configuration
There are three options for viewing traveler configurations:
- Exploded view displays all associated Print Sequences, Quantities, Part Numbers, and Descriptions. Any underlying traveler configuration queries are released versions.
- Indented view displays all associated Part Numbers, Descriptions, and Quantities.
- Single Level view displays all configuration details.
1. To view a Traveler Configuration, select the desired configuration and click the icon for the desired viewing option. When Exploded or Indented is selected, a PDF report is generated that the user may print or save. When Single Level is selected a read-only report pops up on the screen for the user to view.
Figure 13: Traveler Viewing
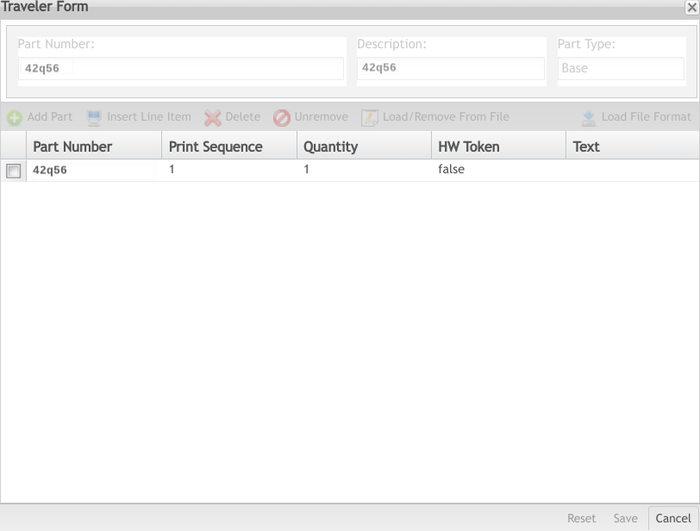
Figure 14: Single Read Only View
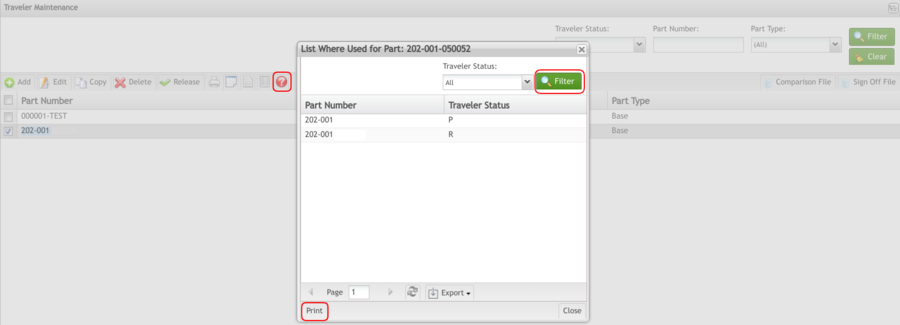
Where is it Used?
This portlet is used to view a Traveler Configuration by part number. This is useful to view the impact when Traveler Configuration modifications are necessary.
1. To view where a Traveler Configuration is used by part number, select the desired configuration.
2. Select the Where Used icon. The List Where Used for Part pop-up displays, showing any traveler configuration using the specified part number.
Figure 15: Where Used
3. Sort by traveler status by selecting the status from the list box and clicking Filter. Only the selected traveler list displays in the Where Used for Part list.
4. To print the List Where Used for Part, select Print.
Comparison File
This portlet creates a text file that contains the selected traveler(s). This file is used to compare COPS and COPICS BOMs.
1. To compare files, select the desired Traveler Configurations and click the Comparison File button. Automatically the Comparison File will download into the user desktop.The user can Save or Open the file. The file is created in the destination selected above.
Figure 16: Comparison File
Sign Off File
This portlet creates a file for the selected traveler configuration, pending, or released. The text file contains the selected traveler configuration and the corresponding tokens for the configuration.
The file naming convention used is as follows for the part number:
- The first character is "P" for pending and "R" for release.
- Characters 2-7 are the first 7 characters of the part number
- The three-character extension is an incrementing value to make the filename unique.
1. To create the Sign Off file, select the desired Traveler Configurations and click the Sign Off File button.
Figure 17: Sign Off File
2. Navigate to the desired location to save the file, and select Save or just select Open with and click on Ok. The file is created in the destination selected above.
