Difference between revisions of "42Q-MES0186-A-PTS Mobile"
| Line 214: | Line 214: | ||
| | ||
| − | |||
| − | + | === <span class="mw-headline" id="Scan_Barcode"><span class="mw-headline" id="Scan_Barcode"><span class="mw-headline" id="Scan_Barcode"><span class="mw-headline" id="Scan_Barcode"><span class="mw-headline" id="Scan_Barcode"><span class="mw-headline" id="Scan_Barcode"><span class="mw-headline" id="Scan_Barcode"><span class="mw-headline" id="Scan_Barcode"><span class="mw-headline" id="Scan_Barcode">'''Scan Barcode [[File:PTSM Logo4.png|PTSM Logo4.png]]'''</span></span></span></span></span></span></span></span></span> === | |
| − | <br/> <br/> '''Figure | + | After the production line has been activated the materials loaded in Traceability, go to the '''Scan Barcode''' module. |
| + | |||
| + | <br/> <br/> '''Figure 9: Scan Barcode ''' | ||
'''[[File:PTSM ScanBarcode.png|900px|PTSM ScanBarcode.png]]''' | '''[[File:PTSM ScanBarcode.png|900px|PTSM ScanBarcode.png]]''' | ||
| Line 226: | Line 227: | ||
| | ||
| − | ''' | + | Users will need to add the Workstation name and select a workstation. The BOM, Picklist, and Work Order information will be displayed. The field'''Board Barcode '''will show and can be edited. |
| − | + | The PCB board/panel/serial barcode will need to be '''Scan''' as per Workstation Setup defined in the Production Setup module.“Scan board barcode successfully” will display after the scan barcode successfully. | |
| + | |||
| + | Users can view the Loaded Material report by clicking the '''Loaded''' button and also view the Scanned Board Report by clicking the '''Scanned''' button. Close the current page by clicking the '''Cancel''' button. | ||
| + | |||
| + | | ||
| | ||
| − | '''Figure | + | '''Figure 10: Loaded Material Report ''' |
| − | [[File:PTSM | + | [[File:PTSM LoadedMaterialReport .png|900px|PTSM LoadedMaterialReport .png]] |
| | ||
| − | | + | '''Figure 11: Scanned ''' |
| + | |||
| + | [[File:PTSM Scanned.png|900px|PTSM Scanned.png]] | ||
| | ||
Revision as of 18:03, 30 August 2023
42Q Home > Production > 100% Traceability> PTS Mobile
Contents
Introduction
The Part Traceability System (PTS) is an essential component of the MES suite of tools, designed specifically to meet the growing demands of customers. Its primary objective includes offering comprehensive traceability at the component level and ensuring strict quality controls. By automating production lines and enforcing rigorous product quality control, this system plays a pivotal role in enhancing overall productivity. its successful implementation has been witnessed across numerous plants worldwide.
As technology continues to evolve and SMT process equipment tools become increasingly intricate and feature-rich, the PTS application and its accompanying features consistently advance. However, our commitment remains to provide support for all technology tools. 42Q prioritizes offering the necessary flexibility to accommodate various line types and deliver diverse levels of traceability that are crucial to the success of your business.
PTS Mobile
PTS Mobile is specifically designed to be compatible with handheld devices, recognizing that operators may not always be in front of a computer and require the convenience of using a handheld device for operation.
To access PTS Mobile, navigate to Production > 100% Traceability > PTS Mobile
Re-Validate Material
Whenever material is going to be exhausted, splicing is required to ensure production can proceed without interruption. However, there is a small chance that splicing was mistakenly done to the wrong feeder slot and it can’t be detected by the normal part verification process.
Therefore, a material re-validation is required to handle this scenario. By re-validate material (just re-scan material barcode, without interrupting the current production run), chances of splicing material to the wrong feeder slot can be avoided.
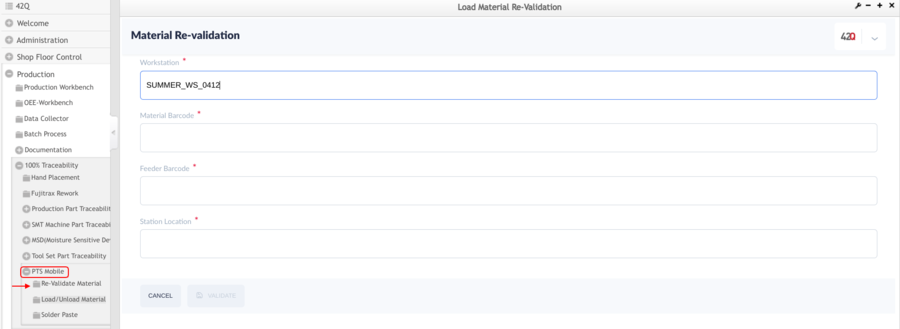
The Re-Validate Material is a mobile solution (GUI) to handle the situation of Component Reset and Re-validation for traditional SMT Machines. The users can validate the materials with the Workstation, Material Barcode, Feeder Barcode, and Station.
Figure 1: Re-Validate Material
The main screen will request the user to input or scan the Workstation, Material Barcode, Feeder Barcode, andStation Location.
Load/ Unload Materials
It is mainly used for material loading and unloading materials and SMT tools, including the following subpages:
- Load Material
- Load SMT Tools
- Material Queue
- Scan Barcode
- Prepare Material
- Unload Material
- Load Prepare Material
Figure 2: Load / Unload Materials page
PTSM Load UnloadMaterials page.png
Load Material 
This function is used to load material to the workstation.
Figure 3: Load to Workstation
Workstation: Input the Workstation name and select a workstation, and the detailed items for load material will display.
Notes:
- For the SMT workstation, the fields will contain the Material barcode, feeder barcode, and station;
- For the AI workstation, the fields will contain the Material barcode and station;
- For the HL workstation, the fields will contain a Material barcode.
Figure 4: Load Material to an SMT Workstation
- Material Barcode: Scan (or Input manually) the material barcode.
- New Feeder Barcode: Scan (or Input manually) New Feeder Barcode. (Apply to the feeder which will be loaded to the defined SMT machine slot).
- Feeder Barcode: The Feeder Barcode checkbox is unchecked by default. If the "Feeder Barcode" checkbox is checked, then the "Old Feeder Barcode" and "Old Remaining Quantity" input boxes will be displayed.
- Old Feeder Barcode: Scan (or Input manually) Old Feeder Barcode.
- Old Remain Qty: Input Old Remain Qty.
- Station Location: Scan the station barcode. gram.)
- Click Submit. “ Load Material Successfully” will display after the material loads successfully.
- Detailed information can be seen on the “Load Material Report” page.
- The user can see the loaded detailed information by clicking the Report button.
- The user can clear the content of the input box by clicking the Reset button.
- The user can close the current page by clicking the Cancel button.
Figure 5: Load Material to an HL Workstation
- Material Barcode: Scan (or Input manually) the material barcode.
- Click Submit. “Load Material Successfully” will display after the material loads successfully.
- Detailed information can be seen on the “Load Material Report” page.
- The user can see the loaded detailed information by clicking the Report button.
- The user can clear the content of the input box by clicking the Reset button.
- The user can close the current page by clicking the Cancel button.
Load SMT Tools 
This function is used to load and unload Jig.
Prerequisites
- Set Jig Control=Yes under the System Setting(Traceability) page
- A Jig barcode has been created
Figure 6: Load SMT Tools
- Input the Workstation name and select a Workstation Available.
- Input the corresponding jig barcode in the Jig Barcode textbox.
- Click Submit.
- The user can clear the content of the input box by clicking the Reset button.
- The user can close the current page by clicking the Cancel button.
- The system will auto-verify whether the jig barcode can be loaded to the selected workstation based on the defined mapping. If the jig barcode is correct, it will then be loaded successfully. An error message will show up at the top side if the system fails to load the jig.
- If the JIG has been loaded to the workstation, then the user can enter the workstation and JIG barcode again to unload the Jig from this workstation.
Marial Queue 
This function is used to batch joint materials and prepare for automatic loading.
Prerequisites
Set Allow material queue =Yes under the “System Settings (Traceability)” page
Figure 7: Material Queue
- Workstation: Input the Workstation name and select a Workstation Available.
- Station: Input the Station and press the enter key. The loaded material will show automatically.
- Confirm Material Barcode: Input Confirm Material Barcode.
- New material Barcode: Input or scan the New material Barcode.
- Click Submit.
- The user can close the current page by clicking the Cancel button.
- The user can clear the content of the input box by clicking the Reset button.
- The user can return the previous step by clicking the Return button.
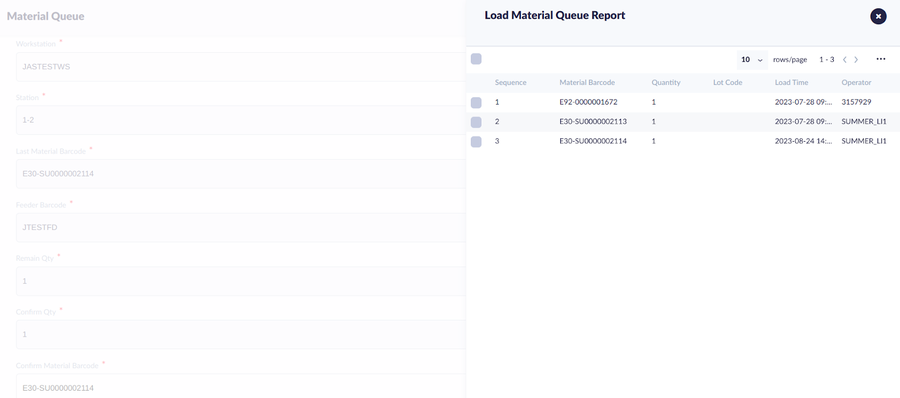
- The user can view the Material Queue Report by clicking the Report button.
Figure 8: Material Queue - Material Queue Report
- Select and click Delete to delete the material if needed.
Note 1: The first material cannot be deleted from the Material Queue Report.
Note 2: Material queue max reels and Material queue max Boards cannot be larger than the values set on the system settings page if Allow Material Queue is YES.
Scan Barcode 
After the production line has been activated the materials loaded in Traceability, go to the Scan Barcode module.
Figure 9: Scan Barcode
Users will need to add the Workstation name and select a workstation. The BOM, Picklist, and Work Order information will be displayed. The fieldBoard Barcode will show and can be edited.
The PCB board/panel/serial barcode will need to be Scan as per Workstation Setup defined in the Production Setup module.“Scan board barcode successfully” will display after the scan barcode successfully.
Users can view the Loaded Material report by clicking the Loaded button and also view the Scanned Board Report by clicking the Scanned button. Close the current page by clicking the Cancel button.
Figure 10: Loaded Material Report
Figure 11: Scanned
Prepare Material PTSM Logo5.png
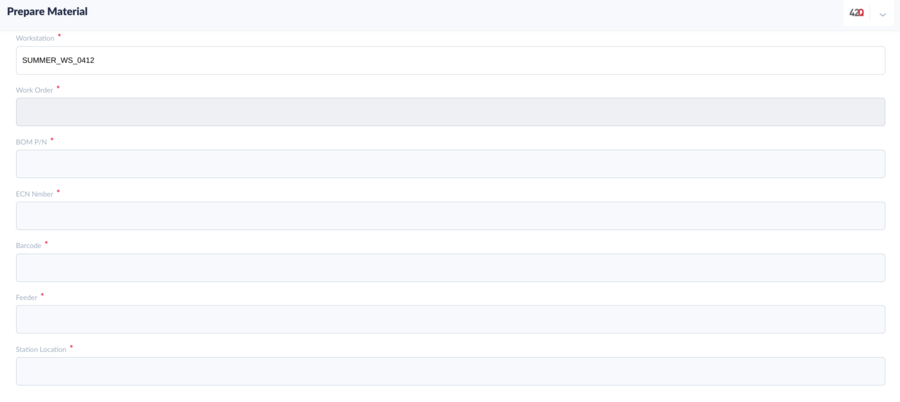
To prepare material in advance while the production line is either in offline mode or online mode.
Figure 10: Prepare Material
Unload Material PTSM Logo6.png
Unload Feeder/Material from Workstation.
Figure 11: Unload Material
Load Prepare Material PTM Logo7.png
Load prepared material sing.
Figure 12: Load Prepare Material
Solder Paste
Solder Paste Mainly used to manage solder paste, including the following submenus:
- Refrigeration In
- Refrigeration out
- Thaw Start
- Thaw End
- Stirring
- Open Jar
- Solder-Paste Scrap
Figure 13: Solder Paste
Refrigeration In PTSM Logo8.png
This function is used to put the solder paste into the refrigerator.
Figure 14: Refrigeration In
Refrigeration Out PTSM Logo9.png
This function is used to take the solder paste out of the refrigerator.
Figure 15: Refrigeration Out
Thaw Start PTSM Logo10.png
This function is used to start thawing Solder Paste.
Figure 16: Thaw Start
Thaw End PTSM Logo11.png
This function is used to end the thawed solder paste.
Figure 17: Thaw End
Stirring PTSM Logo12.png
This function is used to stir the solder paste.
Figure 18: Stirring
Open Jar PTSM 13.png
This function is used to open the solder paste and prepare it for use.
Figure 19: Open Jar
Solder Paste Scrap PTSM Logo14.png
This function is used to scrap expired or unusable solder paste.
Figure 20: Solder Paste Scrap


