Difference between revisions of "42Q-MES0167 SAP Adapter"
| Line 113: | Line 113: | ||
| | ||
| − | |||
| − | Mapping of operation happens on 42Q when we map the operation/routing received from SAP to the process/routing on 42Q. If users want to map a particular operation to a location in 42Q site | + | = <span class="mw-headline" id="Mapping_an_Operation"><span class="mw-headline" id="Mapping_an_Operation"><span class="mw-headline" id="Mapping_an_Operation"><span class="mw-headline" id="Mapping_an_Operation"><span class="mw-headline" id="Mapping_an_Operation"><span class="mw-headline" id="Mapping_an_Operation"><span class="mw-headline" id="Mapping_an_Operation"><span class="mw-headline" id="Mapping_an_Operation"><span class="mw-headline" id="Mapping_an_Operation"><span class="mw-headline" id="Mapping_an_Operation"><span class="mw-headline" id="Mapping_an_Operation"><span class="mw-headline" id="Mapping_an_Operation"><span class="mw-headline" id="Mapping_an_Operation"><span class="mw-headline" id="Mapping_an_Operation"><span class="mw-headline" id="Mapping_an_Operation"><span class="mw-headline" id="Mapping_an_Operation">Mapping an Operation</span></span></span></span></span></span></span></span></span></span></span></span></span></span></span></span> = |
| + | |||
| + | Mapping of operation happens on 42Q when we map the operation/routing received from SAP to the process/routing on 42Q. If users want to map a particular operation to a location in the 42Q site | ||
#Enter the next command: CO01 and then press Enter. | #Enter the next command: CO01 and then press Enter. | ||
| Line 128: | Line 129: | ||
'''[[File:SA Component Overview.png|700x700px|SA Component Overview.png]]''' | '''[[File:SA Component Overview.png|700x700px|SA Component Overview.png]]''' | ||
| − | + | <center style="text-align: left;"> <ol start="4"> | |
<li>A new pop-up window will appear, then in the last field in the lower right corner select the '''Milestone confirmation (not PS/PM)''' option.</li> | <li>A new pop-up window will appear, then in the last field in the lower right corner select the '''Milestone confirmation (not PS/PM)''' option.</li> | ||
<li>Click on the icon: [[File:SA Enter Icon.png|30x30px|SA Enter Icon.png]] to save changes.</li> | <li>Click on the icon: [[File:SA Enter Icon.png|30x30px|SA Enter Icon.png]] to save changes.</li> | ||
| Line 143: | Line 144: | ||
<li>A pop-up window will be displayed to show you the information of the recently mapped operation, finally, click on the icon: [[File:SA Enter Icon.png|30x30px|SA Enter Icon.png]] to close the window.</li> | <li>A pop-up window will be displayed to show you the information of the recently mapped operation, finally, click on the icon: [[File:SA Enter Icon.png|30x30px|SA Enter Icon.png]] to close the window.</li> | ||
</ol> | </ol> | ||
| − | </center> <center style="text-align: left;"> </center> <center style="text-align: left;"> | + | </center> <center style="text-align: left;"> </center> <center style="text-align: left;"> </center> |
| + | |||
= <span class="mw-headline" id="Monitor_SAP_updates"><span class="mw-headline" id="Monitor_SAP_updates"><span class="mw-headline" id="Monitor_SAP_updates"><span class="mw-headline" id="Monitor_SAP_updates"><span class="mw-headline" id="Monitor_SAP_updates"><span class="mw-headline" id="Monitor_SAP_updates"><span class="mw-headline" id="Monitor_SAP_updates"><span class="mw-headline" id="Monitor_SAP_updates"><span class="mw-headline" id="Monitor_SAP_updates"><span class="mw-headline" id="Monitor_SAP_updates"><span class="mw-headline" id="Monitor_SAP_updates"><span class="mw-headline" id="Monitor_SAP_updates"><span class="mw-headline" id="Monitor_SAP_updates"><span class="mw-headline" id="Monitor_SAP_updates"><span class="mw-headline" id="Monitor_SAP_updates">Monitor SAP updates</span></span></span></span></span></span></span></span></span></span></span></span></span></span></span> = | = <span class="mw-headline" id="Monitor_SAP_updates"><span class="mw-headline" id="Monitor_SAP_updates"><span class="mw-headline" id="Monitor_SAP_updates"><span class="mw-headline" id="Monitor_SAP_updates"><span class="mw-headline" id="Monitor_SAP_updates"><span class="mw-headline" id="Monitor_SAP_updates"><span class="mw-headline" id="Monitor_SAP_updates"><span class="mw-headline" id="Monitor_SAP_updates"><span class="mw-headline" id="Monitor_SAP_updates"><span class="mw-headline" id="Monitor_SAP_updates"><span class="mw-headline" id="Monitor_SAP_updates"><span class="mw-headline" id="Monitor_SAP_updates"><span class="mw-headline" id="Monitor_SAP_updates"><span class="mw-headline" id="Monitor_SAP_updates"><span class="mw-headline" id="Monitor_SAP_updates">Monitor SAP updates</span></span></span></span></span></span></span></span></span></span></span></span></span></span></span> = | ||
Revision as of 20:10, 1 December 2021
42Q Home > Tools > SAP Adapter
Contents
- 1 Introduction
- 2 Create a Work Order
- 3 Mapping an Operation
- 4 Monitor SAP updates
- 5 Update Work Order
- 6 Checking Transaction Errors
- 7 Send ship notification from SAP to 42Q
- 8 Standard Cycle Time and Hands on Time
- 9 Standard Cycle Time from Work Order
- 10 Date Code Setup
- 11 Perform GR
- 12 Scheduled Start and End Time Flag
- 13 TECO Flag
- 14 WIP Confirmation Change
- 15 Common Issues on SAP
Introduction
The SAP Adapter is a middleware software that has been developed for customers to seamlessly integrate their SAP systems with 42Q. This adapter can be installed in the customer’s SAP system in order to allow SAP users to monitor and iterate with 42Q.
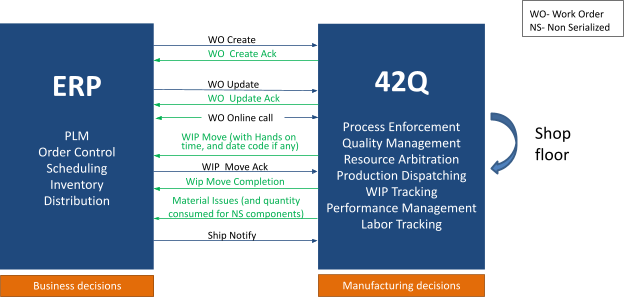
The below diagram explains the capabilities provided by these SAP Adapters:
Figure 1: SAP Diagram
The SAP adapter requires an initial setup for new customers.
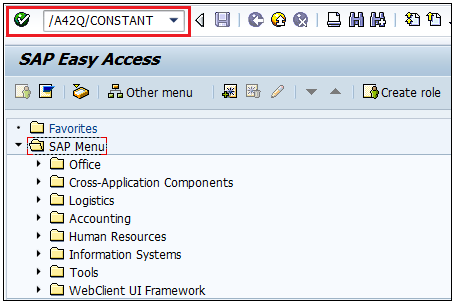
- In the command field, enter the following command: /A42Q/CONSTANT (or ZQWO_CONSTANT, ZWO_CONSTANT), and then press Enter.
Figure 2: Command Field
- On the new window, set up the Org. Id (Organization code) and the Customer (Customer code).
Figure 3: Initial Set Up
- Now it’s time to set up the BOM’s information, enter the next command: CS02, and then press Enter.
- Click on the Header icon:

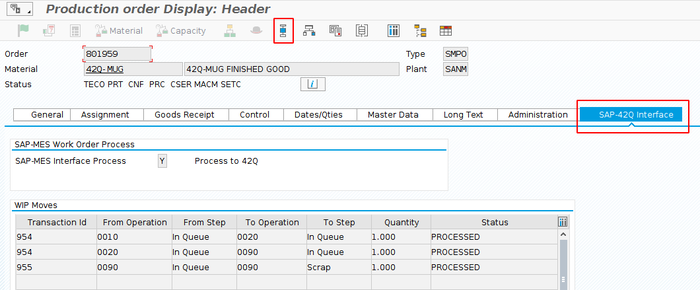
- Click on the SAP-42Q Interface tab.
Figure 4: 42Q Interface
- In the SFDC System field, click on the icon:
 , select the value MES and then click on the icon:
- In the Interface Type field, click on the icon:
 , select one of the following values:
- DEFAULT: Use this value if you want to send WO Header, WO Route, Flex field, or ATO Details (if applicable) to 42Q.
- SYS-BUILD: Use this value if you want to send WO Header, WO Route, or BOM to 42Q.
Note: In the previous step 2, users set up the Organization code and Customer code, the purpose of these fields is to determine how the adapter will perform for each plant.
Create a Work Order
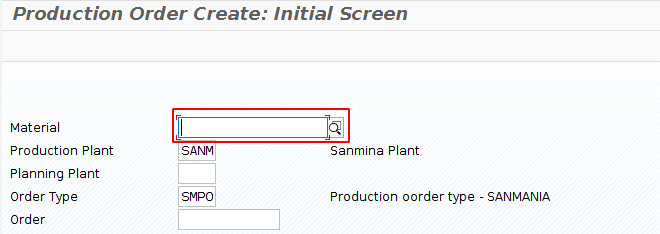
- Enter the next command: CO01, and then press Enter.
- In the Material field, enter a Part Number.
- Enter the Production Plant.
- Enter the Planning Plant.
- Enter the Order Type.
- Press Enter.
Figure 5: Production Order Create
- Set the Total Qty, Start date, and End date.
Figure 6: Work Order Creation
- Click on the icon:
 to release the Work Order.
 - Click on the Save icon to save the Work Order. The work order will be sent to 42Q.
Based on correct setups Work Order XML will include the following information:
- WO Header
- WO Production Version
- WO Routing and standard times for each operation (For sending standard time setup should be done correctly, see section nn for that)
- WO Component
Mapping an Operation
Mapping of operation happens on 42Q when we map the operation/routing received from SAP to the process/routing on 42Q. If users want to map a particular operation to a location in the 42Q site
- Enter the next command: CO01 and then press Enter.
- Click on the Operation Overview icon:

- A new list of operations will be displayed, choose one operation and hover the mouse cursor over its corresponding Control Key field, when a hover icon appears next to this field, click on it.
Figure 7: Component Overview
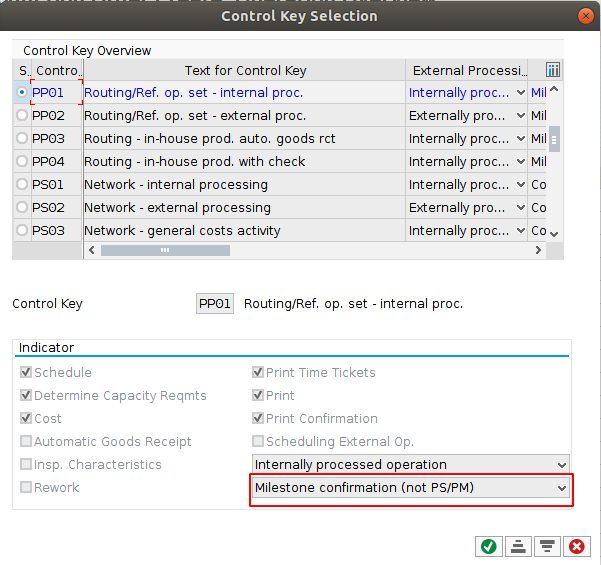
- A new pop-up window will appear, then in the last field in the lower right corner select the Milestone confirmation (not PS/PM) option.
- Click on the icon:
 to save changes.
Figure 8: Control Key Selection
- Click on the icon:
 to go back to the Production Order Create: Header.
 - Click on the Save icon:
 , then select Yes to save it, or select No or Cancel to abort.
 - A pop-up window will be displayed to show you the information of the recently mapped operation, finally, click on the icon:
 to close the window.
Monitor SAP updates
If the users want to see all transactions between SAP and 42Q, such as Acknowledgement, WIP-Move, MAT-Move, Shipment, and MAP-Issue, follow the next steps:
- Enter the next command: /A42Q/PROCESS (or ZQWO_PROCESS, ZWO_PROCESS), and then press Enter.
- Users can see in the Message column if the information was received successfully by 42Q.
Figure 9: Work Order Transactions
Update / Change
Users can view updates or changes made to a Work Order (e. g. changes in quantity) by following the next steps:
- Click on the Update/Change button.
- In the new window that will appear, users can see the data that was updated as well as a confirmation message, notifying that 42Q received the update successfully.
Figure 10: Work Order Updates-Changes
WIP-Move
Users can view Work Order WIP-Moves by following the next steps:
- Select a row.
- Click on the WIP-Move button.
Figure 11: View WIP-Moves
- A new window will appear, users can see all WIP-Moves belonging to that specific Work Order, as well as all detailed information. To see the Production Order information from a specific WIP-Move, click on the Work Order number.
Figure 12: Work Order WIP-Moves

- To see the WIP-Moves transactions, click on the SAP-42Q Interface tab.
- To see the overview of each operation, click on the Operation Overview button.
Figure 13: WIP-Moves Transactions
Figure 14: WIP-Moves Operation Overview
- Users can also view each individual WIP-Move, as well as their details. In this view, it is easier to identify in what WIP-Move an error occurred by looking at the Message column. To see this view, click on the Display button.
Figure 15: Display WIP-Moves Process Details
Figure 16: WIP-Moves Process Details
Note: If there is one milestone operation in the Routing, then WIP Move confirmations only happen when a WIP Move is received for the milestone operation, all the non milestone operations will be confirmed with that WIP Move. If there are no milestone operations in the routing, then confirmations happen when the WIP moves of respective operations are received.
MAT-Move
To get a material issue from 42Q the component/ BOM item should be set as PUSH type in SAP. If it is PULL type material standard backflush will happen for that BOM item
An assembly definition should be created for that component on 42Q. 42Q sends wip moves when assembly is either Standard, Unique, Custom, Consume from NSB or Non Tracked with Quantity.
Users can view Work Order MAT-Moves (Material Movements) by following the next steps:
- Select a row.
- Click on the MAT-Move button.
Figure 17: View MAT-Moves
Figure 18: Work Order MAT-Moves
- A new window will appear, users can see all MAT-Moves belonging to that specific Work Order, as well as all detailed information.
MAT-Issue
Users can view Work Order MAT-Issues (Material Issues) by following the next steps:
- Select a row.
- Click on the MAT-Issue button.
Figure 20: Work Order MAT-Issues

- A new window will appear, users can see all MAT-Issues belonging to that specific Work Order, as well as all detailed information.
Note: When you receive a Work Order from SAP (or ERP) to 42Q, this Work Order Status will be set as N (Not released) in the 42Q system, if you want to release it, you must do it using 42Q. Figure 21: Work Order Received by 42Q.

Update Work Order
SAP Adapter allows users to send work order changes to 42Q in the form of Work Order Update Transaction.
Following are the common WO updates from the ERP sent to 42Q:
- Work Order Header
- Status change:
- Unreleased to Released -- Send the entire work order details to 42Q
- On Hold
- Closed
- Canceled - Online call directly to 42Q to allow or not allow this change
- Complete - No Charges -Online call directly to 42Q to allow or not allow this change
- Scheduled Start Date change
- Scheduled Completion Date
- Start Quantity
- Increase
- Decrease - Online call directly to 42Q to allow or not allow this change
- Work Order Routing/ Production Version/ Component Change
Note: The routing and component change will only happen if the work order is in status ‘N’on 42Q. In order to update a Work Order, users must follow the next steps:
- Enter the next command in SAP: CO02.
- Enter the Work Order number in the field Order.
- Click on the icon:

- Once the new window is open, modify the data you want to change.
- Click on the Save icon:

- Select Yes to save it, or select No or Cancel to abort.
- Finally, a pop-up window will appear which shows the information changed, to close the window click on the green icon.
Checking Transaction Errors
- Enter the next command in SAP: SE11.
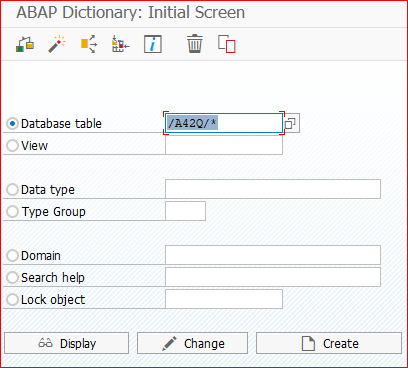
- In the field of Database table, enter /A42Q/* (or ZQWO_*, ZWO_*), and click on the icon:
 to display all types of transactions.
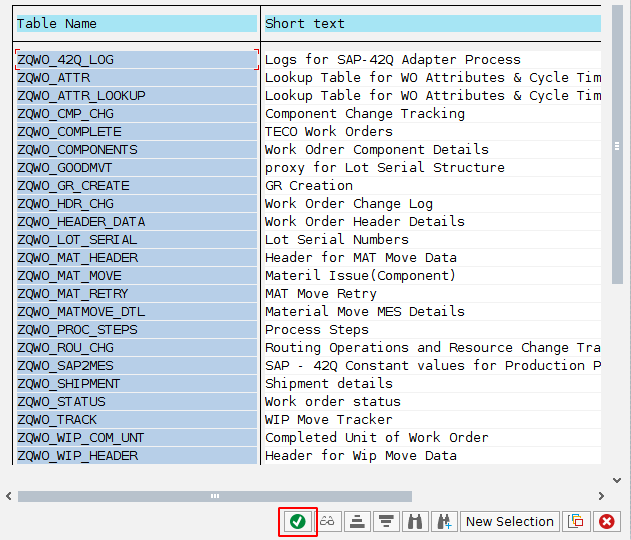
 - A pop-up window will appear, select one value from the Table Name column, and click on the accept button.
Figure 22: Table Name Values
- Click on the Display button.
Figure 23: Display Transaction Errors
- To search for specific information, click on the Contents button.
Figure 24: View Contents
- Enter the information you want to look for. The next image will look for rejected WIP-Moves.
- Click the Execute button.
Figure 25: Search for Rejected WIP-Moves
SA Search for Rejected WIP-Moves.png
Figure 26: Rejected WIP-Moves Found
SA Rejected WIP-Moves Found.png
Send ship notification from SAP to 42Q
Create a Sales Order
- Enter the next command in SAP: VA01.
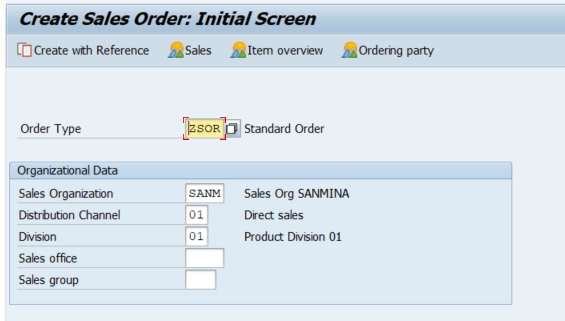
- In the field Order Type, enter the value ZSOR and click on the icon:

Figure 27: Create Sales Order Initial Screen
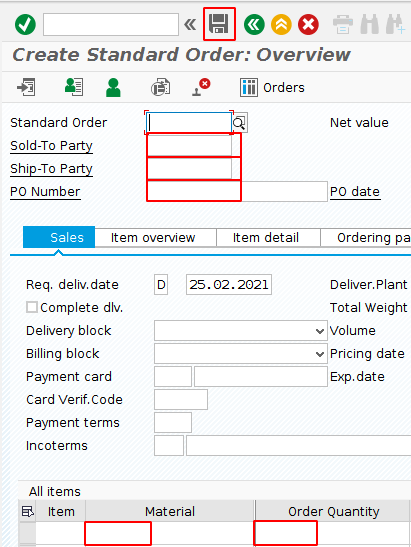
- Enter the corresponding information for Sold-To Party, PO Number, Material, Order Quantity.
Figure 28: Filling out Sales Order Data
- Click on the Save icon. In the lower left corner you will see the Standard Order Number generated.
Figure 29: Standard Order Number Generated
- After creating a Sales Order, the next step is to create an Outbound Delivery.
Create an Outbound Delivery
- Enter the next command in SAP: VL01N.
- Enter the Shipping point value 1000 (Sanmina Shipping Point) and Order number, then press Enter.
Figure 30: Create Outbound Delivery Initial Screen
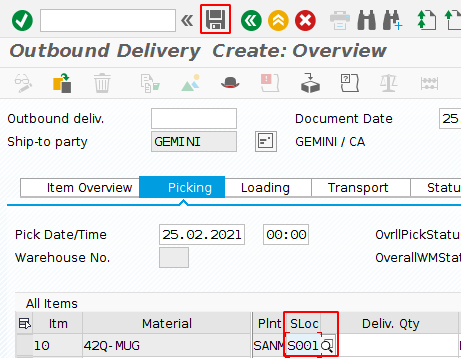
- Since we already had a Sales Order created, SAP will take the corresponding data automatically. Click on the Picking tab.
- In the SLocation field, enter the value S001 (Finished goods).
- Click on the Save icon .
- Select Yes to save it, or select No or Cancel to abort.
Figure 31: Filling out Outbound Delivery Data
- After creating an Outbound Delivery, the next step is to create a Transfer Order.
Create Transfer Order
- On the menu bar, click on the Subsequent Functions option.
- Select the option Create Transfer Order.
Figure 32: Create Transfer Order
- A new window will be displayed, you will notice that in the lower left corner will appear the Outbound Delivery number generated, make sure that number is entered in the Delivery field, then click on the icon:

Figure 33: Outbound Delivery Number Generated
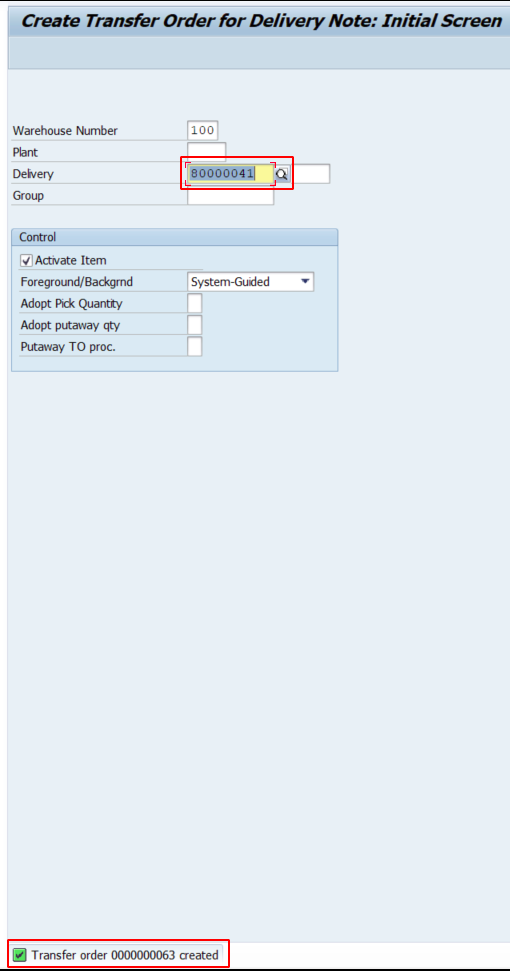
Figure 34: Generate TO Item
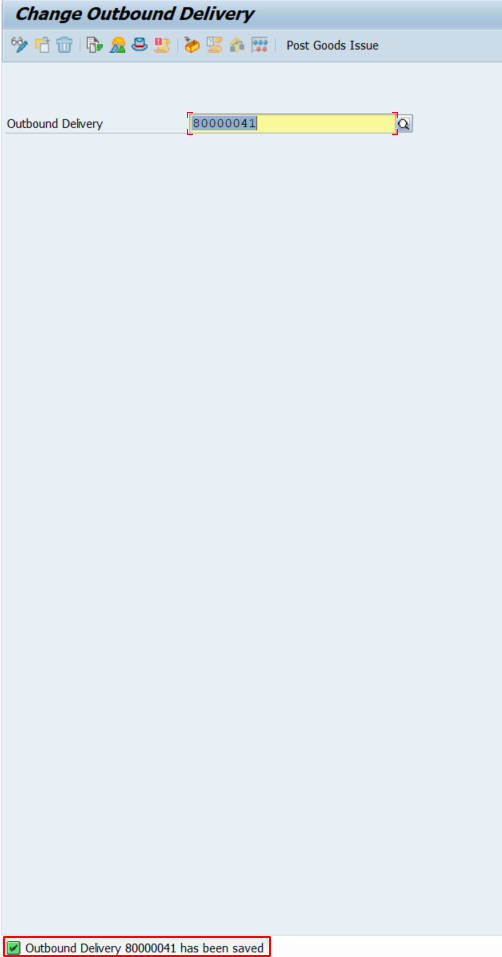
- In the lower left corner you will see the Transfer Order number generated. Copy the value from the field Delivery.
Figure 35: Transfer Order Number Generated
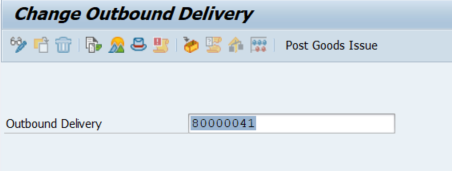
Figure 36: Change Outbound Delivery Initial Screen
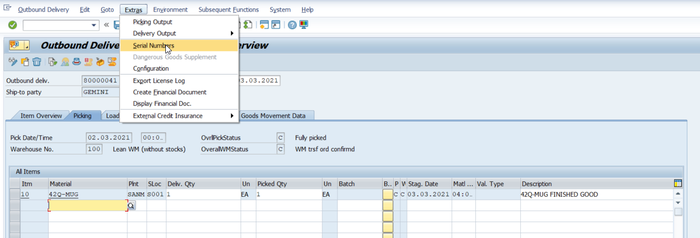
- On the menu bar, click on the Extras option.
- Select Serial Numbers.
Figure 37: Extras Options
- Click on the button Create serial number automatically.
Figure 38: Maintain Serial Numbers
- A new pop-up window will appear, check the boxes of the Order Numbers you want.
- Click on the Copy icon:

- Then click on the Continue button:

- Select a specific row.
- Click on the icon:
 to execute.
 - Click on the Post Goods Issues button.
Figure 39: Outbound Delivery Change Overview
- Users will notice in the lower left corner that the Outbound Delivery number was generated.
Figure 40: Outbound Delivery Number Generated
- The next step is to create a Shipment.
Create a Shipment
- Enter the next command: VT01N and press Enter.
- Click on the Deliveries button.
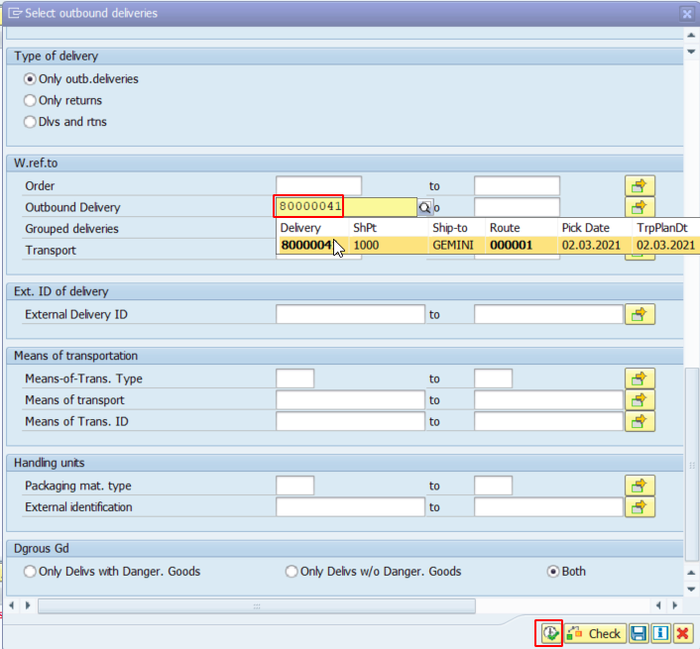
- Once the new window is displayed, scroll down to the section W.ref.to, in the field Outbound Delivery, enter the Outbound Delivery number that was just created.
- In the Delivery Status section, in case you don’t need the Total GDS mvt stat. or Trms.plan.status, simply delete their multiple values.
- Click on the Execute button.
Figure 41: Selecting Outbound Deliveries
- Users will notice the Number of Deliveries found.
Figure 42: Number of Deliveries Found
- Select the shipment number that you just created.
- Click on the button Overview of Current Shipment.
Figure 43: Selecting Shipment Number
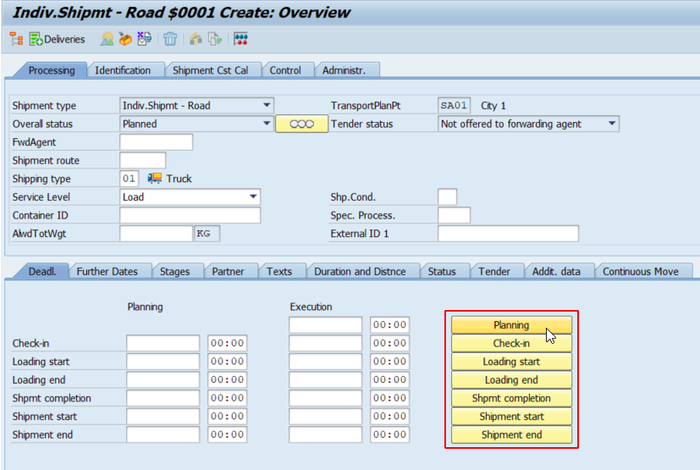
- In the lower right corner, you must select all the options (Planning, Check-in, Loading start, Shipmt. Completion, Shipment start, and Shipment end).
Figure 44: Selecting Shipment Steps
Standard Cycle Time and Hands on Time
Note: Part of 42Q 15.66 update.
Hands on Time Setup
To configure Hands on Time on SAP, users must follow the next steps:
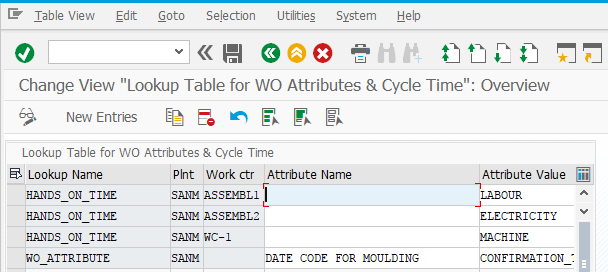
- In the command field, enter the following command: /A42Q/LOOKUP (or ZQWO_LOOKUP, ZWO_LOOKUP), and then press Enter.
- For hands on time setup, enter the following details in the lookup table:
Lookup Name: HANDS_ON_TIME
Plant: Customer Plant name
WorkCenter: Enter work center linked to the operation
Attribute Name: Leave a blank value
Attribute Value: LABOUR or MACHINE or SETUP
- Click the Save button.
42Q records cycle time (hands on time) for each process. The cycle time recordings are sent to SAP with the WIP Move transaction. WorkCenter Attribute value decides if the hand on time should be posted in machine, setup or labour activity hours.
Figure 45: Lookup Table
Users can verify the Hands on Time and Cycle Time by navigating to: Reporting > MESWeb > Default Reports > Cycle Time Details Report, filling out the information users are looking for, and press the Go button.
Figure 46: Cycle Time Details Report
Check Hands on Time Values
To check the HANDS_ON_TIME values on SAP, users must follow the next steps:
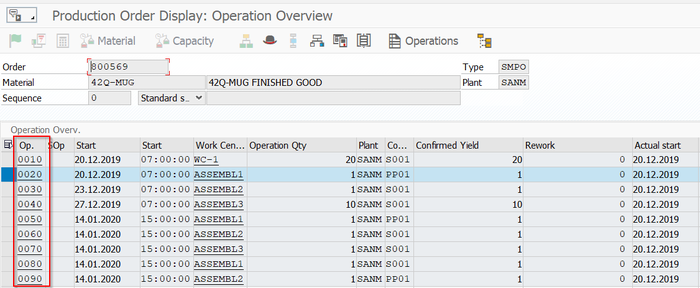
- In the command field, enter the following command: CO03 and then press Enter.
- Click on the Operation Overview button.
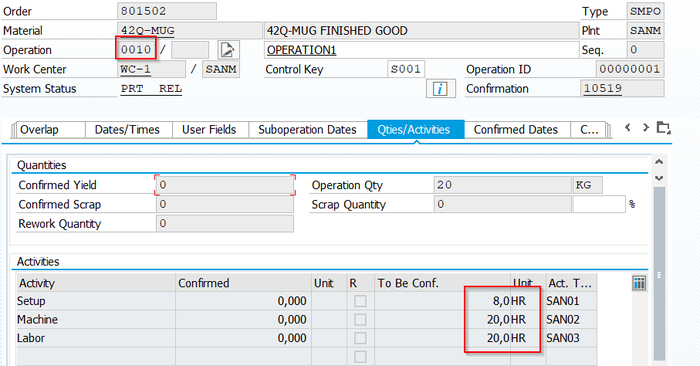
Figure 47: Production Order Display
- Double-click on the operation sequence for which the hands on time needs to be checked.
Figure 48: Selecting Operation Value
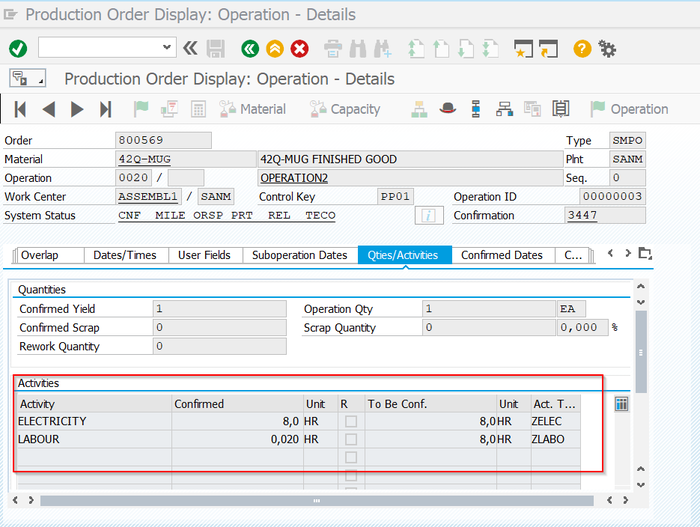
- Click in the Folder Icon and select Qties/Activities from the list.
Figure 49: Displaying More Options
Standard Cycle Time Setup
To configure Standard Cycle Time on SAP, users must follow the next steps:
- In the command field, enter the following command: /A42Q/LOOKUP (or ZQWO_LOOKUP, ZWO_LOOKUP), and then press Enter.
- Enter the correct Attribute Name (the parameter which stores the standard time on SAP) mapping to Attribute Value (this parameter determines where to store the mapped attribute on 42Q).
Figure 51: Attributes from Lookup Table
Note: For reference see the different attribute values that exist:
- Item: Machine time
- Lot: Setup time
- Labor: Labor time
The standard time will be sent for all the operations, which will have an attribute name listed in the Lookup table and have a time value greater than zero.
Figure 52: Operation Value
To visualize the operation value (Operation Sequence Number), in the command field, enter the following command: /A42Q/PROCESS (or ZQWO_PROCESS, ZWO_PROCESS), and then, press Enter, select the Work Order and click the Display XML button.
Figure 53: Operation Value in Work Order Creation Code
Standard Cycle Time from Work Order
To send resource information such as setup time, machine time for operations from WO Level, users must select the ‘Ord lv Stf’ flag in /A42Q/CONSTANT (or ZQWO_CONSTANT, ZWO_CONSTANT) form.
Figure 54: Select ‘Ord lv Stf’ Flag
With this flag checked any resource changed or added at the time of work order creation will be sent to 42Q. If the flag is not sent the resource information is picked from route level and sent to 42Q. For standard cycle time, check the setups under: Standard Cycle Time Setup.
Date Code Setup
To configure Data Code on SAP, users must follow the next steps:
- In the command field, enter the following command: /A42Q/LOOKUP (or ZQWO_LOOKUP, ZWO_LOOKUP), and then press Enter.
- For the Data Code setup, enter the following details in the lookup table:
Lookup Name: WO_ATTRIBUTE
Plant: Enter customer plant name
WorkCenter: Leave a blank value
Attribute Name: DATE CODE FOR MOULDING
Attribute Value: LABOUR or MACHINE or SETUP
When 42Q records DATE CODE FOR MOULDING attribute. The recorded value is sent to SAP.
Figure 55: Recorded Value Received by 42Q
Check Data Code
To check the Data Code on SAP, users must follow the next steps:
- In the command field, enter the following command: CO14 and then press Enter.
- Enter the work order for which the date code information needs to be checked.
Figure 56: Entering Work Order
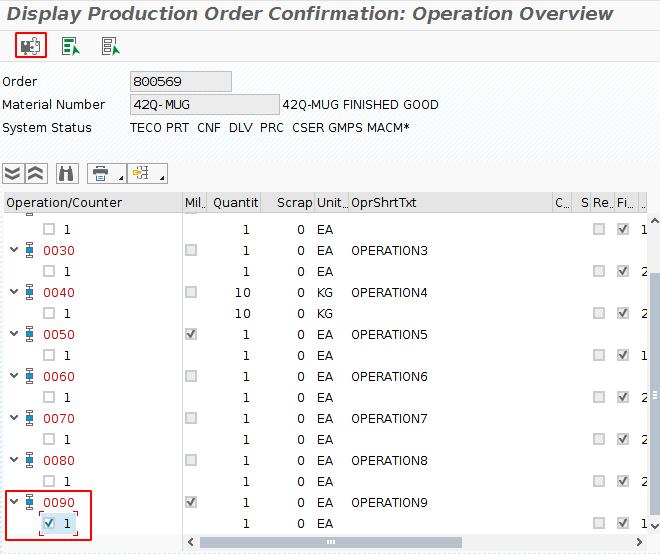
- Select the Final Confirmation.
- Click the Details button.
Note: Date code is available only at the final confirmation of the work order.
Figure 57: Selecting Final Confirmation
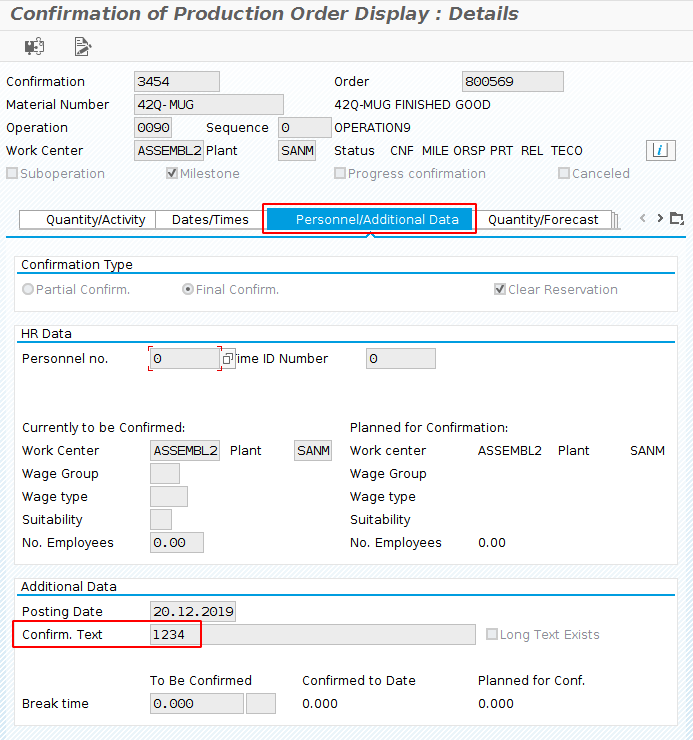
- Select the Personnel/Additional Data tab.
- Users will see that the Date Code is available in the Confirmation text field.
Figure 58: Data Code
Perform GR
First of all, users must do two different types of configuration, Automatic GR Configuration and Enable Perform GR Flag:
Enable Perform GR Flag
This function allows users to use the adapter to do the delivery manually at a later stage:
- In the command field, enter the following command: /A42Q/CONSTANT (or ZQWO_CONSTANT, ZWO_CONSTANT) (constant table), and then press Enter.
- Make sure the Perform GR option is enabled, users will be able to go to the work order and see if the final operation control key is an Automatic GR enabled or not, this way users will only do the confirmation if it is disabled users will do the confirmation and then do the GR.
Figure 59: Constant Table Window
Automatic GR Configuration
In order to do this configuration, users must follow the next steps:
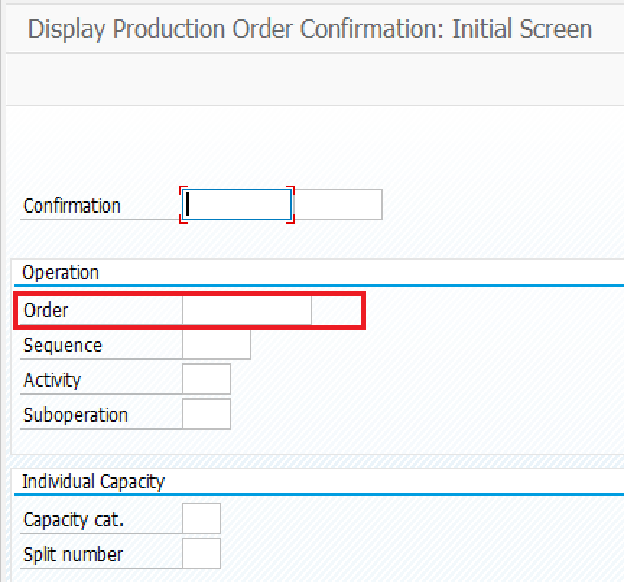
- Enter the next command in SAP: CO02.
- Enter the Work Order number in the field Order.
- Click on the icon:

- Click on the Operation Overview icon:

- A new list of operations will be displayed, choose one operation and hover the mouse cursor over its corresponding Control Key field, when a hover icon appears next to this field, click on it.
Figure 60: Control Key Icon
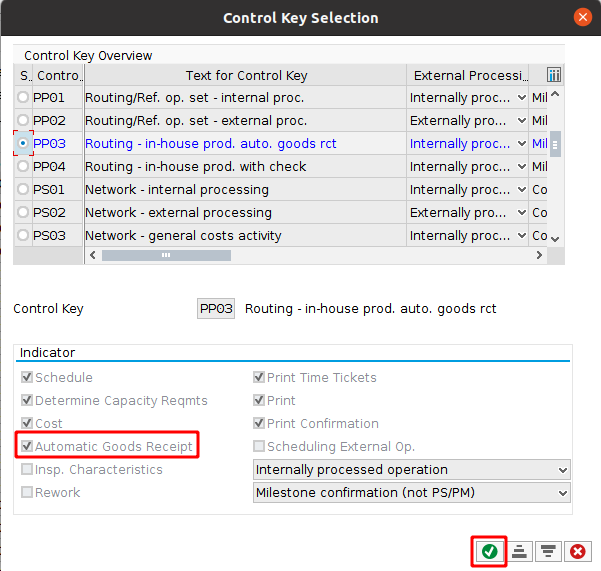
- Mark theAutomatic Goods Receipt checkbox and click on the green Continue button.
Figure 61: Automatic Goods Receipt Option
Note: If the information or the final operation sequence are done, then the adapter will prevent users from marking the Automatic GR (Goods Receipt) option. On the other hand, if the Automatic GR is enabled the SAP system will take it forward but the adapter will not bate if the Automatic GR is successfully processed or not, if the Automatic GR fails, the delivered quantity will have an impact, so the delivered quantity will not be available and if it’s not available, users won’t be able to change the status to TECO as in Figure 62.
Figure 62: Production Order Status
To access the Material Document, users must navigate from the menu option: Goto > Documented Goods Movements.
The material document will have a different range based on the adapter creator GR document and the system creator GR document. Users may notice that the Material Document Number will be ready, moreover to access the Material Document Window, users must click on the Material Document Number.
Figure 63: Documented Goods Movements Window
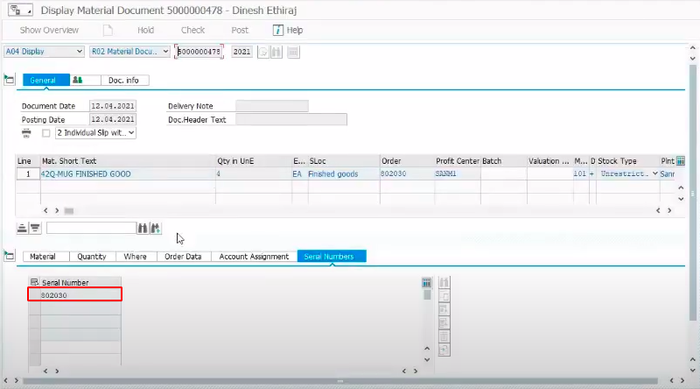
Users will be able to pass the serial number only if it was not configured with the Automatic GR option in Control Key.
Figure 64: Material Document Window
Scheduled Start and End Time Flag
This flag will allow the users to select between the two dates at the work order level.
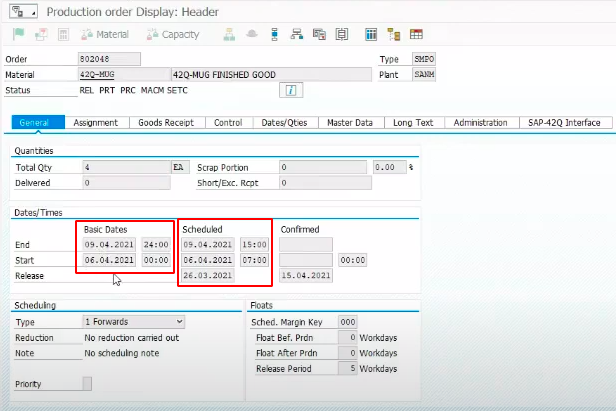
If this flag is enabled at the constant table, the adapter will pick the dates from the Scheduled start date and end date column, but if it is disabled, users will pick the dates between the Basic start date and End date.
Figure 65: Scheduled Date Flag
Figure 66: WO Basic and Scheduled Date
TECO Flag
In the command field, enter the following command: /A42Q/PROCESS (or ZQWO_PROCESS, ZWO_PROCESS) (process table), press Enter and enable the TECO flag as in Figure 67.
After the TECO flag is enabled at the process table, any updates to the work order will not be sent to 42Q.
If users want to make any change to the work order after marking the TECO flag option, users must remove this flag.
After users use the program /A42Q/RESET_WO_STATUS (or ZQWO_RESET_WO_STATUS, ZWO_RESET_WO_STATUS), the TECO flag will be removed and the user will be able to send the updates.
Figure 67: Process Table Teco Flag

WIP Confirmation Change
Note: Part of 42Q 15.69 update.
To enable the WIP Moves being sent when units leave a mapped operation go to: Administration > Generic Attribute Maintenance, set attribute: do_leave_move as: ‘true’, under the table wip_movement.
Figure 68: Activate ‘do_leave_move’ Attribute
For this logic, a new step type ‘Complete’ will be introduced. It will be used when a unit moves from a mapped operation to a non-mapped operation. Scenarios for ‘Complete’ step type:
- In Queue to Complete - Confirm From sequence till To sequence.
- Complete to Complete - Confirm (From sequence+1) till To sequence.
- Reject to next station Complete - Cancel Rework and Confirm From sequence till To sequence.
Special Scenario: When rework/scrap happens on the middle non mapped operation send the reject/scrap for the next mapped operation. If 20 Mapped, 30 Non-Mapped, 50 Mapped and Reject or Scrap happens on operation 30. 42Q should send 20 Complete to 50 Reject/Scrap, i.e the Reject/Scrap happens at the next mapped operation. If there is no mapped operation the Rework/Scrap will be sent for the last operation 20 Complete to 50 Reject/Scrap.
Business Rule (If Milestones are used on SAP): Completion operation should always be a milestone/ mapped on 42Q.
Common Issues on SAP
Figure 69: Common Issues on SAP
