Difference between revisions of "SOP-42Q-MES0025 Serialized Item Tracker"
Disha Sharma (talk | contribs) |
Disha Sharma (talk | contribs) |
||
| Line 685: | Line 685: | ||
|} | |} | ||
| − | <br> | + | <br> |
| − | |||
| − | |||
| − | |||
| − | |||
| − | |||
| − | |||
| − | |||
| − | |||
Revision as of 14:54, 9 June 2017
42Q Home > Shop Floor Control > Production Control > Serialized Item Tracker
This edition applies to MES15 Portal 1.0 Application and all subsequent releases and modifications until otherwise indicated in new revisions.'
Contents
- 1 Serialized Item Tracker
- 1.1 Functionalities Executed from Serialized Items ListHeader
- 1.1.1 Accessing SIT Application
- 1.1.2 Serialized Item Tracker List
- 1.1.3 Edit (Update)
- 1.1.4 Process (Return/Obsolete/Damage)
- 1.1.5 Resend
- 1.1.6 Additional Information
- 1.1.7 Print/Export or Print/Export Filtered
- 1.1.8 SIT Batch Traveler
- 1.1.9 Receive
- 1.1.10 Receive PTS
- 1.1.11 Part x Sit Type
- 1.1.12 Location x Sit Type
- 1.1 Functionalities Executed from Serialized Items ListHeader
- 2 Appendix A
- 3 Appendix B
- 4 Document Revision History
Serialized Item Tracker
The Serialized Item Tracker (SIT) is a 42Q module designed for effectively creating and importing large numbers of serialized components to be used in the manufacturing process. It eliminates much of the overhead of creating serial numbers one at a time. The serialized components can be created based on a starting serial number and algorithm or from a list of serial numbers scanned or copied from a text file.
The SIT can receive, return, and make obsolete a range of serialized items. Serialized Item Ranges will be stored in a new SIT_Range table in the database. Each item in the range is exploded into the serial table as tracked components. The assignment of these items to units will be done with standard SFDC technology. There are reports and EDI extracts that will be written to support SIT. These reports and extracts are not been defined in this document as they will most likely be written outside MDS.
SIT also manages and sends e-mail alerts of the serialized items consumption by low and very low watermarks.
Functionalities Executed from Serialized Items ListHeader
Accessing SIT Application
To access the SIT Serialized Item Tracker, navigate to Shop Floor Control > Production Control > Serialized Item Tracker.
Figure 1: Serialized Item Tracker
File:SOP-5-I-MES0025-C Serialized-Item-Tracker.jpg
To list and search Serialized Items, click on Serialized Item.
The SIT Range List displays:
Figure 2: SIT Range List
The user is able to perform the following actions from the SIT Range List: Receive, Receive (PTS), Edit, Process, Resend, Additional Info, SIT Batch Traveler, Print/Export, and Print/Export Filtered Ranges.
Figure 3: Search Using "Filter" Button
There are three available fields by which to search: Status, Type, and Filter By. Enter the information and click Filter.
Figure 4: Searching by Status
Figure 4 Searching by Status.jpg
The serialized items created by SIT have a status. The current statuses are Received, Returned, Damaged and Obsolete. See the following descriptions for each:
- Received: Serial number created (SFDC status is the same as the location where the serial was created).
- Returned: Returns a range of serials, a specific serial or all serials (change SFDC status to "50-Killed").
- Damaged: Serial item damaged (change SFDC status to "50-Killed").
- Obsolete: Serial will not be used anymore but continues to exist. No longer in use or valid (change SFDC status to "50-Killed").
1. To search, select a status and click Filter.
Figure 5: Searching by Type
There are four types available: COA label, EUI-48-Intel-MAC, Manually Entered, and Non-SN Batch. Selecting a type will display serial number ranges already created for all statuses (receive, obsolete, damage, return).
1. To perform a search, select a type and click on Filter.
Figure 6: Searching by "Filter by":
1. To perform a search using the "Filter by" field, select one of the available options (Part Number, Serial Number, PO, PO Line, Packing List, or Create User) and enter the information into the value field accordingly.
2. Select Filter.
Serialized Item Tracker List
The Serialized Item Tracker main page shows a list of locations that are based on the actual SFDC Configuration,
Figure 7: Serialized Item Tracker Range List
Edit (Update)
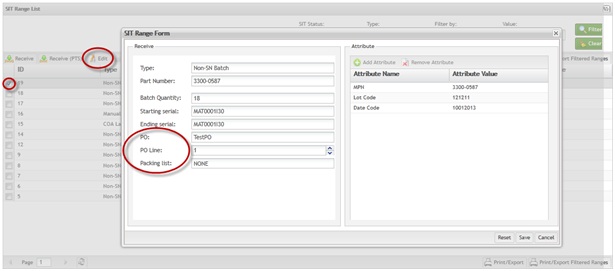
The Edit portlet can be used to make changes to the PO, PO line, and Packing List information.
1. To use the edit portlet, select the serial number and click Edit. The SIT Range Form displays.
Figure 8: SIT Range Form
2. Enter new values for:
- PO: The Purchase Order of the range being received.
- PO Line: The Line Number of the Purchase Order above.
- Packing List: The shipping number of the range being received.
3. Select Save. The updates are saved and the list is refreshed.
Process (Return/Obsolete/Damage)
For Return, an RMA (Return Material Authorization) number is required for the new range. The application saves this information for historical reporting.
This portlet allows the user to return a range, all available units, or a single serial item number to a vendor according to the chosen option in the Process page. The range is stored in the SIT_Range table as "Returned" for Return, "Obsolete" for Obsolete and "Damaged" for Damage.
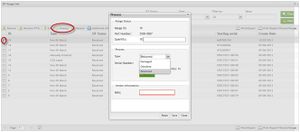
1. To modify an existing serial, select a serial number and click Process. The Process pop-up window appears.
2. In the Process section of the Process window, select a Type from the drop-down box.
Figure 9: Process
The following information can be entered in the page, Range ID, Part Number, and Available Units associated to the
percent of the available units to be returned.
Return/Obsolete/Damage "All Available Units"
An Operation Summary page is displayed with the result of the operation. All available units must be returned/obsolete/damaged and must be inserted in the Serialized Items List with a new status and serial range information.
Result: An Operation Summary page is displayed with the result of the operation. All available units are returned/obsoleted/damaged and a new line on "Serialized Items List" with the new status is inserted. After any operation, the serial numbers do not appear as available units.
Return/Obsolete/Damage "Single Serial"
An Operation Summary page is displayed with the result of the operation. The single unit must be returned/obsoleted/damaged and must be inserted as a new line on "Serialized Items List" with the new status and the serial number information.
Result: An Operation Summary page is displayed with the result of the operation. The Single Serial is returned/obsolete/damaged and a new line on "Serialized Items List" with the new status is inserted. After a return operation, the returned serial numbers do not appear as "available units".
Return/Obsolete/Damage "Serial Range"
An Operation Summary page is displayed with the result of the operation. The serial range filled in must be returned/obsolete/damaged and must be inserted as a new line on "Serialized Items List" with the new status and the serial range information. After any operation, the serial range returned does not have to appear as "available units".
Result: An Operation Summary page is displayed with the result of the operation. Serial range units are returned/obsolete/damaged and a new line on "Serialized Items List, with the new status is inserted. After any operation, the serial numbers do not appear as "available units".
Choose one of the available options to return/obsolete or damage (all available units, single serial, or a range (starting and ending serials).
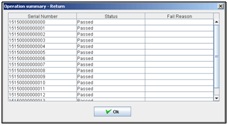
An operation summary is returned.
Figure 10: Operation Summary
In this summary you can see all returned/obsolete/damaged serial numbers, statuses, and fail reasons.
A new line with the new status is created in the serialized list.
Resend
This functionality allows the user to create an attribute for an SIT Range. This triggers another process to send an EDI file to the vendor.
Figure 11: Serialized Item Tracker List - Resend
1. To resend a serial range, check the box of a range and select Resend. A confirmation message is displayed.
2. Select Yes to complete the action (or No to cancel). A confirmation message displays, and the serialized items are resent.
Additional Information
This Topic discusses the basic information of a selected range as Range ID, Part Number, Quantity and Serial Number List.
Figure 12: Serialized Tracker List - Received
1. To use the Additional Info portlet, check the box of a serial range with a Received status from the list and select Additional Info. The information of the selected range will be displayed, including Range ID, Part Number, Quantity and Serial Number List.
2. Select Print/Export Serial Numbers to display the page that will allow the user to select the status desired. The Print Label option is available. The following report is displayed:
Figure 13: Export Serial Numbers Report Viewer
Print/Export or Print/Export Filtered
This section covers the print/export portlet on the main SIT Range List page. This portlet is used to Print or Export a selected range or a single serial number.
Figure 14: Serialized Items List – Print/Export
1. Select Print/Export or Print/Export Filtered Ranges in the Serialized Items Tracker list.
2. A PDF report is generated that the user may print or save.
Figure 15: Print/Export Report
Figure 16: Print/Export Filtered Ranges Report
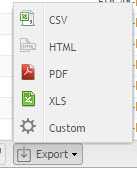
Exporting can also be performed with multiple file formats:
- CSV
- HTML
- PDF
- XLS
To perform this action
1. Select Export at the bottom of the SIT Range List menu:
Figure 17: Export Menu
2. Select the format into that which you want to export the file. The file is exported and downloaded to the system in the format selected.
Similarly, the Custom function can be used to export the information into multiple file formats. To use this function
1. Select Export at the bottom of the SIT Range List screen.
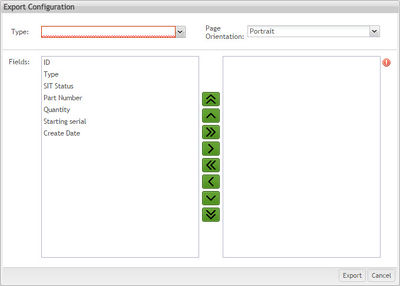
2. Select the Custom option. This opens the Export Configuration window.
Figure 18: Export Configuration Window
3. Select the file Type to which to Export the file.
4. Select the Page Orientation from the drop-down.
5. Select the fields to be included in the exported file. Only the fields selected will be displayed in the exported files.
NOTE: The arrow and chevron icons are used to select the fields to be included in the report and also allow the user to determine the order in which the fields will appear in the same report.
SIT Batch Traveler
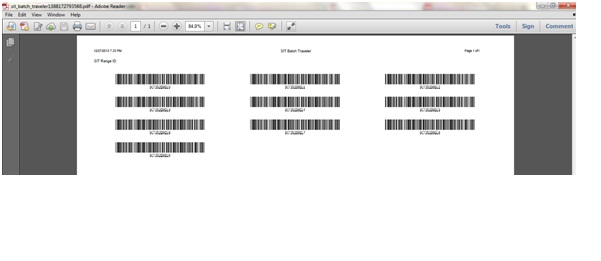
This section instructs users about the SIT Batch Traveler portlet. This portlet prints all the serial numbers that make up a selected range.
Figure 19: Serialized Tracker List - SIT Batch Traveler
1. To use the SIT batch traveler, select SIT Batch Traveler from the SIT Range List main page. This generates a PDF batch report that the user may save or print.
Figure 20: Batch Report
Receive
This portlet allows a user to receive (create) a range of serialized items. The user specifies the beginning and ending serial number, part number, and other miscellaneous attribute data. The range is stored in the SIT_Range table as "received" SIT status and has the same status as the location where it was created (see Location x SIT Type). Individual items are created in the database as tracked components. A serial number algorithm for the part number needs to be created and released to support generating serial numbers for the defined range.
NOTE:
SIT works with just with two algorithm types:
1. Shop Order Algorithm (created using the Algorithm Tool).
2. Manually encoded Algorithm.
The serial numbers are created and associated to the location (and unit status) that was defined on Location x Sit Type. The following attributes are linked to each serial number:
- SIT Range Pointer
- SIT Serial Number
- SIT Date Code
- SIT Lot Code
- SIT Manufacturer Part Number
- SIT PTS ID (only in case of a PTS receive)
The algorithm is updated with the last serial number received.
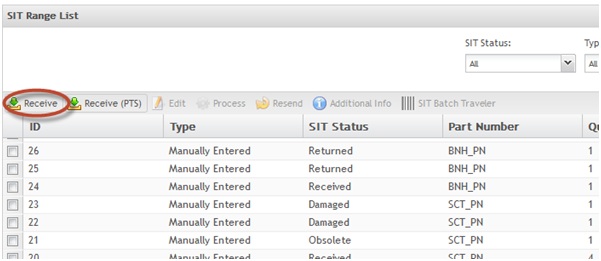
1. To start the receive process, select Receive from the SIT Range List main page.
Figure 19: Receive
2. Click on Receive button.
Figure 21: SIT Range Form for Non SN Batch, COA Label and EUI-48 types
3. Complete the Type,Part Number, Quantity, and Starting Serial fields.
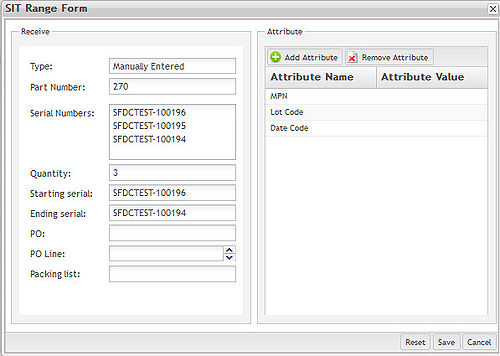
NOTE: After entering the mandatory fields, the Print Label pop-up for receive units is displayed. The user can fill the mandatory fields to print the label or cancel to proceed with the receive task. When Manually Entered is selected, the Quantity, Starting serial and Ending serial fields are disabled. A multi-line text box appears to be filled with the serials. Paste in a list of serial numbers in the text box, one serial number per line. The quantity field will be automatically updated with the number of serial numbers in the text box. Then select Ok. These serial numbers will be used instead of calculating serial numbers from an algorithm.
A new generic attribute (project:receive_sit_range_default_optional_attributes) will control which attributes will be prompted when receiving a serial number range. The default attributes are "LOT Code, Date Code, MPN". These attributes can be added to, removed, or replaced with new attribute values. Default attribute values will be comma separated items, allowing for multiple default attributes to be configured.
To edit, double click on the attribute name.
To add, click on Add Attribute, enter the data and click on Update to commit.
To remove, select the attribute and click on Remove Attribute. Click on Yes to confirm.
Figure 22: Manually Entered Type
Part Number: The user selects one part number from the drop-down list, depending on the selected type.
Batch Quantity: Calculated if the starting and ending serial fields are populated. If the Starting serial and a specific quantity are entered, the system calculates the ending serial. If the starting serial and ending serial are populated, the quantity field is disabled.
PO: The Purchase Order of the range being received.
PO Line: The Line Number of the Purchase Order above.
Packing List: The shipping number of the range being received.
4. After all fields are populated, a confirmation message is displayed.
5. Click on Yes to confirm the range creation or No to cancel. The created range is displayed in the SIT list.
Non-SN Batch
Always create a batch serial number. The batch serial number quantity is determined by the receive quantity.
If the part number is assigned to an algorithm, the serial number will be validated accordingly; otherwise no validation will occur.
Receive PTS
This functionality is used by the plants that need traceability. This is controlled using a new set of screens and portlets in profile management, so only users with access to this screen can see or use it. Conversely, if the existing screen should not be shown in a specific project, it should not be assigned to any profile.
Receive PTS Steps:
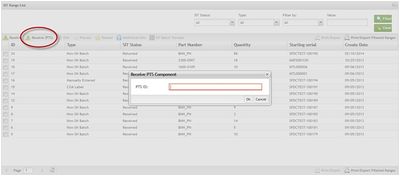
1. Check Receive (PTS) in the SIT Range List page. The Receive PTS Component pop-up appears.
Figure 23: Receive PTS
2. Enter a PTS ID.
3. If the PTS ID information is not stored in the MDS tables, then jMDS tries to connect to the PTS database and imports PTS information for the PTS ID (like PTS ID’s Part Number, Date Code, Lot Code, MPN). The next time that same PTS ID is entered, jMDS will not have to connect to the PTS database.
NOTE: The process to import PTS ID data is as follows:
- jMDS checks if the PTS ID is on MDS database.
- If found, the PTS information in MDS database will be displayed.
- If not found, jMDS will try to get connect to the PTS database.
- If PTS records are found, the information will be imported (i.e., copied) to MDS database.
- If no PTS records are found, a warning message will be displayed stating that the PTS ID is invalid.
4. Select Ok using a valid PTS ID. The Sit Range screen will open showing the imported data.
Figure 24: SIT Range
NOTE: The Range Type is always Manually Entered. Because of this, the combo box is disabled. The Part Number, Date Code, Lot Code, and MPN will contain the imported PTS information and is disabled for editing.
5. Use the Edit portlet is available for PTS to update the PO, PO Line and Packing List information. If the generic attribute update_pts_data is defined as "Yes," the Date Code, Lot Code and MPN information will be available for editing as well.
Part x Sit Type
This section covers how a part number can be assigned or unassigned to an SIT type. To access the Part x Sit Type module navigate to the Serialized Item Tracker main page (Shop Floor Control > Production Control > Serialized Item Tracker) and select Part x Sit Type.
Figure 25: Part SIT Type
The SIT Type List page displays:
Figure 26: SIT Type List
1. To edit a SIT type, check the box of a SIT type from the list and click Edit. The Part x Type list is displayed.
Figure 27: Add Part x SIT Type
2. To add an association, click on Add Part x SIT Type in the Tasks panel.
Figure 28: Add Part x SIT Type
3. Select a part number to be associated and click on Save. The selected part number will disappear from this list and will be displayed in the SIT type list, for the previously selected type. To cancel this action, select Cancel.
Editing a SIT Type:
The rules for editing SIT Types are the same for COA, MAC or Manually Entered:
1. Select Edit to edit a MAC Address or COA Label Type. The Edit page is displayed.
Figure 29: Part x Type List – Edit Part SIT Type
Figure 30: Part x SIT Type Form
NOTE: Unless the user checks the check box "Do you want to manage the LVM and VLVM?" this page will not be available for editing.
- Low Water Mark: This is a value set by the user to trigger an alert when the available SN quantity for that part number is low and needs attention. This is defined when the user intends to manage the available quantity of SN. When the LWM is reached, e-mail alerts are sent for the registered addresses.
- Very Low Watermark: This is a value set by the user to trigger an alert when the available SN quantity is very low and has become a critical situation. When the VLWM is reached, e-mail alerts are sent for the registered addresses.
2. After checking the "Do you want manage the LVM and VLVM?" box, the data can be edited.
3. The N&E Rule ID field allows users to configure a specific rule in the Notification & Escalation regarding to send e-mails. If there is a previous configured rule in the N&E, just type the rule name in this field and it will be executed. In the other hand, if there is no configured rule on N&E, the Default Rule already configured will be executed.
4. Type a user name and click on add icon for the LWM and VLWM CC E-mail. The e-mail list box is populated with the e-mail from the CC E-mail textbox. The user may also select Remove (All Items or Selected Items) for the LWM and VLWM CC E-mail. This removes the selected e-mail from the e-mail list.
NOTES:
- Selected users will receive e-mails frequently, unless they are removed from the list.
- ACRON job must be configured to send the emails.
Figure 31: Part x Type List - Disassociating Part Numbers
1. To delete a part x SIT type, select a part number to delete and click Delete.
NOTE: This selected part number will not be deleted from database per se; it will just be unassigned from the selected SIT type.
2. Select Yes to confirm, or No to cancel.
Location x Sit Type
This section covers how a location can be assigned or unassigned to a SIT type.
To access the Location x SIT Type module, navigate to Shop Floor Control > Production Control > Serialized Item Tracker and select Location x SIT Type from the SIT main page.
Figure 32: Location x SIT Type
1. To edit the Location, check the box of an SIT type in the list and select Edit.
Figure 33: SIT Type List
2. Edit the location and select Save to confirm the updates, or Cancel to abort.
Figure 34: SIT Type Form
NOTE: If the SIT Type already has received SIT Range, it will not be possible to change its location (see the image above).
Appendix A
Acronyms
Acronyms are abbreviations, such as LDAP, MDS, and SFDC, written as the initial letter or letters of words, and pronounced on the basis of this abbreviated written form. By developing these acronyms, it is not necessary to write the complete name all the time in the guide.
| COA Certificate of Authenticity |
Appendix B
Glossary
This glossary is a list of terms with the definitions for them.
Administrator
The System Administration has full access - all plants, all reports, all users.
Component
A component is a specific piece of data that appears on a label, for example: bar code, part numbers, graphic images, line or text. Hence, label components are broken down into several different types: text, graphic images, MDS database values, or a combination of text and database values.
Framework
In software development, a framework is a defined support structure in which another software project can be organized and developed. A framework may include support programs, code libraries, a scripting language, or other software to help develop and glue together the different components of a software project.
LVM
Low water mark – this is a value set by the user to alert when the available SN for that part number are low and it needs attention. It’s defined when the user intends to manage the available quantity of SN. Always when the LWM is reached, e-mail alerts are sent for the registered addresses.
Packing List
Packing List is the shipping number of the range being received
PO
PO is the Purchase Order of the range being received
PO Line
PO Line is the Line Number of the Purchase Order above
SFDC Configuration
The rules used to define how SFDC collects data, provides analysis, controls processing and maintains unit histories
Site Minder
Universal login of 42Q
Username
The username is the site minder username (or a partial string)
VLVM
Very low watermark - this is a value set by the user to alert when the available SN are very low and this is a critical situation.
Appendix C
| Name | Type | Required | Min length / Min value | Max length / Max value |
Notes |
| Type | alpha-numeric | x | 1 | 30 | |
| Part Number | alpha-numeric | x | 1 | 25 | |
| Quantity | numeric | 1 | 999999999 | ||
| Starting | alpha-numeric | x | 14 | 14 | mask: AAAAA######### / The last 9 numbers must be minor to the Ending value |
| Ending | alpha-numeric | 14 | 14 | mask: AAAAA######### / The first 5 characters must be equals to the Starting value | |
| PO | alpha-numeric | 1 | 30 | ||
| PO Line | numeric | 1 | 9999999 | ||
| Packing List | alpha-numeric | 1 | 30 |
Document Revision History
| Date | Author | Title | Version | Change Reference |
| 14/01/06 | Elaine Fonaro | Tech Writer | 1.0 | Initial User’s Guide |
| 02/17/14 | Dane Parker | Tech Writer | 1.0 | General review and new screen capture |
| 02/28/14 | Elaine Fonaro | Tech Writer | 1.0 | Review and format for WIKI |
| 07/28/14 | Elaine Fonaro | Tech Writer | 1.0 | Update Receive: A new generic attribute (project:receive_sit_range_default_optional_attributes) will control which attributes will be prompted when receiving a serial number range in SIT |
| 04/27/16 | Elaine Fonaro | Tech Writer | 1.0 | Converted to 42Q |
| 05/10/16 | Elaine Fonaro | Tech Writer | 1.0 | Update Logo |
| 05/31/16 | Elaine Fonaro | Tech Writer | 1.0 | Added new images regarding the N&E Rule ID field and the rule for this field |


