Difference between revisions of "42Q-MES0168 NetSuite Adapter"
| Line 1,459: | Line 1,459: | ||
| | ||
| − | |||
| − | + | = <span class="mw-headline" id="Scheduling_Scripts"><span class="mw-headline" id="Scheduling_Scripts"><span class="mw-headline" id="Scheduling_Scripts"><span class="mw-headline" id="Scheduling_Scripts"><span class="mw-headline" id="Scheduling_Scripts"><span class="mw-headline" id="Scheduling_Scripts"><span class="mw-headline" id="Scheduling_Scripts"><span class="mw-headline" id="Scheduling_Scripts"><span class="mw-headline" id="Scheduling_Scripts"><span class="mw-headline" id="Scheduling_Scripts"><span class="mw-headline" id="Scheduling_Scripts"><span class="mw-headline" id="Scheduling_Scripts"><span class="mw-headline" id="Scheduling_Scripts"><span class="mw-headline" id="Scheduling_Scripts"><span class="mw-headline" id="Scheduling_Scripts"><span class="mw-headline" id="Scheduling_Scripts"><span class="mw-headline" id="Scheduling_Scripts"><span class="mw-headline" id="Scheduling_Scripts"><span class="mw-headline" id="Scheduling_Scripts"><span class="mw-headline" id="Scheduling_Scripts"><span class="mw-headline" id="Scheduling_Scripts"><span class="mw-headline" id="Scheduling_Scripts"><span class="mw-headline" id="Scheduling_Scripts"><span class="mw-headline" id="Scheduling_Scripts"><span class="mw-headline" id="Scheduling_Scripts"><span class="mw-headline" id="Scheduling_Scripts"><span class="mw-headline" id="Scheduling_Scripts"><span class="mw-headline" id="Scheduling_Scripts"><span class="mw-headline" id="Scheduling_Scripts"><span class="mw-headline" id="Scheduling_Scripts"><span class="mw-headline" id="Scheduling_Scripts"><span class="mw-headline" id="Scheduling_Scripts">Scheduling Scripts</span></span></span></span></span></span></span></span></span></span></span></span></span></span></span></span></span></span></span></span></span></span></span></span></span></span></span></span></span></span></span></span> = | |
| − | #XX42Q WO Retry Schedule Job | + | There are eight 42Q-related scheduled scripts that utilize native NetSuite Scheduled Scripts: |
| − | + | ||
| − | + | # | |
| − | + | '''XX42Q WO Retry Schedule Job''' | |
| − | + | ||
| + | <ul style="margin-left: 40px;"> | ||
| + | <li> | ||
| + | A Scheduled script that processes the Mass order creation XMLs, failed WO Create and update XMLs. | ||
| + | </li> | ||
| + | </ul> | ||
| + | <ol start="2"> | ||
| + | <li> | ||
| + | '''XX42Q Retry LargeWO process''' | ||
| + | </li> | ||
| + | </ol> | ||
| + | <ul style="margin-left: 40px;"> | ||
| + | <li> | ||
| + | A Schedule script to pick Large order Create and Update XMLs. | ||
| + | </li> | ||
| + | </ul> | ||
| + | <ol start="3"> | ||
| + | <li> | ||
| + | '''XX42Q Wip Move Retry Scheduled Job''' | ||
| + | </li> | ||
| + | </ol> | ||
| + | <ul style="margin-left: 40px;"> | ||
| + | <li> | ||
| + | The Failed WIP transactions will be picked and reprocessed by WIP Move Retry Scheduled Job every 15 mins for a 24hrs time period from the WIP record creation date. | ||
| + | </li> | ||
| + | </ul> | ||
| + | <ol start="4"> | ||
| + | <li> | ||
| + | '''XX42Q Material Transaction Scheduled Job''' | ||
| + | </li> | ||
| + | </ol> | ||
| + | <ul style="margin-left: 40px;"> | ||
| + | <li> | ||
| + | The Failed MAT transactions will be picked and reprocessed by Material Transactions Schedule Job every 15 mins for a 24hrs time period from the MAT record creation date. | ||
| + | </li> | ||
| + | </ul> | ||
| + | <ol start="5"> | ||
| + | <li> | ||
| + | '''XX42Q Retry Inbound XML''' | ||
| + | </li> | ||
| + | </ol> | ||
| + | <ul style="margin-left: 40px;"> | ||
| + | <li> | ||
| + | A Schedule script to inbound WIP/MAT XML from 42Q and continue with WIP/MAT custom record creation. | ||
| + | </li> | ||
| + | </ul> | ||
| + | <ol start="6"> | ||
| + | <li> | ||
| + | '''XX42Q Update WO Status''' | ||
| + | </li> | ||
| + | </ol> | ||
| + | <ul style="margin-left: 40px;"> | ||
| + | <li> | ||
| + | A Scheduled script that scans for orders completed in the past 24hrs and send WO completion XML to 42Q, when the Built Qty matches the Workorder Qty and also there are no MAT move transaction failures. | ||
| + | </li> | ||
| + | </ul> | ||
| + | <ol start="7"> | ||
| + | <li> | ||
| + | '''XX42Q WO Posting Period Check''' | ||
| + | </li> | ||
| + | </ol> | ||
| + | <ul style="margin-left: 40px;"> | ||
| + | <li> | ||
| + | A Scheduled script that runs once a month where it picks “In Process” work orders and locks the previous month Transaction records (WCO and WOI documents). This ensures any new WIP/MAT moves are recorded in a new WCO/WOI document for the current posting month. | ||
| + | </li> | ||
| + | <li> | ||
| + | '''<u>Note</u>: '''The following are the parameters for this script that are different from the rest of the scripts. | ||
| + | |||
| + | * | ||
| + | '''Start Date = '''Today's date | ||
| + | |||
| + | * | ||
| + | '''Start Time '''= 2:00 am | ||
| + | |||
| + | * | ||
| + | '''Monthly Event '''= Radio button enabled | ||
| + | |||
| + | * | ||
| + | '''Daily Event '''= Radio button disabled | ||
| + | |||
| + | * | ||
| + | '''Repeat every 1 day '''= Radio button disabled | ||
| + | </li> | ||
| + | |||
| + | <ol start="8"> | ||
| + | <li> | ||
| + | '''XX42Q Retry WO ShipNotify''' | ||
| + | </li> | ||
| + | </ol> | ||
| + | <ul style="margin-left: 40px;"> | ||
| + | <li> | ||
| + | A Scheduled script that processes the failed Item shipment details to 42Q. | ||
| + | </li> | ||
| + | </ul> | ||
Each of these should be set to 12:00 AM based on the customer server timezone. If the Start Time is set to any other time than 12:00 AM (for example: 2:00 PM), the script will start at 2:00 PM, but then finish its hourly execution at 12:00 AM. It will not resume until the next day at 2:00 PM. | Each of these should be set to 12:00 AM based on the customer server timezone. If the Start Time is set to any other time than 12:00 AM (for example: 2:00 PM), the script will start at 2:00 PM, but then finish its hourly execution at 12:00 AM. It will not resume until the next day at 2:00 PM. | ||
If users want to deploy scheduled scripts that are scheduled to run every 15 minutes on a 24 hour basis, the following sample values should be set on the Script Deployment page: | If users want to deploy scheduled scripts that are scheduled to run every 15 minutes on a 24 hour basis, the following sample values should be set on the Script Deployment page: | ||
| − | |||
| − | |||
*'''Deployed =''' Checked | *'''Deployed =''' Checked | ||
| Line 1,502: | Line 1,592: | ||
For more information about the NetSuite documentation on Scheduled Script Best Practices, visit the next web page: [https://docs.oracle.com/en/cloud/saas/netsuite/ns-online-help/chapter_N3361671.html NetSuite documentation on Scheduled Script Best Practices].<br/> | For more information about the NetSuite documentation on Scheduled Script Best Practices, visit the next web page: [https://docs.oracle.com/en/cloud/saas/netsuite/ns-online-help/chapter_N3361671.html NetSuite documentation on Scheduled Script Best Practices].<br/> | ||
| − | |||
| − | |||
| − | |||
| − | |||
= <span class="mw-headline" id="NetSuite_Roles"><span class="mw-headline" id="NetSuite_Roles"><span class="mw-headline" id="NetSuite_Roles"><span class="mw-headline" id="NetSuite_Roles"><span class="mw-headline" id="NetSuite_Roles"><span class="mw-headline" id="NetSuite_Roles"><span class="mw-headline" id="NetSuite_Roles"><span class="mw-headline" id="NetSuite_Roles"><span class="mw-headline" id="NetSuite_Roles"><span class="mw-headline" id="NetSuite_Roles"><span class="mw-headline" id="NetSuite_Roles"><span class="mw-headline" id="NetSuite_Roles"><span class="mw-headline" id="NetSuite_Roles"><span class="mw-headline" id="NetSuite_Roles"><span class="mw-headline" id="NetSuite_Roles"><span class="mw-headline" id="NetSuite_Roles"><span class="mw-headline" id="NetSuite_Roles"><span class="mw-headline" id="NetSuite_Roles"><span class="mw-headline" id="NetSuite_Roles"><span class="mw-headline" id="NetSuite_Roles"><span class="mw-headline" id="NetSuite_Roles"><span class="mw-headline" id="NetSuite_Roles"><span class="mw-headline" id="NetSuite_Roles"><span class="mw-headline" id="NetSuite_Roles"><span class="mw-headline" id="NetSuite_Roles"><span class="mw-headline" id="NetSuite_Roles"><span class="mw-headline" id="NetSuite_Roles"><span class="mw-headline" id="NetSuite_Roles"><span class="mw-headline" id="NetSuite_Roles"><span class="mw-headline" id="NetSuite_Roles"><span class="mw-headline" id="NetSuite_Roles"><span class="mw-headline" id="NetSuite_Roles"><span class="mw-headline" id="NetSuite_Roles"><span class="mw-headline" id="NetSuite_Roles"><span class="mw-headline" id="NetSuite_Roles"><span class="mw-headline" id="NetSuite_Roles">NetSuite Roles</span></span></span></span></span></span></span></span></span></span></span></span></span></span></span></span></span></span></span></span></span></span></span></span></span></span></span></span></span></span></span></span></span></span></span></span> = | = <span class="mw-headline" id="NetSuite_Roles"><span class="mw-headline" id="NetSuite_Roles"><span class="mw-headline" id="NetSuite_Roles"><span class="mw-headline" id="NetSuite_Roles"><span class="mw-headline" id="NetSuite_Roles"><span class="mw-headline" id="NetSuite_Roles"><span class="mw-headline" id="NetSuite_Roles"><span class="mw-headline" id="NetSuite_Roles"><span class="mw-headline" id="NetSuite_Roles"><span class="mw-headline" id="NetSuite_Roles"><span class="mw-headline" id="NetSuite_Roles"><span class="mw-headline" id="NetSuite_Roles"><span class="mw-headline" id="NetSuite_Roles"><span class="mw-headline" id="NetSuite_Roles"><span class="mw-headline" id="NetSuite_Roles"><span class="mw-headline" id="NetSuite_Roles"><span class="mw-headline" id="NetSuite_Roles"><span class="mw-headline" id="NetSuite_Roles"><span class="mw-headline" id="NetSuite_Roles"><span class="mw-headline" id="NetSuite_Roles"><span class="mw-headline" id="NetSuite_Roles"><span class="mw-headline" id="NetSuite_Roles"><span class="mw-headline" id="NetSuite_Roles"><span class="mw-headline" id="NetSuite_Roles"><span class="mw-headline" id="NetSuite_Roles"><span class="mw-headline" id="NetSuite_Roles"><span class="mw-headline" id="NetSuite_Roles"><span class="mw-headline" id="NetSuite_Roles"><span class="mw-headline" id="NetSuite_Roles"><span class="mw-headline" id="NetSuite_Roles"><span class="mw-headline" id="NetSuite_Roles"><span class="mw-headline" id="NetSuite_Roles"><span class="mw-headline" id="NetSuite_Roles"><span class="mw-headline" id="NetSuite_Roles"><span class="mw-headline" id="NetSuite_Roles"><span class="mw-headline" id="NetSuite_Roles">NetSuite Roles</span></span></span></span></span></span></span></span></span></span></span></span></span></span></span></span></span></span></span></span></span></span></span></span></span></span></span></span></span></span></span></span></span></span></span></span> = | ||
Revision as of 11:37, 7 October 2024
42Q Home > Tools > NetSuite Adapter
Contents
- 1 Introduction
- 2 Assembly Item / Product Setup
- 3 Create a Work Order
- 4 Monitoring Work Order Updates
- 5 Key Value Pairs
- 6 Standard Cycle Time and Hands on Time
- 7 Bin Values from 42Q
- 8 Work Order Built And Close
- 9 Expiration Date in WIP Completion
- 10 Work Order Over Completion
- 11 Ship Notify Process
- 12 Close Work Order Form
- 13 Work Order Cancelation
- 14 Mark Work Order Built Form
- 15 Work Order Build Process
- 16 Scheduling Scripts
- 17 NetSuite Roles
- 18 Work Order Creation Error List
- 19 WIP Move Transaction Error List
- 20 WIP Material Issue Error List
- 21 Ship Notify Error List
Introduction
The NetSuite Adapter is a middleware software that has been developed for customers to seamlessly integrate their NetSuite systems with 42Q. This adapter can be installed to the customer’s NetSuite system in order to allow NetSuite users to monitor and iterate with 42Q.
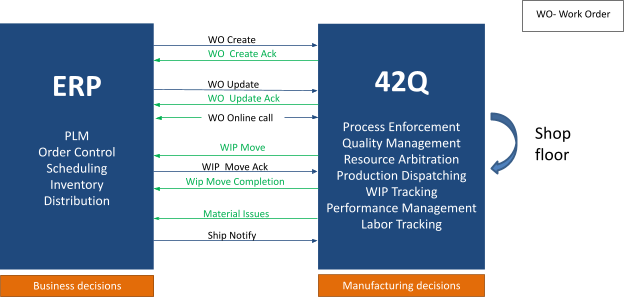
The below diagram explains the capabilities provided by these NetSuite Adapters:
Figure 1: NetSuite Diagram
To begin, users must configure the Global and Plant setups:
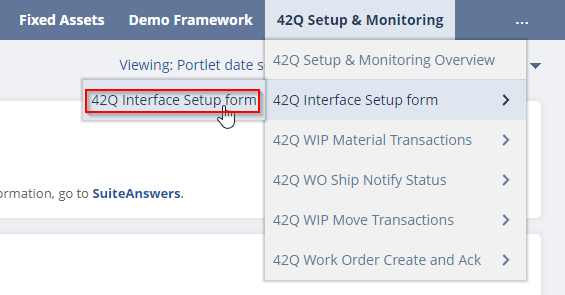
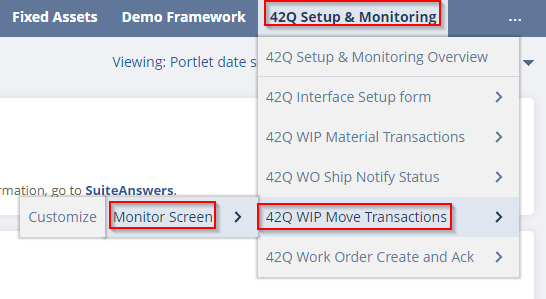
- Go to: 42Q Setup & Monitoring > 42Q Interface Setup Form > 42Q Interface Setup Form.
Figure 2: Accessing to 42Q Interface Setup form
- Add the setups manually or import them using the Import Config Files button.
Note: To be able to import the files, the config file should exist in the file cabinet.
- Define Global setups on the top header.
Figure 3: Defining Global Setups
Note: The 42Q USER NAME and 42Q PASSWORD will be provided by the 42Q team.
- Select the 42Q Plant Setup tab to define NetSuite-42Q configuration by specific location.
Figure 4: 42Q Plant Setup Tab
The information below corresponds to the 42Q Plant Setup Tab fields name and its description :
LOCATION: Netsuite Location in the subsidiary.
ORG CODE42Q ORG ID: Organization code set to link with 42Q.
CUSTOMER CODE: Customer code set to link with 42Q.
NOTIFICATION TO EMAILID: Not a required field
NOTIFICATION FROM EMAILID: Not a required field
JOB TYPE: Field required for work order creation
JOB CLASS: Field required for work order creation
ASSY REVISION: Field required for work order creation
ASSY REVISION DESC: Field required for work order creation
ROUTING REVISION: Field required for work order creation
SCHEDULE FLAG: Field required for work order creation
AVAILABLE 24HRS FLAG: Field required for work order creation
SCHEDULE PRIORITY: Define from which field to pick the order priority.
ASSIGNED UNITS: Field required for work order creation
ADVANCE BOM: Advance BOM is enabled or disabled for this location.
OVERCOMPLETION PERCENTAGE: Overcompletion percentage for the plant.
DEFAULT BIN: Default global bin for the plant.
SHOW PHANTOM: Send phantom in the BOM.
ONLINECALL ROUTING COMPONENTS: On manually changing routing and components. This flag will check the 42Q order for not release status before allowing the update when set as 'YES'.
ONLINECALL STATUS COMPLETE: On manually changing order status to 'BUILT'. This flag will check the 42Q order status for not release before allowing the update when set as 'YES'.
LARGE ORDER ITEM LIMIT: Define the large BOM order limit.
BUILT STATUS VALIDATION: The work order status will not change to ‘BUILT’ if any material issue or backflush fails.
42Q PULLBIN: Consider only 42Q pull bin for material backflush.
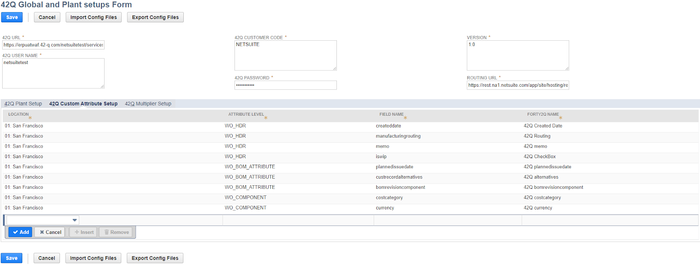
- Select the 42Q Custom Attribute Setup tab to define the mapping of custom attributes from NetSuite with 42Q attribute names. Users need to use the attribute ID from NetSuite in the FIELD_NAME and give the attribute name they want to see on the 42Q side in the FORTY2Q_NAME field.
Figure 5: 42Q Custom Attribute Setup Tab
- Select the 42Q Multiplier Setup tab if customers are using a different unit of measures other than each, like thousands or ten thousand. To send the correct work order quantity, users must set up a unit and multiplier for it, so the work order quantity is converted based on the multiplier and sent to 42Q individually.
- Select Save to save all changes.
Figure 6: 42Q Multiplier Setup Tab
- Select Add File and choose the configuration file.
Figure 7: Add a File for Import
Assembly Item / Product Setup
- On the search bar, enter the product for product setup 42Q-MUG.
- A list will be displayed, choose the options that say 42Q-MUG, and next to it, click Edit.
Figure 8: Assembly/Bill of Materials: 42Q-MUG
- Change the value of CUSTOM FORM to Standard Group Item Form so you can see a new tab at the bottom.
- Scroll all the way down, click on the 42Q tab and make sure the option RELEASED TO 42Q is checked.
- In the option WORK ORDER EXTRACTS * select one of the following options:
- Default: Select this option if you want to send WO Header, WO Route or Flex field.
- System build: Select this option if you want to send WO Header, WO Route or BOM Item.
- Click on the Save button.
Figure 9: 42Q Tab
Create a Work Order
- On the menu bar, go to: Transactions > Manufacturing > Enter Work Orders.
- Change the value of CUSTOM FORM * to Job Creation Job Order.
- A new window will appear, change the value of SUBSIDIARY * to Honeycomb Mfg.
- Then in the LOCATION field, select 01 San Francisco.
- Change the value of the ASSEMBLY field to 42Q-MUG (the item with 42Q setup in Assembly Item / Product Setup section).
- In the field ORDER #, enter the order number.
- If you want to send the route’s information which is your operation sequences to 42Q, then check the WIP box (the MANUFACTURING ROUTING option will be selected automatically).
- Click the Save button.
Figure 10: Filling out Work Order Data
Work Order Priority:
Work Order Priorities can be defined within: 42Q Setup & Monitoring > 42Q Interface Setup Form > 42Q Interface Setup Form > 42Q Plant Setup > Schulde Priority field.
‘SCHEDULE_PRIORITY’:‘CUSTOM’ will use the custbody_cust_priority custom NetSuite field to send the order priority to 42Q in the SCHEDULE_PRIORITY XML tag.
Users can send these other fields as well in the ‘schedule_priority’ field:
- Customer - customer priority
- Location - location priority
Figure 11: Work Order Priority Value
Figure 12: Schedule Priority Value
Large BOM Work Order:
Work Orders with Large BOM quantities (greater than 50) can be sent to 42Q through the 42Q NetSuite adapter as scheduled Work Orders. Scheduled scripts are set to run every 15 minutes by default. If a plant has a large BOM order, enable the setting by configuring "LARGE_ORDER_ITEM_LIMIT":"50" within: 42Q Setup & Monitoring > 42Q Interface Setup Form > 42Q Interface Setup Form > 42Q Plant Setup.
Figure 13: Large BOM Work Order Example
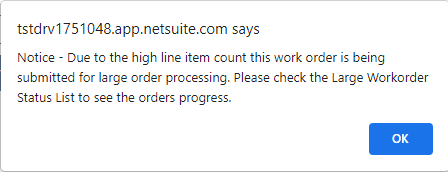
Figure 14: Warning Message
Note: A warning is displayed when a Large BOM order is released.
Mass Create Work Order:
To mass create a Work Orders, navigate to: Transactions > Manufacturing > Mass Create Work Orders.
Work orders are generated when the assembly backorder quantities are equal and greater than to build point. After reaching the build point, a work order is added in the Mass Create Work Orders queue. After submitting the record, the work order is automatically generated.
Figure 15: Recorder Point Items Tab
Figure 16: Process Status Form
Figure 17: Processed Items Form
Figure 18: Created Work Order
Note: The Work Orders are created in Planned status. Example: Product: 42Q-MUGTH.
Next, users must release the Work Order, so that 42Q receives the Work Order.
Figure 19: Released Work Order
Figure 20: Work Order Received In 42Q
Mark Work Order Released:
To mark Work Orders as ‘Released’, navigate to: Transactions > Manufacturing > Mass Create Work Orders.
Mark Work Order form allows mass release of work orders which are in planned status. Mark work orders are sent to 42Q as part of a schedule script, which is set to run every 15 minutes by default.
Figure 21: 'Mark Work Order Released' Form Page In NetSuite
Figure 22: 'Mark Work Order Released' Process Status Page (In Progress)
Figure 23: 'Mark Work Order Released' Process Status Page (Complete)
Figure 24: Work Order Create and Ack Monitoring Screen
Figure 25: Work Order Create and Ack Results Monitoring Screen
Figure 26: Work Orders Successfully Received On 42Q
Monitoring Work Order Updates
Update / Change
Users can update or change the information of a work order (e. g. change the quantity) by following the next steps:
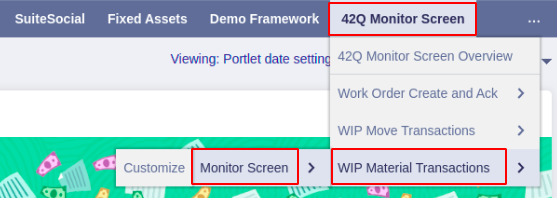
- On the menu bar, go to: 42Q Monitor Screen > Work Order Create and Ack > Monitor Screen.
Figure 27: Work Order Monitor and Acknowledge Monitor Screen
- In the TRANSACTION NAME column, click on any work order.
Figure 28: Work Order Create and Ack Table
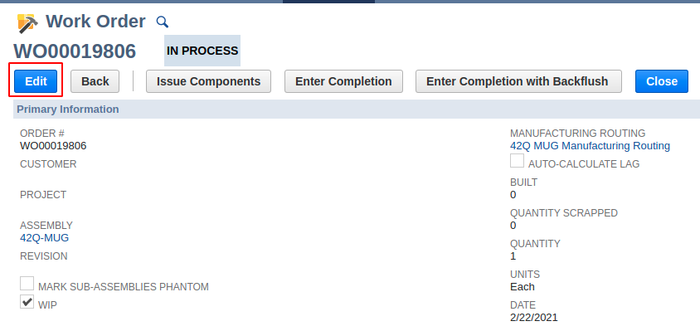
- A new window will be displayed, click on Edit.
- Make any changes (e.g. QUANTITY).
- Click the Save button.
Figure 29: Edit Work Order
- If users want to check if it was successfully updated, click on the Back button to return to Monitor Screen.
The adapter also supports re-release of order. When an order is released to 42Q but it is in status: Not Release ‘N’ on 42Q, users can change the work order status to Planned on NetSuite, and then release the order again by setting the order status to Release. But if the work order is already released on 42Q, the adapter will not allow to change the status on NetSuite from Released to Planned, and will display the next error: 'Status change not allowed as order is released in 42Q'.
Figure 30: Error Message
WIP Move Transactions
Users can view Work Order WIP Move Transactions by following the next steps:
- On the menu bar, go to: 42Q Monitor Screen > 42Q WIP Move Transactions > Monitor Screen.
Figure 31: 42Q WIP Move Transactions Monitor Screen
- Click on any WORK ORDER NUMBER.
Figure 32: WIP Move Transactions Table
- A new window will be displayed, at the bottom, there is a menu bar, select the Netsuite-42Q Interface tab.
- Click on the WIP Move Transactions option.
- When you complete your orders in the 42Q system, click on the Close button.
Figure 33: WIP Move Transactions NetSuite 42Q Interface
Figure 34: Save WIP Move Transactions Changes
- On the new window, click Save.
WIP Material Transactions
There are two types of Materials (BOM Components):
- PULL: Standard backflush items, which doesn’t require serial or lot type traceability.
- Assembly Pull: Backflush happens on a unit completion.
- Operation Pull: Backflush happens on completion of corresponding Backflush Operation.
- PUSH: It is generally referred for the items which require tracking, like lot numbered or serial numbered inventory items. 42Q sends Material issues for only Push types of materials.
Material Issues are seen at the work order level under ‘WIP_Material Transactions’.
Figure 35: WIP Material Transactions Tab
Note: 42Q NetSuite interface supports over completion and under completion of BOM items.
Lot type material consumption: 42Q sends material issues for lot type materials as well. You can setup components on 42Q with the following three types:
- Non Tracked with Quantity: This type of component item sends the lot number and the quantity consumed to NetSuite on material consumption. Lot doesn’t have to exist in the 42Q for consumption.
- Consume from NSB: This type of component item sends the lot number and the quantity consumed to NetSuite on material consumption. Lots and quantities to be consumed, should exist in the 42Q.
- Non Serialized Batch: This type of component item only sends a lot number back to NetSuite on material consumption.
Figure 36: Material Lot And Quantity Consumed On 42Q
Figure 37: Material Transaction Received on NetSuite
The ‘Used in build’ quantity will be updated with the quantity received from 42Q.
Figure 38: Used In Build Values
Under the related records of work order issue, the consumed quantity and lot number will be recorded.
Figure 39: Recorded Quantity And Lot Number
Note: For duplicated items if no or same operation sequences are assigned, the material issue happens for the first occurrence of material in BOM.
Users can view Work Order WIP Material Transactions by following the next steps:
- On the menu bar, go to: 42Q Monitor Screen > WIP Material Transactions > Monitor Screen.
Figure 40: 42Q WIP Material Transactions Monitor Screen
- Click on any WORK ORDER.
Figure 41: 42Q WIP Material Transactions Table
- A new window will be displayed, at the bottom, there is a menu bar, select the Netsuite-42Q Interface tab.
- Click on the WIP Material Transactions option.
- When you complete your orders in the 42Q system, click on the Close button.
Figure 42: WIP Material Transactions NetSuite 42Q Interface
- On the new window, click Save.
Figure 43: Save WIP Material Transactions Changes
Phantom Items as Component Item (Bill of Material):
To send phantom details in the component list to 42Q use the ‘SHOW_PHANTOM’ field in the: 42Q Global and Plant Setup Form > 42Q Plant Setup tab > Show Phantom field.
If the SHOW_PHANTOM is set as ‘YES’, the Phantom item and Phantom Child items details in the component list will be sent to 42Q.
Figure 44: SHOW_PHANTOM Value Set To ‘YES’
Figure 45: Component List On 42Q
If the SHOW_PHANTOM is set as ‘NO’, only the Phantom child item details in the component list will be sent to 42Q.
The Phantom Item is not sent in the BOM, only the phantom child’s are sent:
Figure 46: BOM Data Sent to 42Q
Routing Updates
The updates supported under Routing from NetSuite to 42Q are the following:
- Edit an operation restricted to release status only: Operation name.
- Edit setup time.
- Edit run rate.
- Edit cost template (no update will be sent to 42Q).
- Edit manufacturing work center.
- Adding a new operation sequence.
Key Value Pairs
Key Value Pairs (Custom Attributes) allows users to send custom fields or native fields, which are not part of the standard adapter from ERP to 42Q.
Key value pairs can be sent from the following 4 ERP levels:
- Work Order (shop order)
- Work Order Assembly (shop order part number)
- BOM Item (shop order BOM component part)
- Work Order BOM Item (specific to work order)
To send these custom attributes, users need to follow the next steps:
- Go to: 42Q Setup & Monitoring > 42Q Interface Setup Form > 42Q Interface Setup Form > 42Q Custom Attribute Setup.
- Select Location for which the custom attribute should be sent with the work order created.
- Select an Attribute Level, and choose from the 4 levels defined.
Figure 47: Choose an Attribute Level
- To perform the mapping of the custom attribute field, set FIELD_NAME = Field ID from NetSuite as in Figure 48.
- Set the 42Q generic field name called FORTY2Q_NAME = Field name to be displayed on 42Q as in Figure 48.
Figure 48: Custom Attributes Setup
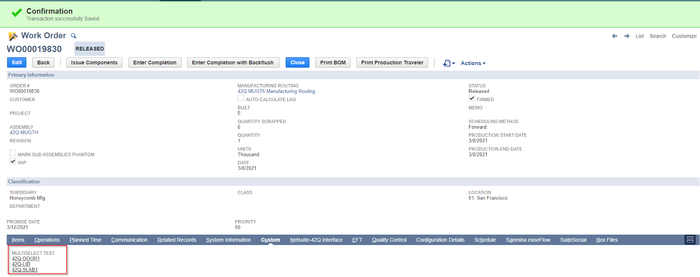
Note: If custom fields have multiple inputs, the adapter comma separates them and sends them to 42Q.
Figure 49: Custom Tab
Figure 50: Custom Data Sent to 42Q
Figure 51: Data Received By 42Q
Note: COMPONENT_PART_ATTRIBUTE and WO_BOM_ATRIBUTE attributes are not sent to 42Q when the BOM item list has more than 500 line items.
Standard Cycle Time and Hands on Time
Standard Cycle Time
- On the menu bar, go to: 42Q Monitor Screen > Work Order Create and Ack > Monitor Screen.
- Click on any work order from the column TRANSACTION NAME.
- Select the Operations tab.
Two types of standard times are available:
- SETUP TIME (MIN) (Basis type is lot).
- RUN RATE (MIN/UNIT) also known as machine run time (Basis type is item).
Figure 52: Work Order Operations
These standard times are saved in the SQC Configuration table and SOMS target table on the 42Q.
If the standard baselines are not set for an operation or require an update, follow the next steps:
- In the section Primary Information, users will see the MANUFACTURING ROUTING option, below that option, users will see the manufacturing routing that has been set up, click on it.
- Click on the Edit button.
- Add the standard baselines for each operation in the SETUP TIME (MIN) and RUN RATE (MIN/UNIT) columns.
Figure 53: Manufacturing Routing Edition
Hands on Time
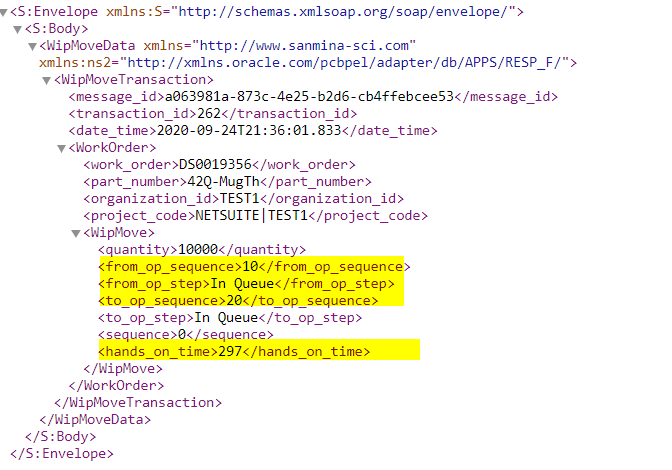
42Q records cycle time (hands on time) for each process. The cycle time recordings are sent to NetSuite with the WIP Move transaction. The hands-on time received from 42Q is saved in Machine run time and Labor run time for that operation under the work order completion record in the related records tab.
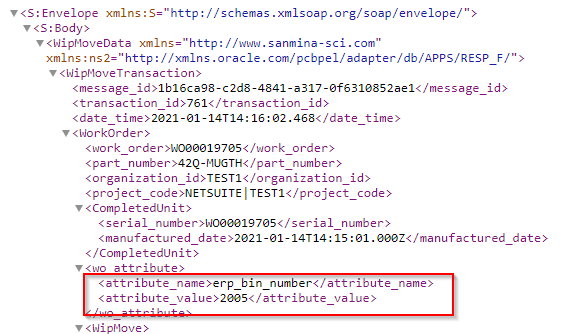
If users navigate to: Documents > Files > File Cabinet > 42Q MES > WIP Move and Material Move XML, they will be able to see the WIP Move with the hands on time in seconds as seen in Figure 54.
Figure 54: WIP Move and Material Move XML
Work Order Completion records store the hands on time in minutes (default unit of measure for the time in NetSuite).
In Figure 54, users can see an example of the previously mentioned.
If users navigate to: 42Q Monitor Screen > WIP Move Transactions or WIP Material Transactions > Monitor Screen, click on any work order, click on the tab Related Records, click on any Work Order Completion date, they will be able to see the Machine Run Time and Labor Run Time as seen in Figure 55.
Figure 55: Work Order Completion
Note: If the standard is set only for setup time, then the actual hands-on time from 42Q will be stored in the set up time slots, that is, in the Machine Setup Time and Labor Setup Time.
Bin Values from 42Q
Material Consumption
Material Consumption provides the ability to define Bin for Consumption.
For materials that have Use Bins checked, under Inventory Management requires to provide the bin number on material consumption. Customers can get the material consumption quantity, lot, or serial number as well as the bin location from which the material is consumed from the 42Q system.
Note: Enable material checkbox before ‘Built’ status changes by adding ‘BUILT_STATUS_VALIDATION=YES’ within the: 42Q Setup & Monitoring > 42Q Interface Setup Form > 42Q Interface Setup Form > 42Q Plant Setup.
In order to do so, users must access Inventory Management, they must follow the next steps:
- Enter 42Q-SHEET1 in the top search box and then click on the option that is going to appear below.
Figure 56: Top Search Box
- Click the Edit button
- Make sure the USE BINS checkbox has been marked.
Figure 57: Inventory Management
Users can define a bin for each location on 42Q, under location maintenance, in order to do so, follow the next steps:
- Navigate to: Shop Floor Control > Configuration > Shop Floor Configuration > Location.
- Select one row.
- Click the Edit button.
- Update the information.
- Click the Save button.
Figure 58: Updating Bin Information (Material Consumption)
The bin number stored in the location will be sent in the material issue transaction performed on that location as seen in Figure 58 and Figure 59.
If users go to the WIP Move and Material Move XML page, they will be able to see the WIP Move with the hands on time in seconds as seen in Figure 59.
Figure 59: WIP Move and Material Move Xml (Material Consumption)
If users navigate to: 42Q Monitor Screen > WIP Move Transactions or WIP Material Transactions > Monitor Screen, click on any work order, click on the tab Related Records, click on any Work Order Issue date, then click on the Inventory Detail icon, they will be able to see the bin number as seen in Figure 60.
Figure 60: Inventory Details (Material Consumption)
A global default bin is defined on NetSuite under mes_42Q_plant_setup.conf file, if a bin is not sent from 42Q that global bin is used to perform material issues.
If users want to see the Default Bin Number as seen in Figure 55, they must navigate to: 42Q Setup & Monitoring > 42Q Interface Setup Form > 42Q Interface Setup Form > 42Q Plant Setup, click on the DEFAULT BIN field, then enter the bin value and save the form.
Figure 61: Default Bin Number (Material Consumption)
Note: If the Bin number does not exist on the ERP side users will get an error as seen in Figure 61. To fix this error users will have to manually either create the Bin in the system or do the material consumption.
Figure 62: Bin Number Error Message
The priority that the adapter uses for pull item bin is:
- Pull bin sent from 42Q in the WIP Move.
- Pull bin sent from 42Q in the previous WIP Move stored in the custom field.
- Prefered / Available Bin of the item (native NetSuite default bin, currently only used on the first consumption of a part in a WO by NetSuite).
- Default bin in the 42Q Plant Setup form on 42Q adapter.
If only 42Q pull bin should be considered for material backflush (not the above mentioned priority), set ‘42Q PULLBIN=YES’ in the 42Q Interface Setup Form. With this setting if the pull bin sent from 42Q is wrong or has insufficient quantity, the backflush will not occur. This is a plant level setting.
Figure 63: 42Q Pullbin Value
Finished Goods
Finished Goods provides the ability to define the Bin for Finished Goods completions.
Once the Finished Goods are ready, they will be added to a bin. 42Q has the capability to send the bin location in the WIP Complete Transaction.
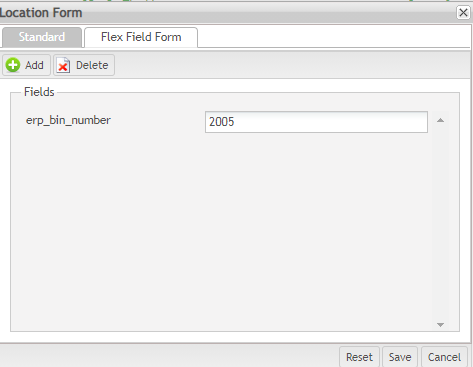
Users can define a bin for each complete location on 42Q, under Location Maintenance, select the location and click the Edit button, then go to the Flex Field Form tab as in Figure 64.
Figure 64: Updating Bin Information (Finished Goods)
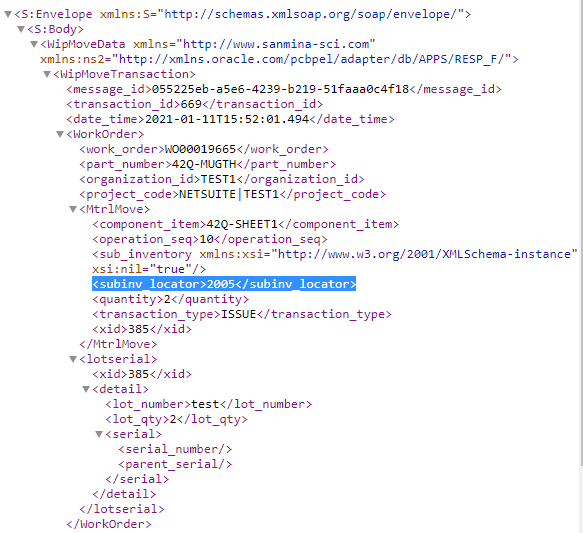
The bin number stored in the location will be sent in the WIP Move Completion Transaction when a unit reaches that complete location as seen in Figure 65.
Figure 65: WIP Move and Material Move Xml (Finished Goods)
If users navigate to: 42Q Monitor Screen > WIP Move Transactions or WIP Material Transactions > Monitor Screen, click on any work order, click on the tab Related Records, click on any Work Order Completion date, then click on the Inventory Detail icon, they will be able to see the bin number as seen in Figure 66.
Figure 66: Verifying Bin Information (Finished Goods) in NetSuite
A global default bin is defined on NetSuite under mes_42Q_plant_setup.conf file, if a bin is not sent from 42Q that global bin is used.
If users want to see the Default Bin Number as seen in Figure 55, they must navigate to: 42Q Setup & Monitoring > 42Q Interface Setup Form > 42Q Interface Setup Form > 42Q Plant Setup, click on the DEFAULT BIN field, then enter the bin value and save the form.Enter the bin value and save the form.
Figure 67: Default Bin Number
Note: If the Bin number does not exist on the ERP side users will get an error as seen in Figure 61. To fix this error users will have to manually either create the Bin in the system or do the material consumption.
Figure 68: Bin Number Error Message
Note: If put away bins are used for finished goods, then the best practice is to use ‘new_completion_xml’ (table wip_movement), value set as ‘true’. This enables the put away bin link or any other attribute link to serial/lot which is completed in the WIP Move Completion.
Work Order Built And Close
The 42Q NetSuite adapter supports work order ‘Built’ status change when the quntity+scrap quantity is equal to the work order quantity. When an order is closed manually, a work order update is sent to 42Q with the ERP status as ‘COMPLETE’, which changes the order status to ‘C’ on 42Q. The setting: ‘ONLINECALL STATUS COMPLETE’=YES in the 42Q Interface Setup Form is a recommended setting which sends an online call manually to change the order status to ‘Built’; this prevents the order status to change to ‘Built’ on NetSuite when the order is already released on 42Q.
To prevent the work order status to change to ‘Built’ if there are any errored push/pull material changes, users have to navigate to: 42Q Setup & Monitoring > 42Q Interface Setup Form > 42Q Interface Setup Form > 42Q Plant Setup, and then enable the material checkbox before the ‘Built’ status changes when adding ‘BUILT STATUS VALIDATION=YES’.
When a WIP Move fails with the warning of pull components and material issue validation, the adapter will be checking that validation of materials every 15 minutes using the ‘Update WO status’ script. When, and if the issue is solved, the adapter will change the Work Order status to ‘BUILT’, and the warning message will be removed.
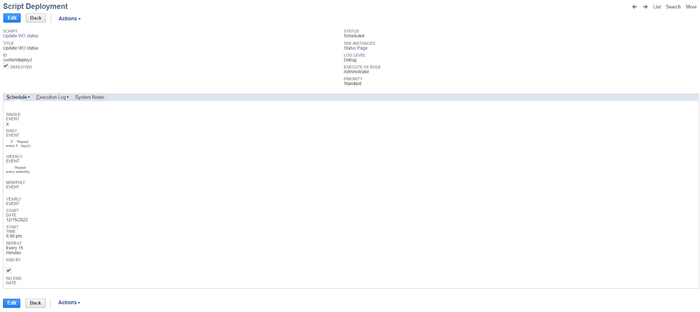
Figure 69: Script Deployment
For planners to manually change the work order status to ‘Built’, mark the ‘IGNORE ONLINE STATUS COMPLETE’ checkbox under the ‘NetSuite-42Q Interface’ tab for the work order.
Note: If the units are in WIP on 42Q and the order status is changed to ‘BUILT’ on NetSuite, no ‘Complete’ status update will be sent to 42Q. The work order will remain open on 42Q as it has WIP serials.
If the units are completed on 42Q, then use the ‘42Q Action’ button in WIP Move to send the ‘Complete’ status to 42Q.
Figure 70: Ignore Online Status Complete Checkbox
Figure 71: Work Order Complete Update On 42Q
If the IGNORE ONLINE STATUS COMPLETE flag is checked on order level, an update transaction will be sent and no online call will be performed. In this case, if the order is in status ‘R’ on 42Q with serials in status less than 30, the update acknowledgment will result in an acknowledgment error.
The same logic is supported by ‘Mark Work Order Built’ for mass completion.
For more information, please refer to the next section: Mark Work Order Built Form.
The 42Q NetSuite adapter also supports close work order updates in 42Q. When an order is closed manually, a work order update is sent to 42Q with the ERP status as ‘CLOSED’.
Figure 72: Work Order Update Closed And Sent to 42Q
The same logic is used for ‘Closed Work Order Form’ for mass work order close updates.
For more information, please refer to the next section: Close Work Order Form.
Expiration Date in WIP Completion
Expiration Date for Lots (Batch)
NetSuite supports expiration dates for lot type items only, which can be sent in the WIP Move Completion XML for the finished lot (or Non Serialized Batch).
To send the expiration date from the 42Q, follow the steps below:
- Navigate to: Administration > Generic Attribute Maintenance.
- Select the Add Generic Attribute button.
- For the Table field, enter the next value: wip_movement.
- For the Attribute Name field, enter the next value: lot_serial_attributes.
- For the Value field, enter the next value: expiration_date.
Figure 73: New Generic Attribute Added
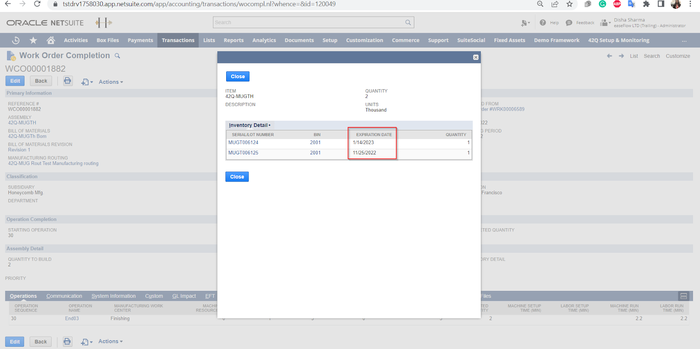
Note: If the attribute: ‘expiration_date’ is added on 42Q, it will be sent to NetSuite on Unit Completion to NetSuite as part of WIP Completion XML, and will be stored on NetSuite in the ‘Related records’.
Figure 74: Attribute Name Set As ‘expiration_date’
Note: Set the Attribute as: expiration_date for the units to send the expiration date to NetSuite. Expiration date has to be in the NetSuite supported format mm/dd/yyyy.
Figure 75: Attribute And Value Setup
Figure 76: Work Order Inventory Details
Note: NetSuite allows only one expiration date for a lot, the first expiration date received from 42Q will be stored on NetSuite.
Serialized batch items to be completed as lot item on NetSuite
NetSuite supports expiration dates for lot type items only. To support expiration dates for items that are serialized the following setup will be required:
- Set the ‘put_away_type’ as serial for those items using the custom field ‘Put away type’ in the 42Q tab. This field can be set at item level and is pulled at order level at the time of work order creation. The put away type at order level takes precedence.
- The ‘put away type’ can be sent as custom attributes (key value pairs) from work order level and work order item level. The put_away_type is sent as part of the WO Create XML to 42Q.
Figure 77: Work Order Item Level
Figure 78: Work Order Level
- To send the values for the ‘put away type’, define the custom attribute (by navigating to: 42Q Interface setup form > 42Q Custom Attribute Setup) for the Work Order Item Level or Work Order Level or both if needed.
Figure 79: Custom Attribute Setup Tab
- The put away type value is used as the type of WIP Completion, which converts serial type into lot type, and allows the serialized units to be saved as lot items on Netsuite with expiration date.
Figure 80: Items Expiration Dates
Work Order Over Completion
42Q allows over the completion of Non-Serialized Batch type of Work Orders i.e an over completion for a lot of type order. For such orders over completion quantity (amount) or over completion percentage can be sent from NetSuite.
Users can define over completion percentage or amount at two levels:
- Work order level: Over Completion amount/percentage can be set by each work order, under NetSuite-42Q Interface tab, there are two fields, one is Over Completion Percentage which sends the allowed over completion percentage for this work order to 42Q and the other is Over Completion Value which sends the allowed over completion amount for this work order to 42Q.
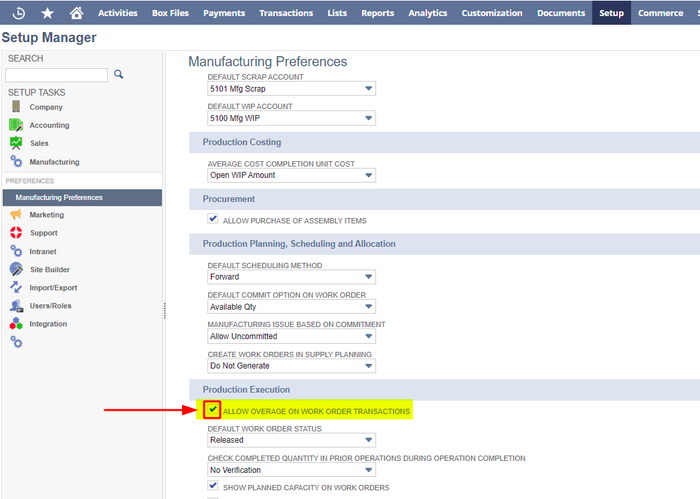
Note: Over Completion Value has precedence over the Over Completion Percentage. To enable over completion, mark the 'ALLOW OVERAGE ON WORK ORDER TRANSACTIONS' checkbox under: Setup > Manufacturing > Manufacturing Preference.
Figure 81: Enabling Over Completion
Figure 82: NetSuite-42Q Interface Tab
The over-completion value sent to 42Q is stored against the work order under generic attributes.
If users want to see the Generic Attributes, they must follow the next steps:
- Navigate to: Shop Floor Configuration > Production Control > Shop Order Browser.
- Search the shop order.
- Select the shop order.
- Click the Shop Order Information.
- Click the Display Generic Attributes.
Figure 83: Shop Order Generic Attribute List
To perform the over completion on 42Q, please use the command Increase Non Serialized Batch Quantity.
In Figure 84, users can see that in 42Q Production Workbench, a batch was scanned and then used the Increase Non-Serialized Batch Quantity command, to increase the batch quantity by 1500.
Figure 84: Using Increase Non-Serialized Batch Quantity Command
42Q doesn’t allow exceeding the over completion limit sent from NetSuite as users can see in Figure 85.
Figure 85: Exceeding the Over Completion Limit Error
When over completion happens on the 42Q side, it is sent in WIP Move XML:
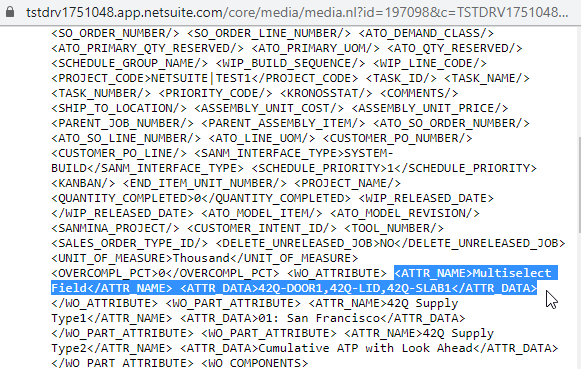
If users navigate to: Documents > Files > File Cabinet > 42Q MES > WIP Move and Material Move XML, they will be able to see the WIP Move with the over completion as seen in Figure 86.
Figure 86: WIP Move and Material Move XML
NetSuite Adapter checks the tolerance value and processes the WIP Move:
Figure 87: WIP Move Processed
- Global level: A global over completion percentage or amount is defined on NetSuite under mes_42Q_plant_setup.conf file. If an over completion is not defined at the work order level the global value is sent to 42Q.
If users want to see the Default Bin Number as seen in Figure 55, they must navigate to: 42Q Setup & Monitoring >42Q Interface Setup Form > 42Q Interface Setup Form > 42Q Plant Setup, click on the OVERCOMPLETION PERCENTAGE field, then enter the bin value and save the form.
Figure 88: Global OverCompletion Percentage
Ship Notify Process
Figure 89: Ship Notify Process Diagram
Once the user moves the unit from the COMPLETE location, the NetSuite Adapter will receive the completed serial numbers from 42Q. After that, whenever a sales order is fulfilled using that serial number, a ship notification transaction will be sent to 42Q, and the status of the serial will change to status 44.
Figure 90: Shop Order Information
To monitor the transactions, status, 42Q responses, and errors related to Ship Notify, users can go from the menu bar, to: 42Q WO ShipNotify Status > Monitor Screen.
Figure 91: 42Q WO ShipNotify Status
By default, when serial numbers are shipped using a sales order on Netsuite, the serial entry will be available in the ‘42Q WO Serial Number’ screen, a serial number will be created, and that serial number will have the values of the two columns ISSHIPPED and 42Q RESPONSE, set to ‘No’.
When users create a sales order and submit the form, the NetSuite Adapter will compare the entered serial number to the serial numbers contained in the customer record to verify if that serial number already exists. Then, the entered serial number will be sent along with the XML file to 42Q. Once the 42Q processes the data and response with a success message, it will update the entered serial number, and its status will be set as well.
Figure 92: Monitor Work Orders Ship Notify Serial Numbers
Note: Serial numbers colored in green means that the values of the columns ISSHIPED and 42Q RESPONSE are both set to Yes, therefore, these serial numbers are under shipment.
Serial numbers colored in white mean that the WIP Move was completed and these serial numbers are ready to ship, it also means that the values of the columns ISSHIPED and 42Q RESPONSE are both set to No.
Serial numbers colored in red mean that the value of the column ISSHIPED is set to Yes but the value of the column 42Q RESPONSE is set to No, this mean there was a technical error, therefore 42Q did not respond with a successful message; These serial numbers are ready to retry. When 42Q responds with a No message, (or unsuccessful message) a record will be created in the customer record Retry WO ship notify List, and the system will retry to send each of those records to 42Q every 15 minutes.
Steps for Shipping Process on NetSuite:
Create Sales Order:
- From the menu bar, navigate to: Transactions > Sales > Enter Sales Order.
Figure 93: Navigate to ‘Enter Sales Order’
- Enter the Customer, PO number, Item, and Amount, then, click Save.
Figure 94: Enter the Required Information
Figure 95: Enter the Amount Value
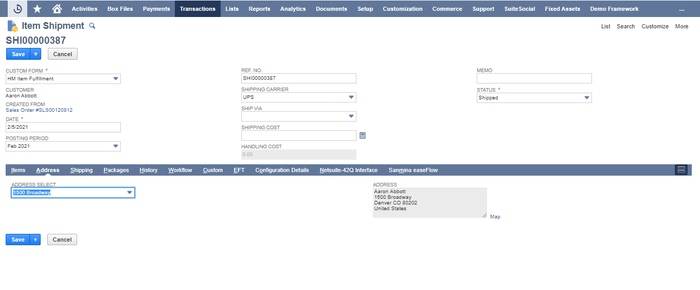
- Click Fulfill and enter the required information. Next, go to the Address tab, and select the address. On the INVENTORY DETAIL Form, enter the serial number, Bin number, Qty, next, click the OK button and then click Save, to save the form.
Figure 96: Click ‘Fulfill’ Button
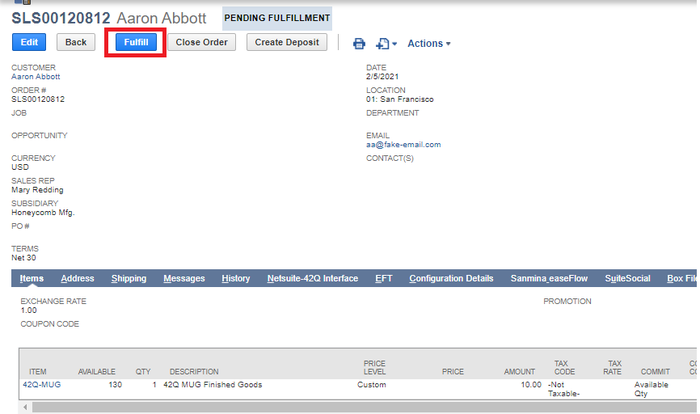
Figure 97: Select Address
Figure 98: Click on the ‘INVENTORY DETAIL’ Icon
![]()
Figure 99: Enter the Required Information In the Inventory Detail Form
- The status will change to Pending Bill from Pending Fulfillment, if the process is successful.
Close Work Order Form
For some work orders users may want to show the items as being assembled without completing all the steps. In such a case users can skip the steps and mark the order as closed. To do so, follow the next step list:
- Navigate to: Transactions > Manufacturing > Close Work Orders, and fill the required details. If WO status is 'R' on 42Q the close will not be allowed.
- Select the desired Posting Period to post this transaction to.
Note: It is not possible to post to a closed period.
- Enter a transaction Date.
- Select a transaction Subsidiary and Location.
- Select an assembly Item to filter the list and show only work orders for the item.
- Select a Customer to filter the list for transactions associated with the customer. Select All to show all transactions.
- Check the Include In-Process Work Orders box to include work orders with In Process and Built status.
- Check the Close box.
- Select Submit.
Figure 100: Close Work Orders Portlet
After selecting submit, the status of the submitted transaction will be visible.
Figure 101: Work Orders Process Statuses
Select the Refresh button to make sure the transaction is 100% complete.
Figure 102: Percentage of Completion
When the transaction is fully completed, the Work Order status will change to ‘CLOSED’.
Figure 103: Closed Work Order
Figure 104: Work Order Status
Work Order Cancelation
In the event that a NetSuite Work Order will be closed prior to starting the build, or even closing the order short, it is recommended to use the "Close button" to cancel the order.
It is not advised to delete orders 42Q or NetSuite, as this causes the systems to be out of sync.
The following signals are sent to 42Q based on the order status:
- Order is in Unreleased (N) status in 42Q - Close is allowed
- Order is in Released (R) status in 42Q - Units in WIP close/cancel is not possible
- Order is in Released (R) status in 42Q with Unit in WIP - Units in WIP close/cancel not possible
- Order is Complete (C) status in 42Q - Closed
- Planned orders - No transition to 42Q
Mark Work Order Built Form
NetSuite enables users to show Work Order items as assembled without completing all the steps. Make sure Work Orders are in status ‘In Process’ to be available in ‘Mark Work Order Built’ form. To do so, follow the next step list:
- Navigate to : Transactions > Manufacturing > Mark Work Orders Built.
- Select a Location to filter the list of orders.
- Select an Item to filter the list of orders.
- Select a Customer to filter the list of orders.
- Check the Mark Built box.
- Select Submit.
Figure 105: Mark Work Order Built Portlet
After selecting Submit, the status of the submitted transaction will be visible.
Figure 106: Work Order Process Status
Select the Refresh button to make sure the transaction is 100% complete.
Click the Complete link to view all the work orders (Processed Records).
Figure 107: Percentage of Completion (Completed)
Figure 108: Processed Records Statuses
When the transaction is fully completed, the Work Order status will change to BUILT.
Figure 109: Built Work Order
42Q only allows status change to be built (C on 42Q) through this form when the status of the order on the 42Q side is not released (N). The transaction will error out if status is released on 42Q side and Mark WO Built form is used.
Figure 110: Bulk Processing Errors Message
Work Order Build Process
The NetSuite Adapter sends 3 types of information to 42Q: Header details, Routing and Component, however, if certain users do not want to send the route information but only send the header details and the component from NetSuite to 42Q, there exists the Work Order Build Process form that allows users to do so.
Figure 111: Work Order Build Process Flow Diagram

In order to create a Work Order Build Process, users must follow the next step list:
- On the menu bar, go to: Transactions > Manufacturing > Enter Work Orders.
- Change the value of CUSTOM FORM * to Job Creation Job Order.
- A new window will appear, change the value of SUBSIDIARY * to Honeycomb Mfg.
- Then in the LOCATION field, select 01 San Francisco.
- Change the value of the ASSEMBLY field to 42Q-MUG (the item with 42Q setup in Assembly Item / Product Setup section).
- In the field ORDER #, enter the order number.
- Click the Save button.
Note: In the Work Order Build Process form the WIP checkbox will be unchecked and the MANUFACTURING ROUTING option will not be possible to select.
Note: In the Work Order Build Process scenario it is not possible to send any material issues from 42Q to the ERP system (NetSuite), because NetSuite does not allow that action.
Figure 112: Filling out Work Order Build Process Data

Figure 113: Work Order Build Process Successfully Created
The Work Order Build Process supports sending Over Completion and sending a Scrap from 42Q to NetSuite, however, if users can not perform actions that require Routing, such as WIP Moves, Rework, etc.
For the scrap scenario, completion status is sent to 42Q when the scrap quantity and complete quantity sum are equal to the work order quantity.
When all units are completed in the Work Order, the Work Order status will change to Built (completion status), and it will be sent to 42Q, then, if users Scrap or they do not want to build the whole Work Order, they can do Close, however it is not possible to do Close after Built, but users can do Close if there is a Scrap; if users record a Scrap, then users can Close a whole Work Order, in this case, users do not do a Built, they do directly a Close (which is more like a financial close), after that, the Close will be sent to NetSuite to 42Q.
Scheduling Scripts
There are eight 42Q-related scheduled scripts that utilize native NetSuite Scheduled Scripts:
XX42Q WO Retry Schedule Job
- A Scheduled script that processes the Mass order creation XMLs, failed WO Create and update XMLs.
- XX42Q Retry LargeWO process
- A Schedule script to pick Large order Create and Update XMLs.
- XX42Q Wip Move Retry Scheduled Job
- The Failed WIP transactions will be picked and reprocessed by WIP Move Retry Scheduled Job every 15 mins for a 24hrs time period from the WIP record creation date.
- XX42Q Material Transaction Scheduled Job
- The Failed MAT transactions will be picked and reprocessed by Material Transactions Schedule Job every 15 mins for a 24hrs time period from the MAT record creation date.
- XX42Q Retry Inbound XML
- A Schedule script to inbound WIP/MAT XML from 42Q and continue with WIP/MAT custom record creation.
- XX42Q Update WO Status
- A Scheduled script that scans for orders completed in the past 24hrs and send WO completion XML to 42Q, when the Built Qty matches the Workorder Qty and also there are no MAT move transaction failures.
- XX42Q WO Posting Period Check
- A Scheduled script that runs once a month where it picks “In Process” work orders and locks the previous month Transaction records (WCO and WOI documents). This ensures any new WIP/MAT moves are recorded in a new WCO/WOI document for the current posting month.
-
Note: The following are the parameters for this script that are different from the rest of the scripts.
- XX42Q Retry WO ShipNotify
- A Scheduled script that processes the failed Item shipment details to 42Q.
- Deployed = Checked
- Daily Event = Radio button enabled
- Repeat every 1 day
- Start Date = Today's date
- Start Time = 12:00 AM
- Repeat = Every 15 minutes
- End By = Blank
- No End Date = Checked
- Status = Scheduled
- Log Level = Error
- Execute as Role = Set to Administrator
- Navigate to: Customization > Scripting > Script Deployments.
- Filter by SCRIPT name for each of the below scripts:
- WO Retry Schedule Job.
- Retry Large Order Process.
- WIP Move Retry Scheduled Job.
- Material Transactions Schedule Job.
- Click the Edit link for each script selected in the previous step.
- Follow the above example settings and save the script schedule.
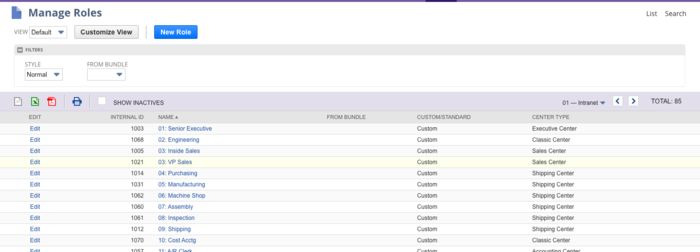
- 42Q Monitoring: Can view 42Q monitoring screens.
- 42Q ShipmentUser: Can perform shipment which includes the creation of sales order, and performing item fulfillment.
- 42Q User: Can perform actions related to the work order. It cannot do shipment actions.
- 42Q Admin: Admin access where all work order actions, shipment actions, and retry actions are allowed. Restriction for this user is that they cannot access scheduled scripts and access tokens.
- 42Q Connect: Site Admin type user with full access. This access is for SMEs only.
- 42Q Monitoring
- Will have only view access to the custom records and monitor screen. Usually given only to view the 42Q transactions and their status.
- 42Q User
- Best suited for production planners or supervisors who will create, release and modify the work orders.
- Will have access to work order transactions with EDIT level.
- Can only view the monitor screen and the interface setup form.
- If required the work order user event scripts can be executed as “42Q user”.
- 42Q Admin
- Typically plant super users or production managers who will require higher access to modify the 42Q transaction and the setup form.
- Will have access to work order transactions with FULL access level.
- Will have the ability to retry the failed transactions using 42Q action link.
- 42Q Connect
- A virtual user account where the automations run.
- Enables users to track all the script logs and used for debugging technical issues.
- Will have access to all scripts and customizations in addition to the 42Q Admin access.
- Integrations and access tokens should be created using this role.
- 42Q Shipment user
- Best suited for order management or shipment who will be creating the item fulfillment record.
- Will have access only to the Sales order transaction and the custom records related to serial numbers.
- Navigate to: Customization > Scripting > Script Deployments.
- Search for the 42Q Adapter Suitelet, client or user event scripts.
- Select Edit.
- Add the additional roles to the Roles multi select field under Audience subtab.
- Access to the 42Q Adapter Custom Records.
- Navigate to: Setup > User/Roles > Manage Role.
- Choose a role and select Edit.
- Select the Permissions tab.
- Select the Custom Record subtab.
- Add the required 42Q Custom records and provide the desired access level.
- The attribute file is missing in the MES config folder.
- The attribute file contains invalid data.
- Ensure the mes_42Q_custom_attributes.conf file exists.
- Check the mes_42Q_custom_attributes.conf formatting.
- Routing and/or Component changes after Order has been released in 42Q.
- Work Order quantity decreases after the Work Order has been released and is in WIP in 42Q.
- The multiplier file is missing in the MES config folder.
- The file contains invalid data or formatting.
- Ensure the mes_42Q_unitmultipler_setup.conf file exists.
- Check the mes_42Q_unitmultipler_setup.conf formatting.
- Create a Bin Number for the data sent from 42Q.
- Set the transaction status to ‘Ignore’, then process the Work Order Completion and Work Order Built status manually.
- The ‘FromSequence’ quantity in NetSuite Operation table does not match the ‘FromSequence’ quantity in the 42Q WIP Move transaction.
- Manually transacted WIP Move Completions.
- Issue with the data used for entering Work Order Completion form.
- Previous Work Order completion failure.
- Validate the WIP Move XML data and NetSuite Form data.
- Resolve the previous Work Order completion failure.
- Ensure the Expense Account is defined for each Manufacturing Cost Template for the Manufacturing Routing.
- Code: ASSEMBLY_ITEM_IS_MISSING_WIP_ACCOUNT Details: Assembly item is missing WIP Account.
- The multiplier file is missing in the MES config folder.
- The file contains invalid data.
- Configure an appropriate multiplier name and value.
- Check the mes_42Q_unitmultipler_setup.conf file for proper formatting.
- The multiplier file is missing.
- The file is mismatched.
- Configure an appropriate multiplier name and value.
- Check the mes_42Q_unitmultipler_setup.conf file for proper formatting.
- Create a Bin Number to match the 42Q data.
- Set the transaction status to ‘Ignore’, then process the Work Order Completion and Work Order Built status manually.
- Internal ID of the inventory number record is verified to be correct.
- Check the Bin number is not on the specific location of the inventory number.
- Check whether the WorkOrder is Closed.
- Check the WIP guidelines and make sure the Work Order does not use WIP.
- A Standard Cost Version has been created under: Lists > Accounting > Standard Cost Versions.
- A Planned Standard Cost has been assigned to the item under: Lists > Accounting > Planned Standard Costs.
- This is not always necessary. If you decide to activate an existing Cost Version, you may manually revalue a single item through Transactions > Inventory > Revalue Inventory Cost.
- Update the standard cost of items with the effective date by running the Inventory Cost Revaluation under Lists> Accounting> Revalue Standard Cost Inventory
- A Standard Cost Version has been created under: Lists > Accounting > Standard Cost Versions.
- A Planned Standard Cost has been assigned to the item under: Lists > Accounting > Planned Standard Costs.
- This is not always necessary. If you decide to activate an existing Cost Version, you may manually revalue a single item through: Transactions > Inventory > Revalue Inventory Cost.
- Update the standard cost of items with the effective date by running the Inventory Cost Revaluation under: Lists> Accounting> Revalue Standard Cost Inventory.
Each of these should be set to 12:00 AM based on the customer server timezone. If the Start Time is set to any other time than 12:00 AM (for example: 2:00 PM), the script will start at 2:00 PM, but then finish its hourly execution at 12:00 AM. It will not resume until the next day at 2:00 PM.
If users want to deploy scheduled scripts that are scheduled to run every 15 minutes on a 24 hour basis, the following sample values should be set on the Script Deployment page:
To configure the scheduled scripts by following the next step list:
For more information about the NetSuite documentation on Scheduled Script Best Practices, visit the next web page: NetSuite documentation on Scheduled Script Best Practices.
NetSuite Roles
42Q NetSuite Adapter supports multiple roles based on the job profiles:
With the adapter, the following Roles will be created in the installed system. The Roles are not locked and the customer can update the roles if necessary. The roles will have all necessary permissions based on each action that can be performed by the user with different roles.
The roles and definitions of each of them are as follows:
Note: Detailed list of custom records and permissions levels are listed in the next file: NetSuite - 42Q Role Permissions (32.03.01_15.72.00).
Adding Custom Customer Roles
Sometimes customers might have their own custom roles and might use the same role to do adapter actions and view the custom records. Below procedure will explain how to add the audience to different scripts deployments and custom records:
Note: The list of scripts are in the next file: NetSuite - 42Q Role Permissions (32.03.01_15.72.00).
Figure 114: Script Deployments Page
Figure 115: Script Deployment Audience Tab
Adding New Roles To Custom Records
Figure 116: Editing A Role
Figure 117: Custom Record Subtab
Note: Based on the access level the user will be able to View or Edit the 42Q transaction records in the 42Q Monitoring Screen.
Work Order Creation Error List
The next table lists the errors that the users may encounter related to Work Order Creation as well as the possible causes and solutions.
| Error Description | Possible Cause | Solution |
| Please check the attribute file |
|
|
| Workorder released in 42Q. Routing/Component changes not allowed and Cannot Decrease Units in 42Q |
|
If possible, delete unstarted serials to unrelease the Work Order in 42Q, or cancel the Work Order, and release another with updated changes. |
| Workorder released in 42Q. Routing/Component changes not allowed. | Routing and/or Component changes after the Work Order has been released in 42Q. | If possible, delete unstarted serials to unrelease the Work Order in 42Q, or cancel the Work Order, and release another with updated changes. |
| Cannot Decrease Units Release in 42Q. | Work Order quantity decreases after the Work Order has been released and is in WIP in 42Q. | Remove the desired quantity from the Work Order in 42Q, then, attempt to decrease the quantity again. |
| Work Order Exist in 42Q. | The Work Order already exists in 42Q. | Create the Work Order with a new number that does not yet exist. |
| Please check the multiplier file |
|
|
| EXCEPTION_WHILE_CREATING_ATTACHMENT | The attachment file is missing. | Verify the attachment file. |
| Job has WIP or Completed serials in 42Q System | Attempted to make WIP changes after the Work Order is released in 42Q. | Ensure the Work Order is either Unreleased or Completed in 42Q. |
WIP Move Transaction Error List
The next table lists the errors that the users may encounter related to WIP Move Transaction as well as the possible causes and solutions.
| Error Description | Possible Cause | Solution |
| Bin Number not found/Assign Bin number to the lot | The Bin Number does not exist in NetSuite. |
|
| Quantity is Mismatch |
|
Edit the transactional quantities to match what is in NetSuite, or edit for desired ‘FromSequence’ quantities. Reprocess (Manual Retry) the transaction. |
| checkXMLFormat | checkXMLFormat MES Config file formatting inconsistencies. | Ensure all the config files are formatted properly. |
| WO Completion creation failed |
|
|
| Wo completion failed for 10 to 20 | ||
| Please check the multiplier file |
|
|
| EXCEPTION_WHILE_CREATING_ATTACHMENT | The attachment file is missing | Verify the attachment file |
| Pull components material Issue & Built status update failed | The pull components failed due to invalid bin or presence of serialized pull components | Issue the pull components manually, then edit the Work Orders to Built status. |
WIP Material Issue Error List
The next table lists the errors that the users may encounter related to WIP Material Issue as well as the possible causes and solutions.
| Error Description | Possible Cause | Solution |
| Pull components material Issue & Built status update failed | Pull components failed due to invalid bin or presence of serialized pull components | Issue the pull components manually. Allow transactions to retry automatically, or select the 42Q action button in the WIP Move monitor screen, then select User Retry, and Submit to attempt to reprocess the transaction. |
| Please check the multiplier file |
|
|
| EXCEPTION_WHILE_CREATING_ATTACHMENT | Attachment file is missing | Verify the attachment file |
| Bin Number not found/Assign Bin number to the lot | Bin Number provided in 42Q is not available in NetSuite |
|
| Code: INVALID_KEY_OR_REF Details: Invalid Bin number reference key 7265 for issue inventory number <NULL>. |
|
Check and define that the location set on the request corresponds to the Bin number record's location. |
| Code: YOU_HAVE_AN_INVALID_WORK_ORDER_1_THE_WORK_ORDER_DOES_NOT_USE_WIP_OR_THE_WORK_ORDER_IS_ALREADY_CLOSED Details: One of the following problems exists: You have an invalid work order <number>, the work order does not use WIP, or the work order is already closed. |
|
Create the New Work Order with WIP enabled |
| Code: QUANTITY_MUST_BE_GREATER_THAN_ZERO_FOR_AT_LEAST_ONE_OF_THE_COMPONENT_ITEMS Details: Quantity must be greater than zero for at least one of the component items. | Work Order Issue is already created, and an attempt is made to create a Work Order Completion with backflush - not allowed to save the Work Order Completion with backflush as it is required to enter component quantities. | Create the Work Order with the required component quantities |
| Code: SUBLIST_1_FIELD_2_ALREADY_CONTAINS_A_SUBRECORD_YOU_CANNOT_CALL_CREATECURRENTLINEITEMSUBRECORD Details: Sublist component field component inventory detail already contains a subrecord, you cannot call createCurrentLineItemSubrecord. | The most significant difference between the record and a subrecord is that the subrecord must have a parent record, the subrecord cannot exist in the system without being attached to a record. To update the subrecord, access is required to the parent record. | Check and access the subrecord in the sublist by using the sublist API |
| Serial Number not exist | Serial Number not given for the appropriate components in NetSuite | Create the serial/lot number for the components |
| Item is not exist | Item does not exist | Create the Item |
| Code: INVENTORY_REVALUATION_IS_NOT_THE_FIRST_TRANSACTION_IN_THE_ITEM_HISTORY_ERROR_MSG Details: Inventory Revaluation is no longer the first transaction in the item's history |
|
|
| org.mozilla.javascript.EcmaError: ReferenceError: "itemId" is not defined. WOCREATEMES LIB#1678) | Script Bug - ReferenceError: "itemId" is not defined.(WOCREATEMES LINE #1678) | Need to define proper variable for itemId |
| org.mozilla.javascript.EcmaError: ReferenceError: "opSeqNum" is not defined. (WOCREATEMES LIB#1681) | Script Bug - ReferenceError: "opSeqNum" is not defined.(WOCREATEMES LINE #1681) | Need to define proper variable for opSeqNum |
| Code: UNEXPECTED_ERROR | Netsuite Bug | It can be time out or a Netsuite bug |
| Code: USER_ERROR Details: Please enter value(s) for: Serial/Lot Number, Bin | Serial Number/Bin is not defined in NetSuite | Check and define the serial number/ Bin in NetSuite |
| Code: SSS_INVALID_SRCH_OPERATOR Details: An nlobjSearchFilter contains an invalid operator, or is not in proper syntax: inventorynumber. | Check the operator or Braces for the appropriate condition | Correct the conditions of filters with Braces and Conditions |
| Code: ASSEMBLY_ITEM_IS_MISSING_WIP_ACCOUNT Details: Assembly item is missing WIP Account. | The assembly item is missing WIP Account | Add the WIP Account to the Assembly Item. |
| WOrk Order Issue is not available for this Work Order | ||
| Code: USER_ERROR Details: The total inventory detail quantity must be n | Two or more Material Transaction lines for the same component item with only one line item on the BOM. | This is likely due to an older version (32.02.10_15.72.00 or older) in which the adapter and 42Q v15.72.5 does not support multiple component items (for same component item), with multiple lots/serials, in the same XML. As of 17-Mar-2022 this item is under analysis for appropriate enhancement to support this exception. |
| Code: Invalid Bin number Details: Bin Number not found/Assign Bin number to the lot | Manual update of Bin Number in a failing Material Transaction, without updating the Bin ID. | Manual update of Bin Number in a failing Material Transaction, without updating the Bin ID. Add appropriate Bin ID to the failing transaction and then retry the transaction manually, or wait for the auto retry script to run. |
Ship Notify Error List
The next table lists the errors that the users may encounter related to Ship Notify as well as the possible causes and solutions.
| Error Description | Possible Cause | Solution |
| org.mozilla.javascript.EcmaError: ReferenceError: "orderid" is not defined. (WO ShipNotify UE LIB#13) | Script Bug - ReferenceError: "orderid" is not defined. (WO ShipNotify UE LINE #13) | Need to define orderid |
| org.mozilla.javascript.EcmaError: ReferenceError: "serialNoCount " is not defined. (WO ShipNotify UE LIB#172) | Script Bug - ReferenceError: "serialNoCount " is not defined. (WO ShipNotify UE LINE #172) | Need to define serialNoCount |
| Code: UNEXPECTED_ERROR | Netsuite Bug | It can be Time out or a Netsuite bug |
