Difference between revisions of "Event Link"
| Line 45: | Line 45: | ||
| | ||
| − | == <span class="mw-headline" id="Define_Source_and_Filter"><span class="mw-headline" id="Define_Source_and_Filter"><span class="mw-headline" id="Define_Source_and_Filter">Define Source and Filter </span></span></span> == | + | |
| + | == <span class="mw-headline" id="Define_Source_and_Filter"><span class="mw-headline" id="Define_Source_and_Filter"><span class="mw-headline" id="Define_Source_and_Filter"><span class="mw-headline" id="Define_Source_and_Filter">Define Source and Filter </span></span></span></span> == | ||
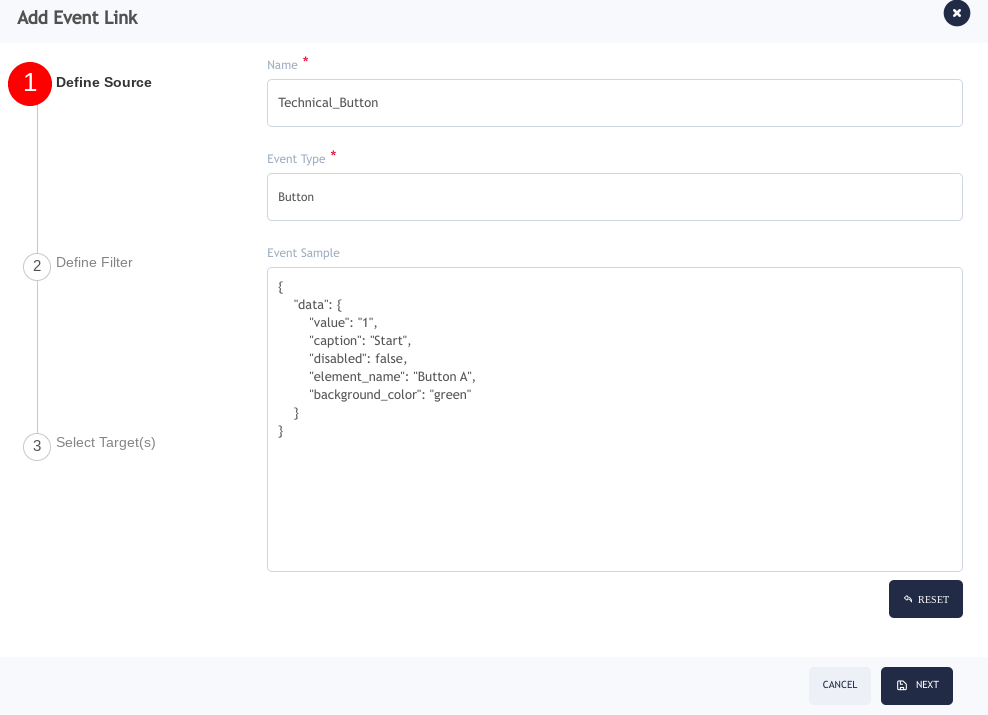
The user must'''Define the Event Link '''name and select the'''Event Type '''from the drop-down list. It must match the'''Asset Type''' ( see pre-configuration) so that both have the same properties. | The user must'''Define the Event Link '''name and select the'''Event Type '''from the drop-down list. It must match the'''Asset Type''' ( see pre-configuration) so that both have the same properties. | ||
'''Figure 2: Define Source ''' | '''Figure 2: Define Source ''' | ||
| + | |||
| + | '''[[File:EVL 1.png]]''' | ||
| | ||
| − | + | Click '''Next''' to continue to '''Define Filter'''. | |
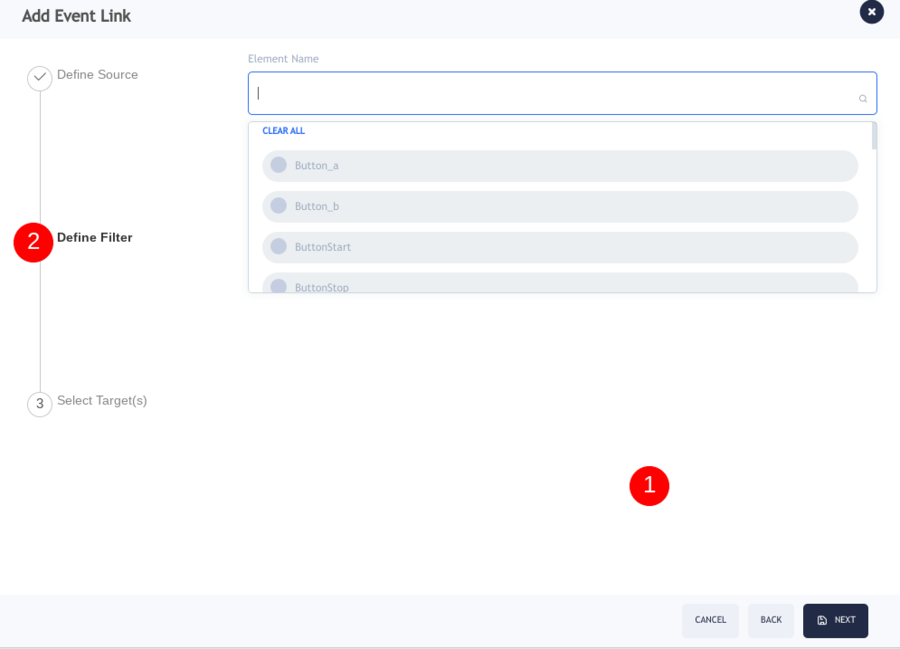
| − | + | <br/> The next step is '''Define Filter''', here select the '''Element Name.''' | |
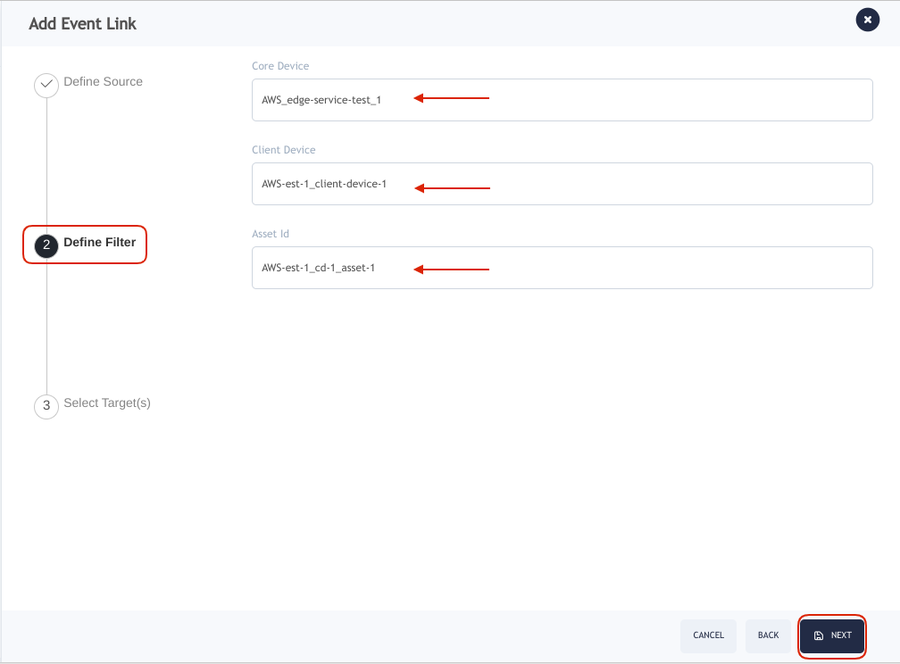
| − | Select from the drop-down lists a Core Device, a Client Device, and an Asset ID. | + | Select from the drop-down lists a '''Core Device''', a '''Client Device''', and an '''Asset ID'''. |
'''Figure 3: Define Filter''' | '''Figure 3: Define Filter''' | ||
| + | |||
| + | '''[[File:EVL 2.png|900px]]''' | ||
| | ||
| − | <u>'''Note:'''</u>If the fields for Client Device or Asset ID do not display a list, go back to IIoT Configuration to complete the IIoT Asset setup. <br/> | + | <u>'''Note: '''</u>If the fields for Client Device or Asset ID do not display a list, go back to IIoT Configuration to complete the IIoT Asset setup. <br/> |
'''Figure 4: Complete Configuration *''' | '''Figure 4: Complete Configuration *''' | ||
| Line 71: | Line 76: | ||
| | ||
| − | + | Click '''Next''' to continue to '''Select Target'''. | |
| − | |||
| − | Click Next to continue to Select Target. | ||
In this step, users must define the action (including basic transformations) that should be executed once this Event Link gets triggered. Multiple targets can be configured which will all be executed. | In this step, users must define the action (including basic transformations) that should be executed once this Event Link gets triggered. Multiple targets can be configured which will all be executed. | ||
| − | Select a Target from the drop-down list.<br/> | + | Select a '''Target''' from the drop-down list.<br/> |
'''Figure 5: Select Target ''' | '''Figure 5: Select Target ''' | ||
| − | + | '''[[File:EVL Config.png|900px]]''' | |
| | ||
| Line 104: | Line 107: | ||
<br/> | <br/> | ||
| − | |||
Revision as of 21:45, 11 June 2024
42Q Home > Shop Floor Control > Configuration > Event Link
Introduction
Event Link acts as a bridge between the quick action button and the equipment, making communication available and ensuring the button reflects real-time equipment status.
To access this portlet go to: Shop Floor Control > Configuration > Event Link
IIoT Configuration
To set up the equipment users need to pre-configure them in Edge Device.
To access this portlet go to: Shop Floor Control > Configuration > IIoT Configuration> Edge Device
Users must configure the Client Device first;
- Select the Edge Device you want to connect to.
- Click Edit.
- Navigate to Client Device.
- Click on Assets.
- Select the desired Asset and click Edit Attributes.
- Here, you can define the actions and properties associated with the Event. Users can have multiple asset types in one action.
Note: Set up the connection that goes from the equipment to the action, this way users can see the status of the equipment.
For more information on how to configure Edge Devices please visitIIoT Configuration.
Add Event Link
Select the +ADD button at the top of the page, the Add Event Link window will be displayed to fill the Define Source fields.
Figure 1: Add Event Link
Define Source and Filter
The user mustDefine the Event Link name and select theEvent Type from the drop-down list. It must match theAsset Type ( see pre-configuration) so that both have the same properties.
Figure 2: Define Source
Click Next to continue to Define Filter.
The next step is Define Filter, here select the Element Name.
Select from the drop-down lists a Core Device, a Client Device, and an Asset ID.
Figure 3: Define Filter
Note: If the fields for Client Device or Asset ID do not display a list, go back to IIoT Configuration to complete the IIoT Asset setup.
Figure 4: Complete Configuration *
Click Next to continue to Select Target.
In this step, users must define the action (including basic transformations) that should be executed once this Event Link gets triggered. Multiple targets can be configured which will all be executed.
Select a Target from the drop-down list.
Figure 5: Select Target
To configure a button select the “Button” option from the drop-down list.
- Select the + button located beside the Target field
- A panel will appear to input the button information (Element Name, Schema Mapping, and JSON)
- Select the “Element Name” from the drop-down list. This was previously configured in Quick Action Configuration
- Select the “Element Name” from the drop-down list. This was previously configured in Quick Action Configuration.
- Define the JSON properties to set the transformation actions.
Figure 6: Add Event Link. Target button selection
Select Save to complete the configuration.
Note: Optionally, the user can test the schema mapping of the transformation by selecting the TEST button.


