Difference between revisions of "Quick Action Configuration"
| Line 31: | Line 31: | ||
| | ||
| − | === <span class="mw-headline" id="Name.2C_Module.2C_and_Type"><span class="mw-headline" id="Name.2C_Module.2C_and_Type">Name, Module, and Type</span></span> === | + | |
| + | === <span class="mw-headline" id="Name.2C_Module.2C_and_Type"><span class="mw-headline" id="Name.2C_Module.2C_and_Type"><span class="mw-headline" id="Name.2C_Module.2C_and_Type">Name, Module, and Type</span></span></span> === | ||
The first step is to configure the action’s Name, the Module, and the Type. | The first step is to configure the action’s Name, the Module, and the Type. | ||
| Line 45: | Line 46: | ||
'''Figure 2: Add a Quick Action''' | '''Figure 2: Add a Quick Action''' | ||
| − | + | [[File:QAC Add.png|900px]] | |
| − | |||
| − | |||
| | ||
Revision as of 19:15, 11 June 2024
42Q Home > Shop Floor Control > Configuration > Quick Action Configuration
Contents
Introduction
Quick Action Configuration is a tool designed to allow authorized users with administrator or engineering access to trigger macros and commands with a simple click, to connect actions with equipment, by creating buttons or quick actions.
To access this portlet go to: Shop Floor Control > Configuration > Quick Action Configuration
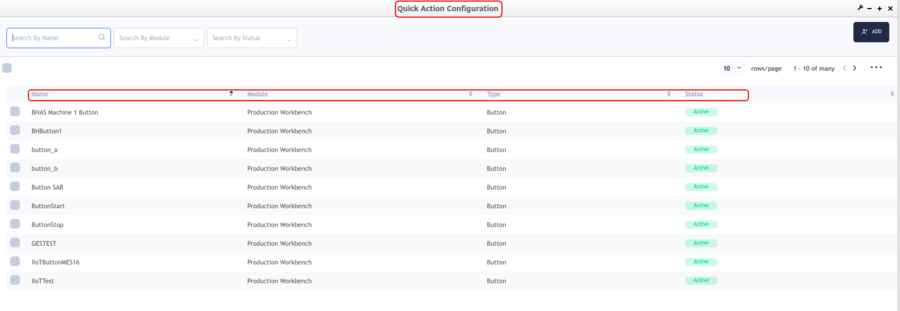
Upon opening the page, users will find Filter and +ADD options, data can be easily filtered by Name, Module, or Type, using the search bar.
Figure 1: Quick Action Main page
Add and Edit a Quick Action
To add a quick action click on the upright button + ADD, located on the top right of the screen; this will open a new window for configuring a new action.
The structure of the form is separated into 3 sections:
Name, Module, and Type
The first step is to configure the action’s Name, the Module, and the Type.
To configure the Button:
- Name: Users must choose a clear and concise name that accurately reflects the button's function.
- Module: Select the specific module where this button will be available. The default selection is Production Workbench.
- Type: Select "Button" as the type.
Figure 2: Add a Quick Action
Properties
The Properties panel lets you define the initial state of the action, including:
- Background color: Users will be able to type the color (For more information visit the page: https://en.wikipedia.org/wiki/Web_colors)
- Caption: Will define the action of this button
- Value.
- Publish Events checkbox: Enable or disable this option to control whether the action triggers specific events within the system.
Figure 3: Quick Action Properties
Context and Operation
The next section will request the Client ID, Context, andOperations.
The Client ID and Context will be loaded with Location and Process, which defines where in the Production Workbench the user will be able to see the button, and whether or not to Require Scanned Unit.
Note:The same Context cannot be added twice
Figure 4: Quick Action Context
The Operation drop-down button contains the list of commands and macros available for a given Shop Floor ID.
Each user-defined action (command) allows customizable parameters to configure the operation.
In the example below; ADD Comment To was chosen, users will need to set up all the parameters that this operation has, for example, Condition Execution, Unite serial number, Unit Part number, etc. This changes depending on the selected command.
Figure 5: Add comment
Upon successful operation, the user will have the option to Publish an event and save it.

