Difference between revisions of "SOP-MES0074 CMMS Asset"
Helena wang (talk | contribs) |
Helena wang (talk | contribs) |
||
| Line 1,612: | Line 1,612: | ||
| − | === <span class="mw-headline" id="Edit_Checklist:_Checklist_Revision"><span class="mw-headline" id="Edit_Checklist:_Checklist_Revision"><span class="mw-headline" id="Edit_Checklist:_Checklist_Revision"><span class="mw-headline" id="Edit_Checklist:_Checklist_Revision_Tab"><span class="mw-headline" id="Edit_Checklist:_Checklist_Revision_Tab"><span class="mw-headline" id="Edit_Checklist:_Checklist_Revision_Tab"><span class="mw-headline" id="Edit_Checklist:_Checklist_Revision_Tab"><span class="mw-headline" id="Edit_Checklist:_Checklist_Revision_Tab"><span class="mw-headline" id="Edit_Checklist:_Checklist_Revision_Tab"><span class="mw-headline" id="Edit_Checklist:_Checklist_Revision_Tab"><span class="mw-headline" id="Edit_Checklist:_Checklist_Revision_Tab"><span class="mw-headline" id="Edit_Checklist:_Checklist_Revision_Tab"><span class="mw-headline" id="Edit_Checklist:_Checklist_Revision_Tab"><span class="mw-headline" id="Edit_Checklist:_Checklist_Revision_Tab"><span class="mw-headline" id="Edit_Checklist:_Checklist_Revision_Tab"><span class="mw-headline" id="Edit_Checklist:_Checklist_Revision_Tab"><span class="mw-headline" id="Edit_Checklist:_Checklist_Revision_Tab"><span class="mw-headline" id="Edit_Checklist:_Checklist_Revision_Tab"><span class="mw-headline" id="Edit_Checklist:_Checklist_Revision_Tab"><span class="mw-headline" id="Edit_Checklist:_Checklist_Revision_Tab"><span class="mw-headline" id="Edit_Checklist:_Checklist_Revision_Tab"><span class="mw-headline" id="Edit_Checklist:_Checklist_Revision_Tab"><span class="mw-headline" id="Edit_Checklist:_Checklist_Revision_Tab"><span class="mw-headline" id="Edit_Checklist:_Checklist_Revision_Tab"><span class="mw-headline" id="Edit_Checklist:_Checklist_Revision_Tab"><span class="mw-headline" id="Edit_Checklist:_Checklist_Revision_Tab">Edit Checklist: Checklist Revision </span></span></span></span></span></span></span></span></span></span></span></span></span></span></span></span></span></span></span></span></span></span></span></span></span></span> === | + | |
| + | === <span class="mw-headline" id="Edit_Checklist:_Checklist_Revision"><span class="mw-headline" id="Edit_Checklist:_Checklist_Revision"><span class="mw-headline" id="Edit_Checklist:_Checklist_Revision"><span class="mw-headline" id="Edit_Checklist:_Checklist_Revision"><span class="mw-headline" id="Edit_Checklist:_Checklist_Revision"><span class="mw-headline" id="Edit_Checklist:_Checklist_Revision"><span class="mw-headline" id="Edit_Checklist:_Checklist_Revision"><span class="mw-headline" id="Edit_Checklist:_Checklist_Revision"><span class="mw-headline" id="Edit_Checklist:_Checklist_Revision"><span class="mw-headline" id="Edit_Checklist:_Checklist_Revision_Tab"><span class="mw-headline" id="Edit_Checklist:_Checklist_Revision_Tab"><span class="mw-headline" id="Edit_Checklist:_Checklist_Revision_Tab"><span class="mw-headline" id="Edit_Checklist:_Checklist_Revision_Tab"><span class="mw-headline" id="Edit_Checklist:_Checklist_Revision_Tab"><span class="mw-headline" id="Edit_Checklist:_Checklist_Revision_Tab"><span class="mw-headline" id="Edit_Checklist:_Checklist_Revision_Tab"><span class="mw-headline" id="Edit_Checklist:_Checklist_Revision_Tab"><span class="mw-headline" id="Edit_Checklist:_Checklist_Revision_Tab"><span class="mw-headline" id="Edit_Checklist:_Checklist_Revision_Tab"><span class="mw-headline" id="Edit_Checklist:_Checklist_Revision_Tab"><span class="mw-headline" id="Edit_Checklist:_Checklist_Revision_Tab"><span class="mw-headline" id="Edit_Checklist:_Checklist_Revision_Tab"><span class="mw-headline" id="Edit_Checklist:_Checklist_Revision_Tab"><span class="mw-headline" id="Edit_Checklist:_Checklist_Revision_Tab"><span class="mw-headline" id="Edit_Checklist:_Checklist_Revision_Tab"><span class="mw-headline" id="Edit_Checklist:_Checklist_Revision_Tab"><span class="mw-headline" id="Edit_Checklist:_Checklist_Revision_Tab"><span class="mw-headline" id="Edit_Checklist:_Checklist_Revision_Tab"><span class="mw-headline" id="Edit_Checklist:_Checklist_Revision_Tab"><span class="mw-headline" id="Edit_Checklist:_Checklist_Revision_Tab"><span class="mw-headline" id="Edit_Checklist:_Checklist_Revision_Tab"><span class="mw-headline" id="Edit_Checklist:_Checklist_Revision_Tab">Edit Checklist: Checklist Revision </span></span></span></span></span></span></span></span></span></span></span></span></span></span></span></span></span></span></span></span></span></span></span></span></span></span></span></span></span></span></span></span> === | ||
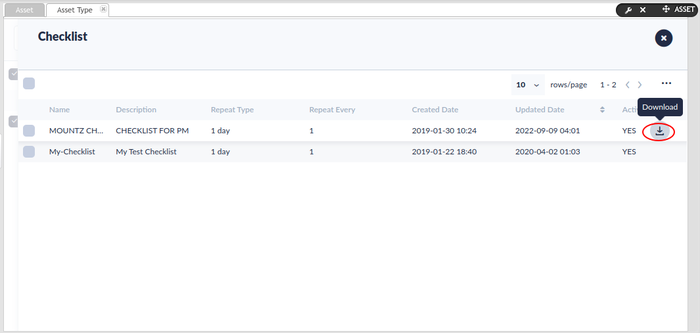
Within the '''Checklist Revision ''', users may '''add, edit, enable/disable, download''', and '''copy''' revisions. | Within the '''Checklist Revision ''', users may '''add, edit, enable/disable, download''', and '''copy''' revisions. | ||
| Line 1,626: | Line 1,627: | ||
| | ||
| − | ==== <span class="mw-headline" id="Checklist_Revision_:_Add_a_Revision"><span class="mw-headline" id="Checklist_Revision_Tab:_Add_a_Revision"><span class="mw-headline" id="Checklist_Revision_Tab:_Add_a_Revision"><span class="mw-headline" id="Checklist_Revision_Tab:_Add_a_Revision"><span class="mw-headline" id="Checklist_Revision_Tab:_Add_a_Revision"><span class="mw-headline" id="Checklist_Revision_Tab:_Add_a_Revision"><span class="mw-headline" id="Checklist_Revision_Tab:_Add_a_Revision"><span class="mw-headline" id="Checklist_Revision_Tab:_Add_a_Revision"><span class="mw-headline" id="Checklist_Revision_Tab:_Add_a_Revision"><span class="mw-headline" id="Checklist_Revision_Tab:_Add_a_Revision"><span class="mw-headline" id="Checklist_Revision_Tab:_Add_a_Revision"><span class="mw-headline" id="Checklist_Revision_Tab:_Add_a_Revision"><span class="mw-headline" id="Checklist_Revision_Tab:_Add_a_Revision"><span class="mw-headline" id="Checklist_Revision_Tab:_Add_a_Revision"><span class="mw-headline" id="Checklist_Revision_Tab:_Add_a_Revision"><span class="mw-headline" id="Checklist_Revision_Tab:_Add_a_Revision"><span class="mw-headline" id="Checklist_Revision_Tab:_Add_a_Revision"><span class="mw-headline" id="Checklist_Revision_Tab:_Add_a_Revision"><span class="mw-headline" id="Checklist_Revision_Tab:_Add_a_Revision"><span class="mw-headline" id="Checklist_Revision_Tab:_Add_a_Revision"><span class="mw-headline" id="Checklist_Revision_Tab:_Add_a_Revision"><span class="mw-headline" id="Checklist_Revision_Tab:_Add_a_Revision"><span class="mw-headline" id="Checklist_Revision_Tab:_Add_a_Revision"><span class="mw-headline" id="Checklist_Revision_Tab:_Add_a_Revision"><span class="mw-headline" id="Checklist_Revision_Tab:_Add_a_Revision">Checklist Revision : Add a Revision</span></span></span></span></span></span></span></span></span></span></span></span></span></span></span></span></span></span></span></span></span></span></span></span></span> ==== | + | ==== <span class="mw-headline" id="Checklist_Revision_:_Add_a_Revision"><span class="mw-headline" id="Checklist_Revision_:_Add_a_Revision"><span class="mw-headline" id="Checklist_Revision_:_Add_a_Revision"><span class="mw-headline" id="Checklist_Revision_:_Add_a_Revision"><span class="mw-headline" id="Checklist_Revision_:_Add_a_Revision"><span class="mw-headline" id="Checklist_Revision_:_Add_a_Revision"><span class="mw-headline" id="Checklist_Revision_:_Add_a_Revision"><span class="mw-headline" id="Checklist_Revision_Tab:_Add_a_Revision"><span class="mw-headline" id="Checklist_Revision_Tab:_Add_a_Revision"><span class="mw-headline" id="Checklist_Revision_Tab:_Add_a_Revision"><span class="mw-headline" id="Checklist_Revision_Tab:_Add_a_Revision"><span class="mw-headline" id="Checklist_Revision_Tab:_Add_a_Revision"><span class="mw-headline" id="Checklist_Revision_Tab:_Add_a_Revision"><span class="mw-headline" id="Checklist_Revision_Tab:_Add_a_Revision"><span class="mw-headline" id="Checklist_Revision_Tab:_Add_a_Revision"><span class="mw-headline" id="Checklist_Revision_Tab:_Add_a_Revision"><span class="mw-headline" id="Checklist_Revision_Tab:_Add_a_Revision"><span class="mw-headline" id="Checklist_Revision_Tab:_Add_a_Revision"><span class="mw-headline" id="Checklist_Revision_Tab:_Add_a_Revision"><span class="mw-headline" id="Checklist_Revision_Tab:_Add_a_Revision"><span class="mw-headline" id="Checklist_Revision_Tab:_Add_a_Revision"><span class="mw-headline" id="Checklist_Revision_Tab:_Add_a_Revision"><span class="mw-headline" id="Checklist_Revision_Tab:_Add_a_Revision"><span class="mw-headline" id="Checklist_Revision_Tab:_Add_a_Revision"><span class="mw-headline" id="Checklist_Revision_Tab:_Add_a_Revision"><span class="mw-headline" id="Checklist_Revision_Tab:_Add_a_Revision"><span class="mw-headline" id="Checklist_Revision_Tab:_Add_a_Revision"><span class="mw-headline" id="Checklist_Revision_Tab:_Add_a_Revision"><span class="mw-headline" id="Checklist_Revision_Tab:_Add_a_Revision"><span class="mw-headline" id="Checklist_Revision_Tab:_Add_a_Revision"><span class="mw-headline" id="Checklist_Revision_Tab:_Add_a_Revision">Checklist Revision : Add a Revision</span></span></span></span></span></span></span></span></span></span></span></span></span></span></span></span></span></span></span></span></span></span></span></span></span></span></span></span></span></span></span> ==== |
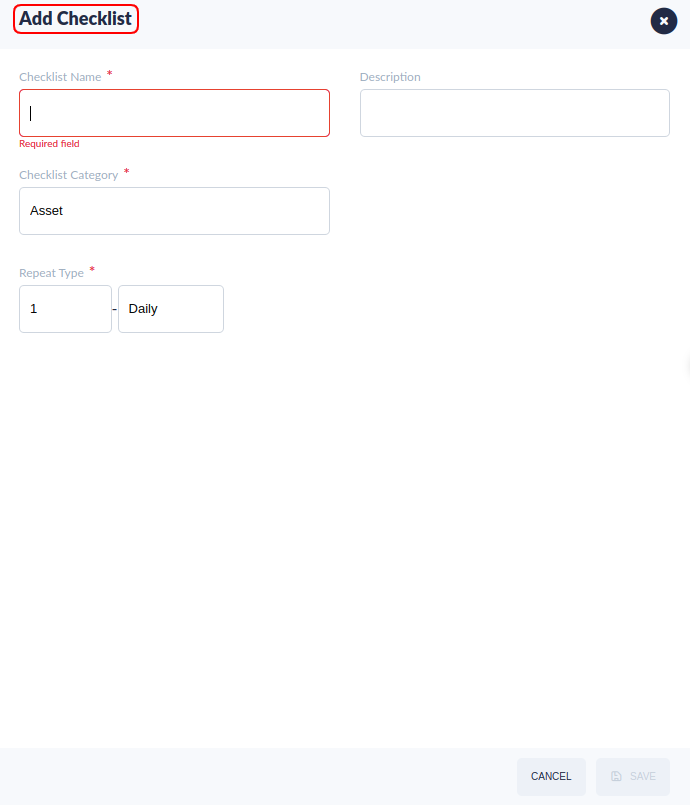
#Use the Checklist revision tab to add your checklists into the system. | #Use the Checklist revision tab to add your checklists into the system. | ||
| − | #Select the | + | #Select the '''Add icon''' from the '''Checklist Revision '''. The '''Add '''pop-up window displays. |
'''Figure 68: Add Checklist Revision Pop-up Window''' | '''Figure 68: Add Checklist Revision Pop-up Window''' | ||
| − | '''[[File: | + | '''[[File:Figure 67- Checklist Revision.png|border|800px|RTENOTITLE]]''' |
2. Complete the empty fields (the Name and Description fields are automatically provided according to the Checklist entry being edited): | 2. Complete the empty fields (the Name and Description fields are automatically provided according to the Checklist entry being edited): | ||
| Line 1,641: | Line 1,642: | ||
*'''Active''' (Default is '''Active''') | *'''Active''' (Default is '''Active''') | ||
| − | | + | ==== <span class="mw-headline" id="Download_Checklist_Revision"><span class="mw-headline" id="Download_Checklist_Revision"><span class="mw-headline" id="Download_Checklist_Revision"><span class="mw-headline" id="Download_Checklist_Revision">Download Checklist Revision </span></span></span></span> ==== |
| + | |||
| + | Download the checklist template as a .csv file by selecting the '''Download Checklist Template icon''', located in the bottom lower field of the '''Add Checklist '''page. | ||
| − | | + | # The following fields are provided in the Checklist Template. |
*'''Content''' | *'''Content''' | ||
| Line 1,653: | Line 1,656: | ||
*'''Field Type 2''' | *'''Field Type 2''' | ||
*'''Estimate Hours''' | *'''Estimate Hours''' | ||
| − | <ol start=" | + | <ol start="2"> |
<li> Upload a new checklist by choosing '''Select File'''. This function opens the user’s local browser.</li> | <li> Upload a new checklist by choosing '''Select File'''. This function opens the user’s local browser.</li> | ||
<li> Select the checklist to be uploaded from the local drive and click '''Open'''.</li> | <li> Select the checklist to be uploaded from the local drive and click '''Open'''.</li> | ||
| Line 1,660: | Line 1,663: | ||
''' '''<u>'''Note:'''</u> Once uploaded, users can edit the checklist directly by double-clicking in the text field and utilizing drop-downs. Users can delete selected rows with the Delete GUI. | ''' '''<u>'''Note:'''</u> Once uploaded, users can edit the checklist directly by double-clicking in the text field and utilizing drop-downs. Users can delete selected rows with the Delete GUI. | ||
| − | + | <ol start="5"> | |
| − | |||
| − | |||
| − | |||
| − | |||
| − | |||
| − | <ol start=" | ||
<li>Select '''Save '''to complete or '''Cancel''' to abort.</li> | <li>Select '''Save '''to complete or '''Cancel''' to abort.</li> | ||
<li>Once saved, the '''Revision''' displays according to the number assigned ('''Step 2''') on the '''Checklist Revision''' page. (In our example the letter A would display.)</li> | <li>Once saved, the '''Revision''' displays according to the number assigned ('''Step 2''') on the '''Checklist Revision''' page. (In our example the letter A would display.)</li> | ||
| Line 1,675: | Line 1,672: | ||
| | ||
| − | ==== <span class="mw-headline" id="Checklist_Definitions"><span class="mw-headline" id="Checklist_Definitions"><span class="mw-headline" id="Checklist_Definitions"><span class="mw-headline" id="Checklist_Definitions"><span class="mw-headline" id="Checklist_Definitions"><span class="mw-headline" id="Checklist_Definitions"><span class="mw-headline" id="Checklist_Definitions"><span class="mw-headline" id="Checklist_Definitions"><span class="mw-headline" id="Checklist_Definitions"><span class="mw-headline" id="Checklist_Definitions"><span class="mw-headline" id="Checklist_Definitions"><span class="mw-headline" id="Checklist_Definitions"><span class="mw-headline" id="Checklist_Definitions"><span class="mw-headline" id="Checklist_Definitions"><span class="mw-headline" id="Checklist_Definitions"><span class="mw-headline" id="Checklist_Definitions"><span class="mw-headline" id="Checklist_Definitions"><span class="mw-headline" id="Checklist_Definitions"><span class="mw-headline" id="Checklist_Definitions"><span class="mw-headline" id="Checklist_Definitions"><span class="mw-headline" id="Checklist_Definitions"><span class="mw-headline" id="Checklist_Definitions">Checklist Definitions</span></span></span></span></span></span></span></span></span></span></span></span></span></span></span></span></span></span></span></span></span></span> ==== | + | ==== <span class="mw-headline" id="Checklist_Definitions"><span class="mw-headline" id="Checklist_Definitions"><span class="mw-headline" id="Checklist_Definitions"><span class="mw-headline" id="Checklist_Definitions"><span class="mw-headline" id="Checklist_Definitions"><span class="mw-headline" id="Checklist_Definitions"><span class="mw-headline" id="Checklist_Definitions"><span class="mw-headline" id="Checklist_Definitions"><span class="mw-headline" id="Checklist_Definitions"><span class="mw-headline" id="Checklist_Definitions"><span class="mw-headline" id="Checklist_Definitions"><span class="mw-headline" id="Checklist_Definitions"><span class="mw-headline" id="Checklist_Definitions"><span class="mw-headline" id="Checklist_Definitions"><span class="mw-headline" id="Checklist_Definitions"><span class="mw-headline" id="Checklist_Definitions"><span class="mw-headline" id="Checklist_Definitions"><span class="mw-headline" id="Checklist_Definitions"><span class="mw-headline" id="Checklist_Definitions"><span class="mw-headline" id="Checklist_Definitions"><span class="mw-headline" id="Checklist_Definitions"><span class="mw-headline" id="Checklist_Definitions"><span class="mw-headline" id="Checklist_Definitions"><span class="mw-headline" id="Checklist_Definitions"><span class="mw-headline" id="Checklist_Definitions"><span class="mw-headline" id="Checklist_Definitions"><span class="mw-headline" id="Checklist_Definitions"><span class="mw-headline" id="Checklist_Definitions">Checklist Definitions</span></span></span></span></span></span></span></span></span></span></span></span></span></span></span></span></span></span></span></span></span></span></span></span></span></span></span></span> ==== |
| + | |||
| + | #<span class="mw-headline"><span class="mw-headline"><span class="mw-headline"><span class="mw-headline"><span class="mw-headline"><span class="mw-headline"><span class="mw-headline"><span class="mw-headline"><span class="mw-headline"><span class="mw-headline"><span class="mw-headline"><span class="mw-headline"><span class="mw-headline"><span class="mw-headline"><span class="mw-headline"><span class="mw-headline"><span class="mw-headline"><span class="mw-headline"><span class="mw-headline"><span class="mw-headline"><span class="mw-headline"><span class="mw-headline"><span class="mw-headline"><span class="mw-headline">Select the Checklist Revision, then select the Checklist ICON from the pop-up toolbar.</span></span></span></span></span></span></span></span></span></span></span></span></span></span></span></span></span></span></span></span></span></span></span></span> | ||
| + | #<span class="mw-headline"><span class="mw-headline"><span class="mw-headline"><span class="mw-headline"><span class="mw-headline"><span class="mw-headline"><span class="mw-headline"><span class="mw-headline"><span class="mw-headline"><span class="mw-headline"><span class="mw-headline"><span class="mw-headline"><span class="mw-headline"><span class="mw-headline"><span class="mw-headline"><span class="mw-headline"><span class="mw-headline"><span class="mw-headline"><span class="mw-headline"><span class="mw-headline"><span class="mw-headline"><span class="mw-headline"><span class="mw-headline"><span class="mw-headline">The Checklist Items page displays.</span></span></span></span></span></span></span></span></span></span></span></span></span></span></span></span></span></span></span></span></span></span></span></span> | ||
| + | |||
| + | '''<span class="mw-headline"><span class="mw-headline"><span class="mw-headline"><span class="mw-headline"><span class="mw-headline"><span class="mw-headline"><span class="mw-headline"><span class="mw-headline"><span class="mw-headline"><span class="mw-headline"><span class="mw-headline"><span class="mw-headline"><span class="mw-headline"><span class="mw-headline"><span class="mw-headline"><span class="mw-headline"><span class="mw-headline"><span class="mw-headline"><span class="mw-headline"><span class="mw-headline"><span class="mw-headline"><span class="mw-headline"><span class="mw-headline"><span class="mw-headline">Figure 68a: Edit Checklist: CMMS Asset Checklist Items</span></span></span></span></span></span></span></span></span></span></span></span></span></span></span></span></span></span></span></span></span></span></span></span>''' | ||
| + | |||
| + | '''[[File:Figure 68a- Edit Checklist Directly- CMMS Asset Checklist.png|border|800px|RTENOTITLE]]''' | ||
| + | <ol start="3"> | ||
| + | <li>Select one item, the add, edit, save, delete icons are enabled.</li> | ||
| + | <li>Input or edit the fields.</li> | ||
| + | </ol> | ||
| − | + | *'''Content''': In the '''Content''' field, plant users enter a title to describe the process being completed. (e.g. Clean Foreign Particles) | |
<u>'''Note'''</u>: Administrators may choose to include a deeper explanation of the process by copying the '''Description''' field in the Content field ('''see #2'''). | <u>'''Note'''</u>: Administrators may choose to include a deeper explanation of the process by copying the '''Description''' field in the Content field ('''see #2'''). | ||
| − | + | ||
| − | + | *'''Description''': The '''Description''' field includes a detailed explanation of the task (e.g. a list of parts that must be checked, the steps in the procedure, tools needed, etc.) Operators will follow the instructions in the Description field to repair, calibrate, or tune the machine. Language in instructions should be simple to understand and represent the speech of the operator group performing the maintenance. (e.g. Clean foreign particles in all zones by IPA/Fingers). | |
| − | + | *'''Level''': <span id="docs-internal-guid-2757c298-49d1-d341-b928-0e4e467a2d9c">Levels allow users to add a hierarchy to the repair steps in the checklist. Most checklist steps will only require one level to adequately outline the task(s). For complicated tasks, place additional instructions in Level 2 or Level 3 to make subtasks clear for operators to follow.</span> | |
| − | + | *'''Field Name''': In the '''Field Name''' section, plant administrators define the purpose of the task or the parameter for task completion. Some examples include: Status (e.g. Completed/In Process); Good/Bad; Failed/Passed | |
| − | + | *'''Field Type:''' Select the method of checking completion. Select 1, 2, or 3 to define the checklist format. Three field types are available: 1. checkbox/checkmark; 2. numbers; or 3. text box. | |
| − | + | *'''Field Name 2''': Most Checklists will only need one field name. '''Field Name 2''' is helpful in special situations when plant admins need to compare two sets of checklists. For example, a plant may need to record the history record. In this case, the administrator can set two field names and the maintenance record will compare the old/new values. <u>'''NOTE'''</u>: The following example displays the special case of including '''Field Name 2''' in a checklist. | |
| − | |||
{| align="left" border="1" cellpadding="1" cellspacing="1" width="500" | {| align="left" border="1" cellpadding="1" cellspacing="1" width="500" | ||
| Line 1,705: | Line 1,712: | ||
| | ||
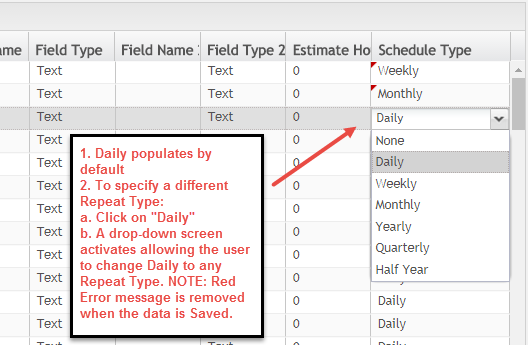
| − | + | *'''Schedule''' '''Type''': Plant admins may define the Schedule type to complete the steps/task in the checklist. | |
| | ||
| − | ==== <span class="mw-headline" id="Checklist_Revision_Tab:_Edit_a_Revision"><span class="mw-headline" id="Checklist_Revision_Tab:_Edit_a_Revision"><span class="mw-headline" id="Checklist_Revision_Tab:_Edit_a_Revision"><span class="mw-headline" id="Checklist_Revision_Tab:_Edit_a_Revision"><span class="mw-headline" id="Checklist_Revision_Tab:_Edit_a_Revision"><span class="mw-headline" id="Checklist_Revision_Tab:_Edit_a_Revision"><span class="mw-headline" id="Checklist_Revision_Tab:_Edit_a_Revision"><span class="mw-headline" id="Checklist_Revision_Tab:_Edit_a_Revision"><span class="mw-headline" id="Checklist_Revision_Tab:_Edit_a_Revision"><span class="mw-headline" id="Checklist_Revision_Tab:_Edit_a_Revision"><span class="mw-headline" id="Checklist_Revision_Tab:_Edit_a_Revision"><span class="mw-headline" id="Checklist_Revision_Tab:_Edit_a_Revision"><span class="mw-headline" id="Checklist_Revision_Tab:_Edit_a_Revision"><span class="mw-headline" id="Checklist_Revision_Tab:_Edit_a_Revision"><span class="mw-headline" id="Checklist_Revision_Tab:_Edit_a_Revision"><span class="mw-headline" id="Checklist_Revision_Tab:_Edit_a_Revision"><span class="mw-headline" id="Checklist_Revision_Tab:_Edit_a_Revision"><span class="mw-headline" id="Checklist_Revision_Tab:_Edit_a_Revision"><span class="mw-headline" id="Checklist_Revision_Tab:_Edit_a_Revision"><span class="mw-headline" id="Checklist_Revision_Tab:_Edit_a_Revision"><span class="mw-headline" id="Checklist_Revision_Tab:_Edit_a_Revision"><span class="mw-headline" id="Checklist_Revision_Tab:_Edit_a_Revision">Checklist Revision Tab: Edit a Revision</span></span></span></span></span></span></span></span></span></span></span></span></span></span></span></span></span></span></span></span></span></span> ==== | + | ==== <span class="mw-headline" id="Checklist_Revision_Tab:_Edit_a_Revision"><span class="mw-headline" id="Checklist_Revision_Tab:_Edit_a_Revision"><span class="mw-headline" id="Checklist_Revision_Tab:_Edit_a_Revision"><span class="mw-headline" id="Checklist_Revision_Tab:_Edit_a_Revision"><span class="mw-headline" id="Checklist_Revision_Tab:_Edit_a_Revision"><span class="mw-headline" id="Checklist_Revision_Tab:_Edit_a_Revision"><span class="mw-headline" id="Checklist_Revision_Tab:_Edit_a_Revision"><span class="mw-headline" id="Checklist_Revision_Tab:_Edit_a_Revision"><span class="mw-headline" id="Checklist_Revision_Tab:_Edit_a_Revision"><span class="mw-headline" id="Checklist_Revision_Tab:_Edit_a_Revision"><span class="mw-headline" id="Checklist_Revision_Tab:_Edit_a_Revision"><span class="mw-headline" id="Checklist_Revision_Tab:_Edit_a_Revision"><span class="mw-headline" id="Checklist_Revision_Tab:_Edit_a_Revision"><span class="mw-headline" id="Checklist_Revision_Tab:_Edit_a_Revision"><span class="mw-headline" id="Checklist_Revision_Tab:_Edit_a_Revision"><span class="mw-headline" id="Checklist_Revision_Tab:_Edit_a_Revision"><span class="mw-headline" id="Checklist_Revision_Tab:_Edit_a_Revision"><span class="mw-headline" id="Checklist_Revision_Tab:_Edit_a_Revision"><span class="mw-headline" id="Checklist_Revision_Tab:_Edit_a_Revision"><span class="mw-headline" id="Checklist_Revision_Tab:_Edit_a_Revision"><span class="mw-headline" id="Checklist_Revision_Tab:_Edit_a_Revision"><span class="mw-headline" id="Checklist_Revision_Tab:_Edit_a_Revision"><span class="mw-headline" id="Checklist_Revision_Tab:_Edit_a_Revision"><span class="mw-headline" id="Checklist_Revision_Tab:_Edit_a_Revision"><span class="mw-headline" id="Checklist_Revision_Tab:_Edit_a_Revision"><span class="mw-headline" id="Checklist_Revision_Tab:_Edit_a_Revision"><span class="mw-headline" id="Checklist_Revision_Tab:_Edit_a_Revision"><span class="mw-headline" id="Checklist_Revision_Tab:_Edit_a_Revision">Checklist Revision Tab: Edit a Revision</span></span></span></span></span></span></span></span></span></span></span></span></span></span></span></span></span></span></span></span></span></span></span></span></span></span></span></span> ==== |
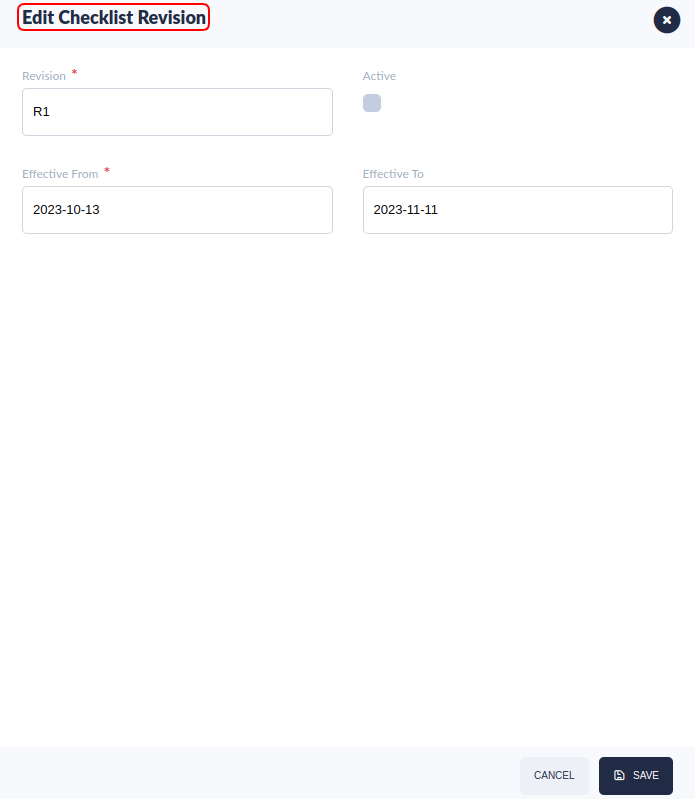
'''Figure 69: Edit Checklist Revision''' | '''Figure 69: Edit Checklist Revision''' | ||
| − | '''[[File:Edit | + | '''[[File:Figure 69- Edit Checklist Revision.png|border|RTENOTITLE]]''' |
| | ||
| Line 1,719: | Line 1,726: | ||
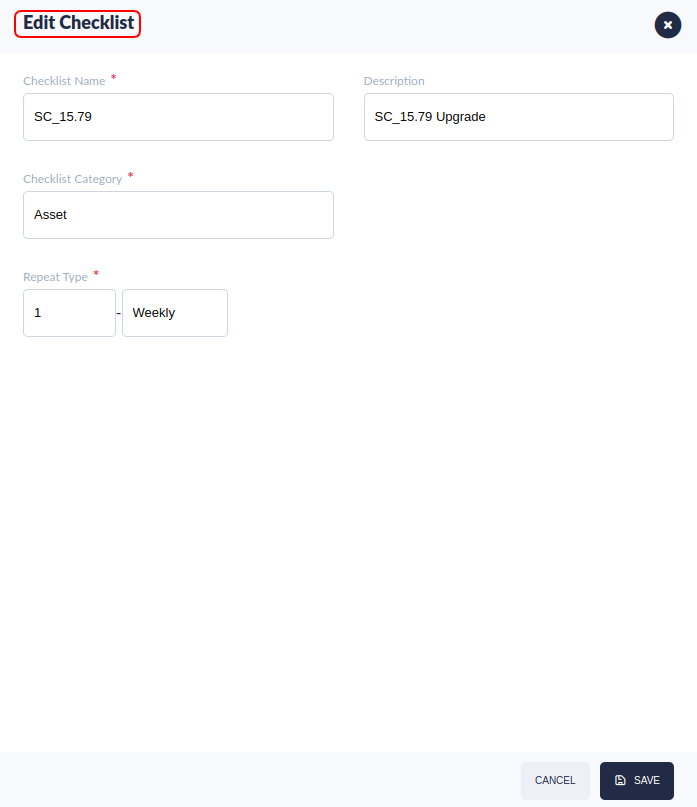
To '''edit''' a Checklist Revision: | To '''edit''' a Checklist Revision: | ||
| − | #Select '''Edit''' from the Checklist | + | #Select the checklist revision then select '''Edit''' from the Checklist toolbar . The '''Edit''' pop-up window appears. |
#Edit all fields as needed (Name and Description fields cannot be modified): | #Edit all fields as needed (Name and Description fields cannot be modified): | ||
*'''Revision''': Denotes the version of the given checklist. | *'''Revision''': Denotes the version of the given checklist. | ||
*'''Effective from/to: '''Denotes the effective time period of the checklist revision. | *'''Effective from/to: '''Denotes the effective time period of the checklist revision. | ||
| − | *''' | + | *'''Active''': This will enable the revision if it was disabled, or disable the revision if it was enabled. |
| − | |||
| − | |||
| − | |||
| − | |||
| − | |||
| | ||
| − | ====== <span class="mw-headline" id="Checklist_Revision_Tab: | + | ==== <span class="mw-headline" id="Checklist_Revision:_Export_a_Revision"><span class="mw-headline" id="Checklist_Revision:_Export_a_Revision"><span class="mw-headline" id="Checklist_Revision_Tab:_Export_a_Revision"><span class="mw-headline" id="Checklist_Revision_Tab:_Export_a_Revision"><span class="mw-headline" id="Checklist_Revision_Tab:_Export_a_Revision"><span class="mw-headline" id="Checklist_Revision_Tab:_Export_a_Revision"><span class="mw-headline" id="Checklist_Revision_Tab:_Export_a_Revision"><span class="mw-headline" id="Checklist_Revision_Tab:_Export_a_Revision"><span class="mw-headline" id="Checklist_Revision_Tab:_Export_a_Revision"><span class="mw-headline" id="Checklist_Revision_Tab:_Export_a_Revision"><span class="mw-headline" id="Checklist_Revision_Tab:_Export_a_Revision"><span class="mw-headline" id="Checklist_Revision_Tab:_Export_a_Revision"><span class="mw-headline" id="Checklist_Revision_Tab:_Export_a_Revision"><span class="mw-headline" id="Checklist_Revision_Tab:_Export_a_Revision"><span class="mw-headline" id="Checklist_Revision_Tab:_Export_a_Revision"><span class="mw-headline" id="Checklist_Revision_Tab:_Export_a_Revision"><span class="mw-headline" id="Checklist_Revision_Tab:_Export_a_Revision"><span class="mw-headline" id="Checklist_Revision_Tab:_Export_a_Revision"><span class="mw-headline" id="Checklist_Revision_Tab:_Export_a_Revision"><span class="mw-headline" id="Checklist_Revision_Tab:_Export_a_Revision"><span class="mw-headline" id="Checklist_Revision_Tab:_Export_a_Revision"><span class="mw-headline" id="Checklist_Revision_Tab:_Export_a_Revision"><span class="mw-headline" id="Checklist_Revision_Tab:_Export_a_Revision"><span class="mw-headline" id="Checklist_Revision_Tab:_Export_a_Revision"><span class="mw-headline" id="Checklist_Revision_Tab:_Export_a_Revision"><span class="mw-headline" id="Checklist_Revision_Tab:_Export_a_Revision"><span class="mw-headline" id="Checklist_Revision_Tab:_Export_a_Revision"><span class="mw-headline" id="Checklist_Revision_Tab:_Export_a_Revision">Checklist Revision: Export a Revision</span></span></span></span></span></span></span></span></span></span></span></span></span></span></span></span></span></span></span></span></span></span></span></span></span></span></span></span> ==== |
| − | #Select a revision under the '''Checklist Revision | + | #Select a revision under the '''Checklist Revision'''. |
| − | |||
| − | |||
| − | |||
| − | |||
| − | |||
| − | |||
| − | |||
#Select '''Export''' from the top menu bar. | #Select '''Export''' from the top menu bar. | ||
#The revision will automatically download onto the local drive in .csv format | #The revision will automatically download onto the local drive in .csv format | ||
| Line 1,749: | Line 1,744: | ||
| | ||
| − | ==== <span class="mw-headline" id="Checklist_Revision_Tab:_Copy_a_Revision"><span class="mw-headline" id="Checklist_Revision_Tab:_Copy_a_Revision"><span class="mw-headline" id="Checklist_Revision_Tab:_Copy_a_Revision"><span class="mw-headline" id="Checklist_Revision_Tab:_Copy_a_Revision"><span class="mw-headline" id="Checklist_Revision_Tab:_Copy_a_Revision"><span class="mw-headline" id="Checklist_Revision_Tab:_Copy_a_Revision"><span class="mw-headline" id="Checklist_Revision_Tab:_Copy_a_Revision"><span class="mw-headline" id="Checklist_Revision_Tab:_Copy_a_Revision"><span class="mw-headline" id="Checklist_Revision_Tab:_Copy_a_Revision"><span class="mw-headline" id="Checklist_Revision_Tab:_Copy_a_Revision"><span class="mw-headline" id="Checklist_Revision_Tab:_Copy_a_Revision"><span class="mw-headline" id="Checklist_Revision_Tab:_Copy_a_Revision"><span class="mw-headline" id="Checklist_Revision_Tab:_Copy_a_Revision"><span class="mw-headline" id="Checklist_Revision_Tab:_Copy_a_Revision"><span class="mw-headline" id="Checklist_Revision_Tab:_Copy_a_Revision"><span class="mw-headline" id="Checklist_Revision_Tab:_Copy_a_Revision"><span class="mw-headline" id="Checklist_Revision_Tab:_Copy_a_Revision"><span class="mw-headline" id="Checklist_Revision_Tab:_Copy_a_Revision"><span class="mw-headline" id="Checklist_Revision_Tab:_Copy_a_Revision"><span class="mw-headline" id="Checklist_Revision_Tab:_Copy_a_Revision"><span class="mw-headline" id="Checklist_Revision_Tab:_Copy_a_Revision"><span class="mw-headline" id="Checklist_Revision_Tab:_Copy_a_Revision">Checklist Revision | + | ==== <span class="mw-headline" id="Checklist_Revision:_Copy_a_Revision"><span class="mw-headline" id="Checklist_Revision:_Copy_a_Revision"><span class="mw-headline" id="Checklist_Revision_Tab:_Copy_a_Revision"><span class="mw-headline" id="Checklist_Revision_Tab:_Copy_a_Revision"><span class="mw-headline" id="Checklist_Revision_Tab:_Copy_a_Revision"><span class="mw-headline" id="Checklist_Revision_Tab:_Copy_a_Revision"><span class="mw-headline" id="Checklist_Revision_Tab:_Copy_a_Revision"><span class="mw-headline" id="Checklist_Revision_Tab:_Copy_a_Revision"><span class="mw-headline" id="Checklist_Revision_Tab:_Copy_a_Revision"><span class="mw-headline" id="Checklist_Revision_Tab:_Copy_a_Revision"><span class="mw-headline" id="Checklist_Revision_Tab:_Copy_a_Revision"><span class="mw-headline" id="Checklist_Revision_Tab:_Copy_a_Revision"><span class="mw-headline" id="Checklist_Revision_Tab:_Copy_a_Revision"><span class="mw-headline" id="Checklist_Revision_Tab:_Copy_a_Revision"><span class="mw-headline" id="Checklist_Revision_Tab:_Copy_a_Revision"><span class="mw-headline" id="Checklist_Revision_Tab:_Copy_a_Revision"><span class="mw-headline" id="Checklist_Revision_Tab:_Copy_a_Revision"><span class="mw-headline" id="Checklist_Revision_Tab:_Copy_a_Revision"><span class="mw-headline" id="Checklist_Revision_Tab:_Copy_a_Revision"><span class="mw-headline" id="Checklist_Revision_Tab:_Copy_a_Revision"><span class="mw-headline" id="Checklist_Revision_Tab:_Copy_a_Revision"><span class="mw-headline" id="Checklist_Revision_Tab:_Copy_a_Revision"><span class="mw-headline" id="Checklist_Revision_Tab:_Copy_a_Revision"><span class="mw-headline" id="Checklist_Revision_Tab:_Copy_a_Revision"><span class="mw-headline" id="Checklist_Revision_Tab:_Copy_a_Revision"><span class="mw-headline" id="Checklist_Revision_Tab:_Copy_a_Revision"><span class="mw-headline" id="Checklist_Revision_Tab:_Copy_a_Revision"><span class="mw-headline" id="Checklist_Revision_Tab:_Copy_a_Revision">Checklist Revision: Copy a Revision</span></span></span></span></span></span></span></span></span></span></span></span></span></span></span></span></span></span></span></span></span></span></span></span></span></span></span></span> ==== |
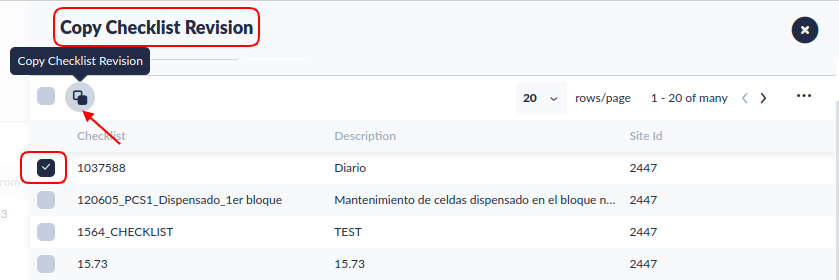
| − | #Select '''Copy''' from the top menu of the '''Checklist Revision | + | #Select '''Copy''' from the top menu of the '''Checklist Revision page'''. A '''Copy Checklist Revision''' pop-up Window displays. Select the checklist to copy into the '''Checklist''', and choose '''Copy'''. |
#The new checklist will now display on the checklist revision list. | #The new checklist will now display on the checklist revision list. | ||
'''Figure 70: Copy Checklist Revision''' | '''Figure 70: Copy Checklist Revision''' | ||
| − | '''[[File:Copy Checklist Revision.png|RTENOTITLE]]''' | + | '''[[File:Figure 70- Copy Checklist Revision.png|border|RTENOTITLE]]''' |
| − | |||
| − | |||
| − | |||
| − | |||
| | ||
| − | ===== <span class="mw-headline" id="Edit_Checklist:_Asset_Type_Tab"><span class="mw-headline" id="Edit_Checklist:_Asset_Type_Tab"><span class="mw-headline" id="Edit_Checklist:_Asset_Type_Tab"><span class="mw-headline" id="Edit_Checklist:_Asset_Type_Tab"><span class="mw-headline" id="Edit_Checklist:_Asset_Type_Tab"><span class="mw-headline" id="Edit_Checklist:_Asset_Type_Tab"><span class="mw-headline" id="Edit_Checklist:_Asset_Type_Tab"><span class="mw-headline" id="Edit_Checklist:_Asset_Type_Tab"><span class="mw-headline" id="Edit_Checklist:_Asset_Type_Tab"><span class="mw-headline" id="Edit_Checklist:_Asset_Type_Tab"><span class="mw-headline" id="Edit_Checklist:_Asset_Type_Tab"><span class="mw-headline" id="Edit_Checklist:_Asset_Type_Tab"><span class="mw-headline" id="Edit_Checklist:_Asset_Type_Tab"><span class="mw-headline" id="Edit_Checklist:_Asset_Type_Tab"><span class="mw-headline" id="Edit_Checklist:_Asset_Type_Tab"><span class="mw-headline" id="Edit_Checklist:_Asset_Type_Tab"><span class="mw-headline" id="Edit_Checklist:_Asset_Type_Tab"><span class="mw-headline" id="Edit_Checklist:_Asset_Type_Tab"><span class="mw-headline" id="Edit_Checklist:_Asset_Type_Tab"><span class="mw-headline" id="Edit_Checklist:_Asset_Type_Tab"><span class="mw-headline" id="Edit_Checklist:_Asset_Type_Tab"><span class="mw-headline" id="Edit_Checklist:_Asset_Type_Tab">Edit Checklist: Asset Type | + | === <span class="mw-headline" id="Edit_Checklist:_Asset_Type"><span class="mw-headline" id="Edit_Checklist:_Asset_Type_Tab"><span class="mw-headline" id="Edit_Checklist:_Asset_Type_Tab"><span class="mw-headline" id="Edit_Checklist:_Asset_Type_Tab"><span class="mw-headline" id="Edit_Checklist:_Asset_Type_Tab"><span class="mw-headline" id="Edit_Checklist:_Asset_Type_Tab"><span class="mw-headline" id="Edit_Checklist:_Asset_Type_Tab"><span class="mw-headline" id="Edit_Checklist:_Asset_Type_Tab"><span class="mw-headline" id="Edit_Checklist:_Asset_Type_Tab"><span class="mw-headline" id="Edit_Checklist:_Asset_Type_Tab"><span class="mw-headline" id="Edit_Checklist:_Asset_Type_Tab"><span class="mw-headline" id="Edit_Checklist:_Asset_Type_Tab"><span class="mw-headline" id="Edit_Checklist:_Asset_Type_Tab"><span class="mw-headline" id="Edit_Checklist:_Asset_Type_Tab"><span class="mw-headline" id="Edit_Checklist:_Asset_Type_Tab"><span class="mw-headline" id="Edit_Checklist:_Asset_Type_Tab"><span class="mw-headline" id="Edit_Checklist:_Asset_Type_Tab"><span class="mw-headline" id="Edit_Checklist:_Asset_Type_Tab"><span class="mw-headline" id="Edit_Checklist:_Asset_Type_Tab"><span class="mw-headline" id="Edit_Checklist:_Asset_Type_Tab"><span class="mw-headline" id="Edit_Checklist:_Asset_Type_Tab"><span class="mw-headline" id="Edit_Checklist:_Asset_Type_Tab"><span class="mw-headline" id="Edit_Checklist:_Asset_Type_Tab"><span class="mw-headline" id="Edit_Checklist:_Asset_Type_Tab"><span class="mw-headline" id="Edit_Checklist:_Asset_Type_Tab"><span class="mw-headline" id="Edit_Checklist:_Asset_Type_Tab"><span class="mw-headline" id="Edit_Checklist:_Asset_Type_Tab"><span class="mw-headline" id="Edit_Checklist:_Asset_Type_Tab">Edit Checklist: Asset Type </span></span></span></span></span></span></span></span></span></span></span></span></span></span></span></span></span></span></span></span></span></span></span></span></span></span></span></span> === |
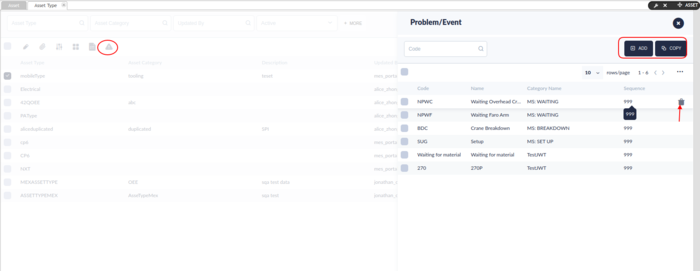
| − | In the '''Asset ''' | + | In the '''Asset Type page''', users can '''Add''' or '''Delete Asset''' Types associated with a checklist. |
| | ||
| − | '''Figure 71: Checklist Asset Type | + | '''Figure 71: Checklist Asset Type '''<br/> [[File:Figure 71- Checklist Asset Type .png|border|RTENOTITLE]] |
| | ||
| − | To '''Add''''' Asset Type: | + | To '''Add''''' Asset Type:'' |
#Select the '''Add '''icon from the menu. The '''Add Asset Type '''pop-up window displays. | #Select the '''Add '''icon from the menu. The '''Add Asset Type '''pop-up window displays. | ||
| Line 1,784: | Line 1,775: | ||
To '''Delete:''' | To '''Delete:''' | ||
| − | #Select the '''Asset ''''''Type'' '''''by activating the checkbox next to its listing. | + | #Select the '''Asset''''' ''''''Type'' '''''by activating the checkbox next to its listing. |
#Select the '''Delete''' icon from the top menu bar.<br/> | #Select the '''Delete''' icon from the top menu bar.<br/> | ||
| Line 1,791: | Line 1,782: | ||
| | ||
| − | ===== <span class="mw-headline" id="Edit_Checklist:_Asset_Tab"><span class="mw-headline" id="Edit_Checklist:_Asset_Tab"><span class="mw-headline" id="Edit_Checklist:_Asset_Tab"><span class="mw-headline" id="Edit_Checklist:_Asset_Tab"><span class="mw-headline" id="Edit_Checklist:_Asset_Tab"><span class="mw-headline" id="Edit_Checklist:_Asset_Tab"><span class="mw-headline" id="Edit_Checklist:_Asset_Tab"><span class="mw-headline" id="Edit_Checklist:_Asset_Tab"><span class="mw-headline" id="Edit_Checklist:_Asset_Tab"><span class="mw-headline" id="Edit_Checklist:_Asset_Tab"><span class="mw-headline" id="Edit_Checklist:_Asset_Tab"><span class="mw-headline" id="Edit_Checklist:_Asset_Tab"><span class="mw-headline" id="Edit_Checklist:_Asset_Tab"><span class="mw-headline" id="Edit_Checklist:_Asset_Tab"><span class="mw-headline" id="Edit_Checklist:_Asset_Tab"><span class="mw-headline" id="Edit_Checklist:_Asset_Tab"><span class="mw-headline" id="Edit_Checklist:_Asset_Tab"><span class="mw-headline" id="Edit_Checklist:_Asset_Tab"><span class="mw-headline" id="Edit_Checklist:_Asset_Tab"><span class="mw-headline" id="Edit_Checklist:_Asset_Tab"><span class="mw-headline" id="Edit_Checklist:_Asset_Tab"><span class="mw-headline" id="Edit_Checklist:_Asset_Tab">Edit Checklist: Asset | + | === <span class="mw-headline" id="Edit_Checklist:_Asset_Tab"><span class="mw-headline" id="Edit_Checklist:_Asset_Tab"><span class="mw-headline" id="Edit_Checklist:_Asset_Tab"><span class="mw-headline" id="Edit_Checklist:_Asset_Tab"><span class="mw-headline" id="Edit_Checklist:_Asset_Tab"><span class="mw-headline" id="Edit_Checklist:_Asset_Tab"><span class="mw-headline" id="Edit_Checklist:_Asset_Tab"><span class="mw-headline" id="Edit_Checklist:_Asset_Tab"><span class="mw-headline" id="Edit_Checklist:_Asset_Tab"><span class="mw-headline" id="Edit_Checklist:_Asset_Tab"><span class="mw-headline" id="Edit_Checklist:_Asset_Tab"><span class="mw-headline" id="Edit_Checklist:_Asset_Tab"><span class="mw-headline" id="Edit_Checklist:_Asset_Tab"><span class="mw-headline" id="Edit_Checklist:_Asset_Tab"><span class="mw-headline" id="Edit_Checklist:_Asset_Tab"><span class="mw-headline" id="Edit_Checklist:_Asset_Tab"><span class="mw-headline" id="Edit_Checklist:_Asset_Tab"><span class="mw-headline" id="Edit_Checklist:_Asset_Tab"><span class="mw-headline" id="Edit_Checklist:_Asset_Tab"><span class="mw-headline" id="Edit_Checklist:_Asset_Tab"><span class="mw-headline" id="Edit_Checklist:_Asset_Tab"><span class="mw-headline" id="Edit_Checklist:_Asset_Tab"><span class="mw-headline" id="Edit_Checklist:_Asset_Tab"><span class="mw-headline" id="Edit_Checklist:_Asset_Tab"><span class="mw-headline" id="Edit_Checklist:_Asset_Tab"><span class="mw-headline" id="Edit_Checklist:_Asset_Tab"><span class="mw-headline" id="Edit_Checklist:_Asset_Tab"><span class="mw-headline" id="Edit_Checklist:_Asset_Tab">Edit Checklist: Asset </span></span></span></span></span></span></span></span></span></span></span></span></span></span></span></span></span></span></span></span></span></span></span></span></span></span></span></span> === |
| − | Within the '''Asset | + | Within the '''Asset page,''' the user may view the assets for the respective asset types that were added in the '''Asset Type''' tab. Assets are listed by '''Asset ID,''' '''Asset Name,''' '''Asset Type,'''and '''Department'''. |
| − | '''Figure 72: Checklist: Asset | + | '''Figure 72: Checklist: Asset''' |
| − | [[File:Figure | + | [[File:Figure 72- Checklist Asset.png|border|800px|RTENOTITLE]] |
| | ||
Revision as of 02:01, 1 November 2023
42Q Home > Shop Floor Control > Configuration > CMMS Asset
Contents
- 1 Asset
- 1.1 Asset
- 1.2 Search/Filter Assets
- 1.3 More View Features
- 1.4 Export Assets
- 1.5 Add Assets
- 1.6 Bulk Upload Assets
- 1.7 Edit Assets
- 2 Production Line
- 3 Location
- 4 Asset Type
- 5 Checklist
- 6 Problem
- 7 Event Code
- 8 Problem Type
- 9 Problem Category
- 10 Asset Mapping
- 11 Import Mapping
- 12 My Asset
- 13 Asset View
- 14 Repair Code Category
- 15 Repair Code
- 16 Spare Parts Usage
Asset
The Asset module is designed for administrators. Within CMMS Asset, approved users can configure details related to a plant's assets, and perform administration-related actions. There are sub-modules in the Asset portal available to the system administrators. Each submodule is described in detail within this work instruction.
| Sub-module Name | Function |
|---|---|
| Asset |
|
| Production Line |
|
| Location |
|
| Asset Type |
|
| Checklist |
|
| Problem |
|
| Problem Type |
|
| Problem Category |
|
| Asset Mapping |
|
| Import Mapping |
|
| My Asset |
|
| Asset View |
|
| Event Code |
|
| Repair Category |
|
| Repair Code |
|
| Spare Parts Usage |
|
Figure 1: CMMS Asset Module
Asset
The Asset sub-module allows users to view assets and to perform various tasks related to asset management. Users can search/filter the Asset List; add/edit assets; export/copy asset information onto local drives, and view details of a specific asset. Users can define the calibration, maintenance, and attachment information for the assets.
1. To access the CMMS Asset sub-module, navigate to Shop Floor Control > Configuration > CMMS Asset.
2. The Asset List displays all existing assets.
Figure 2: Asset List Page Main Menu
Search/Filter Assets
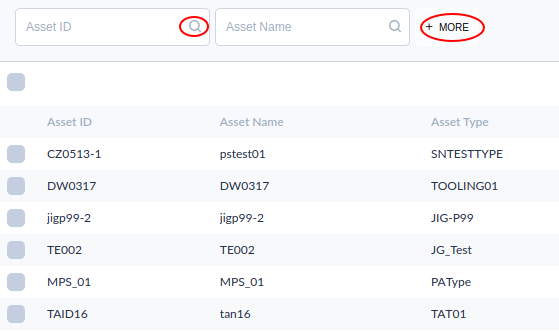
Under the Asset sub-module, users can search and filter the assets list. To search/filter the entries in the list:
Figure 3: Search Asset
1. Specify the search criteria by using the filters provided:
- Asset ID
- Asset Name
- Line Name
- Asset Serial Number
- Supplier
- Asset Type
- Status
- Calibration Needed
- Customer Owned
- Manufacturer
- 2. Select the search icon (e.g. magnifying glass).
More View Features
Users can hover over data in any of the columns of CMMS Asset to view the field in hover view.
Figure 4: Hover Feature in CMMS Asset View 1
Figure 4a: Hover Feature in CMMS Asset View 2
Export Assets
Users may export asset information as a .csv file
- Select the ... icon on the top menu bar.
- Choose the Export All Columns or Export Visible Columns.
- Information will automatically download onto the user’s local drive.
- The user may then rename, save, print, or share as desired.
Add Assets
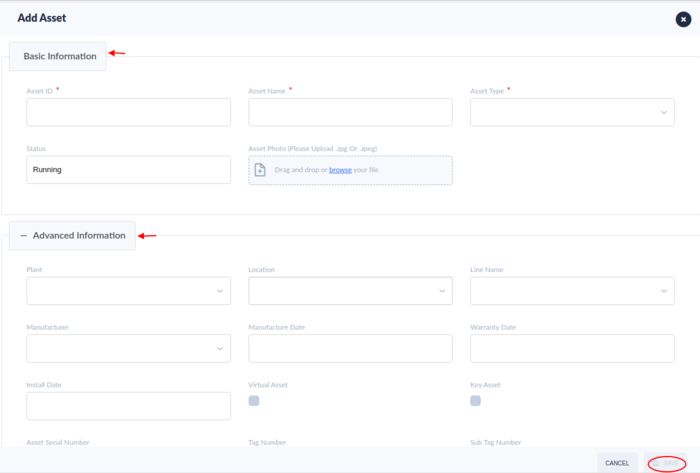
Under the Asset sub-module, users can add assets to the asset list. To add an asset:
1. Select ADD ASSET from the top right menu. The Add Asset window appears.
Note: Configuration can be completed within either the add or edit functions. Configuration tasks can also be completed within the Work Order & Preventive Maintenance module. (Administration > Shop Floor Control > Configuration > Work Order & Preventive Maintenance).
Figure 6: Add Asset
2. Enter the asset Basic information into the appropriate fields:
- Asset ID: Enter the asset ID number here. Take note that the asset ID cannot be changed or edited once it is established in the system.
- Asset Name: Designation for the asset.
- Asset Type: The asset type for a group of assets (e.g. reflow ovens, test equipment) Multiple configurations can be configured according to asset type (groups, assets, checklists, etc.) - adding asset types saves significant setup time.Select Asset Type from the drop-down list.
- Status: Asset status can be:
- Running: Asset is currently running on the line.
- Obsolete: An asset that has been temporarily or permanently moved from production.
- Spare: Asset is not currently in production, but is available for use if needed.
- In Maintenance: The tool is currently being maintained by PM plan.
- Unscheduled Down: Asset breaks down unscheduled.
- Scheduled Down: Asset is down scheduled.
- Setup: Asset is currently waiting for running because of setup.
- Idle: Asset is not in use.
- Calibration: The Asset is under the calibration process.
- To be reviewed: This status happens when the tooling maintenance work order is not conducted till the milestone reaches or maximum usage has reached but the engineer wants to double check before scrapping.
- Default value = To be reviewed.
- Asset Photo: An image of the asset for easy identification. Users Browse and Upload Asset images from their local drive, then to view the image.
- Enter the Advanced information into the appropriate fields:
Figure 6a: Add Asset Advanced Information
- Plant: Plant where the Asset is located.
- Line Name: Production line where the asset is located.
- Location Number: The numbered ID associated with the Location for that asset.
- Location: Location for the asset. There are 3 levels available for use: Building, Floor, and Shop Floor. A Production Line: This field is disabled unless a shop floor is selected in the Location # field, as the Production Line options are based upon the shop floor location.
- Manufacturer: Displays all available manufacturers. Select one from the drop-down list.
- Manufacture Date: Date on which the asset was manufactured. The current date is selected by default. yyyy/mm/dd
- Warranty Date: Date on which the warranty period of the asset ends. The current date is selected by default.
- Install Date: The date on which the asset is installed. The current date is selected by default.
- Virtual Asset: Virtual assets represent those “machines” or “tools” that are not physical in nature, such as software packages, or computer applications that require regular maintenance of a different type, such as periodic updates, data cleansing, or virus scans. Checkbox interface. Default is unchecked.
- Key Asset: Key Asset is designed as an asset label/property intended to be used for production scheduling, which means bottleneck asset for one production line. For example, If one key asset is scheduled down (according to plant calendar etc), Production Scheduling may regard the whole MFG line as down..
- Asset Serial Number: The Serial Number of the asset.
- Owner: Department in charge of the asset’s maintenance and repair.
- Sub Tag Number: The sub tag number marked on the asset itself. This number will be used when configuring and sending data virtually.
- Cost Center: Cost center for the asset.
- Locator: Locator for the asset.
- Supplier: The supplier for the asset.
- Install Date: Date on which the asset is installed. The current date is selected by default.
- Run Time(Hours): The time (in hours) the asset keeps on running in a lifecycle, something like how many miles has been running for a car..
- Customer Owned: Asset is owned by the customer. Checkbox. Default is unchecked.
- Customer: The customer name.
- PoC : Point of contact.The person that is in charge of that machine on the floor or uses the machine on the floor to manufacture a product..
- PO Number: The PO number for the asset.
- Owning Dept.: Department to which the asset belongs.
- Using Department: Department who uses the asset. This field is optional.
- Additional Emails: Add email addresses of those individuals involved with this asset’s maintenance, but not included in group configurations. Note: To add multiple email addresses, use a list format with commas in between each email address.
- Model Number: The Model number of the asset.
- Asset Description: This field is optional. Include any additional information about the asset here.
Note:
1. The Asset ID, Asset Name, and Asset Type are mandatory fields.Asset ID and Asset Name allow space in between.
2. Manufacturers and Suppliers are defined in CMMS Admin > Company. When configuring Company information it is important to select the appropriate heading from the drop-down screen. Users can select a company as a Supplier, Manufacturer, or Both. If selected incorrectly, companies will not be available in the drop-down list
3.The Warranty Date can not be prior to the Manufacture Date.If the warranty date set prior to the manufacture date, a warning message will prompt up.
Bulk Upload Assets
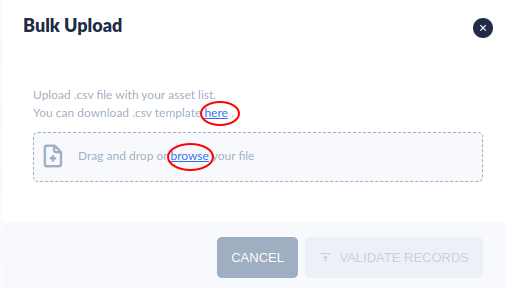
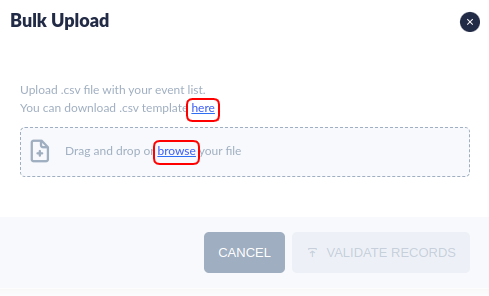
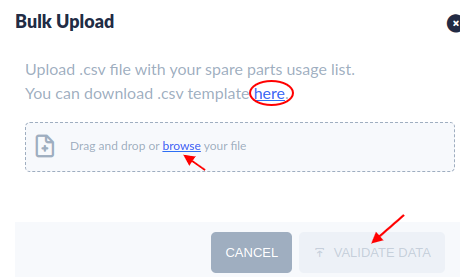
With the Bulk Upload asset function, users can import(create/add) many assets at one time. This function involves downloading the template file, uploading the file and validating whether the data is valid. Users can download the invalid records to check and correct.
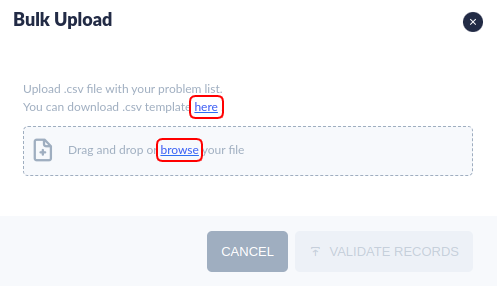
- Select the BULK UPLOAD , the Bulk Upload window pop-up.
Figure 7: Bulk Upload Asset
- Select the here(blue link) to download the .csv template file and fill your assets records if you do not have the template file.
- Drag and drop or select browse(blue link) to open your file.
- Select VALIDATE RECORDS, the UPLOAD button will show if the validation process passed.
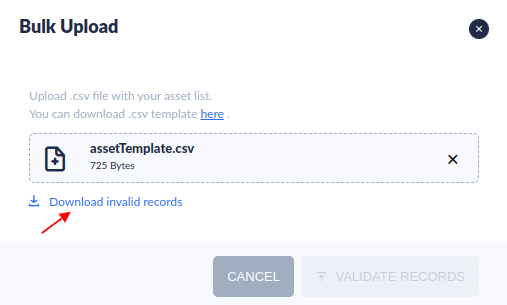
- Select Upload to save the assets records to the CMMS system.
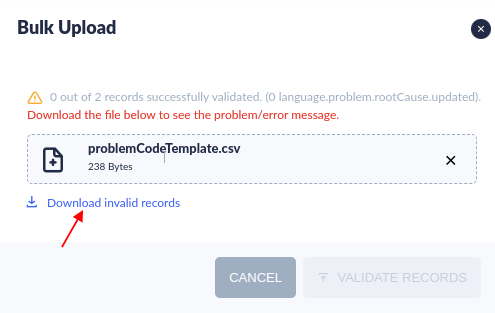
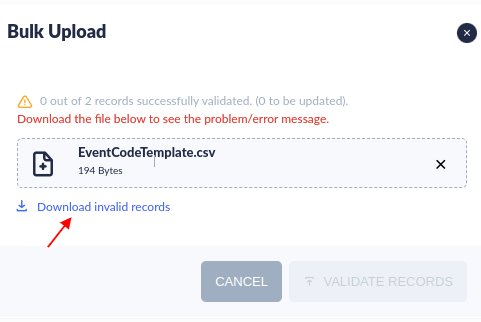
- Select Download invalid records to download and check the invalid records if some records are invalid.
Figure 7a: Download invalid Records
Edit Assets
1. Select an asset from the list , then the buttons list for asset properties will show at the top and right.
2. There are Tabs/buttons available for edit/configuration: Edit Asset, Calibration, Maintenance, Group, Attachment, View, Copy Asset, Print, Spare Parts.
3.Select Edit Asset. This opens the Edit Asset Properties pop-up window.
4. The General is displayed by default.
Figure 8: Edit Asset Properties Screen
![]()
Edit Asset: General
Under the Edit Asset window, the user may edit the property fields that were defined when the Asset was created:
Select Save to save the changes of the asset information.
Figure 8a: Edit Asset
Edit Asset: Calibration
- Calibration assignments are created according to the asset, using the asset’s Calibration function.
- Select the Calibration
 icon to open the Calibration subpage.
Figure 8: Edit Asset Calibration Details
2. Input all applicable data, then click the Save button to submit or Cancel to abort.
Calibration Fields
The following fields are available for input:
- Calibration Needed(?): Define whether this asset needs calibration. Select the checkbox if the asset needs calibration. Note: Once configured, the necessary calibration will appear in the Calibration Requested list under Production > Calibration > My Requested.
Note: When creating a new Asset, the system will set Calibration Needed false by default, that means the Assets doesn’t need calibration, the user can select the checkbox if the asset needs calibration.
- Status: The following status options refer to the Asset being calibrated:
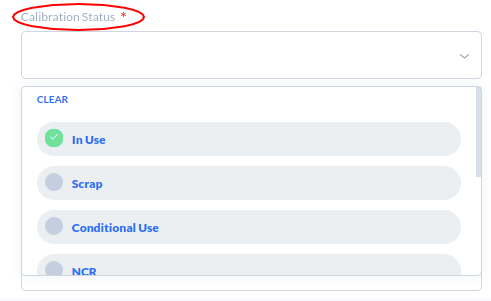
Figure 9: Status Menu
- In use: Calibration OK: paste label
- Scrap: Cannot repair; must be scrapped
- Conditional Use: In use on the special condition
- NCR (No Calibration Request): No scale with the machine; paste “NCR” label
- NIS: (Not In Service): The machine is presently not in service and calibration is not needed at this time; paste “NIS” label.
Note: Assigning an unused asset to “NIS” reduces costs.
- Lost: Lost by user department and cannot be located; paste “lost” label to mini-machine and change status to “Lost.”.
Note: By marking the asset status lost, the record remains in the MES system.
- RTC: (Return to Customer).
Note: Once returned, the asset will be removed from the system. It belongs to the customer and is no longer available to the plant.
- On hold: Calibration failure; repair and recalibration needed
- Method:
- Internal calibration: Calibration is performed by the company’s in-house lab (see Type: QA Calibration, below).
- External calibration: Calibration is performed by calibration service providers that are accredited to ISO/IEC 17025 or accredited by CNAS, and qualified by 42Q. (see Type: Engineering Calibration, below).
- Accuracy: Required Tolerance Level for the asset calibration, such as ±0.3℃.
- SOP/WI: The SOP/WI document for the calibration.
- Internal Costs: Amount billed for this calibration.
- Money Spent: (This field is Optional) Amount billed for this calibration.
- Currency: The type of currency used in the plant, according to country. Choices include: CNY/USD/JPY/EUR/MYR/THB/INR/HUF/GBP/AUD/BRL/CAD/CHF/CZK/DKK/HKD/IDR/ILS/KRW/MXN/NOK/NZD/PLN/SEK/SGD/TWD.
- Calibration Service Provider: Calibration Service Provider for the asset being serviced.
- Alert Email: Send an automatic email alert to the rescheduling group. Note: An automatic email will be sent to the rescheduling/approver and requester for rescheduling/approval action if uses select the checkbox.
- Alert Email Before (Days):The number of days before the scheduled calibration to send an email alert.
- Need Approval: Choose whether or not the calibration needs to be approved.
- Approval User*: If the calibration needs approval, the user must select the approval user by choosing a user from the drop-down list provided.
- Repeat Type: The period (in Day/Month/Year) between calibrations.
- Repeat Every: Calibration repeat frequency.
Note: The Engineering Calibration team or QA Calibration team (located under Type) specify current calibration dates for each piece of equipment, then according to calibration frequency (Repeat Type(Day/Month/Year), the system calculates the next calibration (due) date for each piece of equipment.
- Grace Period(Days): The time period (in days) available to change the next calibration date. Days can be set before and after (Forward/backward) the last calibration date or after (Backward) the next calibration date. The default for this setting is one week (7 days); plants typically set this date for the 15th day of the month.
- Last Calibration Date: The last calibration date is synced from the actual calibration date filled at the calibration record.
- Next Calibration Date: This field automatically populates based on the date chosen above and the number of days chosen in the interval field.
- Grace Orientation: Grace orientation determines whether the grace period for rescheduling calibration is before or after the date of the next calibration. Choose Forward/Backward to set the period before and after the last calibration date. Choose Backward to set the time period after the next calibration date.
- EXAMPLE: If the last calibration date was the 15th of the month, a 7-day Forward/Backward grace period would allow the user to reschedule the calibration date anytime between the 8th day of the month and the 23rd of the month. A 7-day Backward grace period in this example allows the user to change the calibration date anytime between the 15th - 23rd of the month.
- Note: If Forward is chosen, Next to Last Calibrated Date cannot be later than Last Calibrated Date+Calibration Internal. If Backward is chosen, Next to Last Calibrated Date cannot be later than Last Calibrated Date+Calibration Internal+Grace Period.
- Comment: Add any additional comments in this text box.
Edit Asset: Maintenance
Users can add/edit tooling maintenance requirements for an individual asset in the asset’s Maintenance Tab.
See Edit Asset Type: Maintenance Tab for instructions on Tooling Maintenance. Complete instructions and background are available in Tooling Control Work Instructions.
Edit Asset: Group
- Using the Group button, users can assign groups to the selected asset. There are two tabs available within the Group : Group list; Inherited Groups.
- Select the Group
 icon to open the Group subpage.
Group : Assign a Group
The Group function is used to assign groups to a selected asset.
Note: When doing Group configuration at Asset level by Add button, it's led by Group Name rather than group category. When the user selects a group name, all the predefined group categories will be displayed in the column with a checkbox by default, the user can be able to select/unselect one or more categories for specific assets if necessary.
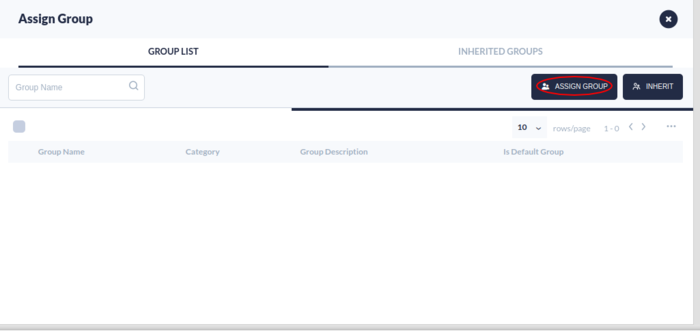
- Users may add groups from the selected group list by choosing the ASSIGN GROUP icon.
Figure 10: Assign Group
- The Group List pop-up window displays.
- Selected Groups appear in the top portion of the tab.
- Groups to be added (Inherited Groups) are listed on the bottom portion of the tab.
Note: This list displays the configuration completed in the Group function of CMMS Admin (Shop Floor Production > Configuration > CMMS Admin > Group > Add Group). This association will be applied when creating work orders.
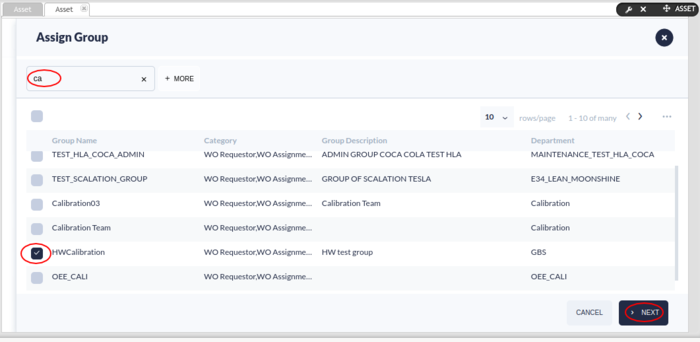
- The user can search groups by Group Name, category, and Department.
Figure 11: Edit Asset: Search Groups
- Select the button NEXT, then the Category will appear at the list below.
Note: When the user selects a group name, all the predefined group categories will be displayed in the column with the checkbox by default, user can be able to select/unselect one or more categories for a specific asset if necessary.
Figure 12: Edit Asset: Group Category
- Select/unselect the Category assigned to the asset from the Category list.
- Categories include:
- WO Requester: Group that can request the Work Order
- WO Assignment: Group can be assigned to complete the Work Order
- PM Requestor: Group that can request the Preventive Maintenance
- PM Assignment: Group can be assigned to the Preventive Maintenance
- PM Notification: Group to receive an automatic email notification for Preventive Maintenance Work Order
- PM Rescheduling: Group assigned to reschedule Preventive Maintenance
- Escalation: Group that will receive email notifications if the work order is not opened by the WO Assign group within a set period of time.
- Calibration Requestor: Group that can request the calibration
- Calibration Assignment: Group can be assigned to complete the calibration
- Calibration Rescheduling: Group can be assigned to reschedule the calibration
- Calibration Notification: Group to receive an automatic email notification for Calibration Work Order
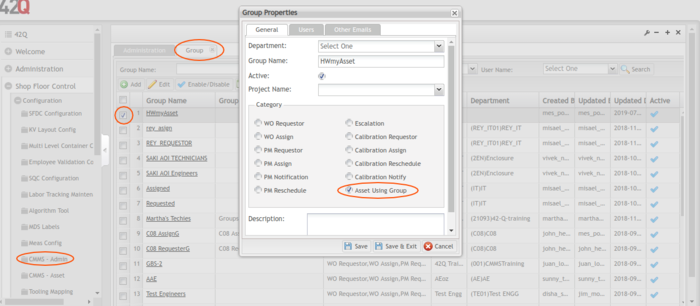
- Asset Using Group: Group that uses Asset, If Asset assigned to the Asset Using Group, it can be managed at the My Asset module.
- Once located, select the group line by activating the checkbox next to its listing.
- Select SAVE to save the Group or Cancel to abort.
- Once added, the new group will display on the top section of the Group Tab page.
Figure 12a: Edit Asset: Assign Group Succeed Category
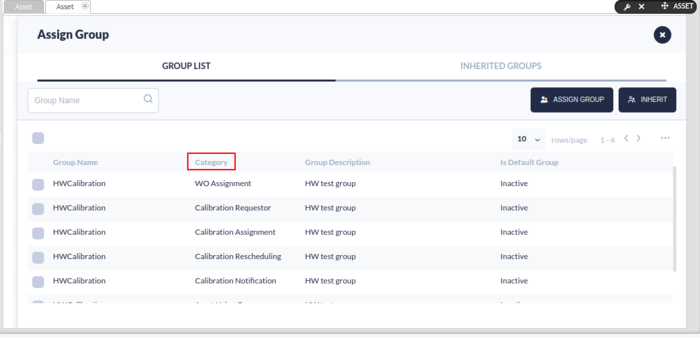
Group : Import from an Inherited Group
The Import from Inherited Groups option saves configuration time for busy administrators by linking similar predefined groups to the current group. Inherited Groups are selected according to their production line or Location (CMMS Asset > Production Line). As an example, consider the following:
- Manager A is assigning groups to an Optical Test Inspection machine that runs Production Line 2.
- The In-Circuit Test Inspection Machinery that operates Production Line 1 already has a group of trained technicians assigned.
- Manager A wants to assign Production Line 1 technician to Production Line 2.
- She selects Import from Inherited Group to assign Production Line 1’s technicians to Production Line 2.
- Please Note: For groups to be available in the Import from Inherited Group section, Production Line 1 must be mapped to the Group. (CMMS Asset > Production Line).
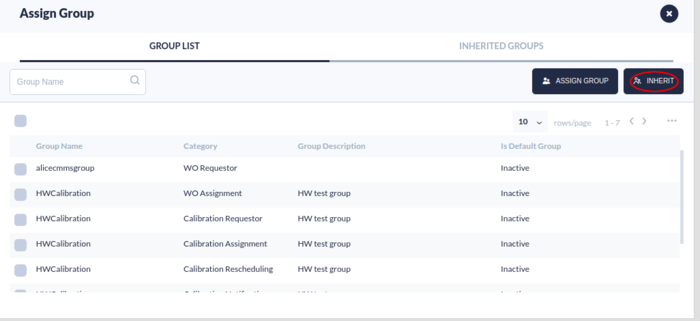
- Please Note: Manager A cannot assign Production Line 1’s Group to Production Line 2 unless the group has been mapped to the Production Line first. If the group has not been mapped to the production line, there will be no data available in the Import from Inherited Group section. This association is defined in CMMS Asset > Production Line. Users may also add groups from the Inherited Group List located on the bottom portion of the Group Tab page.
Note: For asset Inherited group, will be inherited from groups mapped with production line first, if production line doesn’t map group, will be inherited from groups mapped with Location.
Tim Import from Inherited Group:
- Select the Import from Inherited Group icon.
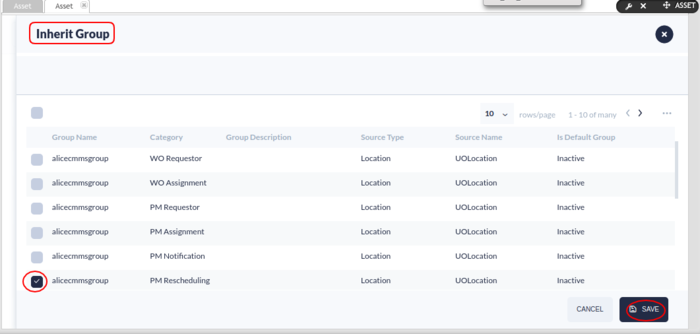
- A pop-up window displays, entitled Group List.
- Choose the Inherited Group from the Group List.
- Select SAVE to save or CANCEL to abort.
- Once added, the Group will display in the top portion of the Group Tab.
Figure 13: Import from an Inherited Group
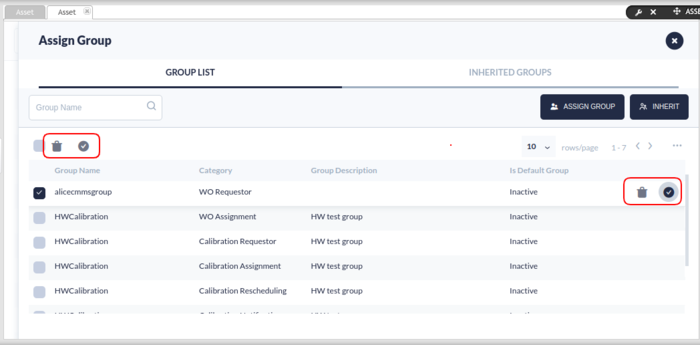
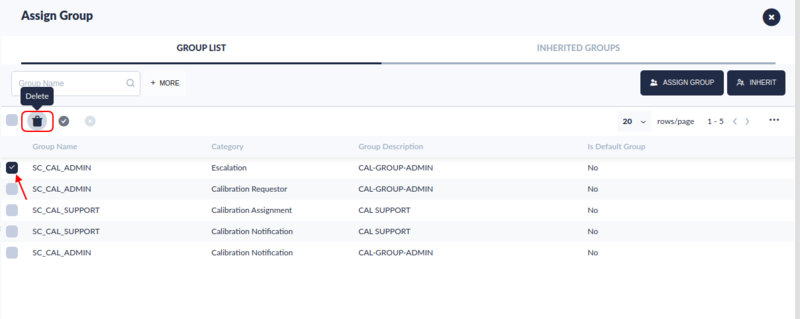
Group : Delete/Default
1. Selected groups can be deleted within the Group of Edit Asset.
2. To delete:
- Select the Group by activating the checkmark next to its name.
- Choose DELETE.
3. Users can also change the status of a group within the Group of Edit Asset.
4. To mark the group as the Default Group:
- Select the Group by activating the checkmark next to its name.
- Choose “Is Default Group.”
- Users may remove the default status by selecting the “Is Default Group” again.
- Groups that are not the default group are noted as inactive for the 'Is Default 'Group column.
Figure 14: Group : Delete a Group/Mark as Default
Note: Groups are configured within CMMS Admin (Shop Floor Control > Configuration > CMMS Admin) underneath Group.
Edit Asset: Attachment
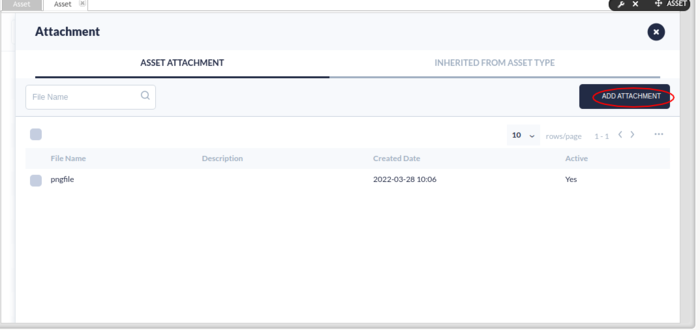
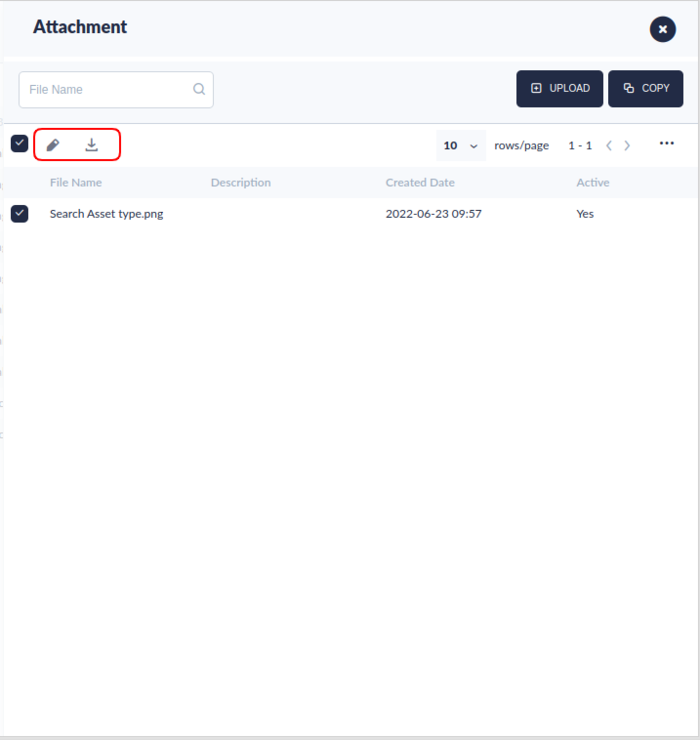
Within the Attachment , users can view, upload, edit, or enable/disable attachment files pertaining to the given asset.
Figure 15: Attachment Window
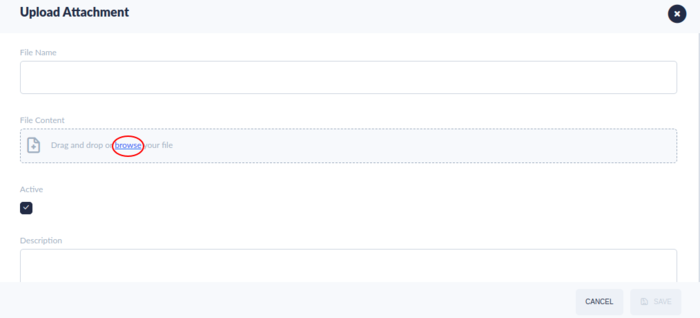
To add attachment:
1. Choose the ADD ATTACHMENT icon .
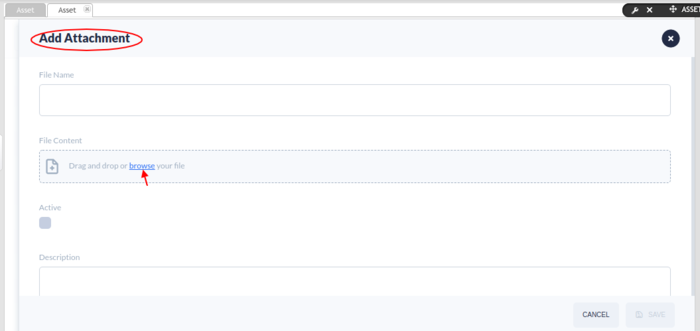
2. The Add Attachment pop-up window displays.
3. The following fields are available for completion:
- File Name (Mandatory)
- File Content (Mandatory): Locate the file on the local drive by typing its name in the File Content field.
- Active/Inactive Status: Mark whether the Asset is Active or Inactive. (Default is Active)
- Description: (Optional)
4. Choose SAVE to complete the action or CANCEL to abort.
Figure 16: Add an Attachment Pop-up Window
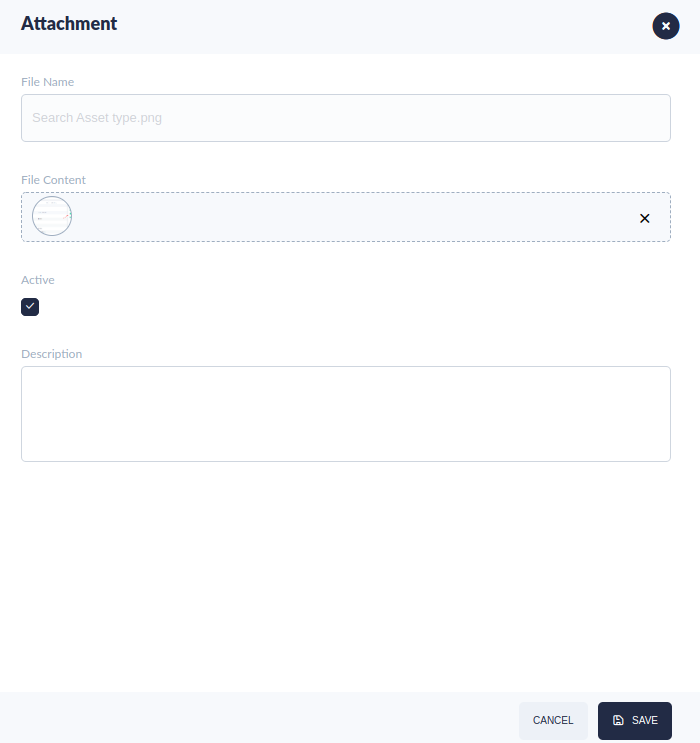
5. Users may edit an Uploaded file or download the attachment file.
Figure 17: Edit/Enable/Disable Attachment
View Asset:
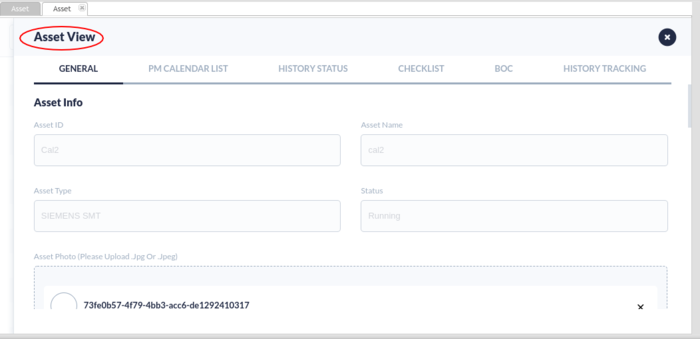
At the View Asset mode, users can view the general information, the calibration list, history status,checklist, Boc and history tracking of the asset.
Figure 18: View Asset icon
Figure 19: View Asset Main Page
There are 6 tabs: General, PM Calendar List, History Status, Checklist, BOC, and History Tracking.
PM Calendar List Tab
Under the PM Calendar List, users may view preventative maintenance for a full production line or multiple assets. The PM planned for the production line will eventually be scheduled for all the assets on this production line.
For configuration details, see CMMS Work Order & Preventive Maintenance or navigate to Production > CMMS Preventive Maintenance > PM List/PM Calendar. Within the Preventive Maintenance portal, users can reschedule and edit preventive maintenance work orders and view detailed calendar plans.
Figure 20: PM Calendar List
History Status Tab
Under the History Status Tab, users can view the Asset History, Calibration History and Maintenance History.
Figure 21: Asset View - Asset History Status
Figure 22: Asset View - Calibration History Status
Figure 23: Asset View - Maintenance History Status
Checklist
Within this window, users may view and export the Checklist associated with the selected Asset.
Note: This window is view only. Checklists are created in the Checklist submodule of CMMS Asset.
Checklist details for view include:
- Checklist Name
- Description
- Repeat Type
- Repeat Every
- Updated Date
- Updated By
- Active/Inactive status as denoted by a blue (active) or grey (inactive)checkmark.
Figure 24: View Asset: Checklist
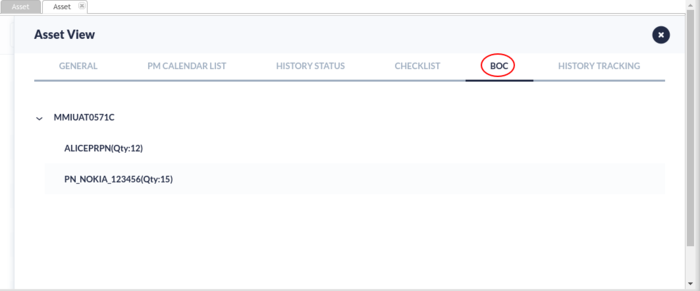
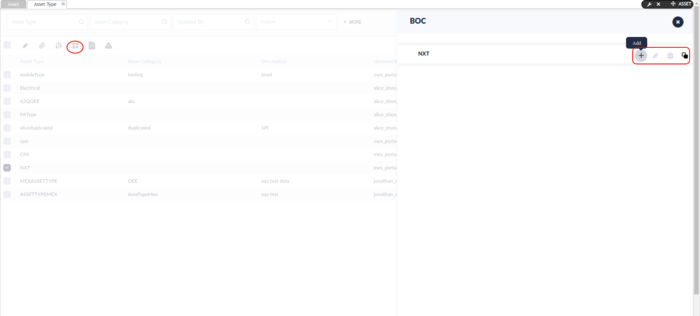
Boc
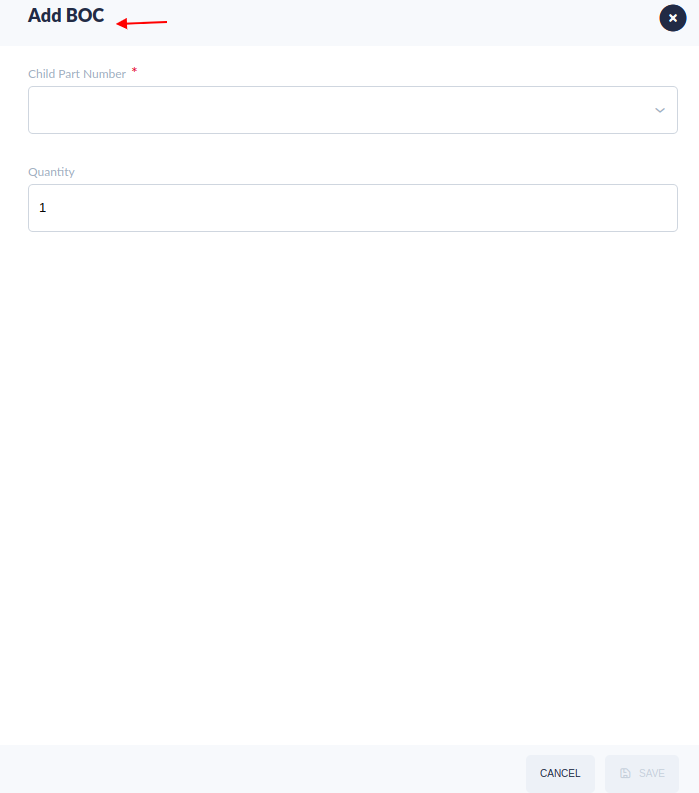
The Boc (Bill of components) displays component and/or part number information according to the location (department) for the Asset ID being edited/viewed. The Boc tab displays in tree format according to parent/child departments and department code.
Boc information is configured in CMMS Admin. (Shop Floor Control > Configuration > CMMS Admin > Department).
Figure 25: Edit Asset: Boc
History Tracking Tab
A complete history of an asset’s activity is available for view in the History Tracking Tab. All changes made to the asset are reflected here, including status updates, maintenance activity, and modifications to the asset’s configuration details.
Activity recorded in History Tracking is simultaneously recorded in the My Asset submodule of CMMS (CMMS Asset > My Asset).
History Tracking Data Fields
- Updated by: the person or event that initiated the change. For example, in the figure below, the first change was prompted by a regularly scheduled work order; the asset is in need of maintenance review. The second change was created by a user (Martha Jordan) who modified details about the asset’s manufacturing, warranty, and install dates; as well as the owning department for the asset.
- Update Date: The date and time the system activated the change.
- Source Type: Source Type describes where the change originated. Source Types include:
- Asset: Denotes all changes made directly to the asset.
- WR (Work Request): Denotes all changes made as a response to a Work Request.
- Source ID: This feature is under development.
Figure 26: History Tracking Tab
Copy Assets
Copy is a timesaving feature of CMMS Asset. Users can easily copy information associated with a given asset to a similar asset.
- Choose the asset to copy by selecting the checkbox next to its name.
- Select Copy.
- A pop-up window displays: Copy Asset.
Figure 27: Copy Asset icon
- Enter the Asset ID and Asset Name for the new asset that will inherit all the selected asset’s features.
- Select Save.
- The new Asset’s information is identical to the copied asset except for Asset ID and Asset Name.
Figure 27a: Copy Asset
- Edit the new asset fields as needed.
Note: The asset type field is not available for edit.
Print Assets
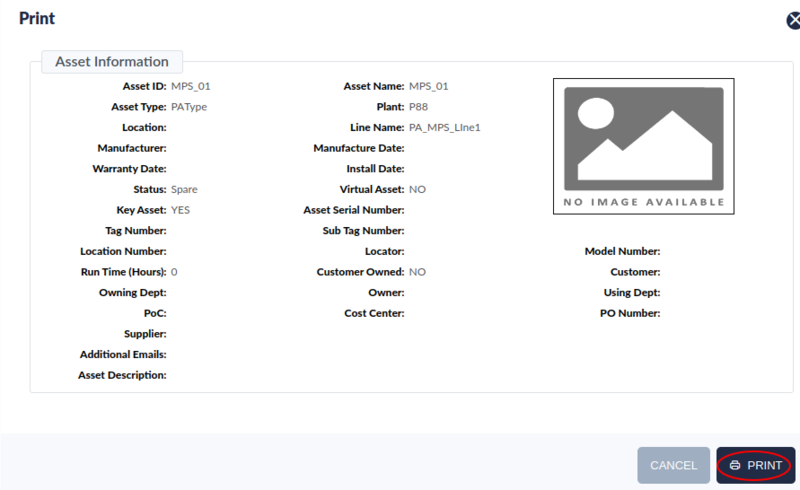
Users may print asset information from a printer.
- Select the asset line.
- Choose the Print
 icon on the top menu bar.
 - Will open the Print Asset sub-page.
- The user may click the Printer Icon to print the Asset information.
Figure 28: Print Asset
Edit Asset: Spare Parts
Under the Spare Parts, users may load spare parts with its part number, serial number, load time for the asset. The users are able to know which kind of spare parts can be used by this asset, and track the asset’s spare parts usage situation. This is especially important for initiation when no work order has been conducted for the asset to track spare parts.
Figure 29: Spare Parts Page
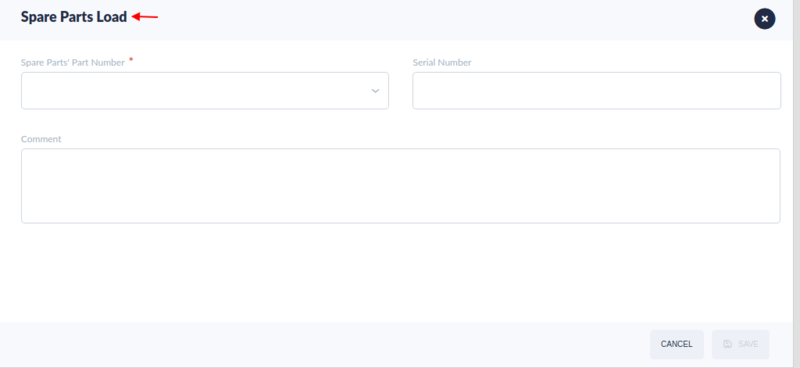
- Select LOAD to load the spare parts for this asset.
Figure 30: Edit Asset - Load Spare Parts
- Spare Parts’ Part Number: The Part number of the spare part.
- Serial Number: The serial number of the spare part.
- Comment: The comment of the spare part.
- Enter the Spare Parts’ part number, serial number, comment, then select Save to load the spare part.
- Users can select the Current/History to view the currently used spare parts or the history of spare parts for this asset.
Production Line
From the Production Line sub-module, users can associate production lines with assets. Capabilities include Add, Edit, and Export.
- Select the Production Line Icon to enter the submodule.
- The Production lina page show.
Figure 31: Production Line Page
Add a Production Line
To add a Production line:
- From the Production Line sub-module page, select ADD. The Add Production Line pop-up window displays.
Figure 32: Add Production Line

2. Complete the fields provided:
- Location (Mandatory): Physical location. A drop-down list is available for easy selection; the list shows the departments in a tree format .
- Line Name (Mandatory) Type the line name into the field.
- Description (Optional)
3. Select Save to complete or Cancel to abort.
Edit a Production Line
Users can configure Production Lines using the edit function. There are three tabs available within the Edit Production Line submodule: General, Assets, and Group.
- Select a Production Line.
- Choose the Edit icon.
- The Edit This Production Line Popup Tab displays.
Figure 34: Edit This Production Line

- Users may edit the information in any of the available fields:
- Location (i.e., shop floor). A drop-down menu is provided for ease of selection with locations listed in tree format.
- Line Name: This field populates automatically once the location is chosen.
- Description: Optional
Production Line: Assets
The users can add assets, delete assets, set the asset as a key asset for the production line.
- Select a Production Line from the list, the Assets function/icon will be available .
- Choose the Assets icon.
- The Assets (with the Production Line name) pop-up window displays.
- Assets are displayed in a block and their status is reflected by the block’s color:
- Running.
- Spare.
- Setup.
- Idle.
- In Maintenance.
- Calibration.
- Scheduled Down.
- Unscheduled Down.
- The page supports a drag-and-drop function that can be used to change the sequence of the assets.
Figure 34: Production Line Asset
- Users can add or delete assets, and set the asset Is Key Asset or not.
Assets: Add Assets
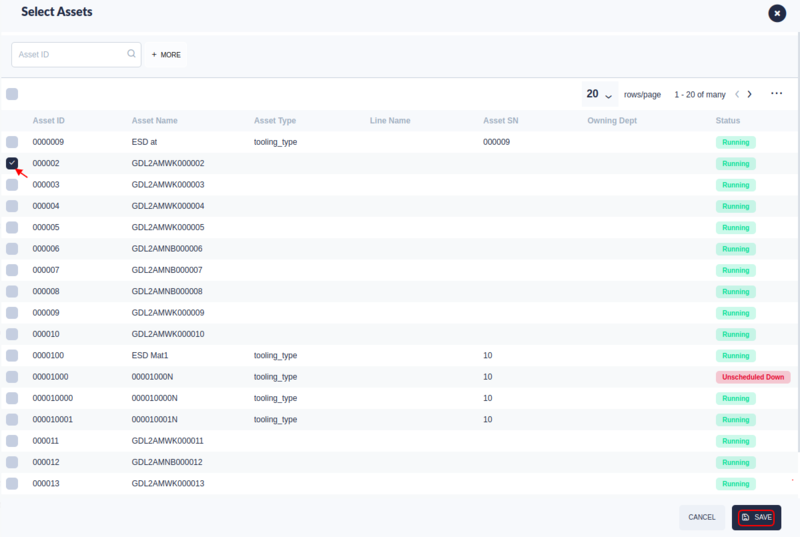
- To add an asset select ADD from the Assets Tab menu. The Select Assets pop-up window displays.
- From the Select Assets pop-up window, select one or more assets to add.
- Select the Save icon on the top left of the screen to add the selected assets, or close the window to cancel.
Figure 35: Add an Asset
Assets: Delete Assets
- To delete an asset, highlight an asset listed in the Assets page.
- Select DELETE from the Assets page menu.
Assets: Key Assets
- To set an asset is a key asset or not, highlight an asset listed in the Assets Tab.
- Select Is Key Asset/Not Key Asset from the Assets Tab menu.
Figure 35: Is Key Asset
The Key Asset with a * at the beginning of the asset name.
Production Line: Group
The users can assign groups, delete groups for the production line.
- Select a Production Line from the list, the Group function/icon will be available.
- Select Group. TheAssign Group pop-up window displays.
- Under the Assign Group , the user may add or remove groups assigned to a given production line according to the work category.
Note: When doing Group configuration at production Line by Add button, it's led by Group Name rather than group category. When the user selects the group name, all the predefined group categories will be displayed in the column with a checkbox by default, user can be able to select/unselect one or more categories for a specific production line if necessary.
Figure 36: Production Line: Group
Group: Add A Group
- To add a group to a production line, select theASSIGN GROUP icon within the Group list tab.
- A pop-up window displays the Group List.
- Users can search groups by Group Name, Category, Department.
- Select the checkbox at the left of the Group Name, then the Category will appear at the list below.
Note: When the user selects a group name, all the predefined group categories will be displayed in the column with a checkbox by default, user can be able to select/unselect one or more categories for a specific production line if necessary.
- All the Categories including:
- WO Requestor
- WO Assignment
- PM Requestor
- PM Assignment
- PM Notification
- PM Rescheduling
- Escalation
- Calibration Requestor
- Calibration Assignment
- Calibration Rescheduling
- Calibration Notification
- Asset Using Group
The unavailable categories will be gray.
Figure 37: Add Production line Group: Group List
- Select/Unselect the group Categories.
- Select the groups to add to the production line
- Select Save to complete or Cancel to abort.
- A success message will display.
Group : Import from Inherited Group
The Import from Inherited Groups option saves configuration time for busy administrators by linking similar predefined groups to the current group. Inherited Groups are selected according to their Location.
Note: For Production Line Inherited group, will inherit from groups mapped with the associated location.
Users may also add a group by importing from an inherited (child) group.
1. To Import from Inherited Group:
- Select the Inherited icon.
- The Inherite Group List pop-up window displays.
- Check the groups to import
- Select SAVE to complete or Cancel to abort.
- A success message will display.
Figure 38: Import from Inherited Group: Group List pop-up Window
Group: Delete Group/Default Group Status
- Within the Edit Asset: Group Tab, users may delete a group or change the group’s status.
- Choose the delete icon to remove the group from the production line.
- Change the status of the group by selecting the “Is Default Group” icon.
Figure 39: Delete Group
Activate/Deactivate a Production Line
The users can change the status production line.
- Select a Production Line from the list, the Activate or Deactivate function/icon will be available.
- Select Activate or Deactivate. The Status of the production will be changed.
Figure 40: Activate/Deactivate a Production Line
Location 
Within the Location submodule, users can view locations, add locations to a route; or edit the groups, assets, and production lines associated with a given location or route. Locations are listed in a hierarchical fashion represented by folder and subfolder icons.
Figure 42: Location Submodule
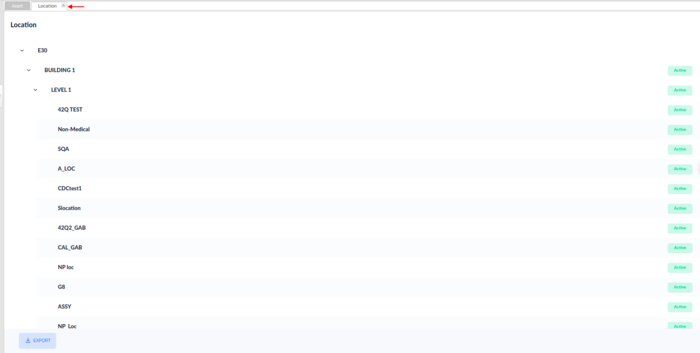
Add a Location
- Select the parent route to which the new location will be assigned.
- A pop-up window will display next to the cursor, with options to Add or Edit.
- Choose the green add icon.
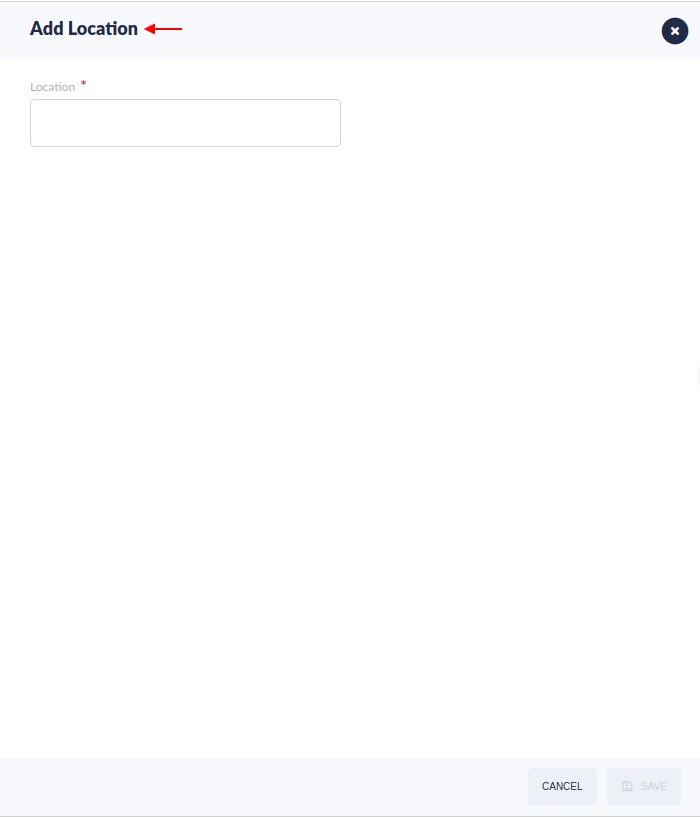
- A pop-up window, Add Location, displays.
- Enter the location name in the field provided.
- Select Save to add the new location or cancel to abort.
Figure 43: Location Toolbar
Figure 43a: Add a New Location
Edit a Location
- To edit a parent route, select the desired location then select EDIT icon from the pop-up toolbar.
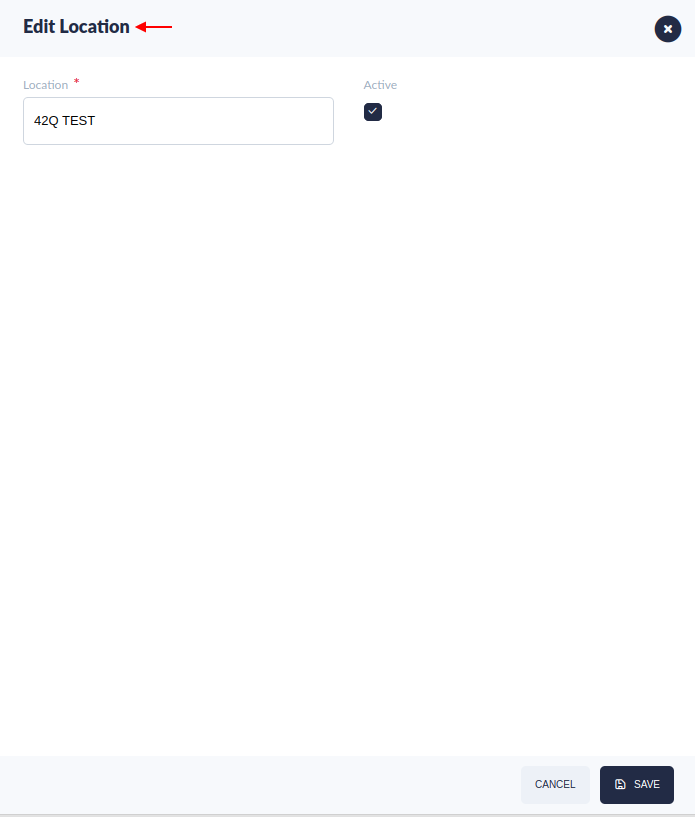
- The Edit Location pop-up window displays.
- Select the checkbox next to Active to active or inactive the loction.
- Select Save to enable or disable the location.
- Select Cancel to retain the status of the location.
Edit Location: Asset
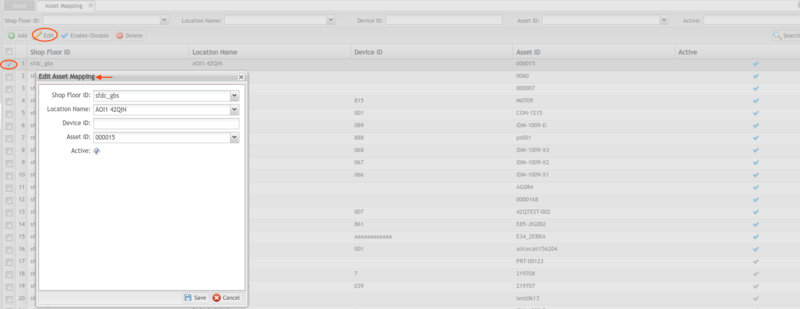
Figure 45: Edit Location: Asset

Within the Asset page, users can add or delete assets from the selected locations.
Asset : Add an Asset
- Select the Add icon from the Assets menu. The Add a New Asset pop-up window appears.
Figure 46: Add a New Asset to Location
2. Select assets from the list to add and select Save to finish or Cancel to abort.
Asset : Delete an Asset
- Select the asset to be removed from the location by marking the checkbox next to its name.
- Choose the delete icon.
Edit Location: Group
- Groups assigned to locations can be edited within the Group Tab.
- Users can Add a group, Import from an Inherited Group, Delete group, or mark the group as the Default Group.
Note: When doing Group configuration at Location by Add button, it's led by Group Name rather than group category. When the user selects a group name, all the predefined group categories will be displayed in the column with a checkbox by default, user can be able to select/unselect one or more categories for a specific location if necessary.
Figure 47: Edit Location Group

Group: Add a Group
- To add a group to a location, select the ASSIGN GROUP within the Edit Location page.
- A pop-up window displays containing the Group List.
Note: Users add Groups to a location following the same steps used to add groups to add a Production Line.
- Select groups according to categories available using the drop-down menu:
- WO Requestor
- WO Assignment
- PM Requestor
- PM Assignment
- PM Notification
- Escalation
- Calibration Requestor
- Calibration Assignment
- Calibration Rescheduling
- Calibration Notification
- Asset Using Group
Figure 48: Add Group: Group List
4. Select the groups to add to the production line.
5. Select Add to complete or Cancel to abort.
6. A success message will display.
Group: Import from an Inherited Group
The Import from Inherited Groups option saves configuration time for busy administrators by linking similar predefined groups to the current group. Inherited Groups are selected according to their parent Location.
Note: For Location inherited group, will inherit from groups mapped with associated parent location.
Users may also add a group by importing from an inherited (child) group.
- To Import from Inherited Group:
- Select the Import from Inherited Group icon.
- A Group List pop-up window displays.
- Check the group(s) to import
- Select Add to complete or Cancel to abort.
- A success message will display.
Edit Location: Production Line
- Select the desired location and select the Producion Lines icon from the pop-up toolbar.
- Under the Production Line , users can view the production lines associated with a given location. Production lines are listed in ascending order beginning at 1.
Figure 49: Edit Location: Production Line

Asset Type 
The asset type sub-module is used to search, add, edit, enable/disable, and import asset types (assets).
Figure 51: Asset Type Submodule Page
Search for Asset Type
To perform a search:
Figure 52: Search Asset Type
'
- Enter the asset type name in the search field.
- Select the search icon (e.g. magnifying glass).
- Note: The system performs a “fuzzy” search; it is not necessary to type the entire Asset Type ID
- Users may also select the asset type by scrolling the available list.
Add Asset Type
To add an asset type:
- Select Add in the Asset Type submodule. The Add a New Asset Type window displays.
- Enter the name of the Asset Type and a description of the asset type in the Description box.
Note: The Asset Type name cannot be changed once saved.
- Select Save to complete or Cancel to abort.
Figure 52a: Add a New Asset Type Window
Note: If the Asset type already exists, the system will pop up an altered message that allows users to select the Import function to get the asset type information because the asset type exists in the Database but from other sites.
Bulk Upload Asset Type
With the Bulk Upload asset type function, users can import(create/add) many asset types at one time. This function involves downloading the template file, uploading the file and validating whether the data is valid. Users can download the invalid records to check and correct.
- Select theBULK UPLOAD , the Bulk Upload window pop-up.
Figure 53: Bulk Upload Asset Type
- Select the here(blue link) to download the .csv template file and fill your asset types records.
- Drag and drop or select browse(blue link) to open your file.
- Select VALIDATE RECORDS, the UPLOAD button will show if the validation process passed.
- Select Upload to save the asset types to the CMMS system.
- Select Download invalid records to download and check the invalid records if some records are invalid.
Figure 53a: Upload Asset Type
Edit Asset Type
To edit an asset type:
- Select an asset type from the Asset Type list, select the checkbox at the left.
- The Edit Asset Type and other menu buttons will show at the right top.
Then menu buttons are:
- Edit Asset Type
- Attachment
- Maintenance
- BOC
- Checklist
- Problem/Event
Figure 54: Edit Asset Type ICON
- Select Edit Asset Type. An Edit This Asset Type pop-up.
Figure 54a: Edit This Asset Type Window

Edit Asset Type
- Edit the Description by typing any text into the Description box.
- Note: that the name of the Asset 'Typeis grey and unavailable for edit. The name was completed during the Addstep and is not available for change.
- Edit the Active status.
- Select Save to complete; or Cancel to abort.
Edit AssetType: Attachment
The Attachment tab allows the user to edit any attachments that include auxiliary information pertaining to the asset type.
- Select the asset type then select Attachment from the menu buttons at the top or the right.
- Within the Attachment tab, the user may upload , edit , download an attachment, enable/disable an attachment, or copy an attachment.
Figure 56: Edit Asset Type Attachment Main page
Attachment Tab: Upload an Attachment
Select Upload from the Attachment menu. An Upload Attachment pop-up window displays.
Figure 56b: Upload Attachment Pop-up Window
- To add File Content, select Browse and browse the local drive for the desired attachment.
- Check whether the attachment is Active.
- Enter a description of the attachment in the Description box.
- Select Save to complete or Cancel to abort.
Attachment Tab: Edit an Attachment
- Select an attachment from the Attachment list.
- Choose Edit in the Attachment menu. The Edit This Attachment pop-up window displays.
Figure 57: Edit This Attachment pop-up window
- Select the delete icon to clear the uploaded attachment file..
- Under File Content, Choose Browse to browse files on the local drive; the chosen attachment will replace the existing attachment.
- Change the attachment status using the Active checkbox.
- Edit the description of the attachment in the Description text field.
- Select Save to complete or Cancel to abort.
Attachment Tab: Copy an Attachment
- To copy an attachment select the Copy icon from the Menu Bar. A Copy Asset Type Attachment Window displays.
Figure 58: Copy Asset Type Attachment Window

2. Select the attachment to copy from the list.
3. Choose Save.
4. The copied attachment is now available on the Attachment Tab list.
Edit Asset Type: Maintenance Tab
Maintenance for Tooling type assets is configured in the Maintenance Tab of Asset Type OR the Maintenance Tab of the individual asset. Toolings are configured according to Usage, Expiration Date, Periodic Maintenance, or a combination thereof. Maintenance configuration is mapped to production on the shop floor in Tooling Mapping and is operated from Tooling Unload/Load. This feature allows 42Q to place an MFG hold on the production line if assets are not maintained according to specifications, or incorrect assets are used.
Special Note: Although this approach is generally applied to tooling type equipment, any asset type can be mapped similarly for ultimate traceability and control.
*For complete instructions on tooling type configuration, see Tooling Control Work Instruction.
Figure 59 : Edit Asset Type Maintenance Tab
Edit Asset Type: Boc Tab
The Boc tab lists the Part Numbers according to their location within the plant (configured in the Location Submodule). The list is displayed in a tree format, designating parent/child parts. Within the Boc tab, users can Add, Edit, and Enable/Disable Bocs.
Boc Tab: Add a Boc
- Select a Boc from the list. A pop-up window displays next to the Boc, with the following options available: add, edit, enable/disable/delete.
Note: Users may only Add a Boc to a parent location , Users may perform all options on a child's location .
3. Select Add from the pop-up menu. The Add a New Boc pop-up window displays.
Figure 61: Add a New Boc Pop-Up Window
4. Select the Child Part Number from the drop-down list.
5. Enter the Quantity for the new BOC.
6. Select Save to finish or Cancel to abort.
Boc Tab: Edit a Boc
- Select a Boc from the Boc list. A pop-up menu displays are adjacent to the location of the cursor.
- Select Edit from the pop-up menu. The Edit Boc pop-up window displays.
3. Select Parent Part Number from the drop-down list.
4. Select Child Part Number from the drop-down list.
5. Enter the Quantity for the BOC.
6. Select Save to finish or Cancel to abort.
Boc Tab: Delete a Boc
- Select one of the Bocs in the Boc list. A pop-up menu displays are adjacent to the location of the cursor.
- Select Delete from the pop-up menu.
Note: In previous submodules, items remain listed even when their status is changed from Active to Inactive. The Boc listing contains only active Bocs; disabling a Boc removes it from the list entirely. It does not remain listed with an inactive (grey) checkmark.
Edit Asset Type: Checklist Tab
Under the Checklist tab, the user can view basic details of a checklist associated with a given asset type, or download the checklist information in a .csv file.
Checklist Tab: Download Checklist information
- Select a checklist from the entries under the Checklist tab.
- Select the Download icon in the Checklist menu.
- A .csv file automatically downloads onto the local drive.
- Users can rename, save, share, print, etc. as desired.
Figure 63: Checklist Information
Edit Asset Type: Problem/Event Tab
Under the Problem tab, the user can add, delete, or copy problem information.
Figure 64: Problem Tab
Problem Tab: Add a Problem/Event
- Select Add from the Problem menu. The Add Problem/Event pop-up window displays.
- Select a problem category item from the list provided on the left-hand side of the page. A list of corresponding problem codes and problem names display on the right-hand side of the page.
- Check the problem code and name that apply, then select Save to finish or Cancel to abort.
Figure 65: Asset Type: Add Problem
Problem Tab: Delete a Problem/Event
- Select an entry from the list under the Problem/Event tab and select the Delete icon.
- The selected problem is now removed from the problem/event list.
Problem Tab: Copy a Problem
To copy a problem to another Asset Type:
- Select an entry from the Problem list.
- Choose the Copy icon.
- The Copy Problem pop-up window displays.
- Choose the Asset 'type' to copy the problem onto the available drop-down menu.
- Select the Copy icon.
- The new Problem entry now displays on the Problem list.
Import Asset Type
Asset types can be imported under the Asset Type sub-module. To import a file:
- Select Import from the Asset Type menu. The Import Asset Type pop-up window appears. The user can search for Asset Type by Asset Type name or Site ID.
- Select an asset type from the list and select Import.
- The new asset type will now be available in the Asset Type list.
Export Asset Type
To export asset type information as a .csv file:
- From the Asset Type page select an asset type from the list.
- Select Export All Columns from the AssetType menu.
- The .csv file will automatically download onto the local drive.
- The user may rename, save, share, print, as desired.
Figure 66: Export Asset Type
Checklist 
Within the checklist submodule, users can search/filter, edit, enable/disable, and export checklists.
Figure 63: Checklist
Search/Filter Checklist
To search/filter checklists:
- Type the Checklist name/Checklist Category/Checklist Type into the field to filter search.
- Select the search icon (i.e., magnifying glass).
- Or choose the checklist from the list by activating the checkbox.
Add Checklist
- Select Add from the Checklist sub-module menu. The Add a New Checklist pop-up window appears.
- Enter a Checklist Name.
- Enter a Description of the checklist in the box provided.
- Select a Checklist Category from the drop-down list.
- Enter days to repeat in the Repeat Type field. Note: If more than one interval is required for the machine, users must select Special. Special Checklists require a unique configuration.
- Select Save to finish or select Cancel to abort.
Figure 64: Add a New Checklist Window
Special Repeat Type Checklist
All Preventive Maintenance work orders must have a checklist attached. If Preventive Maintenance is required for more than one-time interval (e.g. Monthly and Quarterly), plants must select Special as a Checklist Type.
Note: Special Checklist Types can only be associated with a single asset, not an entire production line)
To create a Special Repeat Checklist for PMs:
- Select Add a New Checklist
- Complete the fields as above
- Select Special using the drop-down menu in the pop-up window.
Figure 65: Add a Checklist for Repeat Type: Special
Note: For Special Checklists, Repeat Every field must be set to 1.
- Export the checklist template file onto the local drive by selecting the Export button from the top menu.
- Locate the newly created checklist from the list of Checklists.
- Open the Checklist.
- Select the second tab from the pop-up window: Checklist Revision. (For more details about editing a checklist refer to Edit Checklist )
- Select Add.
- Upload the checklist template file by utilizing the green Select File button: Template will load onto the bottom of the window for users to populate.
- Note: The special checklist type template file includes an extra column (“Schedule Type”) that allows users to select different repeat types for the selected checklist (e.g. monthly, quarterly, half-year, yearly). See directions for choosing special repeat types in Figure 59b, (below).
Figure 65a: Special Template
12. Return to Production > CMMS > Preventive Maintenance > PM List, to create the PM work order. (See PM Work Order Special Instructions).
Edit Checklist
To edit a checklist:
- Select an item from the Checklist sub-module page. The Toolbar displays in the menu.
- The Toolbar appears in which there are some ICON: Edit, Checklist Revision, Asset Type, Asset, Activate andInactivate.
- Select Edit from the menu. The Edit Checklist pop-up window appears.
Figure 66: Edit Checklist Toolbar
Figure 66: Edit Checklist
- Edit any of the fields, drop-down lists, and checkboxes needed. These include Checklist Name, Description, Checklist Type, Repeat Type, and Active.
Edit Checklist: Checklist Revision
Within the Checklist Revision , users may add, edit, enable/disable, download, and copy revisions.
Figure 67: Checklist Revision
Checklist Revision : Add a Revision
- Use the Checklist revision tab to add your checklists into the system.
- Select the Add icon from the Checklist Revision . The Add pop-up window displays.
Figure 68: Add Checklist Revision Pop-up Window
2. Complete the empty fields (the Name and Description fields are automatically provided according to the Checklist entry being edited):
- Revision
- Effective From -To dates
- Active (Default is Active)
Download Checklist Revision
Download the checklist template as a .csv file by selecting the Download Checklist Template icon, located in the bottom lower field of the Add Checklist page.
- The following fields are provided in the Checklist Template.
- Content
- Description
- Level
- Field Name
- Field Type
- Field Name 2
- Field Type 2
- Estimate Hours
- Upload a new checklist by choosing Select File. This function opens the user’s local browser.
- Select the checklist to be uploaded from the local drive and click Open.
- The uploaded checklist items will now appear in the listings in the lower half of the Add window.
Note: Once uploaded, users can edit the checklist directly by double-clicking in the text field and utilizing drop-downs. Users can delete selected rows with the Delete GUI.
- Select Save to complete or Cancel to abort.
- Once saved, the Revision displays according to the number assigned (Step 2) on the Checklist Revision page. (In our example the letter A would display.)
Checklist Definitions
- Select the Checklist Revision, then select the Checklist ICON from the pop-up toolbar.
- The Checklist Items page displays.
Figure 68a: Edit Checklist: CMMS Asset Checklist Items
- Select one item, the add, edit, save, delete icons are enabled.
- Input or edit the fields.
- Content: In the Content field, plant users enter a title to describe the process being completed. (e.g. Clean Foreign Particles)
Note: Administrators may choose to include a deeper explanation of the process by copying the Description field in the Content field (see #2).
- Description: The Description field includes a detailed explanation of the task (e.g. a list of parts that must be checked, the steps in the procedure, tools needed, etc.) Operators will follow the instructions in the Description field to repair, calibrate, or tune the machine. Language in instructions should be simple to understand and represent the speech of the operator group performing the maintenance. (e.g. Clean foreign particles in all zones by IPA/Fingers).
- Level: Levels allow users to add a hierarchy to the repair steps in the checklist. Most checklist steps will only require one level to adequately outline the task(s). For complicated tasks, place additional instructions in Level 2 or Level 3 to make subtasks clear for operators to follow.
- Field Name: In the Field Name section, plant administrators define the purpose of the task or the parameter for task completion. Some examples include: Status (e.g. Completed/In Process); Good/Bad; Failed/Passed
- Field Type: Select the method of checking completion. Select 1, 2, or 3 to define the checklist format. Three field types are available: 1. checkbox/checkmark; 2. numbers; or 3. text box.
- Field Name 2: Most Checklists will only need one field name. Field Name 2 is helpful in special situations when plant admins need to compare two sets of checklists. For example, a plant may need to record the history record. In this case, the administrator can set two field names and the maintenance record will compare the old/new values. NOTE: The following example displays the special case of including Field Name 2 in a checklist.
| Field Name | Field Type | Field Name 2 | Field Type |
| Before Adjust | Number | After Adjust | Number |
- Schedule Type: Plant admins may define the Schedule type to complete the steps/task in the checklist.
Checklist Revision Tab: Edit a Revision
Figure 69: Edit Checklist Revision
To edit a Checklist Revision:
- Select the checklist revision then select Edit from the Checklist toolbar . The Edit pop-up window appears.
- Edit all fields as needed (Name and Description fields cannot be modified):
- Revision: Denotes the version of the given checklist.
- Effective from/to: Denotes the effective time period of the checklist revision.
- Active: This will enable the revision if it was disabled, or disable the revision if it was enabled.
Checklist Revision: Export a Revision
- Select a revision under the Checklist Revision.
- Select Export from the top menu bar.
- The revision will automatically download onto the local drive in .csv format
- Open the .csv file and save, print, share as desired.
Checklist Revision: Copy a Revision
- Select Copy from the top menu of the Checklist Revision page. A Copy Checklist Revision pop-up Window displays. Select the checklist to copy into the Checklist, and choose Copy.
- The new checklist will now display on the checklist revision list.
Figure 70: Copy Checklist Revision
Edit Checklist: Asset Type
In the Asset Type page, users can Add or Delete Asset Types associated with a checklist.
Figure 71: Checklist Asset Type

To Add Asset Type:
- Select the Add icon from the menu. The Add Asset Type pop-up window displays.
- Search or browse the list for asset types.
- Asset Types are listed by: Asset Type Name; Description; and Site ID.
- Select Add or Add & Exit to return to the Asset Type screen.
- Select Cancel to Abort.
To Delete:
- Select the Asset 'Type by activating the checkbox next to its listing.
- Select the Delete icon from the top menu bar.
Edit Checklist: Asset
Within the Asset page, the user may view the assets for the respective asset types that were added in the Asset Type tab. Assets are listed by Asset ID, Asset Name, Asset Type,and Department.
Figure 72: Checklist: Asset
Problem 
Under the Problem submodule, users can search, add, edit, enable/disable, and export problem entries. Problems are defined as parts that went wrong in some manner, to encompass hardware and software problems.
Each problem is assigned a Problem Code, for easy identification. Plants can assign naming conventions to suit their individual needs; Problem Code naming convention used for this test example consists of a four-digit numeral preceded by the letter P.
Note: A problem can belong to multiple categories, but can only be assigned to one problem type. Examples of problem categories are Manufacture Problem, Quality Problem, or Energy Problem.
Figure 73: Problem Submodule Main Screen
Search/Filter Problem
- Users can search for a specific problem with filter options available on the top right of the menu bar.
- Filtering options include
- Problem Name: Enter the Problem Name into the text box.
- Problem Type: Choose a Problem Type from the drop-down list.
- Problem Category: Select a Problem Category from the drop-down list.
- Scheduled Down: Select Yes or No.
- Asset Generated: Select Yes or No.
- Status : Select Inactive or Active.
3. Select the search icon (i.e., the magnifying glass). Only entries matching the search criteria will now display.
Note: To return to the full list, refresh the screen and the complete list will populate.
Bulk Upload Problems
With the Bulk Upload problem function, users can import(create/add) many problems at one time. This function involves downloading the template file, uploading the file and validating whether the data is valid. Users can download invalid records to check and correct them.
- Select the BULK UPLOAD , the Bulk Upload window pop-up.
Figure 74: Bulk Upload Problem
- Select the here(blue link) to download the .csv template file and fill in your problems records if you do not have the template file.
- Drag and drop or select browse(blue link) to open your file.
- Select VALIDATE RECORDS, the UPLOAD button will show if the validation process passed.
- Select Upload to save the problems records to the system.
- Select Download invalid records to download and check the invalid records if some records are invalid.
Figure 74a: Download invalid Records
Add A Problem
The add problem function will be divided into two parts, scheduled down and unscheduled down.
- Scheduled Down: The Scheduled Downtime is not for asset failure.
- Unscheduled down: The Unscheduled Downtime is for asset failure and it will be part of the OEE availability calculation.
To add a new Problem:
- Select ADD PROBLEM from the menu, it will pop-up a menu with SCHEDULED DOWN and UNSCHEDULED DOWN.
Figure 75a: Add problem
- Select SCHEDULED DOWN, the Add Problem pop-up window appears.
Figure 75b: Add Scheduled Down Problem
- Select UNSCHEDULED DOWN, the Add Problem pop-up window appears.
Figure 75c: Add Unscheduled Down Problem
Complete the fields provided:
- Problem Category: Select a Problem Category from the respective drop-down list.
- Problem Type: Select a Problem Type from the respective drop-down list.
- Problem Code: Enter a Problem Code in the respective field.
- Problem Name: Enter a Problem Name in the respective field.
- Description: Enter a description in the box provided.
- Status: In the Active checkbox select whether the problem will be active. The new problem is active by default.
- Asset Failure: Un-selected by default.
- Asset Generated: Un-selected by default. This item is used for special status or special interface. If the Machine Generated is selected, then the problem information will show at the interface list. Otherwise, it will hide the problem information. Users can overlook it if they don't use the interface.
- Non-Stop: If the Machine Generated is selected, Non-stop will be available. By default this field is not chosen. Checking this function allows the machine to continue production despite the problem being reported.
- Priority: If the Machine Generated is selected, priority will be available. Select a priority level from the drop-down list provided. Priority is organized in descending level of importance: P1, P2 or P3. To select another priority, choose a different one from the drop-down list.
- Global Problem: Select one global problem from the list.
Note: This Global Problem is for the single site only and the major purpose of this Global Problem is to unify the different machine types that have the same problem (Downtime).This Global Problem value will be available at a single site. This means if the users would like to know the same problem for different types of assets in the entire plant, then they can apply for this Global Problem option.
- Select Add to finish, or select Close to abort.
Edit Problem
Any of the Problem entry fields can be edited. To edit a Problem:
- Select a problem from the list by activating the checkbox next to its name. The Edit function becomes available.
- Select Edit. The Edit Problem pop-up window appears.
- Edit the Problem Category by selecting a different item from the respective drop-down list.
- Edit the Problem by selecting a different item from the drop-down list.
- Edit the Problem Code entry.
- Edit the Problem Name entry.
- Edit the Description.
- Check or uncheck the Status box.
- Select Save to finish, or Close to abort.
Event Code
In this module, users can define the event code with the event name and the asset status, such as Running, Spare, In Maintenance, Setup, Idle, and Calibration. The system will match the asset status once it receives the event code.
To configure an event code, navigate to Shop Floor Control > Configuration > OEE > Event Code.
Users can add, edit, enable/disable and export the event code.
Figure 76: Event Code Main Page
Bulk Upload Event Code
With the Bulk Upload event code function, users can import(create/add) many event codes at one time. This function involves downloading the template file, uploading the file and validating whether the data is valid. Users can download invalid records to check and correct them.
- Select the BULK UPLOAD , the Bulk Upload window pop-up.
Figure 76a: Bulk Upload Event Code
- Select the here(blue link) to download the .csv template file and fill in your event codes records if you do not have the template file.
- Drag and drop or select browse(blue link) to open your file.
- Select VALIDATE RECORDS, the UPLOAD button will show if the validation process passed.
- Select Upload to save the event codes records to the system.
- Select Download invalid records to download and check the invalid records if some records are invalid.
Figure 76b: Download invalid Records
Add Event Code
To add an Event Code:
- Select Add. The Add Event pop-up window appears.
- Select one Status from the Asset Status drop-down list.
- Enter an Event Code in the respective field.
- Enter an Event Name in the respective field.
- Enter a Description of the category in the box provided.
- Status: The checkbox is ticked by default, which means this event code is active.
- Select Add to finish, or Cancel to abort.
Figure 77: Add Event Code
Edit Event
Any of the Event Code entry fields can be edited. To edit an Event Code:
- Select an event code from the list by activating the checkbox next to its name. The Edit function becomes available.
- Select Edit. The Edit Event Code pop-up window appears.
- Edit the Asset Status by selecting a different item from the respective drop-down list.
- Edit the Event Code entry.
- Edit the Event Name entry.
- Edit the Description.
- Check or uncheck the Status box.
- Select Save to finish, or Close to abort.
Problem Type 
Within the Problem Type submodule, users can add new problem types or edit existing Problem Types to meet the changing needs of their plants. Users can also enable/disable Problem Types as needed.
To configure a problem type, navigate to Shop Floor Control > Configuration > CMMS Asset > Problem Type.
Figure 78: Problem type Main Page
Bulk Upload Problem Type
With the Bulk Upload problem type function, users can import(create/add) many problem types at one time. This function involves downloading the template file, uploading the file and validating whether the data is valid. Users can download invalid records to check and correct them.
- Select the BULK UPLOAD , the Bulk Upload window pop-up.
Figure 78a: Bulk Upload Problem Type
- Select the here(blue link) to download the .csv template file and fill in your calibrations records if you do not have the template file.
- Drag and drop or select browse(blue link) to open your file.
- Select VALIDATE RECORDS, the UPLOAD button will show if the validation process passed.
- Select Upload to save the problem types records to the system.
- Select Download invalid records to download and check the invalid records if some records are invalid.
Figure 78b: Download invalid Records
Add Problem Type
To Add a Problem Type:
- Select the Add icon
- The Add Problem Type Windowdisplays
- Complete the following fields:
- Problem Type Code (Mandatory)
- Problem Type Name (Mandatory)
- Description (Optional)
- Global Problem: Select the checkbox to make the problem a global problem.
Note: This Global Problem is for the single site only and the major purpose of this Global Problem is to unify the different asset types that have the same problem (Downtime).This Global Problem value will be available at a single site. This means if the users would like to know the same problem for different types of assets in the entire plant, then they can apply for this Global Problem option.
- Status: checkbox (Default is Active)
4. Select Save to save or Close to cancel
5. The new Problem Type now displays in the list.
Figure 79: Add a New Problem Type Window
Edit Problem Type
All Problem Types are available for edit. To edit a Problem Type:
- Select a problem type from the list by activating the checkbox next to its name. The Edit function becomes available.
- Select Edit. The Edit Problem Type pop-up window appears. There are two tabs available within the Edit Problem Type Window: General andProblem.
Figure 80: Edit a Problem Type
Edit Problem Type: General Tab
- Within General Tab, users can edit any of the information contained therein:
- Problem Type Code
- Problem Type Name
- Description
- Status (Default is Active)
- Global Problem
2. Select Save' 'to finish; select Close to abort.
Edit Problem Type: Problem Tab
- Within the Problem Tab, users may view a complete list of any problems associated with this Problem Type and their status.
Note: If no problems have been added for this Problem Type, this tab will be empty.
Problem Category
- Within the Problem Category submodule of CMMS Asset, users can organize problems into a categorical hierarchy. From the Problem Category page, users may Add or Edit problem categories. The following predefined Problem Categories that describe common manufacturing problems are available:
- Manufacture
- Production
- Process
- Quality
- Energy
2. To best describe their plant processes, Administrators may also add additional problem categories underneath parent categories or change titles of parent categories.
Figure 81: Problem Category Submodule Main Screen
Add a Problem Category
To add a problem category to a pre-existing parent category:
- Select a Problem Category icon from the list. A pop-up menu displays adjacent to the category.
- In the pop-up menu, select Add. The Add a New Problem Category pop-up window appears.
- Enter a Problem Category Name in the respective field.
- Enter a Problem Category Code in the respective field.
- Enter a Description of the category in the box provided.
- Enter the Attended Time:
- Select SAVE to finish, or Cancel to abort.
Figure 82: Add a New Problem Category

Edit a Problem Category
All Problem Categories are available for edit. To edit a Problem Category:
- Select a Problem Category icon from the list. A pop-up menu displays adjacent to the category.
- In the pop-up menu, select Edit. The Edit Problem Category pop-up window appears.
Figure 83: Edit a Problem Category
- The users can edit any of the information contained therein:
- Parent Problem Category: Select a category from the drop-down menu
- Problem Category Name: Enter a new category name in the text box.
- Problem Category Code: Change the code assigned to this Problem Category in the text field.
- Description: This field is optional.
- Status (Default is Active)
- Attended TIme.
2. Select Save to finish; select Close to abort.
Problem Category: Problem
Within the Problem, users may view a problem to the selected category. All problems that have been assigned to the given problem category are displayed in list form in the Problem page.
Activate/Deactivate Problem Category
The Activate/Deactivate function allows the user to change the Problem status from active to inactive or inactive to active.
- Select a problem category from the list . The Activate/Deactivate function becomes available.
- Select Activate/Deactivate.
Asset Mapping 
The Asset Mapping submodule is used to identify location details ('Shop Floor' ID, Device ID, Location Name) of a given asset.
Best Practice Naming Conventions
Although Asset Mapping does not directly connect asset activity to the production process (e.g. feed information, SNs, scan activity, etc.), users can cross reference the fields in Asset Mapping to those in SFDC(Shop Floor Control) to match assets to their location on the shop floor. In this way, administrators can easily move between assets and production by searching according to the name and number assigned.
| Shop Floor Control | Asset Mapping |
| Shop Floor ID | Shop Floor ID |
| Device # | Device ID |
| Location | Location Name |
Remember: asset management relates to the assets (machines/equipment) that manufacture the factory product, not the products themselves. All information about the product process (locations, part numbers, containers, pass/fail rates) is configured in the SFDC (Shop Floor Data Collector) portal of 42Q MES and stored in 42Q’s MES cloud.
- To navigate to the Asset Mapping submodule go to Shop Floor Control > Configuration > CMMS Asset > Asset Mapping
- The following functions are available in CMMS Asset Mapping: Add, Edit, Enable/Disable, and Delete.
Figure 84: Available Actions in Asset Mapping
Add Asset Mapping
To add a Shop Floor ID to an asset:
- Select the Add icon.
- A pop-up window displays: “Add Asset Mapping.”
Figure 84a: Add Asset Mapping
3. Complete the following fields.
- Shop Floor ID (Mandatory)
- Device ID (Optional if the Location field is provided)
- Location Name (Optional if the Device ID field is provided)
Note: Users must complete either the Location name Field or the Device Id Field. They may fill both fields.
- Asset ID (Mandatory)
- Active: To mark the Device ID as active, activate the checkmark. The default status is active (checked).
4. Select Save to add data or Cancel to abort the action.
Edit Asset Mapping
To edit an Asset Mapping:
- Select a line of information.
- Choose the Edit icon.
- A pop-up window displays, “Edit Asset Mapping.”
Figure 84b: Edit Asset Mapping
- Change any of the available fields (see description above).
- Select Save to save changes or Cancel to abort the activity.
Enable/Disable an Asset Mapping
To change the active status of an Asset Mapping:
- Select the asset mapping information on the line.
- Select the Enable/Disable icon on the top menu bar.
Note: This function is a toggle; if a Device ID is presently active (blue checkmark), selecting the Enable/Disable icon moves the status to inactive (grey checkmark) and vice versa.
Delete an Asset Mapping
To delete an Asset Mapping entry:
- Select the line of information.
- Select the Delete icon on the top menu bar.
Note: Users add information manually within the Asset Mapping submodule, per individual asset. If many assets require mapping, users may export templates and upload information in the corresponding Import Mapping Submodule.
Import Mapping 
The Import Mapping submodule allows users to efficiently add Client IDs and location details to numerous assets at one time. Users may download the provided template, then export that information into the CMMS Asset portal, and upload details into the MES.
- To access Import Mapping navigate to Shop Floor Control > Configuration > CMMS Asset > Import Mapping.
2. The following actions are available to users in CMMS Import Mapping: Import, Validate, Upload, Download Template, and Export.
Figure 85: Import Mapping Functions
Download Template
To download the template:
- Select the Download Template icon.
- A template in the .csv form automatically downloads onto the user’s local drive.
- The template is named “ClientIDassetTemplate.csv” for easy retrieval.
- Open the template and add asset information. Note: Column Headings match the headings in the Import Mapping submodule. (Client ID; Device ID; Location Name; Asset ID; and Status)
Import
To import a .csv file:
- Select the Import icon.
- A pop-up window displays: "Add File."
Figure 86: Add File
- Select the File from your local drive and select Submit.
- The data then populates into the CMMS Asset portal.
Validate
After the information is uploaded into the portal, it is important to confirm the Asset IDs are valid and are part of the plant’s asset data.
To validate:
- Select the Asset ID to validate by activating the checkbox next to the line of data.
- Select the Validate icon.
- Items that the system does not recognize will be shown in red text (See figure, below).
- Return to the CMMS Asset submodule Asset > Add Asset to configure assets that were not identified as valid.
Figure 87: Validate Asset ID
Upload
Once all information is valid, the user may upload the new data onto the MES system. To upload:
- Select the Upload icon.
Note: All Asset IDs must be valid, if one is invalid, the Upload feature remains unavailable.
Figure 88: Upload Data: Import Mapping
Export
Users may export the Asset ID data to share with other team members or save it onto their local drive.
To export Asset ID information:
- Select the line of data to export.
- Select the Export icon.
- A .csv file automatically downloads onto the user’s local drive.
- Users may rename, save, share, or print as desired.
My Asset 
My Asset Submodule supports the same functions as Asset Submodule; The difference between them is that My Asset Submodule only displays assets assigned to the current user whose group category is Asset Using Group. This feature allows users to efficiently manage their own assets. See CMMS Admin > Groups for an explanation of Asset Using Group.
- To access My Asset navigate to Shop Floor Control > Configuration > CMMS Asset > My Asset.
- Users can Add, Edit, Copy, or Export assets in the list. See Asset Submodule for a detailed description of each action.
Figure 89: My Asset Main page
The following shows how the configuration for Asset Using in CMMS Admin > Groups determines the available list on My Asset page.
- Create a group at the Group submodule of CMMS - Admin > Groups.
- Select Asset Using Group from the Category.
Figure 89a: Create Group
- Add users to the group at the Group Properties page Users tab.
Figure 89b: Add user to the Group
- Edit the Asset (at the CMMS Asset module) Group to add the group created at step 1.
- Select the Asset.
- Click Group to open the Assign Group subpage.
- Select the Assign Group ,
- Select the Group created at step1, then select SAVE.
- The list of groups assigned to the asset displays.
- Select the Group then click Add.
- The Group is successfully assigned to the asset as an Asset Using Group.
Figure 89c: Asset assigned to the Group
Asset View
Asset View Submodule is for users who only have view rights. A complete list of assets is available. Assets are not available for editing in the Asset View submodule.
- To access Asset View navigate to Shop Floor Control > Configuration > CMMS Asset > Asset View.
- The following actions are available to users in CMMS Asset View: Search andView.
Figure 91: Asset View Main page
Repair Code Category
Sometimes the production line’s low OEE value may be caused by worn out, misaligned, or broken parts on the asset itself. To resume producing a good quality product, the repair team must replace or refurbish the asset’s parts or calibrate the asset itself. The management team may also want to view the asset’s repair history according to reported Problems and/or most commonly reported repairs (Top Repair Codes). All repair details are compiled into reports that are available on the factory’s shop floor via Operation Dashboard. Overall, OEE’s Repair Code feature is a valuable tool that helps management teams to determine the root cause of poor OEE scores.
Following is an example of how a production team might use OEE Repair Codes to improve the quality of its factory’s products.
Repair CodeScenario
- Managers on the factory floor view their Operation Dashboard screens and notice that a certain asset’s OEE scores are critically below the defined target level (See Setting Targets for OEE Data discussion in this document).
- Management informs the repair, production, & quality teams to check the equipment.
- By digging deeper into the corresponding OEE Reports, the engineering team concludes the problem is caused by poor quality asset (machine) parts.
- A work order is created in CMMS and the repair team replaces the parts.
- The machine resumes producing a good quality product.
Configure Repair Code per Asset
The Repair Code allows technicians to quickly record the outcome of their asset repair after the work order is completed. Managers can determine which assets are frequently down for repair by filtering according to “Repair” in the top menu bar of the CMMS Work Order screen.
Repair codes are directly linked to Root Causes, and Reasons (CMMS Problems). Therefore, it is a good idea to create a relationship between them before the configuration so that OEE report data provides valuable insights.
Read more about how to establish a relationship between problems (reasons), repairs, and root causes in How to Connect Problems (Reasons), Root Causes, & Repairs in OEE.
Standard Repair Codes are defined by asset, according to the following flow: Configure Repair Code Category (OEE) > Configure Repair Code (OEE) > Set Repair Code per Work Order (CMMS Work Order).
To link the Repair Code to the Asset, follow these instructions: How to Set a Standard Repair Code
Repair Code Category
The Repair Code Category submodule allows users to organize Repair Codes into a categorical hierarchy. From the Repair Category page, users may Add, Edit or Enable/Disable Repair categories. Administrators may add as many Repair Code Categories as needed to describe their business model; users may add or delete Repair Codes directly from the Repair Code Category submodule. (See: Edit A Repair Code Category).
To configure a Repair Code Category, navigate to Shop Floor Control > Configuration > CMMS - Asset > Repair Code Category.
Figure 92: Repair Code Category Main Screen
Add A Repair Code Category
To add a Repair Code Category to a pre-existing parent category:
- Select a Repair Code Category icon from the list. A pop-up menu displays are adjacent to the category.
- In the pop-up menu, select Add. The Add a New Repair Code Category pop-up window appears.
- Enter a Repair Code Category Name in the respective field.
- Enter a Repair Code Category Code in the respective field.
- Enter a Description of the category in the box provided.
- Select SAVE to finish, or Cancel to abort.
Figure 93: Add a New Repair Code Category
Edit A Repair Code Category
All Repair Code Categories are available for edit. To edit a Repair Code Category:
- Select a Repair Code Category icon from the list. A pop-up menu displays adjacent to the category.
- In the pop-up menu, select Edit. The Edit Repair Code Category pop-up window appears.
Figure 94: Edit a Repair Code Category
- The users can edit any of the following information:
- Parent Repair Code Category: Select a category from the drop-down menu.
- Repair Code Category Name: Enter a new category name in the text box.
- Repair Code Category Code: Change the code assigned to this Repair Code Category in the text field.
- Description: This field is optional.
- Status: (Default is Active)
- Select Save to finish; select Close to abort.
Repair Code Category: Repair Code
Within the Repair Tab, users may view the Repair Codes to the selected category.
Repair Code
Under the Repair Code submodule, users can search, add, bulk upload, edit, activate/deactivate, and export repair code entries.
Each Repair Code is assigned a Repair Code Code, for easy identification. Plants can assign naming conventions to suit their individual needs; Repair Code naming convention used for this test example consists of a four-digit numeral preceded by the letter P.
Figure 96: Repair Code Main Screen
Bulk Upload Repair Code
With the Bulk Upload repair code function, users can import(create/add) many repair codes at one time.
This function involves downloading the template file, uploading the file and validating whether data is valid. Users can download the invalid records to check and correct them.
- Select the BULK UPLOAD , the Bulk Upload window pop-up.
- Select the here(blue link) to download the .csv template file and fill in your repair code records if you do not have the template file.
- Drag and drop or select browse(blue link) to open your file.
- Select VALIDATE RECORDS, the UPLOAD button will show if the validation process passed.
- Select Upload to save the records to the CMMS system.
- Select Download invalid records to download and check the invalid records if some records are invalid.
Add Repair Code
To add a new Repair Code:
- Select Add from the Repair Code submodule menu. The Add a New Repair Code pop-up window appears.
- Complete the fields provided:
- Select a Repair Code Category from the respective drop-down list.
- Enter a Repair Code Code in the respective field.
- Enter a Repair Code Name in the respective field.
- Enter a Description in the box provided.
- In the Status checkbox select whether the problem will be active.
- Select Save to finish or select Close to abort.
Figure 97: Add Repair Code pop-up Window
Edit Repair Code
Any of the Repair Code entry fields can be edited. To edit a Repair Code:
- Select a repair code from the list by activating the checkbox next to its name. The Edit function becomes available.
- Select Edit. The Edit Repair Code pop-up window appears.
- Edit the Repair Code Category by selecting a different item from the respective drop-down list.
- Edit the Repair Code Code entry.
- Edit the Repair Code Name entry.
- Edit the Description.
- Check or uncheck the Status box.
- Select Save to finish, or Close to abort.
Activate/Deactivate Repair Code
Repair Code entries can be enabled or disabled by the user. To activate/deactivate a Repair Code:
- Select a Repair code from the list by activating the checkbox next to its name. The Activate/Deactivate function becomes available.
- Select Activate/Deactivate.
Set Repair code for Asset
To set a repair code to an asset:
- Navigate to Production > CMMS Work Order.
- Select the Repair Type Work Order from the Work Order List.
- Click Edit to open the Work Order.
- Choose the Repair Code (configured in OEE) from the drop-down list.
- Requirements: Only Repair type Work Orders may be assigned a Repair Code. The Work Order must in assigned status.
Figure 99: Edit Work Order Set Repair Code --CMMS Asset module
Spare Parts Usage
Under the Spare parts usage submodule, users can search,bulk upload and export spare parts.
Figure 100: Spare Parts Usage Main page
Given that technician want to bulk upload some load or unload spare parts for asset,
When trying to prepare spare parts usage record, then the users will be able to download the template, with spare parts’s part number, serial number, load/unload time, load/unload user, asset id, work order id.
Given that technician has prepared the spare parts usage via template,
When selecting the csv file and clicking upload,
Then the users can import the load/unload records to CMMS system, including part number, serial number, load/unload time, load/unload user, asset id, work order id.
Bulk Upload
Users are able to bulk upload spare parts load/unload for assets, so that spare parts usage can be tracked by asset or work order.
- Select the BULK UPLOAD.
- The Bulk Upload page shows.
Figure 101: Bulk Upload Spare Parts
- Select the highlink here to download the .csv template.
- Select the highlink browser to choose and import the file with spare parts’s part number, serial number, load/unload time, load/unload user, asset id, work order id.
- Select VALIDATE DATA to verify the data, if there is invalid data, users can download the file to view the error message. Otherwise, import the valid data to the system.


