Difference between revisions of "42Q-MES0166 Customization Platform"
| Line 250: | Line 250: | ||
| | ||
| − | |||
| − | |||
| − | |||
| − | |||
| − | |||
| − | |||
| − | |||
| − | |||
| − | |||
| − | |||
| − | |||
| − | |||
| − | |||
| − | |||
| − | |||
| − | |||
| − | |||
| − | |||
| − | |||
| − | |||
| − | |||
| − | |||
| − | |||
| − | |||
| − | |||
| − | |||
| − | |||
| − | |||
| − | |||
| − | |||
| − | |||
| − | |||
| − | |||
| | ||
Revision as of 18:16, 18 July 2023
42Q Home > Administration > Customization Platfom
Administration
Customization Platform
Version MES 15.77
Revision B1
Contents
Introduction
The Customization Application Platform provides a platform that allows customization teams or customers to develop customized applications that can access MES data through an API.
Process of Customization Platform for External Customers:
- Developer Register
- The support team configures the app and assigns the APIs to the developer
- The developer develops the custom app
- Dev-Ops run Terraform script to create a Sandbox server to host custom apps
- The support team configures the Sandbox information into Server Information
- Site admin uploads and deploys the custom apps
Process of customization platform for 42Q:
- The customization team develops custom apps
- Dev-Ops run TF script to deploy the custom apps to a Sandbox server
The Customization Application Platform is organized by the following portlets:
- Server Information Configuration
- Customizations Apps
- Custom Apps Management
- Target Info
Server Information Configuration
The Server Information form must be filled in by the 42Q support team; Below are the steps listed to set up the configuration for Server Information:
From the menu panel, navigate to Administration > Server Information
Figure 1: Server Information Portlet
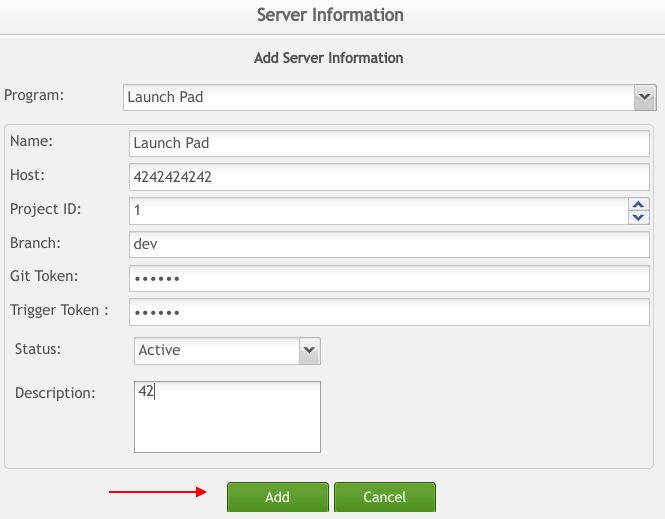
To add new server information, click the Add button.
- Fill in the fields with the corresponding information.
- To save the server information, click the Save button or Cancel to abort
Figure 2: Filling In The New Server Information
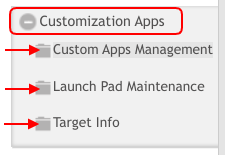
Customization Apps
The Customization Apps Section is groped by the following three portlets: Custom Apps Management, Launch Pad MAintenance, and Target Info, below, each of these portlets will be explained.
Figure 3: Customization Apps
Custom Apps Management
The Site administrator utilizes this portlet to effortlessly upload and deploy custom apps. Users have the freedom to develop their application and package it as a .war file. By using the launching pad upload page, users can easily upload the .war file. Once uploaded, users can navigate to the launchpad, where they will find their application's icon, ready to be launched and opened.
Upload
To upload a new file packed .war file. users can take .war file as an installation package. Figure 4: Customization Apps Upload
Add a New Application
From the menu panel, navigate to Administration > Customization Apps > LaunchPad Maintenance
Figure 4: Access LaunchPad Maintenance Portlet
To add a new application, click the Add button.
Figure 5: Adding a New Application
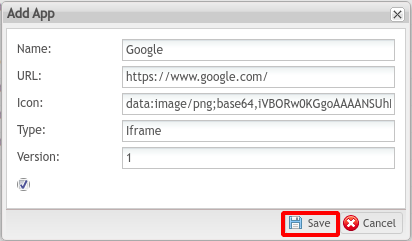
- Enter a name for the application.
- Enter the URL of the application.
- In the Icon field, enter the image address of the application icon.
- Notice that the Type field is filled in automatically with the default value ‘Iframe’.
- Enter the application’s version
- Click the Save button to save the information or Cancel to abort
Figure 6: Filling In The App Information
Edit an Application
- Select an application from the list.
- Click the Edit button.
Figure 7: Selecting an App From The List
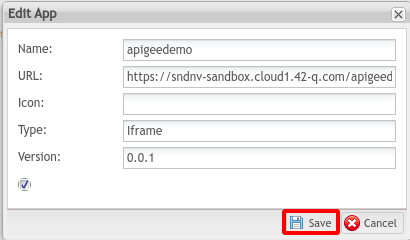
- Change the information of the app.
- Click the Save button to save the information or Cancel to abort.
Figure 8: Editing The Application Information
Active / Disable an Application
Users are able to activate or disable current applications listed in the Launchpad Maintenance portlet.
In order to activate or disable an application, users must follow the next steps below:
- Select an application from the list.
- Click the Active/Disable button to activate or disable the selected application.
Figure 9: Disabling an Application
Note: Applications that are currently active are marked with a blue checked icon under the “Active” column.
Figure 10: Application Disabled
Custom Apps Management
The Site administrator uses this portlet to upload and deploy the custom apps.
Deploy All Custom Apps
To access the Custom Apps Management portlet, navigate to Administration > Customization Apps > Custom Apps Management.
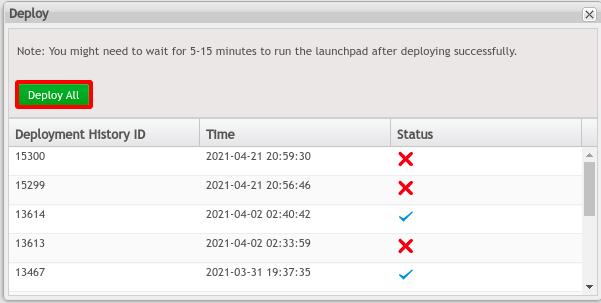
To deploy all the custom applications, click on the Deploy All button, a pop-up window will display as in Figure 12, users may notice that the column Status indicates whether the deployment was successful (blue tick icon) or not (red ex icon).
Figure 11: Deploying All The Custom Apps
Note: It is not possible to deploy only one or various custom apps; By clicking on the Deploy All button, all the apps listed will be deployed.
Press the Deploy All button as seen in Figure 12 to retry deploying all the apps that failed to be deployed, however, if users retry the deployment, the Deployment History ID and Time values will change.
Figure 12: Deployment Details
Note: Users may have to wait between 5 and 15 minutes to run the launchpad after deploying successfully.
Delete a Custom App
To delete a custom app, select the app to be deleted and click on the Delete button.
Figure 13: Select and Delete Custom App
Target Info
This portlet is used by the 42Q administrator to generate the site-target string and add this string to the app attribute in Apigee. Doing so will allow the app to gain access to the site/target’s data defined in the string. From the menu panel, navigate to Administration > Customization Apps > Target Info.
Figure 17: Accessing The Target Info Portlet
This portlet will be used by the 42Q support team in order to provide external Engineers with the Target.
To visualize the user’s Target, select the Site and click on the Targets button, to close the pop-up window click on the OK button.
Figure 18: Target Provided By The 42Q Support Team
Figure 19: Server Information Shop Floor ID
Note: Notice that the Target matches with the Shop Floor ID from the server information portlet.

