Difference between revisions of "42Q-MES0184-IIoT Configuration"
| Line 12: | Line 12: | ||
| | ||
| − | = <span class="mw-headline" id="Introduction"><span class="mw-headline" id="Introduction"><span class="mw-headline" id="Introduction"><span class="mw-headline" id="Introduction"><span class="mw-headline" id="Introduction"><span class="mw-headline" id="Introduction">Introduction</span></span></span></span></span></span> = | + | = <span class="mw-headline" id="Introduction"><span class="mw-headline" id="Introduction"><span class="mw-headline" id="Introduction"><span class="mw-headline" id="Introduction"><span class="mw-headline" id="Introduction"><span class="mw-headline" id="Introduction"><span class="mw-headline" id="Introduction">Introduction</span></span></span></span></span></span></span> = |
The concept of GGC stands for “Green Grass Computer”, the word: “Computer” also refers to any kind of device. This document will teach users how to configure, install, and deploy a GGC, as well as create and set up an Edge Device for the purpose of establishing a connection between the computer (device) and the 42Q portal to send data (payloads). | The concept of GGC stands for “Green Grass Computer”, the word: “Computer” also refers to any kind of device. This document will teach users how to configure, install, and deploy a GGC, as well as create and set up an Edge Device for the purpose of establishing a connection between the computer (device) and the 42Q portal to send data (payloads). | ||
| Line 20: | Line 20: | ||
| | ||
| + | | ||
| − | = <span class="mw-headline" id="Prerequisites"><span class="mw-headline" id="Prerequisites"><span class="mw-headline" id="Prerequisites"><span class="mw-headline" id="Prerequisites"><span class="mw-headline" id="Prerequisites"><span class="mw-headline" id="Prerequisites">Prerequisites</span></span></span></span></span></span> = | + | = <span class="mw-headline" id="Prerequisites"><span class="mw-headline" id="Prerequisites"><span class="mw-headline" id="Prerequisites"><span class="mw-headline" id="Prerequisites"><span class="mw-headline" id="Prerequisites"><span class="mw-headline" id="Prerequisites"><span class="mw-headline" id="Prerequisites">Prerequisites</span></span></span></span></span></span></span> = |
*Only Linux is supported for the computer or device to install the Green Grass Core. The related shell scripts and test code only work on Linux systems (Windows is not currently supported). | *Only Linux is supported for the computer or device to install the Green Grass Core. The related shell scripts and test code only work on Linux systems (Windows is not currently supported). | ||
| Line 34: | Line 35: | ||
**greengrass-ats.iot.us-east-1.amazonaws.com. '''Ports:''' 8443, 443. | **greengrass-ats.iot.us-east-1.amazonaws.com. '''Ports:''' 8443, 443. | ||
***.iot.us-east-1.amazonaws.com. '''Ports:''' 8883, 8443, 443. | ***.iot.us-east-1.amazonaws.com. '''Ports:''' 8883, 8443, 443. | ||
| − | ***.credentials.iot.us-east-1.amazonaws.com. '''Ports:''' 443 | + | ***.credentials.iot.us-east-1.amazonaws.com. '''Ports:''' 443 |
| | ||
| Line 40: | Line 41: | ||
| | ||
| − | = <span class="mw-headline" id="Functional_Description"><span class="mw-headline" id="Functional_Description"><span class="mw-headline" id="Functional_Description"><span class="mw-headline" id="Functional_Description"><span class="mw-headline" id="Functional_Description">Functional Description</span></span></span></span></span> = | + | = <span class="mw-headline" id="Functional_Description"><span class="mw-headline" id="Functional_Description"><span class="mw-headline" id="Functional_Description"><span class="mw-headline" id="Functional_Description"><span class="mw-headline" id="Functional_Description"><span class="mw-headline" id="Functional_Description">Functional Description</span></span></span></span></span></span> = |
There are three different functional components: '''CloudPrinting''', '''MachineInterface''', and '''DataIngestion'''.<br/> To access the Edge Devices portlet, navigate to: '''Shop Floor Control > Configuration > IIoT Configuration > Edge Devices'''. | There are three different functional components: '''CloudPrinting''', '''MachineInterface''', and '''DataIngestion'''.<br/> To access the Edge Devices portlet, navigate to: '''Shop Floor Control > Configuration > IIoT Configuration > Edge Devices'''. | ||
| − | <br/> '''Figure 1: Accessing Edge Devices'''<br/> [[File:DSS Accessing Edge Devices.png| | + | <br/> '''Figure 1: Accessing Edge Devices'''<br/> [[File:DSS Accessing Edge Devices.png|900px|DSS Accessing Edge Devices.png]] |
| | ||
| Line 52: | Line 53: | ||
'''Figure 2: Edge Devices Functions''' | '''Figure 2: Edge Devices Functions''' | ||
| − | [[File:DSS Edge Devices Functions.png| | + | [[File:DSS Edge Devices Functions.png|900px|DSS Edge Devices Functions.png]] |
| | ||
| Line 68: | Line 69: | ||
| | ||
| − | = <span class="mw-headline" id="Install_42Q_Edge_Software"><span class="mw-headline" id="Install_42Q_Edge_Software"><span class="mw-headline" id="Install_42Q_Edge_Software"><span class="mw-headline" id="Install_42Q_Edge_Software"><span class="mw-headline" id="Install_42Q_Edge_Software">Install 42Q Edge Software</span></span></span></span></span> = | + | = <span class="mw-headline" id="Install_42Q_Edge_Software"><span class="mw-headline" id="Install_42Q_Edge_Software"><span class="mw-headline" id="Install_42Q_Edge_Software"><span class="mw-headline" id="Install_42Q_Edge_Software"><span class="mw-headline" id="Install_42Q_Edge_Software"><span class="mw-headline" id="Install_42Q_Edge_Software">Install 42Q Edge Software</span></span></span></span></span></span> = |
| − | == <span class="mw-headline" id="CloudPrinting"><span class="mw-headline" id="CloudPrinting"><span class="mw-headline" id="CloudPrinting"><span class="mw-headline" id="CloudPrinting"><span class="mw-headline" id="CloudPrinting">CloudPrinting</span></span></span></span></span> == | + | == <span class="mw-headline" id="CloudPrinting"><span class="mw-headline" id="CloudPrinting"><span class="mw-headline" id="CloudPrinting"><span class="mw-headline" id="CloudPrinting"><span class="mw-headline" id="CloudPrinting"><span class="mw-headline" id="CloudPrinting">CloudPrinting</span></span></span></span></span></span> == |
Please follow the steps below to create a 42Q Cloud Printing Edge Device in 42Q: | Please follow the steps below to create a 42Q Cloud Printing Edge Device in 42Q: | ||
| Line 81: | Line 82: | ||
'''Figure 3: CREATE EDGE DEVICE Button''' | '''Figure 3: CREATE EDGE DEVICE Button''' | ||
| − | [[File:DSS CREATE EDGE DEVICE Button.png| | + | [[File:DSS CREATE EDGE DEVICE Button.png|900px|DSS CREATE EDGE DEVICE Button.png]] |
| | ||
| Line 109: | Line 110: | ||
'''Figure 5: Downloading The Files''' | '''Figure 5: Downloading The Files''' | ||
| − | [[File:DSS Downloading The Files.png| | + | [[File:DSS Downloading The Files.png|900px|DSS Downloading The Files.png]] |
| | ||
| Line 139: | Line 140: | ||
<br/> '''Figure 7: Edge Device Folder''' | <br/> '''Figure 7: Edge Device Folder''' | ||
| − | [[File:DSS Edge Device Folder.png| | + | [[File:DSS Edge Device Folder.png|900px|DSS Edge Device Folder.png]] |
| | ||
| − | === <span class="mw-headline" id="Testing_Label_Printing_Function_Using_Label_Engine_Screens"><span class="mw-headline" id="Testing_Label_Printing_Function_Using_Label_Engine_Screens"><span class="mw-headline" id="Testing_Label_Printing_Function_Using_Label_Engine_Screens"><span class="mw-headline" id="Testing_Label_Printing_Function_Using_Label_Engine_Screens"><span class="mw-headline" id="Testing_Label_Printing_Function_Using_Label_Engine_Screens">Testing Label Printing Function Using Label Engine Screens</span></span></span></span></span> === | + | === <span class="mw-headline" id="Testing_Label_Printing_Function_Using_Label_Engine_Screens"><span class="mw-headline" id="Testing_Label_Printing_Function_Using_Label_Engine_Screens"><span class="mw-headline" id="Testing_Label_Printing_Function_Using_Label_Engine_Screens"><span class="mw-headline" id="Testing_Label_Printing_Function_Using_Label_Engine_Screens"><span class="mw-headline" id="Testing_Label_Printing_Function_Using_Label_Engine_Screens"><span class="mw-headline" id="Testing_Label_Printing_Function_Using_Label_Engine_Screens">Testing Label Printing Function Using Label Engine Screens</span></span></span></span></span></span> === |
#'''Navigate''' to: '''Administration > Label Engine Admin > Printer'''. | #'''Navigate''' to: '''Administration > Label Engine Admin > Printer'''. | ||
| Line 150: | Line 151: | ||
| | ||
| − | <br/> '''Figure 8: Add Printer Button'''<br/> [[File:DSS Add Printer Button.png| | + | <br/> '''Figure 8: Add Printer Button'''<br/> [[File:DSS Add Printer Button.png|900px|DSS Add Printer Button.png]] |
| | ||
| Line 181: | Line 182: | ||
<br/> '''Figure 10: Print Button''' | <br/> '''Figure 10: Print Button''' | ||
| − | [[File:DSS Print Button.png| | + | [[File:DSS Print Button.png|900px|DSS Print Button.png]] |
| | ||
| Line 196: | Line 197: | ||
'''Figure 11: Entering Test Print Data''' | '''Figure 11: Entering Test Print Data''' | ||
| − | [[File:DSS Entering Test Print Data.png| | + | [[File:DSS Entering Test Print Data.png|900px|DSS Entering Test Print Data.png]] |
| | ||
| Line 215: | Line 216: | ||
| | ||
| + | | ||
| − | == <span class="mw-headline" id="MachineInterface"><span class="mw-headline" id="MachineInterface"><span class="mw-headline" id="MachineInterface"><span class="mw-headline" id="MachineInterface">MachineInterface</span></span></span></span> == | + | == <span class="mw-headline" id="MachineInterface"><span class="mw-headline" id="MachineInterface"><span class="mw-headline" id="MachineInterface"><span class="mw-headline" id="MachineInterface"><span class="mw-headline" id="MachineInterface">MachineInterface</span></span></span></span></span> == |
This function is used for sending commands to machines from the cloud.<br/> Below there is an example for stopping a machine when the server finds MSD material expired. | This function is used for sending commands to machines from the cloud.<br/> Below there is an example for stopping a machine when the server finds MSD material expired. | ||
| Line 224: | Line 226: | ||
'''Figure 13: Server Stopping A Machine Due To Material Expired Diagram''' | '''Figure 13: Server Stopping A Machine Due To Material Expired Diagram''' | ||
| − | [[File:DSS Server Stopping A Machine Due To Material Expired Diagram.png| | + | [[File:DSS Server Stopping A Machine Due To Material Expired Diagram.png|900px|DSS Server Stopping A Machine Due To Material Expired Diagram.png]]<br/> |
The diagram above is divided into three steps: | The diagram above is divided into three steps: | ||
| Line 268: | Line 270: | ||
| | ||
| − | Data nomenclature:<br/> '''URL:''' https://portal-uat.42-q.com/mes-api/[SiteName]/greengrass/v2/publish<br/> '''Topic:''' [Envide]/machine-interface/[Envide]_[Edge device name]<br/> '''Output:''' [Envide]/machine-interface/results<br/> '''Error:''' [Envide]/machine-interface/errors | + | Data nomenclature:<br/> '''URL:''' [https://portal-uat.42-q.com/mes-api/ https://portal-uat.42-q.com/mes-api/][SiteName]/greengrass/v2/publish<br/> '''Topic:''' [Envide]/machine-interface/[Envide]_[Edge device name]<br/> '''Output:''' [Envide]/machine-interface/results<br/> '''Error:''' [Envide]/machine-interface/errors |
| | ||
| Line 274: | Line 276: | ||
<br/> '''Figure 14: Sending The Payload Using Postman''' | <br/> '''Figure 14: Sending The Payload Using Postman''' | ||
| − | [[File:DSS Sending The Payload Using Postman. | + | [[File:DSS Sending The Payload Using Postman..png]]<br/> |
<ol start="20"> | <ol start="20"> | ||
<li>'''Open''' the '''Terminal'''.</li> | <li>'''Open''' the '''Terminal'''.</li> | ||
| Line 286: | Line 288: | ||
'''Figure 15: Successful Payload Sending Logs''' | '''Figure 15: Successful Payload Sending Logs''' | ||
| − | [[File:DSS Successful Payload Sending Logs.png| | + | [[File:DSS Successful Payload Sending Logs.png|900px|DSS Successful Payload Sending Logs.png]]<br/> |
<u>'''Note:'''</u> If the message from the previous image is printed in your local log, the function has succeeded.<br/> Adding the corresponding configuration for PTS allows PTS to send messages to Edge Device. | <u>'''Note:'''</u> If the message from the previous image is printed in your local log, the function has succeeded.<br/> Adding the corresponding configuration for PTS allows PTS to send messages to Edge Device. | ||
| Line 292: | Line 294: | ||
| | ||
| − | == <span class="mw-headline" id="DataIngestion"><span class="mw-headline" id="DataIngestion"><span class="mw-headline" id="DataIngestion">DataIngestion</span></span></span> == | + | == <span class="mw-headline" id="DataIngestion"><span class="mw-headline" id="DataIngestion"><span class="mw-headline" id="DataIngestion"><span class="mw-headline" id="DataIngestion">DataIngestion</span></span></span></span> == |
Please follow the steps below to create a 42Q Cloud Data Ingestion Edge Device in 42Q: | Please follow the steps below to create a 42Q Cloud Data Ingestion Edge Device in 42Q: | ||
| Line 326: | Line 328: | ||
<br/> '''Figure 16: Edit Button''' | <br/> '''Figure 16: Edit Button''' | ||
| − | [[File:DSS Edit Button.png| | + | [[File:DSS Edit Button.png|900px|DSS Edit Button.png]] |
| | ||
| Line 338: | Line 340: | ||
<br/> '''Figure 17: CLIENT DEVICES TAB''' | <br/> '''Figure 17: CLIENT DEVICES TAB''' | ||
| − | [[File:DSS CLIENT DEVICES TAB.png| | + | [[File:DSS CLIENT DEVICES TAB.png|900px|DSS CLIENT DEVICES TAB.png]] |
| | ||
| Line 371: | Line 373: | ||
<br/> '''Figure 19: Client Device Folder''' | <br/> '''Figure 19: Client Device Folder''' | ||
| − | [[File:DSS Client Device Folder.png| | + | [[File:DSS Client Device Folder.png|900px|DSS Client Device Folder.png]] |
| | ||
| Line 384: | Line 386: | ||
<br/> '''Figure 20: Data To Be Modified''' | <br/> '''Figure 20: Data To Be Modified''' | ||
| − | [[File:DSS Data To Be Modified.png| | + | [[File:DSS Data To Be Modified.png|900px|DSS Data To Be Modified.png]] |
| | ||
| Line 396: | Line 398: | ||
<br/> '''Figure 21: Result Of Executing The MqttTest.py File''' | <br/> '''Figure 21: Result Of Executing The MqttTest.py File''' | ||
| − | [[File:DSS Result Of Executing The MqttTest.py File.png| | + | [[File:DSS Result Of Executing The MqttTest.py File.png|900px|DSS Result Of Executing The MqttTest.py File.png]] |
| | ||
| Line 424: | Line 426: | ||
<br/> '''Figure 23: Things Portlet''' | <br/> '''Figure 23: Things Portlet''' | ||
| − | [[File:DSS Things Portlet.png| | + | [[File:DSS Things Portlet.png|900px|DSS Things Portlet.png]] |
| | ||
| Line 435: | Line 437: | ||
| | ||
| − | '''Figure 24: Thing ID'''<br/> [[File:DSS Thing ID.png| | + | '''Figure 24: Thing ID'''<br/> [[File:DSS Thing ID.png|900px|DSS Thing ID.png]] |
| | ||
| Line 447: | Line 449: | ||
| | ||
| − | '''Figure 25: Add (+) Icon'''<br/> [[File:DSS Add (+) Icon.png| | + | '''Figure 25: Add (+) Icon'''<br/> [[File:DSS Add (+) Icon.png|900px|DSS Add (+) Icon.png]] |
| | ||
| Line 461: | Line 463: | ||
<br/> '''Figure 26: Creating a Widget''' | <br/> '''Figure 26: Creating a Widget''' | ||
| − | [[File:DSS Creating a Widget.png| | + | [[File:DSS Creating a Widget.png|900px|DSS Creating a Widget.png]] |
| | ||
| Line 472: | Line 474: | ||
<br/> '''Figure 27: Show/Hide Icon''' | <br/> '''Figure 27: Show/Hide Icon''' | ||
| − | [[File:DSS Show-Hide Icon.png| | + | [[File:DSS Show-Hide Icon.png|900px|DSS Show-Hide Icon.png]] |
<br/> <u>'''Note:'''</u> Users can check the payload sent through either of the following: | <br/> <u>'''Note:'''</u> Users can check the payload sent through either of the following: | ||
Revision as of 22:57, 16 March 2023
42Q Home > IIoT > Device Self Service
Contents
Introduction
The concept of GGC stands for “Green Grass Computer”, the word: “Computer” also refers to any kind of device. This document will teach users how to configure, install, and deploy a GGC, as well as create and set up an Edge Device for the purpose of establishing a connection between the computer (device) and the 42Q portal to send data (payloads).
Prerequisites
- Only Linux is supported for the computer or device to install the Green Grass Core. The related shell scripts and test code only work on Linux systems (Windows is not currently supported).
- Python 3.8 or higher must be installed and configured to run the test code.
- Operating System and Software requirements:
- Linux kernel version 4.4 or later (Ubuntu 20.04 and CentOS 8.5).
- Java Runtime Environment (JRE) version 8 or greater (included in the installation script).
- Python version 3.8 for functions that use the Python 3.8 runtime (included in the installation script).
- Network requirements:
A Region is an AWS region that hosts 42Q portal APIs. The Green Grass Core hardware needs to be able to access the following endpoints through specific ports:- https://www.amazontrust.com/repository/AmazonRootCA1.pem.
- https://d2s8p88vqu9w66.cloudfront.net/releases/greengrass-2.6.0.zip.
- greengrass-ats.iot.us-east-1.amazonaws.com. Ports: 8443, 443.
- .iot.us-east-1.amazonaws.com. Ports: 8883, 8443, 443.
- .credentials.iot.us-east-1.amazonaws.com. Ports: 443
Functional Description
There are three different functional components: CloudPrinting, MachineInterface, and DataIngestion.
To access the Edge Devices portlet, navigate to: Shop Floor Control > Configuration > IIoT Configuration > Edge Devices.
Figure 1: Accessing Edge Devices

Figure 2: Edge Devices Functions
DSS Edge Devices Functions.png
- Users can query the list of all devices by Edge Device Name or Group Name.
- Users can create a new edge device.
- Users can view the details of the edge device.
- Users can download the software of the edge device.
- Users can upgrade this edge device with more features.
- Users can get all functional components through this button when no functional components are deployed on their local core device.
- Users can delete the edge device.
Install 42Q Edge Software
CloudPrinting
Please follow the steps below to create a 42Q Cloud Printing Edge Device in 42Q:
- Navigate to: Shop Floor Control > Configuration > IIoT Configuration > Edge Devices.
- Select CREATE EDGE DEVICE to create a new Green Grass Core.
Figure 3: CREATE EDGE DEVICE Button
DSS CREATE EDGE DEVICE Button.png
- Enter the Edge Device Name of the Green Grass Core. The name can be up to 128 characters. Valid characters are: a-z, A-Z, 0-9, colon (:), underscore (_), and hyphen (-).
- Select the Group Name as CloudPrintingGroup.
Note: After selecting the Group Name, the Group Version will automatically be selected.
Figure 4: Create Edge Device Form
DSS Create Edge Device Form.png
- Select the checkbox next to the desired Edge Device.
- Select the Download icon to download the Edge Device ZIP file.
Figure 5: Downloading The Files
- Right-click on the ZIP file.
- Select Extract Here to unzip the file.
- Open the Terminal.
- Enter the command: sudo su, and then press Enter.
- Enter the root user’s password, and then press Enter.
Note: If the word: root@ appears before the computer’s username as in the image below, it means that you are logged in as a root user.
Figure 6: User Logged In as a Root User
- Enter the next command: sh ggcV2.sh, and then press Enter.
Note: After the script is installed successfully, users can navigate to the local device’s path: /greengrass/v2 to check the installed folder; logs are contained in the path: /greengrass/v2/logs.
Figure 7: Edge Device Folder
Testing Label Printing Function Using Label Engine Screens
- Navigate to: Administration > Label Engine Admin > Printer.
- Select Add.
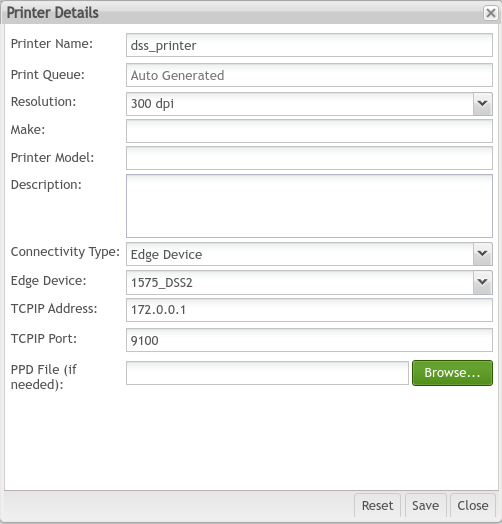
- Enter the Printer Name.
- Select theResolution from the drop-down list.
- Select the Connectivity Type as Edge Device.
Figure 9: Entering The Printer Details
Note: The TCP IP Address should be the address of the printer or start a TCP Server as a simulator by executing the next command in the Terminal: python3 tcpServer.py.
- Navigate to: Production > Label Engine Labels > LE Labels.
- Search for the label called “entry”, which will print whatever "Entry" value is passed.
- Select the checkbox next to the printer name.
- Select Print.
Figure 10: Print Button
- Select the Printer Name previously created.
- Enter a value in the Entry field.
- Select Test Print.
Figure 11: Entering Test Print Data
- Open the Terminal.
- Navigate to the local device’s path: /greengrass/v2/logs.
- Enter the next command: tail -f {envide}_CloudPrinting.log. After that, a message will be received to confirm the successful testing.
Figure 12: Successful Testing Message
MachineInterface
This function is used for sending commands to machines from the cloud.
Below there is an example for stopping a machine when the server finds MSD material expired.
Figure 13: Server Stopping A Machine Due To Material Expired Diagram
DSS Server Stopping A Machine Due To Material Expired Diagram.png
The diagram above is divided into three steps:
- Install an Edge Device on a server in the plant.
- The plant creates a new local application which can communicate with the Edge Device by TCP and also can send commands to machines.
- The Cloud application will send commands to the Edge Device, then the Edge Device will forward the message to the local application through TCP/IP.
Please follow the steps below to create a 42Q Cloud Machine Interface Edge Device in 42Q:
- Navigate to: Shop Floor Control > Configuration > IIoT Configuration > Edge Devices.
- Select CREATE EDGE DEVICE to create a new Green Grass Core.
- Enter the Edge Device Name of the Green Grass Core. The name can be up to 128 characters. Valid characters are: a-z, A-Z, 0-9, colon (:), underscore (_), and hyphen (-).
- Select the Group Name as MachineInterfaceGroup.
Note: After selecting the Group Name, the Group Version will automatically be selected.
- Select the checkbox next to the desired Edge Device.
- Select the Download icon to download the ZIP file.
- Right-click on the ZIP file.
- Select Extract Here to unzip the file.
- Open the Terminal.
- Enter the command: sudo su, and then press Enter.
- Enter the root user’s password, and then press Enter.
- Navigate to the extract folder by using the command: cd {folder path}.
- Enter the next command: sh ggcV2.sh, and then press Enter.
Note: After the script is installed successfully, users can navigate to the computer’s path: /greengrass/v2 to check the installed folder; logs are contained in the path: /greengrass/v2/logs.
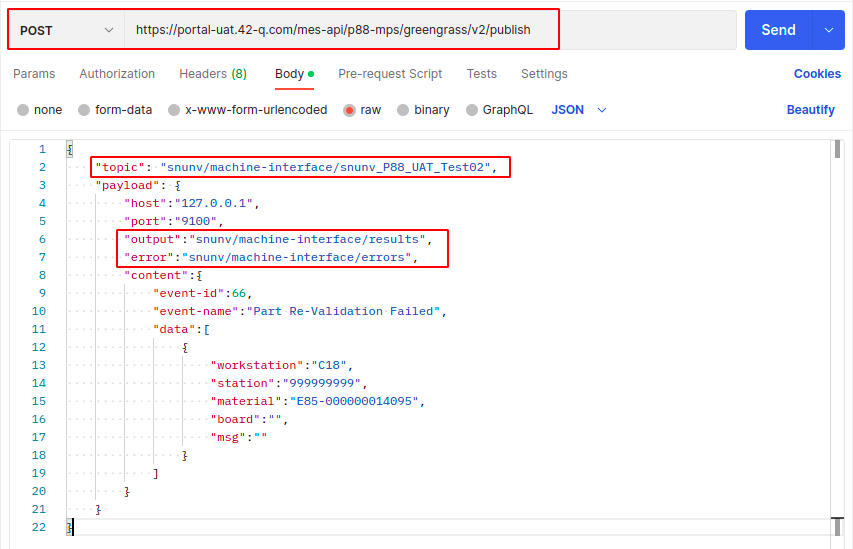
- Open Postman to test its functionality.
- Select POST as HTTP Method.
- Enter the URL.
- Enter the Topic.
- Enter the Output.
- Enter the Error.
Data nomenclature:
URL: https://portal-uat.42-q.com/mes-api/[SiteName]/greengrass/v2/publish
Topic: [Envide]/machine-interface/[Envide]_[Edge device name]
Output: [Envide]/machine-interface/results
Error: [Envide]/machine-interface/errors
Figure 14: Sending The Payload Using Postman
- Open the Terminal.
- Navigate to the local device’s path: /greengrass/v2/log to view the logs.
Figure 15: Successful Payload Sending Logs
Note: If the message from the previous image is printed in your local log, the function has succeeded.
Adding the corresponding configuration for PTS allows PTS to send messages to Edge Device.
DataIngestion
Please follow the steps below to create a 42Q Cloud Data Ingestion Edge Device in 42Q:
- Navigate to: Shop Floor Control > Configuration > IIoT Configuration > Edge Devices.
- Select CREATE EDGE DEVICE to create a new Green Grass Core.
- Enter the Edge Device Name of the Green Grass Core. The name can be up to 128 characters. Valid characters are: a-z, A-Z, 0-9, colon (:), underscore (_), and hyphen (-).
- Select the Group Name as DataIngestionGroup.
Note: After selecting the Group Name, the Group Version will automatically be selected.
- Select the checkbox next to the desired Edge Device.
- Select the Download icon to download the ZIP file.
- Right-click on the ZIP file.
- Select Extract Here to unzip the file.
- Open the Terminal.
- Enter the command: sudo su, and then press Enter.
- Enter the root user’s password, and then press Enter.
- Enter the next command: sh ggcV2.sh, and then press Enter.
Note: After the script is installed successfully, users can navigate to the computer’s path: /greengrass/v2 to check the installed folder; logs are contained in the path: /greengrass/v2/logs.
- When the status of this Edge Device is "Healthy", select the Edit button to enter the Edge Device information.
Figure 16: Edit Button
- Select the CLIENT DEVICES tab.
- Select CREATE CLIENT DEVICES.
Figure 17: CLIENT DEVICES TAB
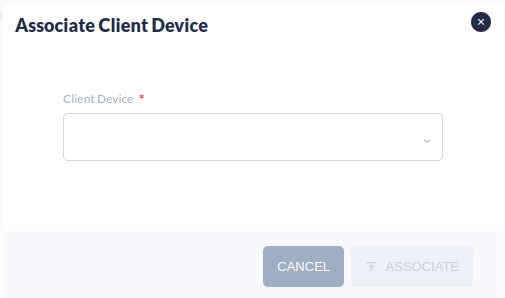
- Enter the name of the Client Device to be created.
Note: The name can be up to 128 characters. Valid characters: a-z, A-Z, 0-9, colon (:), underscore (_), and hyphen (-).
- Select ASSOCIATE.
Figure 18: Creating a Client Device
- Select the Download icon to download the Client Device ZIP file.
- Right-click on the ZIP file.
- Select Extract Here to unzip the file.
Figure 19: Client Device Folder
- Open the MqttTest.py file.
- Find the line that contains: ‘# Change This’.
- Modify the data information to be sent; users may see an example below (user’s will be different).
Figure 20: Data To Be Modified
- Open the Terminal.
- Enter the next command: python MqttTest.py, and then press Enter. The result should be similar to the image below:
Figure 21: Result Of Executing The MqttTest.py File
- Navigate to the local device’s path: /greengrass/v2/log to view the logs.
Figure 22: Successful MqttTest.py Running Logs
Note: If the message from the previous image is printed in your local log, the function has succeeded.
- Navigate to: Shop Floor Control > Configuration > IIoT Configuration > Things.
Figure 23: Things Portlet
- If the “Thing ID” is the same as the “id” configured in MqttTest.py file, it means that AWS Cloud has already stored the data uploaded.
- Navigate to: Reporting > IIoT Dashboard.
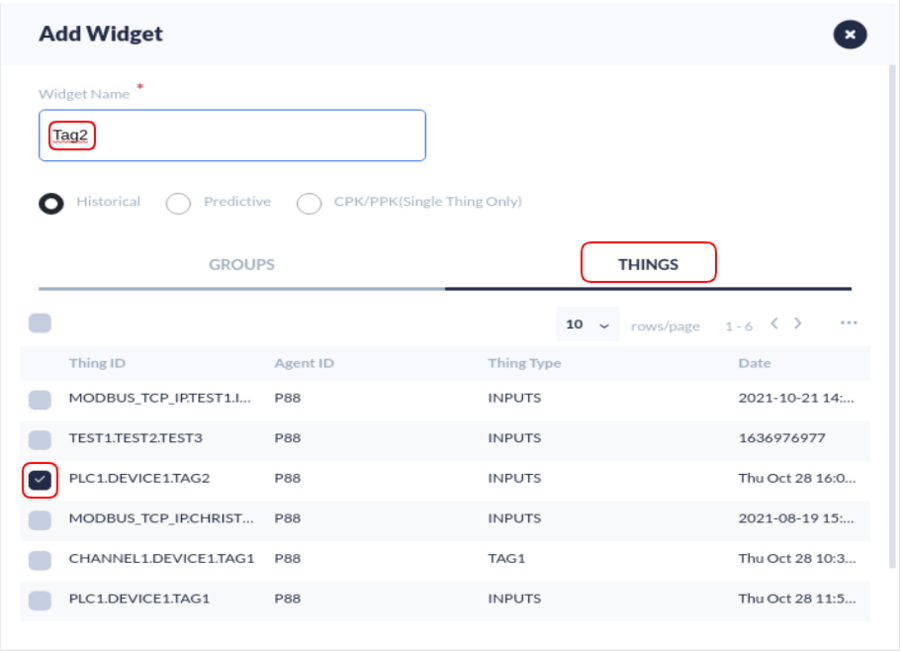
- Select the + icon to create a new widget.
- Enter the Widget Name.
- Select the THINGS tab.
- Select the "id" value previously configured in the MqttTest.py file.
- Select the SAVE button located at the end of the Add Widget Form.
Figure 26: Creating a Widget
- Select the show/hide icon to view the values of the widget created.
Figure 27: Show/Hide Icon
Note: Users can check the payload sent through either of the following:
- IIoT widget.


