Difference between revisions of "How to manage Calibration in CMMS"
Jump to navigation
Jump to search
| Line 1: | Line 1: | ||
| − | |||
= Configure the Calibration Group = | = Configure the Calibration Group = | ||
| Line 8: | Line 7: | ||
#Go to the Users tab and add Users one at a time. | #Go to the Users tab and add Users one at a time. | ||
| − | ''' | + | '''Figure 1: Set Group Category''' |
[[File:1 Group.png|800px|1 Group.png]] | [[File:1 Group.png|800px|1 Group.png]] | ||
| − | ''' | + | '''Figure 2: Add Group’s Users''' |
[[File:Add group user.png|800px|Add group user.png]] | [[File:Add group user.png|800px|Add group user.png]] | ||
| + | | ||
= Assign the Calibration Group to Assets = | = Assign the Calibration Group to Assets = | ||
| Line 28: | Line 28: | ||
| | ||
| − | ''' | + | '''Figure 3: Set Calibration Category''' |
[[File:Calibration category.png|RTENOTITLE]] | [[File:Calibration category.png|RTENOTITLE]] | ||
| − | ''' | + | '''Figure 4: Set Group for Asset''' |
[[File:Assign group to asset.png|800px|Assign group to asset.png]] | [[File:Assign group to asset.png|800px|Assign group to asset.png]] | ||
| + | | ||
= Assign the Calibration. = | = Assign the Calibration. = | ||
| Line 53: | Line 54: | ||
</ol> | </ol> | ||
| − | ''' | + | '''Figure 5: Edit Asset Calibration Tab''' |
[[File:Calibration tab.png|800px|Calibration tab.png]] | [[File:Calibration tab.png|800px|Calibration tab.png]] | ||
| Line 62: | Line 63: | ||
| | ||
| − | ''' | + | '''Figure 6: Assigned Alter Email''' |
[[File:Assigned Alter Email.png|800px|Assigned Alter Email.png]] | [[File:Assigned Alter Email.png|800px|Assigned Alter Email.png]] | ||
| + | | ||
= Complete the Calibration on the Asset = | = Complete the Calibration on the Asset = | ||
| Line 83: | Line 85: | ||
</ol> | </ol> | ||
| − | ''' | + | '''Figure 7: Calibration Assigned''' |
[[File:Calibartion Assigned.png|800px|Calibartion Assigned.png]] | [[File:Calibartion Assigned.png|800px|Calibartion Assigned.png]] | ||
| Line 92: | Line 94: | ||
| | ||
| − | ''' | + | '''Figure 8: Status Change alter Email''' |
[[File:Status Change Alter Email.png|800px|Status Change Alter Email.png]] | [[File:Status Change Alter Email.png|800px|Status Change Alter Email.png]] | ||
| + | | ||
= Approve (or Reject) the Calibration = | = Approve (or Reject) the Calibration = | ||
| Line 110: | Line 113: | ||
</ol> | </ol> | ||
| − | ''' | + | '''Figure 9: Calibration Approval''' |
[[File:Calibration approval.png|800px|Calibration approval.png]] | [[File:Calibration approval.png|800px|Calibration approval.png]] | ||
| Line 118: | Line 121: | ||
| | ||
| − | ''' | + | '''Figure 10: Approval Alter Email''' |
[[File:Approval alter email.png|800px|Approval alter email.png]] | [[File:Approval alter email.png|800px|Approval alter email.png]] | ||
| Line 124: | Line 127: | ||
| | ||
| + | | ||
= Reschedule the Calibration = | = Reschedule the Calibration = | ||
| Line 137: | Line 141: | ||
</ol> | </ol> | ||
| − | ''' | + | '''Figure 11: My Rescheduling''' |
[[File:Calibration rescheduled.png|800px|Calibration rescheduled.png]] | [[File:Calibration rescheduled.png|800px|Calibration rescheduled.png]] | ||
| Line 165: | Line 169: | ||
| | | | ||
|- | |- | ||
| − | | style="width: 60px;" | | + | | style="width: 60px;" | 1A |
| style="width: 86px;" | 4/11/19 | | style="width: 86px;" | 4/11/19 | ||
| style="width: 293px;" | Update screenshots. Correct some mandatory fields | | style="width: 293px;" | Update screenshots. Correct some mandatory fields | ||
| Line 175: | Line 179: | ||
| style="width: 60px;" | 2 | | style="width: 60px;" | 2 | ||
| style="width: 86px;" | 8/12/2020 | | style="width: 86px;" | 8/12/2020 | ||
| − | | style="width: 293px;" | Title Update | + | | style="width: 293px;" | Title Update and link update |
| Elaine Fonaro | | Elaine Fonaro | ||
| | | | ||
| Line 181: | Line 185: | ||
| style="width: 60px;" | 2A | | style="width: 60px;" | 2A | ||
| style="width: 86px;" | 8/12/2020 | | style="width: 86px;" | 8/12/2020 | ||
| − | | style="width: 293px;" | Revision Log Update | + | | style="width: 293px;" | Revision Log Update, Renamed screenshots to Figures. |
| Marisol Vargas | | Marisol Vargas | ||
| | | | ||
|} | |} | ||
Revision as of 18:17, 12 August 2020
Contents
Configure the Calibration Group
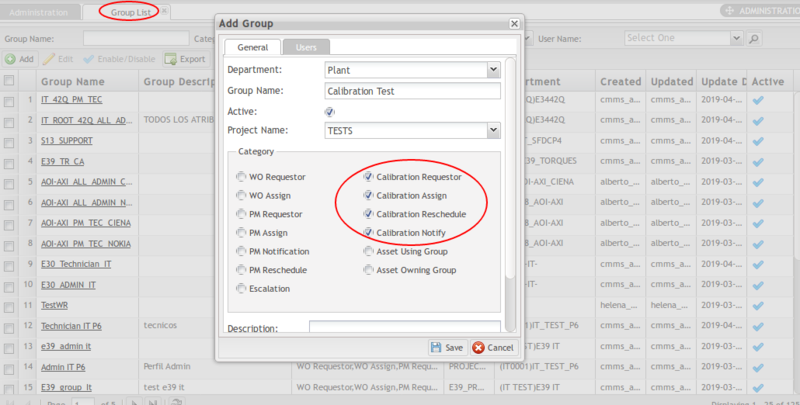
- Go to: Shop Floor Control > Config > CMMS Admin > Group.
- Add a new Calibration Group or edit an existing Calibration Group.
- Select the Calibration Categories at the General tab as needed.
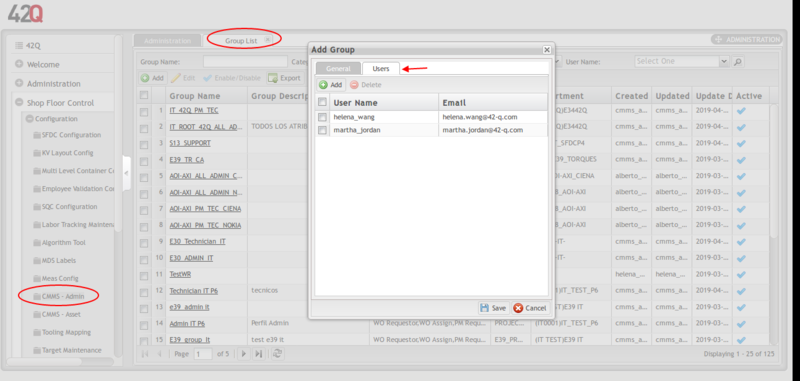
- Go to the Users tab and add Users one at a time.
Figure 1: Set Group Category
Figure 2: Add Group’s Users
Assign the Calibration Group to Assets
- Go to: Shop Floor Control > Config > CMMS Asset and select the Asset to edit.
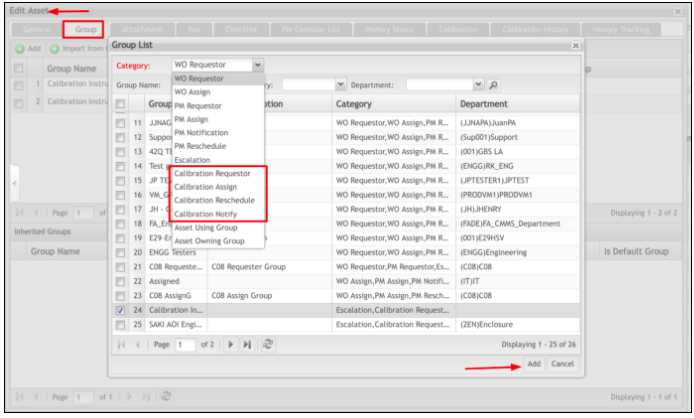
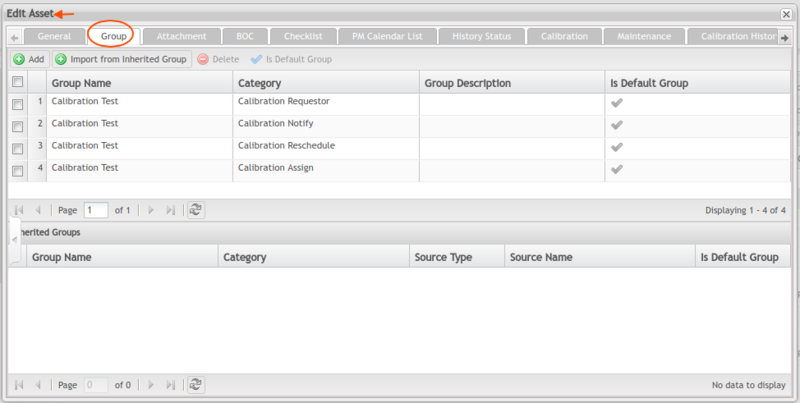
- Add Calibration Categories to this Asset's Group:
- Go to Group Tab.
- Add Calibration Categories one at a time.
Figure 3: Set Calibration Category
Figure 4: Set Group for Asset
Assign the Calibration.
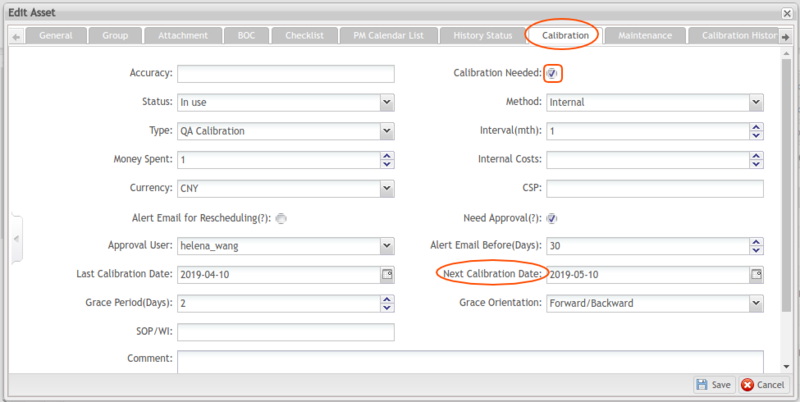
- At the Edit Asset Page, move to the Asset’s Calibration Tab.
- Complete the following mandatory fields:
- Calibration Needed checkbox.
- Last Calibration Date
- Interval (mth)
- The system will populate Next Calibration Date based on the Last Calibration Date and the number of months selected in the Interval section.
- Grace Period(Days).
- Complete the other optional fields if needed.
- Save.
Figure 5: Edit Asset Calibration Tab
- Email notification goes to the Assigned group members, including Requester and Approver.
Figure 6: Assigned Alter Email
Complete the Calibration on the Asset
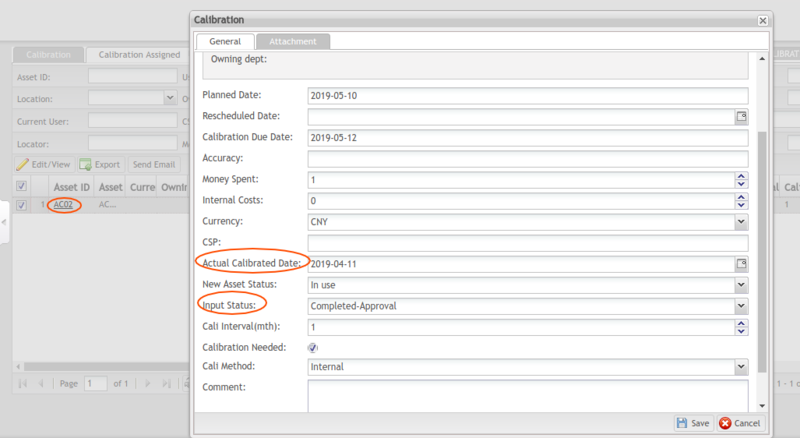
- Go to:Production > CMMS Calibration > My Assigned.
- Double click on the Asset Name.
- Fill out the following mandatory fields:
- Input Status
- Actual Calibrated Date
Note: Only the Input Statu be set to Complete - Approval, this calibration Asset’s go to the approval process.
- Fill out other optional fields if needed.
- Save.
Figure 7: Calibration Assigned
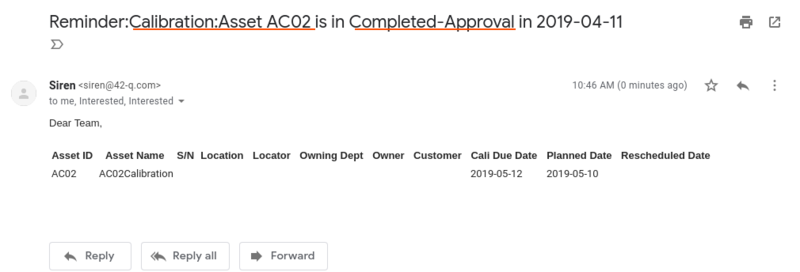
- Email notification goes to the Approver and the assigned group members (this person was selected when the Calibration needs approver) (Step 2).
Figure 8: Status Change alter Email
Approve (or Reject) the Calibration
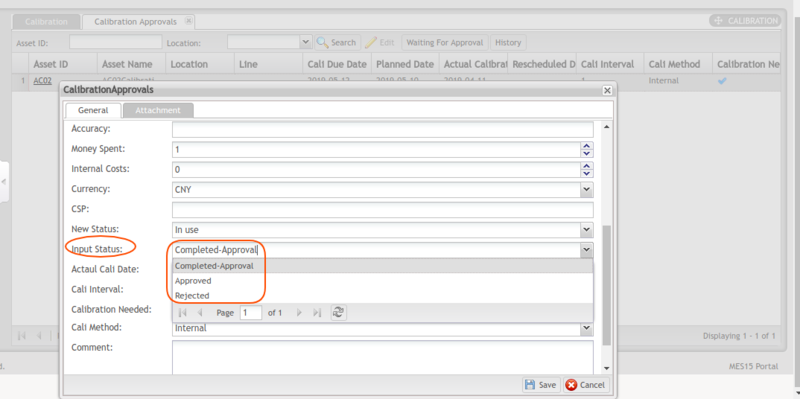
- Go to: Production > CMMS Calibration > My Approvals.
- Double click on the Asset Name.
- Complete the following mandatory fields:
- Input Status: Select Approved or Rejected.
- Actual Cal Date.
- Save.
Figure 9: Calibration Approval
Email notification goes to the approver, requester, and assigned group members.
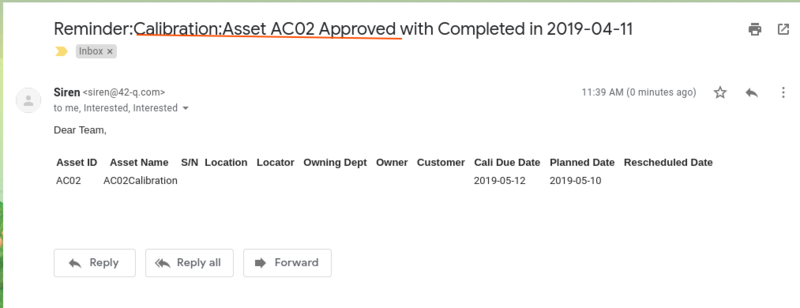
Figure 10: Approval Alter Email
Reschedule the Calibration
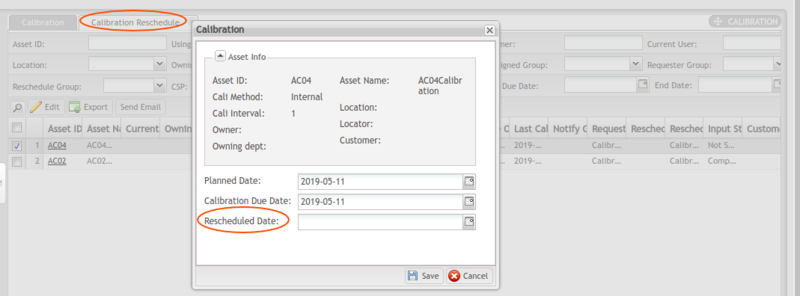
- Go to:Production > CMMS Calibration > My Rescheduling.
- Double click on the Asset Name.
- Complete the following mandatory fields:
- Rescheduled Date.
- Save.
Figure 11: My Rescheduling
Revision Log
| Revision | Revision Date | Description | Updated by | Approved by |
|---|---|---|---|---|
| 1 | 12/19/18 | Initial Draft | Martha Jordan | |
| 1A | 4/11/19 | Update screenshots. Correct some mandatory fields Add Reschedule section | Helena Wang | |
| 2 | 8/12/2020 | Title Update and link update | Elaine Fonaro | |
| 2A | 8/12/2020 | Revision Log Update, Renamed screenshots to Figures. | Marisol Vargas |
