Difference between revisions of "SOP-42Q-MES0028 Incoming Traceability"
m (Elaine fonaro moved page SOP-5-I-MES0028-C RA1 PTS Incoming Material Labeling to SOP-5-I-42Q-MES0028-C RA1 Incoming Material Labeling) |
|
(No difference)
| |
Revision as of 20:42, 30 July 2020
42Q Home > Shop Floor Control > Production Control > PTS Incoming Material Labeling

This edition applies to MES15 Portal 1.0 Application and all subsequent releases and modifications until otherwise indicated in new revisions.
SFDC Production Control
As its name implies, the Shop Floor Data Collection (SFDC) system is responsible for the collection of data from the shop floor. The collected information is then stored in the Manufacturing Execution System (MES). Specifically, the real-time information collected by SFDC is utilized by Reporting and MES Web to create quality control reports. The SFDC system uses manual and automated barcode scanning to monitor and collect data for a product line or plant. Thus SFDC plays an important role in maintaining unit histories and directing product movement on the manufacturing floor.
The system provides Access Control between the modules of the application, including the functionalities of each screen. The current version has an SFDC Configuration page which provides access to all sub modules pages and its functionalities (view, add, edit, delete, print and generate output file).
General Notes
- Incoming material labeling is the foundation of traceability. Initially warehouse staff must ensure that all the received materials must have their correct RT (Receipt Traveler) numbers.
- Every time the warehouse receives materials, there will be RT records downloaded from ERP Application to PTS database server, and the corresponding RT sheet numbers can also be found and printed for the received materials.
- We review incoming material labeling module in this section. By means of the scanner, the material barcode makes it a reality to trace components in modern EMS because the material barcode uniquely identifies the PCB and its components, hence deciding the manufacturer name, manufacturer part number, lot code, etc. of the components. This module implements the function by linking the material barcode to its relevant characteristics.
- Work Instruction alteration suggestions must be reviewed and approved by the site Documentation Manager prior to sending an alteration request to 42Q Corporate.
- This Work Instruction is a basic navigation-training guide and is not meant to teach the process flow for individual department functionality. Individual 42Q sites may have minor or specific process changes that will be documented at the site level.
Pre-Requisites
- Preliminary reading up SOP-5-I-PTS0001_Basic Navigation instruction
- Equipment for label printing and barcode scanning are ready for use.
- Receipt Traveler number
Incoming Process Flow
Figure 1: Incoming Process Flow
Material Labeling
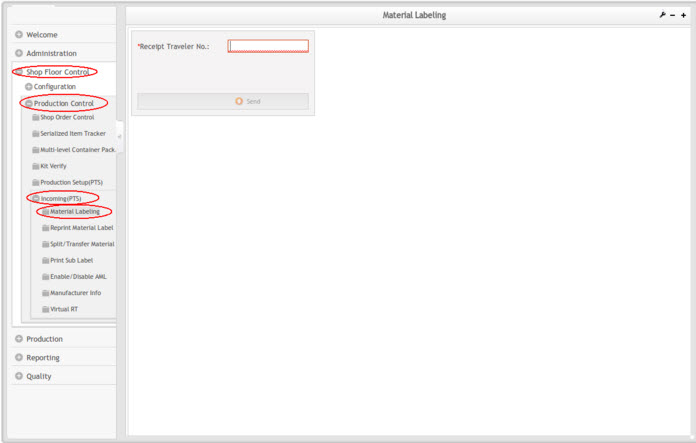
1. To access the Material Labeling Page, navigate to Shop Floor Control >
Production Control >
Incoming Traceability >
Material Labeling.
Figure 2: Incoming Material Labeling
1. Select Material Labeling under Incoming in main menu.
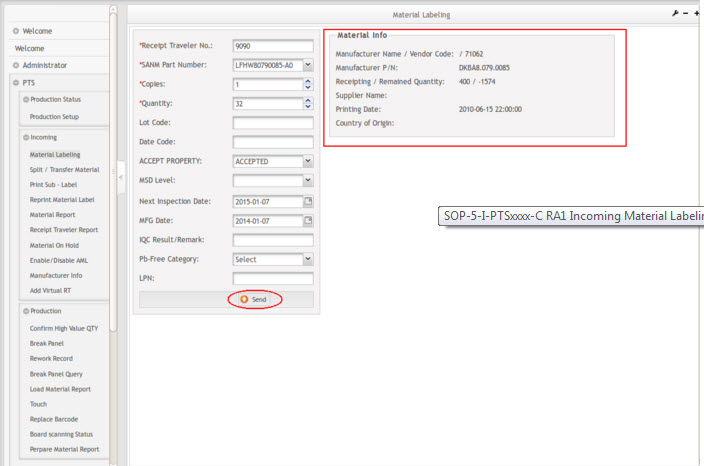
2. Enter Receipting Number. (Compulsory)
3. Next enter the SANM Part Number, Manufacturer P/N, Receipting Qty
Figure 3: Incoming Material Labeling- Input Option
4. Copies : Quantity of labels to be placed on material(default is "1").
5. Quantity : Number of material in each packing unit.
6. Lot Code & Date Code: Ensure it matches supplier ’
s material barcode.
7. MSD Level: Please select as indicated on material label.
8. Accept Property (required): Select from the dropdown (default is "Accepted").
9. Next Inspection Date (required): Normally material will be taken as due after one year since label printed. (Default is today ’
s date +
Material Expire Day)
NOTE: This option only works when ’
Next Inspection Date=Yes ’
at [
"Administrator"- >
PTS Administrator- >
System Setting- >
Material_And_Labeling page. Material Expire Day can also be defined at this page.
10. IQC Result /Remark: Applicable to silk printing, re-inspect, return, transfer, or split material. (Input related reference number if available)
11. MFG Date: Show MFG date on label, but system will not save this data into database.
NOTE:This option only works when ’
MFG Date=Yes ’
at [
"Administrator"- >
PTS Administrator- >
System Setting- >
Material_And_Labeling ]
page.
12. LPN:show LPN( LICENSE_PLATE_NUMBER) on label.
13. Send: Creates and prints material label when Send is selected.
NOTE: Ensure each label passes visual check and checked by scanner, make sure every item on label matches the material, and paste label on the same surface where supplier label is located. (Do not cover the feeder hole or other labels on the packing).
Reprint Material Label
This module is used by IQC to reprint material barcodes. Reasons for reprinting the existing PTS printed labels include the following:
- the quantity is being updated
- poor quality labels printed
- the label has been damaged
NOTE: In this section, it is a prerequisite to have printed the material label.
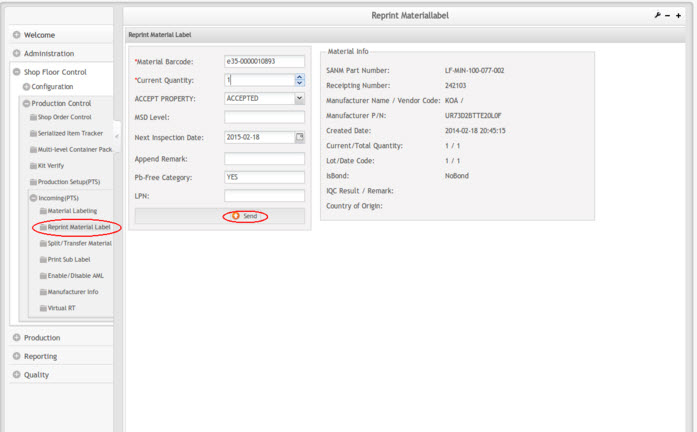
1. To access the Reprint Material Label page, navigate to Shop Floor Control >
Production Control >
Incoming Traceability >
Reprint Material Label.
Figure 4: Incoming Reprint Labeling
1. Enter the Material Barcode, and then select Enter (all related information appears).
2. Confirm and enter the Current Quantity.
NOTE: The entered Current Quantity cannot be greater than Total Quantity. The Item Current Quantity will be in red and the user will not be allowed to print labels when "Material Label Quantity Control" is set to Yes in the PTS system setting page.
3. Define Pb-Free Category, MFG Date, and Next Inspection Date as it appears on the MFR label.
4. Input the reference information in the LPN field if any.
5. Select Send to print the new label.
Print Sub-Label
This module is for creating the second level of material package label(s) into the same quantity level, which split from the first level receiving quantity.
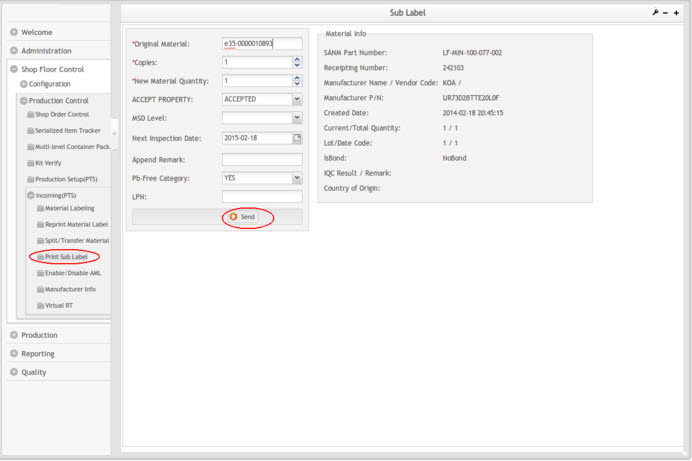
1. To access the Print Sub-Label page, navigate to Shop Floor Control >
Production Control >
Incoming Traceability >
Print Sub-Label.
Figure 5: Print Sub-Label Input Options
1. Select Print Sub-Label from the Incoming Main menu.
2. Input "Original Material", and then select Enter. The related information appears.
3. Define the sub-label quantity in New Material Quantity.
4. Complete the remaining fields per the original material label.
5. Select Send to create a new label.
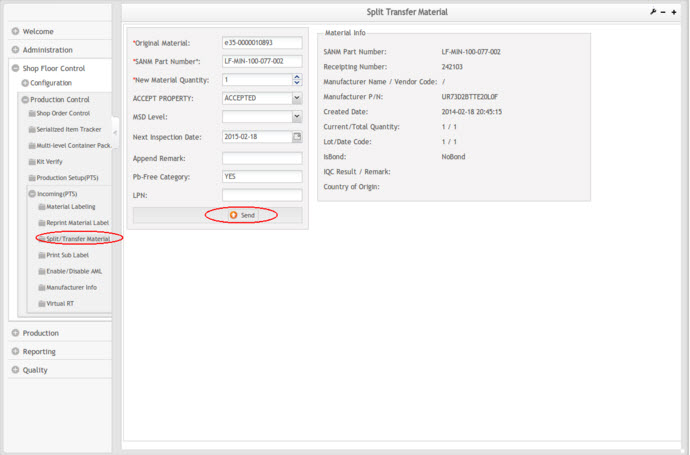
Split/Transfer Material
This module is to split a receiving material lot (from one unique PTS material label) into multiple material size (i.e. multiple PTS material labels and different unique barcodes). This is applicable to the situation if a material is required volume-split.
To access the Split/Transfer Material page, navigate to Shop Floor Control >
Production Control >
Incoming Traceability >
Split/Transfer Material.
NOTE: It it a prequisite to have printed the material label.
Scenario example (To split the material lot from one into two different packages)
Before Split/Transfer in PTS:
Original Material: E12-012345
SSCI Part Number: XYZ6789
Current/Total Quantity: 4000 / 4000
After Split/Transfer in PTS:
Package 1
Original Material: E12-012345
SSCI Part Number: XYZ6789
Current/Total Quantity: 2000 / 4000
Package 2
Original Material: E12-012346
SSCI Part Number: XYZ6789
Current/Total Quantity: 2000 / 2000
Transfer Material
This same module is also used for transferring an item number of a specific material lot to another item number.
1. Transfer the material for different project/customer if both items ’
AML are exactly same.
2. To comply with ROHS or bond policy, some materials may need to change properties by changing SSCI P/N so a new material barcode is applied.
Figure 6: Split /Transfer Material- Input Options
Split Material
When the request quantity is less than the quantity in one packing unit, use the Split Material function:
1. Select Split/Transfer Material from the Incoming Menu.
2. Scan or enter material barcode of the Original Material in the Original Material box. Additional information will show up automatically.
3. New Material Barcode can be granted by serial number.
4. Enter the New Material Quantity.
Pb-Free Category, lead free material can transfer to leaded material if the parameter Lead Free Transfer Control was defined NO at System Settings.
6. Define MSD Level, Next Inspection Date, MFG Date, and LPN as requested.
7. Enter the reference number in Append Remark (if applicable).
8. Select Send and another new label is granted.
Transfer Material
1. Scan or enter the material barcode of the Original Material in the Original Material box. Additional information will show up automatically.
2. Input or scan the new item number SANM Part Number.
3. New Material Barcode can be granted by serial number
4. Enter the New Material Quantity.
5. For Pb-Free Category lead free material can transfer to leaded material if the parameter Lead Free Transfer Control was defined NO at System Settings.
6. Define MSD Level, Next Inspection Date, MFG Date and LPN as requested.
7. Input the reference number in Append Remark (if applicable).
8. Select Send to generate a new level.
NOTE: Pb-Free can be converted to Leaded but Leaded can never be converted to Pb-Free.
Approved Manufacturer List
At the Approved Manufacturer List module,user can add new AML, search special AML, change the status of the AML for expired material.
Navigate to Shop Floor Control > Production Control > Incoming > Approved Manufacturer list,the main page show.
Figure: Approved Manufacturer list main page
Add AML
- Select the Add AML at the top, will insert one new line at the list.
Figure: Add new AML
- Part Number: This is the Part Number for material. This column is mandatory.
- Manufacture Name: This is the Name for of Manufacturer.This column is mandatory.
- Manufacture PN: The Part Number of the manufacturer.This column is mandatory.
- Shelf Life(Days): The days that how long the manufacture will be expired. '0' meaning this manufacture will not expired for ever. '0' by default.
- Status: This column is used to show the status the Manufacturer, the values is Active/Inactive. Active by default.
Note: Shelf Life(Days)= Expiry Days (Column At the AML template file).
- Input the Part Number, Manufacturer Name, Manufacturer P/N, Shelf Life(Days) values in the fields.
Figure: Add new AML with data
- Click Update to add the new AML. The AML create successfully information will show on the page for several minutes.
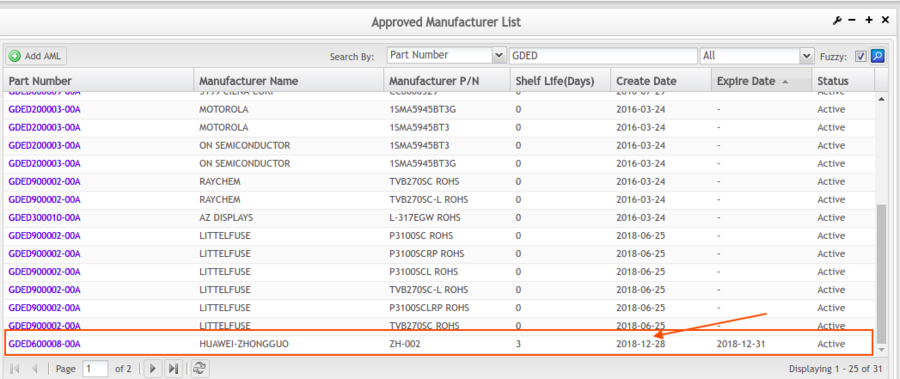
- Once create succeed, uses can check the expirt date(optional).
Figure: Confirm the Expire Date
Note:The Create Date is current date that do the Add AML action , Expire Date = Create Date + Shelf Life(Days).
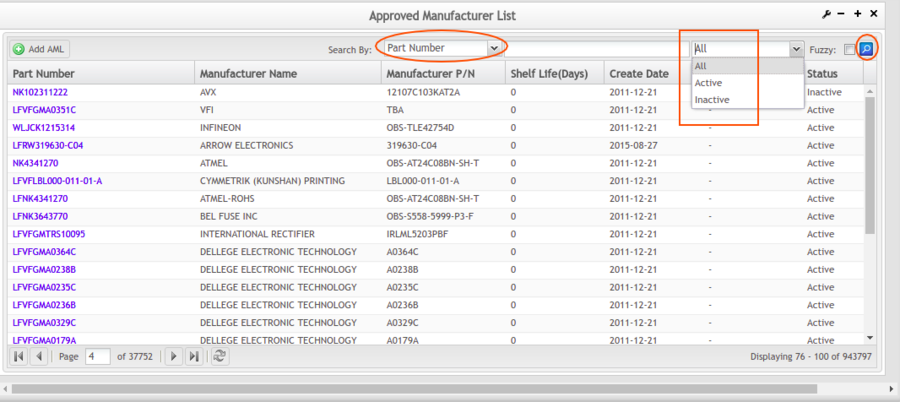
Search AML
User can search special AML by Part Number, Status, and Expire Date.
Figure: Search AML main page
Activate/Inactivate AML
This section is to active or inactive AML . Due to one Part Number has many manufactures, so this function is used to prevent using wrong manufactures, in other words, make the manufactures chosen more exactly.
Activate AML
- Search the special inactive AML.
Figure: Search the special inactive AML
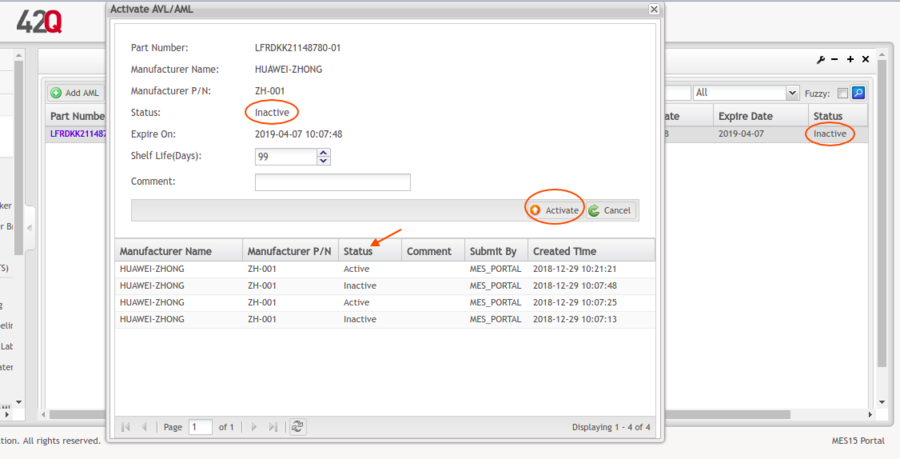
- Select and click the Part Number from Part Number column in Main page.(the status should be 'Inactive'),will open the Activate AML sub-page.
Figure: Activate AML subpage
- At the Activate AML sub-page, Input the "Comment" in the edit box if needed.
- Click Activate button to active the AML.
- The lower table shows this Part Number history.
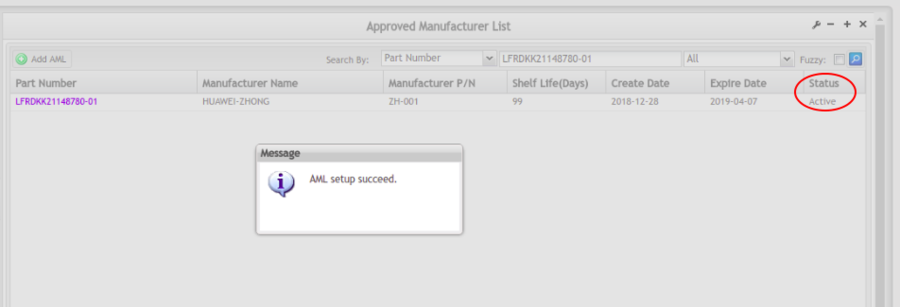
- If do the activate action successfully, the message will be shown as following figure. And the Status will change to Active.
Figure: Activate AML succeed
Inactivate AML
- Search the special active AML.
Figure: Search the special active AML
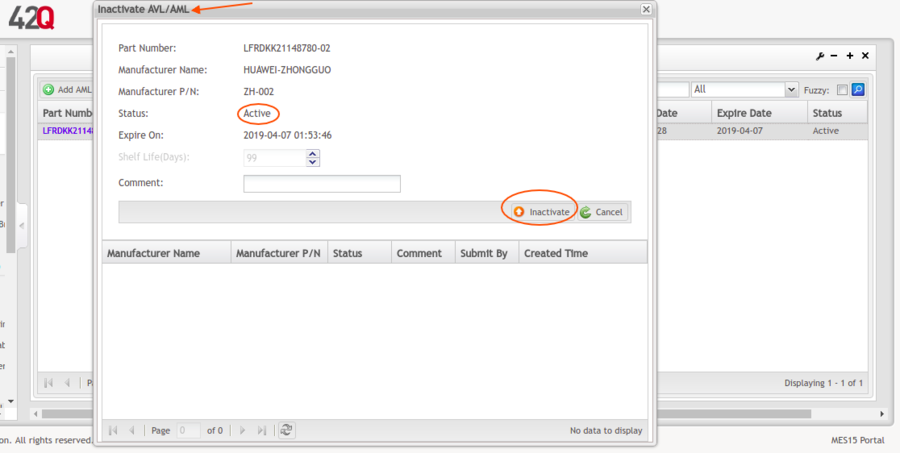
- Select and click the Part Number from Part Number column in Main page.(the status should be 'Active'), then will open the Inactivate AML sub-page.
Figure: Inactivate AML subpage
- Input the "Comment" in the edit box if needed.
- Click Inactivate button to inactivate the AML.
- The lower table shows this Part Number history.
- If do the inactivate action successfully, the message will be shown as following figure. And the Status will change to Inactive.
Manufacturer Info
Under this module, the user is allowed to view manufacturer information, and input or modify part details.
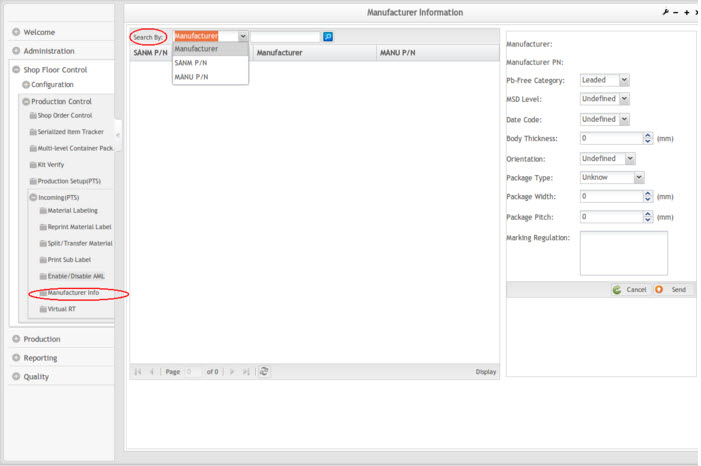
1. To access the Manufacturer Info page, navigate to Shop Floor Control >
Production Control >
Incoming Traceability >
Manufacturer Info.
Figure 11: Incoming Add AML Report
2. Select criteria from the Search By drop-down list to perform search.
For Example: Manufacture, SANM P/N, or MANU P/N.
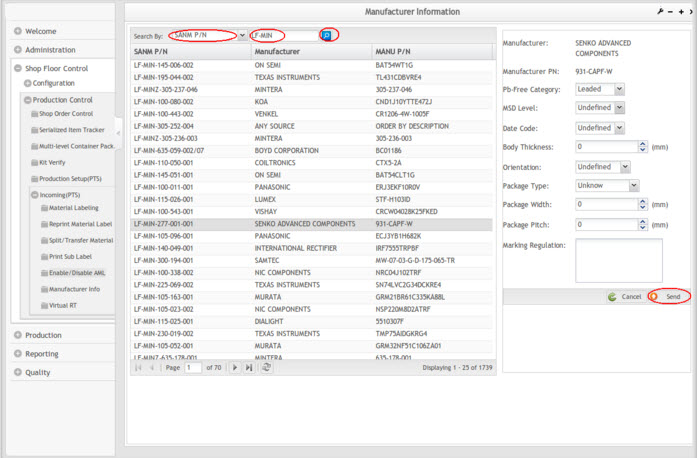
3. Input corresponding code in the textbox and select icon to the right. Below is an example to search by SANM P/N.
Figure 12: Incoming Manufacturer Info Search
Select the SANM P/N to see corresponding manufacturer information:
It lists out all manufacturer part numbers under the selected SANM P/N. To view part details, please click on one manufacturer part number:
- Manufacturer: Manufacturer for the selected material. Display only.
- Manufacturer PN: The manufacturer P/N selected by the user. Display only.
- Pb-Free Category: The Pb levle of selected material. Select from the drop-down list.
- MSD Level: The MSD level of selected material. Select from the drop-down list.
- Date Code: Define the date format. Select from the drop-down list.
- Body Thickness: Material thickness in millimeter. Input corresponding value in the textbox.This is a must-defined item for material verification during material loading.
- Orientation: Define material orientation. Select from the drop-down list. This is a must-defined item for material verification during material loading.
- Package Type: The type of material package. Select from the drop-down list.
- Package Width: Package width in millimeter. Input corresponding value in the textbox.
- Package Pitch: Package pitch in millimeter. Input corresponding value in the textbox.
- Marking Regular (changed to Marking Regulation since PTS 3.4.3.): Allow user to define the naming regulation of IC number. This option won ’
t show up unless it ’ s set "IC Marking = Yes" under System Setting page.
- Send: Save the configuration.
- Cancel: Go back to previous window without saving.
Virtual RT
Process Overview
This function is suggested to be used only under the following scenario and it is strongly recommended to obtain approval from either or both Quality Assurance Manager and Supply Chain Manager:
- Received material item is not purchased through ERP.
- Consignment item and Free of Charge (FOC) item from Supplier or Customer that are not purchased or ordered through ERP.
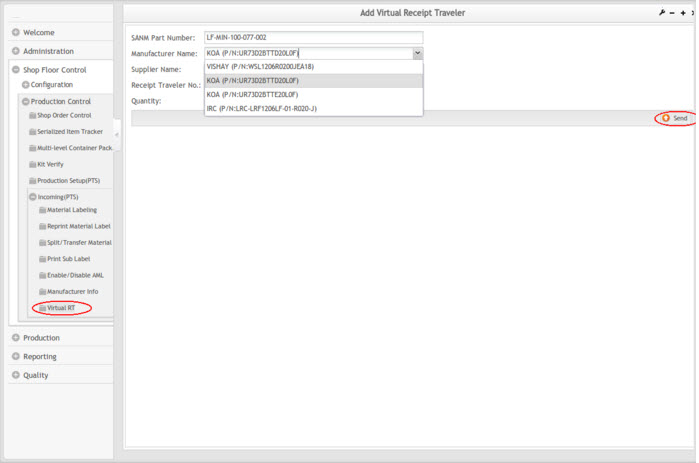
Add Virtual Receipt Traveller
This module creates a virtual Receipt Traveler (RT) number for a specific batch of materials for certain requirements. The name for the virtual RT number generated automatically starts with "v" plus customized name by operator to differentiate from the normal ones.
Figure 13: Incoming Add Virtual RT
1. Select Add Virtual RT under incoming main menu.
2. SANM Part Number: Enter required value in the text box.
3. Manufacturer Name: Select the option from drop-down list.
3. Suppler Name: Select the option from drop-down list.
4. Receipt Traveler No.: Enter the RT number in the text box.
5. Quantity: Enter the required quantity in the text box.
6. Send: Click the button to add a virtual RT.
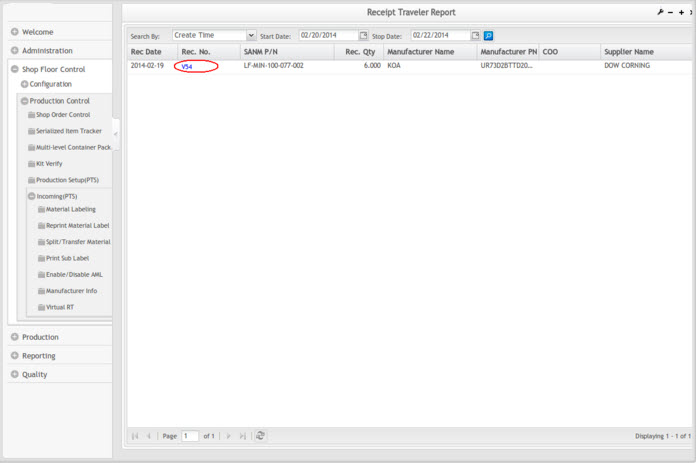
7. A new receipt traveler is generated. The new RT will be displayed in the RT report page.
Figure 14: Incoming RT Report
Further Information
This completes SOP-5-I-PTS0002-C Incoming Material Labeling information. For further information on a specific functional area for incoming please refer to the following SOP.
SOP-5-I-PTS0024-1_Inquiry & Reporting
Document Revision History
| Date | Author | Title | Version | Change Reference |
| 01/08/13 | Helena Wang | Technical Writer | 1.0 | Initial SO Work Instruction |
| 17/02/14 | Ashley Martin | Technical Writer | 1.0 | Review and Format |
| 28/02/14 | Elaine Fonaro | Technical Writer | 1.0 | Format for WIKI |
| 03/04/16 | Elaine Fonaro | Technical Writer | 1.0 | Updated Oracle occurrences to ERP |
| 07/21/20 | Tiana Hollingsworth | Technical Writer | 1.0 | Changed to Incoming (PTS) to Incoming Traceability |

