Difference between revisions of "42Q-MES0136-C OEE Configuration"
| Line 866: | Line 866: | ||
'''Figure 33: Add a New Repair Code Category''' | '''Figure 33: Add a New Repair Code Category''' | ||
| + | |||
== Edit A Repair Code Category == | == Edit A Repair Code Category == | ||
| + | |||
All Repair Code Categories are available for edit. To '''edit''' a Repair Code Category: | All Repair Code Categories are available for edit. To '''edit''' a Repair Code Category: | ||
| − | #Select a '''Repair Code Category''' icon from the list. A pop-up menu displays adjacent to the category (see '''Figure''' below). | + | #Select a '''Repair Code Category''' icon from the list. A pop-up menu displays adjacent to the category (see '''Figure''' below). |
| − | #In the pop-up menu, select '''Edit'''. The '''Edit Repair Code Category''' pop-up window appears. There are two tabs available within the '''Edit Repair Code Category''' Window: '''General''' and '''Repair Code''' (see '''Figure''', below). | + | #In the pop-up menu, select '''Edit'''. The '''Edit Repair Code Category''' pop-up window appears. There are two tabs available within the '''Edit Repair Code Category''' Window: '''General''' and '''Repair Code''' (see '''Figure''', below). |
'''Figure 34: Edit a Repair Code Category''' | '''Figure 34: Edit a Repair Code Category''' | ||
| − | + | === Edit A Repair Code Category: General Tab === | |
| − | #Within '''General Tab''', users can edit any of the following information: | + | |
| − | + | #Within '''General Tab''', users can edit any of the following information: | |
| − | |||
| − | |||
| − | |||
| − | |||
| − | |||
| − | + | *'''Parent Repair Code Category''': Select a category from the drop-down menu. | |
| + | *'''Repair Code Category Name''': Enter a new category name in the text box. | ||
| + | *'''Repair Code Category Code''': Change the code assigned to this Repair Code Category in the text field. | ||
| + | *'''Description''': This field is optional. | ||
| + | *'''Active Status''': (Default is'''Active''') | ||
| + | <ol start="2"> | ||
| + | <li>Select '''Save''' or '''Save & Exit''' to finish; select '''Close''' to abort.</li> | ||
| + | </ol> | ||
| + | |||
| + | | ||
| + | |||
| + | === Edit A Repair Code Category: Repair Code Tab === | ||
Within the Repair Tab, users may '''add''' a Repair Code, '''edit''' a Repair Code, or '''enable/disable''' a Repair Code to the selected category. All Repair Codes that have been assigned to the given repair code category are displayed in list form in the Repair Code Tab. | Within the Repair Tab, users may '''add''' a Repair Code, '''edit''' a Repair Code, or '''enable/disable''' a Repair Code to the selected category. All Repair Codes that have been assigned to the given repair code category are displayed in list form in the Repair Code Tab. | ||
| − | === Repair Code Tab: Add Repair Code === | + | === Repair Code Tab: Add Repair Code === |
| − | #Select the '''Add''' icon from the top menu bar of the '''Repair Code Tab'''. | + | |
| − | #The '''Add a New Repair Code''' pop-up window appears. | + | #Select the '''Add''' icon from the top menu bar of the '''Repair Code Tab'''. |
| − | #Complete the fields provided: | + | #The '''Add a New Repair Code''' pop-up window appears. |
| + | #Complete the fields provided: | ||
| − | Enter a '''Repair Code Code''' in the respective field. | + | *Enter a '''Repair Code Code''' in the respective field. |
| − | Enter a '''Repair Code Name''' in the respective field. | + | *Enter a '''Repair Code Name''' in the respective field. |
| − | Enter a '''Description''' in the text box provided. | + | *Enter a '''Description''' in the text box provided. |
| − | In the '''Active''' checkbox select whether the problem will be active. | + | *In the '''Active''' checkbox select whether the problem will be active. |
| − | Select '''Add & Exit''' to finish; or select '''Close''' to abort. | + | <ol start="4"> |
| + | <li>Select '''Add & Exit''' to finish; or select '''Close''' to abort.</li> | ||
| + | </ol> | ||
'''Figure 35: Edit Repair Code Category: Repair Code Tab: Add a New Repair Code''' | '''Figure 35: Edit Repair Code Category: Repair Code Tab: Add a New Repair Code''' | ||
=== Repair Code Tab: Edit Repair Code === | === Repair Code Tab: Edit Repair Code === | ||
| + | |||
Any of the Repair Code displayed in the list are available for edit. To edit a Repair Code: | Any of the Repair Code displayed in the list are available for edit. To edit a Repair Code: | ||
| − | #Select a repair code from the list by activating the checkbox next to its name. The '''Edit''' function becomes available. | + | #Select a repair code from the list by activating the checkbox next to its name. The '''Edit''' function becomes available. |
#Select '''Edit'''. The '''Edit Repair Code''' pop-up window appears. | #Select '''Edit'''. The '''Edit Repair Code''' pop-up window appears. | ||
| − | #Edit the '''Repair Code Code'''. | + | #Edit the '''Repair Code Code'''. |
| − | #Edit the '''Repair Code Name'''. | + | #Edit the '''Repair Code Name'''. |
| − | #Edit the '''Description'''. | + | #Edit the '''Description'''. |
| − | #Check or uncheck the '''Active''' box. | + | #Check or uncheck the '''Active''' box. |
| − | #Select '''Save''' or '''Save & Exit''' to finish; or '''Close''' to abort. | + | #Select '''Save''' or '''Save & Exit''' to finish; or '''Close''' to abort. |
| | ||
| + | |||
=== Repair Code Tab: Enable/Disable Repair Code === | === Repair Code Tab: Enable/Disable Repair Code === | ||
| + | |||
The '''Enable/Disable''' function allows the user to change the Repair Code status from active to inactive or inactive to active. To enable/disable a Repair Code: | The '''Enable/Disable''' function allows the user to change the Repair Code status from active to inactive or inactive to active. To enable/disable a Repair Code: | ||
| − | #Select a '''Repair Code''' from the list by activating the checkbox next to its name. The Enable/Disable function becomes available. | + | #Select a '''Repair Code''' from the list by activating the checkbox next to its name. The Enable/Disable function becomes available. |
| − | #Select '''Enable/Disable'''. Toggling the '''Enable/Disable''' function switches the status from Enabled to Disabled; or from Disabled to Enabled. '''Enabled''' Repair Codes are noted with a '''blue checkmark''' in the '''Active''' column. Disabled Repair Codes are noted with a '''grey checkmark''' in the '''Active''' column. | + | #Select '''Enable/Disable'''. Toggling the '''Enable/Disable''' function switches the status from Enabled to Disabled; or from Disabled to Enabled. |
| + | #'''Enabled''' Repair Codes are noted with a '''blue checkmark''' in the '''Active''' column. Disabled Repair Codes are noted with a '''grey checkmark''' in the '''Active''' column. | ||
| + | |||
| + | = Repair Code = | ||
| + | |||
| + | Under the Repair Code submodule, users can '''search''', '''add''', '''edit''', '''enable/disable''', and '''export''' repair code entries. | ||
| + | |||
| + | Each Repair Code is assigned a Repair Code Code, for easy identification. Plants can assign naming conventions to suit their individual needs; Repair Code naming convention used for this test example consists of a four digit numeral preceded by the letter P. | ||
| + | |||
| + | | ||
| + | |||
| + | '''Figure 36: Repair Code Submodule Main Screen''' | ||
| + | |||
| + | == Add Repair Code == | ||
| + | |||
| + | To '''add '''a new Repair Code: | ||
| + | |||
| + | #Select '''Add''' from the Repair Code submodule menu. The '''Add a New Repair Code''' pop-up window appears. | ||
| + | #Complete the fields provided: | ||
| + | |||
| + | *Select a '''Repair Code Category''' from the respective drop-down list. | ||
| + | *Enter a '''Repair Code Code''' in the respective field. | ||
| + | *Enter a '''Repair Code Name''' in the respective field. | ||
| + | *Enter a '''Description''' in the box provided. | ||
| + | *In the '''Active''' checkbox select whether the problem will be active. | ||
| + | *Select '''Add & Save''' to finish or select '''Close''' to abort. | ||
| + | |||
| + | '''Figure 37: Add A New Repair Code pop-up Window''' | ||
| + | |||
| + | == Edit Repair Code == | ||
| + | |||
| + | Any of the Repair Code entry fields can be edited. To '''edit''' a Repair Code: | ||
| + | |||
| + | #Select a repair code from the list by activating the checkbox next to its name. The '''Edit''' function becomes available. | ||
| + | #Select '''Edit'''. The '''Edit Repair Code''' pop-up window appears. | ||
| + | #Edit the '''Repair Code Category''' by selecting a different item from the respective drop-down list. | ||
| + | #Edit the '''Repair Code Code''' entry. | ||
| + | #Edit the '''Repair Code Name''' entry. | ||
| + | #Edit the '''Description'''. | ||
| + | #Check or uncheck the '''Active''' box. | ||
| + | #Select '''Save''' or '''Save & Exit''' to finish; or '''Close''' to abort. | ||
| + | |||
| + | '''Figure 38: Edit Problem''' | ||
| + | |||
| + | == <span id="docs-internal-guid-79869f1d-7fff-2804-7fa8-eb5f743fadec">Enable/Disable Repair Code</span> == | ||
| + | |||
| + | <span id="docs-internal-guid-79869f1d-7fff-2804-7fa8-eb5f743fadec">Repair Code entries can be enabled or disabled by the user. To </span>'''enable/disable''' a Repair Code: | ||
| + | |||
| + | #<span id="docs-internal-guid-79869f1d-7fff-2804-7fa8-eb5f743fadec">Select a Repair code from the list by activating the checkbox next to its name. The </span>'''Enable/Disable''' function becomes available. | ||
| + | #<span id="docs-internal-guid-79869f1d-7fff-2804-7fa8-eb5f743fadec">Select </span>'''Enable/Disable'''. Toggling the Enable/Disable function switches the status from Enabled to Disabled; or Disabled to Enabled. '''Enabled''' problems are noted with a '''blue checkmark''' in the '''Active''' column. Disabled problems are noted with a '''grey checkmark''' in the '''Active''' column. | ||
| + | |||
| + | == <span id="docs-internal-guid-79869f1d-7fff-2804-7fa8-eb5f743fadec">Export Repair Code</span> == | ||
| + | |||
| + | <span id="docs-internal-guid-79869f1d-7fff-2804-7fa8-eb5f743fadec">Users can export</span> '''Repair Code''' details to a .csv file to save onto their local drives. | ||
| + | |||
| + | <span id="docs-internal-guid-79869f1d-7fff-2804-7fa8-eb5f743fadec">To export a repair code:</span> | ||
| + | |||
| + | #<span id="docs-internal-guid-79869f1d-7fff-2804-7fa8-eb5f743fadec">Select a repair code from the list by activating the checkbox next to its name. The </span>'''Export''' function becomes available. | ||
| + | #<span id="docs-internal-guid-79869f1d-7fff-2804-7fa8-eb5f743fadec">Select </span>'''Export''' from the Problem menu. | ||
| + | #<span id="docs-internal-guid-79869f1d-7fff-2804-7fa8-eb5f743fadec">The Repair Code description is automatically downloaded onto the local drive as a .csv file.</span> | ||
| + | #<span id="docs-internal-guid-79869f1d-7fff-2804-7fa8-eb5f743fadec">Open the .csv file</span> | ||
| + | #<span id="docs-internal-guid-79869f1d-7fff-2804-7fa8-eb5f743fadec">Rename, save, print, or share as desired.</span> | ||
| + | |||
| + | == <span id="docs-internal-guid-84229fa6-7fff-9166-9f5c-6788caf3ac6d">Set Repair code for Asset</span> == | ||
| + | |||
| + | <span id="docs-internal-guid-84229fa6-7fff-9166-9f5c-6788caf3ac6d">To set a repair code to an asset:</span> | ||
| + | |||
| + | #<span>Navigate to '''Production''' > '''CMMS Work Order'''.</span> | ||
| + | #<span>Select the '''Repair Type Work Order''' from the Work Order List.</span> | ||
| + | #<span>Click '''Edit''' to open the Work Order.</span> | ||
| + | #<span>Choose the '''Repair Code''' (configured in OEE) from the drop-down list.</span> | ||
| + | #<span id="docs-internal-guid-84229fa6-7fff-9166-9f5c-6788caf3ac6d">'''<u>Requirements</u>''':</span> Only Repair type Work Orders may be assigned a Repair Code. The Work Order must in assigned status. | ||
| + | |||
| + | '''<span id="docs-internal-guid-84229fa6-7fff-9166-9f5c-6788caf3ac6d">Figure 39: Edit Work Order Set Repair Code --CMMS Asset module</span>''' | ||
| + | <div> | ||
| + | = <span id="docs-internal-guid-53b899f3-7fff-0132-f397-fe5909ba5677">Configure OEE Target Values</span> = | ||
| + | |||
| + | == <span id="docs-internal-guid-53b899f3-7fff-0132-f397-fe5909ba5677">Background</span><br/> == | ||
| + | |||
| + | <span id="docs-internal-guid-53b899f3-7fff-0132-f397-fe5909ba5677">The Target UPH (Units per Hour) defines the throughput performance on a given asset. Users can define Target UPH values per asset, production line, work center, department, or location. Once defined, the system compares target UPH values with actual UPH values and displays the results on 42Q’s Operation Dashboard in real time. See also: </span>[https://docs.google.com/document/d/12dAE7A8QBYGBfbER79xWGxfdhL5NWRVHvHSAY0oLnfk/edit OEE Operation Dashboard]. | ||
| + | |||
| + | <span id="docs-internal-guid-53b899f3-7fff-0132-f397-fe5909ba5677">OEE interfaces successfully with the following data source types:</span> | ||
| + | |||
| + | #<span id="docs-internal-guid-53b899f3-7fff-0132-f397-fe5909ba5677">Oracle ERP systems push cycle time data from MSD plants. See </span>[https://docs.google.com/document/d/1K3-_PJQDJHli_rEC8d-G_56pBecUbmUM-0HWrkXuwcs/edit# Oracle Process Flow.] | ||
| + | #<span id="docs-internal-guid-53b899f3-7fff-0132-f397-fe5909ba5677">OEE Target UPH and Target Maintenance modules integrate cycle time data.</span> | ||
| + | </div> | ||
| + | == <span id="docs-internal-guid-2bd3c8a8-7fff-9af1-44a3-e6e7a0ccb5b6">Solution</span> == | ||
| + | |||
| + | <span id="docs-internal-guid-2bd3c8a8-7fff-9af1-44a3-e6e7a0ccb5b6">To meet the requirements of a wide variety of plants, OEE offers several ways to configure target data/Target UPH.</span> | ||
| + | |||
| + | #<span id="docs-internal-guid-2bd3c8a8-7fff-9af1-44a3-e6e7a0ccb5b6">Plants operating OEE as a standalone product input their target UPH data manually through</span>[https://docs.google.com/document/d/1F2c5M3uWYHLAnAhYlOwthfjAnHo1V1XqDCigAYpIwnM/edit#heading=h.q06r5eu4ucdg OEE’s Target UPH module]. | ||
| + | #<span id="docs-internal-guid-2bd3c8a8-7fff-9af1-44a3-e6e7a0ccb5b6">Plants using 42Q’s API system set target values in MES 101’s </span>[https://docs.google.com/document/d/1F2c5M3uWYHLAnAhYlOwthfjAnHo1V1XqDCigAYpIwnM/edit#heading=h.enk0qi7iov6q Target Maintenance] module; the system automatically saves data into CMMS and OEE databases. | ||
| + | #<span id="docs-internal-guid-2bd3c8a8-7fff-9af1-44a3-e6e7a0ccb5b6">Plants that utilize Oracle’s ERP to transfer data define target values in Oracle; 42Q sends data via the Oracle Work Order to 42Q’s Shop Order.</span> | ||
| + | |||
| + | | ||
| + | |||
| + | == <span id="docs-internal-guid-4282cfaf-7fff-3cd0-757d-20ffb05cab7e">Configure Source Type</span> == | ||
| + | |||
| + | <span id="docs-internal-guid-4282cfaf-7fff-3cd0-757d-20ffb05cab7e">42Q locates the data source by a tag field/column target UPH source type. Source types are based on the plant’s</span>[https://docs.google.com/document/d/1F2c5M3uWYHLAnAhYlOwthfjAnHo1V1XqDCigAYpIwnM/edit#heading=h.wqfwnvvxcx9v OEE Solution] ('''above'''). Source Types are configured on the backend, by the MES support team. Following is a brief description of each source type. | ||
| + | |||
| + | <span id="docs-internal-guid-4282cfaf-7fff-3cd0-757d-20ffb05cab7e">Source_type data field value will be 1/2/3/4. The default source type is 1.</span> | ||
| + | |||
| + | <span id="docs-internal-guid-c44eedb8-7fff-0a65-a1d2-af36ecad1491">'''Source_type data field'''</span> | ||
| + | |||
| + | *<span id="docs-internal-guid-c44eedb8-7fff-0a65-a1d2-af36ecad1491">1 </span>- To input the Target UPH manually. This is suitable for setting Target UPH in the OEE Target UPH module. | ||
| + | *<span id="docs-internal-guid-c44eedb8-7fff-0a65-a1d2-af36ecad1491">2 </span>- To send Target UPH automatically from MES101 into CMMS OEE database. This is suitable for setting SOMS_Target for mfg lines in the Target Maintenance module. | ||
| + | *<span id="docs-internal-guid-c44eedb8-7fff-0a65-a1d2-af36ecad1491">3 </span>- To get Target UPH automatically from MES101database into CMMS OEE database. This is suitable for setting OEE_Target for Assets in the Target Maintenance module. | ||
| + | *<span id="docs-internal-guid-c44eedb8-7fff-0a65-a1d2-af36ecad1491">4 </span>- To get the Target UPH automatically for plants using the MES system in conjunction with Oracle’s database. The system will collect the Target UPH from the Oracle database accordingly. | ||
| + | |||
| + | <span id="docs-internal-guid-c44eedb8-7fff-0a65-a1d2-af36ecad1491">'''Note''':</span> OEE Target data will be saved into CMMS/OEE databases. | ||
| + | |||
| + | = <span id="docs-internal-guid-291a43a9-7fff-fe0a-4214-b07eb1893200">OEE Target UPH</span> = | ||
| + | |||
| + | <span id="docs-internal-guid-291a43a9-7fff-fe0a-4214-b07eb1893200">The</span> '''OEE Target UPH''' (unit-per-hour machine rates) module allows users to manually set Target UPH rates for EMS plants and plants using OEE as a standalone feature. | ||
| + | |||
| + | <span id="docs-internal-guid-291a43a9-7fff-fe0a-4214-b07eb1893200">Go to: </span>'''Shop Floor Control''' > '''Configuration''' > '''OEE''' > '''Target UPH.''' | ||
| − | + | '''<span id="docs-internal-guid-291a43a9-7fff-fe0a-4214-b07eb1893200">Figure 40: Target UPH Main Page</span>''' | |
| + | <div> </div> | ||
= Glossary of Terms = | = Glossary of Terms = | ||
Revision as of 16:58, 10 November 2018
42Q Home > Reporting > OEE Reports > OEE Configuraton
This edition applies to MES 15 Portal 1.0 and all subsequent releases and modifications until otherwise indicated in new revisions.
Contents
- 1 OEE Configuration
- 2 Shift
- 3 Plant Calendar
- 4 Work Center
- 5 Root Cause Category
- 6 Root Cause
- 7 Tag Mapping
- 8 Up/Down Threshold
- 9 Import Tag Asset Mapping
- 10 Import Up/Down Threshold
- 11 Repair Code Category
- 12 Repair Code
- 13 Configure OEE Target Values
- 14 OEE Target UPH
- 15 Glossary of Terms
- 16 Document Revision History
OEE Configuration
The OEE Configuration modules allow users to define the following:
- Shift
- Plant Calendar
- Work Center
- Root Cause Category
- Root Cause
- Repair Code Category
- Repair Code
Users complete the following tasks within OEE:
- Map Tag IDs to Assets (Tag Mapping)
- Define Up/Down Thresholds for Asset Types
- Import Tag Mapping
- Import Up/Down Thresholds
- Set Target UPH for Mfg Line, Process Part Number, and Shop Order
Prerequisites
The OEE application utilizes data configured in CMMS Asset (Shop Floor Control > Configuration > CMMS Asset). The following CMMS categories must be predefined. Associations are noted throughout this document.
- Asset
- Asset Type
- Problem Type
- Problem Category
- Problem
- Location
Shift
The Shift submodule is utilized by supervisory personnel to define time and days of operation to the various shifts operating in their plants in order to accurately measure OEE availability. Administrators assign Shift Names and Shift Codes to scheduled shifts, and edit and add shifts as needed.
1. Navigate to Shop Floor Control > Configuration > OEE > Shift. The Shift’s main page displays.
Figure 1: Shift Main Page
2. Users may add, edit, and enable/disable the shift, and search for shifts using the following filters:
- Shift Name
- Shift Code
Add Shift
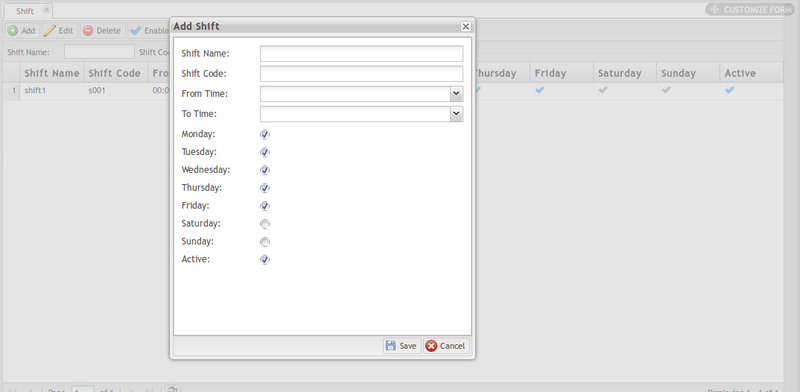
1. Select the Add button on the top menu bar to create a new shift entry.
Figure 2: Add Shift
2. The following fields are available:
- Shift Name: Provide a name to differentiate the Shift.
- Shift Code: Provide a Code for the Shift.
- From Time: Note the Shift’s start time with the drop-down calendar provided.
- To Time: Note the Shift’s end time with the drop-down calendar provided.
- Workdays: Select all days that have shifts assigned. Available days are Monday - Sunday. NOTE: Monday-Friday are selected by default.
- Active Status: Mark active shift days by activating the checkmark. Shifts marked as active are enabled in the system. The default selection is Active.
Edit Shift
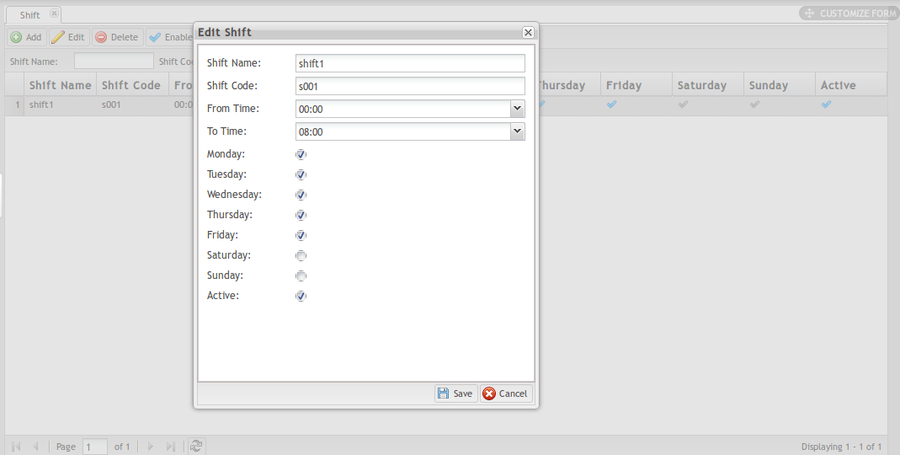
1. Select one Shift from the list then click Edit to open the Edit Shift page.
Figure 3: Edit Shift
2. Change the Shift Name, Shift Code, From Time, To Time as needed.
3. Change the workdays: A Checkbox signifies there is a working shift assigned to the day. Change the Active status as needed. When the checkbox is selected the shift is in active status.
4. Click Save to save the changes of shift or Cancel to leave the Edit Shift page.
Enable/Disable Shift
1. Select the desired shift by double clicking on the line of data.
2. Select Enable/Disable to change the shift status from active/inactive into inactive/active.
Plant Calendar
The Plant Calendar is a planning tool that allows administrators to add or remove special shifts from the work schedule (such as holidays, or extra work days, e.g. Sundays), without affecting the regular work shift calendar. NOTE: Plant Calendar is not a standard monthly view calendar.
1. Navigate to Shop Floor Control > Configuration > OEE > Plant Calendar to access the plant calendar main page.
Figure 4: Plant Calendar Main Page
- The Plant Calendar screenshot above shows all 3 Shifts that run at this plant; they are scheduled as not working on the Friday following Thanksgiving holiday. The information will be automatically recorded as downtime by the MES.
- Users can Add, Edit, Delete, and Search the Plant Calendar by Shift Name or Shift Date.
Add Plant Calendar
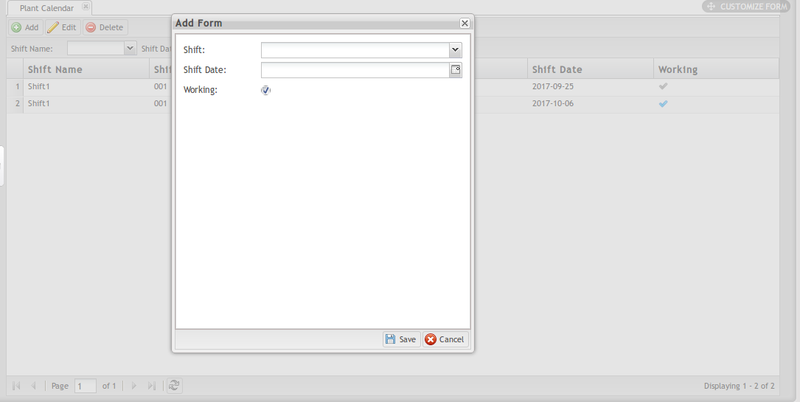
1. Select the Add button to open the Add form.
Figure 5: Add Plant Calendar
- Select the Shift and Shift Date using the drop-down menus provided.
- Select Working if the shift is scheduled to work on the given date; deselect if the shift is off duty on the selected date.
- Select Save to save the new plant calendar, or cancel to exit the add form.
Edit Plant Calendar
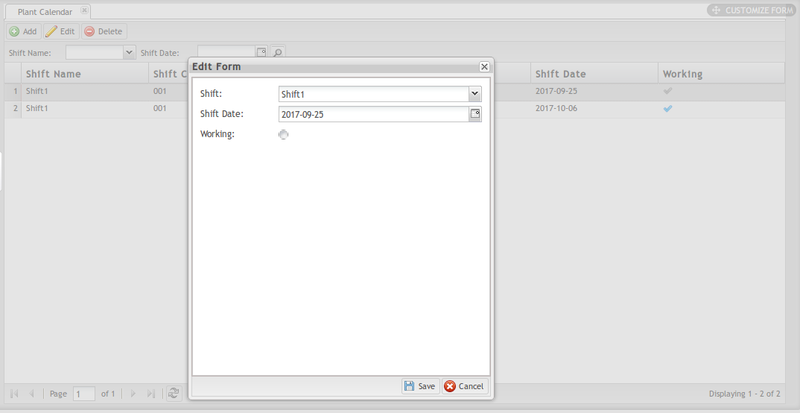
1. Select the Plant Calendar for modification then select the Edit icon to open the Edit Form.
Figure 6: Edit Plant Calendar
2. Change the Shift and Shift Date.
3. Select Working if the shift is scheduled to work on the selected date; deselect if the shift is off duty.
4. Click Save to save the changes in the plant calendar, or cancel to exit the edit form.
Delete Plant Calendar
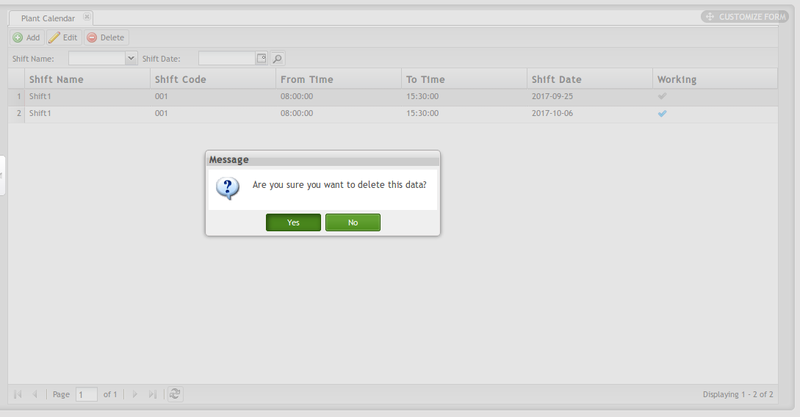
1. Select the Plant Calendar, then click Delete button.
Figure 9: Delete Plant Calendar
2. A message window displays asking the user to confirm the action. Select Yes to delete the Plant Calendar, or No to cancel.
Work Center
The Work Center defines a group of machines that build the same product on a production line or shop floor. Work Center is a configuration tool used by managers to:
- Designate the Work Center Name
- Assign an Asset to the Work Center.
Assigning the asset is a critical step that allows data to move between portals within the MES system, thus providing superior traceability and data collection. NOTE: Assets are configured within the CMMS Asset portal (Shop Floor Control > Configuration > CMMS Asset).
1. Navigate to Shop Floor Control > Configuration > OEE > Work Center to access the Work Center’s main page.
Figure 8: Work Center Main Page
2. Users can Add, Edit, Delete, and search the Work Center.
Add Work Center
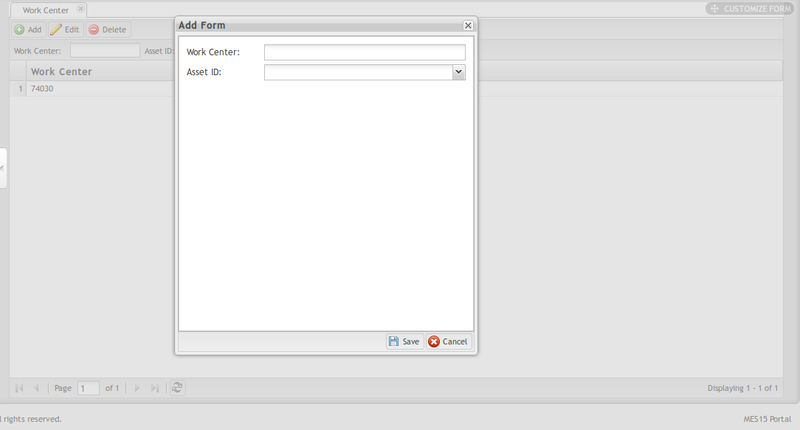
1. Select the Add Button to open the add form.
2. Enter the Work Center name
3. Select the Asset ID for the machine running on the work center.
4. Select the Save button to add the new Work Center or Cancel to exit the field.
Edit Work Center
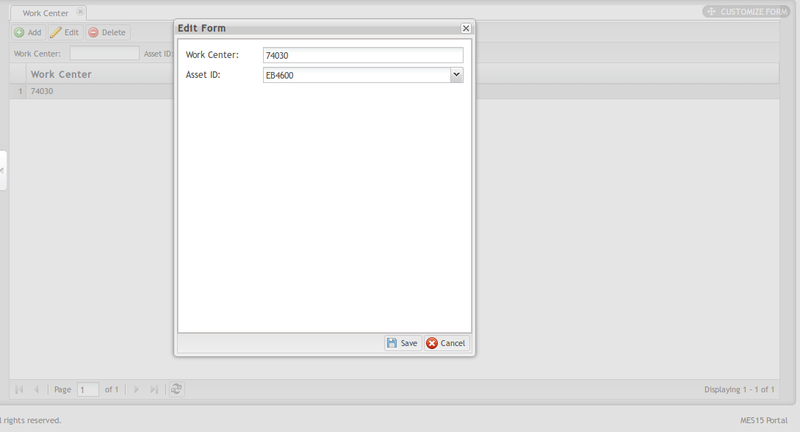
Select one Work Center from the list then click Edit to open the Edit form.
Figure 10: Edit Work Center
2. Change Work Center or Asset ID as needed.
3. Select Save to save the updates, or Cancel to close the edit form without saving.
Delete Work Center
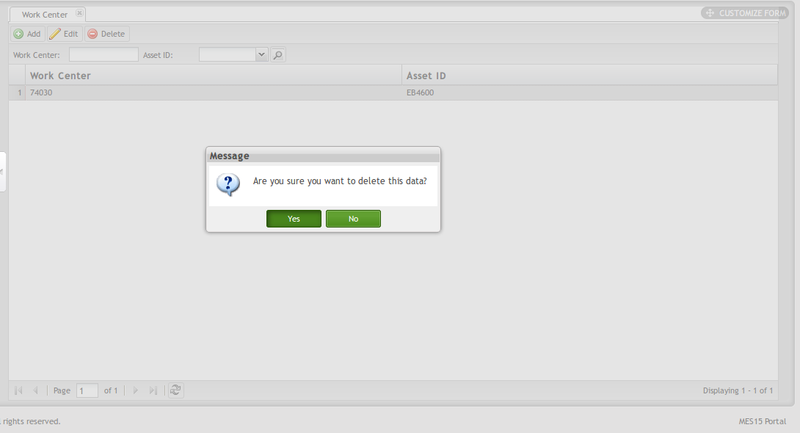
1. Select the Work Center, then click Delete.
Figure 11: Delete Work Center
2. A Message window displays asking the user to confirm the action.
3. Click Yes to delete the Work Center, or click No to cancel.
Root Cause Category
Root Cause Categories are broad descriptions of machine downtime problems. Possible manufacturing Root Cause Category examples include: Process, Energy, System, and Maintenance. Engineers may also add new root causes or edit associated root causes from the Category submodule.
Root Cause Categories are organized in a parent/child hierarchy in a visual tree format. Main categories are represented by yellow folders (parents); blue file folders represent subcategories (children).
1. Navigate: Shop Floor Control > Configuration > OEE > Root Cause Category.
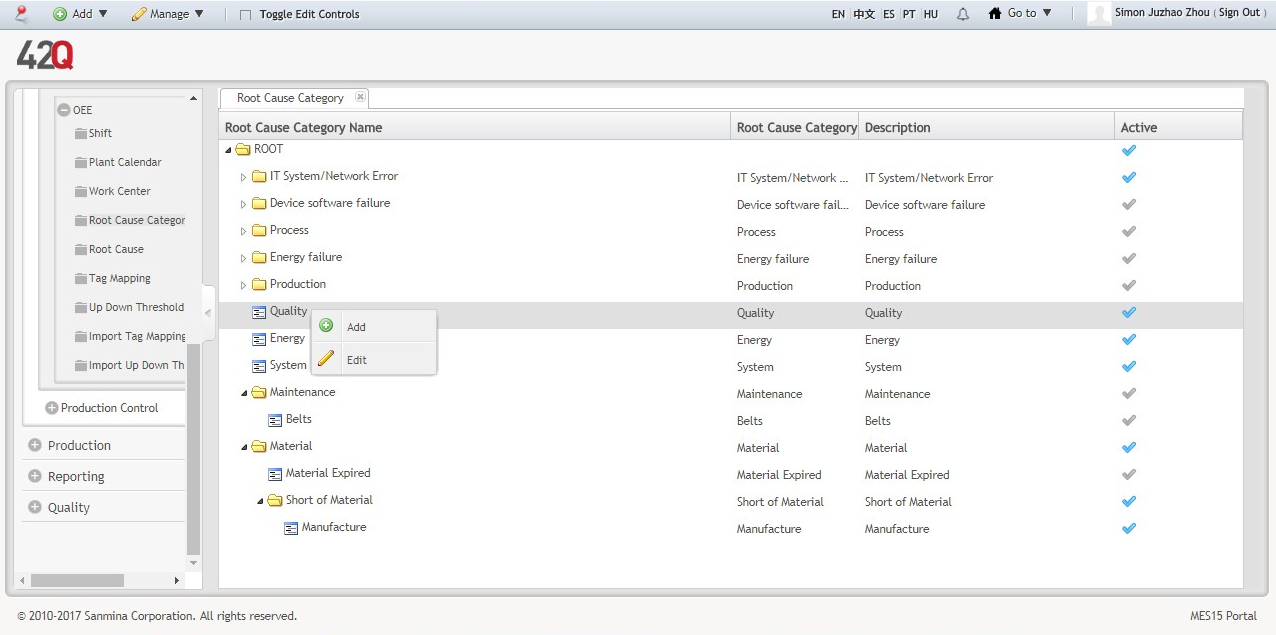
2. To add/edit a category, select the category’s location within the hierarchy by right clicking on the parent or child icon. A pop-up window displays, which allows the user to Add a new category or Edit the selected category. (See figure, below.)
Figure 12: Add Child Root Cause Category
Add Root Cause Category
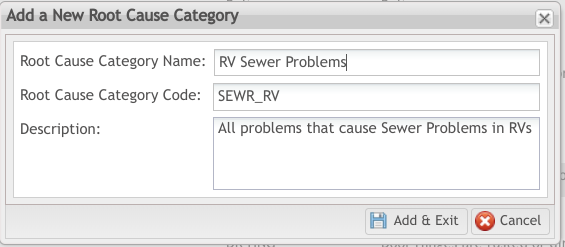
1. A new window displays, with the following fields available for entry (see figure, below):
- Root Cause Category Name (Mandatory)
- Root Cause Category Code (Mandatory)
- Description (Optional)
2. Select the Add & Exit icon to save the new root cause category as a “child” to the selected “parent” Root Cause.
![]() TIP: Users can add corresponding Root Causes directly to Root Cause Category in Edit mode.
TIP: Users can add corresponding Root Causes directly to Root Cause Category in Edit mode.
3. GENERAL NOTES about Categories:
- Parent folders are denoted by a yellow folder icon.
- Child folders are denoted by a blue folder icon.
- Users may not add more than 5 levels to one root cause category.
- Only active Parent categories (denoted by a blue checkmark in the Active column) are available for edit. Likewise, children categories cannot be added to inactive parent categories.
- Children categories display indented beneath their parent.
- If a second child category is added to the first child, its position moves to the left side of the screen to signify parent hierarchy (and changes to yellow file folder icon)
Figure 13: Add a New Root Cause Category Pop-up Window
Edit Root Cause Category
To edit a Root Cause Category:
1. Right click on the root cause to activate the Edit Root Cause Category window.
2. Modify any of the fields:
- Root Cause Category: Select a different category from the drop-down list.
- Root Cause Category Name: Change the Name of the Root Cause Category
- Root Cause Category Code: Change the Code for the Root Cause Category
- Description: Add or change the description.
- Active: Change the status of the root cause category by activating or deactivating the checkmark. Active = Checked.
Edit Root Cause
Root Causes associated with the selected category may also be added/edited directly from the Edit Root Cause Category submodule by selecting the Root Cause Tab.
Figure 14: Edit Root Cause Category: Root Cause Tab
To Add a new Root Cause, select Add.
1. Complete the fields in the new window: Root Cause Code, Root Cause Name, Description, Active/Inactive status.
2. Select Add & Exit or Close to cancel.
To Edit a Root Cause:
1. Select the Root Cause in the list by activating the checkmark next to its data.
2. Modify any of the fields in the new window: Root Cause Code, Root Cause Name, Description, Active/Inactive status.
To change the statusof a Root Cause:
1. Select the Root Cause by activating the checkmark.
2. Select Enable/Disable.
Root Cause
Users may add and edit root causes directly from the Root Cause Category submodule, or within the Root Cause submodule of OEE. It is important that a direct relationship between Root Causes and Root Categories exist.
![]() TIP: Chart Root Cause Categories and Root Causes in a table or spreadsheet first. See this example.
TIP: Chart Root Cause Categories and Root Causes in a table or spreadsheet first. See this example.
Examples of root causes pertaining to a manufacturing environment include: Material Issues, Shortage of Operators, Unscheduled Maintenance, Change Over, End of Shift Cleaning, and Tool Change.
NOTE: Selecting exact root causes assists engineering teams in troubleshooting machine downtimes, thereby creating strong OEE data to achieve optimal asset productivity.
Add a Root Cause
To create a new Root Cause:
- Go to: Shop Floor Control > Configuration > OEE > Root Cause.
- Select theAdd button.
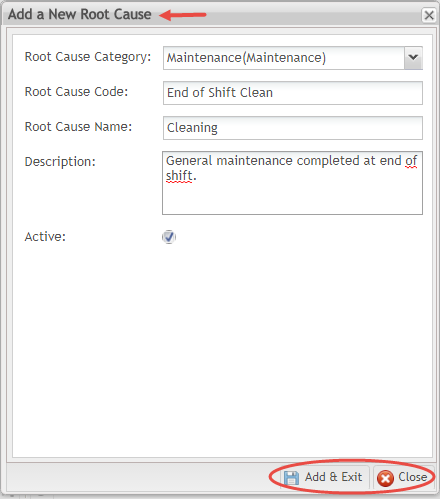
- The Add a New Root Cause window displays with the following options:
- Root Cause Category (Mandatory) Select the appropriate category from the drop-down menu. Categories are listed as icons in a tree format according to parent/child relationship.
- Root Cause Code (Mandatory) Enter the Root Cause Code into the text field.
- Root Cause Name (Mandatory) Enter the Name of the Root Cause in the text field.
- Description (Optional) Add any additional instructions that may be necessary.
- Active (Checkmark) Select the checkmark to activate the Root Cause.
Figure 15: Add New Root Cause
Edit Root Cause
To edit a Root Cause:
- Select the Root Cause from the Root Cause list.
- Modify any of the fields:
- Root Cause Category: Select a different category from the drop-down list.
- Root Cause Code: Change the Code for the Root Cause selected.
- Root Cause Name: Change the Name of the Root Cause selected.
- Description: Add or change the description.
- Active: Change the status of the root cause by activating or deactivating the checkmark. Active = Checked.
Export Root Cause
Users may also Export Root Cause information for quick access from a local pc or laptop.
- Select the Root Cause to Export.
- Select the Export icon.
- The data automatically downloads in .csv file onto the user’s local drive and is available to save, print, or share as desired.
Root Cause Category & Root Cause Relationship Example
The screenshot below shows a Root Cause Category and corresponding Root Causes surrounding uneven doors on a Recreational Vehicle (RV) Rental Lot.
![]() TIP: Read more about the relationship between problems, root causes, and repairs in this RV Rental Problem/Root Cause/Repair Example.
TIP: Read more about the relationship between problems, root causes, and repairs in this RV Rental Problem/Root Cause/Repair Example.
Tag Mapping
The Tag Mapping feature links (tags) assets to the OEE reporting system. This mapping process allows 42Q's MES to automacially capture asset downtimes and problems from CMMS, and eliminates the need to manually input downtime events. Once a downtime event is recieved, the system creates a new repair Work Order or closes the corresponding Work Order in CMMS.
To connect your factory’s standalone equipment (e.g. sensors), see Rapid IIoT
Downtime Data Flow
Once mapped, 42Q captures and sends downtime data to multiple systems within the 42Q family.
Asset is Down → Downtime data is sent to OEE → OEE sends data to MESWeb Reports → MESWeb Reports creates reports → Real-time data is displayed directly on the factory floor via Operation Dashboard.
Tag Ids are set according to Error Code or Up/Down in OEE and are configured in CMMS Asset according to Problem Type.
Asset Mapping Features
Users may search, add, edit, or enable/disable a Tag ID via the Tag Mapping submodule.
Figure 16: Tag Asset Mapping Main Screen
Search/Filter Tag ID
Users may search assets mapped to OEE according to the filters located on the top menu bar: Tag ID, Asset ID, Asset Status. See descriptions below.
Add Tag ID
- Select Add from the top menu bar.
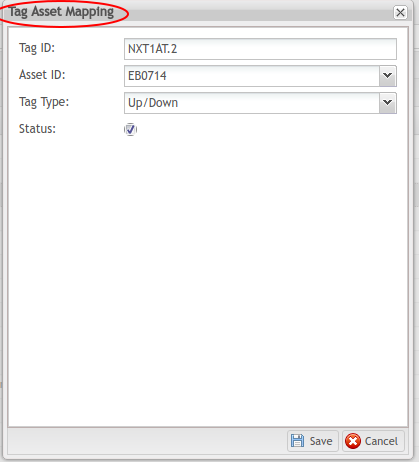
- Complete the fields in the pop-up window:
- Tag ID: The unique Tag the Client will use to send data to 42Q’s API. The Tag ID is the identifier that links the CMMS Asset to OEE and allows the system to automatically create and close Repair type Work Orders.
- Asset ID: Select the Asset ID from the drop-down menu. This mapping allows CMMS and OEE to interface with each other. (NOTE: Asset IDs are configured in CMMS Asset: Shop Floor Control > Configuration > CMMS Asset).
- Tag Type: Select the Tag Type from the drop-down list. There are two options : Error Code and Up/Down. Default is Error Code.
- Error Codes (Problems): Select Error Codes to send downtime error codes from Assets to the Client to CMMS and OEE.
Note: In order for the Client to send downtime errors to OEE, Error Codes must first be configured in CMMS as a Problem Code. Error Codes are determined by the software used by the Client. Check with your local development team for the list of Error Codes used by your plant’s Client, then configure the Problem Code in CMMS Asset > Problem Type so the systems connect.
- Up/Down: Select Up/Down if the data being collected is for the purpose of determining the asset’s Availability (downtime) only. (e.g. Is this asset running or stopped?).
- Up signals = 0/True
- Down signals = 1/False
- Status: Mark the Tag ID as active (checked) or inactive (unchecked). Default is active (checked). NOTE: Marking the Status as inactive removes connectivity between OEE and CMMS.
Note: Some Clients do not have the ability to capture Error Codes - they can only capture up or downtimes. For this situation select Up/Down. Check with your local development team about Client capabilities and features.
- Select Save to add the new Tag ID or Cancel to exit the field.
Figure 17: Add Tag Asset Mapping
Edit Tag ID
To modify a Tag ID:
- Select the Tag ID by highlighting the line of data.
- Select Edit from the top menu bar.
- Change any of the fields using the pop-up window.
- Select Save to save changes or cancel to exit the field.
Figure 18: Edit Tag Asset ID
Figure 19: Edit Tag Asset Mapping
Enable/Disable Tag ID
To change the status of a Tag ID:
- Select the Tag ID by highlighting the line of data.
- Select Enable/Disable from the top menu bar.
NOTE: Selecting Disable moves the Tag ID to the bottom of the list. If the list is extensive, enter the Tag ID in the search field, then select Enable.
![]() Tip: For more details about Error Codes and Up/Down Signals read this document: How to Configure OEE Error Codes and Up/Down Signals.
Tip: For more details about Error Codes and Up/Down Signals read this document: How to Configure OEE Error Codes and Up/Down Signals.
Schedule Regular Downtimes According to Problem in CMMS
Plants using MES101 automatic data collection without a PLC connection can record regularly scheduled downtimes (such as lunch breaks) through the Problem module in CMMS Asset. Follow these steps:
- Move to CMMS Asset > Problem.
- Select Add.
- Complete all the fields.
- Note: Users will first need to create a Problem Category and Problem Type.
- Select: Scheduled Down.
- Select Active.
- Alternatively, breaks can be added as a Global Problem if the entire plant will take the same amount of time for lunch.
Figure: Regularly Scheduled Downtimes in CMMS Problem
Up/Down Threshold
The Up/Down Threshold submodule of OEE allows engineers to set a grace period (threshold time) before assets are officially flagged as down or up in the 42Q MES.
Up/Down Thresholds are configured according to Asset Type, and depend upon that machine’s unique running patterns and idiosyncrasies. The time selected will determine how long the system allows before machine stoppages and starts are recorded as down/up times. Time intervals are available in minutes, seconds, or milliseconds.
Example: Down Threshold
Machine A stops for one minute between each cycle to rotate to new trays. If the system captured each one minute stop as part of the OEE downtime data, that data would inaccurately reflect low Performance rates. To counteract the problem, engineers might set the Down Threshold for Machine A to 2 minutes. This way normal process downtime will not adversely affect the OEE calculation or show as downtime events.
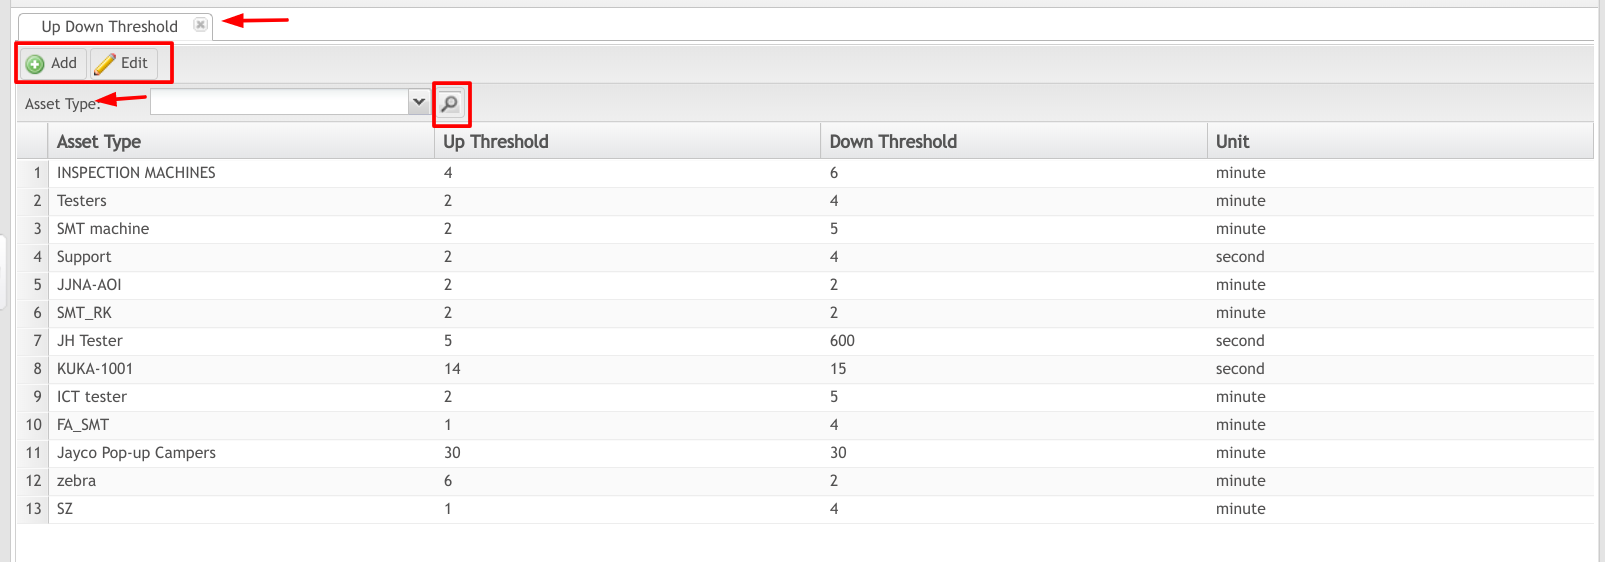
Figure 20: Up/Down Threshold Main Screen
Search/Filter Up/Down Threshold
- Users may search according to the following criteria, located on the top menu bar of the Up/Down Threshold submodule:
- Asset Type: Select the asset type from the drop-down menu provided.
- Choose the search icon (e.g. magnifying glass).
Add Up/Down Threshold
- Select Add from the top menu bar.
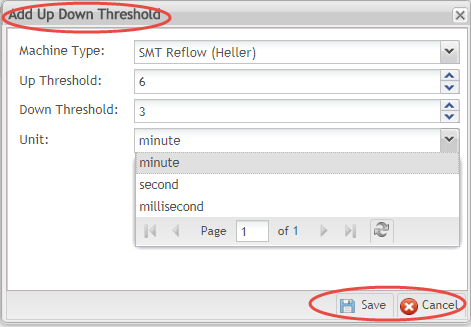
- Complete the following fields in the pop-up window provided:
- Asset Type: Select the Asset Type from the drop-down menu provided. (Note: Asset Types are configured in the CMMS Asset portal: Shop Floor Control > Configuration > CMMS Asset).
- Up Threshold: The amount of time allowed before the asset is reported up and running after stoppages. (e.g. repair and/or setup time needed following downtime). Select the time interval using the drop-down menu provided.
- Down Threshold: The amount of time (grace period) allowed before the machine is reported down. This is especially useful when DMIs are employed to collect asset data. If the program does not receive a run signal by the defined down threshold, technical engineers must enter the reason for downtime. Select the time interval using the drop-down menu provided.
- Unit: Select the unit of time from the available options: Minutes, Seconds, Milliseconds. Minutes are selected by default.
Figure 21: Add Up/Down Thresholds
Edit Up/Down Thresholds
To modify an Up/Down Threshold:
- Select the Up/Down threshold by highlighting the line of data.
- Select Edit from the top menu bar.
- Change any of the fields using the pop-up window.
- Select Save to save changes or cancel to exit the field.
Import Tag Asset Mapping
The Import Tag Asset Mapping submodule of OEE allows administrators to efficiently add numerous Tag IDs to Assets at one time. Users may download the provided template, then export that information into the OEE portal, and upload data into MES.
- To access Import Tag Asset Mapping navigate to Shop Floor Control > Configuration > OEE > Import Tag Asset Mapping.
- The following actions are available to users in Import Tag Asset Mapping: Import, Validate, Upload, Download Template, and Export.
Figure 22: Import Tag Asset Mapping Main Screen
Download Template
To download the template:
- Select the Download Template icon from the top menu bar.
- A template in .csv form automatically downloads onto the user’s local drive.
- Template is named “TagAssetTemplate.csv” for easy retrieval.
- Open the template and add Tag ID and Asset ID information.
NOTE: Column Headings match the headings in the Tag Mapping submodule.
Import File
To import .csv file:
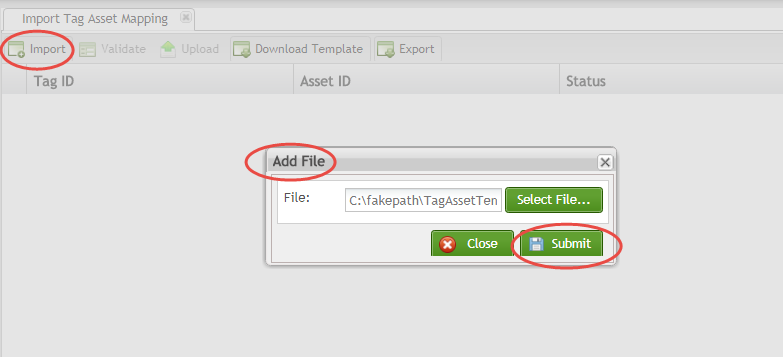
- Select the Import icon.
- A pop-up window displays: “Add File.”
- Select the File from your local drive and select Submit.
- The data then populates into the Import Tag Asset Mapping portal.
Figure 23: Import File
Validate Data
After the information is uploaded into the portal, it is important to validate the data and ensure the Assets exist in the OEE system.
To validate:
- Select the Tag ID to validate by activating the line of data.
- Select the Validate icon.
- Items that the system does not recognize will be shown inred text (See figure, below).
- If assets do not exist, Return to the Tag Mapping submodule to locate assets already defined in the system. To define (add) an asset to the system, navigate to CMMS Assets.
Upload Data
Once all information is valid, the user may upload the new data onto the MES system. To upload:
- Select the Upload icon.
- NOTE: All Asset IDs must be valid; if one is invalid, the Upload feature remains unavailable.
Figure 25: Upload Data: Import Tag Asset Mapping
Export Data
Users may export the Tag ID/Asset ID data to share with other team members or save onto their local drive.
To export Tag ID/Asset ID information:
- Select the line of data to export.
- Select the Export icon.
- A .csv file automatically downloads onto the user’s local drive.
- Users may rename, save, share, or print as desired.
Figure 26: Export Tag Asset Mapping Data
Import Up/Down Threshold
The Import Up/Down Threshold submodule of OEE allows administrators to efficiently add numerous Up Down Thresholds to Machine Types at one time. Users may download the provided template, then export that information into the OEE portal, and upload data into MES.
- To access Import Up Down Threshold navigate to Shop Floor Control > Configuration > OEE > Import Up Down Threshold.
- The following actions are available to users in Import Up Down Threshold: Import, Validate, Upload, Download Template, and Export.
Figure 27: Import Up Down Threshold Main Screen
Download Template
To download the template:
- Select the Download Template icon from the top menu bar.
- A template in .csv form automatically downloads onto the user’s local drive.
- Template is named “UpDownThresholdTemplate.csv” for easy retrieval.
- Open the template and add Up Down Threshold information for the machine type.
NOTE: Column Headings match the headings in the Up Down Threshold submodule.
Import File
To import .csv file:
- Select the Import icon.
- A pop-up window displays: “Add File.”
- Select the File from your local drive and select Submit.
- The data then populates into the Import Up Down Threshold portal.
Figure 28: Import Up Down Threshold File
Validate Data
After the information is uploaded into the portal, it is important to validate the data and ensure the Machine Types exist in the OEE system. To validate:
- Select the Asset Typeto validate by activating the line of data.
- Select the Validate icon.
- Items that the system does not recognize will be shown in red text (See figure, below).
- If desired machine types do not exist, return to the Up Down Threshold submodule to locate asset types already defined in the system. To define (add) an asset type to the system, navigate to CMMS Assets > Machine Types.
Figure 29: Validate Asset Type

Upload Data
Once all information is valid, the user may upload the new data onto the MES system. To upload:
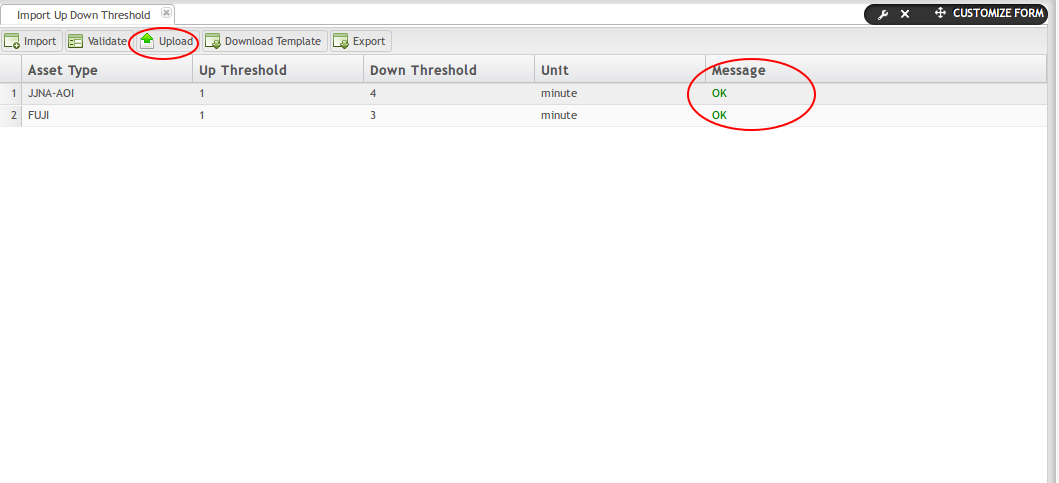
- Select the Upload icon.
- NOTE: All Machine Types must be valid; if one is invalid, the Upload feature remains unavailable.
Figure 30: Upload Data: Import Up Down Threshold
Export Data
Users may export the Up Down Threshold data to share with other team members or save onto their local drive.
To export Up Down Threshold information:
- Select the line of data to export.
- Select the Export icon.
- A .csv file automatically downloads onto the user’s local drive.
- Users may rename, save, share, or print as desired.
Figure 31: Export Machine Type Up Down Threshold Data
Repair Code Category
Sometimes the production line’s low OEE value may be caused by worn out, misaligned, or broken parts on the asset itself. To resume producing good quality product, the repair team must replace or refurbish the asset’s parts or calibrate the asset itself. The management team may also want to view the asset’s repair history according to reported Problems and/or most commonly reported repairs (Top Repair Codes). All repair details are compiled into reports that are available on the factory’s shop floor via Operation Dashboard. Overall, OEE’s Repair Code feature is a valuable tool that helps management teams to determine the root cause of poor OEE scores.
Following is an example of how a production team might use OEE Repair Codes to improve the quality of its factory’s products.
Repair Code Example
- Managers on the factory floor view their Operation Dashboard screens and notice that a certain asset’s OEE scores are critically below the defined target level (See Setting Targets for OEE Data discussion in this document).
- Management informs the repair, production, & quality teams to check the equipment.
- By digging deeper into the corresponding OEE Reports, the engineer team concludes the problem is caused by poor quality asset (machine) parts.
- A work order is created in CMMS and the repair team replaces the parts.
- The machine resumes producing good quality product.
Configure Repair Code per Asset
The Repair Code allows technicians to quickly record the outcome of their asset repair after the work order is completed. Managers can determine which assets are frequently down for repair by filtering according to “Repair” in the top menu bar of the CMMS Work Order screen.
Repair codes are directly linked to Root Causes, and Reasons (CMMS Problems). Therefore, it is a good idea to create a relationship between them prior to configuration so that OEE report data provides valuable insights.
Read more about how to establish a relationship between problems (reasons), repairs, and root causes in: How to Connect Problems (Reasons), Root Causes, & Repairs in OEE
Standard Repair Codes are defined by asset, according to the following flow: Configure Repair Code Category (OEE) > Configure Repair Code (OEE) > Set Repair Code per Work Order (CMMS Work Order).
To link the Repair Code to the Asset, follow these instructions: How to Set a Standard Repair Code
Repair Code Category
The Repair Code Category submodule allows users to organize Repair Codes into a categorical hierarchy. From the Repair Category page, users may Add, Edit or Enable/Disable Repair categories. Administrators may add as many Repair Code Categories as needed to describe their business model; users may add or delete Repair Codes directly from the Repair Code Category submodule. (See: Edit A Repair Code Category).
To configure a Repair Code Category, navigate to Shop Floor Control > Configuration > OEE > Repair Code.
Figure 32: Repair Code Category Main Screen
Add A Repair Code Category
To add a Repair Code Category to a pre-existing parent category:
- Select a Repair Code Category icon from the list. A pop-up menu displays adjacent to the category.
- In the pop-up menu, select Add. The Add a New Repair Code Category pop-up window appears.
- Enter a Repair Code Category Name in the respective field.
- Enter a Repair Code Category Code in the respective field.
- Enter a Description of the category in the box provided.
- Select Add & Exit to finish; or Cancel to abort.
Figure 33: Add a New Repair Code Category
Edit A Repair Code Category
All Repair Code Categories are available for edit. To edit a Repair Code Category:
- Select a Repair Code Category icon from the list. A pop-up menu displays adjacent to the category (see Figure below).
- In the pop-up menu, select Edit. The Edit Repair Code Category pop-up window appears. There are two tabs available within the Edit Repair Code Category Window: General and Repair Code (see Figure, below).
Figure 34: Edit a Repair Code Category
Edit A Repair Code Category: General Tab
- Within General Tab, users can edit any of the following information:
- Parent Repair Code Category: Select a category from the drop-down menu.
- Repair Code Category Name: Enter a new category name in the text box.
- Repair Code Category Code: Change the code assigned to this Repair Code Category in the text field.
- Description: This field is optional.
- Active Status: (Default isActive)
- Select Save or Save & Exit to finish; select Close to abort.
Edit A Repair Code Category: Repair Code Tab
Within the Repair Tab, users may add a Repair Code, edit a Repair Code, or enable/disable a Repair Code to the selected category. All Repair Codes that have been assigned to the given repair code category are displayed in list form in the Repair Code Tab.
Repair Code Tab: Add Repair Code
- Select the Add icon from the top menu bar of the Repair Code Tab.
- The Add a New Repair Code pop-up window appears.
- Complete the fields provided:
- Enter a Repair Code Code in the respective field.
- Enter a Repair Code Name in the respective field.
- Enter a Description in the text box provided.
- In the Active checkbox select whether the problem will be active.
- Select Add & Exit to finish; or select Close to abort.
Figure 35: Edit Repair Code Category: Repair Code Tab: Add a New Repair Code
Repair Code Tab: Edit Repair Code
Any of the Repair Code displayed in the list are available for edit. To edit a Repair Code:
- Select a repair code from the list by activating the checkbox next to its name. The Edit function becomes available.
- Select Edit. The Edit Repair Code pop-up window appears.
- Edit the Repair Code Code.
- Edit the Repair Code Name.
- Edit the Description.
- Check or uncheck the Active box.
- Select Save or Save & Exit to finish; or Close to abort.
Repair Code Tab: Enable/Disable Repair Code
The Enable/Disable function allows the user to change the Repair Code status from active to inactive or inactive to active. To enable/disable a Repair Code:
- Select a Repair Code from the list by activating the checkbox next to its name. The Enable/Disable function becomes available.
- Select Enable/Disable. Toggling the Enable/Disable function switches the status from Enabled to Disabled; or from Disabled to Enabled.
- Enabled Repair Codes are noted with a blue checkmark in the Active column. Disabled Repair Codes are noted with a grey checkmark in the Active column.
Repair Code
Under the Repair Code submodule, users can search, add, edit, enable/disable, and export repair code entries.
Each Repair Code is assigned a Repair Code Code, for easy identification. Plants can assign naming conventions to suit their individual needs; Repair Code naming convention used for this test example consists of a four digit numeral preceded by the letter P.
Figure 36: Repair Code Submodule Main Screen
Add Repair Code
To add a new Repair Code:
- Select Add from the Repair Code submodule menu. The Add a New Repair Code pop-up window appears.
- Complete the fields provided:
- Select a Repair Code Category from the respective drop-down list.
- Enter a Repair Code Code in the respective field.
- Enter a Repair Code Name in the respective field.
- Enter a Description in the box provided.
- In the Active checkbox select whether the problem will be active.
- Select Add & Save to finish or select Close to abort.
Figure 37: Add A New Repair Code pop-up Window
Edit Repair Code
Any of the Repair Code entry fields can be edited. To edit a Repair Code:
- Select a repair code from the list by activating the checkbox next to its name. The Edit function becomes available.
- Select Edit. The Edit Repair Code pop-up window appears.
- Edit the Repair Code Category by selecting a different item from the respective drop-down list.
- Edit the Repair Code Code entry.
- Edit the Repair Code Name entry.
- Edit the Description.
- Check or uncheck the Active box.
- Select Save or Save & Exit to finish; or Close to abort.
Figure 38: Edit Problem
Enable/Disable Repair Code
Repair Code entries can be enabled or disabled by the user. To enable/disable a Repair Code:
- Select a Repair code from the list by activating the checkbox next to its name. The Enable/Disable function becomes available.
- Select Enable/Disable. Toggling the Enable/Disable function switches the status from Enabled to Disabled; or Disabled to Enabled. Enabled problems are noted with a blue checkmark in the Active column. Disabled problems are noted with a grey checkmark in the Active column.
Export Repair Code
Users can export Repair Code details to a .csv file to save onto their local drives.
To export a repair code:
- Select a repair code from the list by activating the checkbox next to its name. The Export function becomes available.
- Select Export from the Problem menu.
- The Repair Code description is automatically downloaded onto the local drive as a .csv file.
- Open the .csv file
- Rename, save, print, or share as desired.
Set Repair code for Asset
To set a repair code to an asset:
- Navigate to Production > CMMS Work Order.
- Select the Repair Type Work Order from the Work Order List.
- Click Edit to open the Work Order.
- Choose the Repair Code (configured in OEE) from the drop-down list.
- Requirements: Only Repair type Work Orders may be assigned a Repair Code. The Work Order must in assigned status.
Figure 39: Edit Work Order Set Repair Code --CMMS Asset module
Configure OEE Target Values
Background
The Target UPH (Units per Hour) defines the throughput performance on a given asset. Users can define Target UPH values per asset, production line, work center, department, or location. Once defined, the system compares target UPH values with actual UPH values and displays the results on 42Q’s Operation Dashboard in real time. See also: OEE Operation Dashboard.
OEE interfaces successfully with the following data source types:
- Oracle ERP systems push cycle time data from MSD plants. See Oracle Process Flow.
- OEE Target UPH and Target Maintenance modules integrate cycle time data.
Solution
To meet the requirements of a wide variety of plants, OEE offers several ways to configure target data/Target UPH.
- Plants operating OEE as a standalone product input their target UPH data manually throughOEE’s Target UPH module.
- Plants using 42Q’s API system set target values in MES 101’s Target Maintenance module; the system automatically saves data into CMMS and OEE databases.
- Plants that utilize Oracle’s ERP to transfer data define target values in Oracle; 42Q sends data via the Oracle Work Order to 42Q’s Shop Order.
Configure Source Type
42Q locates the data source by a tag field/column target UPH source type. Source types are based on the plant’sOEE Solution (above). Source Types are configured on the backend, by the MES support team. Following is a brief description of each source type.
Source_type data field value will be 1/2/3/4. The default source type is 1.
Source_type data field
- 1 - To input the Target UPH manually. This is suitable for setting Target UPH in the OEE Target UPH module.
- 2 - To send Target UPH automatically from MES101 into CMMS OEE database. This is suitable for setting SOMS_Target for mfg lines in the Target Maintenance module.
- 3 - To get Target UPH automatically from MES101database into CMMS OEE database. This is suitable for setting OEE_Target for Assets in the Target Maintenance module.
- 4 - To get the Target UPH automatically for plants using the MES system in conjunction with Oracle’s database. The system will collect the Target UPH from the Oracle database accordingly.
Note: OEE Target data will be saved into CMMS/OEE databases.
OEE Target UPH
The OEE Target UPH (unit-per-hour machine rates) module allows users to manually set Target UPH rates for EMS plants and plants using OEE as a standalone feature.
Go to: Shop Floor Control > Configuration > OEE > Target UPH.
Figure 40: Target UPH Main Page
Glossary of Terms
- Availability: Machine Downtime, according to duration. Takes into account all machine downtime to include minor stoppages, slow production, and idling. Calculated as: Operation Time/Planned Production Time = Availability.
- KPI: Key Performance Indicators
- Loading: Represents the percentage of time that an operation is scheduled to operate compared to the total Calendar Time that is available. Calculated as: Scheduled Time/Calendar Time = Loading
- OEE: Overall Equipment Effectiveness is a manufacturing metric that identifies the percentage of productive manufacturing time according to Quality, Performance, and Availability. It is the single best metric for identifying losses, benchmarking progress, and improving the productivity of manufacturing equipment. Calculated as: Availability x Performance x Quality = OEE
- Performance: A measure of productivity, specifically the speed at which parts are built. Calculated as: Actual Rate/Standard Rate = Performance
- PLC: Programming Logic Control
- OPC Server: Open Platform Communication Servers
- Quality: The percentage of parts that meet quality standards without rework. Calculated as: Good Units/Total Units = Quality
- TEEP: Total Effective Equipment Performance. Calculated as: Loading x OEE.
Document Revision History
| Date | Author | Title | Version | Change Reference | Approved by |
| 09/06/17 | Helena Wang | Technical Writer | A1 | This is the first edition of the OEE Work Instruction Phase II | |
| 10/13/17 | Martha Jordan | Technical Writer | A2 | English grammar/New features | |
| 11/14/17 | Martha Jordan | Technical Writer | A3 | Add Phase III | Simon Zhou |
| 11/17/17 | Martha Jordan | Technical Writer | A4 | Screenshot updates | Simon Zhou |
| 11/09/17 | Martha Jordan | Technical Writer | A5 | Move to Separate document page and combine modules: OEE configuration. Add changes per 11/2018 OEE upgrade. | Simon Zhou |


